Krups 880-42 Manuel utilisateur
- Catégorie
- Cafetières
- Taper
- Manuel utilisateur


n
b
c
e
g
f
m
h
o
d
a
l
i
j
k

1 2 3
4 5 6
8
7

9 10 11
1312 14
15 16 1717

A
B
C
18 20
21 22 23
19
22

6
ART. 880.SOM.PM6 19/01/04, 16:066

7
Espresso Vivo Art. 880
Deutsch 8
English 15
Français 22
Nederlands 29
Español 36
Português 43
Italiano Italiano 50
Danmark 57
Norge 64
Sverige 71
Suomi 77
Eììèviëá 84
´
´
92
Русский
ART. 880.SOM.PM6 19/01/04, 16:067

8
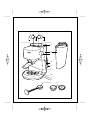
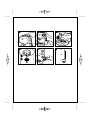
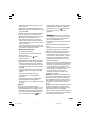
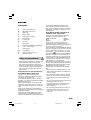
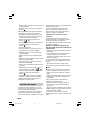
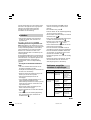
Beschreibung
a Wasserbehälterdeckel
b Herausnehmbarer Wasserbehälter
c Drehknopf für Dampf
d Dampfrohr
e Aufschäumhilfe
f Filterträger
g Abstellgitter
h Auffangschale
i Pumpenschalter
j Aufheizkontrolleuchte (gelb)
k Betriebskontrolleuchte (rot)
l Ein/Aus-Schalter
m Kabelaufwicklung
n 1 bzw. 2-Tassen Filtersieb
o Meßlöffel
Sicherheitshinweise
•Lesen Sie diese Bedienungsanleitung vor der
Inbetriebnahme Ihrer Espressomaschine
aufmerksam durch. Schließen Sie das Gerät
nur an eine geerdete Schutzleiter-Steckdose
an. Überprüfen Sie, daß die auf dem
Typenschild dieses Gerätes angegebene
Spannung mit der Ihres Stromnetzes
übereinstimmt.
•Bei falschem Anschluß erlischt die
Garantie.
•Benutzen Sie das Gerät niemals im Freien.
•Stellen sie das Gerät nicht auf heiße Flächen
(z.B. Herdplatte) oder in der Nähe von
offenen Flammen ab.
•Entfernen sie den mit Kaffeemehl gefüllten
Filterträger nicht während des Durchlaufes,
da das Gerät unter Druck steht.
•Benutzen Sie das Gerät nicht, wenn
Abstellgitter und Auffangschale nicht in
Position sind.
•Stellen Sie sicher, daß der Filterträger gut
festgezogen ist, bevor Sie mit der
Kaffeezubereitung beginnen.
• Bei Problemen während des Brühvorgangs
und vor der Reinigung des Gerätes muß der
Netzstecker gezogen werden.
• Ziehen Sie den Stecker nicht durch Ziehen
am Netzkabel, und legen sie dieses nicht
über scharfe Kanten oder über Ecken.
• Vermeiden Sie einen Kontakt des Netzkabels
oder Ihrer Hände mit den heißen Teilen des
Gerätes (Tassenvorwärmplatte, Filterträger,
Dampfdüse, Brühkopf)
• Tauchen Sie das Gerät niemals in Wasser
oder andere Füssigkeiten.
• Halten Sie Kinder vom Gerät fern, und lassen
Sie das Netzkabel nicht herunterhängen.
• Halten Sie sich an die Entkalkungshinweise
in der Bedienungsanleitung.
• Benutzen Sie das Gerät keinesfalls, wenn es
beschädigt ist, nicht korrekt funktioniert
oder wenn der Stecker oder das Netzkabel
beschädigt sind. In solchen Fällen wenden
Sie sich bitte sofort an den Krups-
Kundendienst (siehe Adressen im Krups-
Serviceheft), da Spezialwerkzeug
erforderlich ist.
• Das Gerät darf nicht von Ihnen geöffnet
werden.
• Außer der Reinigung und der normalen
Gebrauchsprüfung, müssen alle anderen
Arbeiten an dem Gerät vom Krups-
Kundendienst ausgeführt werden.
• Zu Ihrer eigenen Sicherheit sollten Sie nur
Original Krups Zubehör-und Ersatzteile
passend zu Ihrem Gerät verwenden.
•Der Hersteller kann nicht für Schäden
verantwortlich gemacht werden, die durch
nicht bestimmungsgemäße Verwendung
oder falsche Bedienung verursacht werden.
Der Espresso-Kaffee
Espresso ist weitaus aromatischer und
kräftiger als normaler Kaffee. Er wird aus
kleinen Tassen, Espressotassen getrunken. Bei
der Zubereitung wird heißes Wasser unter
Druck durch das Kaffeemehl gepreßt. So
entsteht das köstliche schwarze Kaffeegetränk
mit der anregenden Wirkung.
Deutsch
ART. 880.PM6.5 19/01/04, 16:018

9
Kennzeichen des Espresso ist neben seinem
charakteristischen Geschmack, die typische
schöne Schaumbildung (Crema). Dies setzt
hohen Druck voraus und die Verwendung von
echtem, gut geröstetem Espressokaffee sowie
die richtige Mahlung der Bohnen.
Wenn Sie keinen gemahlenen Espressokaffee
kaufen, mahlen Sie die Espressobohnen mit
einer Mahlwerkmühle auf Einstellung mittel
bis fein.
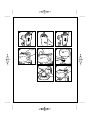
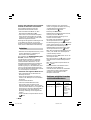
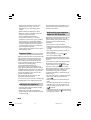
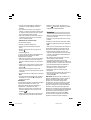
Gerät vorbereiten
• Deckel öffnen und Wasserbehälter
entnehmen (1).
• Wasserbehälter füllen (2).
• Behälter wieder einsetzen und fest
andrücken, damit sich das Bodenventil
öffnet. Deckel schließen (3).
Am transparenten Wasserbehälter kann die
Wasserstandsanzeige abgelesen werden.
Wasser immer rechtzeitig nachfüllen.
Vor dem ersten Gebrauch
Vor Erstgebrauch, aber auch nach längerem
Nichtgebrauch, sollten Sie einige Tassen
Wasser (ohne Kaffeemehl) zubereiten, um das
System durchzuspülen.
• Filtersieb in den Filterträger einsetzen.
• Den Filterträger links an der Markierung des
Gehäuses einsetzen und nach rechts
festziehen (6).
• Ein möglichst großes Gefäß unter den
Filterträger stellen (7).
• Pumpenschalter auf Pos.
stellen (4).
• Gerät einschalten (5).
Betriebskontrolleuchte (rot) und
Aufheizkontrolleuchte (gelb) leuchten auf.
Während der Aufheizphase kann ein wenig
Wasser aus dem Brühkopf austreten.
• Den Pumpenschalter auf Pos.
stellen (8).
Damit wird die Pumpe eingeschaltet. Bei
leerem Boiler (z.B. bei Erstgebrauch) nimmt
die Maschine erst Wasser auf (deutlich
hörbares Pumpgeräusch) und danach wird das
im Boiler befindliche Wasser aus dem
Brühkopf herausgepreßt.
• Sobald Wasser aus dem Filterträger läuft,
Pumpenschalter auf Pos.
stellen.
• Gerät aufheizen.
• Sobald die gelbe Kontrolleuchte erlischt, 2-3
Tassen Wasser durchlaufen lassen. Dazu den
Pumpenschalter auf Pos. stellen.
• Gegebenenfalls den Vorgang unterbrechen,
indem Sie den Pumpenschalter auf
stellen
und das Gefäß entleeren.
• Zum Durchspülen des Dampfrohres, Gefäß
unter das Dampfrohr stellen, Drehknopf
langsam auf Pos. max stellen und ca. 10
Sek. dampfen lassen.
• Den Drehknopf auf O zurückstellen.
• Gefäß entleeren.
Boiler mit Wasser füllen
• Bevor Sie mit dem Gerät arbeiten,
überprüfen Sie, ob der Boiler mit Wasser
gefüllt ist.
• Gefäß unter den Brühkopf stellen.
• Gerät einschalten, Pumpenschalter auf Pos.
stellen. Sobald Wasser aus dem
Brühkopf läuft, ist der Boiler gefüllt.
Sollte sich während der Dampferzeugung der
Boiler leeren (es tritt kein Dampf mehr aus
dem Dampfrohr aus), muß der Boiler erneut
gefüllt werden.
• Hierzu den Drehknopf auf O stellen. Ein
Gefäß unter den Brühkopf stellen.
Pumpenschalter auf Pos. stellen.
• Solange Wasser aus dem Brühkopf laufen
lassen, bis die gelbe Kontrolleuchte
aufleuchtet. Danach den Pumpenschalter
auf Pos.
zurückstellen.
• Warten, bis die gelbe Kontrolleuchte erlischt.
Nun können Sie mit der Dampferzeugung
fortfahren. Dazu den Drehknopf langsam
wieder auf Pos. max stellen.
ART. 880.PM6.5 19/01/04, 16:019

10
Espresso zubereiten
•Wasserbehälter füllen (1) (2) (3).
•Pumpenschalter auf Pos. stellen (4).
•Gerät einschalten (5).
•Pumpenschalter auf Pos.
stellen und
warten, bis eine kleine Menge Wasser
ausfließt (Kontrolle, ob der Boiler gefüllt ist).
•Pumpenschalter zurück auf Pos.
stellen.
Sobald das Heizsystem die erforderliche
Temperatur erreicht hat, erlischt die gelbe
Aufheizkontrolleuchte.
•Wärmen Sie die Espresso-Tassen vor, indem
Sie den Filterträger (ohne Kaffeemehl)
einsetzen und die Tassen unter den
Filterträger stellen.
•Pumpenschalter auf Pos.
stellen (9).
•Füllen Sie die Tassen mit heißem Wasser und
stellen den Pumpenschalter zurück auf Pos.
.
•Filterträger entnehmen.
•Gewünschtes Filtersieb (1 oder 2 Tassen) in
den Filterträger einsetzen (10).
•1 bzw. 2 gestrichene Meßlöffel
Espressokaffee einfüllen (11).
•Espressomehl mit dem Meßlöffel andrücken
(12).
•Rand des Filtersiebes von Kaffeemehl
säubern (13).
•Den Filterträger einsetzen und nach rechts
festziehen (14).
•Eine bzw. zwei Espressotasse(n) unter den
Filterträger stellen.
•Espresso zubereiten. Dazu den
Pumpenschalter auf Pos. stellen (15).
•Nach dem Durchlauf den Pumpenschalter
auf Pos.
zurückstellen.
•Nach der Espressozubereitung den
Filterträger entnehmen und den Kaffeesatz
ausklopfen (16).
Nach erneuter Füllung des Siebes kann der
nächste Espresso zubereitet werden.
Die Dampferzeugung
Der Dampf kann zum Aufschäumen von Milch
für Cappuccino und zum Erhitzen von
Flüssigkeiten benutzt werden.
Da zur Dampferzeugung eine höhere
Temperatur als zur Espressozubereitung
benötigt wird, sollte immer zuerst der
Espresso zubereitet werden, da sonst das
Kaffeemehl verbrennen kann.
Systembedingt tritt vor dem Dampfen etwas
Wasser aus der Dampfdüse aus, das in einem
separaten Gefäß aufgefangen werden kann.
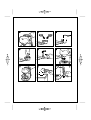
. MILCHAUFSCHÄUMEN FÜR CAPPUCCINO
Außer der Zubereitung von Espresso können
Sie mit diesem Gerät die für Cappuccino
benötigte Milch aufschäumen.
Um ein optimales Aufschäumergebnis zu
erreichen, sollten Sie die separate
Aufschäumhilfe verwenden.
Achtung! Die Aufschäumhilfe darf nur
zum Milchaufschäumen verwendet
werden.
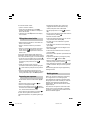
• Stecken Sie die Aufschäumhilfe auf die
Dampfdüse (17).
• Gießen Sie ca. 200 ml fettarme Milch in
einen schmalen kleinen Krug (max. 0,5 l
Fassungsvermögen), der unter das
Dampfrohr der Maschine passen muß.
Die Milch sollte gut gekühlt sein. Ebenfalls
sollten Sie ein kaltes Gefäß benutzen. Nicht
vorher mit warmem Wasser ausspülen.
• Vergewissern Sie sich, daß der Boiler mit
Wasser gefüllt ist.
Der Pumpenschalter muß auf Pos.
stehen
(18).
• Sobald die gelbe Kontrolleuchte erloschen
ist, halten Sie ein separates Gefäß unter die
Dampfdüse und stellen den Drehknopf auf
Pos. max.
• Lassen Sie das Wasser in das Gefäß laufen,
bis Dampf austritt. Drehknopf auf Pos. O
stellen.
Beginnen Sie nun mit dem
Milchaufschäumen.
• Halten Sie hierzu den Krug so unter die
ART. 880.PM6.5 19/01/04, 16:0110

11
Dampfdüse, daß das Düsenteil ganz in die
Milch eintaucht.
• Stellen Sie den Drehknopf langsam auf Pos.
max. Während des Aufschäumens den Krug
ruhighalten (19).
Die Düse darf nicht den Krugboden berühren,
um den Dampfaustritt nicht zu behindern.
• Nach dem Aufschäumen Drehknopf auf Pos.
O stellen und das Gefäß entfernen.
• Den Drehknopf nochmals kurzzeitig auf
Dampf stellen, damit eventuelle Milchreste
aus dem Dampfrohr entfernt werden (leeres
Gefäß unterstellen).
• Aufschäumhilfe und Dampfrohr sofort nach
dem Milchaufschäumen mit einem feuchten
Tuch reinigen. Flüssigkeiten erhitzen
. DAMPFROHR AUSSCHWENKEN.
• Aufschäumhilfe abziehen.
• Vergewissern Sie sich, daß der Boiler mit
Wasser gefüllt ist.
• Pumpenschalter auf Pos.
stellen.
• Gerät einschalten.
Systembedingt tritt während des Aufheizens
etwas Wasser und Dampf aus dem Brühkopf.
• Sobald die gelbe Kontrolleuchte erloschen
ist, halten Sie ein separates Gefäß unter die
Dampfdüse und stellen den Drehknopf auf
Pos. max.
• Lassen Sie das Wasser in das Gefäß laufen,
bis Dampf austritt. Drehknopf auf Pos. O
stellen.
• Gefäß mit der Flüssigkeit unter die
Dampfdüse führen und Dampfdüse
eintauchen.
• Drehknopf langsam auf Pos. max stellen.
• Ist die Flüssigkeit ausreichend erhitzt,
Drehknopf zurück auf Pos. O stellen. Gefäß
entfernen.
Hinweis:
Wenn Sie direkt im Anschluß an die
Dampferzeugung Espresso zubereiten wollen,
muß die Espressomaschine unbedingt vorher
auf die Kaffeetemperatur abgekühlt werden.
• Ein Gefäß unter den Filterträger stellen und
den Pumpenschalter auf Pos. stellen.
• Solange Wasser durchlaufen lassen, bis die
gelbe Aufheizkontrolleuchte aufleuchtet.
• Pumpenschalter auf Pos.
zurückstellen.
Danach den Espresso wie gewohnt
zubereiten.
Reinigen
• Vor der Reinigung stets den Netzstecker
ziehen. Gerät abkühlen lassen.
• Das Gehäuse nur mit einem feuchten Tuch
abwischen.
Nach Gebrauch ist der Wasserbehälter zu
leeren.
• Abstellgitter abnehmen und reinigen (20).
• Auffangschale entleeren und reinigen.
Brühkopf, Filterträger und Filtersiebe sollten
nach jedem Gebrauch gereinigt werden.
• Gerät abkühlen lassen. Brühkopf nur mit
einem feuchten Tuch abwischen. Alle losen
Teile unter fließendem Wasser abspülen.
• Filterträger und Abstellgitter nicht in die
Spülmaschine geben.
• Bei starker Verschmutzung das Brühsieb am
Brühkopf mit einer Münze herausschrauben.
Dabei fällt die Ventilfeder mit Dichtung mit
heraus. Brühsieb reinigen. Brühkopf mit
einem feuchten Tuch auswischen. Brühsieb
wieder einsetzen und festschrauben.
• Achten Sie darauf, daß hierbei die
Ventilfeder mit Dichtung wieder richtig
eingesetzt wird (21).
Wichtig: Reinigen Sie die Dampfdüse sofort
nach dem Milchaufschäumen, indem Sie das
Gerät noch 1-2 Sek. dampfen lassen (Düse
wird freigeblasen). Düse mit einem feuchten
Tuch abwischen. Sollte die Düse doch einmal
verstopft sein, reinigen Sie diese mit einer
Nadel.
Nötigenfalls kann die Dampfdüse mit dem am
Meßlöffel angebrachten Schlüssel (6-kant)
gegen den Uhrzeigersinn abgeschraubt und
anschließend gereinigt werden (22).
Das Aufschrauben der gereinigten Düse muß
im Uhrzeigersinn erfolgen. Mit dem Schlüssel
in vernünftigem Maß festziehen.
ART. 880.PM6.5 19/01/04, 16:0111

12
Achtung: Die Dampfdüse nicht in heißem
Zustand montieren bzw. demontieren.
Zur gründlichen Reinigung kann die
Aufschäumhilfe demontiert werden.
•Dazu die beiden Teile A + C von dem
Metallröhrchen B abziehen (23).
•Alle 3 Teile in warmem Wasser ausspülen.
Sollte die kleine Ansaugöffnung in Teil A
verstopft sein, kann diese mit einer feinen
Nadel durchgestoßen werden.
Bei längerem Nichtgebrauch Filterträger nicht
in den Brühkopf einsetzen, da sonst die
Dichtung unnötig lange zusammengedrückt
bleibt, was ihre Lebensdauer beeinträchtigt.
Entkalken
•Entkalken Sie Ihre Espressomaschine, je nach
örtlicher Wasserhärte, regelmäßig mit
Zitronensäure oder Weinsäure.
Wir empfehlen das KRUPS Entkalkungsset
Art. 054, welches in den Krups
Kundendiensten erhältlich ist. Dieses Set
enthält, neben zwei Portionen Entkalker,
einen Wasserhärte-Teststreifen, um die
Häufigkeit der Entkalkung Ihres Gerätes bei
normalem Gebrauch zu bestimmen. Die
Verkalkung hängt von der Wasserhärte, aber
auch von der Häufigkeit der Benutzung ab.
Die ermittelte Entkalkungshäufigkeit ist daher
nur als Anhaltspunkt zu verstehen.
- Gehen Sie nach folgender Methode vor:
•Kalk und Kaffeereste von Brühsieb und
Brühkopf entfernen.
•Setzen Sie die Ventilfeder mit Dichtung
wieder in den Brühkopf ein und schrauben
Sie sie fest.
•Aufschäumhilfe abziehen.
•Lösen Sie 2 Eßlöffel Weinsäure oder
Zitronensäure oder ein Päckchen des
Entkalkers KRUPS Art.054 in einem halben
Liter lauwarmem Wasser auf, und gießen Sie
diese Lösung in den leeren Wasserbehälter.
Zum Entkalken muß das Brühsieb am
Brühkopf unbedingt vorher abgeschraubt
werden.
•Gerät einschalten. Pumpenschalter auf Pos.
stellen.
• Entkalkungslösung sofort durchlaufen
lassen, bis ungefähr die Hälfte der Lösung
aus dem Brühkopf ausgelaufen ist.
Pumpenschalter auf
stellen.
• Drehknopf auf max stellen.
• Sobald Dampf aus dem Dampfrohr austritt,
Drehknopf auf Pos. O stellen.
• Die restliche Entkalkungslösung 10-15
Minuten einwirken lassen.
• Ein Gefäß unter den Brühkopf stellen und
den Pumpenschalter auf Pos. stellen.
• Die Entkalkungslösung komplett durchlaufen
lassen. Pumpenschalter zurück auf
stellen.
• Anschließend die Wassermenge von 2
Wasserbehältern durchlaufen lassen. Dazu
den Pumpenschalter auf Pos. stellen.
• Nach dem Durchlauf Wasserbehälter erneut
füllen. Je ein Gefäß unter das Dampfrohr
und den Brühkopf stellen.
• Drehknopf auf Pos. max stellen und ca. 30
Sek. dampfen lassen.
• Dann den Drehknopf auf O stellen und das
restliche Wasser aus dem Brühkopf laufen
lassen.
• Nach dem Durchlauf Pumpenschalter auf
Pos.
stellen.
• Gerät ausschalten und abkühlen lassen.
• Ventilfeder aus dem Brühkopf
herausschrauben. Brühsieb mit Ventilfeder
und Dichtung wieder in den Brühkopf
einsetzen. Aufschäumhilfe auf das
Dampfrohr aufstecken.
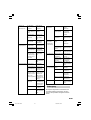
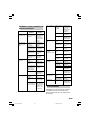
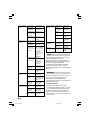
Probleme, mögliche Ursachen
und Abstellmaßnahmen
Probleme mögliche Abstellmaß-
Ursache nahmen
Der Espresso ist Tassen, Filtersieb, Wärmen sie die
nicht heiß genug Filterträger sind Zubehörteile
kalt (Tassen,
Filtersieb, Filter-
träger) vor. Siehe
Abschnitt
„Espressozu-
bereitung“
ART. 880.PM6.5 19/01/04, 16:0112

13
Espresso tritt Der Filterträger Siehe Abschnitt
oberhalb des ist nicht richtig „Espresso
Filterträgers aus eingesetzt zubereitung“
Es liegt Kaffeemehl Reinigen Sie den
auf dem Rand des Filterrand.
Filters
Die Brühkopfdich- Reinigen Sie die
tung ist Dichtung mit
verschmutzt einem feuchten
Tuch.
Die Brühkopfdich- Wenden Sie sich
tung ist defekt. an den KRUPS
Kundendienst
Sehr lautes Kein Wasser im Füllen Sie den
Pumpengeräusch Wasserbehälter Wasserbehälter auf
Wasserbehälter ist Drücken Sie den
nicht richtig einge- Wasserbehälter
setzt kräftig nach unten.
Kaffeemehl zu alt Benutzen sie
oder sehr trocken, frisches Kaffee-
so daß die Pumpe mehl.
keinen Druck auf-
bauen kann
Der boiler ist leer. Siehe Abschnitt
„Boiler mit Wasser
füllen“
Es tritt kein Wasser/ Kein Wasser im Füllen Sie den
Espresso aus Wasserbehälter Wasserbehälter auf
Wasserbehälter ist Drücken Sie den
nicht richtig einge- Wasserbehälter
setzt kräftig nach unten
Das Filtersieb ist Reinigen Sie den
verstopft, das Kaf- Filter und das Sieb
feemehl ist zu fein des Brühkopfes
oder zu sehr (s. Kap.„Reinigen“
zusammengedrückt und benutzen Sie
eine weniger feine
Mahlung.
Brühkopfsieb Legen Sie das Sieb
verschmutzt in Entkalkerlösung
zum Einweichen(s.
Kap. „Reinigen“)
Gerät verkalkt siehe Kapitel
„Entkalkung“
Der boiler ist leer. Siehe Abschnitt
„Boiler mit Wasser
füllen“
Wasser läuft zu Kaffeemehl zu grob Verwenden Sie
schnell durch feineres
Kaffeemehl
Zu wenig Kaffee- Benutzen Sie den
mehl eingefüllt mitgelieferten
Meßlöffel zum
Dosieren
Kaffeemehl nicht Drücken Sie das
angedrückt Kaffeemehl fester
an
Der Espresso hat Kaffeemehl zu Verwenden Sie
keine Crema grob feineres
(Schaumschicht Kaffeemehl
auf dem Kaffee)
Kaffeemehl nicht Drücken Sie das
genügend ange- Kaffeemehl fester
drückt an
Kaffeemehl zu alt Verwenden Sie
oder zu trocken frisches Kaffeemehl
Zuviel Wasser auf
Espressomehl wurde
Drücken Sie das
dem Espressomehl nicht ausreichend Espressomehl
angedrückt. fester an.
Es ist zu wenig Füllen Sie mehr
Espressomehl im Espressomehl in
Filtersieb. das Filtersieb.
Der boiler ist leer. Siehe Abschnitt
„Boiler mit Wasser
füllen“
Milch ist nicht ge- Dampfdüse ist ver- siehe Kapitel
nug aufgeschäumt stopft „Reinigen“
Milch zu alt Benutzen Sie
frische Milch
Milch lauwarm Stellen Sie die
Milch in den
Kühlschrank
Falscher Fettgehalt Benutzen Sie
fettarme Milch
Kein Dampf Der boiler ist leer. Siehe Abschnitt
„Boiler mit Wasser
füllen“
Entsorgung
Die Verpackung besteht ausschließlich aus
umweltfreundlichen Materialien, die den
örtlichen Recyclestellen übergeben werden
sollten.
ART. 880.PM6.5 19/01/04, 16:0113

14
Entsorgungsmöglichkeiten für das
ausgediente Gerät erfahren Sie bei Ihrer
Gemeinde- bzw. Stadtverwaltung.
Rezepte
Genießen Sie Ihren Espresso, wann und wie
Sie mögen. Wenn Sie entspannen wollen oder
als Abschluß eines wohlgelungenen Mahles.
Hier einige Anregungen zum Gebrauch Ihrer
Maschine.
. Original Espresso
•Pro Tasse 1 Meßlöffel echten, gut gerösteten
Espressokaffee nehmen und den Espresso
direkt in die vorgewärmte Espressotasse
filtern.
•Bei richtigem Kaffeemehl und richtiger
Mahlung bildet sich eine schöne Crema.
Je nach Geschmack Zucker zugeben und
Schluck für Schluck genießen.
Original Espresso wird ohne Milch, aber mit
viel Zucker getrunken.
. Café Corretto
•Wie üblich eine Tasse Espresso zubereiten.
•Dann den Geschmack ein wenig
“korrigieren“, indem 1/4 bis 1/2 Gläschen
Cognac oder Likör zugefügt wird.
Sehr gut eignen sich auch Anisette, Grappa,
Sambuca, Kirsch, Cointreau.
Sicherlich gibt es noch weitere Möglichkeiten,
den Espresso zu veredeln. Der Phantasie sind
hierbei keine Grenzen gesetzt.
. Cappuccino
•Vorgewärmte große Tassen verwenden.
•Die Menge einer Espressotasse hineinfiltern
und dann mit aufgeschäumter Milch auf-
füllen und mit Schokoraspeln überstreuen.
Zum Milchaufschäumen ca. 200 ml Milch (mit
niedrigem Fettgehalt) zum Aufschäumen in
ein Kännchen mit offenem Ausguß geben und
mit der Dampfdüse aufschäumen. Die
aufgeschäumte Milch mit einem Löffel auf
den Espresso geben.
. Friesisches Kaffeevergnügen
• Unter eine fertig zubereitete und gut
gesüßte Tasse Espressokaffee ein Gläschen
Rum geben.
• Eine dicke Haube Sahne aufsetzen und so
servieren.
. Espresso Flambé
Zutaten:
2 Gläschen Weinbrand
2 Teelöffel brauner Zucker
2 Tassen Espressokaffee, Schlagsahne
• Den Weinbrand in feuerfeste Gläser geben,
erhitzen, entzünden, Zucker hinzufügen,
umrühren, Espresso darüber gießen und mit
einer Sahnehaube krönen.
Nach Wunsch kann der Espresso auch mit
etwas kochendem Wasser verdünnt werden.
. Italienischer Eiskaffee
Zutaten:
4 Kugeln Vanilleeis, 2 Tassen gut gesüßter,
erkalteter Espressokaffee, 1/8 Liter Milch,
Schlagsahne, Schokoladenraspeln.
• Den kalten Espressokaffee mit der Milch
vermischen. Eiskugeln in Gläser verteilen, mit
Kaffee übergießen und mit einer dicken
Sahnehaube anrichten. Zum Schluß mit
Schokoraspeln verzieren.
ART. 880.PM6.5 19/01/04, 16:0114

15
Description
a Lid for removable tank
b Removable water tank
c Steam tap
d Steam nozzle
e Cappuccino accessory
f Filter holder
g Cup rest grid
h Drip tray
i Pump switch
j Temperature indicator light (yellow)
k « On » indicator light
l On/Off switch
m Cord storage
n Filters for one or two cups
o Measuring spoon
Safety recommendations
• Before using your espresso for the first time,
please read these instructions carefully.
• Only use an earthed plug to connect the
appliance. Check that the voltage indicated
on the information plate on the appliance
does in fact match that of your electrical
wiring system.
Wiring instructions for U.K and Ireland only :
APPLIANCES WITH FITTED PLUG
Important : For your convenience this
appliance is supplied complete with a plug
incorporating a 13 amp fuse.
In the event of replacing a fuse in the plug
supplied, a 13 amp fuse approved by ASTA to
BS1362 must be used.
If the socket outlets are not of the 13A BS
1363 type, and therefore do not accept the
plug connected to this appliance, cut off the
plug.
When cut off, this plug is a shock hazard if
inserted into a socket outlet and must therefore
be disposed of safely.
If the fuse cover is detachable, never use the
plug with the cover omitted. Replacement
covers can be obtained from your service agent.
Fit the appropriate plug according to the
instructions in paragraph «Fitting a plug».
With alternative plugs a 15 amp fuse must be
fitted either in the plug or adaptor or at the
main fuse box.
APPLIANCES WITHOUT FITTED PLUG
FITTING A PLUG - IMPORTANT
The wires in the mains lead are coloured in
accordance with the following code:
GREEN & YELLOW : EARTH
BLUE : NEUTRAL
BROWN : LIVE
As the colours in the mains lead of this
appliance may not correspond with the
coloured markings identifying the terminals in
your plug, proceed as follows:
The wire which is coloured GREEN & YELLOW
must be connected to the terminal in the plug
which is marked with the letter ‘E’ or by the
earth symbol
or coloured green or green
and yellow. The wire which is coloured BLUE
must be connected to the terminal which is
marked with the letter ‘N’ or coloured black.
The wire which is coloured BROWN must be
connected to the terminal which is marked
with the letter ‘L’ or coloured red.
This appliance is manufactured to conform to
the Low Voltage Electrical Equipment (Safety)
Regulations 1989 and is designed to comply
with BS 3456. It complies with the
requirements of the EEC Directive (89/336/
EEC).
• Do not place your espresso maker on a hot
surface (electrical hotplate, for example) or
close to a flame.
• Do not remove the filter holder containing
the coffee while water is running through,
as the appliance is under pressure at this
time.
• Do not use the appliance when the drip tray
and the grid are not in place.
• Unplug the appliance if a problem occurs
while the coffee is running through or
before cleaning it.
• Do not unplug the appliance by pulling on
the cord and do not place the cord on a
sharp edge or the corner of an item of
furniture.
English
ART. 880.PM6.5 19/01/04, 16:0115

16
•Avoid contact with the hot parts of the
appliance by the cord or your hands
(hotplate for cups, filter holder, steam
nozzle).
•Never immerse the appliance in water.
•Keep out of reach of children and do not
allow the cord to hang down.
•Follow the descaling instructions.
•Do not use the machine if it has been
damaged or if the cord is in poor condition.
•If the cord or any other specific element
becomes defective, these must be replaced
only by an approved Krups service centre.
You should never under any circumstances
open the appliance yourself.
•Check that the filter holder is firmly in place
before making coffee.
Espresso coffee
Espresso coffee is richer in aroma and stronger
than normal coffee. It is drunk from small
espresso cups. It is made by passing hot
water under pressure through the ground
coffee to obtain this delicious foamy black
coffee with its revitalising effect.
You can recognise espresso by its
characteristic aroma and its typical foamy
head. But this requires high pressure and an
excellent espresso coffee which has been well
roasted and correctly ground. If you cannot
buy ground espresso coffee, use a coffee
grinder to grind the beans.
The coffee must not be ground too fine.
It should be slightly granulous.
If it is too fine, you run the risk of blocking the
grid and water will no longer pass through
Setting-up the appliance
•Lift the lid and remove the water tank (1).
•Fill the water tank (2).
•Replace the water tank, pressing down
firmly so that the valve at the bottom opens.
Close the lid (3).
The transparent water tank enables you to
check the water level. Always top up the
water when necessary.
Before using your espresso
maker for the first time
Before using the appliance for the first time
and also after a long period of non-use,
prepare several cups of water (without any
coffee) to rinse the system through
completely:
• Place the filter in the filter holder.
• Engage the filter holder on the left facing
the external marking and turn it firmly to the
right (6).
• Place a large enough container under the
filter holder (7).
• Set the pump switch to position
(4).
• Turn on the appliance (5).
The operating indicator light (red) and the
thermostat indicator light (yellow) will both
come on.
A little water may leak from the percolation
head during the rise in temperature.
• Set the switch to the « » position (8).
The pump is then activated. If the boiler
(water-heating system) is empty (on first use,
for example), it will fill with water with a
characteristic filling noise. The water
contained in the boiler is evacuated via the
infusion nozzle.
•As soon as the water is running out of the
filter holder, reset the pump switch to
position
.
• Allow the appliance to finish heating the
water.
• Once the yellow light goes out, allow the
equivalent of 2 to 3 cups of water to run
through, setting the pump switch to the
« » position.
• If necessary interrupt the process by setting
the pump switch back to
position in order
to empty the container.
ART. 880.PM6.5 19/01/04, 16:0116

17
To rinse the steam nozzle :
• place a container under it,
• slowly turn the steam tap to the max
position and allow the steam to escape for
about 10 seconds.
• reset the tap to the O position and empty
the container.
Filling the water boiler
• Before using the appliance, check that the
boiler is full of water.
• Place a container under the percolation
head.
• Switch on the appliance and set the pump
switch to the « » position. As soon as
water flows from the percolation head, the
boiler is full.
If the water boiler empties itself during the
preparation of the steam (steam stops coming
out of the evacuation pipe), it must be refilled.
• To do this, turn the steam tap to position O,
place a container under the percolation head
and set the pump switch to the « »
position.
• Allow the water to flow from the
percolation head until the yellow light goes
on ; then reset the pump switch to position
.
• Wait until the yellow light has gone out
before resuming steam production by slowly
turning the steam tap to the max position.
Preparing an espresso
•Fill the water tank with fresh water (1) (2)
(3).
•Set the pump switch to position
(4).
• Switch on the appliance (5).
• Set the pump switch to the « » position
and wait until a small amount of water flows
out, which means the boiler is full.
• Then reset the pump switch to position
.
As soon as the system has reached the
required temperature, the yellow light will go
out.
• Preheat the espresso cups, having first
engaged the filter holder (without any
coffee) and place them underneath.
• Set the pump switch to the « » position
(9).
• Fill the cups with boiling water and reset the
pump switch to position
.
• Remove the filter holder.
• Insert the appropriate fillter (for one or two
cups) into the filter holder (10).
• Fill with one or two measures of ground
coffee (11).
• Press down the coffee with the measuring
spoon (12).
• Remove any coffee from the edges of the
filter holder (13).
• Insert the filter holder and turn it firmly to
the right (14).
• Place one or two espresso cups beneath the
filter holder.
• Prepare the espresso by turning the pump
switch to the « » position (15).
• When a sufficient quantity has run through,
reset the pump switch to position
.
• After making the espresso, remove the filter
holder and throw away the coffee grounds
(16).
The following espresso may be prepared by
refilling the filter.
Making steam
Steam can be used to make the milk frothy
for a cappuccino or for heating liquids.
The temperature required to produce steam
being higher than that necessary to make an
espresso, the espresso should always be
prepared first, because otherwise the coffee
might be burnt.
The nature of the system is such that a little
water, which can be collected in a separate
container, will escape from the steam nozzle
before the steam appears.
ART. 880.PM6.5 19/01/04, 16:0117

18
. FROTHING MILK FOR A CAPPUCCINO
When preparing an espresso, this machine
can be used to produce frothy milk to prepare
a cappuccino.
For best results, use the cappuccino accessory.
Please note: The cappuccino accessory
must only be used for producing frothy
milk.
•Fit the accessory to the end of the steam
nozzle (17).
•Pour about 200 ml of skimmed milk into a
small high-sided container (maximum
capacity 0.5 L) which will fit beneath the
steam nozzle.
The milk must be nice and fresh, and the
container must also be chilled, so do not rinse
it in hot water beforehand.
• Check that the boiler is full of water.
The pump switch must be in position
(18).
When the yellow temperature indicator light
goes out:
• Place a container under the steam nozzle
and turn the steam tap to max position.
•Let the water flow until steam appears, then
turn the tap back to position O.
You can now start to prepare frothy milk.
• Place a container under the steam nozzle in
such a way that it is completely immersed in
the milk.
• Turn the tap slowly to max position and
hold the container steady during the
operation (19).
The nozzle must not touch the bottom of the
container so as not to prevent the steam
escaping.
• Once you have obtained the froth, reset the
tap to position O and remove the container.
• Then set the tap to steam position again for
a few moments (with an empty container
under the nozzle) to eliminate the residue of
milk in the nozzle.
• Once this operation is finished, clean the
cappuccino accessory and the steam nozzle
with a damp cloth.
. HEATING OTHER LIQUIDS
• Take out the steam nozzle.
•Remove the cappuccino accessory.
• Make sure the boiler is full of water.
•Set the pump switch to position
.
• Switch on the appliance.
A little water and steam will escape from the
percolation head while the appliance is
heating up.
• When the yellow temperature indicator light
goes out, place a container under the steam
nozzle and turn the steam tap to max
position.
•Let the water flow until steam appears, then
turn the tap back to position O.
• Place the container under the steam nozzle
in such a way that the jet is immersed in the
liquid.
• Turn the tap slowly to max position.
• Once the liquid is hot enough, reset the tap
to position O and remove the container
from the nozzle.
Note :
If you wish to prepare an espresso
immediately after using steam, it is vital that
you allow the appliance to cool down to the
«coffee making» temperature :
• Place a container under the filter holder and
set the pump switch to the « » position.
• Let the water run through until the yellow
temperature indicator light goes out.
•Reset the pump switch to position
, after
which you may prepare an espresso in the
usual way.
Cleaning
• Before doing any cleaning, unplug the
appliance and allow it to cool down.
• Wipe the body of the appliance with a
damp cloth.
The water tank must be emptied after use.
• Remove the cup rest grid and clean it (20).
• Empty the drip tray and clean it.
ART. 880.PM6.5 19/01/04, 16:0118

19
The percolation head, the filter holder and the
filters must be cleaned after each use :
• First, allow the appliance to cool down, then
wipe the percolation head with a damp
cloth. Each detachable element can be
rinsed under running water.
• Do not clean the filter holder or the cup rest
grid in the dishwasher.
• If the percolation head is very dirty, unscrew
the percolation head using a coin : the valve
spring and sealing gasket will also come off.
• Clean the grid and wipe the percolation
head with a damp cloth.
• Replace the grid and screw it firmly in place.
• Make sure the valve spring and the sealing
gasket are correctly positioned (21).
Important : After making frothy milk, clean
the steam nozzle immediately by allowing the
appliance to produce steam for 1 to 2
seconds. Then wipe the tip with a damp
cloth. If the pipe and the tip have been
completely obstructed, clean these using a
needle.
If necessary, this part of the nozzle can be
unscrewed using the hexagonal key found on
the measuring spoon and by unscrewing it in
an anticlockwise direction. Clean this part
thoroughly (22).
The nozzle must be screwed back on in a
clockwise direction after cleaning.
Use the key carefully when screwing it back
on, and do not over-tighten.
Warning : Do not remove or assemble the
steam nozzle when it is hot.
The cappuccino accessory can be given a
thorough cleaning as follows:
• Remove the two parts, A and C, of the
metal stem, B (23).
• Wash both parts in hot water.
• If the tiny aspiration hole of part A is
blocked, unblock it using a fine needle.
If the appliance is not to be used for a long
period, do not leave the filter holder in the
percolation head, as this will cause
unnecessary wear on the gasket and shorten
its lifetime.
Descaling
• You should descale your espresso maker
more or less frequently, with citric or tartaric
acid.
We do, however, recommend that you use the
Krups descaling accessory, reference 054,
available from all approved Krups service
centres. This accessory also includes, apart
from two descaling doses, a strip tester for
water hardness to assess how often you need
to descale your appliance in normal use.
Descaling depends on the hardness of the
water, but also on the cycle of use. The
frequency of descaling indicated by accesaory
054 is thus given only by way of indication.
• Then use the following method :
• Before descaling, unscrew the percolation
grid from the percolation head.
• Clean the percolation grid and the
percolation head of any tartar and coffee
ground residues.
• Replace the valve spring and the gasket on
the percolation head and screw down firmly.
• Remove the cappuccino accessory from the
steam nozzle.
• Dissolve two dessertspoons of descaling
product or one sachet from accessory 054 in
half a litre of warm water and pour this into
the empty water tank.
• Place one container under the percolation
head and another under the steam nozzle.
• Switch on the appliance and set the pump
switch to « » position.
• Allow about half of the descaling solution to
run through, then reset the pump switch to
position.
• Turn the steam tap to max position.
•When the steam appears, turn the tap back
to O position.
• Leave the remainder of the descaling
solution to work on the interior of the
machine for 10 to 15 minutes.
• Place a container under the percolation
head and reset the pump switch to « »
position.
ART. 880.PM6.5 19/01/04, 16:0119

20
• Allow the descaling solution to run through
completely, then reset the pump switch to
position.
•Continue by allowing two water tanks of
clean water to run through with the pump
switch in « » position.
• Refill the water tank and place one contai-
ner under the percolation head and another
under the steam nozzle.
• Set the steam tap to max position for about
30 seconds.
• Then reset the steam tap to O position and
allow the remainder of the water to run
through via the percolation head.
• Then reset the pump switch to
position.
•Switch off the appliance and allow it to cool
down.
• Unscrew the valve spring and the gasket
from the percolation head and replace the
percolation grid with the valve spring and
the gasket on the percolation head.
•Finally, replace the cappuccino accessory on
the steam nozzle.
Problems, probable causes and
solutions
Problems Probable causes Solutions
The espresso is not The cups, the filter Preheat the
hot enough. and filter holder accessories (cups,
are cold. filter and filter
holder). See
paragraph
«Preparing an
espresso ».
Coffee is leaking The filter holder is See paragraph
around the filter not correctly fitted. «Preparing an
holder. espresso ».
There is still some Clean around the
ground coffee filter and the
around the edge of gasket.
the filter.
The percolation Clean the gasket
head gasket is dirty. with a damp cloth.
The percolation Contact an
head gasket is approved Krups
faulty. service centre.
Very loud noise No water in the Fill the water tank.
from the pump water tank.
Water tank incor- Press down firmly
rectly fitted. on the water tank.
Ground coffee too Use fresh ground
old or very dry and coffee.
pump cannot
produce pressure.
Boiler is empty. See paragraph
«Filling the water
boiler ».
Water is not No water in the Fill the water tank.
flowing through. water tank.
Water tank incor- Press down firmly
rectly fitted. on the water tank.
Filter is blocked, Clean the filter
the ground coffee and the head
is too fine or grid. See the
pressed down too paragraph «Clea-
hard. ning » and try
using a coarser
ground coffee.
Percolation head Soak the grid in
grid is clogged. descaling solution.
See « Cleaning »
paragraph.
Appliance needs See « Descaling »
descaling. paragraph.
Boiler is empty. See paragraph
«Filling the water
boiler ».
Water is running Coffee is too coarse Try using a finer
through too quickly ground coffee.
Insufficient quantity Use the spoon
of ground coffee. provided to
measure out the
coffee.
Ground coffee not Press down the
pressed down coffee more firmly.
firmly enough.
There is no head Coffee is too coarse Try using a finer
(froth) on the ground coffee.
espresso.
Ground coffee not Press down the
pressed down coffee more firmly.
firmly enough.
Ground coffee is Use fresh ground
old or too dry. coffee.
The milk is not very Steam nozzle See the paragraph
frothy. blocked. « Cleaning »
Cappuccino acces- See the paragraph
sory blocked. « Cleaning »
ART. 880.PM6.5 19/01/04, 16:0120
La page est en cours de chargement...
La page est en cours de chargement...
La page est en cours de chargement...
La page est en cours de chargement...
La page est en cours de chargement...
La page est en cours de chargement...
La page est en cours de chargement...
La page est en cours de chargement...
La page est en cours de chargement...
La page est en cours de chargement...
La page est en cours de chargement...
La page est en cours de chargement...
La page est en cours de chargement...
La page est en cours de chargement...
La page est en cours de chargement...
La page est en cours de chargement...
-
 1
1
-
 2
2
-
 3
3
-
 4
4
-
 5
5
-
 6
6
-
 7
7
-
 8
8
-
 9
9
-
 10
10
-
 11
11
-
 12
12
-
 13
13
-
 14
14
-
 15
15
-
 16
16
-
 17
17
-
 18
18
-
 19
19
-
 20
20
-
 21
21
-
 22
22
-
 23
23
-
 24
24
-
 25
25
-
 26
26
-
 27
27
-
 28
28
-
 29
29
-
 30
30
-
 31
31
-
 32
32
-
 33
33
-
 34
34
-
 35
35
-
 36
36


Krups 880-42 Manuel utilisateur
- Catégorie
- Cafetières
- Taper
- Manuel utilisateur
dans d''autres langues
- English: Krups 880-42 User manual
- Deutsch: Krups 880-42 Benutzerhandbuch
- Nederlands: Krups 880-42 Handleiding
Documents connexes
-
Krups F880 Le manuel du propriétaire
-
Krups XP5020 Le manuel du propriétaire
-
-
-
-
-
-
-
Krups KM468910 T8 E Le manuel du propriétaire
-
Autres documents
-
Kenwood ES630 Le manuel du propriétaire
-
Kenwood ES020RD Le manuel du propriétaire
-
-
Support Princess Manuel utilisateur
-
Princess 01.249413.01.001 Espresso and Capsule Machine Manuel utilisateur
-
Zanussi ZCOF637X Manuel utilisateur
-
-
Magimix 11404 Le manuel du propriétaire
-
Magimix 11414/CHROME MAT Le manuel du propriétaire
-
Tristar KZ-2271 Manuel utilisateur