Sony MZ-N707 Manuel utilisateur
- Catégorie
- Joueurs de minidisc
- Taper
- Manuel utilisateur

3-234-038-73(1)
Portable
MiniDisc Recorder
Operating Instructions
_
________________________
_
_
________________________________
_
_
_______________________________
_
GB
CT
KR
© 2002 Sony Corporation
MZ-N707
WALKMAN is a trademark of Sony Corporation.
Portable MiniDisc Recorder MZ-N707

2-GB
To prevent fire or shock hazard, do
not expose the unit to rain or
moisture.
To prevent fire, do not cover the
ventilation of the apparatus with news
papers, table cloths, curtains, etc. And
don’t place lighted candles on the
apparatus.
To prevent fire or shock hazard, do not
place objects filled with liquids, such as
vases, on the apparatus.
Certain countries may regulate disposal of
the battery used to power this product.
Please consult with your local authority.
CAUTION — INVISIBLE LASER
RADIATION WHEN OPEN
AVOID EXPOSURE TO BEAM
Information
The CE mark is valid only for
products marketed in the
European Union.
• OpenMG and its logo are trademarks of
Sony Corporation.
• US and foreign patents licenced from
Dolby Laboratories.
• All other trademarks and registered
trademarks are trademarks or registered
trademarks of their respective holders.
• ™ and ® marks are omitted in this
manual.
Do not install the appliance in a
confined space, such as a bookcase or
built-in cabinet.
IN NO EVENT SHALL SELLER BE
LIABLE FOR ANY DIRECT,
INCIDENTAL OR
CONSEQUENTIAL DAMAGES OF
ANY NATURE, OR LOSSES OR
EXPENSES RESULTING FROM
ANY DEFECTIVE PRODUCT OR
THE USE OF ANY PRODUCT.
WARNING

3-GB
Notice for users
On the supplied software
• Copyright laws prohibit reproducing the
software or the manual accompanying it
in whole or in part, or renting the
software without the permission of the
copyright holder.
• In no event will SONY be liable for any
financial damage, or loss of profits,
including claims made by third parties,
arising out of the use of the software
supplied with this recorder.
• In the event a problem occures with this
software as a result of defective
manufacturing, SONY will replace it.
However, SONY bears no other
responsibility.
• The software provided with this player
cannot be used with equipment other
than that which is so desgnated.
• Please note that, due to continued efforts
to improve quality, the software
specifications may be changed without
notice.
• Operation of this player with software
other than that provided is not covered
by the warranty.
• Duplication of any or all of the contents
of this software and instruction manual
or lending of this software to third
parties without the express permission
of the copyright holder is strictly
prohibited by copyright low.
• Sony cannot be held liable in any way
for monetary losses, lost profits or
claims from third parties arising from
the use of this software.
• Should any manufacturing defects
occur, Sony’s responsibility shall be
limited solely to replacing said defective
merchandise.
• This software is approved for use only
with the specified equipment.
• Sony reserves the right to change
software specifications without prior
notice.
Program © 2000 Sony Corporation
Documentation © 2002 Sony Corporation
This operating instructions explains
how to operate the portable MiniDisc
recorder itself. For details on how to
use the supplied software (OpenMG
Jukebox), refer to the OpenMG
Jukebox Operating Instructions.
GB

4-GB
Table of contents
Overview ...........................................................8
Checking the supplied accessories ..........................................................9
Looking at the controls .................................. 10
Getting started! .............................................. 13
Recording an MD right away!
(Synchro-recording) ........................................16
Transferring songs from the computer to the
MiniDisc (Check-out) ......................................20
Playing an MD right away! ..............................22
Various ways of recording .............................. 24
Note on digital and analog recording (Digital input and analog input) 24
Recording in analog (Analog Recording) .............................................25
Long-time recording (MDLP) ..............................................................26
When you do not want “LP:” added automatically at the
beginning of a track .........................................................26
Recording tracks using the group function (Group Mode Recording) .27
To activate group mode (Group Mode Recording) ........................28
Recording a track into a new group ................................................29
Recording a track into an existing group ........................................29
Recording without overwriting existing material .................................29
Recording from a microphone ..............................................................30
Adding track marks automatically (Auto Time Stamp) ........................31
Adjusting the recording level manually (Manual Recording) ..............32
Checking the remaining recordable time ..............................................33

5-GB
Various ways of playback .............................. 35
Searching for a specific track or a position quickly (Quick Search) .... 35
Using the group function (Group Mode) ............................................. 35
Listening to tracks in a specific group (Group Mode Playback) ... 35
Selecting and playing groups (Group Skip Mode) ........................ 36
Changing play modes ........................................................................... 37
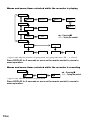
Creating a program (Program Play) ............................................... 38
To adjust the sound quality (Digital Sound Preset) ............................. 39
Selecting the sound quality ............................................................ 39
Adjusting the sound quality ........................................................... 40
Checking the remaining time or the playing position .......................... 41
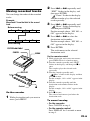
Editing recorded tracks .................................. 43
Labeling/relabeling recordings ............................................................ 43
Labeling recordings ....................................................................... 44
Relabeling recordings .................................................................... 45
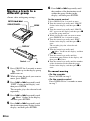
Registering tracks or groups as a new group (Group Setting) ............. 46
To release a group setting .................................................................... 48
Moving recorded tracks ....................................................................... 49
Moving a track to a different group ..................................................... 50
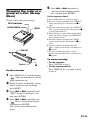
Changing the order of a group on a disc (Group Move) ...................... 51
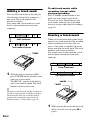
Adding a track mark ............................................................................. 52
Erasing a track mark ............................................................................ 52
Erasing tracks ....................................................................................... 53
To erase a track .............................................................................. 53
To erase the whole disc .................................................................. 54
To erase a group ............................................................................. 54
Other operations ............................................. 56
Protecting your hearing (AVLS) .......................................................... 56
Turning off the beep sound .................................................................. 57
Locking the controls (HOLD) .............................................................. 58
Power sources ................................................ 59
Battery life ............................................................................................ 59

6-GB
Additional information .................................... 60
Precautions ............................................................................................60
System limitations .................................................................................63
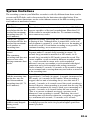
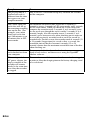
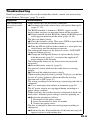
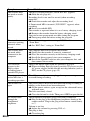
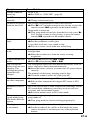
Troubleshooting ....................................................................................65
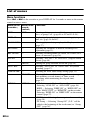
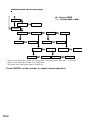
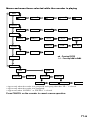
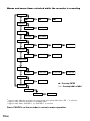
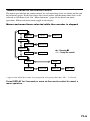
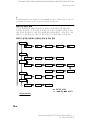
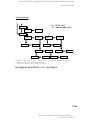
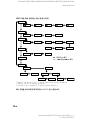
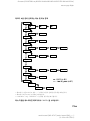
List of menus ........................................................................................68
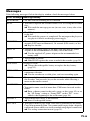
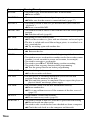
Messages ...............................................................................................76
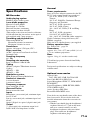
Specifications ........................................................................................78
Explanations ..........................................................................................79
Index .....................................................................................................79

7-GB

8-GB
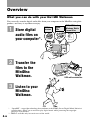
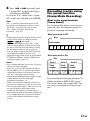
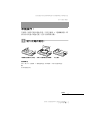
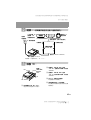
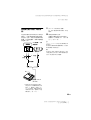
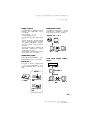
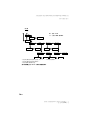
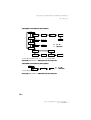
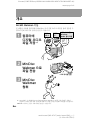
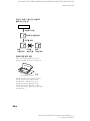
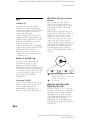
Overview
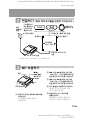
What you can do with your Net MD Walkman
You can easily transfer digital audio files from your computer to the MiniDisc using this
product, and carry it anywhere to enjoy.
1 Store digital
audio files on
your computer*.
2 Transfer the
files to the
MiniDisc
Walkman.
3 Listen to your
MiniDisc
Walkman.
Audio
CDs
MP3, WAV and
Windows Media
Format files
USB cable connection
* “OpenMG”, a copyright technology that conforms to the SDMI (Secure Digital Music Initiative)
specifications, allows you to record or play digital music while protecting the copyright
privileges of its holders.
** EMD is available onl
y
in certain areas of the world.
EMD**
Services

9-GB
Notes on use
The recording may not be completed properly or the recorded data may be lost if:
— you take the disc out of the recorder, disconnect the AC power adaptor from the
recorder, or unplug the USB cable during reading or writing of data.
— the disc you used was subjected to static electricity or electrical noise.
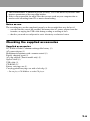
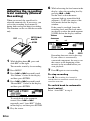
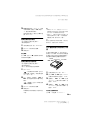
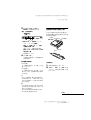
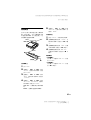
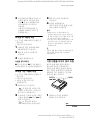
Checking the supplied accessories
Supplied accessories
NC-WMAA Nickel Cadmium rechargeable battery (1)
AC power adaptor (1)
Headphones/earphones with a remote control (1)
Battery charging stand (1)
AC plug adaptor (Tourist model only) (1)
Optical cable (1)
USB cable (1)
CD-ROM (1)*
Battery carrying case (1)
Carrying pouch/carrying case with a belt clip (1)
∗ Do not play a CD-ROM on an audio CD player.
• The recorded music is limited to private use only. Use of the music beyond this limit
requires permission of the copyright holders.
• Sony is not responsible for music files that are not saved on your computer due to
unsuccessful recording from CD or music downloading.

10-GB
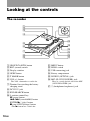
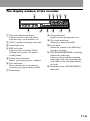
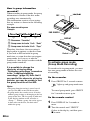
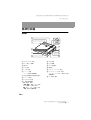
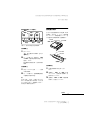
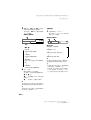
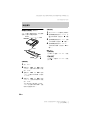
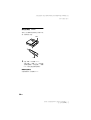
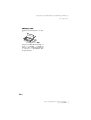
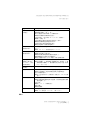
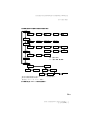
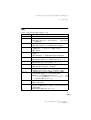
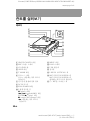
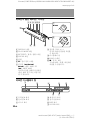
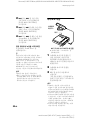
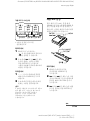
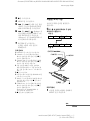
Looking at the controls
The recorder
A GROUP/CANCEL button
B REC (record) switch
C Display window
D OPEN button
E T MARK button
F VOL +/– button
The VOL + button has a tactile dot.
G
Terminal for attaching the battery
charging stand
H DC IN 3V jack
I END SEARCH button
J 5 position control key
X (pause) button
./> (search/AMS) button
ENTER/N* (play) button
x (stop)/CHG (charge) button
*The N button has a tactile dot.
K
MENU button
L HOLD switch
M USB connecting jack
N Battery compartment
O LINE IN (OPTICAL) jack
P MIC (PLUG IN POWER) jack
There is a tactile dot left side of the MIC
(PLUG IN POWER) jack.
Q
i (headphones/earphones) jack
1
3
2
4
5
6
qg
qf
qh
qj
qa
qs
qd
7
8
9
J
ENTER
C
H
G

11-GB
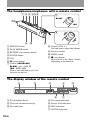
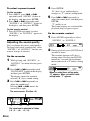
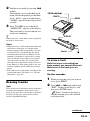
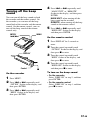
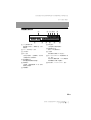
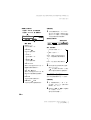
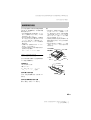
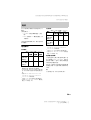
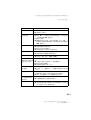
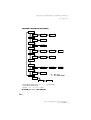
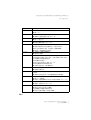
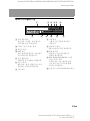
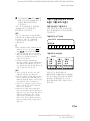
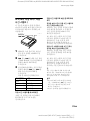
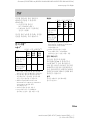
The display window of the recorder
A Character information display
Displays the disc and track names,
error messages, track numbers, etc.
B SYNC (synchro-recording) indication
C Sound indication
D REC indication
Lights up while recording. When
flashing, the recorder is in record
standby mode.
E Battery level indication
Shows approximate battery condition.
F Disc indication
Shows that the disc is rotating for
recording, playing or editing an MD.
G Time display
H Group indication
Lights up when group mode is on.
I Play mode indication
Shows play mode of the MD.
J Level meter
Shows the volume of the MD being
played or recorded.
K REC REMAIN/REMAIN (remaining
time/tracks) indication
Lights up along with the remaining
time of the track, the remaining time
of the MD, or the remaining number
of tracks.
L Recording mode (LP2/LP4/MONO)
indication
132456
7qsqaq;98

12-GB
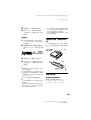
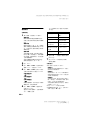
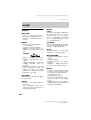
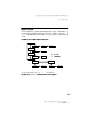
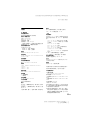
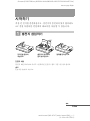
The headphones/earphones with a remote control
A DISPLAY button
B PLAY MODE button
C RPT/ENT (repeat/enter) button
D SOUND button
E Clip
F X (pause) button
G Control (./N>)
N> : play, AMS, FF
. : REW, AMS
Turn or turn and hold to play, fast
forward, rewind, etc.
H Control (VOL +/–)
Pull and turn to adjust the volume.
I Display window
J HOLD switch
K x (stop) button
May be used as the “Enter” button,
depending on the function.
The display window of the remote control
A Track number display
B Character information display
C Disc indication
D Play mode indication
E Battery level indication
F REC indication
G SOUND indication
+
–
A B C DE
K
F
IJ
G
H
.
N>
E
GF
A
BCD

13-GB
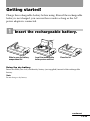
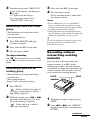
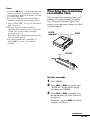
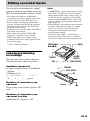
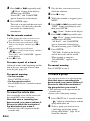
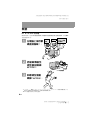
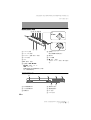
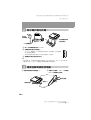
Getting started!
Charge the rechargeable battery before using. Even if the rechargeable
battery is not charged, you can use the recorder as long as the AC
power adaptor is connected.
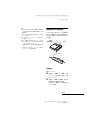
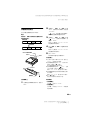
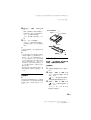
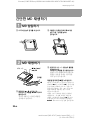
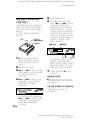
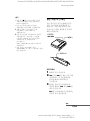
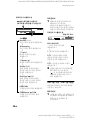
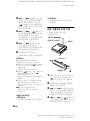
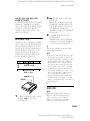
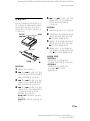
1
Insert the rechargeable battery.
Using the dry battery
Insert one LR6 (size AA) alkaline dry battery (not supplied) instead of the rechargeable
battery.
Note
Do not charge a dry battery.
e
E
Insert the rechargeable
battery minus end first.
Slide to open the battery
compartment lid.
Close the lid.
continued

14-GB
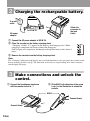
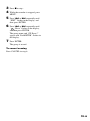
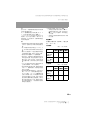
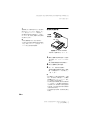
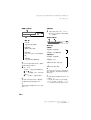
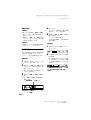
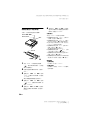
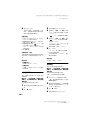
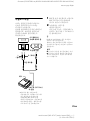
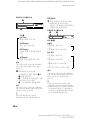
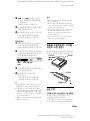
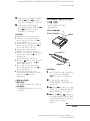
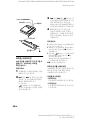
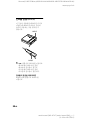
2
Charging the rechargeable battery.
3
Make connections and unlock the
control.
1 Connect the headphones/earphones
with the remote control to i.
2 Slide HOLD to the direction of the arrow
(.) in the illustration to unlock the
controls.
AC power
adaptor
Attach the
connector to
the jack
firmly.
To DC IN 3V
1 Connect the AC power adaptor to DC IN 3V.
2 Place the recorder on the battery charging stand.
“Charging” flashes, e appears in the display, and charging starts. When
charging is completed, the battery indication disappears.
Full charging of a completely discharged rechargeable battery takes about 3
hours.
3 Remove the recorder from the battery charging stand.
Note
The “Charging” indication in the display may not flash immediately after you place the recorder on th
e
battery charging stand in step 2. The indication will, however, begin flashing after about 3 minutes
and charging will begin
.
To a wall
outlet
HOLD
to i
Connect firmly.
Connect firmly.

15-GB
z
You can also charge the rechargeable battery by
connecting the AC power adaptor directly to the
recorder.
Connect the AC power adaptor to DC IN 3V on
the recorder, and then press x/CHG while the
recorder is stopped.
“Charging” and e appear in the display and
charging starts. Full charging takes about 3
hours. Charging is complete when e
disappears. Charging time may vary depending
on the battery condition.
Notes
• The supplied battery charging stand can be
used only with this recorder. Any other model
cannot be charged.
• Do not use the recorder to charge any other
battery besides the supplied one or the one
designated for it (NC-WMAA).
• Though the battery charging stand and the
battery may become hot during the charging
procedure, this poses no danger.
• Be sure to use the supplied AC power adaptor.
• If you are recharging the battery for the first
time or after a long period of disuse, the
battery may not charge up to its rated capacity.
This is a normal characteristic. After you use
and recharge the battery a few times, it will
return to its normal charge capacity.
• When the battery life of a fully charged
rechargeable battery becomes about half the
normal life, replace it.
• If the recorder will not be used for a long
period of time, disconnect the AC power
adaptor from a wall outlet and remove the
recorder from the battery charging stand.
• If during operation the recorder stops with
“LOW BATT” in the display, charge the
rechargeable battery. You may be able to
operate the recorder for a while after “LOW
BATT” has appeared. However, if you operate
the recorder until the rechargeable battery is
completely discharged, you may not be able to
recharge it again by placing the recorder on
the battery charging stand. If this happens,
remove the battery from the recorder once,
then reinsert it before placing the recorder on
the battery charging stand.
• Please note the following points when
charging the battery:
—If you press x/CHG immediately after
charging has completed, charging will
begin again. If this happens, press x/CHG
again to stop the charging operation since
the battery is already fully charged.
—Charging stops when you try to operate the
recorder during charging.
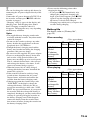
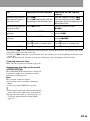
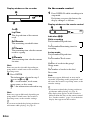
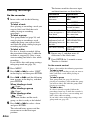
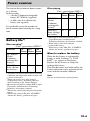
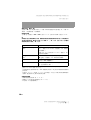
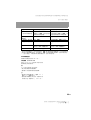
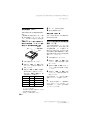
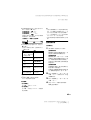
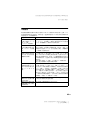
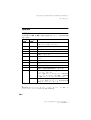
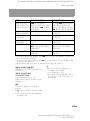
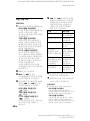
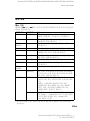
Battery life
For details, refer to (“Battery life”,
page 59).
When recording
(Unit: approx.hours)
When playing
(Unit: approx.hours)
Batteries SP
Stereo
LP2
Stereo
LP4
Stereo
NC-WMAA
Nickel
Cadmium
rechargeable
battery
4 6 7.5
LR6 (SG)
Sony alkaline
dry battery
91316
Batteries SP
Stereo
LP2
Stereo
LP4
Stereo
NC-WMAA
Nickel
Cadmium
rechargeable
battery
15 16 20
LR6 (SG)
Sony alkaline
dry battery
42 48 56

16-GB
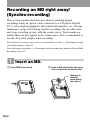
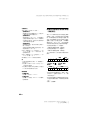
Recording an MD right away!
(Synchro-recording)
This section explains the basic procedure for making digital
recordings using an optical cable connected to a CD player, Digital
TV or other digital equipment. (For further information, see “System
limitations” (page 63)) During synchro-recording, the recorder starts
and stops recording in sync with the sound source. Track marks are
added wherever they appear in the sound source. It is recommended to
use the AC power adaptor when recording.
To record from an analog source such as a cassette deck or a radio t “Recording in analog
(Analog Recording)” (page 25)
.
To record using group mode t “Recording tracks using the group function (Group Mode
Recording)” (page 27)
.
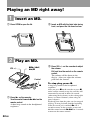
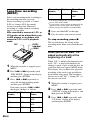
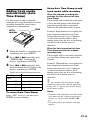
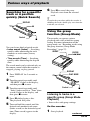
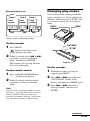
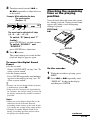
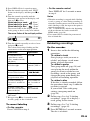
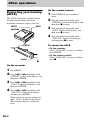
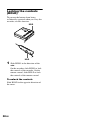
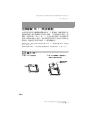
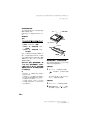
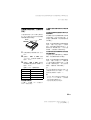
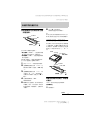
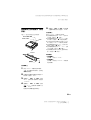
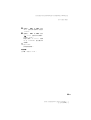
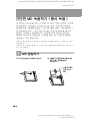
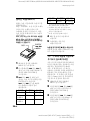
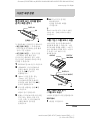
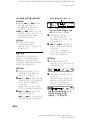
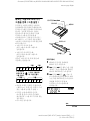
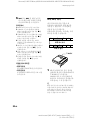
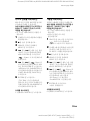
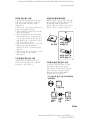
1
Insert an MD.
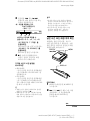
1 Press OPEN to open the lid. 2 Insert an MD with the label side facing
front, and press the lid down to close.
Make sure to
check the
record-protect
tab is closed.

17-GB
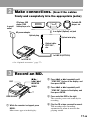
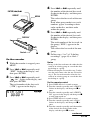
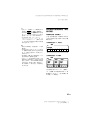
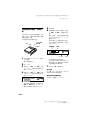
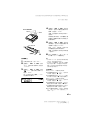
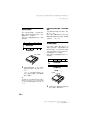
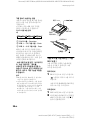
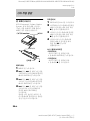
2
Make connections.
(Insert the cables
firmly and completely into the appropriate jacks)
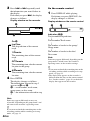
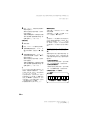
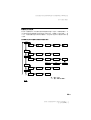
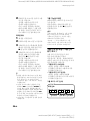
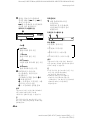
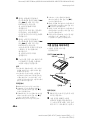
3
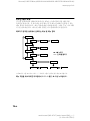
Record an MD.
1 While the recorder is stopped, press
MENU.
Menu items appear in the display.
2 Press . or > repeatedly until
“SYNC REC” flashes in the display, and
then press ENTER.
3 Press . or > repeatedly until
“SYNC ON” flashes in the display, and
then press ENTER.
4 Press and slide REC to the right.
The recorder pauses and stands by for
recording.
5 Play the CD or tape you want to record.
The recorder starts recording
automatically when it receives the
playing sound.
to a wall
outlet
AC power adaptor
CD player, MD
player, DVD
video player, etc.
Portable CD
player, etc.
Optical cable
POC-15B*,
etc.
Optical plug
Optical mini-plug
to a digital (Optical) out jack
to LINE IN (OPTICAL)
to DC IN 3V
∗ See “Optional accessories” (page 77).
REC
x/N/
./ >/
X/ENTER
END SEARCH
MENU

18-GB
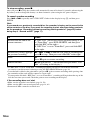
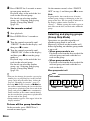
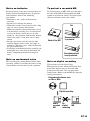
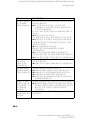
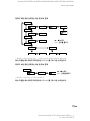
To stop recording, press x.
After you press x to stop, the recorder will automatically turn off in about 10 seconds (when using the
dry battery or the rechargeable battery) or about 3 minutes (when using the AC power adaptor).
To cancel synchro-recording
Press . or > repeatedly until “SYNC OFF” flashes in the display in step 3, and then press
ENTER.
Note
If you record on a previously recorded disc, the recorder is factory set to overwrite the
entire contents of the disc. If you want the recording to start after the existing contents,
do the procedure “Recording without overwriting existing material” (page 29) before
doing step 3, “Record an MD.” (page 17).
If the recording does not start
• Make sure the recorder is not locked (page 14, 58).
• Make sure the MD is not record-protected (page 14, 61).
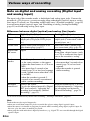
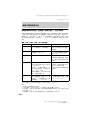
• Premastered MDs cannot be recorded over.
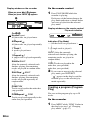
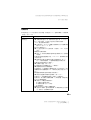
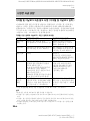
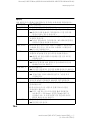
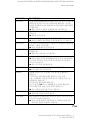
To Press
Record from the end of the
current contents
1)
If “REC-Posi” (the record-starting position setting) is set
to “From Here”, press END SEARCH, and then press
and slide REC to the right.
1)
If “REC-Posi” is set to “From End”, press and slide REC
to the right.
Record over partway through
the previous recording
1)
N, ., or > to find the start point of recording and
press x to stop. Then press and slide REC to the right.
Pause X
2)
.
Press X again to resume recording.
Remove the MD x and open the lid.
3)
(The lid does not open while “TOC
Edit” is flashing in the display.)
1)
If “REC-Posi” is set to “From End”, recording operations will always start from the end of the
previously recorded material without pressing the END SEARCH button (page 29).
2)
A track mark is added at the point where you press X again to resume recording while pausing; thus
the remainder of the track will be counted as a new track.
3)
If you open the lid while “REC-Posi” is set to “From Here”, recording will begin from the top of the
disc the next time you record. Check the point to start recording on the display.

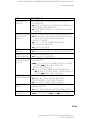
19-GB
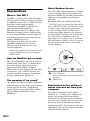
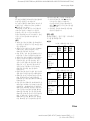
About the DSP TYPE-R for ATRAC
“TYPE-R” is a high-level Sony specification
used in the Digital Signal Processor (DSP),
which is heart of the MiniDisc sound. This
technology gives the MiniDisc recorder twice
the signal processing capability as previous
MiniDisc Walkman models, producing a sound
quality close to that of MiniDisc decks. This
unit supports the “TYPE-R” function only
during recording or playback in normal stereo
(or monaural) mode. It does not support this
function in MDLP mode, or during the
checking out of audio data from the computer
in normal stereo (or monaural) mode using
OpenMG Jukebox.
Notes
• The pause function cannot be turned on or off
manually during synchro-recording. Press x
to stop recording.
• Do not change SYNC REC setting while
recording. Recording may not be done
properly.
• Even when there is no recorded sound on the
sound source, there may be cases when
recording does not pause automatically during
synchro-recording due to the noise level
emitted from the sound source.
• If a silent portion is encountered for
approximately 2 seconds during synchro-
recording from a sound source other than a
CD or an MD, a new track mark is
automatically added at the point where the
silent portion ends.
• Synchro-recording cannot be done if the
connecting cord is not an optical cable, or if
the cable is connected to the MIC (PLUG IN
POWER) jack.
• You cannot change the recording mode during
recording.
• “Data Save” or “TOC Edit” flashes while data
of the recording (the track’s start and end
points, etc.) is being recorded. Do not move
the recorder or disconnect the power source
while the indication is flashing in the display.
• The lid does not open until “TOC Edit”
disappears in the display.
• If the power supply is disrupted (i.e. the
battery is removed or becomes exhausted or
the AC power adaptor is disconnected) during
a recording or editing operation, or while
“TOC Edit” appears in the display, then it will
not be possible to open the lid until power is
restored.
• You can make a digital recording only from an
optical type output.
• When recording from a portable CD player,
set the CD player to pause, and then do the
recording procedure on the recorder.
• Note the following when recording from a
portable CD player:
—Some portable CD players may not be
capable of digital out when the AC power
adaptor is disconnected. If this is the case,
connect the AC power adaptor to the
portable CD player and use it on AC power
as the power source.
—On some portable CD players, optical
output may not be possible when using an
anti-skip function (e.g., ESP* or G-
PROTECTION). If this is the case, turn off
the anti-skip function.
∗ Electronic Shock Protection
z
• When there is no sound from the player for
more than 3 seconds during synchro-
recording, the recorder goes into the standby
mode automatically. When the sound comes
from the player again, the recorder resumes
synchro-recording. If the recorder is kept in
the standby mode for 5 minutes or longer, the
recorder stops automatically.
• For longer recording, follow step 1 of “Long-
time recording (MDLP)” (page 26) to select
the recording mode, and then start the
procedure of synchro-recording.
• LINE IN (OPTICAL) jack is for both digital
and analog input. The recorder automatically
recognizes the type of line cable and switches
to digital or analog input.
• The recording level is adjusted automatically.
To adjust the level manually, see “Adjusting
the recording level manually (Manual
Recording)” (page 32).
• You can monitor the sound during recording.
Connect the supplied headphones/earphones
with remote control to i and adjust the
volume by pressing VOL +/–. This does not
affect the recording level.

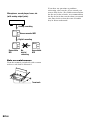
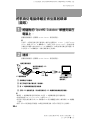
20-GB
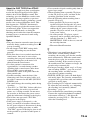
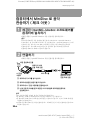
Transferring songs from the
computer to the MiniDisc (Check-out)
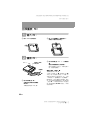
1
Install the supplied OpenMG Jukebox
software onto your computer.
For details, refer to the OpenMG Jukebox Operating Instructions.
Note
When you connect the recorder to your computer for the first time, make sure to install the
“OpenMG Jukebox software” and “Net MD driver” from the supplied CD-ROM. If OpenMG
Jukebox has already been installed, you should install the driver for the Net MD before
connecting the recorder to your computer. If you connect the recorder to the computer without
first installing the Net MD driver, the recorder will not operate properly.
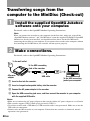
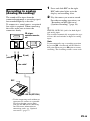
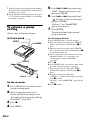
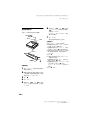
2
Make connections.
For details, refer to the OpenMG Jukebox Operating Instructions.
Notes
• Make sure to connect the AC power adaptor to the recorder and the AC power adaptor to a wall outlet.
• This recorder supports USB 2.0 Full speed (previously USB 1.1).
• Use of this recorder with a USB hub or a USB extension cable is not guaranteed. Make sure to use the
USB cable for connection.
• Connect only one MD recorder to your computer. If more than one recorder is connected, normal
operation is not guaranteed.
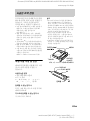
1 Insert a disc into the recorder.
2 Insert a charged rechargeable battery into the recorder.
3 Connect the AC power adaptor to the recorder.
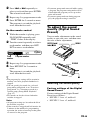
4 Open the USB connecting jack cover, and then connect the recorder to your computer
with the supplied USB cable.
USB cable
To the USB connecting
Jack of the recorder.
To the USB connecting
jack of your computer.
To the wall outlet
AC power
adaptor
La page charge ...
La page charge ...
La page charge ...
La page charge ...
La page charge ...
La page charge ...
La page charge ...
La page charge ...
La page charge ...
La page charge ...
La page charge ...
La page charge ...
La page charge ...
La page charge ...
La page charge ...
La page charge ...
La page charge ...
La page charge ...
La page charge ...
La page charge ...
La page charge ...
La page charge ...
La page charge ...
La page charge ...
La page charge ...
La page charge ...
La page charge ...
La page charge ...
La page charge ...
La page charge ...
La page charge ...
La page charge ...
La page charge ...
La page charge ...
La page charge ...
La page charge ...
La page charge ...
La page charge ...
La page charge ...
La page charge ...
La page charge ...
La page charge ...
La page charge ...
La page charge ...
La page charge ...
La page charge ...
La page charge ...
La page charge ...
La page charge ...
La page charge ...
La page charge ...
La page charge ...
La page charge ...
La page charge ...
La page charge ...
La page charge ...
La page charge ...
La page charge ...
La page charge ...
La page charge ...
La page charge ...
La page charge ...
La page charge ...
La page charge ...
La page charge ...
La page charge ...
La page charge ...
La page charge ...
La page charge ...
La page charge ...
La page charge ...
La page charge ...
La page charge ...
La page charge ...
La page charge ...
La page charge ...
La page charge ...
La page charge ...
La page charge ...
La page charge ...
La page charge ...
La page charge ...
La page charge ...
La page charge ...
La page charge ...
La page charge ...
La page charge ...
La page charge ...
La page charge ...
La page charge ...
La page charge ...
La page charge ...
La page charge ...
La page charge ...
La page charge ...
La page charge ...
La page charge ...
La page charge ...
La page charge ...
La page charge ...
La page charge ...
La page charge ...
La page charge ...
La page charge ...
La page charge ...
La page charge ...
La page charge ...
La page charge ...
La page charge ...
La page charge ...
La page charge ...
La page charge ...
La page charge ...
La page charge ...
La page charge ...
La page charge ...
La page charge ...
La page charge ...
La page charge ...
La page charge ...
La page charge ...
La page charge ...
La page charge ...
La page charge ...
La page charge ...
La page charge ...
La page charge ...
La page charge ...
La page charge ...
La page charge ...
La page charge ...
La page charge ...
La page charge ...
La page charge ...
La page charge ...
La page charge ...
La page charge ...
La page charge ...
La page charge ...
La page charge ...
La page charge ...
La page charge ...
La page charge ...
La page charge ...
La page charge ...
La page charge ...
La page charge ...
La page charge ...
La page charge ...
La page charge ...
La page charge ...
La page charge ...
La page charge ...
La page charge ...
La page charge ...
La page charge ...
La page charge ...
La page charge ...
La page charge ...
La page charge ...
La page charge ...
La page charge ...
La page charge ...
La page charge ...
La page charge ...
La page charge ...
La page charge ...
La page charge ...
La page charge ...
La page charge ...
La page charge ...
La page charge ...
La page charge ...
La page charge ...
La page charge ...
La page charge ...
La page charge ...
La page charge ...
La page charge ...
La page charge ...
La page charge ...
La page charge ...
La page charge ...
La page charge ...
La page charge ...
La page charge ...
La page charge ...
La page charge ...
La page charge ...
La page charge ...
La page charge ...
La page charge ...
La page charge ...
La page charge ...
La page charge ...
La page charge ...
La page charge ...
La page charge ...
La page charge ...
La page charge ...
La page charge ...
La page charge ...
La page charge ...
La page charge ...
La page charge ...
La page charge ...
La page charge ...
La page charge ...
La page charge ...
La page charge ...
La page charge ...
La page charge ...
La page charge ...
La page charge ...
La page charge ...
La page charge ...
La page charge ...
La page charge ...
La page charge ...
La page charge ...
-
 1
1
-
 2
2
-
 3
3
-
 4
4
-
 5
5
-
 6
6
-
 7
7
-
 8
8
-
 9
9
-
 10
10
-
 11
11
-
 12
12
-
 13
13
-
 14
14
-
 15
15
-
 16
16
-
 17
17
-
 18
18
-
 19
19
-
 20
20
-
 21
21
-
 22
22
-
 23
23
-
 24
24
-
 25
25
-
 26
26
-
 27
27
-
 28
28
-
 29
29
-
 30
30
-
 31
31
-
 32
32
-
 33
33
-
 34
34
-
 35
35
-
 36
36
-
 37
37
-
 38
38
-
 39
39
-
 40
40
-
 41
41
-
 42
42
-
 43
43
-
 44
44
-
 45
45
-
 46
46
-
 47
47
-
 48
48
-
 49
49
-
 50
50
-
 51
51
-
 52
52
-
 53
53
-
 54
54
-
 55
55
-
 56
56
-
 57
57
-
 58
58
-
 59
59
-
 60
60
-
 61
61
-
 62
62
-
 63
63
-
 64
64
-
 65
65
-
 66
66
-
 67
67
-
 68
68
-
 69
69
-
 70
70
-
 71
71
-
 72
72
-
 73
73
-
 74
74
-
 75
75
-
 76
76
-
 77
77
-
 78
78
-
 79
79
-
 80
80
-
 81
81
-
 82
82
-
 83
83
-
 84
84
-
 85
85
-
 86
86
-
 87
87
-
 88
88
-
 89
89
-
 90
90
-
 91
91
-
 92
92
-
 93
93
-
 94
94
-
 95
95
-
 96
96
-
 97
97
-
 98
98
-
 99
99
-
 100
100
-
 101
101
-
 102
102
-
 103
103
-
 104
104
-
 105
105
-
 106
106
-
 107
107
-
 108
108
-
 109
109
-
 110
110
-
 111
111
-
 112
112
-
 113
113
-
 114
114
-
 115
115
-
 116
116
-
 117
117
-
 118
118
-
 119
119
-
 120
120
-
 121
121
-
 122
122
-
 123
123
-
 124
124
-
 125
125
-
 126
126
-
 127
127
-
 128
128
-
 129
129
-
 130
130
-
 131
131
-
 132
132
-
 133
133
-
 134
134
-
 135
135
-
 136
136
-
 137
137
-
 138
138
-
 139
139
-
 140
140
-
 141
141
-
 142
142
-
 143
143
-
 144
144
-
 145
145
-
 146
146
-
 147
147
-
 148
148
-
 149
149
-
 150
150
-
 151
151
-
 152
152
-
 153
153
-
 154
154
-
 155
155
-
 156
156
-
 157
157
-
 158
158
-
 159
159
-
 160
160
-
 161
161
-
 162
162
-
 163
163
-
 164
164
-
 165
165
-
 166
166
-
 167
167
-
 168
168
-
 169
169
-
 170
170
-
 171
171
-
 172
172
-
 173
173
-
 174
174
-
 175
175
-
 176
176
-
 177
177
-
 178
178
-
 179
179
-
 180
180
-
 181
181
-
 182
182
-
 183
183
-
 184
184
-
 185
185
-
 186
186
-
 187
187
-
 188
188
-
 189
189
-
 190
190
-
 191
191
-
 192
192
-
 193
193
-
 194
194
-
 195
195
-
 196
196
-
 197
197
-
 198
198
-
 199
199
-
 200
200
-
 201
201
-
 202
202
-
 203
203
-
 204
204
-
 205
205
-
 206
206
-
 207
207
-
 208
208
-
 209
209
-
 210
210
-
 211
211
-
 212
212
-
 213
213
-
 214
214
-
 215
215
-
 216
216
-
 217
217
-
 218
218
-
 219
219
-
 220
220
-
 221
221
-
 222
222
-
 223
223
-
 224
224
-
 225
225
-
 226
226
-
 227
227
-
 228
228
-
 229
229
-
 230
230
-
 231
231
-
 232
232
-
 233
233
-
 234
234
-
 235
235
-
 236
236
-
 237
237
-
 238
238
-
 239
239
-
 240
240


Sony MZ-N707 Manuel utilisateur
- Catégorie
- Joueurs de minidisc
- Taper
- Manuel utilisateur
dans d''autres langues
- English: Sony MZ-N707 User manual
