La Crosse CA80550 Manuel utilisateur
- Catégorie
- Stations météo
- Taper
- Manuel utilisateur

WI-FI WIND & WEATHER STATION Page | 1
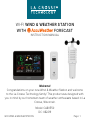
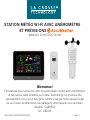
WIFI WIND & WEATHER STATION
WITH FORECAST
INSTRUCTION MANUAL
Welcome!
Congratulations on your new Wind & Weather Station and welcome
to the La Crosse Technology family! This product was designed with
you in mind by our hometown team of weather enthusiasts based in La
Crosse, Wisconsin.
Model: CA80550
DC: 082219

WI-FI WIND & WEATHER STATION Page | 2
TABLE OF CONTENTS
3
4
4
5
8
9
9
10
11
12
12
13
14
14
16
16
17
18
19
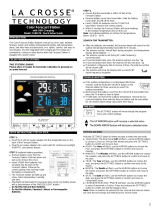
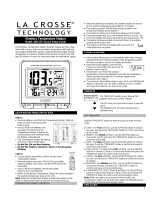
Quick Setup
Quick Mounting Tips
Weather Station Icons
Connect to La Crosse View™ App
Benefits of Connecting to La Crosse View™
Enhanced Weather Forecasts w/La Crosse View™
Advanced Forecast & Chance Precipitation
AccuWeather Daily Forecasts
AccuWeather Hourly Forecasts
AccuWeather HI/LO Temperatures
AccuWeather Wind Direction
Custom Data Streams
Add Sensors to your app
Status Messages when Connected
Button Functions
Adjustable Backlight
Auto Dim Backlight
Settings Menu
Extra Sensor Area
Wind Speed Readings & History
Temperature/Humidity Readings
& HI/LO Records
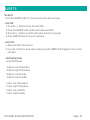
Alerts
Feels Like Temperature
Temperature Trend Arrows
Relative Pressure Reading
Sensor Reception Indicators
Sensor ID and Search
Delete Sensors
Low Battery Indicators
Factory Restart Station
Detailed Sensor Setup
and Mounting
Join the Conversation
Care and Maintenance
Warranty and Support
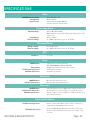
Specifications
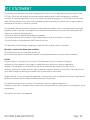
FCC Statement
Canada Statement
21
23
24
26
26
27
27
28
29
29
30
30
33
33
33
34
35
36

WI-FI WIND & WEATHER STATION Page | 3
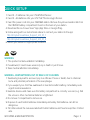
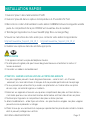
1. Insert 2 - C batteries into your LTV-W1 Wind Sensor.
2. Insert 2 - AA batteries into your LTV-TH2 Thermo-Hygro Sensor.
3. Insert the power cord into your CA80550 station. Remove the yellow insulation tab from
the CR2032 battery compartment found on the back of your station.
4. Download the La Crosse View™ App (App Store or Google Play)
5. Follow along with our instructional videos to connect your station to the app:
http://bit.ly/LaCrosseView_Support_Vid_01_1
http://bit.ly/LaCrosseView_Support_Vid_01_2
6. Mount your sensors in appropriate locations.
QUICK SETUP
WARNING:
1. This product contains a Button Cell Battery.
2. If swallowed, it could cause severe injury or death in just 2 hours.
3. Seek medical attention immediately.
WARNING - KEEP BATTERIES OUT OF REACH OF CHILDREN
1. Swallowing may lead to serious injury in as little as 2 hours or death, due to chemical
burns and potential perforation of the oesophagus.
2. If you suspect your child has swallowed or inserted a button battery, immediately seek
urgent medical assistance.
3. Examine devices and make sure the battery compartment is correctly secured, e.g. that
the screw or other mechanical fastener is tightened.
4. Do not use if compartment is not secure.
5. Dispose of used button batteries immediately and safely. Flat batteries can still be
dangerous.
6. Tell others about the risk associated with button batteries and how to keep their children
safe.

WI-FI WIND & WEATHER STATION Page | 4
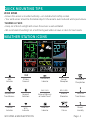
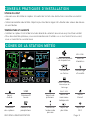
WIND SPEED
• Ensure the sensor is mounted vertically an unobstructed rooftop is ideal.
• Your wind sensor should be the tallest object in the area to avoid reduced wind speed values.
QUICK MOUNTING TIPS
THERMO-HYGRO
• Keep out of direct sunlight and ensure the sensor is well-ventilated.
• We recommend mounting it on a north-facing wall under an eave or deck for best results.
Chance of
Precipitation
12 Hour
Forecast
Low Battery
Indicator
Sensor
Reception
Temperature
Trend Arrows
Forecast
Indicators
Fahrenheit
Celsius
Internet
Indicator
Miles or
Kilometres
Inches of Mercury
or Hecto Pascal
Percent
Humidity
Wi-Fi
Indicator
12 HR
Auto Dim
Indicator
MPH / KMH
INHG / HPA
Alert
Indicator
Pressure
Trend Arrows
WEATHER STATION ICONS
PRESSURE
MP H
WIND
SPEED
DIRECTIO N
10 2 3 4 5 6 7 8 9 10 15
20 25+

WI-FI WIND & WEATHER STATION Page | 5
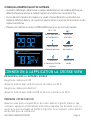
EXTRA SENSOR AREA ICONS:
• The Extra Sensor area of your station will default to Pressure when you first power up.
• When you choose to add additional sensors, the Sensor Reception Indicator will show in the
upper left corner whether Pressure or Sensor reading is displayed.
• Press and release the EXTRA button to view any additional sensors.
Low Battery
Indicator
Sensor
Reception
Inches of Mercury
or Hecto Pascal
INHG / HPA
Pressure
Trend Arrows
Auto Scroll
Pressure/Sensors
Probe
Reading
PRESSURE
INHG
EXTRA SENSOR
CONNECT TO LA CROSSE VIEW™ APP
MOBILE DEVICE REQUIREMENTS
iOS Requirements:
Mobile device with iOS with cellular or Wi-Fi service
Android Requirements:
Mobile device with Android OS with cellular or Wi-Fi service
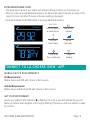
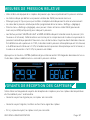
GET YOUR STATION READY
Ensure your station’s Wi-Fi Indicator is flashing. If it is not, press and hold the Plus (+) and
Minus (–) buttons down together until it begins flashing. This tells you that your station is ready
to connect.

WI-FI WIND & WEATHER STATION Page | 6
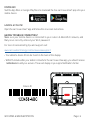
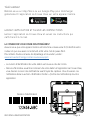
DOWNLOAD
Visit the App Store or Google Play Store to download the free LaCrosse View™ app onto your
mobile device.
LAUNCH & FOLLOW
Open the LaCrosse View™ app and follow the on-screen instructions.
HAVING TROUBLES CONNECTING?
Make sure your mobile device is connected to your router’s 2.4GHz Wi-Fi network, and
that you’ve correctly entered your Wi-Fi password.
For more troubleshooting tips and support visit:
www.lacrossetechnology.com/lacrosseviewsupport
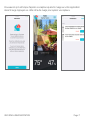
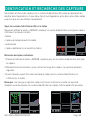
• Your station’s device ID can be found on the back of the display.
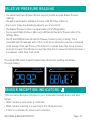
• Within 15 minutes after your station connects to the La Crosse View app, you should receive
notifications to add your sensors. These will display in your app’s Notification Center.
Device ID

WI-FI WIND & WEATHER STATION Page | 7
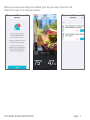
When your sensors are ready to be added, you’ll see your app’s cloud turn red.
Press this Cloud Icon to add your sensors.

WI-FI WIND & WEATHER STATION Page | 8
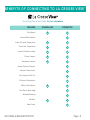
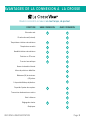
Connecting You to Your Home Anytime, Anywhere.
BENEFITS OF CONNECTING TO LA CROSSE VIEW™
Wind Speed
Internet Wind Direction
Indoor & Outdoor Temperature
“Feels Like” Temperature
Indoor & Outdoor Humidity
12-Hour Forecast
Barometric Pressure
Internet Time and Calendar
Advance Forecast Icons
Daily Forecast HIs & LOs
% Chance of Precipitation
Ability to Add Sensors
Data Stream Technology
Remote Monitoring
Set Alerts
View Graphs
FEATURES CONNECTEDSTANDALONE

WI-FI WIND & WEATHER STATION Page | 9
• Advanced Forecast Icons & Chance of Precipitation (12 Hour Forecast)
• AccuWeather Daily & Hourly Forecasts
• AccuWeather HI/LO Temperatures
• AccuWeather Wind Direction
• Custom Data Streams
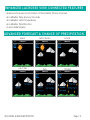
ENHANCED LACROSSE VIEW CONNECTED FEATURES
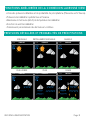
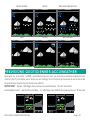
ADVANCED FORECAST & CHANCE OF PRECIPITATION
SUNNY CLOUDSPARTLY SUNNY
LIGHT RAIN
T-STORMRAIN
FORECAST
12 HR
FORECAST
12 HR
FORECAST
12 HR
FORECAST
12 HR
FORECAST
12 HR
FORECAST
12 HR

WI-FI WIND & WEATHER STATION Page | 10
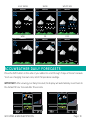
LIGHT SNOW
WINTRY MIX
SNOW
WIND FOGICE
FORECAST
12 HR
FORECAST
12 HR
FORECAST
12 HR
FORECAST
12 HR
FORECAST
12 HR
ICE
FORECAST
12 HR
FOG
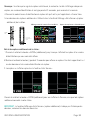
Press the DAY button on the side of your station to scroll through 7 days of future forecasts.
You’ll see changing forecast icons, HI/LO Temperature readings.
IMPORTANT: After viewing your Daily Forecast, the display will automatically revert back to
the default 12 hour forecast after 10 seconds.
ACCUWEATHER DAILY FORECASTS
10 2 3 4 5 6 7 8 9 10 15
20 25+
FORECAST
12 HR
10 2 3 4 5 6 7 8 9 10 15
20 25+
FORECAST12 HR

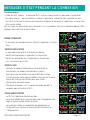
WI-FI WIND & WEATHER STATION Page | 11
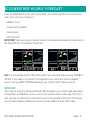
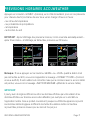
Press the HOUR button on the side of your station to scroll through 12 hours of future fore-
casts. You’ll see hourly changes in:
• Weather Icons
• Chance of Precipitation
• Temperature
• Wind Direction
IMPORTANT: After viewing your Hourly Forecast, the display will automatically revert back to
the default 12 hour forecast after 10 seconds.
ACCUWEATHER HOURLY FORECAST
10 2 3 4 5 6 7 8 9 10 15
20 25+
FORECAST12 HR
WIND
DIRECTIO N
10 2 3 4 5 6 7 8 9 10 15
20 25+
FORECAST12 HR
WIND
DIRECTIO N
Note: If you press the HOUR or DAY button when not connected, station will say CONNECT
TO WIFI. If your station is connected, but happens to lose connection with the weather
service, it will say WAIT FOR WEATHER when your HOUR or DAY button is pushed.
IMPORTANT:
There may be small discrepancies between data displayed on your station and data shown
through other AccuWeather services, such as their website and/or mobile app. This is com-
mon, as there are dierences in the timing in which forecast data is fetched by these items.
Our connected weather stations will receive forecast updates at least 4 times daily.

WI-FI WIND & WEATHER STATION Page | 12
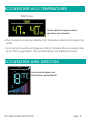
TODAY Shows
Internet Indicator will appear in bottom
right corner when connected.
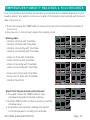
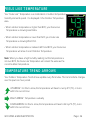
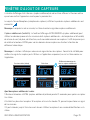
ACCUWEATHER HI/LO TEMPERATURES
• When connected, your daily AccuWeather HI/LO Temperature predictions will display in this
section.
• If unconnected, this section will display your Outdoor Temperature Records registered daily
by your Thermo-Hygro Sensor. These will automatically reset at Midnight everyday.
Internet Indicator Appears and
Wind Direction replaces Top 1HR
ACCUWEATHER WIND DIRECTION
10 2 3 4 5 6 7 8 9 10 15
20 25+
MP H
WIND
SPEED
DIRECTIO N

WI-FI WIND & WEATHER STATION Page | 13
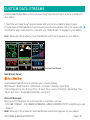
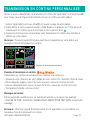
Custom Data Stream
Use the Data Stream Menu in the La Crosse View™ app to select up to 3 items to stream on
your station.
1. Open the La Crosse View™ app and swipe until you find your station’s device page.
2. Scroll down to the Data Stream section and press the blue stream icon in the upper right.
3. Follow the app’s instructions to customize your “Data Stream” to display on your station
Note: Allow up to 10 minutes for new Data Stream selections to appear on your station.
CUSTOM DATA STREAMS
Data Stream Items:
Customizable Data Streams to enhance your in-home display:
Wind Speed Wind Direction Wind Gust UV Index Visibility Dew Point
Percentage of Clouds Sunrise Time Sunset Time Hours of Sunlight Moon Rise Time
Moon Set Time Temperature/Humidity and more!
Personal Messages
Enter up to 20 characters for special events or reminders, such as:
SOCCER TONIGHT ICE CREAM IN FREEZER GREAT JOB MATH TEST or anything you can
think of!
Note: Allow up to 10 minutes for new Data Stream selections to appear on your station.

WI-FI WIND & WEATHER STATION Page | 14
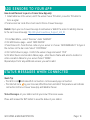
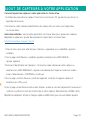
How to add Sensors to your La Crosse View App only:
1. Install batteries in the sensor, and if the sensor has a TX button, press the TX button to
force a signal.
2. Scan sensor bar code ID so it will read in the La Crosse View app.
Details: Open your La Crosse View app to add sensors. Watch the video for adding devices
to the La Crosse View app: http://bit.ly/LaCrosseView_Support_Vid_10
1. From Main Menu - select “Devices” under “Add/Edit”
2. On Edit Devices page - select “ADD DEVICE”
3. Scan Device ID - Scan the bar code on your sensor or choose “ADD MANUALLY” to type in
the number on the bar code. Select “CONTINUE”.
4. On Confirm Device page - Confirm the sensor image and select “YES”
5. On Enter Device and Location Name page - enter Device Name and select a location or
enter a Location Name for your sensor. Select “DONE”.
Repeat steps 1-5 for any additional sensors you wish to add.
ADD SENSORS TO YOUR APP
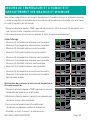
Status Messages on your station will let you know if there are issues.
Press and release the SET button to view the status of your station.
Quick Tip:
• The Wi-Fi Icon indicates Wi-Fi connection- not necessarily app connection.
• The Internet Icons by your Forecast, Wind Direction and HI/LO Temperatures will indicate
connection to the La Crosse View App and Weather Server.
STATUS MESSAGES WHEN CONNECTED

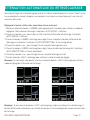
WI-FI WIND & WEATHER STATION Page | 15
PRESSUR E
MP H
WIND
SPEE D
DIRECTIO N
10 2 3 4 5 6 7 8 9 10 15
20 25+
PRESSURE
MP H
WIND
SPEE D
DIRECTIO N
10 2 3 4 5 6 7 8 9 10 15
20 25+
MP H
WIND
SPEE D
DIRECTION
10 2 3 4 5 6 7 8 9 10 15
20 25+
1
HR
EXTR A SENSOR
MP H
WIND
SPEE D
DIRECTIO N
10 2 3 4 5 6 7 8 9 10 15
20 25+
1
HR
EXTR A SENSOR
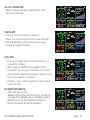
LOST WIFI
• Check your power cord connection (power cord
required to connect)
• When trying to reestablish your station’s Wi-Fi
connection, be sure your mobile device is on the
same 2.4GHz network you want your station to use.
• Check your network connection.
• Hold the + and – buttons together for 3 seconds to
search for Wi-Fi.
NO WEATHER SERVICE
• Wi-Fi, and App are fine.
• Weather/Time service not connecting. This will be
resolved at the Weather Server. Please be patient.
• Weather Forecast, Precipitation and Internet
HI/LO temperature will not be displayed.
ALL OK CONNECTED
• Station is connected all the way through to the
La Crosse View app.
CHECK APP
• The Wi-Fi router connection is working.
• Check your connection to the La Crosse View app.
• Check Notifications in the La Crosse View app
• Is there an update to install?

WI-FI WIND & WEATHER STATION Page | 16
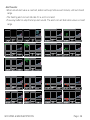
Buttons located on top of Professional Weather Station
Buttons located on the right side of Professional Weather Station
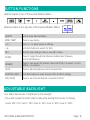
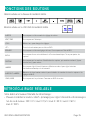
BUTTON FUNCTIONS
ALERTS Hold to enter Alert Set Mode.
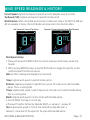
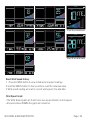
WIND, TEMP Press to view history.
+ or Use + or – to adjust values in settings.
+ & Hold both buttons to search for Wi-Fi.
SET Hold for basic settings. Press to view Wi-Fi status.
EXTRA
Press to toggle through Extra Sensors & Barometric Pressure.
Hold to add Sensors.
SENSOR
Press to view sensor ID numbers, then hold PLUS (+) to search, or hold
MINUS (–) to remove.
LIGHT Press to adjust brightness. Hold to set Auto Dim.
ALERTS & LIGHT Hold both buttons to reset all sensor ID’s and Wi-Fi settings.
DAY, HOUR Press to see forecast. Must be connected to Wi-Fi.
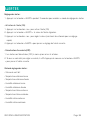
Your station has 5 levels of brightness for the backlight:
• Press and release the LIGHT button to adjust the backlight at 5 levels of intensity.
Levels: OFF = 0% | level 1 = 1.5% | level 2 = 20% | level 3 = 50% | level 4 = 100%.
ADJUSTABLE BACKLIGHT

WI-FI WIND & WEATHER STATION Page | 17
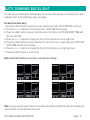
You can set your backlight to automatically dim to level 1 at a set hour for sleeping, then auto-
matically return to full brightness when you wake.
Set Auto Dim (Hour only):
1. Hold the LIGHT button 2 seconds to enter dimmer set mode. AUTO DIM OFF will show.
2. Press the + or – buttons to turn dimmer (ON). AUTO DIM ON will show.
3. Press the LIGHT button to select start time (Hour) for dimmer. AUTO DIM START TIME and
the hour will flash.
4. Press the + or – buttons to change the hour for the dimmer to be low light level.
5. Press the LIGHT button to select start time for dimmer to be on High light level. AUTO DIM
STOP TIME and the hour will flash.
6. Press the + or – buttons to change the hour for the dimmer to be high light level.
7. Press the LIGHT button to confirm exit.
Note: Hold LIGHT button at any time to exit dimmer settings.
AUTO DIMMING BACKLIGHT
10 2 3 4 5 6 7 8 9 10 15
20 25+
10 2 3 4 5 6 7 8 9 10 15
20 25+
10 2 3 4 5 6 7 8 9 10 15
20 25+
10 2 3 4 5 6 7 8 9 10 15
20 25+
Note: If you press the LIGHT button to manually adjust the backlight, the Auto Dim feature will
resume at the next scheduled time to dim.

WI-FI WIND & WEATHER STATION Page | 18
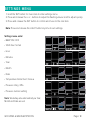
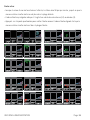
1. Hold the SET button for 3 seconds to enter settings menu.
2. Press and release the + or - buttons to adjust the flashing values. Hold to adjust quickly.
3. Press and release the SET button to confirm and move to the next item.
Note: Press and release the LIGHT button any time to exit settings.
SETTINGS MENU
10 2 3 4 5 6 7 8 9 10 15
20 25+
10 2 3 4 5 6 7 8 9 10 15
20 25+
10 2 3 4 5 6 7 8 9 10 15
20 25+
10 2 3 4 5 6 7 8 9 10 15
20 25+
10 2 3 4 5 6 7 8 9 10 15
20 25+
10 2 3 4 5 6 7 8 9 10 15
20 25+
10 2 3 4 5 6 7 8 9 10 15
20 25+
10 2 3 4 5 6 7 8 9 10 15
20 25+
10 2 3 4 5 6 7 8 9 10 15
20 25+
10 2 3 4 5 6 7 8 9 10 15
20 25+
INHG
PRESSURE
INHG
PRESSURE
Settings menu order:
• BEEP ON | OFF
• 12/24 hour format
• Hour
• Minutes
• Year
• Month
• Date
• Temperature Fahrenheit | Celsius
• Pressure: InHg / hPa
• Pressure number setting
Note: Weekday sets automatically as Year,
Month and Date are set.

WI-FI WIND & WEATHER STATION Page | 19
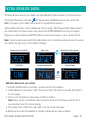
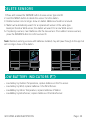
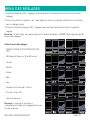
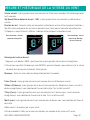
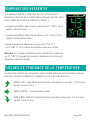
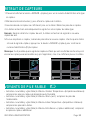
EXTRA SENSOR AREA
The Extra Sensor area of your station will show Relative Pressure when you first power up.
The Sensor Reception indicator will display when additional sensors are connected.
Note: On power up the station will search for any additional sensors.
Optional Extra Sensors: Up to 4 additional Thermo-Hygro, Wind Speed, Rain, Water Leak or
any combination of these sensors can read to the EXTRA SENSOR area of your display.
Simply press and release the EXTRA button to view these sensors or turn on Auto Scroll.
Note: Not all sensors will read to the station. Be sure to check the website to see if a sensor
can read to the app only, or both station and app.
Relative Pressure (default)
Temperature/Humidity
24 Hr Rain
Water Leak
Contact Probe
Probe
Reading
PRESSURE
INH G
Auto Scroll all Extra Sensors
EXTRA SENSOREXTRA SENSOR
24 HR
EXTRA SENSOR
EXTRA SENSOR
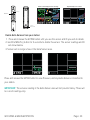
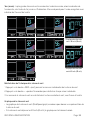
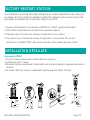
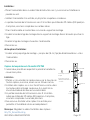
Add Extra Sensors to your station:
1. Hold the EXTRA button 3 seconds, to add a sensor to the station.
2. Install batteries in the sensor, and if the sensor has a TX button, press the TX button to
force a signal.
3. Allow up to 3 minutes to view sensor and ID on station.
Note: Once sensor is found the search will stop. Sensor, ID, and type will show for 3
seconds then return to normal display.
4. Scan sensor bar code ID so it will read in the La Crosse View app.
5. Added sensors will be available for display in Extra Sensor area of station.

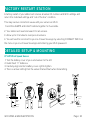
WI-FI WIND & WEATHER STATION Page | 20
Sensor
Barcode ID
TX Button
LED Light
AA
+
-
AA
+
-
Temp/Humidity sensor added
Station normal display-Pressure showing
PRESSURE
MP H
WIND
SPEED
DIRECTIO N
10 2 3 4 5 6 7 8 9 10 15
20 25+
10 2 3 4 5 6 7 8 9 10 15
20 25+
EXTR A SENSOR
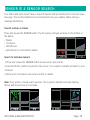
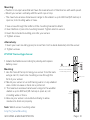
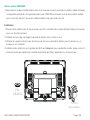
Delete Extra Sensors from your station:
1. Press and release the EXTRA button until you see the sensor and ID you wish to delete.
2. Hold the MINUS (-) button for 3 seconds to delete this sensor. The sensor readings and ID
will show dashes.
3. Sensor will no longer show in the Extra Sensor area.
EXTRA SENSOR
EXTRA SENSOR
Press and release the EXTRA button to view Pressure, and any Extra Sensors connected to
your station.
IMPORTANT: The sensors reading in the Extra Sensor area will not provide history. These will
be current readings only.
La page est en cours de chargement...
La page est en cours de chargement...
La page est en cours de chargement...
La page est en cours de chargement...
La page est en cours de chargement...
La page est en cours de chargement...
La page est en cours de chargement...
La page est en cours de chargement...
La page est en cours de chargement...
La page est en cours de chargement...
La page est en cours de chargement...
La page est en cours de chargement...
La page est en cours de chargement...
La page est en cours de chargement...
La page est en cours de chargement...
La page est en cours de chargement...
La page est en cours de chargement...
La page est en cours de chargement...
La page est en cours de chargement...
La page est en cours de chargement...
La page est en cours de chargement...
La page est en cours de chargement...
La page est en cours de chargement...
La page est en cours de chargement...
La page est en cours de chargement...
La page est en cours de chargement...
La page est en cours de chargement...
La page est en cours de chargement...
La page est en cours de chargement...
La page est en cours de chargement...
La page est en cours de chargement...
La page est en cours de chargement...
La page est en cours de chargement...
La page est en cours de chargement...
La page est en cours de chargement...
La page est en cours de chargement...
La page est en cours de chargement...
La page est en cours de chargement...
La page est en cours de chargement...
La page est en cours de chargement...
La page est en cours de chargement...
La page est en cours de chargement...
La page est en cours de chargement...
La page est en cours de chargement...
La page est en cours de chargement...
La page est en cours de chargement...
La page est en cours de chargement...
La page est en cours de chargement...
La page est en cours de chargement...
La page est en cours de chargement...
La page est en cours de chargement...
La page est en cours de chargement...
-
 1
1
-
 2
2
-
 3
3
-
 4
4
-
 5
5
-
 6
6
-
 7
7
-
 8
8
-
 9
9
-
 10
10
-
 11
11
-
 12
12
-
 13
13
-
 14
14
-
 15
15
-
 16
16
-
 17
17
-
 18
18
-
 19
19
-
 20
20
-
 21
21
-
 22
22
-
 23
23
-
 24
24
-
 25
25
-
 26
26
-
 27
27
-
 28
28
-
 29
29
-
 30
30
-
 31
31
-
 32
32
-
 33
33
-
 34
34
-
 35
35
-
 36
36
-
 37
37
-
 38
38
-
 39
39
-
 40
40
-
 41
41
-
 42
42
-
 43
43
-
 44
44
-
 45
45
-
 46
46
-
 47
47
-
 48
48
-
 49
49
-
 50
50
-
 51
51
-
 52
52
-
 53
53
-
 54
54
-
 55
55
-
 56
56
-
 57
57
-
 58
58
-
 59
59
-
 60
60
-
 61
61
-
 62
62
-
 63
63
-
 64
64
-
 65
65
-
 66
66
-
 67
67
-
 68
68
-
 69
69
-
 70
70
-
 71
71
-
 72
72


La Crosse CA80550 Manuel utilisateur
- Catégorie
- Stations météo
- Taper
- Manuel utilisateur
dans d''autres langues
- English: La Crosse CA80550 User manual
Documents connexes
Autres documents
-
Cateye HL-EL520 Manuel utilisateur
-
 La Crosse Technology C79790V2-BBQ1 Guide d'installation
-
La Crosse Technology V21-WTHV4 Manuel utilisateur
-
 La Crosse Technology CA85176 Manuel utilisateur
-
La Crosse Technology WS-9032U Manuel utilisateur
-
 La Crosse Technology OMOTX141-AV2 Manuel utilisateur
-
La Crosse Technology CA85169 Manuel utilisateur
-
 La Crosse Technology 53152340 Mode d'emploi
-
 La Crosse Technology WS-1610TWC-IT Manuel utilisateur
-
 La Crosse Technology C82929-INT Guide d'installation


