Panasonic DMP-BD10 Manuel utilisateur
- Catégorie
- Lecteurs DVD
- Taper
- Manuel utilisateur
Ce manuel convient également à

RQT8745-1Y
PP
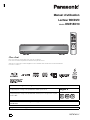
Operating Instructions
BD/DVD Player
Model No. DMP-BD10
Dear customer
Thank you for purchasing this product.
For optimum performance and safety, please read these instructions carefully.
Before connecting, operating or adjusting this product, please read the instructions completely. Please keep this manual for future reference.

2
RQT8745
IMPORTANT SAFETY INSTRUCTIONS
Read these operating instructions carefully before using the unit. Follow the safety instructions on the unit and the applicable safety instructions
listed below. Keep these operating instructions handy for future reference.
(Inside of product)
1) Read these instructions.
2) Keep these instructions.
3) Heed all warnings.
4) Follow all instructions.
5) Do not use this apparatus near water.
6) Clean only with dry cloth.
7) Do not block any ventilation openings. Install in accordance
with the manufacturer’s instructions.
8) Do not install near any heat sources such as radiators, heat
registers, stoves, or other apparatus (including amplifiers) that
produce heat.
9) Do not defeat the safety purpose of the polarized or
grounding-type plug. A polarized plug has two blades with
one wider than the other. A grounding-type plug has two
blades and a third grounding prong. The wide blade or the
third prong are provided for your safety. If the provided plug
does not fit into your outlet, consult an electrician for
replacement of the obsolete outlet.
10) Protect the power cord from being walked on or pinched
particularly at plugs, convenience receptacles, and the point
where they exit from the apparatus.
11) Only use attachments/accessories specified by the
manufacturer.
12) Use only with the cart, stand, tripod, bracket, or
table specified by the manufacturer, or sold
with the apparatus. When a cart is used, use
caution when moving the cart/apparatus
combination to avoid injury from tip-over.
13) Unplug this apparatus during lightning storms
or when unused for long periods of time.
14) Refer all servicing to qualified service personnel. Servicing is
required when the apparatus has been damaged in any way,
such as power-supply cord or plug is damaged, liquid has
been spilled or objects have fallen into the apparatus, the
apparatus has been exposed to rain or moisture, does not
operate normally, or has been dropped.

3
RQT8745
Table of contents
IMPORTANT SAFETY INSTRUCTIONS............. 2
Accessory information ..................................... 3
Disc information................................................. 4
Control reference guide..................................... 6
Connection ......................................................... 8
Easy Setting...................................................... 11
Remote control setting.................................... 11
Basic play ......................................................... 12
Adjusting picture and sound quality.............. 14
Operations using menu screen ...................... 15
Playing MP3 files and still pictures ................ 16
Control with HDMI
(EZ Sync
TM
HDAVI Control) ........................... 18
Changing settings with the
On-screen menu............................................. 19
Changing the unit’s settings........................... 21
Frequently asked questions............................ 24
Troubleshooting guide .................................... 24
Messages .......................................................... 27
Disc handling.................................................... 27
Maintenance ..................................................... 27
Product Service................................................ 28
Specifications................................................... 28
Glossary............................................................ 29
Limited Warranty (ONLY FOR U.S.A.) ............ 30
Limited Warranty (ONLY FOR CANADA) ....... 31
Index.................................................................. 33
Accessory information
(ONLY FOR U.S.A. )
Product Registration Card
Please complete and return the included product registration card, or register via the Internet at: http://www.prodreg.com/panasonic/
User memo:
Getting started
Playback
Settings
Reference
Referencia rápida en español
(Spanish Quick Reference) ............................ 32
Please check and identify the supplied accessories. Use numbers indicated in parentheses when asking for replacement parts.
(Product numbers correct as of July 2006. These may be subject to change.)
Only for U.S.A.: To order accessories, refer to “Accessory Purchases” on page 30.
Only for Canada: To order accessories, call the dealer from whom you have made your purchase.
1 Remote control
(EUR7658Y80)
1 Audio/video cable
(K2KA6BA00003)
2 Batteries
for remote control
1 AC power supply cord
(K2CB2CB00018)
For use with this unit only. Do not
use it with other equipment.
Also, do not use cords for other
equipment with this unit.

4
RQT8745
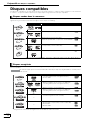
Disc information
This unit is compatible with a variety of disc types and formats, including both packaged discs and recorded discs. Use the following chart to
learn more about the discs that can be played on this unit.
This chart shows the different type of retail/commercial discs you can use, and also includes the industry-standard logos that should appear on
the discs and/or packaging.
To play DVD-Video content, set “Play DVD-Audio in Video Mode” to “Video Mode (Video On)”
(
➡ 21, “Disc” tab)
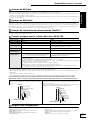
This chart shows the different type of discs recorded with DVD recorders, DVD video cameras, personal computers, etc. that you can use.
This mark means you must finalize (➡ 29, Glossary) the disc with the DVD recorder, etc. before playback.
It may not be possible to play the above discs in some cases due to the type of discs, the condition of the recording, the recording
method and how the files were created.
Packaged discs
Logo Features Indicated as
High Definition (HD) movie and music discs . . . . . . . . . . . . . . . . .
[BD-V]
High quality movie and music discs. . . . . . . . . . . . . . . . . . . . . . . .
[DVD-V]
High fidelity music discs. . . . . . . . . . . . . . . . . . . . . . . . . . . . . . . . .
[DVD-A]
Some DVD-Audio discs contain DVD-Video content.
. . . . . . . . . .
[DVD-V]
Compact Discs (CD’s) that contain music and video.
Including SVCD (Conforming to IEC62107) . . . . . . . . . . . . . . . . . .
[VCD]
Compact Discs (CD’s) that contain audio and music. . . . . . . . . . .
[CD]
BD-Video
BD-Video

5
RQT8745
You can play MP3 and still pictures (JPEG) on this unit by making folders as shown below. However depending on how you create the
disc (writing software), play may not be in the order you numbered the folders.
Regarding BD-Video
If the audio track of the disc was recorded with Dolby TrueHD, it will be output as Dolby Digital audio.
If the audio track of the disc was recorded with DTS-HD, it will be output as DTS audio.
When BD-J application (➡ 29, Glossary) is executed, operations may take a little more time than usual. Please wait, there is nothing wrong with
this unit.
When playing a two disc set of BD-Video, once the first disc finishes playing, video may continue to display even if playback has been
stopped.
Regarding DVD-Audio
Some multi-channel DVD-Audio will prevent down-mixing (➡ 29, Glossary) of all or part of their contents if this is the manufacturer’s intention.
When playing such discs, or such parts of the disc, unless the number of connected speakers is the same as the disc’s channel specification,
audio will not be output properly (e.g. part of the audio is missing, multi-channel audio cannot be selected and audio is played in two channels).
Refer to the disc’s jacket for more information.
Note about using a DualDisc
The digital audio content side of a DualDisc does not meet the technical specifications of the Compact Disc Digital Audio (CD-DA) format so
play may not be possible.
Tips for making MP3/JPEG files
File format MP3 JPEG
Playable discs
CD-R/RW
1
DVD-RAM
2
, CD-R/RW
1
Extension Files must have the extension “.mp3” or “.MP3”. Files must have the extension “.jpg” or “.JPG”.
Number of pixels — between 3434 and 61444096 pixels
(Sub sampling is 4:2:2 or 4:2:0)
Bit rates 32 kbps to 320 kbps —
Sampling frequency 44.1 kHz/48 kHz —
Reference ID3 tags: not compatible
If there is a large amount of still picture data etc. within a
MP3 file, play may not be possible.
Compatible formats: DCF
3
compliant (Content
recorded on a digital camera, etc.)
MOTION JPEG: not compatible
English alphabet and Arabic numerals are displayed correctly. Other characters may not be displayed correctly.
The display order on this unit may differ from how the order is displayed on a computer.
Depending on how you create the disc (writing software), files (tracks) and folders (groups) may not play in the
order you numbered them.
This unit is not compatible with packet-write format.
Depending on the recording conditions, the disc may not play.
Operation may take time to complete when there are many files (tracks) and/or folders (groups) and some files
(tracks) may not display or be playable.
1
CD-R/RW
Compatible formats: ISO9660 level 1 or 2 (except for extended formats), Joliet
This unit is compatible with multi-session but reading or play of the disc may take time if there are a lot of sessions.
2
DVD-RAM
Discs must conform to UDF 2.0.
3
Design rule for Camera File system: unified standard established by Japan Electronics and Information Technology Industries Association
(JEITA).
Structure of MP3 folders in CD-R/CD-RW
Prefix with 3-digit numbers in the order you want to play them.
Structures of still pictures(JPEG) in CD-R/CD-RW
Files inside a folder are displayed in the order they were updated or taken.
When the highest level folders are “DCIM” folders, they are displayed
first on the tree.
002 group
001
001
001track.mp3
002track.mp3
003track.mp3
003 group
001track.mp3
002track.mp3
003track.mp3
001track.mp3
002track.mp3
003track.mp3
004track.mp3
Root
Order of play
(folder=group)
(file=track)
001
P0000010.jpg
P0000011.jpg
P0000012.jp
g
P0000003.jpg
P0000004.jpg
P0000005.jpg
P0000001.jpg
P0000002.jpg
P0000006.jpg
P0000007.jpg
P0000008.jpg
P0000009.jpg
Root
Order of play
002 Folder
003 Folder
004 Folder
Discs that cannot be played
BD-R, BD-RE v1/v2
2.6-GB and 5.2-GB DVD-RAM
DVD-RAM that cannot be removed from their cartridges
Version 1.0 of DVD-RW
DVD-ROM, CD-ROM, CDV, CD-G, SACD and Photo CD
WMA discs
DivX discs
PAL discs
“Chaoji VCD” available on the market including CVD, DVCD and
SVCD that do not conform to IEC62107.
HD DVD
Other discs that are not specifically supported
Getting started Disc information
Getting started

6
RQT8745
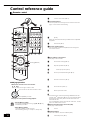
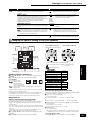
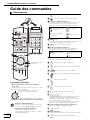
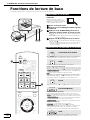
Control reference guide
Multi-jog operation
Turn the Multi-jog lightly.
If you press it strongly when turning it, [, , , ] may
be mistakenly activated.
About Multi-jog Setting
The wheel operation can be turned off.
Set the “Multi-jog Setting” to “Off” (➡ 21,“Setup” tab).
Turn the unit on and off (➡ 12)
TV operation buttons
You can operate the TV through the unit’s remote control. See
page 11 for the remote control setting.
(➡ 18)
Works only with Panasonic EZ Sync HDAVI Control compatible
equipment.
Select audio (➡ 13)
Receiver operation buttons
You can operate a Panasonic amplifier/receiver through the
unit’s remote control.
. Basic playback control buttons
See page 12 for the details.
Show status messages (➡ 13)
Skip the specified time (➡ 13)
Show Pop-up menu (➡ 15)
! Show Top menu/Direct Navigator (➡ 15)
Show On-screen menu (➡ 19)
Show sub menu (➡ 15,17)
Return to previous screen
These buttons are used when operating a BD-Video disc that
includes Java
TM
applications (BD-J). For more information about
operating this kind of disc, please read the instructions that
came with the disc.
The A and B buttons are also used with the “Title View”, “Picture
View” and “Album View” screens.
Buttons that adjust picture and sound quality
See page 14 for the details.
Cancel
Numbered buttons
Select title numbers, etc./Enter numbers (➡ 13)
7 Show Setup menu (➡ 21)
Remote control
Select items on menu screens and set items.
[, , , ]
Press up, down, left or right to select an item.
You can also turn the wheel to select an item.
Press [ENTER] to confirm.
See page 13 for the operations during playback.
GAMMA
3D-NR
RE-MASTER
INTEGRATED
DNR
CONTRAST
BRIGHTNESS
COLOR
SHARPNESS
CANCEL
TIME SLIP
SKIP
SEARCH/SLOW
SETUP
STATUS
ABCD
ENTER
RETURN
SUB MENU
ONE TOUCH
RECEIVER
PLAY
AUDIO MUTING
P
O
P
-
U
P
M
E
N
U
D
I
S
P
L
A
Y
VOLUME
CH
TV/VIDEO
POWER
POWER
BD
VOLUME
PLAY
PAU SE
STOP
D
I
R
E
C
T
N
A
V
I
G
A
T
O
R
T
O
P
M
E
N
U
S
.
!
7
Multi-jog(➡ below)
Red
Green
Blue
Yellow
ENTER
NOTE

7
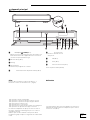
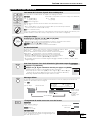
RQT8745
POWER button (
/I POWER
)
(➡ 12)
Press to switch the unit from on to standby mode or vice versa. In
standby mode, the unit is still consuming a small amount of
power.
Disc tray (➡ 12)
Display
IIlumination lamp
Lights when the unit is turned on.
Open/close disc tray (➡ 12)
. Search / Skip
Search: Press and hold
Skip: Press
Stop (➡ 12)
Pause (➡ 12)
Start play (➡ 12)
Rear panel terminals (➡ 8–10)
Batteries
Insert so the poles ( and ) match those in the remote control.
When closing the lid, insert it from the (minus) side.
Do not use rechargeable type batteries.
Do not mix old and new batteries.
Do not use different types at the same time.
Do not heat or expose to flame.
Do not take apart or short circuit.
Do not attempt to recharge alkaline or manganese batteries.
Do not use batteries if the covering has been peeled off.
Mishandling of batteries can cause electrolyte leakage which can
damage items the fluid contacts and may cause a fire.
Remove batteries if the remote control is not going to be used for a
long period of time. Store in a cool, dark place.
Use
If you cannot operate the unit or television using the remote control
after changing the batteries, please re-enter the codes (➡ 11).
Main unit
OPEN/CLOSE
POWER
.
POWER
OPEN/CLOSE
Using remote control
R6/LR6, AA
30
20
30
20
Remote control signal sensor
7 m (23 feet) directly in
front of the unit
Getting started Control reference guide
Getting started

8
RQT8745
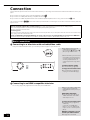
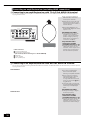
Connection
From the list below, please choose the connection method that fits your TV viewing environment best and follow the illustrations to connect your
player.
If you connect to a television using an included Audio/Video cable
➜
If you connect to an HDMI (➡ 29, Glossary) compatible television
➜
If you connect to an HDMI compatible television and an HDMI compatible amplifier/receiver to enjoy surround sound
➜
(➡ 9)
The connection examples (
) are the most commonly used methods for connecting the unit. For other connection methods, please see
pages 9 and 10.
Do not place the unit on amplifiers or equipment that may become hot. The heat can damage the unit.
Do not connect through the video cassette recorder
.
Due to copy guard protection, the picture may not display properly.
Turn off all equipment before connection and read the appropriate operating instructions.
Connect terminals of the same color.
Conserving power
This unit consumes a small amount of power even when it is turned off (less than 1 W). To save power when the unit is not to be used for a long
time, unplug it from the household AC outlet.
Please use HDMI cables that have the HDMI logo (as shown on the cover). It is recommended that you use Panasonic’s HDMI cable.
Recommended part number: RP-CDHG15 (1.5 m/4.9 ft.), RP-CDHG30 (3.0 m/9.8 ft.), RP-CDHG50 (5.0 m/16.4 ft.), etc.
Basic connections
Connecting to a television with an Audio/Video cable
Using the included Audio/Video cable, you can directly connect the player to your television set.
High definition video cannot be
output with this connection.
Use connection (➡ below) or
(➡ 9) for high definition video.
With audio cables, you can connect
these AUDIO OUT terminals to the
2-channel audio input terminals of
an analog amplifier/receiver or
system component to enjoy stereo
sound.
To improve picture quality
Use connections or (➡ 9).
To enjoy an even richer sound
Use connections or (➡ 10).
(Unplug the red and white plug.)
Connecting to an HDMI compatible television
You can enjoy high quality, digital video and audio with just one HDMI cable.
When you use 1080p (1125p) video
output, please use Panasonic
HDMI cables 5 meters (16.4 ft.) or
shorter.
NECESSARY SETTINGS
From the Setup menu (➡ 23), set
“HDMI Video Mode” and “HDMI
Audio Output” to “On”.
To enjoy an even richer sound
Use connections or (➡ 10)
additionally.
In this case, set “HDMI Video
Mode” to “On” and “HDMI Audio
Output” to “Off” in the Setup menu
(➡ 23).
With this connection, you can
use EZ Sync HDAVI Control
See page 18 for the details.
AUDIO IN
R L
VIDEO IN
AV OUT

9
RQT8745
(Continued on the next page)
Connecting to an HDMI compatible television and HDMI compatible
amplifier/receiver
You can connect the player to your HDMI compatible amplifier/receiver with an HDMI cable to enjoy digital surround sound along with
high quality digital video. Using an additional HDMI cable, you can connect the amplifier/receiver to your HDMI compatible television.
When you use 1080p (1125p) video
output, please use Panasonic
HDMI cables 5 meters (16.4 ft.) or
shorter.
When playing BD-Video, only LPCM
or Dolby Digital Plus (➡ 29,
Glossary) can be output as 7.1ch.
NECESSARY SETTINGS
From the Setup menu (➡ 23), set
“HDMI Video Mode” and “HDMI
Audio Output” to “On”
If the speaker setup cannot be
completed on the amplifier/
receiver, change multi channel
speaker settings by selecting “Multi
-
channel” in “Speaker” of
“Connection” tab (➡ 22).
If connecting to an amplifier/
receiver incompatible with HDCP
(➡ 29, Glossary), copy-protected
DVD-Audio cannot be output
through the HDMI terminal.
Connect to the amplifier/receiver
with audio cables (red and white),
coaxial cable, or optical digital
audio cable (➡ 10).
With this connection, you can
use EZ Sync HDAVI Control
See page 18 for the details.
Connection methods for using other video terminals
With S VIDEO IN
The S VIDEO OUT terminal achieves a more vivid picture than the VIDEO OUT terminal.
High definition video cannot be
output with this connection.
Use connection (➡ 8) or
(➡ above) for high definition video.
Unplug the yellow plug of Audio/
Video cable.
Actual video quality depends on
the television.
With COMPONENT VIDEO IN
These terminals can be used for either interlace or progressive output (➡ 29, Glossary) and provide a purer picture than the S VIDEO OUT
terminal.
Select “Darker” from the “Black
Level Control” (➡ 22, “Video” tab).
Unplug the yellow plug of Audio/
Video cable.
Regarding the high definition
video output
Some discs prohibit high definition
video output from COMPONENT
VIDEO OUT terminals. In this
case, video resolution is converted
and output as 480p.
To enjoy high definition/
progressive video
Connect to a progressive
compatible television.
From the Setup menu (➡ 22),
select “480p” , “720p” or “1080i” in
“Component Video Resolution” of
“Connection” tab.
From the Setup menu (➡ 23), set
“HDMI Video Mode” to “Off”.
Otherwise, the video is output as

10
RQT8745
Connecting an amplifier/receiver (excluding HDMI connection)
Connecting to an amplifier/receiver with 7.1ch/5.1ch AUDIO IN terminal
You can enjoy surround sound using the 7.1ch AUDIO OUT terminals. The 7.1ch AUDIO OUT terminals offer you another option for
enjoying surround sound.
This unit supports playback of
DVD-Video discs in surround
sound up to 5.1channels.
Depending on how the disc was
recorded, the audio may not be
output properly on the number of
channels desired.
When playing BD-Video, only
LPCM or Dolby Digital Plus can be
output as 7.1ch.
NECESSARY SETTINGS
If the speaker setup cannot be
completed on the amplifier/
receiver, change multi channel
speaker settings by selecting
“Multi-channel” in “Speaker” of
“Connection” tab (➡ 22).
Only when this unit is
connected to an HDMI
compatible television (➡ 8,)
From the Setup menu (➡ 23), set
“HDMI Audio Output” to “Off”.
Otherwise, audio is output as two
channels only, and also output
from the television’s speakers.
Cable connections
Surround speaker (L/R)
Surround back speaker (L/R)
(Not necessary when connecting to 5.1 channel AUDIO IN)
! Subwoofer
" Center speaker
# Front speaker (L/R)
Connecting to an amplifier/receiver with DIGITAL AUDIO IN terminal
You can enjoy surround sound using the DIGITAL AUDIO OUT terminals. The DIGITAL AUDIO OUT terminals offer you another option for
enjoying surround sound.
With COAXIAL IN
You cannot use DTS Digital
Surround decoders (➡ 29,
Glossary) incompatible with DVD.
Even if using this connection,
output will be only 2 channels
when playing DVD-Audio.
To enjoy multi-channel surround
sound, use connections (➡ 9)
or (➡ above).
If the audio track of the disc was
recorded with Dolby Digital Plus, it
will be output as Dolby Digital
audio.
NECESSARY SETTINGS
Change the settings in “Digital
Audio Output” (➡ 22).
Only when this unit is
connected to an HDMI
compatible television (➡ 8,)
From the Setup menu (➡ 23), set
“HDMI Audio Output” to “Off”.
Otherwise, the sound may not be
output with the desired settings.
With OPTICAL IN
Manufactured
S VIDEO
OUT
VIDEO OUT
Please connect
directly to TV.
COMPONENT
VIDEO OUT
DIGITAL AUDIO
OUT
(PCM/BITSTREAM)
COAXIAL
OPTICAL
2ch AUDIO OUT
7.1ch AUDIO OUT
L
1
2
R
FRONT R /R
CENTER
SUBWOOFER
SURROUND
R
L
SURROUND
BACK
R
L
FRONT L /L
PR
Y
P
B

11
RQT8745
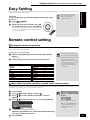
Easy Setting
After connecting your new player and pressing the power button, a screen will appear prompting you to perform setup for the basic settings.
Please follow the guide and perform setup.
Remote control setting
You can configure the remote control TV operation buttons to turn the television on/off, change the television input mode, select the television
channel and change the television volume.
Change the remote control code on the main unit and the remote control (the two must match) if you place other Panasonic products close
together. Use “1”, the factory set code, under normal circumstances.
Preparation
Turn on the television and select the appropriate video input on the
television.
Press [
BD POWER].
Setup screen appears.
Follow the on-screen instructions and make
the settings with [, , , ] and [ENTER].
“On-screen Language”, “TV Aspect” and “Speaker” are set.
You can also change their settings individually ( “Display”
and “Connection” tab ➡ 22).
You can perform this setup
anytime by selecting “Easy
Setting” in Setup menu
(➡ 21,“Setup” tab).
Setting the television operation
Point the remote control at the television.
While pressing [RETURN], enter the code with the numbered
buttons.
e.g., 01: [0] ➡ [1]
Test by turning on the television and changing channels.
If your television brand has more
than one code listed, select the
one that allows correct operation.
If your television brand is not listed
or if the code listed for your
television does not allow control of
your television, this remote control
is not compatible with your
television. Use the television’s
remote control.
Manufacturer and Code No
Panasonic
National
QUASAR
01/02
PHILIPS (RC-5) 03
RCA 05
SAMSUNG 14/18/19
FISHER 10 SANYO 10
GE 05 SHARP 06/07
GOLDSTAR 15/16/17 SONY 08
HITACHI 12 SYLVANIA 03
JVC 11 THOMSON 05
LG 15/16/17 TOSHIBA 09
MAGNAVOX 03 ZENITH 04
MITSUBISHI 13
When other Panasonic products respond to this remote control
Press [SETUP].
Press [
,
] to select “Setup” and press [
].
Press [
,
] to select “Remote Control Code” and press
[ENTER].
Press [
,
] to select the code (1, 2, or 3) and press [ENTER].
To change the code on the remote control
While pressing [ENTER], press and hold the numbered button ([1],
[2] or [3]) for more than 2 seconds.
Press [ENTER].
When the following indicator
appears on the unit’s display
and you are unable to operate
the unit
Press and hold [ENTER] and the
indicated
number button at the
same time for more than 2
seconds.
ENTER
TIPS
NOTE
Setup
Remote Control Code
Press
“
n
”
and
“
ENTER
”
together
for more than 2 seconds on the remote.
Disc
Setup
NOTE
D
R
The unit’s remote control code
Getting started Easy Setting / Remote control setting
Getting started

12
RQT8745
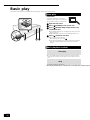
Basic play
Instructions for operations are generally described using the remote control in this manual.
Start play
Preparation
Turn on the television and select the
appropriate video input on the television
with the remote control for the television.
Open the front cover.
Press [
/I POWER] to turn on the unit.
Press [
OPEN/CLOSE] to open the disc tray
and load the disc.
Load double-sided discs so the label for the side you want to
play is facing up.
DVD-RAM: Remove discs from their cartridges before use.
Press [
](PLAY) to start play.
When a menu screen appears
➡ 15,Showing disc menu, step
If the screen prompting you to use the color buttons appears,
continue to operate with the color buttons on the remote
control.
VIDEO1
Basic playback control
Start play
It is not possible to play continuously from one side of a double
sided disc to the other. You will need to eject the disc and turn it
over.
Stop
The stopped position is memorized.
Resume play fu8.678 2.066 -2 1 Tf5.2F2 1 Tf40 -1.015 TD25-0.076 Tc.42009 Tw[-0.0s.1(2(u)128(s [F2 1 Tf7.47113TD0.0.0037 Tw<0070>Tj134 1 Tf0.6667TD0.10.0037 Tc1.0129 Tw.780s)-1]1 T7270(()-0.2PL)15.2Aou15.2)tftmefrttm9 s1(y15.2rt)-5.t fr15.2m

13
RQT8745
Other operations during play
Starting from a selected item
Play starts from the selected title, chapter or track.
[MP3] [JPEG]
e.g., 5: [0] ➡ [0] ➡ [5]
15: [0] ➡ [1] ➡ [5]
Other discs (You can select a track with DVD-Audio.)
e.g., 5: [0] ➡ [5]
15: [1] ➡ [5]
[DVD-A] Selecting groups
While stopped (screen saver is displayed on the television ➡ right)
e.g., 5: [5]
This works only when stopped (screen saver is displayed on the television ➡ right) with some
discs.
[VCD] (with playback control)
If you press the numbered buttons while stopped (the above screen saver is displayed on the television) you can
cancel playback control. (Elapsed play time appears on the unit’s display.)

14
RQT8745
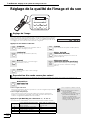
Adjusting picture and sound quality
The purpose of the Re-master function is to add audio to portions of a track where audio was not recorded, or to reproduce audio signals that
were lost in a natural, rich manner.
GAMMA
3D-NR
RE-MASTER
INTEGRATED
DNR
CONTRAST
BRIGHTNESS
COLOR
SHARPNESS
Adjusting the picture
During video playback, pressing each of the following buttons will display the
corresponding on-screen adjustment as shown in the illustration on the right. Adjustments
are made in units of 1 each time the button is pressed. You can also make the same
adjustments by pressing the left or right cursor keys.
Press the buttons below.
Contrast
Increases the contrast between light and dark parts
of the picture (7 to 7).
Gamma
Adjusts the brightness of dark portions of the screen
(0 to 5).
Brightness
Brightens the picture (0 to 15).
3D-NR (Noise Reduction)
Reduces the rough noise in the background to give
a greater feeling of depth (0 to 4).
Sharpness
Adjusts the sharpness of the edges of the horizontal
lines (6 to 6).
Integrated DNR
(Digital Noise Reduction)
Smooths block noise and reduces the smudging
that appears around contrasting sections of the
picture (0 to 3).
Color
Adjusts the shade of the picture’s color
(7 to 7).
Contrast
0
CONTRAST
GAMMA
BRIGHTNESS
3D-NR
SHARPNESS
INTEGRATED
DNR
COLOR
Reproducing more natural audio
Re-master
[DVD-V]
[DVD-VR]
[CD]
During multi-channel output
This feature reproduces the frequencies lost during recording to give you a sound closer
to the original.
During 2 ch output
This feature gives you a more natural sound by adding higher frequency signals not
recorded on the track. (For example, playing DVD-Video recorded with 48 kHz at 96 kHz.)
Press [RE-MASTER] to select “1”, “2” or “3”.
“Re-Master” has three different modes. Select the one that you like best.
Tracks recorded with 48 kHz only
This may not work depending on the
disc’s recording.
When connecting with DIGITAL
AUDIO OUT terminal, the actual
output sampling frequency depends
on “Digital Audio Output” setting in
“Audio” tab (➡ 22).
RE-MASTER
Setting
When playing LPCM sound
Type of music
Other types of sound
Effect level
1 High tempo (e.g., pop and rock) Light
2 Various tempos (e.g., jazz) Medium
3 Low tempo (e.g., classical) Strong
Off Off Off
NOTE
Playback Adjusting picture and sound quality

15
RQT8745
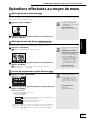
Operations using menu screen
Showing Pop-up menu[BD-V]
The Pop-up menu is a special feature available with some BD-Video discs. This menu may be different depending on discs, and selectable
items may differ as well. For more information on how to operate the menu on your BD-Video discs please read the operating instructions that
came with the disc.
.
Press [POP-UP MENU].
Press [, , , ] to select the item and press [ENTER].
Pop-up menu also appears by
pressing [SUB MENU] and
selecting “Pop-up menu”.
To exit the screen
Press [POP-UP MENU].
Showing disc menu [BD-V] [DVD-V] [DVD-A] [VCD]
This menu may be different depending on discs, and selectable items may differ as well. For more information on how to operate the menu on
your discs, please read the operating instructions that came with the disc.
Press [TOP MENU].
[VCD]
Press [RETURN] while playing.
Press [, , , ] to select the item and press [ENTER].
[VCD]
Press the numbered buttons to select the item.
e.g., 5: [0] ➡ [5] 15: [1] ➡ [5]
With playback control
Using the sub menu to show
menu screen
Press [SUB MENU].
Sub menu appears on the
screen.
Press [, ] to select “Pop-up
menu”, “Top menu” or “Menu”
and press
[ENTER].
Items differ depending on the
disc type playing.
To exit the screen
Press [TOP MENU].
Playing programs with the menu screen[DVD-VR]
Press [DIRECT NAVIGATOR].
Press [, , , ] to select
the program and press
[ENTER].
Press [, ] to show other
pages.
If “Album View” or “Picture View”
screen is displayed, press the “A”
button to switch to the “Title View”
screen.
To exit the screen
Press [DIRECT NAVIGATOR] .
Using the sub menu
While the above screen is displayed
Press [SUB MENU].
The sub menu appears.
Press [, ] to select
the item and press
[ENTER].
Only when “View Chapters” or “View Playlists” is selected
Press [, , , ] to select the item and press [ENTER].
Next
Previous
e.g.,
TIPS
SPECIAL FEATURESSCENE SELECTION
LANGUAGESPLAY MOVIE
e.g.,
TIPS
Previous
02/02
Next

16
RQT8745
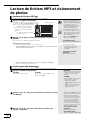
Playing MP3 files and still pictures
You can play MP3 files recorded onto a CD-R/RW.
You can play still pictures recorded onto a DVD-RAM and CD-R/RW.
Playing MP3 files [MP3]
Press [DIRECT NAVIGATOR].
Press [, ] to select the track and press [ENTER].
Play starts on the selected track.
When the JPEG Menu is displayed,
perform steps below.
1 Press [DIRECT NAVIGATOR] to
exit menu screen.
2 Set “Mixed Disc—Audio &
Pictures” to “MP3”
(
➡ 21, “Disc”
tab
).
You can also select the track with
the numbered buttons. (➡ 13,
Starting from a selected item)
Press [, ] to show other
pages.
To exit the screen
Press [DIRECT NAVIGATOR].
Showing list of groups
While the file list (above) is displayed
Press [] while a track is highlighted to display the tree screen.
Press [, ] to select a group and press [ENTER].
The file list for the group appears.
You cannot select groups that
contain no compatible files.
To return to the previous
screen
Press [RETURN].
Playing still pictures [JPEG]
Press [DIRECT NAVIGATOR].
DVD-RAM
When “Title View” screen is
displayed, press the “B” button to
switch to the “Album View” screen.
CD-R/RW
When the MP3 Menu is displayed,
perform steps below.
1 Press [DIRECT NAVIGATOR] to
exit menu screen.
2 Set “Mixed Disc—Audio &
Pictures” to “Pictures” (➡ 21,
“Disc” tab).
DVD-RAM
“Album View” screen is displayed
CD-R/RW
“Picture View” screen is displayed
➡ Go step
Press [, , , ] to select the album and press [ENTER].
Press [, ] to display the
previous or next still picture.
Useful functions during still picture
play (
➡
17).
To select the still pictures in
another folder (
➡
17)
You can also select the still
pictures with the numbered
buttons. (➡ 13, Starting from a
selected item)
To return to the previous
screen
Press [RETURN].
To exit the screen
Press [DIRECT NAVIGATOR].
Press [, , , ] to select the still picture and press [ENTER].
001 Both Ends Freezing
002 Lady Starfish
003 Life on Jupiter
004 Metal Glue
005 Paint It Yellow
006 Pyjamamama
007 Shrimps from Mars
008 Starry Blue
009 Velvet Cuppermine
010 Ziggy Starfish
Page 001/024
1
1 : My favorite
2
3
4
5
6
7
8
9
10
Total Track
Tree
G 1
T 8
Total
8/111
Menu
0 – 9
No.
GroupNo.
Prev.
Next
ENTER
G
: Group No.
T
: Track No. in the group
Total
: Track No./Total tracks in all
groups
Files are treated as tracks and folders
are treated as groups.
Selected group
“” indicates the track currently playing.
NOTE
TIPS
Tree
G 7/25
001 My favorite
001 Brazilian pops
002 Chinese pops
003 Czech pops
004 Hungarian pops
005 Liner notes
006 Japanese pops
007 Mexican pops
008 Philippine pops
009 Swedish pops
001 Momoko
002 Standard number
001 Piano solo
002 Vocal
Menu
No.
G8
T 14
Total
40/111
MP3 music
0 – 9
ENTER
Selected group No. /Total groups
If the group has no track, “– –” is
displayed as group number.
NOTE
TIPS
NOTE

17
RQT8745
Useful functions during still picture play
Start Slideshow
You can display still pictures one by one at a constant interval.
While the “Album View” (DVD-RAM) or “Picture View” (CD-R/RW) screen is displayed
Press [, , , ] to select the album (for DVD-RAM) or “Folder” (for CD-R/RW) and press [SUB MENU].
Press [, ] to select “Start Slideshow” and press [ENTER].
DVD-RAM only
You can also start slideshow by pressing [] (PLAY) after selecting the album
Slideshow settings
To change the display interval
While the “Album View” (DVD-RAM) or “Picture View” (CD-R/RW) screen is displayed
Press [, , , ] to select the album (for DVD-RAM) or “Folder” (for CD-R/RW) and press [SUB MENU].
Press [, ] to select “Slideshow settings” and press [ENTER].
Press [, ] to select “Display Interval” and press [, ] to select the desired interval (0–30 seconds) and press [ENTER].
To repeat slideshow
After step above
Press [, ] to select “Repeat Play” and press [, ] to select “On” or “Off” and press [ENTER].
Rotate
While playing
Press [SUB MENU].
Press [, ] to select “Rotate Right” or “Rotate Left” and press [ENTER].
The rotation information will not be stored.
Zoom in/Zoom out
This function is only available for still pictures smaller than 640480 pixels.
While playing
Press [SUB MENU].
Press [, ] to select “Zoom in” and press [ENTER].
To return the picture to its original size, press [, ] to select “Zoom out” in step and press [ENTER].
When zooming in, the picture may be cut off.
The enlargement information will not be stored.
To select the still pictures in another folder
DVD-RAM
To switch to another higher folder
(Only if there is a multiple number of higher folders recognizable)
While the “Album View” screen is displayed
Press [SUB MENU].
Press [, ] to select “Select Root folder” and press [ENTER].
Press [, ] to select the higher folder and press [ENTER].
CD-R/RW
While the “Picture View” screen is displayed
Press [, , , ] to select “Folder” and press [ENTER].
Press [, ] to select the folder and press [ENTER].
Select folder to access.
Press ENTER to confirm.
Select Root folder
\DCIM
001
Folder 100__DVD
002 003 004
0005 0006 0007 008
Pictures Menu Picture View
CD (JPEG)
F 1/3
021216_0026
103_DVD
104_DVD
To show the picture properties
While playing
Press [STATUS] twice.
To exit the picture properties screen, press [STATUS].
Folder - Picture
# : 102 - 0001
Date: 11 / 12 / 2005 No. : 3 / 9
Shooting date
e.g. JPEG on DVD-RAM
Playback Playing MP3 files and still pictures
Playback

18
RQT8745
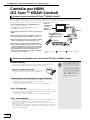
Control with HDMI
(EZ Sync
TM
HDAVI Control)
EZ Sync HDAVI Control is a convenient function that offers linked operations of this unit, and a Panasonic television (VIERA) or amplifier/receiver
under EZ Sync HDAVI Control.You can use this function by connecting the equipment with the HDMI cable. See the operating instructions for
connected equipment for operational details.
It is recommended that you use Panasonic’s HDMI cable.
Recommended part number:
RP-CDHG15 (1.5 m/4.9 ft.), RP-CDHG30 (3.0 m/9.8 ft.),
RP-CDHG50 (5.0 m/16.4 ft.), etc.
Non-HDMI-compliant cables cannot be utilized.
After connecting the unit to a television using an HDMI cable,
set “Ctrl with HDMI” to “On” (➡ 23).
Set the EZ Sync HDAVI Control operations on the connected
equipment (e.g., television).
Turn on all EZ Sync HDAVI Control compatible equipment, turn
the television off and on, and then select this unit’s input
channel on the connected television so that the EZ Sync HDAVI
Control function works properly. Also when the connection or
settings are changed, repeat this procedure.
What is EZ Sync HDAVI Control?
Functions made possible with EZ Sync HDAVI Control are...
One touch play
You can turn on this unit, television and amplifier/receiver, and start playing the disc in the
play position with a single press of a button.
Press [ONE TOUCH PLAY].
When operating, point the remote control at the remote control
signal sensor on the main unit.
Automatic input switching
When the following operations are performed the television will automatically switch the
input channel and displays the corresponding action.
–When play starts on the unit
–When an action that uses the display screen is performed (e.g., Direct Navigator screen)
Power on link
When the television is off and the following operations are performed, the television will
automatically turn on and displays the corresponding action.
–When play starts on the unit
–When an action that uses the display screen is performed (e.g., Direct Navigator screen)
Power off link
All connected equipment compatible with EZ Sync HDAVI Control including this unit
automatically turns off when you switch the television off.
This unit automatically turns off even during playback or any other operation.
Only this unit turns off when you press the power button of the unit or the remote control
for shutting it down. Other connected equipment compatible with EZ Sync HDAVI Control
stays on.
When [ONE TOUCH PLAY] or
[] (PLAY) is pressed on this unit
for “Automatic input switching” or
“Power on link”, the playback
image is not immediately displayed
on the screen and it may not be
possible to watch the contents from
where playback started.
In this case, press [] or []
to go back to where playback
started.
AV OUT
Please see page 8 (connection ) or 9 (connection ) for detailed
setup.
HDMI IN
HDMI AV OUT
This unit
EZ Sync HDAVI
Control
compatible
television
HDMI OUT
HDMI IN
EZ Sync HDAVI
Control compatible
amplifier/receiver
ONE TOUCH
PLAY
NOTE

19
RQT8745
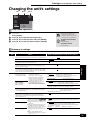
Changing settings with the On-screen
menu
The On-screen menu is a menu that appears on screen, regardless of whether a disc
is being played or stopped, when [DISPLAY] is pressed. The On-screen menu allows
you to turn subtitles on or off, switch audio tracks, and change a variety of other
settings.
(Continued on the next page)
What is On-screen menu?
On-screen menu operations
Press [DISPLAY] to show On-screen menu.
Press [, ] to select the menu and press [].
Press [, ] to select the item and press [].
Press [, ] to select the setting.
Depending on the condition of the
unit (playing, stopped, etc.) and
disc contents, there may be some
items that you cannot select or
change.
Some items can be changed by
pressing [ENTER].
To exit the On-screen menu
Press [DISPLAY].
What you can change with On-screen menu
Menus Items Settings and details
Disc
Soundtrack
[BD-V] [DVD-V] [DVD-A]
Select the audio and language (➡ below, Language, Audio attribute).
[DVD-VR]
The disc’s audio attributes appear (➡ below, Audio attribute).
[VCD] (SVCD)
Select the soundtrack number.
Soundtrack numbers are displayed even when there is only one audio type.
Subtitle
[BD-V] [DVD-V]
Turn the subtitle on/off and select the language (➡ below, Language).
[DVD-VR]
(Only discs that contain subtitle on/off information)
Turn the subtitle on/off.
[VCD] (SVCD)
Turn the subtitle on/off and select the subtitle number.
Subtitle numbers are displayed even if there are not multiple subtitles.
Subtitle Style [BD-V]
Select the subtitle style.
PBC
(Playback control
➡
29)
[VCD]
Indicates whether menu play (playback control) is on or off.
Audio channel [DVD-VR] [VCD]
➡ 13, Changing audio during play
Angle
[BD-V] [DVD-V]
Change the number to select an angle.
Still-P
(Still picture)
[DVD-A]
Selects the play method for still pictures.
Slide Show: Plays according to the default order on the disc.
Page: Select the still picture number and play.
Random: Plays in random order.
Return: Returns to the default still picture on the disc.
You may have to use the menus on the disc to make changes (➡ 15).
Language Audio attribute
ENG: English
FRA: French
DEU: German
ITA: Italian
ESP: Spanish
NLD: Dutch
SVE: Swedish
NOR: Norwegian
DAN: Danish
POR: Portuguese
RUS: Russian
JPN: Japanese
CHI: Chinese
KOR: Korean
MAL: Malay
VIE: Vietnamese
THA: Thai
POL: Polish
CES: Czech
SLK: Slovak
HUN: Hungarian
FIN: Finnish
: Others
LPCM/PPCM/Digital/Digital +/
TrueHD/DTS-HD/DTS/MPEG
Signal type
ch (channel) Number of channels
k (kHz) Sampling frequency
b (bit) Number of bits
Disc
Video
Audio
Other
Play
Soundtrack
Subtitle
1
Audio channel
Off
Stereo
§Digital 2/0ch
Menus Items Settings
NOTE
TIPS
Settings Changing settings with the On-screen menu
Settings
Playback

20
RQT8745
Menus Items Settings and details
Play
Repeat play (Only when the elapsed time is being displayed on the unit display.)
Selects the item which you want to repeat. The items displayed differ depending on the type of
disc.
All Entire disc
Chapter Chapter
Group Entire group
PL Playlist
Title Title (DVD-Video, etc.)
Tra ck Track
Off
Select “Off” to cancel.
Video
Picture
[BD-V] [DVD-V] [DVD-VR] [VCD]
Select the picture quality mode during play.
Normal
:
Default setting
Soft
:
Soft picture with fewer video artifacts
Fine
:
Details are sharper
Cinema
:
Mellows movies, enhances detail in dark scenes.
User
:
You can make further adjustments.
Press [, , , ] to select “Picture adjustment” and press [ENTER].
If the video adjustment buttons on the remote control are used, the setting is
automatically changed to “User”.
Contrast
:
Brightness
:
Sharpness
:
Color
:
Gamma: 3D Noise Reduction: Integrated DNR:
➡ For details, see page 14
DNR [BD-V] [DVD-V] [DVD-VR] [VCD]
Reduces mosaic-like distortion and picture degradation.
On ↔ Off
Progressive
Select “On” to enable progressive output.
Depending on the type of television used, the video may be stretched horizontally when video
is output in progressive mode. When this occurs, select “Off” and the video will then be
output as “480i”.
This setting will be fixed to “On” if you connect with an HDMI cable and set “HDMI Video
Mode” to “On” (➡ 23, “HDMI” tab).
When progressive output is on, closed captions cannot be displayed.
Transfer
[When “Progressive” (➡ above) is set to “On”.]
Select the method of conversion for progressive output to suit the type of material being played
(➡ 29, Glossary, Film and video).
Auto1 (normal)
:
Automatically detects the film and video content, and appropriately converts
it.
Auto2
:
In addition to “Auto1”, automatically detects film contents with different
frame rates and appropriately converts it.
Video
:
Select when using “Auto1” and “Auto2”, and the content is distorted.
4:3 Aspect [BD-V] [DVD-V] [DVD-VR] [VCD]
You can select how images made for 4:3 aspect screens are displayed on a 16:9 aspect
television.
Zoom: Makes 4:3 letterbox video expand to full screen on a wide screen television (16:9).
Normal: The picture is displayed as a 4:3 ratio image in the center of the screen.
Audio
V. Surround Sound [DVD-V] [DVD-VR]
(Dolby Digital with 2 channels or more only)
Enjoy a surround-like effect if you are using two front speakers only.
Emphasis
Natural
Off
Turn V. Surround Sound off if it causes distortion.
Do not use in combination with surround effects on other equipment.
V. Surround Sound does not work for bilingual recordings.
Dialog Enhancer [BD-V] [DVD-V] [DVD-VR]
(Dolby Digital with 3 channels or more only, including a center channel)
The volume of the center channel is raised to make dialog easier to hear.
On ↔ Off
Re-master [DVD-V] [DVD-VR] [CD]
1–3, Off
(➡ 14, Reproducing more natural audio)
Digital Filter When audio is output from 2ch or 7.1ch AUDIO OUT terminals (➡8–10)
Normal: A clear timbre.
Slow: Gives music atmosphere, with softness and a feeling of depth.
Other
Position Select the position of the On-screen menu.
1 (Standard): Highest
to
5 : Lowest
Only when you have selected “480p”, “720p”, “1080i” in “Component Video Resolution” (➡ 22 “Connection” tab)
Settings Changing settings with the On-screen menu
La page est en cours de chargement...
La page est en cours de chargement...
La page est en cours de chargement...
La page est en cours de chargement...
La page est en cours de chargement...
La page est en cours de chargement...
La page est en cours de chargement...
La page est en cours de chargement...
La page est en cours de chargement...
La page est en cours de chargement...
La page est en cours de chargement...
La page est en cours de chargement...
La page est en cours de chargement...
La page est en cours de chargement...
La page est en cours de chargement...
La page est en cours de chargement...
La page est en cours de chargement...
La page est en cours de chargement...
La page est en cours de chargement...
La page est en cours de chargement...
La page est en cours de chargement...
La page est en cours de chargement...
La page est en cours de chargement...
La page est en cours de chargement...
La page est en cours de chargement...
La page est en cours de chargement...
La page est en cours de chargement...
La page est en cours de chargement...
La page est en cours de chargement...
La page est en cours de chargement...
La page est en cours de chargement...
La page est en cours de chargement...
La page est en cours de chargement...
La page est en cours de chargement...
La page est en cours de chargement...
La page est en cours de chargement...
La page est en cours de chargement...
La page est en cours de chargement...
La page est en cours de chargement...
La page est en cours de chargement...
La page est en cours de chargement...
La page est en cours de chargement...
La page est en cours de chargement...
La page est en cours de chargement...
-
 1
1
-
 2
2
-
 3
3
-
 4
4
-
 5
5
-
 6
6
-
 7
7
-
 8
8
-
 9
9
-
 10
10
-
 11
11
-
 12
12
-
 13
13
-
 14
14
-
 15
15
-
 16
16
-
 17
17
-
 18
18
-
 19
19
-
 20
20
-
 21
21
-
 22
22
-
 23
23
-
 24
24
-
 25
25
-
 26
26
-
 27
27
-
 28
28
-
 29
29
-
 30
30
-
 31
31
-
 32
32
-
 33
33
-
 34
34
-
 35
35
-
 36
36
-
 37
37
-
 38
38
-
 39
39
-
 40
40
-
 41
41
-
 42
42
-
 43
43
-
 44
44
-
 45
45
-
 46
46
-
 47
47
-
 48
48
-
 49
49
-
 50
50
-
 51
51
-
 52
52
-
 53
53
-
 54
54
-
 55
55
-
 56
56
-
 57
57
-
 58
58
-
 59
59
-
 60
60
-
 61
61
-
 62
62
-
 63
63
-
 64
64


Panasonic DMP-BD10 Manuel utilisateur
- Catégorie
- Lecteurs DVD
- Taper
- Manuel utilisateur
- Ce manuel convient également à
dans d''autres langues
- English: Panasonic DMP-BD10 User manual