Panasonic SB-HS100A Manuel utilisateur
- Catégorie
- Haut-parleurs de la barre de son
- Taper
- Manuel utilisateur

Operating Instructions
Manuel d’utilisation
Speaker System
Enceintes acoustiques
SB-HS100A
Model No. / Modèle
Before connecting, operating or adjusting this product,
please read the instructions completely. Please keep
this manual for future reference.
Dear customer
Thank you for purchasing this product.
For optimum performance and safety, please read
these instructions carefully.
The 2 speakers are the same.
Use these speakers as the surround speakers.
User memo:
DATE OF PURCHASE
DEALER NAME
DEALER ADDRESS
TELEPHONE NUMBER
The model number and serial number of this
product can be found on either the back or the
bottom of the unit.
Please note them in the space provided below and
keep for future reference.
MODEL NUMBER SB-HS100A
SERIAL NUMBER
Contents
Location ...............................................................2
Connections ........................................................3
Installation options ...............................................3
Notes ...................................................................5
Maintenance ........................................................5
Warranty (U.S.A.) ................................................6
Warranty (CANADA) ............................................7
Product service ....................................Back cover
Specifi cations ......................................Back cover
PP
RQT9195-Y
Avant de raccorder, régler ou utiliser l’appareil, il
est recommandé de lire attentivement le manuel
d’utilisation. Conserver ce manuel.
Cher client
Nous vous remercions d’avoir arrêté votre choix sur
cet appareil.
Pour en tirer un rendement optimal, lire attentivement
le présent manuel.
Les deux enceintes sont identiques.
Les utiliser comme enceintes ambiophoniques.
Homologation:
DATE D’ACHAT
DÉTAILLANT
ADRESSE DU DÉTAILLANT
Nº DE TÉLÉPHONE
Il est recommandé de noter, dans l’espace prévu ci-
dessous, le numéro de modèle et le numéro de série
inscrits à l’arrière, ou sous le fond de l’appareil, et
de conserver ce manuel pour référence ultérieure.
NUMÉRO DE MODÈLE SB-HS100A
NUMÉRO DE SÉRIE
Table des matières
Emplacement ......................................................2
Raccordements ...................................................3
Installations possibles ............................................3
Remarques ..........................................................5
Entretien ..............................................................5
Garantie (CANADA) ............................................7
Service après-vente ................ Couverture arrière
Données techniques ................ Couverture arrière

2
Location
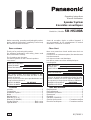
The front, center, and surround speakers should
be placed at approximately the same distance from
the listening position. The angles in the diagram are
approximate.
Front speakers (± left, ≤ right: not included)
Center speaker (≥: not included)
Active subwoofer (¥: not included)
A 5.1-channel surround sound
Surround speakers (μ left, ∂ right: SB-HS100A)
• Put the surround speakers to the side of or slightly
behind the seating area.
B 7.1-channel surround sound
Surround speakers (μ left, ∂ right: SB-HS100A)
• Install these speakers on the left and right sides of
the listening position.
Surround back speakers (
∑
left,
Â
right: SB-HS100A)
• Install the speakers 30 degrees behind the listening
position and about 1 meter above the listener’s
ears.
How you set up your speakers can affect the sound
fi eld. Note the following points.
• Place them on a fl at, level secure surface.
Use spacers or similar items to stop them from
rocking.
• Cover walls and windows with a thick curtain.
Emplacement
Positionner les enceintes avant, centrale et
ambiophoniques à une distance égale de la position
d’écoute. Les angles illustrés sont approximatifs.
Enceintes avant
(± gauche, ≤ droite : vendues séparément)
Enceinte centrale (≥: vendue séparément)
Enceinte d’extrêmes-graves avec amplifi cateur
(¥: vendue séparément)
A Confi guration ambiophonique 5.1 canaux
Enceintes ambiophoniques
(μ gauche, ∂ droite : SB-HS100A)
• Placer les enceintes ambiophoniques de chaque côté
de la position d’écoute ou légèrement derrière.
B Confi guration ambiophonique 7.1 canaux
Enceintes ambiophoniques
(μ gauche, ∂ droite : SB-HS100A)
• Installer ces enceintes à gauche et à droite de la
position d’écoute.
Enceintes ambiophoniques arrière
(∑ gauche, Â droite : SB-HS100A)
• Installer les enceintes derrière la position d’écoute
à un angle de 30° et à environ 1 m au-dessus du
niveau de l’oreille.
L’emplacement et le mode d’installation des enceintes
peuvent avoir un effet sur le champ sonore. Lire
attentivement les points suivants.
• Placer les enceintes sur une surface plate, de niveau
et sécuritaire. Utiliser des cales ou un objet similaire
pour éviter qu’elles ne basculent.
• Recouvrir les murs et les fenêtres d’un rideau
épais.

3
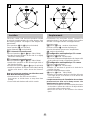
Connections
When using the optional Panasonic Blu-ray
disc home theater sound system SC-BT100
Connect to the optional Panasonic Wireless system
SH-FX67.
• Refer to the relevant operating Instructions for
details.
C Connect the speaker cable a to the speaker
terminals b.
a Speaker cable supplied with the wireless system
SH-FX67
c white d blue
Be sure to connect only positive wire c to positive
(+) terminal and negative wire d to negative (–)
terminal.
Press the spring lever to open the wire inlet, then insert
the lead before releasing the spring lever.
CAUTION
Never short-circuit positive (+) and negative (–)
speaker wires.
When using a receiver or amplifi er
Connect the speakers to a receiver or amplifi er
which has surround speaker terminals with an
impedance of 3 ohms.
The rated output of the receiver or amplifi er must not
exceed the input power of these speakers. You cannot
connect these speakers to any equipment other than
this amplifi er.
D Connect the speaker cable (not included) to
the speaker terminals b. (p see above)
Installation options
• Do not apply an unreasonable force to the net at the
front of the speaker unit. You cannot remove the front
net.
• Lay the speakers on a fl at surface over a soft cloth
when working on them.
Raccordements
Avec la chaîne cinéma maison avec lecteur
Blu-ray Disc
TM
SC-BT100 Panasonic
Raccorder le système sans fi l Panasonic SH-FX67
(pour liaison sans fi l) (vendu séparément)
• Consulter le manuel d’utilisation approprié pour plus
de détails.
C Connecter le câble de raccordement a de
l’enceinte aux prises b.
a Câble de raccordement fourni avec le système sans
fi l SH-FX67.
c blanc d bleu
S’assurer de raccorder uniquement le fi l positif c
à la borne positive (+) et le fi l négatif d à la borne
négative (–).
Pousser le levier pour ouvrir le passage du fi l, puis
insérer le fi l et relâcher le levier.
ATTENTION
Ne jamais court-circuiter les fi ls positif (+) et négatif (–)
du câble d’enceinte.
Avec un récepteur ou un amplifi cateur
Raccorder les enceintes à un récepteur ou à
un amplifi cateur doté de prises pour enceintes
ambiophoniques ayant une impédance de 3 ohms.
La puissance de sortie nominale du récepteur ou
de l’amplifi cateur ne doit pas être supérieure à la
puissance admissible des enceintes. Il ne faut pas
raccorder ces enceintes à tout équipement autre que
cet amplifi cateur.
D Connecter le câble de raccordement des
enceintes (vendu séparément) aux prises
pour enceintes b. (p voir ci-dessus)
Installations possibles
• Ne pas forcer la grille à l’avant de l’enceinte. Il est
impossible de retirer la grille.
• Coucher les enceintes sur une surface plane
recouverte d’un tissu doux.

4
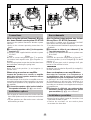
Installation options
Attaching to a wall
Detach the stand e.
f Remove the 3 screws.
Drive a screw g (not included) into the wall.
• Ensure that the screw g is positioned at least 70
mm (2-3/4″) away from the ceiling.
• h Ø7 to 9.4 mm (9/32″ to 3/8″)
The wall on which the speaker is to be mounted and
the screw g (not included) used for installing the
speaker must be strong enough to support a weight
of at least 10 kg (22 lb.). Consult the contractor in
charge of the work.
A screw which is at least 30 mm (1-3/16″) long (p
see above) is used when installing the speaker on
a wooden post or pillar. In all other cases, use a
screw which is strong enough to support a weight
of at least 10 kg (22 lb.).
CAUTION
Do not attach this speaker to walls or ceilings using
methods other than those described here.
Fit the speaker securely onto the screw with the hole.
i In this position, the speaker will likely fall if moved
to the left or right.
j Move the speaker so that the screw is in this
position.
Attaching a stabilizing wire
k Wire (not included) l
Approx. 150 mm (5-29/32″)
Drive a screw g (not included) into the wall. (p
see above (Attaching to a wall))
Attaching to speaker stands
Detach the stand. (p see above (Attaching to a wall))
m Speaker stands (not included)
n Plate thickness + 7 to 10 mm (9/32″ to 13/32″)
o Attach the stands with these holes.
Ensure the following conditions are met when you
purchase your speaker stands.
•
Observe the diameter and length of the screws and the
distance between screws as shown in the diagram.
Screw; diameter: 5 mm (3/16″), pitch: 0.8 mm (1/32″),
length: thickness of stand plate plus between 7 and
10 mm. Distance between the centers of the holes:
60 mm (2-3/8″)
•
The stands must be able to support over 10 kg (22 lb.).
• The stands must be stable even if the speakers are
in a high position.
Installations possibles
Fixation à un mur
Dégager le socle e.
f Retirer les trois vis.
Insérer une vis
g
(vendue séparément) dans le mur.
• S’assurer que la vis g est placée à une distance
d’au moins 70 mm (2 3/4 po) du plafond.
• h Ø7 à 9,4 mm (9/32 po
à
3/8 po)
Le mur sur lequel l’enceinte sera montée et la vis g
(non fournie) utilisée pour installer l’enceinte doivent
être assez solides pour supporter un poids d’au moins
10 kg (22 lb). Informez-vous auprès du contractant
responsable des travaux.
Une vis longue d’au moins 30 mm (1 3/16 po) (p
voir ci-dessus) est utilisée pour installer l’enceinte
sur un montant ou pilier de bois. Dans tous les
autres cas, utiliser une vis assez solide pour
supporter un poids d’au moins 10 kg (22 lb).
ATTENTION
Ne pas fi xer cette enceinte à un mur ou la suspendre
par des méthodes autres que celles décrites dans le
présent manuel.
Fixer l’enceinte au mur de façon sécuritaire en
insérant la vis dans le trou sur son panneau arrière.
i
Dans cette position, l’enceinte est susceptible de
tomber si elle déplacée vers la gauche ou la droite.
j Déplacer l’enceinte de manière que la vis soit dans
cette position.
Installation d’un fi l de stabilisation
k Fil (non fourni) l Environ 150 mm (5 29/32 po)
Insérer une vis
g
(vendue séparément) dans le mur.
(p
voir ci-dessus
(
Fixation à un mur
))
Fixation des enceintes sur un support
Dégager le socle. (p voir ci-dessus (Fixation à un mur))
m Supports (vendus séparément)
n
Épaisseur du support : 7 à 10 mm (9/32 po à 13/32 po)
o
Fixer le support aux orifi ces à l’arrière de l’enceinte.
Vérifi er les points suivants avant d’acheter des
supports pour enceintes:
•
Le diamètre, la longueur des vis ainsi que la distance
entre les vis doivent être comme illustré au schéma.
Les vis doivent avoir un diamètre de 5 mm (3/16 po) et un
pas de 0,8 mm (1/32 po). La longueur doit comprendre
l’épaisseur du support plus 7 à 10 mm. La distance entre
chaque orifi ce doit être de 60 mm (2 3/8 po).
•
Les supports doivent pouvoir supporter plus de 10 kg (22 lb).
• Les supports doivent être stables même lorsque les
enceintes sont placées en hauteur.

5
Notes
Speaker impedance and allowed input
Impedance 3 Ω
Input power 63 W (RATED)
CAUTION
The only receivers or amplifi ers you should connect
to these speakers are those whose rated output does
not exceed the above fi gures.
Using a receiver or amplifi er with higher ratings than
listed above can cause abnormal sounds to occur
because of excessive input, damage to the receiver
or speakers, and fi re. If equipment is damaged in any
way or unexpected trouble occurs during playback,
unplug the system from its outlet and call a servicenter
for assistance.
Protection circuitry
These units incorporate protection circuitry to protect
them from damage caused by excessive input or
abnormal signals; when excess input is detected, input
is automatically interrupted.
If sound is interrupted...
1. Reduce the volume of the receiver (or amplifi er).
2. Check the sound source and connections for any
problems.
If there is no problem, the protection circuitry will
reset in a few minutes.
After the protection circuit is reset...
Take care not to increase the receiver’s volume too
high.
Excessive input
You can damage your speakers and shorten their
life span if you keep the volume high over extended
periods.
Reduce the volume in the following cases to avoid
damage:
• When playing distorted sound.
• When the speakers are receiving howling from
a microphone or record player, noise from FM
broadcasts, or continuous signals from an oscillator,
test disc, or electronic instrument.
• When adjusting the sound quality.
• When turning the amplifi er on or off.
Other notes
These speakers do not have magnetic shielding.
Do not place it near a television set, PC, or other device
that is affected by magnetic fi elds.
Keep magnetized items away.
Magnetized cards, bank cards, commuter passes, etc.,
can be damaged if placed too closed to the speaker
magnets. Clocks may also be affected.
Avoid locations such as described below:
• In direct sunlight
• Near heating appliances or other sources of heat
• Where the humidity is high
Maintenance
Clean these units with a soft, clean, dry cloth.
• Never use alcohol, paint thinner, or benzine to clean
these units.
• Before using chemically treated cloth, read the
instructions that came with the cloth carefully.
Remarques
Impédance des enceintes et puissance
admissible
Impédance 3 Ω
Puissance admissible 63 W (nominale)
MISE EN GARDE
Seuls les amplifi cateurs ou récepteurs dont la puissance
de sortie nominale ne dépasse pas celle donnée ci-dessus
doivent être raccordés aux enceintes acoustiques.
L’utilisation d’un amplifi cateur ou d’un récepteur plus
puissant pourrait produire des sons anormaux en raison
d’entrée excessif, endommager les enceintes ou le
récepteur ou déclencher un incendie. Dans l’éventualité
d’un mauvais fonctionnement des appareils ou si ceux-
ci sont endommagés, les débrancher de la prise de
courant et contacter un centre de service agréé.
Circuit de protection
Les enceintes sont munies de circuits les protégeant
contre les dommages que peuvent causer un signal
d’entrée trop élevé ou anormal ; lorsqu’un signal trop
intense est détecté, l’acheminement du signal est
automatiquement coupé.
Dans le cas où le son est interrompu…
1.
Baisser le volume sur le récepteur ou l’amplifi cateur.
2. Vérifi er la source sonore et les raccordements. Si
aucun problème n’est détecté, le circuit de protection
sera réarmé dans quelques minutes.
Suite au réarmement du circuit de protection…
Veiller à ne pas trop monter le volume sur le récepteur.
Signal d’entrée excessif
Ne pas effectuer d’écoute à un niveau élevé pendant
une période prolongée car cela pourrait endommager
les enceintes et en réduire leur durée de vie.
Afi n de prévenir tout dommage aux enceintes, réduire
le volume dans les conditions suivantes:
• Lors de l’écoute avec distorsion.
•
Lors de la réception de siffl ement à cause d’un micro ou
d’un tournedisque, d’émissions sur la bande FM avec
interférence, ou de signaux continus en provenance d’un
oscillateur, instrument électrique ou disque d’essai.
• Lors du réglage de la qualité sonore.
•
Lors de la mise en ou hors contact de l’amplifi cateur.
Autres remarques
Ces enceintes ne possèdent pas de protection contre
les champs magnétiques.
Ne pas les placer près d’un téléviseur, d’un ordinateur
ou de tout autre périphérique qui pourrait être dérangé
par les champs magnétiques.
Éloigner les enceintes de tout objet magnétisé.
Les cartes magnétiques, cartes de guichet automatique,
etc., pourraient être endommagées si elles sont
placées à proximité de l’aimant d’une enceinte. Les
horloges peuvent aussi être affectées.
Éviter de placer les enceintes:
•
Dans un endroit exposé aux rayons solaires directs;
• Près d’une source de chaleur;
• Dans un endroit humide.
Entretien
Pour nettoyer l’appareil, utiliser un chiffon doux et sec.
• Ne jamais utiliser d’alcool, diluant pour peinture ni
de benzène pour nettoyer l’appareil.
•
Avant d’utiliser un chiffon traité chimiquement, lire
attentivement les directives sur l’emballage du chiffon.
La page est en cours de chargement...

7
(ONLY FOR CANADA)
Panasonic Canada Inc.
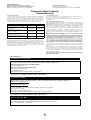
PANASONIC PRODUCT – LIMITED WARRANTY
Panasonic Canada Inc. warrants this product to be free from defects in material and workmanship and agrees to remedy any such defect for a period as stated below from the date of
original purchase.
Technics Audio Product One (1) year, parts and labour
Panasonic Portable / Clock Radio (without Tape, CD, MD) One (1) year, parts and labour
Panasonic Audio / SD Audio Product One (1) year, parts and labour
Panasonic DVD Product One (1) year, parts and labour
Panasonic Combination DVD Player / VCR One (1) year, parts and labour
Panasonic Combination DVD Recorder / VCR One (1) year, parts and labour
Accessories including rechargeable batteries Ninety (90) days
LIMITATIONS AND EXCLUSIONS
This warranty does not apply to products purchased outside Canada or to any product which has been improperly installed, subjected to usage for which the product
was not designed, misused or abused, damaged during shipping, or which has been altered or repaired in any way that affects the reliability or detracts from the
performance, nor does it cover any product which is used commercially. Dry cell batteries are also excluded from coverage under this warranty.
This warranty is extended to the original end user purchaser only. A purchase receipt or other proof of date of original purchase is required before warranty service is
performed.
THIS EXPRESS, LIMITED WARRANTY IS IN LIEU OF ALL OTHER WARRANTIES, EXPRESS OR IMPLIED, INCLUDING ANY IMPLIED WARRANTIES OF MER-
CHANTABILITY AND FITNESS FOR A PARTICULAR PURPOSE.
IN NO EVENT WILL PANASONIC CANADA INC. BE LIABLE FOR ANY SPECIAL, INDIRECT OR CONSEQUENTIAL DAMAGES.
In certain instances, some jurisdictions do not allow the exclusion or limitation of incidental or consequential damages, or the exclusion of implied warranties, so the
above limitations and exclusions may not be applicable.
WARRANTY SERVICE
FOR PRODUCT OPERATION ASSISTANCE, please contact:
Our Customer Care Centre: Telephone #: (905) 624-5505
1-800 #: 1-800-561-5505
Fax #: (905) 238-2360
Email link: “Customer support” on www.panasonic.ca
FOR PRODUCT REPAIRS, please locate your nearest Authorized Servicentre at www.panasonic.ca :
Link : "Servicentres
TM
locator" under "Customer support"
IF YOU SHIP THE PRODUCT TO A SERVICENTRE
Carefully pack and send prepaid, adequately insured and preferably in the original carton.
Include details of the defect claimed, and proof of date of original purchase.
Panasonic Canada Inc.
Certificat de garantie limitée Panasonic
Panasonic Canada Inc. garantit cet appareil contre tout vice de fabrication et accepte, le cas échéant, de remédier à toute défectuosité pendant la période indiquée ci-
dessous et commençant à partir de la date d'achat original.
Appareils audio Technics Un (1) an, pièces et main-d’œuvre
Radio-réveil / portative Panasonic (sans cassette, lecteur CD / MD) Un (1) an, pièces et main-d’œuvre
Appareils audio et appareils audio avec carte SD Panasonic Un (1) an, pièces et main-d’œuvre
Lecteurs DVD Panasonic Un (1) an, pièces et main-d’œuvre
Combiné lecteur DVD/magnétoscope Panasonic Un (1) an, pièces et main-d’œuvre
Combiné enregistreur DVD/magnétoscope Panasonic Un (1) an, pièces et main-d’œuvre
Accessoires incluant les piles rechargeables Quatre-vingt-dix (90) jours
LIMITATIONS ET EXCLUSIONS
Cette garantie n'est valide que pour les appareils achetés au Canada et ne couvre pas les dommages résultant d'une installation incorrecte, d'un usage abusif ou
impropre ainsi que ceux découlant d'un accident en transit ou de manipulation. De plus, si l'appareil a été altéré ou transformé de façon à modifier l'usage pour lequel
il a été conçu ou utilisé à des fins commerciales, cette garantie devient nulle et sans effet. Les piles sèches ne sont pas couvertes sous cette garantie.
Cette garantie est octroyée à l’utilisateur original seulement. La facture ou autre preuve de la date d’achat original sera exigée pour toute réparation sous le couvert de
cette garantie.
CETTE GARANTIE LIMITÉE ET EXPRESSE REMPLACE TOUTE AUTRE GARANTIE, EXPRESSE OU IMPLICITE, INCLUANT LES GARANTIES IMPLICITES DU
CARACTÈRE ADÉQUAT POUR LA COMMERCIALISATION ET UN USAGE PARTICULIER.
PANASONIC N’AURA D’OBLIGATION EN AUCUNE CIRCONSTANCE POUR TOUT DOMMAGE DIRECT, INDIRECT OU CONSÉCUTIF.
Certaines juridictions ne reconnaissent pas les exclusions ou limitations de dommages indirects ou consécutifs, ou les exclusions de garanties implicites. Dans de tels
cas, les limitations stipulées ci-dessus peuvent ne pas être applicables.
RÉPARATION SOUS GARANTIE
Pour de l’aide sur le fonctionnement de l’appareil, veuillez contacter
notre service à la clientèle au : N° de téléphone : (905) 624-5505
Ligne sans frais : 1-800-561-5505
N° de télécopieur : (905) 238-2360
Lien courriel : « Support à la clientèle » à www.panasonic.ca
Pour la réparation des appareils, veuillez consulter notre site www.panasonic.ca pour connaître le centre de service agréé le plus près de votre domicile :
Lien : « Centres de service » sous « support à la clientèle »
Expédition de l'appareil à un centre de service
Emballer soigneusement l'appareil, de préférence dans le carton d'origine, et l'expédier port payé et assuré au centre de service.
Inclure la description détaillée de la panne et la preuve de la date d'achat original.

Product service
1. Damage requiring service—The unit should be
serviced by qualifi ed service personnel if:
(a) The AC power supply cord or the plug has been
damaged; or
(b) Objects or liquids have gotten into the unit; or
(c) The unit has been exposed to rain; or
(d) The unit does not operate normally or exhibits a
marked change in performance; or
(e) The unit has been dropped or the cabinet
damaged.
2. Servicing—Do not attempt to service the unit beyond
that described in these operating instructions.
Refer all other servicing to authorized servicing
personnel.
3. Replacement parts—When parts need replacing
ensure the servicer uses parts specified by
the manufacturer or parts that have the same
characteristics as the original parts. Unauthorized
substitutes may result in fi re, electric shock, or other
hazards.
4. Safety check—After repairs or service, ask the
servicer to perform safety checks to confi rm that
the unit is in proper working condition.
Product information
For product information or assistance with product
operation:
In the U.S.A., refer to “Customer Services Directory”
on page 6.
In Canada, refer to “Limited Warranty” on page 7.
Specifi cations
Type 1 way 1 speaker system Bass-refl ex type
Speaker Woofer: 6.5 cm (2-1/2″) cone type x 1
Impedance 3 Ω
Input power (IEC) 125 W (MAX),
63 W (RATED)
Sound pressure level 80 dB/W (1.0 m)
Frequency range 84 Hz – 25 kHz (at –16 dB)
92 Hz – 22 kHz (at –10 dB)
Dimensions (W x H x D) 121 mm x 328 mm x 129 mm
(4-25/32″ x 12-15/16″ x 5-3/32″)
Mass Approx. 1.0 kg (2.2 lb.)
Note
Specifi cations are subject to change without notice.
-If you see this symbol-
Information on Disposal in other Countries
outside the European Union
This symbol is only valid in the European
Union.
If you wish to discard this product, please
contact your local authorities or dealer and
ask for the correct method of disposal.
Service après-vente
1. En cas de dommage—Confier l’appareil à un
technicien qualifi é dans les cas suivants:
(a) lorsque le cordon d’alimentation ou sa fi che a
été endommagé;
(b) lorsqu’un objet est tombé dans l’appareil ou si
ce dernier a été mouillé;
(c) lorsque l’appareil a été exposé à la pluie;
(d) lorsque l’appareil semble ne pas fonctionner
normalement ou que son rendement laisse à
désirer;
(e) lorsque l’appareil a subi un choc violent ou que
son coffret a été endommagé.
2. Réparation—Ne faire aucun réglage ni ajustement
autres que ceux décrits dans le présent manuel.
Confi er toute réparation à un centre de service
Panasonic agréé.
3. Pièces de rechange—S’assurer que le technicien
utilise des pièces de rechange recommandées par
le fabricant ou dont les caractéristiques sont les
mêmes. L’utilisation de pièces de rechange non
autorisées peut causer un incendie, des chocs
électriques ou d’autres dangers.
4. Vérifi cation de sécurité—Demander au technicien
qui a réparé l’appareil de soumettre ce dernier à des
vérifi cations pour s’assurer qu’il peut être utilisé en
toute sécurité.
Demande d’informations
Pour toutes réparations, renseignements ou conseils
sur le fonctionnement du produit:
Se reporter à “garantie limitée” à la page 7.
Données techniques
Type Enceinte 1 voies à 1 haut-parleurs (évent réfl ex)
Haut-parleur Graves: 6,5 cm (2 1/2 po) à cône x 1
Impédance 3 Ω
Puissance admissible (IEC) 125 W (MAX),
63 W (nominale)
Niveau de pression acoustique 80 dB/W (1,0 m)
Réponse en fréquence 84 Hz – 25 kHz (à –16 dB)
92 Hz – 22 kHz (à –10 dB)
Dimensions (L x H x P) 121 mm x 328 mm x 129 mm
(4 25/32 po x 12 15/16 po x 5 3/32 po)
Poids Environ 1,0 kg (2,2 lb)
Nota
Données sous réserve de modifi cations.
- Si ce symbole apparaît -
Information sur la mise au rebut dans les pays
n’appartenant pas à l’Union européenne
Ce symbole est uniquement valide dans
l’Union européenne.
Si vous désirez mettre ce produit au rebut,
contactez l’administration locale ou le
revendeur et informez-vous de la bonne
façon de procéder.
RQT9195-Y
M0308TK0
© 2008 Matsushita Electric Industrial Co., Ltd.
Printed in Malaysia / Imprimé en Malaisie
Panasonic Puerto Rico, Inc.
Ave. 65 de Infantería, Km. 9.5
San Gabriel Industrial Park,
Carolina, Puerto Rico 00985
Panasonic Canada Inc.
5770 Ambler Drive
Mississauga, Ontario L4W 2T3
www.panasonic.ca
Panasonic Consumer Electronics
Company, Division of Panasonic
Corporation of North America
One Panasonic Way Secaucus,
New Jersey 07094
http://www.panasonic.com
CfEn
-
 1
1
-
 2
2
-
 3
3
-
 4
4
-
 5
5
-
 6
6
-
 7
7
-
 8
8


Panasonic SB-HS100A Manuel utilisateur
- Catégorie
- Haut-parleurs de la barre de son
- Taper
- Manuel utilisateur
dans d''autres langues
- English: Panasonic SB-HS100A User manual
Documents connexes
-
Panasonic Speaker System SB-TP100 Manuel utilisateur
-
-
-
-
-
-
-
-
-
Panasonic DMPBD10 Le manuel du propriétaire