Porter Cable PC600JS Manuel utilisateur
- Catégorie
- Outils électroportatifs
- Taper
- Manuel utilisateur

CATALOG NUMBER
N° DE CATALOGUE
CATÁLOGO N°
PC600JS
Instruction manual
Manuel d’instructions
Manual de’instrucciones
www.portercable.com
INSTRUCTIVO DE OPERACIÓN, CENTROS DE
SERVICIO Y PÓLIZA DE GARANTÍA.
ADVERTENCIA: LÉASE ESTE INSTRUCTIVO
ANTES DE USAR EL PRODUCTO.
Thank you for choosing PORTER-CABLE! To register your new product, go to:
www.portercable.com/ServiceAndSupport/ProductRegistration.aspx
Merci d’avoir choisi PORTER-CABLE! Consulter le site Web www.portercable.
com/ServiceAndSupport/ProductRegistration.aspx pour enregistrer votre
nouveau produit.
Gracias por elegir PORTER-CABLE usted! Para registrar su nuevo producto,
visite: www.portercable.com / ServiceAndSupport / ProductRegistration.aspx
VS Orbital Jig Saw
Scie sauteuse orbitale à vitesse variable
Sierra caladora de acción orbital y
velocidad variable

2
SAFETY GUIDELINES - DEFINITIONS
It is important for you to read and understand this manual. The information it contains
relates to protecting YOUR SAFETY and PREVENTING PROBLEMS. The symbols
below are used to help you recognize this information.
DANGER: Indicates an imminently hazardous situation which, if not avoided,
will result in death or serious injury.
WARNING: Indicates a potentially hazardous situation which, if not avoided,
could result in death or serious injury.
CAUTION: Indicates a potentially haz ard ous situation which, if not avoided,
may result in minor or mod er ate injury.
NOTICE: Used without the safety alert symbol indicates potentially hazardous
situation which, if not avoided, may result in property damage.
GENERAL POWER TOOL SAFETY WARNINGS
WARNING: Read all safety warnings and all instructions. Failure to follow the
warnings and instructions may result in electric shock, fire and/or serious injury.
SAVE ALL WARNINGS AND INSTRUCTIONS FOR FUTURE REFERENCE
The term “power tool” in the warnings refers to your mains-operated (corded) power
tool or battery-operated (cordless) power tool.
1) WORK AREA SAFETY
a) Keep work area clean and well lit. Cluttered or dark areas invite accidents.
b)
Do not operate power tools in explosive atmospheres, such as in the presence of
flammable liquids, gases or dust. Power tools create sparks which may ignite the dust or fumes.
c) Keep children and bystanders away while operating a power tool.
Distractions can cause you to lose control.
2) ELECTRICAL SAFETY
a) Power tool plugs must match the outlet. Never modify the plug in any
way. Do not use any adapter plugs with earthed (grounded) power tools.
Unmodified plugs and matching outlets will reduce risk of electric shock.
b) Avoid body contact with earthed or grounded surfaces such as pipes, radiators,
ranges and refrigerators. There is an increased risk of electric shock if your body is
earthed or grounded.
c) Do not expose power tools to rain or wet conditions. Water entering a power
tool will increase the risk of electric shock.
d) Do not abuse the cord. Never use the cord for carrying, pulling or
unplugging the power tool. Keep cord away from heat, oil, sharp edges or
moving parts. Damaged or entangled cords increase the risk of electric shock.
e)
When operating a power tool outdoors, use an extension cord suitable for
outdoor use. Use of a cord suitable for outdoor use reduces the risk of electric
shock.
f)
If operating a power tool in a damp location is unavoidable, use a ground fault circuit
interrupter (GFCI) protected supply. Use of a GFCI reduces the risk of electric shock.
3) PERSONAL SAFETY
a) Stay alert, watch what you are doing and use common sense when
operating a power tool. Do not use a power tool while you are tired or under
the influence of drugs, alcohol or medication. A moment of inattention while
operating power tools may result in serious personal injury.
b) Use personal protective equipment. Always wear eye protection. Protective
equipment such as dust mask, nonskid safety shoes, hard hat, or hearing
protection used for appropriate conditions will reduce personal injuries.
c) Prevent unintentional starting. Ensure the switch is in the off position before
connecting to power source and/ or battery pack, picking up or carrying
the tool. Carrying power tools with your finger on the switch or energizing power
tools that have the switch on invites accidents.
d)
Remove any adjusting key or wrench before turning the power tool on. A wrench
or a key left attached to a rotating part of the power tool may result in personal injury.
e) Do not overreach. Keep proper footing and balance at all times. This enables

3
better control of the power tool in unexpected situations.
f)
Dress properly. Do not wear loose clothing or jewelry. Keep your hair, clothing and gloves
away from moving parts. Loose clothes, jewelry or long hair can be caught in moving parts.
g)
If devices are provided for the connection of dust extraction and collection facilities, ensure
these are connected and properly used. Use of dust collection can reduce dust-related hazards.
4) POWER TOOL USE AND CARE
a)
Do not force the power tool. Use the correct power tool for your application.
The correct power tool will do the job better and safer at the rate for which it was
designed.
b) Do not use the power tool if the switch does not turn it on and off. Any power
tool that cannot be controlled with the switch is dangerous and must be repaired.
c) Disconnect the plug from the power source and/or the battery pack from the
power tool before making any adjustments, changing accessories, or storing
power tools. Such preventive safety measures reduce the risk of starting the
power tool accidentally.
d) Store idle power tools out of the reach of children and do not allow persons
unfamiliar with the power tool or these instructions to operate the power
tool. Power tools are dangerous in the hands of untrained users.
e) Maintain power tools. Check for misalignment or binding of moving parts, breakage
of parts and any other condition that may affect the power tool’s operation. If
damaged, have the power tool repaired before use. Many accidents are caused by
poorly maintained power tools.
f) Keep cutting tools sharp and clean. Properly maintained cutting tools with sharp
cutting edges are less likely to bind and are easier to control.
g) Use the power tool, accessories and tool bits, etc. in accordance with these
instructions, taking into account the working conditions and the work to be
performed. Use of the power tool for operations different from those intended could
result in a hazardous situation.
5) SERVICE
a)
Have your power tool serviced by a qualified repair person using only identical
replacement parts. This will ensure that the safety of the power tool is maintained.
JIG SAW SAFETY WARNINGS
•Hold power tool by insulated gripping surfaces, when performing an operation
where the cutting accessory may contact hidden wiring. Cutting accessory
contacting a “live” wire may make exposed metal parts of the power tool “live” and
could give the operator an electric shock.
•Use clamps or another practical way to secure and support the workpiece to
a stable platform. Holding the work by hand or against your body leaves it unstable
and may lead to loss of control.
•Keep hands away from cutting area. Never reach underneath the material for any
reason. Hold front of saw by grasping the contoured gripping area. Do not insert
fingers or thumb into the vicinity of the reciprocating blade and blade clamp. Do not
stabilize the saw by gripping the shoe.
• Keep blades sharp. Dull blades may cause the saw to swerve or stall under pressure.
• Use extra caution when cutting overhead and pay particular attention to overhead
wires which may be hidden from view. Anticipate the path of falling branches and
debris ahead of time.
• When cutting pipe or conduit ensure that they are free from water, electrical
wiring, etc.
WARNING: Some dust created by power sanding, sawing, grinding, drilling,
and other construction activities contains chemicals known to cause cancer,
birth defects or other reproductive harm. Some examples of these chemicals are:
•leadfromlead-basedpaints,
•crystallinesilicafrombricksandcementandothermasonryproducts,and
•arsenicandchromiumfromchemically-treatedlumber(CCA).
Yourriskfromtheseexposuresvaries,dependingonhowoftenyoudothistypeof
work.Toreduceyourexposuretothesechemicals:workinawellventilatedarea,and
workwithapprovedsafetyequipment,suchasthosedustmasksthatarespecially
designed to filter out microscopic particles.
• Avoid prolonged contact with dust from power sanding, sawing, grinding,
drilling, and other construction activities. Wear protective clothing and wash
exposed areas with soap and water.Allowingdusttogetintoyourmouth,eyes,or

4
layontheskinmaypromoteabsorptionofharmfulchemicals.
WARNING: ALWAYS use safety glasses. Everyday eyeglasses are NOT safety
glasses. Also use face or dust mask if drilling operation is dusty. ALWAYS WEAR
CERTIFIED SAFETY EQUIPMENT:
• ANSIZ87.1eyeprotection(CAN/CPAZ94.3),
• ANSIS12.6(S3.19)hearingprotection,
• NOSH/OSHArespiratoryprotection.
WARNING: Use of this tool can generate and/or disperse dust, which may
cause serious and permanent respiratory or other injury.AlwaysuseNIOSH/OSHA
approvedrespiratoryprotectionappropriateforthedustexposure.Directparticles
away from face and body.
CAUTION: Wear appropriate hearing protection during use. Under some con-
ditions and duration of use, noise from this product may contribute to hearing loss.
SAVE THESE INSTRUCTIONS
Symbols
• Thelabelonyourtoolmayincludethefollowingsymbols.Thesymbolsandtheir
definitionsareasfollows:
V .................. volts A ...................amperes
Hz ................ hertz W ..................watts
min ..............minutes
or AC .......alternating current
or DC ...direct current
n
o .................no load speed
................Class I Construction ..................earthing terminal
(grounded)
................safety alert symbol
................Class II Construction .../min or rpm...revolutions or
(double insulated) reciprocation per minute
............
Read instruction manual before use
..................Use proper respiratory protection
................Use proper eye protection ..................Use proper hearing protection
sfpm ........... surface feet per minute SPM .............. Strokes per minute
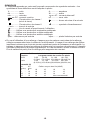
•
Whenusing anextension cord,be sureto useone heavyenough tocarry the
currentyourproductwilldraw.Anundersizedcordwillcauseadropinlinevoltageresulting
in loss of power and overheating. The table shows the correct size to use depending on cord
lengthandnameplateampererating.Ifindoubt,usethenextheaviergauge.Thesmallerthe
gauge number, the heavier the cord.
SAVE THESE INSTRUCTIONS
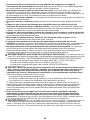
Minimum Gage for Cord Sets
Volts Total Length of Cord in Feet
120V 0-25 26-50 51-100 101-150
(0-7,6m)(7,6-15,2m)(15,2-30,4m)(30,4-45,7m)
240V 0-50 51-100 101-200 201-300
(0-15,2m)(15,2-30,4m)(30,4-60,9m)(60,9-91,4m)
Ampere Rating
More Notmore AmericanWireGage
Than Than
0 - 6 18 16 16 14
6 - 10 18 16 14 12
10 - 12 16 16 14 12
12 - 16 14 12 NotRecommended

5
OPERATION
:
Beforeattemptinganyofthefollowingoperations,makesurethatthe
tool is switched off and unplugged and that the saw blade has stopped. Used saw
blades can be hot.
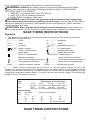
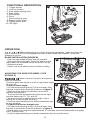
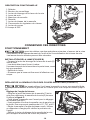
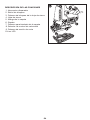
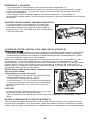
BLADE INSTALLATION (FIGURE B)
-Pushthesawbladelockinglever(3)upward.
-Withteethfacingforward,inserttheshankofthe
saw blade into the blade holder as far as it will go.
-Releasethelever.
-Checktoensurebladeissecurebeforecutting.
ADJUSTING THE SHOE FOR BEVEL CUTS
(FIGURE C)
:
Neverusethetoolwhentheshoeis
loose or removed.
The shoe plate can be set to a left or right bevel angle
ofupto45°.
To set the bevel angle:
-Pulltheshoebevelinglever(7)outandawayfrom
thesawtounlocktheshoe(6)asshowninfigure C.
-Slidetheshoeforwardtoreleaseitfromthe0°
positive stop position.
-Theshoecanbebeveledtotheleftortotheright
andhasdetentsat15°,30°and45°.
-Settheshoetothedesiredbevelangle.Usea
protractor to verify angle accuracy.
-Pushtheshoebevelingleverbacktowardsthesaw
tolocktheshoe.
To reset the shoe for straight cuts:
-Pulltheshoebevelinglever(7)outandawayfrom
thesawtounlocktheshoe(6)asshowninfigure C.
-Rotateshoetoanangleofapproximately0°andthenpullshoebackwardstoengage
the0°positivestop.
-Pushtheshoebevelingleverbacktowardsthesawtolocktheshoe.
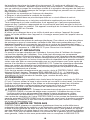
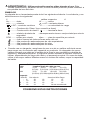
FUNCTIONAL DESCRIPTION
1. Trigger switch
2.Lock-onbutton
3.Sawbladelockinglever
4.Sawblade
5.Shoesleeve
6.Shoe
7.Shoebevelinglever
8.Speedcontrolwheel
9.Cuttingactionlever
10.LEDLight
1
2
3
4
5
6
8
7
9
A
10
B
C

6
SWITCHING ON AND OFF
-Toswitchthetoolon,squeezethetriggerswitch(1).
-Forcontinuousoperation,squeezethetriggerswitchthendepressthelock-onbutton
(2).Oncelock-onbuttonisdepressed,releasethetriggerswitch.
-Toswitchthetooloff,releasethetriggerswitch.Toswitchthetooloff,whenin
continuousoperation,squeezethetriggerandthelockwilldisengage.
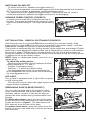
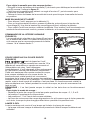
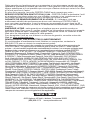
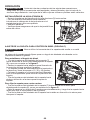
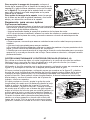
VARIABLE SPEED CONTROL (FIGURE D)
Aspeedcontrolwheel(8)islocatedonthetopof
the saw. The speed increases as the wheel is turned
from a low speed setting of 1 to a high speed setting
of7.
CUTTING ACTION – ORBITAL OR STRAIGHT (FIGURE E)
Check that the tool is not locked on before connecting it to a power supply. If the
trigger switch is locked on when the tool is connected to the power supply, it will start
immediately. Damage to your tool or personal injury may result.
Thisjigsawisequippedwithfourcuttingactions,threeorbitalandonestraight.Orbital
action has a more aggressive blade motion and is designed for cutting in soft materials
likewoodorplastic.Orbitalactionprovidesafastercut,butwithalesssmoothcut
acrossthematerial.Inorbitalaction,theblademovesforwardduringthecuttingstroke
in addition to the up and down motion.
NOTE: Metal or hardwoods should never be cut in
orbital action.
To adjust the cutting action:
-Movethecuttingactionlever(9)betweenthefour
cuttingpositions:0,1,2,and3.
-Position0isstraightcutting.
-Positions1,2,and3areorbitalcutting.
-Theaggressivenessofthecutincreasesasthe
lever is adjusted from one to three, with three being
the most aggressive cut.
LED LIGHT
Thejigsawisequippedwithalightwhichprojects
on the cutting path.
-Thelightwillcomeonwhenthetriggerswitchisdepressedandwillgooffwhenthe
trigger switch is released.
REMOVABLE SHOE SLEEVE (FIGURE F)
Thenon-marringshoesleeve(5)shouldbeused
when cutting surfaces that scratch easily, such as
laminate, veneer, or paint. It can also be used to
protect the shoe surface during transportation and
storage.
To attach shoe sleeve, place the front of the shoe
(6)intothefrontoftheshoesleeve(5)andlowerthe
jig saw as shown in figure F. The shoe sleeve will
clicksecurelyontotherearoftheshoe.
To remove shoe sleeve, grasp the sleeve from the
bottom at the two rear tabs and pull down and away
from the shoe.
D
E
F

7
Hints for optimum use
Sawing laminates
Asthesawbladecutsontheupwardstroke,splinteringmayoccuronthesurface
closest to the shoe plate.
-Useafine-toothsawblade.
-Sawfromthebacksurfaceoftheworkpiece.
-Tominimizesplintering,clampapieceofscrapwoodorhardboardtobothsidesof
theworkpieceandsawthroughthissandwich.
Sawing metal
-Beawarethatsawingmetaltakesmuchmoretimethansawingwood.
-Useasawbladesuitableforsawingmetal.
-Whencuttingthinmetal,clampapieceofscrapwoodtothebacksurfaceofthe
workpieceandcutthroughthissandwich.
-Spreadafilmofoilalongtheintendedlineofcutforeasieroperationandlonger
bladelife.Forcuttingaluminum,keroseneispreferred.
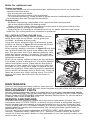
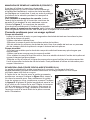
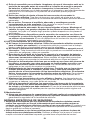
RIP / CIRCLE CUTTING (FIGURE G, H)
Rippingandcirclecuttingwithoutapencillineare
easilydonewiththeripfence/circleguide(not
included-availableatextracost).
Using the screw supplied with the accessory guide,
position as shown in figure G and thread the screw
into the shoe to clamp the fence securely.
When ripping, position as shown in figure G and slide
the rip fence under the screw from either side of the
saw.Setthecrossbar(10)atdesireddistancefrom
bladeandtightenscrew.Forripping,thecrossbar
should be down and against the straight edge of the
workpieceasshown.
When circle cutting, adjust rip fence so that distance
frombladetoholeinfencearm(11)isatthedesired
radiusandtightenscrew.Placesawsothatholein
fencearmisovercenterofcircletobecut(drillhole
for blade or cut inward from edge of material to get
bladeintoposition).Whensawisproperlypositioned,
drive a small nail through hole in fence arm. Using rip
fenceasapivotarm,begincuttingcircle.Forcircle
cutting, the cross bar should be up, as shown in
figure H.
MAINTENANCE
Use only mild soap and damp cloth to clean the tool.
Neverletanyliquidgetinsidethetool;neverimmerseanypartofthetoolintoaliquid.
REPLACEMENT PARTS
Useonlyidenticalreplacementparts.Forapartslistortoorderparts,visitourservicewebsite
atwww.portercable.com.YoucanalsoorderpartsfromyournearestPORTER-CABLEFactory
ServiceCenterorPORTER-CABLEAuthorizedWarrantyServiceCenter.Or,youcancallour
CustomerCareCenterat(888)848-5175.
SERVICE AND REPAIRS
Allqualitytoolswilleventuallyrequireservicingand/orreplacementofparts.For
informationaboutPORTER-CABLE,itsfactoryservicecentersorauthorizedwarranty
servicecenters,visitourwebsiteatwww.portercable.comorcallourCustomerCare
Centerat(888)848-5175.Allrepairsmadebyourservicecentersarefullyguaranteed
againstdefectivematerialandworkmanship.Wecannotguaranteerepairsmadeor
attempted by others.
YoucanalsowritetousforinformationatPORTER-CABLE,4825Highway45North,
Jackson,Tennessee38305,(888)848-5175-Attention:ProductService.Besureto
includealloftheinformationshownonthenameplateofyourtool(modelnumber,type,
serialnumber,etc.).
G
H

8
ACCESSORIES
WARNING: Sinceaccessories,otherthanthoseofferedbyPORTER-CABLE,
have not been tested with this product, use of such accessories with this tool could
behazardous.Toreducetheriskofinjury,onlyPORTER-CABLErecommended
accessories should be used with this product.
AcompletelineofaccessoriesisavailablefromyourPORTER-CABLEFactoryService
CenteroraPORTER-CABLEAuthorizedWarrantyServiceCenter.Pleasevisitour
WebSitewww.portercable.comforacatalogorforthenameofyournearestsupplier.
NOTE:
ThisequipmenthasbeentestedandfoundtocomplywiththelimitsforaClass
Bdigitaldevice,pursuanttoPart15oftheFCCRules.Theselimitsaredesignedto
provide reasonable protection against harmful interference in a residential installation. This
equipmentgenerates,usesandcanradiateradiofrequencyenergyand,ifnotinstalled
and used in accordance with the instructions, may cause harmful interference to radio
communications.
However,thereisnoguaranteethatinterferencewillnotoccurinaparticularinstallation.
Ifthisequipmentdoescauseharmfulinterferencetoradioortelevisionreception,which
canbedeterminedbyturningtheequipmentoffandon,theuserisencouragedtotryto
correcttheinterferencebyoneormoreofthefollowingmeasures:
•Reorientorrelocatethereceivingantenna.
•Increasetheseparationbetweentheequipmentandreceiver.
•
Connecttheequipmentintoanoutletonacircuitdifferentfromthattowhichthereceiverisconnected.
•Consultthedealeroranexperiencedradio/TVtechnicianforhelp.
Changesormodificationstothisunitnotexpresslyapprovedbythepartyresponsiblefor
compliancecouldvoidtheuser’sauthoritytooperatetheequipment.ThisClassBdigital
apparatuscomplieswithCanadianICES-003.
THREE YEAR LIMITED WARRANTY
PORTER-CABLEwillrepairorreplace,withoutcharge,anydefectsduetofaulty
materialsorworkmanshipforthreeyearsfromthedateofpurchasefortools(two
yearsforbatteries).Thiswarrantydoesnotcoverpartfailureduetonormalwearor
toolabuse.Forfurtherdetailofwarrantycoverageandwarrantyrepairinformation,
visitwww.portercable.comorcall(888)848-5175.Thiswarrantydoesnotapply
TROUBLESHOOTING
Problem Possible Cause Possible Solution
•Unitwillnotstart. •Cordnotpluggedin. •Plugtoolintoaworkingoutlet.
•Circuitfuseisblown. •Replacecircuitfuse.(Ifthe
product repeatedly causes the
circuit fuse to blow, discontinue
use immediately and have it
servicedataPorterCable
service center or authorized
servicer.)
•Circuitbreakeristripped. •Resetcircuitbreaker.(Ifthe
product repeatedly causes the
circuitbreakertotrip,
discontinue use immediately
andhaveitservicedataPorter
Cableservicecenteror
authorizedservicer.)
•Cordorswitchisdamaged. •Havecordorswitchreplaced
ataPorterCableService
CenterorAuthorizedServicer
Forassistancewithyourproduct,visit our website at www.portercable.com for a list of
servicecenters,orcallthePorter-CableCustomerCareCenterat(888)848-5175

9
to accessories or damage caused where repairs have been made or attempted by
others. This warranty gives you specific legal rights and you may have other rights
which vary in certain states or provinces.
Inadditiontothewarranty,PORTER-CABLEtoolsarecoveredbyour:
1 YEAR FREE SERVICE:PORTER-CABLEwillmaintainthetoolandreplaceworn
parts caused by normal use, for free, any time during the first year after purchase.
90 DAY MONEY BACK GUARANTEE: If you are not completely satisfied with the
performanceofyourPORTER-CABLEPowerToolforanyreason,youcanreturnit
within90daysfromthedateofpurchasewithareceiptforafullrefund–noquestionsasked.
LATIN AMERICA:ThiswarrantydoesnotapplytoproductssoldinLatinAmerica.For
productssoldinLatinAmerica,seecountryspecific
warrantyinformationcontainedinthepackaging,callthelocalcompanyorsee
website for warranty information.
To register your tool for warranty service visit our website at www.portercable.com.
WARNING LABEL REPLACEMENT
Ifyourwarninglabelsbecomeillegibleoraremissing,call(888)848-5175forafree
replacement.
ThefollowingarePORTER-CABLEtrademarksforoneormorepowertoolsandaccessories:agrayandblackcolorscheme;a“four
pointstar”design;andthreecontrasting/outlinedlongitudinalstripes.ThefollowingarealsotrademarksforoneormorePORTER-
CABLEandDeltaproducts:2BY4®,890™,AirAmerica®,AIRBOSS™,Auto-Set®,B.O.S.S.®,Bammer®,Biesemeyer®,Builders
Saw®,ChargeAir®,ChargeAirPro®,CONTRACTORSUPERDUTY®,Contractor’sSaw®,Delta®,DELTA®,DeltaIndustrial®,
DELTAMACHINERY&DESIGN™,DeltaShopmasterandDesign®,DeltaX5®,Deltacraft®,DELTAGRAM®,DoIt.FeelIt.®,DUAL
LASERLOCANDDESIGN®,EASYAIR®,EASYAIRTOGO™,ENDURADIAMOND®,Ex-Cell®,FrontBevelLock®,GetYoursWhile
theSunShines®,GriptoFit®,GRIPVAC™,GTF®,HICKORYWOODWORKING®,Homecraft®,HPFRAMERHIGHPRESSURE®,
IMPACTSERIES™,InnovationThatWorks®,Jet-Lock®,JobBoss®,Kickstand®,LASERLOC®,LONG-LASTINGWORKLIFE®,
MAXFORCE™,MAXLIFE®,Micro-Set®,Midi-Lathe®,Monsoon®,MONSTER-CARBIDE™,Network®,OLDHAM®,Omnijig®,PC
EDGE®,PerformanceCrew™,PerformanceGear®,PocketCutter®,Porta-Band®,Porta-Plane®,PORTER-CABLE®,PORTER-
CABLEProfessionalPowerTools®,Powerback®,POZI-STOP™,PressureWave®,PRO4000®,Proair®,QuicksandandDesign®,
QuicksetII®,QUIETDRIVETECHNOLOGY™,QUIETDRIVETECHNOLOGYANDDESIGN™,Quik-Change®,QUIK-TILT®,RAPID-
RELEASE™,RAZOR®,RedefiningPerformance®,Riptide®,SafeGuardII®,SandTrapandDesign®,SandingCenter®,Saw
Boss®,ShopBoss®,Sidekick®,SiteBoss®,Speed-Bloc®,Speedmatic®,StairEase®,SteelDriverSeries®,SUPERDUTY®,T4&
DESIGN®,THEAMERICANWOODSHOP®,THEPROFESSIONALEDGE®,Thin-Line®,TigerSaw®,TIGERCLAW®,TIGERCLAW
ANDDESIGN®,Torq-Buster®,TRU-MATCH®,T-Square®,Twinlaser®,Unifence®,Uniguard®,UNIRIP®,UNISAW®,UNITED
STATESSAW®,Veri-Set®,Versa-Feeder®,VIPER®,VT™,VTRAZOR™,WaterDriver®,WATERVROOM®,Waveform®,Whisper
Series®,X5®,YOURACHIEVEMENT.OURTOOLS.®
Trademarksnotedwith®areregisteredintheUnitedStatesPatent
andTrademarkOfficeandmayalsoberegisteredinothercountries.Othertrademarksmayapply.Lesmarques
decommercesuiviesdusymbole®sontenregistréesauprèsduUnitedStatesPatentandTrademarkOfficeet
peuventêtreenregistréesdansd’autrespays.D’autresmarquesdecommercepeuventégalementêtreapplicables.
Lasmarcascomercialesconelsímbolo®estánregistradasenlaOficinadepatentesymarcascomercialesde
EstadosUnidos(UnitedStatesPatentandTrademarkOffice),ytambiénpuedenestarregistradasenotrospaíses.
Posiblementeseapliquenotrasmarcascomercialesregistradas.
4825Highway45North
Jackson,Tennessee38305
(888)848-5175
www.portercable.com

10
Avertissements de sécurité généraux pour les outils électriques
AVERTISSEMENT :
Lire tous les avertissements de sécurité et toutes les
directives. Lenon-respectdesavertissementsetdesdirectivespourraitsesolder
parunchocélectrique,unincendieet/ouuneblessuregrave.
Conserver tous les avertissements et toutes les directives pour un
usage ultérieur.
Leterme«outilélectrique»citédanslesavertissementsserapporteàvotreoutil
électriqueàalimentationsursecteur(avecfil)ouparpiles(sansfil).
1) Sécurité du lieu de travail
a) Tenir la zone de travail propre et bien éclairée. Les endroits sombres sont souvent des
causes d’accidents.
b) Ne pas faire fonctionner d’outils électriques dans un milieu déflagrant, soit en
présence de liquides inflammables, de gaz ou de poussière. Les outils électriques
produisent des étincelles qui peuvent enammer la poussière ou les vapeurs.
c) Éloigner les enfants et les curieux au moment d’utiliser un outil électrique. Une
distraction pourrait vous en faire perdre la maîtrise.
2) Sécurité en matière d’électricité
a) Les fiches des outils électriques doivent correspondre à la prise. Ne jamais modifier
la fiche en aucune façon. Ne jamais utiliser de che d’adaptation avec un outil électrique
mis à la terre. Le risque de choc électrique sera réduit par l’utilisation de ches non
modiées correspondant à la prise.
b) Éviter tout contact physique avec des surfaces mises à la terre comme des tuyaux,
des radiateurs, des cuisinières et des réfrigérateurs. Le risque de choc électrique est
plus élevé si votre corps est mis à la terre.
c) Ne pas exposer les outils électriques à la pluie ou à d’autres conditions où il pourrait
être mouillé. La pénétration de l’eau dans un outil électrique augmente le risque de choc
électrique.
d) Ne pas utiliser abusivement le cordon d’alimentation. Ne jamais utiliser le
cordon pour transporter, tirer ou débrancher un outil électrique. Tenir le cordon
éloigné de la chaleur, de l’huile, des bords tranchants ou des pièces mobiles. Les
cordons endommagés ou emmêlés augmentent les risques de choc électrique.
e) Pour l’utilisation d’un outil électrique à l’extérieur, se servir d’une rallonge
convenant à une telle utilisation. L’utilisation d’une rallonge conçue pour l’extérieur réduit
les risques de choc électrique.
f) S’il est impossible d’éviter l’utilisation d’un outil électrique dans un endroit humide,
brancher l’outil dans une prise ou sur un circuit d’alimentation dotés d’un disjoncteur
de fuite à la terre (GFCI). L’utilisation de ce type de disjoncteur réduit les risques de choc
électrique.
3) Sécurité personnelle
a) Être vigilant, surveiller le travail effectué et faire preuve de jugement lorsqu’un outil
électrique est utilisé. Ne pas utiliser d’outil électrique en cas de fatigue ou sous
l’influence de drogues, d’alcool ou de médicaments. Un simple moment d’inattention en
utilisant un outil électrique peut entraîner des blessures corporelles graves.
LIGNES DIRECTRICES EN MATIÈRE DE SÉCURITÉ - DÉFINITIONS
Ilestimportantquevouslisiezetcompreniezcemoded’emploi.Lesinformations
qu’ilcontientconcernentVOTRESÉCURITÉetvisentàÉVITERTOUTPROBLÈME.
Lessymbolesci-dessousserventàvousaideràreconnaîtrecetteinformation.
DANGER : Indiqueunesituationdangereuseimminentequi,siellen’estpasévitée,
causera la mort ou des graves blessures.
AVERTISSEMENT : Indiqueunesituationpotentiellementdangereusequi,sielle
n’estpasévitée,pourraitcauserlamortoudegravesblessures.
MISE EN GARDE : Indiqueunesituationpotentiellementdangereusequi,sielle
n’estpasévitée,pourraitcauserdesblessuresmineuresoumodérées.
AVIS : Utilisésanslesymboled’alerteàlasécurité,indiqueune
situationvpotentiellementdangereusequi,siellen’estpasévitée,peutrésulterendes
dommagesàlapropriété.

11
b) Utiliser des équipements de protection individuelle. Toujours porter une protection
oculaire. L’utilisation d’équipements de protection comme un masque antipoussière, des
chaussures antidérapantes, un casque de sécurité ou des protecteurs auditifs lorsque la
situation le requiert réduira les risques de blessures corporelles.
c) Empêcher les démarrages intempestifs. S’assurer que l’interrupteur se trouve à la
position d’arrêt avant de relier l’outil à une source d’alimentation et/ou d’insérer un
bloc-piles, de ramasser ou de transporter l’outil. Transporter un outil électrique alors
que le doigt repose sur l’interrupteur ou brancher un outil électrique dont l’interrupteur est
à la position de marche risque de provoquer un accident.
d) Retirer toute clé de réglage ou clé standard avant de démarrer l’outil. Une clé
standard ou une clé de réglage attachée à une partie pivotante peut causer des
blessures.
e) Ne pas trop tendre les bras. Conserver son équilibre en tout temps. Cela permet de
mieux maîtriser l’outil électrique dans les situations imprévues.
f) S’habiller de manière appropriée. Ne pas porter de vêtements amples ni de bijoux.
Garder les cheveux, les vêtements et les gants à l’écart des pièces mobiles. Les
vêtements amples, les bijoux ou les cheveux longs risquent de rester coincés dans les
pièces mobiles.
g) Si des composants sont fournis pour le raccordement de dispositifs de
dépoussiérage et de ramassage, s’assurer que ceux-ci sont bien raccordés et
utilisés. L’utilisation d’un dispositif de dépoussiérage peut réduire les dangers
engendrés par les poussières.
4) Utilisation et entretien d’un outil électrique
a) Ne pas forcer un outil électrique. Utiliser l’outil électrique approprié à l’application.
L’outil électrique approprié effectuera un meilleur travail, de façon plus sûre et à la vitesse
pour laquelle il a été conçu.
b) Ne pas utiliser un outil électrique dont l’interrupteur est défectueux. Tout outil
électrique dont l’interrupteur est défectueux est dangereux et doit être réparé.
c) Débrancher la fiche du secteur ou le bloc-piles de l’outil électrique avant de faire
tout réglage ou changement d’accessoire, ou avant de ranger l’outil électrique. Ces
mesures préventives réduisent les risques de démarrage accidentel de l’outil électrique.
d) Ranger les outils électriques hors de la portée des enfants, et ne permettre à aucune
personne n’étant pas familière avec un outil électrique (ou son manuel d’instruction)
d’utiliser ce dernier. Les outils électriques deviennent dangereux entre les mains
d’utilisateurs inexpérimentés.
e) Entretenir les outils électriques. Vérifier les pièces mobiles pour s’assurer qu’elles
sont bien alignées et tournent librement, qu’elles sont en bon état et ne sont
affectées par aucun trouble susceptible de nuire au bon fonctionnement de l’outil
électrique. En cas de dommage, faire réparer l’outil électrique avant toute nouvelle
utilisation. Beaucoup d’accidents sont causés par des outils électriques mal entretenus.
f)
S’assurer que les outils de coupe sont aiguisés et propres. Les outils de coupe bien
entretenus et affûtés sont moins susceptibles de se coincer et sont plus faciles à contrôler.
g) Utiliser l’outil électrique, les accessoires, les forets, etc. conformément aux
présentes directives en tenant compte des conditions de travail et du travail à
effectuer. L’utilisation d’un outil électrique pour toute opération autre que celle pour
laquelle il a été conçu est dangereuse.
5) Réparation
a) Faire réparer l’outil électrique par un réparateur professionnel en n’utilisant que des
pièces de rechange identiques. Cela permettra de maintenir une utilisation sécuritaire de
l’outil électrique.
CONSIGNES DE SÉCURITÉ PARTICULIÈRES
• Tenir l’outil électrique par sa surface de prise isolée dans une situation où l’accessoire
de coupe pourrait entrer en contact avec un câble électrique dissimulé ou avec son
propre cordon d’alimentation. Tout contact entre un fil « sous tension » et l’accessoire de
coupe pourrait également mettre « sous tension » les pièces métalliques exposées de l’outil et
électrocuter l’utilisateur.
•Utiliser des brides de fixation ou un autre dispositif de fixation permettant de fixer
solidement et de soutenir la pièce sur une plateforme stable. Tenir la pièce avec la main
ou contre son corps la rend instable et risque de provoquer une perte de maîtrise de l’outil.
•Lorsqu’on est installé sur une échelle ou un échafaudage pour travailler, on doit
déposer l’outil sur le côté lorsqu’on ne s’en sert plus.Bienquecertainsoutilsmunis
d’ungrosbloc-pilespuissentêtreplacésàlaverticale,danscetteposition,ilspeuvent

12
facilementêtrerenversés.
•Tenir les mains éloignées de la zone dedécoupe.Nejamaismettrelamainsousle
matériaupourquelqueraisonquecesoit.Tenirlapartieavantdelascieparsazonede
priseprofilée.Nepasmettrelesdoigtsoulepouceàproximitédelasciealternativeet
dumécanismedeserragedelalame.Nepasstabiliserlascieensaisissantlasemelle.
•Maintenir les lames affûtées.Leslamesémousséespeuventfairezigzaguerlalame
oulabloquersouslapression.
•Au moment de couper un tuyau ou un conduit, s’assurerqu’ilssontexemptsd’eau,
decâblageélectrique,etc.
• Attendre l’immobilisation complète du moteur avant de retirer la lame du trait de
scie (la rainure créée par la lame en coupant). En effet, une lame en mouvement
risquedepercuterlapièceetsebriser,d’endommagerlapièceoudeprovoquerune
pertedelamaîtrisedel’outil,cequirisqueraitdeprovoquerdesblessurescorporelles.
• Ne jamais tenir la pièce dans les mains, sur les genoux ou contre toute partie du
corps en cours de découpe. La scie pourrait glisser et la lame pourrait atteindre le
corpsetprovoquerdesblessures.
• Maintenir les poignées sèches, propres, exemptes d’huile et de graisse. Celapermet
demieuxmaîtriserl’outil.
• Nettoyer l’outil régulièrement, particulièrement après une utilisation intensive. La
poussièreetlessaletéscontenantdesparticulesmétalliquess’accumulentsouventsur
lessurfacesinternesdel’outiletpourraientcréerunrisquedechocélectrique.
• Ne pas faire fonctionner cet outil durant de longues périodes. Lesvibrationscausées
parlefonctionnementdecetoutilpeuventprovoquerdesblessurespermanentesaux
doigts,auxmainsetauxbras.Utiliserdesgantspouramortirdavantagelesvibrations,
prendredefréquentespériodesdereposetlimiterladuréequotidienned’utilisation.
AVERTISSEMENT :TOUJOURS porter des lunettes de sécurité. Les lunettes
de vue ne constituent PAS des lunettes de sécurité. Utiliser également un masque
facial ou anti-poussière si l’opération de découpe génère de la poussière. TOUJOURS
PORTER UN ÉQUIPEMENT DE PROTECTION HOMOLOGUÉ :
•protectionoculaireconformeàlanormeANSIZ87.1(CAN/CSAZ94.3);
•protectionauditiveANSIS12.6(S3.19);
•protectiondesvoiesrespiratoiresconformesauxnormesNIOSH/OSHA/MSHA.
AVERTISSEMENT :
certains outils électriques, tels que les sableuses, les
scies, les meules, les perceuses ou certains autres outils de construction, peuvent
produire de la poussière contenant des produits chimiques reconnus par l’État de
la Californie comme étant susceptibles d’entraîner le cancer, des malformations
congénitales ou pouvant être nocifs pour le système reproductif. Parmi ces produits
chimiques, on retrouve :
·leplombdanslespeinturesàbasedeplomb,
· la silice cristalline dans les briques et le ciment et autres produits de maçonnerie,
· l’arsenic et le chrome dans le bois de sciage ayant subi un traitement chimique.
Lerisqueassociéàdetellesexpositionsvarieselonlafréquenceaveclaquelleon
effectuecestravaux.Pourréduirel’expositionàdetelsproduits,ilfauttravaillerdansun
endroit bien aéré et utiliser le matériel de sécurité approprié, tel un masque
anti-poussières spécialement conçu pour filtrer les particules microscopiques.
•Éviter tout contact prolongé avec la poussière soulevée par cet outil ou autres
outils électriques. Porter des vêtements de protection et nettoyer les parties
exposées du corps à l’eau savonneuse. S’assurer de bien se protéger afin d’éviter
d’absorber par la bouche, les yeux ou la peau des produits chimiques nocifs.
AVERTISSEMENT :Cet outil peut produire et répandre de la poussière
susceptible de causer des dommages sérieux et permanents au système
respiratoire. Toujours utiliser un appareil respiratoire anti-poussières approprié
approuvé par le NIOSH ou l’OSHA. Diriger les particules dans le sens opposé du visage et
du corps.
AVERTISSEMENT :Porter les protecteurs auditifs appropriés durant
l’utilisation de l’outil. Danscertainesconditionsetselonladuréed’utilisation,lebruit
engendréparceproduitpeutcontribueràlapertedel’ouïe.

13
SYMBOLES
•L’étiquette apposée sur votre outil pourrait comprendre les symboles suivants. Les
symboles et leurs définitions sont indiqués ci-après :
V .................volts A ...............ampères
Hz ...............hertz W .............. watts
min ..............minutes
ou AC ..courant alternatif
ou DC ..courant continu
n
o .............sous vide
................Construction de classe I
.............. bornedemiseàlaminute
(misàlaterre)
...............
Construction de classe II ............symbole d´avertissement
.../min .........toursàlaminute
.............. Lire le mode d’emploi avant l’utilisation
............Utiliser une protection respiratoire adéquate.
...........Utiliser une protection oculaire adéquate.
............Utiliser une protection auditive adéquate.
spm.....alternance par minute sfpm .........pieds linéaires par minute
•Encasd’utilisationd’unerallonge,s’assurerquelesvaleursnominalesdelarallonge
utiliséecorrespondentbienàcellesdel’outilalimenté.L’usaged’unerallongedecalibre
insuffisantcauseraunechutedetensionentraînantpertedepuissanceetsurchauffe.Le
tableauci-dessousillustrelescalibresàutiliserselonlalongueurderallongeetl’intensité
nominaleindiquéesurlaplaquesignalétique.Encasdedoutes,utiliserlecalibresuivant.
Pluslecalibreestpetit,pluslarallongepeutsupporterdecourant.
Calibre minimal des cordons de rallonge
Tension Longueur totale du cordon en pieds
120V 0-25 26-50 51-100 101-150
(0-7,6m)(7,6-15,2m)(15,2-30,4m)(30,4-45,7m)
240V 0-50 51-100 101-200 201-300
(0-15,2m)(15,2-30,4m)(30,4-60,9m)(60,9-91,4m)
Intensité (A)
Au Au Calibremoyendesfils(AWG)
moins plus
0 - 6 18 16 16 14
6 - 10 18 16 14 12
10 - 12 16 16 14 12
12 - 16 14 12 Nonrecommandé

14
CONSERVER CES DIRECTIVES
FONCTIONNEMENT
avantderéaliserunedesopérationssuivantes,s’assurerdelamise
horstensionetdudébranchementdel’outiletdel’immobilisationdelalamedescie.
Leslamesdescieutiliséespeuventêtrechaudes.
INSTALLATION DE LA LAME (FIGURE B)
-Pousserlelevierdeblocagedelalamedelascie(3)
vers le haut.
-Lesdentsétantversl’avant,insérer
l’emmanchementdelalamedansleporte-lame,aussi
loinquepossible.
-Relâcherlelevier.
-S’assurerquelalameestfixeavantd’effectuerune
coupe.
RÉGLAGE DE LA SEMELLE POUR DES COUPES BISEAUTÉES (FIGURE C)
Nejamaisutiliserl’outilsanslasemelleouavecunesemellelâche.
Laplaquedelasemelles’inclineàgaucheouàdroitepourunecoupeenbiseaujusqu’à
45°.
Réglage de l’angle de biseau :
-Éloignerlelevierdebiseaudelasemelle(7)dela
sciepourdébloquerlasemelledelascie(6)comme
l’indiquelafigure C.
-Faireglisserlasemelleversl’avantpourladégager
delabutéefixede0°.
-Ilestpossibled’inclinerlasemelleverslagaucheou
ladroite.Descranssontpositionnésà15°,30°et45°.
-Réglerlasemelleàl’angledebiseauvoulu.Utiliser
unrapporteurd’anglepourvérifierlaprécisionde
l’angle.
-Releverlelevierdebiseaudelasemelledelascie
pourbloquerlasemelledelascieenposition.
DESCRIPTION FONCTIONNELLE
1.Détente
2. Bouton de verrouillage
3.Levierdeblocagedelalamedelascie
4.Lamedescie
5.Manchondesemelle
6.Semelle
7.Levierdebiseaudelasemelle
8.Commandedurégulateurdevitesse
9.Levierdecoupe
10.LampeàDEL
1
2
3
4
5
6
8
7
9
A
10
B
C

15
Pour régler la semelle pour des coupes droites :
-Éloignerlelevierdebiseaudelasemelle(7)delasciepourdébloquerlasemelledela
scie(6)commel’indiquelafigure C.
-Fairetournerlasemellepourobtenirunangled’environ0°,puislareculerpour
enclencherlabutéefixede0°.
-Releverlelevierdebiseaudelasemelledelasciepourbloquerlasemelledelascie
en position.
MISE EN MARCHE ET ARRÊT
-Pourallumerl’outil,appuyersurladétente(1).
-Pourunfonctionnementcontinu,presserladétente,puisenfoncerleboutonde
verrouillage(2).Unefoisleboutondeverrouillageenfoncé,relâcherladétente.
-Pourmettrel’outilhorstension,relâcherladétente.Pourmettrel’outilhorstensionen
modedefonctionnementcontinu,presserladétente,etleverrouillageseraannulé.
COMMANDE DE LA VITESSE VARIABLE
(FIGURE D)
Lacommandedurégulateurdevitesse(8)setrouve
surledessusdelascie.Lavitesses’accroîtaufur
etàmesurequelacommandepassedelafaible
vitesse1àlavitesseélevée7.
COUPE ORBITALE OU COUPE DROITE
(FIGURE E)
Avant de brancher l’outil,
s’assurer qu’il n’est pas verrouillé sur marche. Si la
détente est verrouillée sur marche au moment où
l’alimentation est mise, l’outil démarrera
immédiatement. L’outil risquerait d’être endommagé,
et il pourrait en résulter des blessures corporelles.
Cettesciesauteuseoffrequatremodesdecoupe,
trois coupes orbitales et une coupe droite. Le
fonctionnement orbital produit un mouvement
énergiquedelalameetsertàcouperdesmatériaux
tendrescommeleboisouleplastique.Lefonctionnementorbitaldonneunecoupe
rapide,maislebordcoupédumatériaun’estpaslisse.Enfonctionnementorbital,la
lamesedéplaceversl’avantpendantlacoursedecoupe,enplusdumouvementde
haut en bas.
REMARQUE : il ne faut jamais couper le métal ou les bois durs en fonctionnement
orbital.
Pour régler le mode de coupe :
-Déplacerlelevierdecoupe(9)entrelesquatrepositionsdecoupe:0,1,2et3.
-Laposition0représentelacoupedroite.
-Lespositions1,2et3sontdescoupesorbitales.
-Laforcedumouvementdecoupeaugmenteaufuretàmesurequelelevierpassede
unàtrois,lacoupelaplusénergiqueétantdoncproduiteàlapositiontrois.
LAMPE À DEL
Lasciesauteuseestmunied’unelampequiéclairelechampdecoupe.
-Lalampes’allumelorsqueladétenteestpresséeets’éteintlorsqueladétenteest
relâchée.
D
E

16
MANCHON DE SEMELLE AMOVIBLE (FIGURE F)
Il est bon d’utiliser le manchon de semelle
antiégratignures(5)pourcouperdessurfacesqui
s’égratignentfacilement,commelesboislamellés,
lesplacagesoulapeinture.Ilsertenoutreàprotéger
la surface de la semelle pendant le transport et
l’entreposage.
Pour attacher le manchon de semelle,insérer
l’avantdelasemelle(6)àl’avantdumanchonde
semelle(5)etabaisserlasciesauteusecomme
l’illustre la figure F. Le manchon de semelle
s’enclencherasolidementàl’arrièredelasemelle.
Pour retirer le manchon de semelle,saisirlebasdumanchonàl’emplacementdes
deuxlanguettesarrièreettirerverslebaspourleséparerdelasemelle.
Conseils pratiques pour un usage optimal
Coupe de lamellés
Lorsqu’onremontelascie,onpeutengendrerdeséclatsdeboissurlasurfacelaplus
prèsdelaplaquedupatin.
-Utiliserunelameàdentsfines.
-Effectuerlacoupeàpartirdelasurfacearrièredelapièce.
-Afinderéduireauminimumleséclatsdebois,fixeruneretailledeboisouunpanneau
durdechaquecôtédelapièceetcouperàtraverslestroispièces.
Coupe du métal
-Ilnefautpasoublierqueladuréedecoupedumétalestbeaucouppluslongueque
celle du bois.
-Utiliserunelameconçuepourlacoupedumétal.
-Pourréaliserlacouped’unetôlemince,fixeruneretailledeboisàl’arrièredelapièceet
couperàtraverslesdeuxpièces.
-Étendreunfilmd’huilesurlalignedecoupeprévuepourfaciliterlefonctionnementde
l’outiletaccroîtreladuréedeviedelalame.Ilestpréférabled’utiliserdukérosènepour
couper l’aluminium.
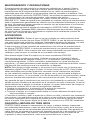
SCIAGE EN LONG/COUPE CIRCULAIRE (FIGURES G, H)
Leguidelongitudinal/leguidecirculaire(noncompris,moyennantdesfrais
supplémentaires)permetderéaliserfacilementunsciagerapideouunecoupe
circulairesanstraittiréaucrayon.
À l’aide de la vis fournie avec le guide accessoire,
positionnercommel’indiquelafigure G et visser la
visdanslasemellepourfixersolidementleguide.
Lorsdusciageenlong,positionnercommel’indique
la figure G et glisser le guide longitudinal sous la vis
d’uncôtéoudel’autredelascie.Réglerlatraverse
(10)àladistancevouluedelalame,puisserrerla
vis.Pourlesciageenlong,abaisserlatraverseet
l’appuyercontreleborddroitdelapiècecomme
dans l’illustration.
G
F

17
CetappareilnumériquedelaclasseBestconformeàlanormeNMB-003duCanada.
Cetappareilestconformeauxdispositionsduparagraphe15desrèglementsdela
FCC.Sonfonctionnementestrégiparlesdeuxconditionssuivantes:(1)Cetappareil
nepeutpascauserd’interférencenuisibleet(2)cetappareildoitacceptertoutesles
interférencesreçues,ycompriscellesquirisquentd’engênerlefonctionnement.
REMARQUE :cematérielaététestéetaétédéclaréconformeauxlimitesen
vigueurconcernantlesdispositifsnumériquesdeclasseB,envertudelapartie15
delaréglementationFCC.Ceslimitesvisentàassureruneprotectionraisonnable
contretoutbrouillagenuisibledansuneinstallationrésidentielle.Cematérielproduit,
consommeetpeutémettreuneénergiederadiofréquenceet,s’iln’estpasinstalléet
utiliséconformémentauxdirectivesquil’accompagnent,ilpeutentraînerunbrouillage
nuisibledescommunicationsradio.Cependant,nousnegarantissonspasl’absence
Pourunecoupecirculaire,réglerleguidelongitudinal
desortequeladistanceséparantlalamedel’orifice
situédanslebrasduguide(11)correspondeaurayon
recherché,puisserrerlavis.Placerlasciedefaçon
àcequel’orificedanslebrasduguidesetrouve
au-dessusducentreducercleàcouper(percerun
troupourlalameoucouperversl’intérieuràpartir
duborddumatériaupourmettreenplacelalame).
Lorsquelascieestdanslapositioncorrecte,enfoncer
unpetitcloudansletroudubrasduguide.Couperle
cercleaumoyenduguidelongitudinalutilisécomme
braspivotant.Pourunecoupecirculaire,latraverse
doitêtreenpositionrelevéecommel’indiquelafigure
H.
H
DÉPANNAGE
Problème Cause possible Solution possible
•L’appareilrefusede •Cordond’alimentation •Brancherl’outildans
démarrer. nonbranché. uneprisequifonctionne.
•Lefusibleducircuitestgrillé. •Remplacerlefusibledu
circuit.(Sileproduitfait
grillerdefaçonrépétée
le fusible du circuit, arrêter
immédiatementd’utiliserle
produitetlefaireréparer
dansuncentrederéparation
PorterCableouuncentre
deréparationautorisé.)
•Ledisjoncteurestdéclenché. •Remettreledisjoncteurà
zéro.(Sileproduitfait
déclencherdefaçon
répétéeledisjoncteur,
arrêterimmédiatement
d’utiliser le produit et le
faireréparerdansun
centrederéparationPorter
Cableouuncentrede
réparationautorisé.)
•Lecordond’alimentation •Faireremplacerle
ou la prise de courant est cordon ou l’interrupteur
endommagé(e). aucentrederéparation
PorterCableouàuncentre
deréparationautorisé.
Pourdel’aideavecl’outil,consulternotresiteWebwww.portercable.com pour
l’emplacementducentrederéparationleplusprèsoucommuniqueravecl’assistance
PorterCableau(888)848-5175.

18
debrouillagedanstouslestypesd’environnement.Si,aprèsavoireffectuéune
vérificationenmettantl’appareilhorstensionpuissoustension,l’utilisateurs’aperçoit
quecematérielprovoqueunbrouillagenuisibleàlaréceptiondessignauxderadioou
detélévision,illuifaudraessayerdecorrigercebrouillageenprenantuneouplusieurs
desmesuresci-dessous:
•Réorienterourepositionnerl’antennederéception.
•Éloignerlepluspossiblelematérieldurécepteur.
•
Brancherlematérieldansunepriseélectriquesituéesuruncircuitdifférentdeceluidu
récepteur.
•Consulterledistributeurouuntechnicienradio/télévisionexpérimentépourobtenirdel’aide.
Toutchangementoutoutemodificationàcetappareilquin’estpasexpressément
approuvéparl’institutionresponsabledelaconformitépeutfaireannulerledroitde
l’utilisateurd’utilisercematériel.CetappareilnumériquedelaclasseBestconformeà
lanormeNMB-003duCanada.
ENTRETIEN
N’utiliserqu’undétergentdouxetunchiffonhumidepournettoyerl’appareil.Nejamais
laisserdeliquidepénétrerdansl’appareiletn’immergeraucunepartiedel’appareildansun
liquide.
PIÈCES DE RECHANGE
Utiliserseulementdespiècesderechangeidentiques.Pourobtenirunelistedespièces
de rechange ou pour en commander, consulter le site Web www.portercable.com. Il est
égalementpossibledecommanderdespiècesaucentrederéparationdel’usine
PORTER-CABLEetaucentrederéparationsousgarantieautoriséPORTER-CABLEle
plusprès.Oucomposerle1-888-848-5175pourleserviceàlaclientèle.
ENTRETIEN ET RÉPARATION
Ceproduitn’estpasréparableparl’utilisateur.Aucunepièceàl’intérieurduchargeur
nepeutêtreréparéeparl’utilisateur.Pourévitertoutdommageauxcomposants
internessensiblesàl’électricitéstatique,faireeffectuertouteréparationparuncentrede
réparationautorisé.PourdeplusamplesrenseignementsàproposdePORTER-CABLE,
sescentresderéparationenusineousescentresderéparationsousgarantieautorisés,
visiternotresiteWebauwww.portercable.comoucommuniqueravecnotrecentrede
serviceàlaclientèleencomposantle888-848-5175.Touteslesréparationseffectuées
dansnoscentresderéparationsontentièrementgarantiescontrelesdéfautsde
matériauxetdemain-d’oeuvre.Nousnepouvonspasgarantirlesréparationseffectuées
en partie ou totalement par d’autres.
Pourdeplusamplesrenseignementsparcourrier,écrireàPORTER-CABLE,4825
Highway45North,Jackson,Tennessee38305,(888)848-5175, É.-U.-àl’attentionde:
ProductService.S’assurerd’indiquertouteslesinformationsfigurantsurlaplaque
signalétiquedel’outil(numérodumodèle,type,numérodesérie,etc.).
ACCESSOIRES
Lasciealternativeestcompatibleavectoutelamedelongueurmaximalede305mm
(12po).Toujoursutiliserlalamelapluscourtequiconvientàvotretravail.Leslames
longuesrisquentdavantaged’êtrepliéesouendommagéesdurantleurutilisation.
Durantleurutilisation,certaineslameslonguespeuventvibrerouémettredes
secoussessilascien’estpasmaintenueencontactaveclapièce.
AVERTISSEMENT : Puisquelesaccessoiresautresqueceuxoffertspar
PORTER-CABLEn’ontpasététestésavecceproduit,l’utilisationdeceux-ciavec
l’outilpourraits’avérerdangereuse.Pourréduirelerisquedeblessures,utiliser
exclusivementlesaccessoiresPORTER-CABLErecommandésavecleproduit.
Lescentresderéparationdel’usinePORTER-CABLEoulescentresderéparationsous
garantieautorisésPORTER-CABLEsontenmesuredevousfournirlagammecomplète
d’accessoires.ConsulterlesiteWebwww.portercable.compourobteniruncatalogue
ou le nom du fournisseur local.
GARANTIE LIMITÉE DE TROIS ANS
PORTER-CABLErépareraouremplaceragratuitementtouslesoutilsdéfectueux
présentantdesdéfautsdematériauoudefabricationpendanttroisansàcompterde
ladated’achat[garantiededeuxanspourlesblocs-piles].Cettegarantienecouvre
pasdesdéfaillancesdepièceduesàuneusurenormaleouàunemauvaiseutilisation
del’outil.Pourplusdedétailsrelatifsàlacouverturedelagarantieetauxréparations
sousgarantie,visiterlesitewww.portercable.comoucomposerle888-848-5175.

19
Cettegarantienes’appliquepasauxaccessoiresniauxdommagescauséspardes
réparationsréaliséesoutentéespardestiers.Cettegarantievousaccordedesdroits
légauxspécifiquesetilestpossiblequevousayezd’autresdroitsquivarientd’unÉtat
oud’uneprovinceàl’autre.
Enplusdelagarantie,lesoutilsPORTER-CABLEsontcouvertsparnotre:
SERVICE D’ENTRETIEN GRATUIT D’UN (1) AN : PORTER-CABLEentretiendral’outil
etremplaceralespiècesuséesparuneutilisationnormale,etce,gratuitementetà
toutinstantpendantlapremièreannéeàcompterdeladated’achat.
GARANTIE DE REMBOURSEMENT DE 90 JOURS : Sil’utilisateurn’estpas
entièrementsatisfaitdesperformancesdesonoutilélectriquePORTER-CABLE
pouruneraisonquelconque,ilpeutleretourneraccompagnédureçudansles90
jourssuivantladated’achat,etnousleluirembourseronsentièrement-sansposerde
question.
AMÉRIQUE LATINE :cettegarantienes’appliquepasauxproduitsvendusen
Amériquelatine.Pourceux-ci,veuillezconsulterlesinformationsrelativesàlagarantie
spécifiqueprésentedansl’emballage,appelerl’entrepriselocaleouconsulterlesite
Webpourlesinformationsrelativesàcettegarantie.
Pourenregistrerl’outilenvued’obtenirunservicedegarantie,consulternotresite
Web au www.portercable.com.
REMPLACEMENT DES ÉTIQUETTES D’AVERTISSEMENT
Sivosétiquettesd’avertissementsontillisiblesoumanquantes,contactezle
888-848-5175pourenobtenirleremplacementgratuit.
Lesélémentsci-dessoussontdesmarquesdecommercedesoutilsetdesaccessoiresde
PORTER-CABLE:unagencementdecouleursgriseetnoire;unmotifd’«étoileàquatre
pointes»ettroisbandeslongitudinalescontrastantes/àcontours.Lesmarquessuivantessont
égalementdesmarquesdecommerceserapportantàunouplusieursproduitsPORTER-
CABLEouDelta:2BY4®,890™,AirAmerica®,AIRBOSS™,Auto-Set®,B.O.S.S.®,
Bammer®,Biesemeyer®,BuildersSaw®,ChargeAir®,ChargeAirPro®,CONTRACTOR
SUPERDUTY®,Contractor’sSaw®,Delta®,DELTA®,DeltaIndustrial®,DELTAMACHINERY
&DESIGN™,DeltaShopmasterandDesign®,DeltaX5®,Deltacraft®,DELTAGRAM®,
DoIt.FeelIt.®,DUALLASERLOCANDDESIGN®,EASYAIR®,EASYAIRTOGO™,
ENDURADIAMOND®,Ex-Cell®,FrontBevelLock®,GetYoursWhiletheSunShines®,Grip
toFit®,GRIPVAC™,GTF®,HICKORYWOODWORKING®,Homecraft®,HPFRAMER
HIGHPRESSURE®,IMPACTSERIES™,InnovationThatWorks®,Jet-Lock®,JobBoss®,
Kickstand®,LASERLOC®,LONG-LASTINGWORKLIFE®,MAXFORCE™,MAXLIFE®,
Micro-Set®,Midi-Lathe®,Monsoon®,MONSTER-CARBIDE™,Network®,OLDHAM®,
Omnijig®,PCEDGE®,PerformanceCrew™,PerformanceGear®,PocketCutter®,Porta-
Band®,Porta-Plane®,PORTER-CABLE®,PORTER-CABLEProfessionalPowerTools®,
Powerback®,POZI-STOP™,PressureWave®,PRO4000®,Proair®,QuicksandandDesign®,
QuicksetII®,QUIETDRIVETECHNOLOGY™,QUIETDRIVETECHNOLOGYANDDESIGN™,
Quik-Change®,QUIK-TILT®,RAPID-RELEASE™,RAZOR®,RedefiningPerformance®,
Riptide®,SafeGuardII®,SandTrapandDesign®,SandingCenter®,SawBoss®,Shop
Boss®,Sidekick®,SiteBoss®,Speed-Bloc®,Speedmatic®,StairEase®,SteelDriverSeries®,
SUPERDUTY®,T4&DESIGN®,THEAMERICANWOODSHOP®,THEPROFESSIONAL
EDGE®,Thin-Line®,TigerSaw®,TIGERCLAW®,TIGERCLAWANDDESIGN®,Torq-Buster®,
TRU-MATCH®,T-Square®,Twinlaser®,Unifence®,Uniguard®,UNIRIP®,UNISAW®,
UNITEDSTATESSAW®,Veri-Set®,Versa-Feeder®,VIPER®,VT™,VTRAZOR™,Water
Driver®,WATERVROOM®,Waveform®,WhisperSeries®,X5®,YOURACHIEVEMENT.OUR
TOOLS.®Lesmarquesdecommercesuiviesdusymbole®sontenregistréesauprèsduUnited
StatesPatentandTrademarkOfficeetpeuventêtreenregistréesdansd’autrespays.D’autres
marquesdecommercepeuventégalementêtreapplicables.
4825Highway45North,Jackson,Tennessee38305
(888)848-5175www.portercable.com

20
Advertencias generales de seguridad para herramientas eléctricas
ADVERTENCIA: Lea todas las advertencias de seguridad e instrucciones El
incumplimiento de las advertencias e instrucciones puede provocar descargas
eléctricas,incendiosolesionesgraves.
Conserve todas las advertencias e instrucciones para futuras consultas.
Eltérmino“herramientaeléctrica”incluidoenlasadvertenciashacereferencia
alasherramientaseléctricasoperadasconcorriente(concableeléctrico)oa
lasherramientaseléctricasoperadasconbaterías(inalámbricas).
1) Seguridad en el área de trabajo
a) Mantenga el área de trabajo limpia y bien iluminada. Las áreas abarrotadas y
oscuras propician accidentes.
b)
No opere herramientas eléctricas en atmósferas explosivas, como ambientes
donde se encuentran líquidos, gases o polvo inflamables. Las herramientas
eléctricas originan chispas que pueden encender el polvo o los vapores.
c) Mantenga a los niños y espectadores alejados de la herramienta eléctrica en
funcionamiento. Las distracciones pueden provocar la pérdida de control.
2) Seguridad eléctrica
a) Los enchufes de la herramienta eléctrica deben adaptarse al tomacorriente. Nunca
modifique el enchufe de ninguna manera. No utilice ningún enchufe adaptador con
herramientas eléctricas con conexión a tierra. Los enchufes no modificados y que se
adaptan a los tomacorrientes reducirán el riesgo de descarga eléctrica.
b) Evite el contacto corporal con superficies puestas a tierra, como por
ejemplo tuberías, radiadores, rangos y refrigeradores. Existe mayor riesgo de
descarga eléctrica si su cuerpo está puesto a tierra.
c) No exponga las herramientas eléctricas a la lluvia o a condiciones de
humedad. Si ingresa agua a una herramienta eléctrica, aumentará el riesgo de
descarga eléctrica.
d)
No maltrate al cable. Nunca utilice el cable para transportar, tirar o desenchufar la
herramienta eléctrica. Mantenga el cable lejos del calor, aceite, bordes afilados o
piezas móviles. Los cables dañados o enredados aumentan el riesgo de descarga eléctrica.
e) Al operar una herramienta eléctrica en el exterior, utilice un cable
prolongador adecuado para tal uso. Utilice un cable adecuado para uso en
exteriores a fin de reducir el riesgo de descarga eléctrica.
f) Si el uso de una herramienta eléctrica en un lugar húmedo es imposible de
evitar, utilice un suministro protegido con un interruptor de circuito por falla a
tierra (GFCI). El uso de un GFCI reduce el riesgo de descargas eléctricas.
3) Seguridad personal
a) Permanezca alerta, controle lo que está haciendo y utilice el sentido común
cuando emplee una herramienta eléctrica. No utilice una herramienta eléctrica
si está cansado o bajo el efecto de drogas, alcohol o medicamentos. Un momento
de descuido mientras se opera una herramienta eléctrica puede provocar lesiones
personales graves.
b) Utilice equipos de protección personal. Siempre utilice protección para los
ojos. En las condiciones adecuadas, el uso de equipos de protección, como
máscaras para polvo, calzado de seguridad antideslizante, cascos o protección
auditiva, reducirá las lesiones personales.
20
PAUTAS DE SEGURIDAD/DEFINICIONES
Esimportantequeleaycomprendaestemanual.Lainformaciónquecontienese
relacionaconlaproteccióndeSUSEGURIDADylaPREVENCIÓNDEPROBLEMAS.
Lossímbolosquesiguenseutilizanparaayudarloareconocerestainformación.
PELIGRO: indicaunasituacióndepeligroinminenteque,sinoseevita,provocará
la muerte o lesiones graves.
ADVERTENCIA: indicaunasituacióndepeligropotencialque,sinoseevita,
provocarálamuerteolesionesgraves.
PRECAUCIÓN: indicaunasituacióndepeligropotencialque,sinoseevita,
provocarálesioneslevesomoderadas.
PRECAUCIÓN: utilizadosinelsímbolodealertadeseguridadindicaunasituación
depeligropotencialque,sinoseevita,puedeprovocardañosenlapropiedad.
La page est en cours de chargement...
La page est en cours de chargement...
La page est en cours de chargement...
La page est en cours de chargement...
La page est en cours de chargement...
La page est en cours de chargement...
La page est en cours de chargement...
La page est en cours de chargement...
La page est en cours de chargement...
La page est en cours de chargement...
La page est en cours de chargement...
La page est en cours de chargement...
-
 1
1
-
 2
2
-
 3
3
-
 4
4
-
 5
5
-
 6
6
-
 7
7
-
 8
8
-
 9
9
-
 10
10
-
 11
11
-
 12
12
-
 13
13
-
 14
14
-
 15
15
-
 16
16
-
 17
17
-
 18
18
-
 19
19
-
 20
20
-
 21
21
-
 22
22
-
 23
23
-
 24
24
-
 25
25
-
 26
26
-
 27
27
-
 28
28
-
 29
29
-
 30
30
-
 31
31
-
 32
32


Porter Cable PC600JS Manuel utilisateur
- Catégorie
- Outils électroportatifs
- Taper
- Manuel utilisateur
dans d''autres langues
- English: Porter Cable PC600JS User manual
- español: Porter Cable PC600JS Manual de usuario
Documents connexes
Autres documents
-
Porter-Cable PC600JS Manuel utilisateur
-
-
-
-
-
DeWalt DWE349 Manuel utilisateur
-
-
DeWalt DW349 Manuel utilisateur
-
Bostitch BTE340K Manuel utilisateur
-