wvvw.GEAppliances.com
Water Filtration System
Syst&rne de Filtration d'Eau
(;x zs50F (;X ZS50F
(;QSSSOF (;QSSSoF
Safety Instructions ............ 2
System Overview ........... 3, 4
Installation Instruglions .... 5-14
BatterT Installation ............ 12
Faucet Installation ........... 8, 9
Feed _'ater Supply ........... 6-8
Filter Replacement ........... 13
Flush Procedule ............. 14
Sysmm Installation ............ 10
Svsmm Starmp ............... ] 3
Tubing Connection ........... 11
Troubleshooting Tips ........ 15
Consumer Support .......... 20
Instructions de s&urit_ ........ 2
Vue d'ensemble sur le systbme .3, 4
Instruc¢ions d'installation . .5-14
Approvisiotmement en eau .... 6-8
Installation de la pile .......... 19
Installation du robinet ........ 8, 9
Installation du syst_me ........ 10
Mise en marche du syst&me .... 13
Procedure de rinqag_ ......... 14
Raccord des myaux ........... 11
Remplacement du fihre ....... 13
Conseils de d@annage ....... 16
Soutien du consommateur ..... 19
GX1S50Fand 6Q1S50Fare Tested and Certified
by NSFInternational against NSF/ANSI
Standard 42for the reduction of Chlorine: Taste
and Odorand Particulate Class ] and Standard
53for the reduction of Lead, Cyst,Turbidity,
Asbestos, Mercury, Lindane andAtrazine.
Les appareils 6X1SSOFet 6Q1SSOFont 6t6
essay6s et certifi6s par NSFInternational
conform6ment _ la norme 42 NSF/ANSI en
mati_re de r6duction de chlore : de saveur
et d'odeur et de particules de classe ! et
confurm6ment _ la norme 53 enmati6re de
r_duction de plumb, despores, de turbidit6,
d'amiante, de mercure, de lindane et d'atrazine.
184D1065PO01 49-501!6-1 03-04JR

IMPORTANTSAFETYINFORMATION.
READALLINSTRUCTIONSBEFOREUSING.
WARNING:Foryoursafe_,theinformationinthismanualmust
be followed to minimize the risk of property damage or personal injury
SAFETYPRECAUTIONS
• Use the Water Filtration system on a ix)table, salb-to-dtink, home
COLDwater supply onl> The tilter canister will not tmrit} , the water,
or make it sale to drink.
• Do not use on a hol waier supply (IO0°F max.).
_, WARNING:Donotusewithwater that is microbiologica//y
unsafe or of unknown quality without adequate disinfection before or after the
system. Systems certified for cyst reduction may be used on disinfected water
that may contain filterable cysts.
PROPERINSTALLATION
This Water Filtration system must be properly installed and located in
accordance with the Installation Instructions before it is used.
• Install or store where it will 171otbe ext)osed to tel//l)eratt71res bel()71v
/i'eezing or exposed to any type of weather. Water ti'eezing in tile
sv.stem will dmnage it. Do not attempt to treat 71,,v_tero\'er 10I)°F.
_k WARNING:Discardallunusedandpackagingmatariala_er
installation. Small parts remaining after installation could be a choke hazard.
• }()lit Water Filtt<io171 svste17171 will withstand lip io 1 20 t)OlllldS per
square inch (psi) water pressure. It g)ur house water supply pressure
is higher dlan 100 psi, install a pressm:e reducing _alve be/bre
installing the Wamr Filtration s_stem.
READANDFOLLOWTHISSAFETY
INFORMATIONCAREFULLY.
SAVETHESEINSTRUCTIONS
MESURESDESECURITEIMPORTANTES.
LISEZD'ABORDTOUTES
LESINSTRUCTIONS.
A AVERTISSEMENT:Pourvotres_curit_,suivezles
instructions fournies dans le present manuel afin de minimiser les risques
de dommages au materiel ou de blessures corporelles.
PRE-CAUTIONSDESE-CURITE
• Eltilisez _otre svst{'lne de filtration d'eau uniquement sur 71me
canalisadon d'eau FROlOEpotable. I e (artou(he de Ill(ration ne
pmilie pas l'eau, ou ne la rend p_ts potN_le.
• N'utilisezjamais xou:e S_','St{517171(!(!171]'aliment.ant d'eau (]latlde (37,7°C
II tt0°F I max.).
AVERTISSEMENT:N'.tilisezjamaisvotrosyst_mo do
filtration avec de I'eau microbiologiquement polluOe ou de qualitO inconnue,
sans avoir mont_ un dispositif de d_sinfection ad@uat en amont ou en aval du
syst_me. Vous pouvez utiliser un syst_me certifi_ de r_duction des spores sur
de I'eau d_sinfect_e qui peut contenir des spores filtrables.
INSTALLATIONPROPRE
Avant son utilisation, le systbme de filtration doit #tre correctement installb et
positionnb conformbment aux instructions d'installation.
• _lolltez ()H I'_lngez _,otre _-,_'st('171/(' /lni(t/lel//ent d:dns (Jes eli/Ilia( eII71ell|S
o171il n'est pas exl)osd au gel ou _'_(tu mam'ais retails. En gelam, l'eau
e171doI7171mag-('\'olre by.st&me de tilir:tiiolL N'essayez pas de traiter de
l'eau dont la teml)&:ature est SUl)&iem:e _'_100 (tegTds E
_, AVERTISSEMENT:JeteztoutmatOriaud'omballageet
mat&iau que vous n'aurez pas utilisO aprOs /e montage. Los petites piOces qui
restent aprils le montage peuvent poser un risque d_tranglemenL
• Votre sxtst_"l/le de/iltration (t'ea711 tol_'re.i71isq[l'_'l ] 20 lJ_,Tes par t)Oll(e
carrd (psi) de pression d'eau. Si la pres.sion de _otre aliment:ation
d'eau domestique est plus dh'vde que 100 psi, montez u171robinet
r{*'dllc|ellr de t)ression el/ alI71ont de volre svM{'ii71e de ]iltl_ltJon (t'eall
{1_,}1171|de l//onter volre s_Lsi{,li71e de ]iltl_ltion (t'eall.
VEUILLEZLIREETSUIVREATTENTIVEMENT
CESMESURESDESE-CURITE
CONSERVEZCESINSTRUCTIONS
2

Specifications Guidelines.
Many bad tastes and!or odors are reduced ti'om water using actiwtted
cal?boll fiher eal]lStel?s. They are ]Host oJ[el] tlsed to reduce a c]]lOlJl/e
taste and odor. They can also reduce other undesirable elements
/i'om drinking water supplies, such as orgvmic chemical contaminm_ts
and lead.
NOTE."Smaflamounts of hydrogensulfide [eoticeable as "rotten egg"odor) may be
reducedby taste and odor filters for a short time, but thecarbonmedia is quickly
exhausted. Otherwater coeditioeing equiprneet is usuaflyrequired for the continuous
treatmeetof hydrogen sulfide.
The Water Filtration System Uses the Following Canister
Models GXIS50F and GQIS50F
(;XRI QR Fiher
(750 gMlon (apacity)
Filter White canister with vellowband
• Reduces dirL rusi and sedimem
• Reduces Chlorine: "Ihste and ()dot
• Reduces I,e_xt
• Reduces tilierable C'_'qs (such as cr_]_tost)oridium and gJatxtia)
• Reduces Turbidiv_
• Red I_ces Asbestos
• ]led lIces Metxl]l _}
• Red uces I .indane
• Reduces An:aNne
• 0.5-1 micron nominal particulate reduction
This system con[irons to NSF/ANSI 42 and 53 ]br the specific
perJbrmanee claims as _vrified and sustained by test data. See
PerJbrmance Dam Sheet tbr details.
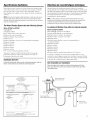
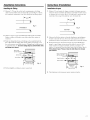
Installation Overview
Locate the drinking water system on the cold water supply pipe, under the
kitchen and/or bathroom sink, to filter the cold drinking water
Directivesde caracteristiquestechniques.
()1/petit att('l/lleF de llOl//bl°et]ses iilatW_lises ()(let]IN et de I/()iil])I'e/[x
mauvais gofits de l'eau en utilisant des cm:touches de/iltre en charbon actill
()n utJlise prindt)ah'ment celle._i pour rdduire le goOt et l'odeur de chlore.
()n peut rig:dement les utiliser pour enle_T d'mmx's ('l('ments ind('sil_d_les
darts Fal}lm)\isiom]ement en eau potable, comme le plomb et h's
contaminmlts de chhnie org_mique.
NOTE: Les filtresd'odeurset desaveurspeuveetr_duirependantpeu detemps
depefits reactantsd'hydrogbeesulfur_ (odeurd_ufs pourris),maisle charboequ'ils
coetienneetestrapidemeet@uise. I/faut utiliser d'autres instrumeetsde
coeditioenemeetfl'eau pour traiter demani_re continue I'hydrogbeesulfur_.
Lesysteme de filtrationd'eauutilise la cartouchesuivante
Modeles GXIS50F et GQIS50F
Filttx' (;XPdQ)R (capacit(' de 750 g_dlons)
Catloudle de filux' blanche a_vc une bande jaune
• R('duit la salet& la tx)uille et les s&timents
• R('duit le chlore :son gofit et son odeur
• R('duit le plomb
• R('duit les si)ores fihrables (comme les cryptosporidies et
les parasites lambia)
• Rdduit la mqfitude
• Rdduit l'amiante
• R('duit le mercmx'
• R('duit le lindane
• R('duit l'atrazine
• R('duit le diam"it\' nominal de particules de 0,5-1 micron
Ce s_,t_'me se con/hi,he aux normes 42 et 53 NSF!ANSI en ce qui
collcerne les caractddstiques m/noncOes de rendemem, qui sont vg'Hfi('es
et soutenues par les donndes obtenues lots des ex_,ais. Collsultez la Feuille
de (t(mnOes de rendement pour de plus amities dOtails.
Vue d'ensemble sur I'installation
Placez le systbme d'eau potable sur le tuyau d'approvisionnement d'eau
froide, sous I_vier de la cuisine ou le lavabo de la salle de bain, pour filtrer
reau potable froide.
State _,f Cithfolnla
[)q_utmcnt _,f Health qelvl._a
Wafer Tleulmenl De_ ic_
eerliflcal_ Number
U2- 1526
Date I_g_e_ kin, 7, 2bD2
GE Sm_._V_at,r GX]_L I,XRLQR
Gt Sm,u t% _k-i GX I$5DF GXRLQR
L,-a
I_,lte,I Ser. ie_Ca i,a,'il : 75O _al I_,lte,I Ser. ie_ Fh,w: 07_ _.pm
Con,UU,,n_ or CerUlicaU,,n:
cy_ reducr_,,nmay be _r_d ,,n d_st,,f_ted wate_ that may c,,ntam fil_erabte cysts,
Sink/ Evier
Hat/
Chaud Froid
WaterSupplyValve/
Robinetd'approvisionnementd'eau
FilteredWater Faucet/
Robinetd'eaufiltr6e
' Adapter/ ':_
Adaptateur _ _ _/
inlet/ Outlet/
Entr6e Sortie
FilterCanister/
Cartoucl_edefiltre
3

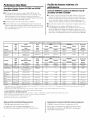
Performance Data Sheet.
SmartWater FiltrationSystemsGXIS50Fand GQIS50F
UsingFilterGXRLQR
• This 8)stem has be(n t_ st_ (1 _/(cording to NSF/ANSI 42 and 53 lot
th( reduction of the subs|antes list_ d below: The con(emrafion of tile
indicated stlbstal/ces Jll wH[t_l"(llteFillg the S}S[( Ill _,\_kS reduc(d to a
concentration l(ss than or (qual t() the permissible limit tot/_lt_ r l(axing
the s}smm, as specified in NSF/,\NSI 49 and 53.
• ,\(trial perlbmlance ma} xm) with local water conditions.
• Do not us( with water that is microbiologically unsa[i' or with water of
unknown quality without ad(quat_ disildi_ction betbr( or al_er the s}stem.
S}st_ ms certifi(d tbr c_st r(duction may b( us(d on disinfi.'cmd waters that
may contain filt_ table (3sts.
Feuillet de donnees relatives a la
performance.
CartoucheGXRLQRdusysMmes de filtration d'eau GE
SmartWater GXIS50Fet GQIS50F
• Ce s}st('me a ('td (ssl} (' s(l(m l(s normes NSF/,\NSI 49 (t 53 pour une
r('dltctiol/de s/tbstalic(s ('ll/lii/t_y('es ci-dessous. I,a COliC( Ilty;itJoI/d(s
substances indiqu& s dam l'eau qui (ntre &ms 1( s}st('m( a dr(' rdduit_ 5
/me conc(ntration ildk:rieure ou dgak fl la limite permis( pour l'(au
quiuant 1( s}stbm(, telle qu( pr&isde par la norm( NSFZ,\NSI 42 (t 53.
• I,e rendem(nt r&l peut v_u:i(r en fimcthm des condithms locales d'(au.
• N'utilisezjamais votre s}'stOme de fihmtion m_c de l'eau
microbiologiquement pollude ou de (tualit6 ineomme, sans avoir
mould un dispositil de ddsinl('ction ad&/uat el/ amont ou en a\ al
du s}_st6me. Vous pou\'t'z utiliser m/s_'q('me t erlifid de r('duction des
Niores sur de l'eau dOsinl_'ctde qui peut eomenir des spores filtmbles.
USEPA
Parareeter MCL
USEPA
Parareetre MCL
Chlofine/Chlo_e
T 8,'O
Parficulam**/
Pardc_lles
Standard No. 42: Aesflmtic Effects / Norme N ° 42 : Effets esfl%d(
Influeut
Challeuge Cooeeutratioo
Oualite
iuRueut coueeutratiou
2.0 rag/l. + 10%
-> 10000 particles,
parfiofles/mL
luflueut
Average
luRueut
lnoyeu
1.88 rag/l,
5700000 #/ml,
Efflueut
Average Maxiremn
Efflueut
Moyeuue Maxiremn
<0.05 rag/l, 0.06 regal,
30583 #/mL 69000 #,ml,
Standaixl No. 53: Health Effects / Norme N ° 53: Effects de sant_
USEPA Influeut
Parareeter MCL ChalleugeCooeeutratimt
USEPA Oualite
Paratnetre MCL iuRueut eoueeutratiou
"l/ll'|)i(]it)//°|/ll'|)i(lit_ | N'li *":* 11 + 1 N'li *":*
(X_,_,/Spores 99.{)5% wd. Min. 500001,
-\_,best__s/-ksbeste {)9% led. 107and/el l 0_fibel-,/libws/1,;
fiber,/fibres >10 pm
longj de long
[ _ead/Plomb, 0.015 mgiL 0.15 mgi1, + 10%
pl t 6.5
LeadiPlomb. 0.015 mg/L 0.15 rag/l, + 10%
pl t 8.5
Me_vul)_ Mert ule, 0.002 ms/1, 0.006 mgi1, + 10%
pl t 6.5,
Me_ In )7'Meroll e, 0.002 rag/l, 0.006 ms/l, + 10%
pl t 8.5,
[ ,indmle ).0002 mgi1, 0.002 mgi1, + 10%
Au'azine 0.003 ms/|, 0.00{) ms/l, + 10%
luRueut
Average
luRueut
inoyeu
11.18 N-fl_
220000 #/1,
155 MF/L
0.153 mgi1,
0.150 rag/l,
0.006 mgi1,
0.006 ms/l,
0.002 mgi1,
0.00873 ms/l,
Efflueut
Average Maxitnmn
Efflueut
Moyeuue Maxitnmn
0.315 N-I| 0.049 NT[
0 0
<1 <1
<O.OOl <0.001
<0.001 <0.001
0.00026 0.0005
0.0008 0.0015
0.000025 0.00007
<0.002 <0.002
lieS
Average
Moyeuue
>97.2t7_
99.52%
% Reduetiou
% R_luetiou
Mhtireum
Mhtireum
96.84(d
98.94'd
% Reduetiou
Average Mhtitnt,,/n
% R_luetiou
Moyeuue Miuireuln
97.12% {)5.15tX
>99.99'X >{){).99%
>99.{){)% >99.{){)%
>99.35'_ >9{).35_
>99.35_ >99.35_d
{)8.72% 90.91%
{)8.72_ 75.93%
98.72_ {)6.50'_
76.99'_ 75.31 td
Miu. Required
Reduction
Reduetiou
exigeautereiu,
>-5O%
->85%
Miu. Required
Reduction
Reduetiou
exiqeautereiu.
0.5 Nfl
>{){).{)5%
99%
0.010 mg/L
0.010 mg/L
0.002 mg/L
0.002 mg/L
0.0002 mg/L
0.003 mg/'L
_:l_st<d using a llow rote <d0.78 gpm (2.{)5 l/rain); pressure o| 60 psig; pit of 7.5 ± 0.5 romp. of68 <± 5F (20 _ ± 3_C) / _l_:s_ milisan_ un d_bit d< 2 {)5l/rain /me press|on d< 4,2 14gicm2
un pl t de 7,5 ± 0,5: et/me wrap. de 20 C + 3° C
**Mea_,memel_t in parti(:les/mI.. Particles u_,d were 0.5-1 microns. / Mesures en parfiollesiml,. [*,s parfiolles/lfili_s _mient de 0,2_1 micron.
*-_'*NTU--Nephelometdc Tmbidil_ [ nit_, / NF[ unilOs de turlfiditd n(,ph(,lom(,uique
Operating Spedficafions / Sp_dfications d'op_rafion
Cap_cit_: certified fin lip to 750 gallons (2,838 I); lip Io six months / Capacitd : cerliti(,e ju_,q/l'fi maxmimum de 2838 l; jusqu'fi maxfimlm de six mois
Pre',_ure req/fi_ement: 32_120 psi (2.8_K2 bar) / Exigence en mati_,_e de pre._si6n : 2,8 fi 8,2 bar
_l_'mperamre: 33-1()0F (().i_-38 C) / "I_'mp('t'ature : 0,6-38 C
FI(,_ n_m: 0.78 gpm (2.{)5 l/rain) / D('bit : 2,95 l/rain
Replacement Filter Canister/Estimated Replacement Costs
(;XPd ,O]_Repla(emen| filter (anister <;30-35
D)r wpla(_nent parts, tall loll-/ix'e 800.626.2009 (LI.S.),
800.663.6060 (Cm_atta-English), 800.361.3869 ((Snada-Frt'mh)
Remp/acement de/a cartouche de fi/tre/CeOtsestimes de remp/acement
(;XRI O..R--(_mou(he de tiltre de rempla(ement 30-358
Pore: les pi,N es de remplat ement, appelez _ms/mis le num('ro
800.626.9009 (aux l{tats-Unis), 800.fiO3.(R)(i0 (Canatta anglais),
800.361.3869 ((Snada tmniais)
4

Installation Instructions.
ImportantInstallation Recommendations
A WARNING:Readentiremanual.Failureto_ollowallguidesand
rules could cause personal injury or property damage.
• Check with your Iocal pubfic works department for plmnbing codes, You
must foflow their guides as you instafl the Water Filtration system.
Toolsand Materials Requiredfor Installation
• Phillips scrc_,(h'i_vr
• "I'_o(2) a(!iusmblewrenches
• ElectlJc (hill and &fill bit to drill 3/4" hole (type as )x'quired)
if mounting hole is needed h)r/imcet
• 1/16" drill bit (optional for pilot holes)
• If your main wamr line is a *ig{d pipe, you will require a compression
lilting and possibly other t)lumbing hardware to coral)lore the
installation.
A CAUTION:re avoiddamagingthe sink,consulta qualified
plumber or installer for drilling procedures. Special drill bits may be needed
for porcelain or stainless steel.
ContentsIncluded with the Product
• Water tilter .Wstem asseml)ly, includiHg molmting s(rcw and (tout)h'-
sided tape
• Feed water adapter and supply valve
• Faucet assembly with electronic base monitor and tubing
InstructionsdTnstallation.
Recommandationsimportantesd'installation
ll_AVERTISSEMENT:UseztoutlemanuelSivousnesuivez
pas toutes los directives etles rbgles, vous pouvez occasionner des blessures
corporelles et des dommages matbriels.
• Verifiez yes codes de plomberie anpres de votre service de travaux
publics. Vous devez vousy conformer pour mentor votre systeme de
filtration d'eau.
Outilset materiaux necessairespour rinstallation
• Lln tournevis t'hillit)s
• Deux (2) (l('s angkdses
• Une perceuse ('lectrique et une m6(he de perceuse pour percer tm
trou de 3/4 po (de la cat('gorie requise) si m_ trou de montage est
n('cessaire t)o/lr le Fobillel,
• Line m6che de t)erceuse de l !l 6 t)o (en option pour trous pilotes)
• Si votre (Oll(l/ItJte ])}Jncil)al(' (t'(';-HI est /11/ tllVa/l l_gJd(', VO/IS a/lrez
besoin d'mm hague de COml)ression et 1)eut_'tre d'autres arti(les de
t)lomberie t)our terminer l'installadon.
A MISEENGARDE:Pourbviterd'endommagerl_vier,
consultez un plombier ou un installateur qualifib pour trouver la bonne
procbdure de percement du trou. Des mbches de perceuse spbciales
peuvent #tre requises pour la porcelaine ou I'acier inoxydable.
Pieces comprisesavec le produit
• I ,'cnscmt)le du svst6me (Ic tiltre d'eau, comp_x'nant los vis de montage
et till chatterton de lllOI/t_t,ge _1 (te/tx/itces
• El:j, adaptatem: d'eau d'alimentation et un robinet d'apt)ro_siom_ement
• Un m6canisme de robinet a_e( moniteur de base ('lectronique et tuvau
5

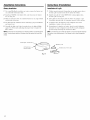
Installation Instructions.
FeedWaterAdapterandSupplyValve
A. PREFERREDINSTALLATION
(Utilizing existing kitchen sink water supply valve [A] and removable faucet
tubing [B])
For 1/2-inch and 3/8-inch installations
1. Re/_'r to Fig. 1 Io coml)leie asseulbl_ rdel)ending on sul)pb/_vdve
size (A).
2 Turn oil tile C()I,D walel: supply _dve (A).
3. UllSCl:ewthe existingliulcet tubingline (B) |i:om the sul_ply\alve (A),
C()I J) side onk NOTE."ForrigMpipe, see C Optional Installationon page Z
InstructionsdTnstallation.
Adaptateurd'eaud'alimentation
et robinetd'approvisionnement
A. INSTALLATION PREFEREE
(Utilisant le robinet existant d'approvisionnement d'eau de I'_vier
de cuisine [A] et un tuyau du robinet amovible [B])
Pour des installations de 1/2 po et 3/8 po
1. Consultez la Figure 1 pour l'installation COml)l_'te, selon la taille
du robinet d'al)provisiomlement (A).
2. Coupez le robinet d'appm\'isiomlement d'eau Iq<()II)E (A).
3.
(A), uniquement du c&t(' FROID. NOTE: Pouruneinstallationfie twau rigicle,
consultezC InstallationenOption,pages7-8,
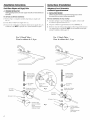
For 3/8-inch Valve /
Pour le robinet de 3/8 po
For 1/2-inch Valve /
Pour le robinet de 1/2 po
(B)Faucettubing
line(notincluded)/
Tuyauderobinet
(pascompris)
-(
t (D)Coupling/ (F)Met valve/Raccord Robinet
d'ap_ " "
(C)Adapter/ @ (F)inletvalve/ Robinet Fig. 2
Adaptateur d'approvisionnement
(G)Gasket/Joint _@
(A) Water supply
valve (not included) /
Robinet
d'approvisiennement
d'eau (pas cempris)
(H)Ferrule/
,Bague
(I)Nut /
Ecreu
(C)Adapter/
Adaptateur
(B)Faucettubing
line(notincluded)/
Tuyaude robinet
(pascempris)
(D)Coupling/
'_ Raccerd
(F)Inletvalve/ Robinet
@ d'approvisionnement
Fig. 1
(G)Gasket/Joint
_(_)""__ (A)Watersupply
"_[ _ T valve(notincluded)/
_,_ / Robinet
d'approvisionnement
(pascompris)
6

Installation Instructions.
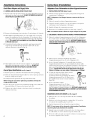
FeedWaterAdapterandSupplyValve
Note Adapter (C) orientation:
l/2-incb Installation--Rounded end of adapter(C)connects to coupling (D),then to
existing faucet tubing (B).
3/8-incb Installation--Rounded endof adapter (C)connects tosupply valve(A),
4. Assemble adapwr (C) and coupling (D) a_,showll ill FJ_. L pCl? yOtlF
COlltigur;+.tion. B(' surc the gaskets ((',) are ill place t)cIbrc lined
assemblx. Start installation t)v hand, then finish tightening wifll
a(!justablc D+rI<'()II(h. Be careful not to overtighten or cross thread
as damage to threads may occur.
5. }]and tighten assembh'd adapter (C) onto sul)l)ly va]%c (A) Ibr
t]l(' ])rot)or siz(' installation. Bc sure the gaskets ((;), as showl/ ill
Fig. 1, are in ])lace before final assembl}. Finish tightening with
a(!iustal)le v,ren(h. Be careful not to overtighten or cross thread
as damage to threads may occur.
6. Reconnect/mtcct tubing line (B) to top o] a(iaptcr (C).
7. Remove nut and terrule fix)m end oI inlet valve. Using the 4 Jcet
of tubing t)rovided, ])lace the mtt (I) and terrule (It) onto the
robing and install onto inlet _al_e (F) as shown in Fig. 2. Tighten
with adjustable wrench.
NOTE: Inspecttheends of the tubing to besure thereare no imperfections aM
endof tubing is cut square,It may benecessary tocut the tubing again.
B. OPTIONAL HOME INSTALLATION
(Where codes permit)--Saddle Valve: Saddle valve must be able
to connect with I/4@@ tubing supplied with system.
Not suppfied with product; check your local hardware or home service
store for product
For I/2" OD or larger metal tubing only.
NOTE: Codes in the state of Massachusetts require installation by a
licensed plumber and do not permit the use of the saddle valve. For
installation, use plmnbing code 248-CMR of the Commonwealth of
Massachusetts.
1. Turn oJt the (old w_llc,r supply and inst;dl saddle val_(' as required
by 1)roduct selecdon. (Be sure to/ollow mamdimmrers' installation
instrucdons.)
A DANGER:If hole is required to be drilled in pipe, to protect
yourself frem serious injury or fatal shock, use a battery powered hand
drill only to make the hole. DO NOT USE AN ELECTRIC DRILL.
()p('l/ ollly allcr (ompl('tc S}'S|('I// has broil installed.
C. OPTIONAL INSTALLATION
(For installation with rigid pipe between supply valve and sink faucet)
Option I
1. P,cmo_' pipe ti'om supply valve and sink/imcct.
2. ()t)tain flexible pipe sized to }_)m: t)lumt)ing.
3. Install flexible pipe.
4. Go back to A. Pre/['rred Installation section step 4.
Option 2
1. Obtain comp)'cssion/iuings to/it rigid pipe.
2. ()brain any other fitlil/g,'b required to c(mnect compression fittings
to a(tapte]:
NOTE: Adapter has I/2-inch and 3/8-inch internal and external Nreads.
3. I),cmo_ • t)ipc ti'om supply valve.
4. Cut pil)e to fit length of a_,sembled fittings and adal)m+:
5. Install compre,_sion titting to pipe.
6. Go back to A. Preli'rred Installation section stop 4.
NOTE"Above described materials are not included with the product
InstructionsdTnstallation.
Adaptateurd'eaud'alimentationetrobinetd'approvisionnement
Notez I'orientation de fadaptateur (C) :
Installation de 1/2 po--Extr_mit_ arrondiede fadaptateur (C)se brancbe auraccord
(D),puis au tuyaude robinet existant (B).
Installation de 3/8 po--Extr#mitb arrondiede fadaptateur (C)se brancbe aurobinet
d'approvisionnement (A).
4. Asscmbh'z l'adal)t;m'm" (C) ct h' rac(ot'd (D) commc l'indiquc la
Ngure 1, contbrm('ment fi votre contiguration. Assurez-vous que les
joints (G) soient enplace avant d'assemblel: Commencez l'installation
fi la main, puis tinissez (te setter axe( tree (ld anglaise. FaResattention
denepas tropserrer,carvouspouvezendommagerlepas devis.
5. S('FI'eZ _'1 1_1 IIl_lil/ ]'a(taptat('Hr _lss('lllbl(' ((1) dal/S 1(' l'ot)ill('t
d'al)provisiom_ement (A), conlbrm&nent _'_la bonne taille.
Assurez-\ous que lesjoints (G), indiqu& a la Figure 1, salem
1)ien en pla(e a_ant l'assemt)lage. Finissez de serrer a_ec tree cl('
anglaise. Faites attention de no pas tropserrer, car vous pouvez
endommager le pas de vis.
6. R(}bFall(hcz 1(' ttl_ltl d/l FO|)i11(q (B) atl SOIIII//ct (It' l'adaptat('tll? ((]).
Z Enlexez l'&rou et la 1)ague de l'extrbmitd (tu rol)inet
d'appt'ovisionnement. A l'aide des 4 pieds de tuyau Ibm:his, placez
l'dcrou (I) et la hague (t t) darts le tuvau et installez darts le robinet
d'al)pt'ovisionnement (F) comme l'indique la Figure 2. Sert'cz a\ ec
m_e cl(' anglaise.
NOTE: Inspectezlosextr_mit_s du tuyaupour vousassurerqu71n'y air pas
d'impeffecfion et que I'extr#mitb du tuyausalt coupee bien droit, fl peut gtre
necessairederecouper /e tuyau.
B. INSTALLATION A LA MAISON EN OPTION
(quand los codes le permettent)--Robinet-vanne _ _trier : Le robinet-vanne
Otrier doit pouvoir se connecter au tuyau de I/4 po foumi avec le systbme.
Le robinet-vanne a etrier n'est pas fourni avec le produit; verifiez votre
quincaillerie locale ou votre service a la maison pour y trouver un
robinet-vanne a etrier.
Seulement pour tuyau en metal de 1/2po de diametre exterieur ou
davantage.
NOTE: Les codes de I'Etat du Massachusetts exigent que 17nstallation
soit faite par un plombier licencie et ne permettent pas I'utilisation d'un
robinet-vanne a etrier. Pour cette installation, utilisez le code de plomberie
2#8-CMR du Commonwealth du Massachusetts.
1. Coupcz l'al)pro_isiom_cmcnt (t'cau fi'oi(h' ct instalh'z l(' )'ot)inet-
\'anne :5 5trier (amine l'exige le pro(luit (_\ssm'cz-vous de stfiwe les
instru(tions d'inst_dlation (tu/id)ricant).
DANGER:Si vous devez percer un trou dans le tuyau, pour
vous proteger de blessures serieuses ou de secousses fatales, utilisez
uniquement une pereeuse a batterie. N'UTILISEZ JAMAIS UNE
PERCEUSE ELECTRIQUE.
N'ouvrcz (tu'apr_'s a_oir install(' tout h' svsff'mc.
C. INSTALLATION EN OPtiON
(Pour une installation avec un myou rigide entre le robinet d'alimentation
d'eau et le robinet de I_vier)
Option 1
1. Enh'vcz h' mvau (tu robinct d'approvisiom_cmcnt ct du robinct
de l'&ier.
2. ()t)tenez tm tmmt flexible f_la taille (te \roHTet)lomt)e)ie.
3. Installez le tmvm flexible.
4. Rctournez f_A. Installation t)r(4_"r('e, section ('tal)e 4.
Option 2
1. ()btcm'z (tcs bagucs dc (oml)rcssion qui ailh'm sur tm tu}_m )'ig_(tc.

Installation Instructions.
FeedWaterAdapterandSupplyValve
D. REMOVAL AND RE-INSTALLATION OFINLET VALVE
1. Ren_o'_einlet'_alxe (F) ti'om adapter (C) /tsillg a(!i/ts|abl(_ vvrren(h Oll
xalxe bodT_ See Fig. 3a for details. OONOTUSE WRENCHONHEXNUT
END OF VALVEAS LEAKMAY OCCUR.
Fig. 3a
2. P.emo_v all sealing tape ti'om inlet vahv (F) and adapwr (C) threads.
3. tland tighten assemNed adapter (C) onto supplyvahe (A)/or the
proper size installation. Be sm:e the g_lskets ((',), as shown in Fig. 1,
are in pla(e beibre final assembl}. Finish tightening with a(!iustable
wrench. Be careful not to overti.qhten or cross thread as dama.qe
to threads may occur.
4. Using whitl.' thread sealing tape provided, appl} approximawly 9
wraps of rope ar(mnd the large dn:eads on inlet _d_e (F) in a
clockwise direcdon, as shown in Ng. 3b.
Fig. 3b
5 ttand tighwn inkt ",al",e (F) into the adapter (C), then finish
ughtening wifll a@lstable v,rendl (see Fig. 3a). DONOTUSE
WRENCH ON HEX NUT END OF VALVEAS LEAKMAY OCCUR.
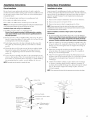
FaucetSpoutInstallations(seeFig.4,page9)
1. Remove spout (A) and timcet body (B)/i:om/hucet packaging.
2. Move die threaded dome-shaped collar (C) on die spout up and away
fi'om file o-rings on file spout.
3. Gemly insert the spout into the top of file tiumet bod'<
NOTE: Turning the spout left to right during installation will help the
o-rings to slide in easily.
4. ()me the spout (A) has been insmlh'd and tulh' seawd, slide the
fllreaded collar (C) down to file thucet body (B).
5. Tighten the collar t)v hand to die/hucet body 1)_' turning in a
(lockwise direcdon.
8
InstructionsdTnstallation.
Adaptateurd'eaud'alimentationetrobinetd'approvisionnement
C. INSTALLATION EN OPTION, Option 2 (suite)
2. ()bu'm'z (t'auu:es gm'nitures requises pourjoindre les bagues de
compression fi l'adaptatem;
NOTE: t'adaptateur a des filetages internes et extemes de 1/2po et
de 3/8 po.
3. Enh'\ez h" myau du robinet d'at)l)rovisiomlement.
4. Coupez h' tuyau (h' martin"re 5 ce que sa longuem: correspon(h'
5 la distance entre l'adaptateur et les bagues.
5. Installez la bague de (ompression au tuymt.
6. Retournez _'_A. Installation 1)r(q(q:de section ('rope 4 (page 7).
NOTE: Les maMriaux decrits ci-dessus ne sontpas compris avec le produit.
D. ENLEVEMENTETREINSTALLATIONDEROBINETD'APPROVISIONNEMENT
1. Enle\ezlerobinet d'at)pro_isiomlement d'eau (F) del'adaptateur
(C) _'_1'aide (tSme c1(' anglaise appliqu('e sin: le coq)s de robinet..
Consultez la Ngm:e 3a pour des ddmils. N'UTILISEZJAMAIS I.Jl CLE
ANBLAISE SUR L'ECROUHEXAGONAL DO ROBINET CAR VOUSRISQUEZ
D'OCCASIONNER DES FUITES.
Fig. 3a
2. Enle\ ez tout le chatterton du filetage du robinet
d'approvisiomlement d'eau (F) et de l'adapmteur (C).
3. Serrez _'_la m_dn l'adaptatem" (C) assembl(' darts le robinet
d'approvisiomlement d'eau (A) pour installer _'_la b(mne faille.
Assurez-_xms que lesjoints (G) in(/iqu('s fi la Ngm:e 1 soiem bien en
place avant 1'assemblage final. T('rminez de serrer avec role c1('
aHglaise. Prenezbiensoin denopastropserrer o. denogas
fausserlefiletage,carvousrisquezd'endommagerlefiletage.
4. ]\ l'aide dll ( ]latteFtoll l)lall( J()llrlli, lllettez
el/ViYOll 9 COIIChes de chatteFtOll el/
l'ell{Olll'_lll| _t/11o/117 (Ill _-IX)S filetage (hi rol)ine|
(l'apt)rovisiomwment d'eau (F) (tans le sens
des aiguilles dhme montre comme indique la
Figure 31).
5 Serrez _'_la main le robinet
d'at)l)rovisiommment d'eau (F) (tans
l'adal)tateur (C), puis terminez de serrer a\ e(
une (1(' anglaise () onsultez la Figure 3a). N'UTILISEZJAMAIS 1.4CLE"
ANGLAISE SUR L'ECROUHEXAGONAL DU ROBINET CAR VOUSRISQUEZ
D'OCCASIONNER DES FUITES.
Installationdubecde robinet(voirFig.4,page9)
1. Enh'\ezh'bec (A) et h'(oq)sde robinet (g) de 1'emballage
du robinet.
2. l)6placez vers le haul le manchon conique filet(' (C) sur le bec
et 6cartez-le des ron(telles t)lac6es sur le bec.
3. Ins&'ez (toucemem le bec en ham (lu corps de robinet.
NOTE : Si vous tournez le bec de gauche a droite pendant I'installation,
vous ferez glisser plus facilement les rondelles.
4. ()mind vous avez install(' et bien mis h' t/('((A), t_dtes glisser
le (ollet tiletd (C) vers le bas (/u (orps de rol)ine_ (g).
5. Serrez le (ollet a la main au (orps (/e robinet en tournant darts
le sens des aiguilles (/Sme montre.

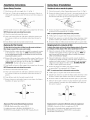
Installation Instructions.
FaucetInstallation
Be sure there is room underneath and above the sink to make the
needed connections, ge/ore starting, make sure there is sufficient room
/till tile batter} t)owered timcet base. Select one of tile tk)llowJng tllaces
to install tile til/lcet:
/. Ill an existh/g sink stmly attachnlent or seat) distlenser hole.
2. Ill a hole tO lie drilled ill tile sillk toil
3. Ill a hole to be drilled ill tile eotlntertol) , next to tile sink.
NOTE:Be sure ae faucet base will fit fiat against ae surfaceat ae selected location
so the bottom gasket between thebase andsurfacearea will seal.
Installation Steps (refer to Fig. 4 for clarification)
1. [J (hilling- is needl'd, Ill:eke a _;/4" dial/Icier hole.
Be sure to use the proper procedure for drilling porcelain or stainless
steel Special drill bits may be needed. Consult a qualified plmnber for
the proper procedure.
2. Re:now till'/muet will/in'e-installed tulfing, thin o-:ing (D),/muet
base (El, bottom base gasket IF), lock washer (O), hex nut (It) and
mounting bracket (I)/i:om tile packaging.
3. Feed tubing connected to tile/imcet througl/tile thin O-ling (D),
timcet base (El, bottom base gosket IF), lock washer (G) and hex
nut (It).
4. Thread tile hex nut (t[) up tile stein of tile tiulcet until tile height
between tile bottom of tile base gasket IF) and top of tile lock
washer ((k) is slightly larger than the thickness of tile mom/th/g
sur/ilee (]).
5. Lower tile thucet assembly into place ill tile mounting hole and
orient to/]nal position. Plate tile mounting bracket (I) above tile
lock washer ((;) around tile fimcet stem (Fig. 5). While holding
tile mounting bracket in place, secm:ely tighten tile hex nut.
NOTE: Twopeople may be requiredto campion this step.
Instructionsd nstallation.
Installationdurobinet
A._surcz-vous qu'il y air sufl]smnment de place au-dex_,ous et au-de._sus
de l'('\ier pour/sireles bnmchements n6ce._,aires. A\m/t de COlmnence_;
assm:ez-_xms qu'il y ait sultismnn/ent de place pour la base de rot)inet
alimentde par pile. Choisix_,ez Fun des emtllacements sui\'m/ts pour
installer le ml/inet :
I. Dens un ttxm existent de distdbuteur de sa\ on ou de douehette.
2. Dens un tmu fi percer el/ haut de l'('vie_;
3. liens ml tmu fi t)ercer dens le con/l)toic lift's tie l'(,vier.
NOTE: Assurez-vousque la base rterobinet salt bien plate centre la surface rte
femp/acement choisi rtemani_re _ce quelejoint p/acd entre/a base et la surface
fie I'emplacementchoisi salt bien dtanche.
Etapes d_nstallation (consultez la Figure 4 pour de plus amples
infermatiens)
1. Si _x)us devez tidre un tmu,/itites un trou de 3/4 lie de diam_'tre.
Assurez-vous d'utiliser la bonne procedure pour percer la porcelaine ou
I'acier inoxydable. Vouspouvez avoir besoin d'une meche speciale de
perceuse. Cmrsultezunplombier qualifie pour trouver la boone procedure.
2. Enh'\ez h" robinet a_vc h" tuVml ln:('-install(', la rondelh" minl e (D),
la base de mbinet (El, h'joint de la 1)ase du l/as IF), la rondelle de
bloeage (G), l'('crou hexagonal (H) et le support de montage (I)
de l'emballage.
3. Faites t)asser le m}ml reli(" au txll)inet t)m: la mndelle mince (D),
la b;Lse de mbinet (El, lejoint de la t);L'_e<Ill 1);LsIF), la mnddle de
blocage (G) et l'6cmu h(b'_agonal (t t).
4. Vix_,ezl'dcmuhexagonal (HI surlatigedurol)inetjusqu'ficeque
la hautem: entre le tlas du joint de la t)_tse (F) et le haul de la mnddle
de blocage (G) soil plus g_ande que l'('paisseur de la surlilce de
montaae(l).
5. At)aissez l'ensemble de robinet el/ place darts le trou de montage
et orientez ell position finale. Placez le suptlort de montage (I)
au dessus de la rondelle de blocage ((;), autour de la tige de robinet
(Fig. 5). Ell tenant le sutlport de montage ell place, serrez tort
l'& rou hexagonal.
NOTE: Vousaurezpeut-gtre beso/ntie rleuxpersonnespour terminercette _tape.
._ {A}Spout / Bec
{B)Faucetbody/
Corpsde robinet _]
€
(G)Lockwasber/
Rondelledeblocage'--....@_
(H)Hexnut/ _'
Ecrouhexagonal
{I)Mounting
bracket/
Supportde
montage
(ElCollar/ Collet
(manchon)
{D)O-ring/ Rondelle
(ElFaucetbase/ Basederobinet
(F)Gasket/ Joint
(J)Mountingsurface/
Surfacedemontage
Fig. 4
Fig. 5
9

Installation Instructions.
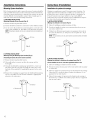
MountingSystemInstallation
Pick a location m_der the sink to re(rant the system. I,ocatJon should be
easily accessible with at least 5 imhes of _lear'ance betx'vreen the t/ouom
of tile filter canister and the floor or bottom of the cabinet; aliv less will
resuh in dilticulty of removing filter canister. Allow enough st)ace on
ei{her side of the .,,vstem tor the tubing com/ections.
A. PREFERRED INSTALLATION
(Mounting Using the Screw Provided [Fig. 6])
1. Remou' sh_nk _mp/ir)m/iher s}:'qem.
2. Sv.,4em should be mounted {o a stud in the wall or solid firm sur/i_ce.
3. Use file screw (B) lm_vi(led to re(rant through file screw hole in tile
center of tlte manilbld (A). (Pre<lrill a 1/16" pilot hole, if needed).
NOTE: If mounting to drywall, with nostud, a drywall anchor(not included) must
be used.
(A) Manifold
_A _. (B)Screw
Fig. 6
B. OPTIONAL INSTALLATION
(Mounting Using the Mounting Tape Provided [Fig. 7])
(If mounting to drywall, the screw must be used also).
1. Remove shl_nk _mt//i'oul/iher system.
2. Clean wall sur/i_ce to remo_e any dirt, oil or grease and dry
thoroughl 5
3. Using tile double-sided mounting tape provided ((]), ix'move one
side of the protective wax paper and apply file entire piece to the
back side of file manitbld (A), at_plying firm pressure to file emire
piece.
4. Remo_' the remaining win-: t)aller ti'om file double-sided mourning
{ape (C) and adhere it to the cleaned wall sur/i_(e, al/l/lying {h:m
pressure to the endre piece.
(C)Mountingtape
(A)Manifold
InstructionsdTnstallation.
Installationdusysteme demontage
Choisissez un eml/la(enwnt sous l'd\'i('r l/our reenter le .sy_'q0me. (k'{
eml/lacement dolt _'tre {ilcilemen{ accessibh', a_'c au moins de 5 po
d'esl)ace lil)re entre le has de la cartouche de filtre et h' t/lancher ou
le has de l'armoire; tout esl)ace ini_Meur 5 5 t)o rendm d_ticile
l'enh"\ emem de la cartouche de fihre. Pr('\ oyez su//isammem d'espace
des deux (6{('s du .',ysff'me t)our bnmcher les tuvaux.
A. INSTALLATION PREFE_RE
(Montage en utilisant la vis fournie [Fig. 6])
1. Enle\ez l'emballage moulant du svst_'me de filtre.
2. \'ells (tevez inst_lller le s'vrst('_//(. 's[lr [in ]//Oll|_t+nt d_lns le l///lr ell s/it
une sm:/ilce solJde t;t'nne.
3. UtJlJsez la vis (g) /burnie l/our reenter en t)assant liar le trou de vis
au centre du collectem: (A). (Pr(,-percez m/trou tfilote de 1/16 t_o
si n('cessaire).
NOTE: Si vousmontezsurtour sec, sansmontant, vousdevezuti/iser une fixation
pour tour sea
Fig. 6
B. INSTALLATION EN OPTION
(Montage en utilisant le chatterton de montage fourni [Fig. 7])
(Si vous installez sur mur sec, vous devez egalement utiliser la vis).
1. l{nle\ ez l'eufl)allage moulant d u svst_'me de filux'.
2. Net{o_'z la surJhce du mur llour enh'_'r toute salet(', lulile ou gTaisse
et sdchez bien.
3. Enlevez le pat)ier cir(' l)rotecteur d'tm cdtb du chauerton de montage
:_lde/lx tilces ((;) et t)osez le r/ll/al/ :_ll'arfi_'re (fil collectetlr (A), el/
al_lm}mu loft sur tome la pi,)ce.
4. Enle\ez l'autre lnqlier cir(" llrotecteur du chatmrton de montage "_
deux trices (C) et colleMe sin: la sin:trice tlropre (Ill tour ell alllmyant
tort sur toute la t/X'(e.
(C)Chat+ertondemontage
(A)Collecteur
/0

Installation Instructions.
Installingthe Tubing
1. Measure 3/4" ]_'om the end o[ cadl rcm',dningl)ie( c o[ tubing
([imcet end mid inlet end) and mark with a pencil (Fig. 8). (Check
tbr rom]dness, smoothness, cuts, nicks, flat spots and shm:p edges).
(
INCORRECT
Fig. 8
2. ()bser\e arroBs on top ofmmfifok[ fllat indicate inlet _tl/d o/Hl{_|.
Failure to t()llOW will result in W_IIeFleaks _rhen filter (anister is
l_(,l//oved.
3. Push die robing firefly imo each fitting on die mani/old mnil file
line is flush with the/itdng collar. (II file robing is removed, re-cm
file end, measm'e, mark and re-insert). Tubing must be flflly inserted
to a\old leaks (Fig. 9). (Toremove tubing:Depress and hold white oolle¢
pull tubing out to remove.)
WhiteCellet _ _/
(DONOTREMOVE)
i
• • i 3 n
Insertionhne_,,_ Y4 "_
i
hlserttubing----_F.]_,
_.- Engagement__}M
I 3/4"(3/8"tubing) I
Fig. 9
4. Pull out slightly on robing to ensm:e a good seal.
InstructionsdTnstallation.
Installationdutuyau
1. M{'surez 3/4 po 5 ]}artir de chaquc cxtrdmitd de {]]aquc mor{eau
l't'S[_lllI (Jr' IIIV_t/I ({'XU'('IlIit( _ (hi Fo|)inet et exH'('llli[(' d'{'ntF('{' (t'{'_llt)
et marquez av{'c m_ cray)n (Ng. 8). (Vdfifiez que le tu}_lu soit bien
fond, lisse, bien cout)(', bien indemd, avec des bords vi6,).
(
Fig. 8
MAUVAIS
Obser\ ez les fl6ches simdes en hmtt (tu (listHbutem; qui indiquem
l'emrde et la sortie de l'emL Si \'ous ne suivez t)as lemPs sens, il se
t)ro(hfira des fltites (t'eau (tuand _)us enl6verez la cartouche de Jiltre.
Poussez {brtement le tm;m (Im]s cha(lue raccord (tu (tisn:ibmeur
jus(lu'_'_ ce (tue la lJgl]e soit au niveau du collier de raccord. (N le
t/tV_t/l est enl{'v(', reco/ipez ]'exllP('iilJi{", l//es/lrez, ii/al'{l/lez el l'(,-
insdrez). I .e tuvau (Ioit 0u'e bien ins('r(' t)our ('viler les tifiies (Ng. 9).
(Pour enlever le tuyau : Pressez et tenez le collier blanc; tirez le tuyau
pour I'enlever.)
Baguedeserrageblanche U//////_/
(NEPASENLEVER)___,,
?--2 .T-q
Ligned'insertiorl--_.,'-_-_ 3/4
/
hls6rerletube_ _J_,,
t_ Engagementl
de3/4 po i_ Fig. 9
(tubede3/8po) I
4. Tirez ldgiTement le tu_m ]}otw assm:er re]joint dtanclle.
11

Installation Instructions.
Batter),Installation
I. Use a small tlat blade S('_'_r(l_V_'_" _)]_coin to remo\e the battery mp_'
(A) at tile side of the [iulcet base.
2. Install one CR2()32, 3 _x)|t batte W (B) + side down into the battery
tray (A) (Fig. 10).
3. Slide trm into tiulcet base (C) until the battery tmv (A) edg+e is flush
with the side of the base.
4. The blue light (D) will/lash 5 times, indicating a proper installation
and sVStel// reset.
5. Norm_dlv the light is o/1_ Atter 6 n/onths of use, the light will flash
again every 30 seconds, indicating tile proper time to replace tile
tilmr ( anisml:
NOTE"Theblue light maystop blinking if it is allowed toblink for an extendedperiod
of time. Toensureproper operation, thebatteryshould bereplaced with every filter
change.
InstructionsdTnstallation.
Installationdela pile
1. Utilisez m_ petit tournevis _'_lame t)lau•ou urn' t)ig'ce pour enlever
le tiroir _ pile (A) situg' sur le c6td de la base de robinet.
2. Installez Hl/e pile de 3 volts CR2032 (B) en tidsam glJsser d_tl/S
le tiroir _1pile (A) (Ng. 10).
3. Faimsglisserledroirdanslabasederobinet (C) jusqu'_lceque
l'extr&nitd (Ill uroir _'_pile (A) salt plate centre le cdtd de la base.
4. I,a lumibre bleu (D) clignotera 5 Ibis, indiquant role bernie
installation et relnise _'_zg'ro (Ill svst_'lne.
5. Norulalemem, la lmni_'re est ('teinte+ Apr_'s 6 mois d'utilisation,
la lun/i&re se remet :_cliglloter tOlltes les 30 secondes, indiquant
qu'il est temps de changer la cartouche de/iltre.
NOTE: La lumlere bleu pouts'arrgter de clignoter si onla laisseclignoter Iongtemps,
Pourassurer unban fonctionnement, il faut changer la pile _ chaquechangernent
de filtre,
{D)Bluelight/Lumi6re bleu _
{C)Faucetbase/ +_"l _-- -_-_ I _'_
Basederobinet _+ _/ /A) Batterytray/Tiroira pile
Fig. lO
12

Installation Instructions.
SystemStartupProcedure
1. Slowly turn on (old water sul)pl _ xalxe (A) in Fie- ]
/ 11.
2. Turn on I< 4 uflet v_ll'_(!to supply _+r_)|erto the syswm. (Valxe is on
whell handle is pointing in same direction as _r_lt(_l"line coming out
at valxe).
OFF..... ---
/
.... ON
3. Turn handle on timce{ to _fllow trapped _dr t() lmrge from the sysmm.
NOTE:System may make noise duringthis procedure.
4. Check Jar F#_lter leaks re:amid the system.
5. ()no(' water starts to flow out of the {hucet, allow the s_'qem {o rml
{[)1" 3 lIlinlltes 10 {llISll O/11 anv ha13//less carbon {]l/('s that l//av be
presem.
6. Turn off {hucet and check aT(rand svsiem {or leaks.
Replacingthe FilterCanister
The blue light in the faucet base will flash every 30 seconds to indicate a
filter change is needed. This occurs every 6 months.
1. Remove the Jilt(')"(anister ti'om 11__'maniJbld t)y rotating ill(' canister
Io Ihe leJi abouI [/3 turn (Ng. [[). NOTE:A small amount of water
from the tubing between the filter and the faucot may come out A small
towel should be able to catch it
2, Remo_' Jbil on {op o_ new repla(ement Hlwr canister, hlsmll the new
canister into the manilbld by turning it to the l_ght about 1/3 turn
Imtil the alignment marks line up and Ihe tilter stops. DO Nor
OIIERTIGHTEN. The filter will rise up as it is turned.
3. Turn handle on {il/icet to allow trapped air m pill:g`(' {i'Oli/the s_'slelll.
NOTE: Systemmay make noise duringthis procedure.
4. Check Jbr water leaks m:omld the ,,,vstem.
5. ())1( (' 'v#_tte)" s{;dr{s to ]loP+ r()lit o] Ill(' {_t/Iue|, allo_ tlle s_,t%IelIl 1o 171111
Jar 5 minutes 1o flush am am' harmless carbon tines (ha{ may be
presem.
6. Turn off {hucet and check aT(rand svsmm Jar leaks.
Z Remove battery tray and replace battery to reset time); (See Battery
Installation tbr proper procedure).
Replacement Filter Canister/Estimated Replacement Costs
(;XPd .(.)l_Repla(emen{filler (anisIer $30-55
For repla(_nem paris, call toll-live 800.626.2002 (U.S.),
800.663.6060 (Canada-English), 800.361.38(;(.) ((hnada-French)
InstructionsdTnstallation.
Proceduredemiseenmarchedusysteme
1. ()u'_rezlememenl le robinet d'approxisionnement d'eau (A) (Iqg. D.
2, Tournez le robinet d'emr('e de l'eau de 1/411() pore: fournir de l'eau
au .wst_,me. ([ e robinet est 1)ran(h(' quand sa p()igng'e est tourn(}e
darts la m(_'me direcdon (lue le myau d'eau qui sort du rol)ine0.
ARRET- _ ....,,
3. "Ibm:nez la poignde du robinet pore: purger le s}:,qSme, en
permettam _'_l'air emprisoml(' de s'('chapper.
NOTE: to systeme pout faire du bruit pendant cette procedure.
4. V('ri/iez qu'il n'y nit pas de Ihite d'eau autour du s_:_ff'm('.
5. ()uand l'em_ (eminence _'l( ouhu: du Tel)ire't, laissez h' s}_ff'me (ouh'r
pendant 5 llli)lllteS pour ('liminer route Jill)'(' de cllarbon pr('senm.
6. Fennez le robine{ el v(,d/iez amour du svst{,1)/e qu'il n'y a pas de fuim.
Remplacementdelacartouchedefiltre
La Imni&e bleue situee surla base du robinet clignotera touteslos 30secondes
pour indiquer qu'il faut changer le filtre. Cola se produit tous los 6mois.
I. l'_nh'\ ez la cartou(he de {ilu'(' du distdbuwur en {hisant tourner la
cartoudl(' \'er.s la gau(he emiron 1/3 de tom" (Fig. [ [ ). NOTE:Un
peu d'eau pout sortir du tuyau entre le filtre et le robinet Vous pouvez
utiliser une serviette pour I'bponge_
2. Enh'v('z 1('/buillet situ(' ('n haul de la nouvelle cartouclle de/ih)'(' d('
remplacemen{. [nstallez la nouvelle cartouche (Inns le dJstributeur en la
Ioumaut vers la droite environ [/3 de Iota; jusqu'_', ce (tue los marques
s'aligl/ement soient aliglu:es el le flit)'(' s'arr&e. NESERREZPAS TROP.
I *, lilt)'(, se soul&'(" qum/d vous h' tournez.
3. Tourm'z la poignde du robim't pore: purger le sysff'me,
en penner(ant 5 l'air emprisom/d de s'('diapper.
NOTE: to systeme pout faire du bruit pendant cette procedure.
4. V('ri/iez (pFil n'y air pas de Iifite d'eau autour du s_:_ff'm('.
5. ()uand l'em_ comnwnce _'_( ouh'r du rol)inet, laissez le s}:'_ff'me couh'r
pendant 5 minutes pour ('liminer (elite Jib)'(' de Cllarbon prdsente.
6. Fennez le rol)inet et \'('dliez autour du svstSme qu'il n'y a l)_ts de flute.
7. Enh'\ez le tiroir i{pile e{ remetmz en place la bauerie pour remettre
fi zdro la minulerie (consuhez la section Installation de la pile pore:
bien melt)'(' ell place).
Fig. 11
our 0ur
installer enlever
Remplacementde lacartouchedefiltre/CoOtsestimesderemplacement
(;XRI Q.R--(hrtou(he (le fihre de rempla(ement 30-355
Pour los pi("ces(to)'('mplacen_ent, appelez sins/mis le num('ro
800.626.2002 (aux l{tats-Unis), 800.663.6060 (Canata m_glais),
800.361.38@ ((hnada tmngais)
13

Installation Instructions.
FlushProcedure
Whenc\ er water of m/known quality is passed through tile (;E W;iter
Filtration s}stem, tile tilter canister should be discarded and the
/iltradon system flushed.
WARNING:These systems sho.M on/y be .sedan
microbio/egica//y safe wate_
Circumstances that may require flushing the system are:
• Boil _r_']: _ldvisorv
• Flooding of the (;E Water Fihmtion system
• I ,any-refill non-/ise
The procedure for flushing the OE Water Filtration system is:
I. S_.',.'Replacing the Filter Canister s.,..,.-dol_,mM _6llo,,,, st,..ps 1_.
Instructionsd_nstallation.
Procedurederin_age
Chaquc/_is (tue h' sy'sff'me dc _iltmtion d'etre (',E cst cxposd _'lde l'cau
de qualitd incomme, on devmit jeter la cartouche de tiltre et ldncer
le s'Q4|_,Iile,
A AVERTISSEMENT:Ve.snepe._e_utilisercossystOmes
qu'avec de I'eau microbio/ogiquement saine.
Cimonstances qui peuvent necessiter un tin,age du syst&ne :
• NotiS(;_ltiOll d_.' ]_l n('(_.'ssit(' (te _ililx' bouillir l'cau
• Inondation du svsff,me de filtration d'eau (',E
• hmdlisation prolongde
Methode de ringage du systeme de filtration d'eau GE:
1. \i)ir la section Remplacement de la cartouche de filtre ct suivcz
les ('ropes 1_.
14

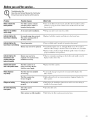
Beforeyoucall forservice...
Troubleshooting -tips
Save time and money/. Review the chart below
first and you may not need to call for service.
Problem Possible Causes What To Do
Water contains tiny New Filter cmtister contains • Turn on the filtered water tim(et and allow these hamfless carbon
black particles activated carbon, which is a pa_tkles to pm'ge fl'om the canister. Turn off the thucet when the
harmless black powder, water is clea_:
Water has air bubbles Air in system after h_stallation. • Will go away after water rtms tot a while.
and is cloudy
Indicator light on the Six months usage has occurred. • Replace both tilter canister and battery in the timcet base.
faucet base isflashing This is the maximum fife of
the filter cmfister.
Indicator light on the Normal operation. • Does not blink tmfil 6 months of operation has passed.
faucet base is not blinking
Battery may need to be replaced. • Nom_ally the light is not on, The light blinks eve_T 30 seconds to
indicate a filter change is needed. This occms about every 6 months.
• Replace battery. Indicator light will blink rapidly 5 times to indicate
proper installation and operation.
Indicator light on the Battery may need to be • (-)bse_we orientation markings on the holder and instnll correctly,
faucet base is not replaced or it may have been Replace battery if it is old.
workingwhennew h_staJled incorrectly.
batteryis installed
Chlorine taste and/or The filter cmtister is no • Replace the filter canister:
odor in the product water longer removhzg chlorine
from the water supply.
Water dispenses The filter has been installed • A six-month change-out period is recommended. Replace the
veryslowly for too long. filter canister;
The filter cmtister has • High sediment levels can cause prematm'e clogging. Replace the
become clogged, filter canister
Fittings are leaking Tubing may not be installed • Full_ follow the instnllation instructions and be sure the tubing is
properly, instnlled to the proper depth.
No water dispensing Inlet valve may be • Open the inlet \_flve.
from system turned off.
Filter canister not fully installed. • Fully fi)llow the filter replacement instructions.
15

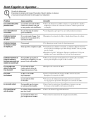
Avantd'appelerun reparateur...
Conseils de d#pannage
Economisezdu temps et de I'argent! Consultez d'abord le tableau ci-dessous
et vous pourrez peut-#tre #viter de faire appel _ un r#parateur.
Probleme Causes possibles Correetifs
L'oaucontient des petites La nouvelle ca_touche de Fdlre • Ouvrez le rol)inet d'eau tiltr_e et laissez ces particules de (harbon
patticules noires contient du charbon actif, qui inoflensives sortir de la CalXouche. Fem_ez le robinet (luand l'eau
est tree poudle nolle inoffensive, est limpide.
L'eau a des bulles d'air II y a de Fair daus le sTst&me • I,'air disparaitra api'&s que l'ea u ait coul6 i)endant tm instant.
et est trouble apr_s l'hlstallation.
L'indicateurlumineux II y a eu six mois d'usage. C'est • Renq)lacez la cai_touche de filtre et la pile dans la base de robinet.
scintille sur la base la dur_e de vie ma_nale de la
de robinet caJctouche de filtre.
L'indicateurlumineux C'est normal. • Ne clignote pas avant 6 Inois de fi)nctionnen/ent.
sur la base de robinet
ne clignotepas I1 faut peut-_tre remplacer la pile. • Noi_/nalelnent, la huni_re est _teinte. I,a huni_re clignote toutes les
30 secondes pour indiquer qu'il timt changer le filtre. Cela se prodtfit
tousles 6 inois.
• Rempla(ez la pile. I,'indicateur clignotera rapidement 5 Ibis I)our
indiquer tree bonne inst;dlafion et un 1)on fimctioi_i_ell_ent.
L'indicateurlumineuxsur II est possil)le que la pile ait • Observez les ilaai'qttes d' oi_ientafion sur le firoir a pile et installez
labasederobinetne besohl d'_tle remplac_e, ou vous bien la pile. Rellq)lacez la pile si elle est vieille.
fonctionne pas quand veus pouvez l'avoir maJ h_stall6e.
instnllez une neuvelle pile
IIy a un go9t et uue La caJctouche de f'fltle • Renq)lacez la cai_touche de filtre.
odeur de chlore dans n'enl_ve plus le chlore de
reau du produit l'approvisiomlement d'eau.
L'eaucome Le fihle a _t6 hlstaJl_ • Nous reconln/andons de changer le filtre totls les six mois.
tres lentement trop longtemps. Renq)lacez la cartouche de filtre.
La caJctouche de f'titie • Des niveaux de s_din_ents illq)ortants peuvent occasionner
est bouch_e, un ei_gorgen_ent pr_ii_attu'_. Renq)lacez la cartouche de filtre.
Les raccords coulent II est possible que les tuyaux • Stfivez bien les instrtlctions d'installafion et asstlrez-votls que
ne soient pas bien hastaJl_s, les tuyaux soient install6s ;'1la bolane i)roflm(leui:
IIn'y a pas d'oau qui Le robh_et d'approvisiom_ement • Ouxrez le robinet d'approxisionnement,
sorte dusysMme peut _tre ferm6.
La caxtouche de f'title n'est • Stfivez bien les ilastrttcfions de renq)lacen_elat (lu filtre.
pas compl_tement hzsta_l_e.

Notes.
17

Notes.
18

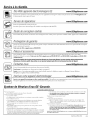
Servicea la client .le.
l Site Webappareils lectrom nagersGE www.GEAppliances.com
Vous axezune question ou xous a'_ezbesoin d'aide pour xotre appareil _lectrom&mger? Cl)Ht,it.ctezIHo/Is]-)_tyInternet au site,_:GFAppliances.com
24 heures par ioul, tons leslouts de l'ann6e.
Serviceder parations
Serdcede r@aradonsCEesttout prbsdevans.
Pourfidrer@arerxotre6lectrom&_ager(;E,ilsuititde -i/ stele)h"" )/e (8(X).4.'29_.2to/)."'_
www.GEAppliances.com
Studio de conceptionr a/iste www.GEAppliances.com
Surdemande,(;Epent fi)urrdrune brochuresur l'am&aagementd'une cuisinepour ]espersonnesfimobilit_r&hdte._ppelez-nousau800.833.4322.
Prolongationdegarantie www. GEAppliances.com
Aehetez un contrat d'ei_tretien (;Em ant que xotre garantie rl'expire et b&16ficiezd'un ,'alMs substm-ltiel..Mnsileserdce _q)r_s-xente GEsera toqjotn_
lfiapr&sexpirationdelagaranfie.
Visitez notre site Web on appdezqmtts an 800.626.2224
Pi ceset accessoires www.GEAppliances.com
Ceuxquid&irentr@arereux-m&mesleurs_le(trom_n>_gerspeuventrece_airpi&cesetaccessoiresdirectementfila In;dson(cartes\qSA,
MasterCard et Disco_er accept(:es).Visitez notre site Web ou appdez-nous an 800.626.2002 (EU), an 800.663.6060 (Canada-Anglais), au 800.361.3869
(Canada-FramTais).
Lesdirectivesstipuleesdanslepresentmanuelpeuvent_treeffectueesparn'importequelutilisateur.Lesautresreparationsdoiventgeneralemeet_tre
effectueesparuetechnicieequalifie.Soyezprudent,carueereparationinadequatepeutaffecterlefonctionnementsecuritairederappareil.
Contactez-nous www.GEAppliances.com
Sivans n'_tes pa_,safiqidt du service apr_,-_erlte dont vans ax_zb_n_fici_:
Prenfi6rement,communiquezaveclesgem qui ant r@aff w_treappareil.
l_)lsttite,si _ous n'&testoujouxspas safisfidtem_o}ezurns les d_mils--num&o de t_l@hone compris--au Managex;Customer Relations,
GEAppliances, Appliance Park, Iouisdlle, KY40225.
Inscrivezvotreappareilgectrom nager www.GEAppliances.com
lnscrivezvotre appareil61ectmm6nager en direct, aussit6tquepossible. Cela am_liorem has communications et notre serdce apr&s-xente.
Vanspomez _galementnouserw(uerpar lapastelefbnnul_dred'inscriptionjoint fivotredocumentation.
Syst .me de filtration d'eau GE-Garantie.
GARANTIE LIMITI_E D'UN AN
• @_*,(v.v_v/a gam**tie?
-- -l_*Ut (l_fmlt de mat&'iel (m de mai_ d'oeut_e (hi prochfit.
-- [,es carm_lches de film'.
-- [*'s d_placemems fi \otis.. domicile pore" x_ms enseigner comment miliser le produit.
-- Une installation inconecm.
-- Une panne (hi p_x)(hlit caus6e par un abus d'utilisation, une mml;;lise udlisation,
l(tIItl' mlldiIi(:atilm oil tlne/itiliN_tJlln Oil plX Kl/lit dallS/111 gilt 11o11 pl'OVtL
-- D£'l;Itll_ el/tl'd/l/_S pal" Hne inslallation ill(7Ol'l'('Cl(' Oil tOUt dt)tllln3g( _ll<)n
imputable ) GE.
--Respon_dfiliff, de (;E o)uvert pal cette ga*;mtie ou t_)_lte mint, garande o)m_;mt
tOUt dl )l/llllag(' indil ('( t.
-- ProdMl_, utilis_s pore des applications induslfielles <)_1commms:ia/es.
-- Utilisation de ce produit lot_,,.lue I'em_ est mic_x;oiologiq/mment impu_*_ ou de qualit(,
in(<)nlltle NII/S q/l'Hn(! (]_sil/l(!ctJlll/addq/late n'ait eli lieu 3\ill/t I'entl'de et sortie dal/s
le CJI( []iL L(:S s_t_'l//_!S hoI//< Ill )_'(l_S pl )Ill" lille I ('d/l( [ion des Illi(ixib( s petl\t'nt ('tl'('
/iti/i_s ap_{'s (ldsintt.clion de l'eau p<)mant o mtenil des mi(;robes filtvables.
-- [l(t/it dlll/ql//ilg(. (a/l_ all prod/lit pal accidl nt, in(el/die, illlllldali(ln at] a(l*. _d(! Die/I.
-- Tout donmmge forttfit ou hitth-ect caus_ a par des d6fauts t%-entuels tie cet appareil,
son histallation ou les r6paradons effectu6es.
• Ojwlh, es! la du_r;e d_, la grm_dk, a[m_s l?_lml?
-- Un an.
• (>rtzrtl_,**tdois@,]ai_, *#a _ala>nation ?
-- RilITI('Ilt'Z I(' pl-odtlit iltl ITl;igilSill 1)1"1 \<)/IS I_iln,_!z ilC[l{!t(' iO,%'c [in(' exeln|lhdr(, (]e la
"Preuxc d'achat': Ceue gm'ande exdut les cofit_ d'exp_dition (mles d@lacements
de sc,_xice ) _me domicile.
• _)j_d(,_th, s:am: d_,n,uegvmmti_, v_s-_?-vis <h,h_ loi?
-- (k,tte ga*;mtie xx_us donne des droits l_gm_x sp_cifiques. [1 es_ po,-,qble que x_ms a}ez
d'mmes (lroi_, qui xafiem d'&at en &at. CETFE GARANTIE REMPLACE DE
TOUTE AUTRE GARANTIE, QU'ELLE SOIT EXPRIMI_E OU SOUS_ENTENDUE,
INCLUANT LES GARANTIES DE NEGOCE ET DE CONVENANCE DANS UN
BUT PARTICULIEIL
Veuillez nous contactor _ ww_z GEAppliances.com, ou composez le 800.952 5039 (_L-tats-Unis) et sans
frais le 066. 777.7627 (Canada).
Imprimfi aux Etats-Unis [

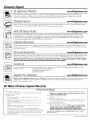
ConsumerSupport.
GEAppliancesWebsite
www.GEAppliances.com
Have a question or need assistance with your appliance? Try the GE Appliances Website 24 hours a da}; any day of the year!
For greater comenience and titster service, }ou can no_ download O_ner's Mamtals, order parts, catalog_, or e_en schedule
service on-line. You can also "A_k Our Team of Experts _'' your questions, and so much more...
Schedule Service www.GEAppliances.com
Expert GE repair serxice is only one step mva} t_'om }our doox: Get on-line and schedule your serqee at your comenienee 24 hotu_
any day of the }earl Or call 800.GE.CARES (800.432.2737) during normal business hours.
RealLifeDesignStudio
www.GEAppliances.com
GE supports the Universal Design concept--pro&rot.s, services and emironment.s fllat can be used b} people of all ages, sizes
and capabilities. "_ x_eognize the need to design ibr a wide range of ph}:si(al and mental abilities and impairments. For details
of GEs Universal Design applications, including kitchen design ideas ibr people with disabilities, cheek out our "_bsite today.
For the hearing impaired, please call 800.TDD.GEAC (800.833.4322).
ExtendedWarranties
www.GEAppliances.com
Purchase a GE extended x_arntnty and learn about special discounts that are available while your wan'antv is still in effect. You can
purchase it on-line an} time, or call 800.626.2224 during normal business hours. (',E Consumer Home SeiMces will still be there aiier
your warranty expires.
PartsandAccessories
www.GEAppliances.com
Indidduals qualified to service dleir o_n appliances can have parts or accessories sent directly to their homes ($ISA, MasterCard and
Discover cards are accepted). Order on-line toda b 24 hours eveU day or by phone at 800.626.2002 during normal business hours.
Instructionscontainedinthismanualcoverprocedurestobeperformedbyanyuser.Otherservicinggenerallyshouldbe referredto qualified
servicepersonnel.Cautionmustbe exercised,sinceimproperservicingmaycauseunsafeoperation.
ContactUs
www.GEAppliances.com
If you are not satisfied with the service you x_ceive ti'om GE, contact us on our Website wid_ all the details including your phone
mimber, or write to: General Manager, Customer Relations
GE Appliances, Appliance Park
[_ouis\ille, KY40225
RegisterYourAppliance
www.GEAppliances.com
Register your new appliance on-line--at your convenience! Timely product registration will allow ff)r enhanced communication and
prompt service under the terms of your warran%; should the need arise. You ma_ also mail in the prepfinted registration card
inchtded in tile l)acking, material.
GE Water Filtration System Warranty.
LIMITED ONE-YEAR WARRANTY
• llT/a/do_'s this u,arrmt/'_'taro?
--Any det;.*ct in nlaterials or workmanship in the manulhcttn-ed pr_Muct.
• 117m1do_,sthis u,arr(ntly _tot cmJo?
-- Filter canistel:
-- Selu'ice trips to your home to teach }_m how to use the product.
-- hnpr_per installation.
-- Failure of the prodtlct if it is a/)use(l, nli'_used, altered or used for other
than the intended purpose.
-- Defbcts that resuh ti-_mlimproper installalion or damage not cansed
bv GE.
-- Liabilily on tile part of GE under this or any other warl_mlv fi)r any
indirect or conseqtmntial damage.
-- Products that arc used f})r conlmercial or industrial applicalions.
-- [se of this l)r_)(luct where _tel- is nlicrobiologically unsatb or of unknown
(lualit): without ade(luale (lisinli ction betore or after the ,,7,-,tena.Systems
certitled fi)r cyst reduction may be used on disinf).*cted water that may
contain filterable _5-,ts.
-- I)anlage to tile pl-_)duct caused by accident, fire, fie(Ms or acts of God.
-- Incidental or consequential damage cattsed by possible defects with tiffs
appliance, its installation or repair.
• ]'i, how 1o_g @ l/_'o_g_tal pm_:ha_e?
-- One ycm:
•tlow do1 make a w(o m_*_'daim?
-- P,tqurn to the retailer ti-om which it was purr hase(I, along with a copy of
the "Primal of Purchase." This warc4nty excludes the c_rq of shipping or
setxice calls to your home.
• tlow (to_'a slal_' [au_ _'[(tle lo lhi, s z_*m'*rt_zl)' ?
-- This warranty gives you specific legal rights, and g)tl may also haxe other
rights which vmT fi-om state to state. THIS _RRANTY IS INTENDED
TO BE IN LIEU OF ALL OTHER _3_RANTIES, grHETHER
EXPRESS OR IMPLIED, INCLUDING THE WARRANTIES OF
MERCHANTABILITY AND FITNESS FOR A PARTICULAR PURPOSE.
Contact us atwww.GEAppliances.com,or call 800.952.5039fl_No U.& or toll-free
866.777.7627b_Canada.
Printed in the UnitedStates
-
 1
1
-
 2
2
-
 3
3
-
 4
4
-
 5
5
-
 6
6
-
 7
7
-
 8
8
-
 9
9
-
 10
10
-
 11
11
-
 12
12
-
 13
13
-
 14
14
-
 15
15
-
 16
16
-
 17
17
-
 18
18
-
 19
19
-
 20
20


GE GX1S50F Le manuel du propriétaire
- Taper
- Le manuel du propriétaire
- Ce manuel convient également à
dans d''autres langues
- English: GE GX1S50F Owner's manual