Hotpoint HSM22IFTASA Le manuel du propriétaire
- Catégorie
- Frigos
- Taper
- Le manuel du propriétaire
Ce manuel convient également à

• Side by Side
Refr 1gerato rs
Hotpoint.com
Side by Side
Refrigerators
Modds 20, 2Z 25
Safety InJbrmation
Connect Electricity ............. 3
Extension Cords ............... 2
Proper Disposal ................ 2
Satetv Precautions .............. 2
Operating Instruddons
Automatic ]cemaker . ......... 7-8
Controls ..................... 6
Crispers and Pans .............. 5
How to Install Features .......... 4
Ice and Water Dispenser . ....... 8
Shelves and Bins ............... 4
_._teI" Filter (_artridge ........... 7
Care and Cleaning
Cleaning ...................... 9
I,ight Bulbs ................... 9
Installation Instrucqions
Preparing to Install ........... 10
_,L_ter i,ine Installation ...... 11-13
7koubleshoofing Tips
Beflxre You Call
Fox"Service ................ 14-16
Nomxal Operating Sotmds ...... 14
Consumer Support
(_onsuxner Support .... Back Cover
Perlormance Data Sheet ....... 19
Product Registration
(Canadian) ............... 21, 22
Product Registration
(U.S.) .................... 20, 21
State of Califl)rnia _'ater
Treatment Device Certificate .... 19
Warranty (Canadian) .......... 17
Warranty (U.S.) ............... 18
Write your model and serial numbers here:
Mo_l#
Serial #
Find these xmxnbers on a label inside
the refl'igerator compartxnex_t at the top
on the right side behind the controls,
C6te "ac6te
R frig&ateurs
La section frangaise commence a la page 23
Mesures de s&urit_
Comment vous d0barrasser
COilVellablellxellt de votx'e
anden r_ti_ig&'amm" . ............... 23
Cordons prolongatem_ .............. 23
Mesm'es de s0cmJt& ................. 23
Raccordement Olectrique ............ 24
Fondionnement
Bacs 5 l_gumes ..................... 26
Cam)uche du filtre 5 eau ............ 28
Clavettes et bacs .................... 25
Installation des accessoires ........... 25
i,e disnibumur d'eau et de glagons .... 29
I,es commandes .................... 27
Machine 5 glaqons atxtoinafiqtxe ..... 28-29
En_en et nettoyage
Netto)_ge ......................... 30
Remplacement des ampoules ........ 30
Installation
Installation de la
conduite d'eau .................. 32-34
PrOparation ........................ 31
Comeils de depannage
Avant d'appeler tli1 x'_pax'ateur . .... 35-38
Bruits de fimctioxmen_ent
noxilla/ix .......................... 35
Service & la dienl_le
Feuillet de dolm_es relatives 5 la
pertimnance de la
cartouche H_ _ . ................... 40
Gax'ai_de pour la
clientele au (_ana(la ................. 39
Service 5 la clientele ................ 41
Lado a lad()
Refrigeradores
La seccionenespa_ol empiezaen la pag&a 42
Informaz.ifin de sewridad
Cables de extensi6n ................ 42
Conectar la electricidad ............. 43
Deshacex_e debidan_ente
de su x'eli_igex'ador . ................. 42
Px'ecauciones de seguridad ........... 42
Ins#ucciones de operaz.i fin
Carmcho del filtro de agua .......... 47
Controles del reffigerador. .......... 46
Dispensador . ...................... 48
Dispositivo automfitico
para hacer hielo ................. 47-48
Entrepafios y recipientes ......... 44-45
Gavetas de alnmcelmnfienm ......... 45
]nstaladdn de las caracterfsticas ...... 44
Cuidado y limpieza
i,impieza ....................... 49-50
Reemplazo de bombillas ............ 50
Instr ucciones de instalaz.idn
h_stalacidn de la lfi_ea
de agua ........................ 5.3-56
Preparaci6n para
instalar el reffigerador . .......... 51-52
Soludonar problemas
Antes de solicitor tm servicio ...... 57-60
Sonidos nommles
de la operacidn .................... 57
Servicio al consumidor
Garantfa para consumidores
en los Estados Unidos ............... 61
Hoja de datos de
flmcionamiento ................... 62
Servicio al consumidor. ............. 63
162D6746P012 39-60501 0!-07 JR

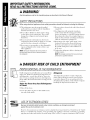
IMPORTANTSAFETYINFORMATION.
READALLINSTRUCTIONSBEFOREUSING.
WARNING!
Use this appliance only for its intended purpose as described in this Owner's Manual.
SAFETYPRECAUTIONS
When using electrical appliances, basic safety precautions should be followed, including the following:
_:i:This refrigerator must be properl) installed
and located in accordance with the Instnllation
Instructions before it is used.
::_Do not allow children to climb, stand or hang
on the shelves in the refl_igerat(m They could
damage the reii_igerator and seriously injm'e
themselves.
_:i:Do not touch the cold sm_i_ces in the fl'eezer
compartment when hands are damp or wet. Skin
mm stick to these extremely cold sm_hces.
::_Do not store or use gasoline or other flammable
\_q)m_ and liqtfids in tile vicini_' of this or any
other appliance.
NOTE."Turningthe refrl)erator off wa thecontrols on
the touchpanel doesnot shut off e/ectrica/power to
the refrigerator
i)::Do not refl'eeze fl'ozen fi)ods which have thawed
completely.
:_;;ln refl_igerato_ with autoinafic icemake_,
avoid contact with tile moving parts of tile
ejector mechanism, or with the heating element
that releases the cubes. Do not place fingers or
hands on tile automatic icemaking mechanism
while the refi_igerator is plugged in.
i)::Keep finge_ out of the "pinch point" areas;
clearances between tile doo_ and between
tile (loots and cabinet are necessarily small.
Be careflfl closing (lores when children are
in tile area.
i_'_Unplug tile refligerator befi_re cleaning and
making repai_.
NOTE: We stronglyrecommendthat anyservicingbe
performedby aqualified individual
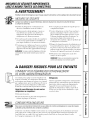
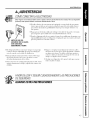
DANGER!RISKOFCHILDENTRAPMENT
PROPERDISPOSALOFTHEREFRIGERATOR
Child entral)inent and suffocation are not problems
of the past. Junked or abandoned refligeratm_ are
still dangerous...even if they will sit for "just a few
dm:s." If you are getting rid of yore" old refiigeratm;
please tollow the instructions below to help prevent
accidents.
Before YouThrewAway YourOldRefrigerator
or Freezer:
iJi::_ke off tile dome.
!i_:I,eaxe the shelves in place so that children may
not easily climb inside.
Refrigerants
_M1refl_igeration products contnin refl_igerants,
which under fecleral law Intlst be removed prior
to l)roduct disposal. If w_u are getting rid of an
old refligeration product, check with tile company
handling tile disposal about what to (lo.
2
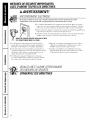
USEOFEXTENSIONCORDS
Because ofpotential safety hazards under certain conditions, we strongly recommend
against the use of an extension cord.
However; if)ou must use an extension cord, it is absolutely necessar_ that it be a UIAisted (in the United
States) or a CSA-listed (in (_anada),. -wn'e ,gr°/mdin'"_ t_,.l)eappliance extension cord haxin,,_ a ,gr°/mding,
t_ )e )luo- di
,] I _ " _d outlet and that the electrical rating of the cord be 15 amperes (minimmn) and 12(1_olts.

www.Hotpoint.com
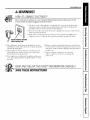
A WARNING!
HOWTOCONNECTELECTRICITY
Donot, under anv circumstances, cut or remove the third (ground) prong from the power cord. For
personal safeW, this appfiance must be properlv grounded.
_¢_The power cord of this appliance is equipped with a 3-prong (grounding) plug
which mates Mth a standard 3-prong (grounding) wall outlet to minimize the
possibility of electric shock hazard fl'om this appliance.
:#1_Have the wall outlet and circuit checked by a qualified electrician to make sm'e the
outlet is properly grounded.
:)_ If the out.let is a standard 2-prong out.let, it is your personal responsibili_' and
obligation to have it replaced with a propedy grounded 3-prong wall outlet.
:_J/The refrigerator should always be plugged into its own
individual electlJcal outlet which has a voltage rating that
matches the rating plate.
_¢_This provides the best pe_l'ommnce and also prevents
overloading house wiring circuits which could cause a
fire hazard fl'om overheated wires.
!:1:......Never un I)lug, rot:w, refrigerator, l:,x,I_ullino,_ on the power
cord. Mwavs,,II,_gfi _ _luo fimfl) and pull smfight, out from
the outlet.
:#1:Repair or replace immediately all power cords that have
become fl'aved or otherwise damaged. Do not use a cord
that shows cracks or abrasion damage along its length or
at either end.
_1:_'_hen mox4no_ the reflJgerator away fl'om the
wall, be careflfl not to roll oxer or damage the
power cord.
READANDFOLLOWTHISSAFETYINFORMATIONCAREFULLY.
SAVETHESEINSTRUCTIONS

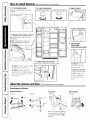
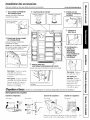
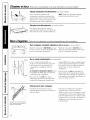
How to install features. (Not all features are on all models.)
(!) TOP FREEZER SHELF
Make sure the shelf front locks into
position.
Top Freezer Shelf
(_ FREEZER DOOR SHELF FRONTS
Make sure that the shelf front locks
into position,
NOTE: On dispenser models, the
longer shelf fronts go in the top
two positions,
_ Dh2,; Front
To remove: I,ifl the shelf extender
straight up, then pull out.
To replace: Engage the shelf
extender in the molded supports
of the door and push in. It will
lock in place.
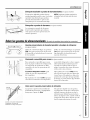
(_) FILTER CARTRIDGE
Remove Bypass Plug Install Filter Cartridge
S
/
Lower Door Bin
@ LOWER FIXED DOOR BINS
Make sure the bin fronts lock into position.
!1
Ill
@ DAIRY COVER
@ BOTTLE RETAINER
@ ADJUSTABLE
DOOR BINS
DOOR BIN SNUGGERS
To remove: I,ifl the
fl'ont of the bin up,
then pull out.
Toreplace or relocate:
Engage the 1)in in the
molded supports of
the door, and push
in. Bin will lock in
place.
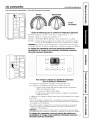
Abouttheshelvesandbins.(Not all features are on aii models.)
Rearranging the Shelves
Refrigerator Shelves:
ToRemove
4
Freezer Pan:
ToReplace ToRemove
I
Remove the pan by pulling it
fin'ward, lifting up the fl'ont
and sliding it past the stop
location.
Freezer Shelves:
ToRemove

www.Hotpointcom
Slide-Out Spillproof Sheff (onsomemodels)
The slide-out spillproof shelf allo_vs you to
reach items stored behind othei_. The
special edges are designed m hel I) prevent
spills from dripping to lower shelves.
NOTE:Makesureyoupushtheshelvesall the
waybackin beforeyouclosethedoo_
I
Spillproof Shelves (onsomemodels)
Spillproof sheh es haxe sI)ecial edges,
to hel I) prevent spills from (h_l)l)ing to
lower shelx es.
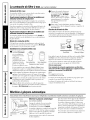
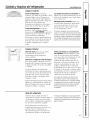
Aboutthe crispersandpans.(Nota. on mode/&)
Adjustable Humidity Crispers and Snack Pan (onsomemodels)
Slide the control all the wax to the Slide the control all the wax to the LOW
High setting to provide high h umidig setting to provide lower humidig lexels
recomm ended for m ost x egetables, recommended torm ost fl'uits.
Normal
Coldest
Convertible Meat Pan (onsomemodels)
The convertible meat pan has its own cold
air duct to allow a stream oI cold air fl'om
the fl'eezer con_l)artmei_t to flow around
the pan.
The variable temperature control regtllates
the air flow fl'om the fl'eezer compartment.
Set control lever up to convert the pan
to noi_nal reli-igerator teml)erature and
provide extra vegetable storage space. Cold
air duct is turned off'. W_riable settings
between these extrelnes can be selected.
Set control lever down to the coldest setting
to store fl'esh lneats. If level" is left in lneat
position for a hmg peciod of tilne, some
frost Inav titan on the inside of the pan.
When replacing the crispers, make
sure you slide them flTrough the
crisper guides.
Crisper Removal
Ccisl)eI_ can easily be remoxed b) tilting up
slightly aim pulling past stop h)cafion.
If the door i)revents you fl'oln taking out
the crispers, the reti]gerator will need to
be rolled fi)rward until the door opens
enough to slide the ccisl)eIs out. In some
cases, when w_u roll the refl{gerator out,
w)u will need to move the refrigerator to
the left as wm roll it out.

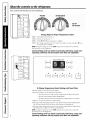
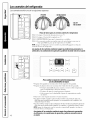
Aboutthe controlsonthe refrigerator.
Yourcontrols will look like one of the following:
I
I
FREEZER
REFRIGERATOR
0 ISOFF
9 ISCOLDEST
Startup Steps for Proper Temperature Control
STEP l--Set Fresh Food (_ontrol on "5.
STEP 2--Set Freezer Control on "5."
STEP _---W_MT 12HOURS fbr tempel_ture to st_bilize.
STEP _-Ifa change is needed, mo',e tile control one mm-lber at a time and allo_ 12houls
tor ternpel'ottlre to stabilize.
NOTE:Turning the l'efrigerator to the 0 (off)setting da tl/e controls does not shut off
electl_ical po_el" to fl_e l'eli'igeratol:
Controlsettings will vary based on personal preferences, usage and
operating conditions and malt require more than one adjustment.
ToChange Temperature Control Setting with TouchPads:
• Freezer setting is on the leii side oi tile dispirit.
• Fresh Food setting is on tile right side of tile display}.
-- Press the _u'mer or colder pad ii)r compartment and dil_cfion desired.
-- Present control setting mm/ber will illmninate.
-- Each time the pad is touched, compartment setting changes one mm-lbel:
A displ_ of l is _rmest and 9 is the coldest setting.
• On some models, setting both controls to the warnlest setting until the displ_J_flashes
(off) will stop cooling in both the freezer and l_fi'igerator compartments.
• On other models, setting either control to die _m-nest setting tmfil d_e (lispl_ flashes
(off) will stop the cooling to fl_e freezer and reti_igel_tol ".
NOTE:Turning the lefi_igerator to tile 0 (off)setting via tile controls does not shut off
electrical po_er to file reti'igel_to_'.
Control settings will vary based on personal preferences, usage and
operating conditions and may require more than one adjustment.

Aboutthe water filter cartridge.(Onsomemodels; w Hotpoint.com
Water Filter Cartridge
The water filter cartridge is located ill the back ul)per right
corner of the refl_igerator comi)artn/ent.
When toReplace theFilteronModels With a
ReplacementIndicatorLight
There is a rel_la('ement indicator light tilt the water filter
cartridge on the dispensei: This light will turn orange to tell
xou that _ou need to replace the filter soon.
Tile filter cartridge should be replaced when the
replacenmnt indicator light turns red or if the flow of water
to the dispenser or icemaker decreases.
When to Replace the Filter on Models Without a
ReplacementIndicatorLight
The filter (artfi(l_e should be replaced every six months
or earlier if the flow at water to the w;iter dispenser or
icemaker decreases.
Removingthe Filter Cartridge
If you are replacing the cartridge, filet relllove the old one
by slowly turnin_ it to the left. Do not/)ull down (m the
cartficl_e, axsmall am()tmt ot water may drip down.
Installing the FilterCartridge
O If you m'e replacing a
with :Ill adal)tel: it lilt/St
be ram( )ved befi )re
installine the camid_e.
To l'elHove the ada/)tel;
ttual it to the left about
1 4 mm.
With adapter Without aaaorer
]f rot/ ;lI'e rel)la(ing ;i
Water by Culligan cartridge, (appearance may vary)
leave tile adapter ill place. This adapter will stay ill the
refrigerator when )ou replace fimue cartridges.
O On models without a replacement indicator light,
appl) the month and xear sticker to the new cartridge
to renfind xou to replace the filter ill six months.
Fill the replacenmnt cartridge with water fl'om the tap
to allow fi)r better flow fron/the dispenser immediately
after installation.
0 i,ine tlI) the arrow on the cartridge and the cartridge
holdei: Place the top of the new cartridge up inside the
holdei: Do not push it up into the holder:
Sh)wly turn it to the right
until the filter cartridge
stops. DO NOTOVERT/GHTEN.
_s you turn the cartridge, it
will autonmficallv, raise itself Holder
into position. The caitridge
will moxe abotlt 1/2 ttlrn.
O Run water fl'om the dispenser fi)r 3 minutes (about l-1/2
galhms) to clear the s\stem and prevent sputtering.
FilterBypassPlug
You must use the filter byl)aSS l)lug when a replaceuwnt filter
cartridge is not ax:lilable. The dispenser and the icemaker
will not operate wifllout the filter or filter byp;_ss l)lug.
SmartWater
Filter_
Bypass ,,,j
Plug i
Waterby&lligan
To use the filter bypass l)lug on Waterby Culligan models,
you must filst remove the filter adapter fl'om the cartridge
holder b) turning it to the left.
If you have questions--visit our Website
at \\_\_v.hotp()int.conl,
or call 1.800.GE.CARES (1.800.432.2737).
Replacement filters:
Toorder additional filter cartridges in the United States,
visit our Website at vvww.hotpoint.com, or call GEParts and
Accessories, 800.628.2002
Suggested Retail $38.95-47.95
()/stolllel_ ill Canada should consult the yell()\\' l)ages fi)r
the nearest Mabe Service Centel;
Custonleis ()utside of the United States or Canada should
contact the local distfibutoi:
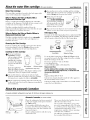
Abouttheautomaticicemaker.
A newly-installed refrigerator may take 12-24 hours to begin making ice.
Switch
Icemaker
6teen
PowerLight _rArm
Automatic Icemaker (onsomemodels)
\,\]_en the refrigerator has been connected
to the water supply, set the power switch to
the I (on) position.
The icemaker \\'ill fill with water when
it cools to 15°E When the bin fills to the
level of the teeler ;urn, the icemaker will
stop producing ice.
Be sure nothing inteHeres with the sweep
at the ti_eler aim.
Till'()\\' away the filet te\\' batches of ice to
allow the \_;ater lille to clam:
The icemaker will produce seven cubes
per wcle--ai)proxinmtely 100-130 cubes
ill a 24-hour period, depending on fl'eezer
COI/ll)_lI'tlllent tei/ll)ei'iltlli'e _ i'OOill
teml)erature, ntunber of door openings
and other use conditions.
You \\'ill hear a buzzing SOtlnd each time
the icemaker fills with \\'ateI: 7

Abouttheautomaticicemaker.
It is nomml tor several cubes to be joined togethex:
If ice is not used fl'equenfly, old ice cubes will
becon_e cloudy, taste stale, and shrink.
NOTE."Inh )rueswith lower-than-averagewaterpressure,
youmayhear theicemakercycle mul@/e times when
making onebatch ofice.
Icemaker Accessory Kit
If your refligerator did not come ah'eady
e(iuipped with an automatic icemakei; an
icemaker accessoi y kit is a\zfilable at extra cost.
Check tile back ot the refligerator for tile specific
icemaker kit needed for your model.
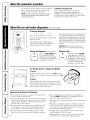
Abouttheice and water dispenser.(onsomemoao¢s)
(-. {:,,
2) {2) (L"
SpillShelf
To Use the Dispenser
® @ •
Select _WQ,e_ _rushed_ (1I" _Cubed_
Press tile _(*lass_(*enflx.against, tile top of tile
dispenser cradle.
Tile spill sheff is not self-draining. To
reduce water si)otting,, tile shelf and its
grille should be cleaned regularly.
Lockingthe Dispenser(onsomemodels)
0 Press the LOCKCONTROLpad
k_ tOr 3 sec°nds t° l°ck the
LOC dispenser and control panel.
To unlock, press and hold the
Hold3seconds pad again for3 seconds.
If no water is dispensed when the refrigerator is
first installed, there may be air in the water line
system. Press the dispenser arm for at least two
minutes toremove trapped air from the water l/be
and to fill the water system. Toflush out/_npurities
in the waterline, throwaway the first sixglassfuls
of water
CAUTION: Never put fingers or any other
objects into the ice crusher discharge opening.
Dispenser Light
Q This pad rams tile nightlight
_v__L -'x in tile (fispenser on and (/fl_
ightJ Tile light also comes (m whenthe dispenser cradle is pr_sed.
If this light bums out, it sho/fld
be rq)laced _ith a 6 _tt
ma_mum, 12 volt D(: b/fib.
Ice Storage Drawer on Dispenser Models
Toremove:
Set the icemaker power switch to tile 0 (Off)position.
Pull the drawer straight out and then lift past the stop
p()sifion.
Toreplace:
\_]wn replacing the (h'awel, make sure to push it
fimdv into place./f it does not go all the way back,
1"el/lOVeit and rotate the Olive mechanism 1/4 turn.
Then push the drawer back again.
Mechanism
Important Facts About Your Dispenser
_: Do not add ice fl'om trays oi" bags to tile storage bin. It
may not crush or (lispeI{se well.
iJi::Avoid overfilling glass with ice and use of narrow glasses.
Backed-up ice canjanl tile chum or cause tile door in tile
chute to freeze shut. If ice is blocking the chute, poke it
through with a wooden spoon.
iJi::Beverages and toods should not be quick-chilled in the
ice storage bin. Cans, bottles or toed packages in the
storage bin may cause the icemaker or auger to jam.
iJi::To kee I) dispensed ice fl'om missing tile glass, put tile
glass close to, but not touching, tile dispenser opening.
8
!i_:Some crushed ice may be dispensed even though you
selected CUBED. This hal)pens occasionally when a few
cubes haxe been left in the crushei:
!i_:_Mier crushed ice is dispensed, some water may (hi l) fl'om
the chute,
iJi::Sometimes a small mound of snow will titan on tile door
in the ice chute. This condition is nomml and usually
occurs when you have dispensed crushed ice repeatedly:
Tile snow will eventually e\:q)oram.
iJi::Tile first glass of water dispensed may be wam/er than
the tollowing ones. This is nomml.
_: Dispensed water is not ice cold. For colder watei; simply
add crushed ice or cubes before dispensing ware1:

Careand cleaningoftherefrigerator. . eetpeintcem
Cleaning the Outside
The dispenser drip area, ((m some Inodels)
S " • " " / " l S 3.
tile deposits by adding undiluted vinegar to
the well. Soak until the deposits disappear
or becoille loose enough to IJnse awavk
The dispenser cradle (on some models).
Before cleaning, lock the dispenser bx
pressing and holding the LO_K CONTROL
pad t0r 3 seconds. Clean with warn1 water
and baking soda solution--al)out a
tablespoon (15,111) at baking soda to a
quart (l 1) of wamn Rinse thoroughly
and wipe (h T.
The doorhandles and trim.Clean with a
cloth dampened Mth soapy wate,: Dry
with a soft cloth.
Keep the outside clean. Wipe with a clean
cloth lightly dampened with kitchen
appliance wax or mild liquid dish dew,gent.
D,_' and polish with a clean, sott cloth.
Do not wipe the refn)erator with a soiled dish
cloth or wet towel. Thesemay leave a residue
that can erode the painL Do not use scouring
pads, powdered cleaners, bleach or cleaners
containing bleach because these products can
scratch and weaken the paint finish.
Cleaning the Inside
Tohelp prevent odors,leave an open box (ff
baking soda in tile refiigerator and fl'eezer
CoII, l)a i't,ilents.
Unplug the refrigerator before cleaning. If this
is not i)ractical, w,ing excess moisture out
of sponge or cloth when cleaning m'olmd
switches, lights or controls.
Use warm water and baking soda solution--
about a tablesl)oon (l 5,1,1) of baking soda
to a quart (1 1) at wate,: This both cleans
and neutralizes oclo,_. Pdnse and wipe dry:
After cleaning tile door gaskets, apply a
thin layer of petroleum jelly to tile door
gaskets at the hinge side. This helps kee I)
tile gaskets fl'om sticking and bending out
at shape.
Drain opening in freezer compartment
Dining yearly cleaning, remove bottom
ti'eezer pan and flush a solution of baking
soda--1 teaspoon (5,111) and 2 cups (500
,/11) of hot (not boiling) wam,_through
the drain line with the hel I) at a meat
baste,: This will hel I) eliminate odor and
reduce the likelihood of a clogged drain
line. If drain becomes clogged, use a meat
baster and baking soda solution to force the
clog through the drain line.
Avoid cleaningcoldglass shelves with hot water
becausethe extremetemperature difference may
causethem to break.Handleglass shelvescarefully
Bumpingtemperedglasscancause it to shatter
Do not wash any plastic refngerator parts in the
dishwasher
Behind the Refrigerator
Be ca ,'eft fl when ,i, ovi,lg the i'eflJgei'atoi" awa} fl'(m, the
wall. M1 types of floor coxefings can be damaged,
particularl) cushioned coxefings and those with embossed
S/,I'til ces.
Pull tile reflJgerator straight out and return it to position by
pushing it straight in. Moving the refligerator in a side
direction may result in damage to tile floor coveting or
refligerato,: '
Whenpushing the refrigerator back, make sure you clan'troll over
the power cord or leemakersupply line (onsome models).
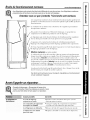
Preparing for Vacation
For hmg \_cafions or absences, remove toed and tml)lug
tile refligerato,: Clean tile interior with a baking soda
solution of one tablespoon (l 5,111) _ff baking soda to one
quart (l 1) of _,_lte,: I,eave tile (loo,_ open.
Set tile icemaker power switch to the O (off] position and
shut off tile water SUl)l)ly to tile refligeratm:
Preparing to Move
Secm'e all loose items such as ,grille, shehes and (h'awe,_ 1)_,tal)ing, them seem'ely in place to prex ent damage.
Be sure the refrigerator stays in an upn)ht position during moving.
Replacing the Light Bulbs
NOTE." Turning the refrigerator to the 0 (off) setting via the controls does not shut off electrical power to the refrigerator.
O ILrnl)lug tile refrigerator. 0 Replace with an appliance bulb of tile same
or lower wattaoe
O Remoxe tile shelf just below tile light shield.
0 Reinstall tile shelf and plug tile refrigerator
back in.

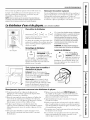
Installation Instructions
Questions?Call 800.GE.CARES(800.432.2737)or visitour _'ebsite at: www.Hotpoint.com
In Canada,call 1.800.361.3400or Visitour _'ebsite at: www.geappliances.ca
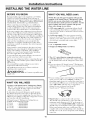
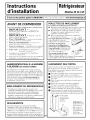
BEFORE YOU BEGIN
Read these instructions completely and carefully.
• IMPORTANT - S ,,ethese
instructions for local inspector's use.
• IMPORTANT - Obse,ve;,ll
governing codes and ordinances.
• Note to Installer _ Be sure to leave these
instHlctions with tile Consun/er.
• Note to Consumer _ Kee I) these instructions
tor fllture reference.
• Skill level - Installation of this appliance requires
basic mechanical skills.
• Completion time - Refligerator Installation
15 mintKes
• Proper installation is tile responsibility of installer.
• Product tailure due to improper installation is not
covered under tile Warranty:
REFRIGERATOR LOCATION
• Do not install the refl'igerator where tile temperature
will go below 60°F (l 6°C) because it will not rtm
often enough to maintain proper temperatures.
• Install it on a floor strong enough to sui)i)ort it fiflly
loaded.
ROLLERS
The milers have 3 purposes:
• Rollers a(!iust so tile door ch)ses easily when opened
about hallway.
• Rollers a_!iust so the refrigerator is firefly i)ositioned
on the floor and does not wobble.
• Rollers allow you to move the retiigerator away fl'om
tile wall fin" cleaning.
To adjust the milers, remove tile base grille by pulling it
out at tile bottom.
Turn the roller a({justing screws dockwise to raise the
reliigerato_; comlterclock, vise to lower it. Use an
a(!iustable wrench (3/8" hex head bolt) or pliers.
To replace base grille, line up the clips on back of grille
between tile bar and tile bottom (ff tile cabinet. Push
tin'ward until grille snaps into place.
WATER SUPPLY TO THE ICEMAKER
(on some models)
If tile refrigerator has an icemaker, it will have to be
connected to a cold water line. A GE water SUl)ply kit
is available at extra cost fl'om your dealer, by visiting
our _'ebsite at www.Hotpohlt.com (in Canada, at
www.geappliances.ca), or from Parts and Accessories,
800.626.2002.
CLEARANCES
_Mlow tile following clearances fin" ease of installation,
proper air circulation and I)lumbing, and electrical
connections.
• Sides 1/8" (4ram) * Top 1" (25 ram) * Back 1" (25 ram)
A door clearance of./4 (19 InIn) is needed fi)I" a 90 ° door
opening which proxides better access to tood storage area.
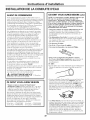
DOOR ALIGNMENT
_Mter lexeling, make sure that tile doo_ are exen at tile top.
To make tile (loo_ exen, a(!just tile refrigerator door as
follows:
O Remoxe tile Base (;rille, open tile doo_s, then pull tile
grille straight out.
Detennine which of tile two doo_s is higher than tile other:
O Lift tile lower (loo_; ahmg with tile small cam.
Place tile shim between tile Door Metal Hinge and tile
small cam as shown.
O Press in tile shim so that it fits in between tile metal
hinge and the plastic cam.
O Close the doo_ and check if they are level at the top.
If one door is still lower than the other; repeat the
process and insert another shim.
underthefreshfood
doortophingecover.
Shim
NOTE: If tile doo_s are not ex,en and tile shim is ah'eadx
inserted xo/I c},n i'eino_e tile shim to lower tile dooI i

Installation Instructions
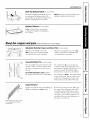
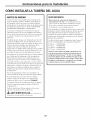
INSTALLING THE WATER LINE
BEFORE YOU BEGIN
Recomn_ended copper water supply kits are _4UX8X2,
WX8X3 or _X8X4, depending on the amom_t of
tubing you need. Approved plastic water SUl_ply lines are
GE Smart(:onnect _'_Refl_igerator Tubing (_4_X08X10002,
WX08X10006, WX08X10015 and X43X08X10025).
When connecting yore" refl'igerator to a GE Reverse
Osmosis _'_ter System, the only approved installation
is with a GE RV/4dt. For other reve_e osmosis water
systems, tollow the inanufilcturer's recommendations.
If the water supply to the reti'igerator is ti'om a Revei_e
Osmosis X4'ater Filtration System AND the refrigerator
also has a water filtei; use the reti'igerator's filter byl)ass
plug. Using the refrigerator's water filtration cartridge in
conjunction with the RO filter can result in hollow ice
cubes and slower water flow fl'om the water dispenser.
This water line installation is not warranted by the
refrigerator or icemaker manufi_cturer. Follo_' these
instructions carefifllv to minimize the risk of expensive
water damage.
_'ater hammer (water banging in the pipes) in house
plmnbing can cause damage to reflJgerator parts and
lead to water leakage or flooding. Call a qualified
phunber to correct water hammer before installing
the water supply line to the refl_igerator.
To prevent bm'ns and product damage, do not hook
up the water line to the hot water line.
If wm use your refrigerator betore connecting the water
line, make'sm'e the icemaker power switch is in the 0
(Off) position.
Do not install the icemaker tubing in areas where
temperatm'es tall below freezing.
All installations ulust be in accordance with local
pltmfl)ing code reqtfirements.
WARNING - Com,e,ttop.t ,ble,, ,te,
supply only.
WHAT YOU WILL NEED
• Copper or GE SmartCmmecf _"Refrigerator Tubing
kit, l/4" outer diameter to connect the refi'igerator
to the water supply. If using copper, be sm'e both
ends of the tubing are cut square.
To determine how much tubing you need: measm'e
the distance ti'om the water wflve on the back of the
refrigerator to the water supply pipe. Be sm'e there is
sufficient extra tubing to allow the refl'igerator to move
out fl'om the wall alier installation.
GE SlnartConnect _''Refl'igerator Tubing Kits are
available in the ti_llowing lengths:
2' (0.6 m) - WX08X10002
6' (t.8 m) - _4UX08X10006
15' (4.6 m) - WX08X10015
25' (7.6 m) - WX08X10025
WHAT YOU WILL NEED (CONT.)
NOTE: The tufty GE approved plastic tubing is that
supplied in GE SmaxtCmmect TM Refrigerator Tubing
kits. Do not use m_y other plastic water supply line
because the line is under pressure at all times. Certain
types of plastic will crack or rupture with age and
cause water damage to your home.
• A GE water supply kit (containing tubing, shutoff
valve and fittings listed below) is available at extra
cost fl'om your dealer or fl'om Parts and Accessories,
800.626.2002.
• A cold water supply. The water pressm'e must be
between 20 and 120 p.s.i. (1.4-8.2 bar) on models
without a water filter and between 40 and 120 p.s.i.
(2.8-8.2 bar) on models with a water filter.
• Power drill.
• 1/2" or adjustable wrench.
• Straight and Phillips blade screwdriver.
• Two 1/4" outer diameter compression nuts m_d
2 ferrules (sleeves)--to connect the COl)per tubing
to the shutoff wflve and the refl'igerator water wflve.
OR
• If wm are using a GE Smart(_onnect TM Refl'igerator
Tubing kit, the necessary fittings are preassembled to
the tubing.
• If wmr existing COl)per water line has a flared fitting
at the end, you will need an adapter (available at
i)lmnbing supply stores) to connect the water line to
the refrigerator OR you can ctlt off the flared fitting
with a tube cutter and then use a compression
fitting. Do not cut ti_rmed end from GE
Smart(_onnect TM Refl'igerator tubing.
• Shutoff valve to connect to the cold water line.
The shutoff wflve should have a water inlet with a
minimmn inside diameter of 5/32" at the point of
connection to the COLD WATER LINE. Saddle-type
shutoffwflves are included in many water supl)ly kits.
Before pro'chasing, make sm'e a saddle-Vpe wflve
complies with yore" local phunbing codes. Install the
shutoff valve on the nearest ti'equently used drinking
water line.
11

Installation Instructions
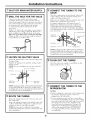
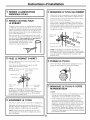
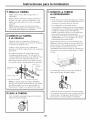
[] SHUT OFF MAIN WATER SUPPLY
[] DRILL THE HOLE FOR THE VALVE
Choose a location for the valve that is easily
accessible. It is best to connect into the side of a
vertical water pipe. When it is necessary to connect
into a horizontal water pipe, make tile 'connection
to the top or side, rather than at the bottom,
to aw)id drawing off any sediment fl'om the
water pipe.
Drill a ]/4" hole in the water pipe (even if using a
self:piercing valve) using a sharp bit. Remove any
burrs resulting fi'om drilling tile hole in tile pipe.
TaKe canre not to allow water to drain into the drill.
Failure to drill a l/4" hole may result in reduced
ice production or smaller cubes.
[] FASTEN THE SHUTOFF VALVE
Fasten the shutoff valve to the cold water pipe with
the pipe clamp.
Tighten tile clamp screws until tile sealing washer
begins to swell.
NOTE: Do not overtighten or you may c_ush the
tubing. Washer
PipeClamp _1_ End
ClampScrew
Saddle@pe J VerticalCold
ShutoffValve WaterPipe
NOTE: Commonwealth of Massachusetts Plumbing
Codes 248CMR shall be adhered to. Saddle wflves
are illegal and use is not permitted in Massachusetts.
Consult with w)ur licensed pluml)e_:
[] ROUTE THE TUBING
Route tile robing between tile cold water line and
tile refrigerator.
Route tile robing through a hole drilled in tile wall
or floor (behind tile refligerator or a(!jacent base
cabinet) as close to the wall as possible.
NOTE; Be sure there is sufficient extra tubing
to allow the refiigerator to move out fi'om the wall
after installation.
I
[] CONNECT THE TUBING TO THE
VALVE
Place tile compression nut and ti_Hule (sleeve) flw
(-opper tubing onto tile end of tile tubing and
connect it to tile shutoff valve.
Make sure the tubing is fiflly inserted into the wflve.
Tighten tile compression nut securel)'.
For plastic tubing fl'om a GE Sinart(]onnect TM
Refligerator Tubing kit, insert tile molded end
of the tubing into the shutoff wflve and tighten
compression nut until it is hand tight, then tighten
one additional turn with a wrench. Overtightening
Ill'IV CatlSe leaks.
oressionNut
Saddle-Type
ShutoffValve
SmartConnect TM
Tubing
PackingNut --
OutletValve -- -- Ferrule(sleeve)
NOTE: Commonwealth of Massachusetts Plumbing
Codes 248CMR shall be adhered to. Saddle wflves
are illegal and use is not permitted in Massachusetts.
Consult with your licensed pluml)e_:
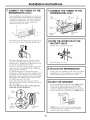
[] FLUSH OUT THE TUBING
Turn tile main water suI_pl,v on and flush out tile
tul)ing until tile water is clear.
[]
CONNECT THE TUBING TO THE
REFRIGERATOR
NOTES:
• gefl)re making tile connection to tile refligerator,
be sure tile refligerator power cord is not
plugged into the wall outlet.
• If your refligerator does not have a water filter,
we recommend installing one if vour water SUl)ply
has sand or particles that could clog tile screen of
the refrigerator's water wflve. Install it in the
water line near tile refligerator. If using a GE
SmartConnect TM Refl'igerator Tubing kit, you
will need an additional tube (WX08X10009)
to connect tile filter. Do not cut plastic tube
to install filter.
12

Installation Instructions
[] CONNECT THE TUBING TO THE
REFRIGERATOR (CONT.)
S()me models have the refl'igerator connection at
the end of robing located outside the compressor
comi)arm_ent access cover. On other models, the
COU/l)ressor COUll)_lI'tIIlent access cover UltlSt be
removed in order to access the refrigerator
connection at the water wflve.
On models using tile refrigeration connection at
the water xalxe, remoxe the plastic flexible cap.
©
Place tile compression nut and ti_Hule (sleeve)
onto the end of the tubing as shown. On a GE
SulartConnect'l RefiJgerator Tubing kit, the ntltS
are ah'eadv assembled to the tubing.
Insert tile end of tile tubing into tile refl'igerator
connection as flu" as possible. While holding the
robing, tighten tile fitting.
For plastic tubing from a GE Smart(:onnec("
Refrigerator Tubing kit, insert tile molded end of
tile tubing into tile reti'igerator connection and
tighten the compression nut tmtil it is hand tight,
then tighten one additional turn with a wrench.
Overtightening may cause leaks.
Fasten the robing into the clamp provided as
shown to kee I) it in position. You may need to pry
open tile clamp.
One of the illustrations below will look like the
commction on your refrigerator.
Tubing
Clamp_
1/4"
Compression
Nut _
1/4"
Tubing
Ferrule
(sleeve)
SleartConnectTM
Connection Tubing
[] CONNECT THE TUBING TO THE
REFRIGERATOR (CONT.)
Tubing 1/4" 1/4"
Tubing
Ferrule
(sleeve)
Connection
SmartConnecffM
Tubing
I_TURN THE WATER ON AT THE
SHUTOFF VALVE
Tighten am connections that leak.
Reattach tile access cover.
[] PLUG IN THE REFRIGERATOR
__rraw,e tile coil of tubing so that it does not vii)rate
against the back of the refrigerator or against the
wall. Push the refrigerator back to the wall.
[] START THE ICEMAKER
Set tile icemaker power switch to tile I (on)position.
Tile icemaker will not begin to operate until it
reaches its operating temperature of I5°F (-9°(:)
or below. It will then begin operation automatically
if the icemaker power switch is in the I (0n) positiol_.
J_
NOTE: In lower water pressm'e conditions, tile
water xalxe ulav turn on t/I ) to 3 times to delixer
enow,h water to tile icemaker.
13

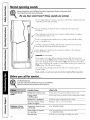
Normal operatingsounds.
Newer refrigerators sound different from older refrigerators. Modem refrigerators have
more features and use newer technology.
Do you hear what I hear? These sounds are normal
The new high efficiency c(m_pressor runs tipster and will haxe a higher pitch hum
or I)ulsating, sound while oi)erating.
_The tim circulating air inside the freezer which keeps the temperatm'es
throughout.
_,_ter droli) ring, on the defl'ost heater causing a sizzling, hissing or i)opping
sound during the defrost c) cle.
The flow of refl_ioerant through the fl'eezer cooling coils sounds like boilino
water or a gtu'gling noise.
Cracking or i)oi)i)ing of cooling coils caused by expansion and contracti(m
dtu'ing defl'ost and refl_igerafion fi)llowing deft'est.
,_4'ater dripping as it melts fl'om the exai)orator and flows to the drain pan
(hu_ing the defl'ost cycle.
Icemaker (onsomemodels)
The icemaker water valve will buzz when the icemaker fills with water; If the
power switch is in the I (on) posifi(m it will buzz even if it has not yet been hooked
up to water; Keeping the power switch in the I (0//) position heft)re it is hooked
up to water can damage the icemaker. To prevent this, set the p()wer switch to the
0 (off)position. This will stop the buzzing.
The sotmd of cubes dropping into the bin and water rtmning in i)ipes as
icemaker refills.
These sounds are normal and are due mostly to highly efficient operation.
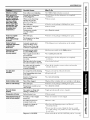
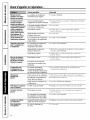
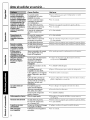
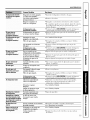
Beforeyoucall forservice...
Troubleshooting -tips
Save time and money/.Review the charts on the following
pages first and youmay not need to call for service.
Possible Causes What ToDo
Refrigerator does not Refrigerator in defrost cycle. * Wait ab()ut 30 minutes fi)r defi'ost cycle to end.
operate Freezer control • Move the fl'eezer control to a lower temperature setting.
in 0 (off) position.
Refrigerator is maplugged. * Push the plug c(>ml)letely int(> the (>uflet.
The fuse is blown/circuit • Replace tuse or reset the breaker.
breaker is tripped.
Refrigerator or freezer Temperature control not set • See About the controls.
compartment too warm cold enough.
Warm weather or frequent • Set the teml)erattu'e control one step col(le_:
door openings. See About the controls.
Door left open. • Check to see if package is holding door open.
14

www.Hotpoint.com
Possible Causes What ToDo
Vibration orrattling Front rollers need adjusting. • See Rollers. Slight vibration is uomml.
Motor operates for Normal when refrigerator * _'ait 24 hotu_ fin" tile refrigerator to completely
Iongperiods or cycles is first plugged in. cool dowu.
on and off frequently.
(Modern refrigerators Often occurs when large * This is hernial.
amounts of food are
withmorestorage
space and alarger placed in re frigerator.
Treezer require more Door left open. * Check to see if _acka_e is holdiug door o )en
operatingtime.They
start and stop often Hot weather or frequent * This is hernial.
to maintain even door ope_fings.
temperatures.) Temperature controls * See About the controls.
set at the coldest
setting.
Frostorice crystals Door left open. * Check to see if l_acka'_e_ is, holdiug, door Ol)en.
onfrozenfood
(frostwithinpackage Too frequent or too long
isnormal) door openings.
Oividerbetween Automatic energy saver • This helps preveut coucleusafiou ou tire outside.
refrigerator and freezer system circulates warm
compartments liquid around front edge
feelswarm of freezer compartment.
Automatic icemaker lcemaker power s_vitch • Set tire power switch to tire I (0n) positiou.
does not work is in the 0 (off) position.
(on some models) Water supply turned off or • See Installingthewater line.
not commcted.
Freezer compartment • _'ait 24 h()tu_ fi)r tire rehJgerat()r to ('()mpletely
too warm. cool dowu.
Piled up cubes ha the storage • l,evel cubes by haud.
bin cause icemaker to shut off.
Ice cubes stuck ha icemaker. • Turu offthe icemakel; relHove cubes, aud tuI'u the
(Green power light on icemaker back ou.
icemaker blhfl_hag.)
Ice cubes have Ice storage bin needs clemlhag. • EmpU mad wash biu. Discard old cubes.
odor/taste
Food trmasmitthag odor/taste • Wrap fi)()(ls well.
to ice cubes.
Interior of refrigerator • See Care and cleaning.
needs clemahag.
Smallorhollowcubes Water f'dter clogged. • Replace filter cartridge with uew cartridge or with l)ltv_"
Slow ice cube freezing Door left open. • Check to see it laacka'_e_ is, holdiug, door Ol)en.
Temperature control not set • See About thecontrols.
cold enough.
Doornot closing Door gasket on hinge side • Apply petroleum jelly ou thce of gasket.
properly sticking or folding over.
Orange glow in freezer Defrost heater is on. • This is nom/al.
Cubedispenserdoesnot lcemaker or water supply • Turu ou icemaker or water supply.
work (on some models) turned off.
Ice cubes are frozen to • ]'_eIllove cubes.
icemaker feeler arm.
Irregular ice clumps ha • Break up with fingertip pressure aud discard
storage contahmr, remaiuiug clumps.
• Fl'eezel" Ill,IV be to0 "_V;llIrl, Ad]l/st the ti'eezer COlltl'ol
to a colder settiug,, one l)°siti°u at a time, uutil clumps
do Hot tOIRll,
Dispenser is LOCFff;D. * Press aud hold the I,OCK CONTROl, pad for 3 secouds.
15

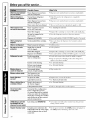
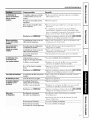
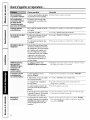
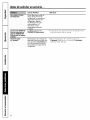
Beforeyoucall forservice...
Possible Causes What ToDo
Water haspoortaste/odor Water dispenser has not been * Dispense water until all water in s}stem is replenished.
(on some models) used for a long time.
Waterin firstglass is Normal when refrigerator * _._fit 24 hom_ fin" tile refl_gerator to completely
is first installed, cool down.
Water dispenser has not been * Dispense water until all water ill s}steul is replenished.
used for along time.
Water system has been drained. * Mlow several ho/u_ fl)r replenished supply to chili.
Waterdispenserdoes Water supply line turned * See Installing the water line.
not work (on some models) o ff or not connected.
Water terclogged. •Rei l cet lteic .ti d erem ,.e, ,tei pl.
Air may be trapped ha the • Press tile dispenser [iY/ll for at least [WO ininutes.
water sTstem.
Dispenser is LOCI_:D. * Press and hold tile I,OCK CONTROl, pad fin 3 seconds.
Water spurting from Newly-h_sta!led filter cartridge. • Run water fl'om tile dispenser for 3 minutes (about
dispenser 1½gallons).
Waterisnotdispensed Water in reservoir is frozen. * Call fi)r service.
No water or ice cube Supply line or shutoff • Call a plumbeI:
production valve is clogged.
Water filter clogged. • Replace filter cartridge or remoxe filter and install plug.
Dispenser is LOCI_]D. * Press and hold tile I,OCK CONTROl, pad fin 3 seconds.
Refrigerator has odor Foods trm_snfitth_g • Foods with ,strono_ ochn_ should be tightly wrapped.
odor to refrigerator. • ]Kee I) an open box ot baking soda in tile i'efYigei'atoY;
replace exerx three months.
Interior needs clemfing. • See Careand cleaning.
Defrost water dxaJnage • See Care and cleaning.
system needs clemfing.
Moisture forms on Not unusual during • Wipe sm_i_ce oh3'.
outsideofrefrigerator periods of high hmnidJty.
Moisture collects inside Too frequent or too
long door openhzgs.
Interiorlightdoes No power at outlet. • Replace filse or reset tile breakei:
not work
Light bulb burned out. • See Replacing the light bulbs
Wateronkitchenflooror Drain in the bottom of • See Care and cleaning.
the freezer clogged.
Cubesjamamed in chute. • Poke ice throuoho with a wooden spoon.
Hotair frombottom
ofrefrigerator
Normal air flow cooling motor.
In the refrigeration process,
it is normal that heat be expelled
in the area tinder the refrigerator.
Some floor coverings axe sensitive
and will discolor at these normal
mid safe temperatures.
Last setthag was CRUSHEDICE.
CUBEDICEwas Selected • A fbw cubes were left in tile crusher from tile previous
butCRUSHEDICEwas setting. This is mmnal.
dispensed(onsomemodels)
Frequent"buzzing"sound lcema, ker power switch is in the
I (on) position but the water supply
to the refrigerator has not been
com_ected.
• Set tile power switch to tile O (off) positiola. KeeI)ilw_ it in
tile I (on) position will dalnage tile water ",al',e.
16

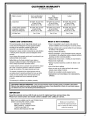
CUSTOMER WARRANTY
(forcustomersin Canada)
Whatis covered
HowLongWarranted
(FromDateofSale)
Parts
Repairor Replace
at Mabe'sOption
Labour
Compressor GEProfile:Ten(10)Years GEProfile:Ten(10)Years GEProfile:Five(5)Years
GEandAll Other GEandAll Other GEandAll Other
Brands:One(1)Year Brands:One(1) Year Brands:One(1)Year
SealedSystem(including GEProfile:Five(5)Years GEProfile:Five(5)Years GEProfile:Five(5)Years
evaporator,condenser GEandAll Other GEandAll Other GEandAll Other
tubingand refrigerant) Brands:One(1)Year Brands:One(1) Year Brands:One(1)Year
All OtherParts One(1)Year One(1)Year One(1)Year
TERMS AND CONDITIONS:
Thiswarrantyappliesonlyforsinglefamilydomesticusein
CanadawhentheRefrigeratorhasbeenproperlyinstalled
accordingtotheinstructionssuppliedbyMabeandis
connectedtoan adequateandproperutilityservice.
Damageduetoabuse,accident,commercialuse,andalteration
or defacingoftheserialplatecancelsallobligationsofthis
warranty.
Serviceduringthis warrantyperiodmustbe performedbyan
AuthorizedMabeServiceAgent.
NeitherMabenortheDealerisliableforanyclaimsor
damagesresultingfromfailureoftheRefrigeratororfrom
servicedelaysbeyondtheirreasonablecontrol.
Toobtainwarrantyservice,purchasermustpresenttheoriginal
BillofSale.Componentsrepairedorreplacedarewarranted
throughtheremainderoftheoriginalwarrantyperiodonly.
Thiswarrantyisextendedtotheoriginalpurchaserandany
succeedingownerforproductspurchasedforhomeusewithin
Canada.Inhomewarrantyservicewill beprovidedinareas
whereit isavailableanddeemedreasonablebyMabe
to provide.
Thiswarrantyis inadditiontoanystatutorywarranty.
WHAT IS NOT COVERED:
• Owneris responsibleto payforservicecallsrelatedto
productinstallationand/orteachinghowtousetheproduct.
• Damagetofinish mustbereportedwithin48 hoursfollowing
thedeliveryoftheappliance.
• Damagetofinishafterdelivery.
• Improperinstallation--properinstallationincludesadequate
air circulationtotherefrigerationsystem,adequateelectrical,
plumbingandotherconnectingfacilities.
• Replacementof housefusesor resettingof circuitbreakers.
• Replacementof lightbulbs.
• Damageto productcausedbyaccident,fire,floodsoracts
of God.
• Lossoffoodduetospoilage.
• Properuseandcareofproductaslistedin theowner's
manual,propersettingofcontrols.
• Productnotaccessibleto providerequiredservice.
• WARRANTORISNOTRESPONSIBLEFORCONSEQUENTIAL
DAMAGES.
EXCLUSIONOFIMPLIED WARRANTIES--Your sole and exclusive remedy isproduct repair asprovided in this Limited
Warranty.Any implied warranties, including the implied warranties of merchantability or fitnessfor aparticular purpose,
are limited toone year or the shortestperiod allowed by law.
11
IMPORTANT
Keep this warranty and your bill of sale as proof of original purchase and purchase date.
Please have serial number and model number available when calling for service.
MabeServiceis availablecoastto coast.If further help is
neededconcerningthis warranty,contact:
Manager,ConsumerRelations
MabeCanadaInc.,ConsumerService
1 FactoryLane,Suite310
Moncton,NewBrunswickE1C9M3
Staple your receipt here.
Proof of the original purchase
dateis needed to obtain service
under the warranty.
17

RefrigeratorWarranty. (Forcustomers in the United States)
Aft warranty service provided by our Factory Service Centers,
or an authorized Customer Care® technician. Toschedule service,
on-line, 24 hours a day, visit us at www.Hotpoint.com, or carl
800.GE.CARES (800.432.2737).Please have serial number and
model number available when calling for service.
Staple your receipt here.
Proof of the original purchase
date is needed to obtain service
under the warrantz
OneYear
From_e dateof the
originalpurchase
ThirtyDays
(Water filter,if included)
Fromtheoriginal
purchasedate of
the refrigerator
We Will Replace:
Any pattof the reti_ige_mn" which tifils due to a defect in materials or workananshii).
During this limited one-year warranty, we will also I)rovide, free of charge,all labor and
related service to replace the defecti\'e part,
Ally pattof the water filter cartridge which thils due to a defect in materials or workmanship,
During this limited thirty-day warranty, we will also i)rovide, free of charge, a replacement water
filter cartridge,
_: Service trips to your home to teach you how to use
the product.
iJi::hnproper hasta]lation, delivery or maJntenmlce.
::Ji::FaAlure of the product if it is abused, misused, or used for
other thma the intended purpose or used commercially.
_: Loss of food due to spoilage.
5:!:Replacement of house fuses or resetting of circuit
breakers.
iJi::Dmnage caused after delivery.
_: Replacement of the water Filter cartridge, if included,
due to water pressure that is outside the specified
operating range or due to excessive sediment in the
water supply.
_: Replacement of the light bulbs, if included, or water filter
cartridge, if included, other thml as noted above.
::Ji::Dmnage to the product caused by accident, fire, floods
or acts of God.
::Ji::h_cidentaJ or consequential damage caused by possible
defects with this applimlce.
iJi::Product not accessible to provide required service.
EXCLUSION OFIMPLIED WARRANTIES--Your sole and exclusive remedy is product repa# as provided in this
Limited Warranty. Any implied warranties, including the implied warranties of merchantability or fitness for a
particular purpose, are limited to one year or the shortest period allowed by law.
This warranty is extended to the original purchaser and any succeeding owner for products purchased for home
use within the USA. If the product is located in an area where service by a GEAuthorized Servicer is not available,
you may be responsible for a trip charge or you may be required to bring the product to an Authorized GEService
location for service. In Alaska, the warranty excludes the cost of shipping or service calls to your home.
Some states do not allow the exclusion or limitation of incidental or consequential damages. This warranty gives
you specific legal rights, and you may also have other rights which vary from state to state. Toknow what your
legal rights are, consult your local or state consumer affairs office or your state's Attorney General.
Warrantor: General Electric Company. Louisville, KY 40225
18

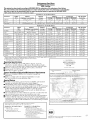
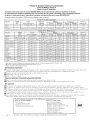
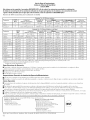
Performance Data Sheet
SmartWaterFiltrationSystem
MWF Cartridge
Thissystemhasbeen testedaccordingtoNSF/ANSI42/53forreductionofthesubstanceslistedbelow.
The concentration of the indicated substances in water entering the system was reduced to a concentration
less than or equal to the permissible limit for water leaving the system, as specified in NSF/AIVS142/53.*
'100%safety factors built in for unmetered usage)
Stmldard No. 42: Aesthetic Effects
Par/minter USEPA hlfluent
MCL CJlalle_ge ConcenWafion
Chlorine -- 2.0 mg/L + 10%
T&O -- --
Particulate** -- _>l 0,000 pard( les/mI,
h_fluent
Average
1.96 mg/I,
I
6,490,01_)#/mL
Effluent
Average Maxhnmn
9.06 rag/I, 9.11 rag/I,
I I
58,833#/mi. 150,(_)0#/mI.
% Reduction
Average Minhnmn
96.77% 94.74%
I I
9!).14% {)7.{)7%
Mhl. Required
Reduction
> 50%
_>8,5(/(,
Standard No. 53: Health Effects
Pariuneter
"IitdMity
Asb('st_}s
I,ead at ])It 6.5
Lead at pit 8.5
Melvu U at Ill t 6.,',
Met*:ttU at Ill t 8.5
,\ladfior
[ hi(lane
2,4-D
"Ibxat)hene
Benzene
Carbofimm
1,4didfiorobenzene
Alrazine
USEPA
MCL
0.5 N'IT
_>9{).{!5%Reduction
_>99% Re(ht(tion
0.015 mg/L
0.015 mg/L
0.002 mg/L
0.002 mg/L
0.002 rag/I.
0.0(X)2 mg/L
0.079 mg/L
0.003 mg/L
0.005 mg/L
0.040 mg/L
0.075 mg/L
0.003 rag/I,
hffluent
Challe_,_ge Concentration
] l k ] NqT ***
Mflfin/urn 50,000 I,
1(F to ](>sfib( I_/I,; > 10[tm
9.15 rag/I, ± 1()f_
9.15 rag/I, ± 1()f_
0.006 mg/L + ] 0!¢
0.006 mg/L + ] 0!¢
0.04 rag/I,± 10!¢
().002 rag/I, ± 1()f_
9.210 rag/I, ± 10%
0.015 mg/L ± 10%
0.015 mg/L ± 10%
0.080 mg/I,_+ 10%
9.225 rag/I, ± 10%
0.0(_}rag/I, ± ] 0%
hffluent
Average
10.5 NTU
1] 8,750 #/I,
7,7MF/I,
0.1567 mg/I,
0.1433 mg/I,
0.(X)7,9rag/I,
0.(X)57 rag/I,
0.0367 rag/I,
0.(X)20 rag/I,
0.2033 rag/I,
0.01 (_) rag/I,
0.0145 rag/I,
0.0830 rag/I,
0.2283 rag/I,
0.(X)87 rag/I,
Effluent
Average Maxhnmn
9.14 NTU 0.28 N'IT
< 1 #/I, 4#/I,
0.996 MF/I, < 1 MF/I,
<0.001 rag/I, <0.001 mg/I,
< 0.001 mg/L < 0.001 rag/I,
0.0(X)350 mg/L 0.0007 mg/L
0.0(X)325 mg/L 0.0006 mg/L
0.0(X)23 rag/I, 0.0004 mg/L
<0.(X)(X)2mg/L <0.(XXX)2mg/L
0.00337 rag/I, 0.011(X)0 rag/I,
0.00](X) rag/I, 0.(X)I(X)0 rag/I,
0.0(X)5(X)rag/I, 0.(X)0500 rag/I,
0.0010(X) mg/L 0.(X)I(X)0 rag/I,
0.0(X)5(X)rag/I, 0.(X)0500 rag/I,
< 0.0(X)5 rag/I, < 0.(X)05 mg/I
% ReduOion
Average Mhlhnmn
98.54% 97.20%
>99.99% >99.99%
99.69% 99.39%
99.36% {)9.3{)%
99.39% {)9.3{)%
94.79% 87.50%
93.20% 8{).2!)%
9!).7>1% {)8.67%
99.(_)% 98.95%
98.32% 94.50%
93.44% 9] .67%
96.5] % !)5.83%
98.78% !)8.65%
9!).78% !)9.77%
94.22% !)3.33%
Mill. Required
Reduction
0.5 NTU
_>9{).{15%
_>9!)%
0.010 mg/I,
0.010 mg/I,
0.002 rag/I,
0.002 rag/I,
0.002 mg/I,
0.0002mg/I,
0.079 rag/I,
0.003 rag/I,
0.005 rag/I,
0.04 mg/I
0.075 rag/I,
0.003 rag/I,
Tested using a flow rare of O.50 gpm; pressure of 60 psig; pH of Z5 _+O.5; temp. of 68°_+5°F (20° _+3°C)
** Measurement in Particles/ml. Particles used were 0.5-1 microns
*** NTU:Nephelometric Turbidity units
gperafing ,
Specifications
Ca I)a(itv" certified for. iu ) to ._;00 ,("all°ns_ ( l 1:,_;51);. u ). to _six
nmnths for inodels without a rel_acen_ent filter m_tRator hoht;
up to one ",ear for inodels xwth a replacement filter indicator hght
• . .! * . c * c . '
• P_ essuI e I eqmI en_ent: 41)-121) psi (2.8-8.2 bai ), non-shock
• Telnperature: 33-1 00°F (0.6-38°C)
• Flow rate: 1).5 gpm (1.9 lpm)
General Installat!on/Operation/Maintenance Requirements
• Flush new cartridge at full fl(/w fill" 3 nfilmtes to purge out
trapped ain
• Replace cartridge when the indicator light flashes (/r water
flow rate is redtlced on i_on-indicator t;nits,
Special Notices
• Installation instructi(ms, parts aim service axailabilitv, aim standaM
wan'ants' are included with file product when shipped. ()_
• This drinking water svsteln Inust be nmilKained according to
• ( _ , , , .... ( ,
illanttfa('ttli'er s lnstrtl(hons, including replacen_ent of filter ('artlldges.
• D(/not ttse with water that is microbiologi&flly unsafe or of unkal(/wn'
quality wifl/out adeqtrate (fisinf_'cfi(nl befllre or after file svstenl. M_ty
gvstelllS certified fi)i" cyst reducfi(m max be used on (fisinfected water r,,xapti_n_
tl_at may contain filte;uble cysts.
• The cohtanfilmnts or othei" substances relnoved or reduced bv this
water ti'eatlllent svstell/are not necessarily in VOIII" wateL
• Check fi)r complihi_ce with the state aim local laws aim regulati(ms.
• Note that while the testing was pei_imned trader standard lal)0IatoI5
conditions actual pell'bi{nance inax xm'v. Sxstelns inust be installed _uld
opelated in accordance with inalm_actt/rei:'s reconm/ended procedures
and gmdehnes.
StmMard No. 42: Aesthetic Effects
Chemical 17nit
Chlorine 'Ihste and Odor
Mechanical Filtralion Lnit
Part{( ulate Reduction, Class I
System "[-csted and Certified by NSF Int( rnational against
_kNSIiNSF Standard 42 & 53 for the reduction ot:
Standmxl No. 53: HeMfll Effects
Chemical Reduction Lnit
Alachh)r and Atl'dzine Reduction
Benzene and Carbofiwan Reduction
1,4 dichlorobenzene and 2,4-1) Reduction
Lead and Lindane P.cduction
Mercm T and Toxaphene Reduction
Mechmfical Fihrdtion [ nit
Tin-bid {Iv l_cduction
(:7,st and A',bestos Rcduction
Slate 0f Calflbrnia
Department of Health Services
Water Treatment Device
Certiticate Number
05- 1698
Date Issued: Pebruary 2.200:_
Raled St,r_ict, ( apacil,,: 3(R) gal Ralt,d Ser*i_e FIm_: (l_ 4pro
C_mdition_of Cvrliflcali_n=
Do n_ u _ _here _ ater is mwrobi_og_cally uns_ or with water ot unk_)wn quaht), except that
cyst reduction may tx_ u_d on dxsxnl_ted _aters that may c_mmin li{ter_le cysts¸
Mamfli_ctu red tot: (;enerdl Electric Compan}; Louisville, tx'Y40225
ER\ EST. No. 070595-MN4t01
/9

GE Service Protection Plus 'M
GE, a naine recognized worldwide %r quality' and dependability, oflers you
Service Protection Plus'_'--comprehensive protection on all y'our appliances--
No Matter What Brand!
Benefits Include:
• Backed by GE
• All brands covered
• Unlimited service calls
• All parts mid labor costs included
• No out-of-pocket expenses
• No hidden deductibles
• One 800 number to call
We71CoverAnyAppliance.
Anywhere. Anytime.*
You will be completel) satisfied with our set\ice protection or you ma) request your inoney back
on the remaining xalue of votu" contract. No questions asked. It's that simple.
Protect your reffigerat(m dishwasher; washer and dryer; range, TV, VCR and much more--rely brand!
Plus there's no extra charge tot emergency service and low monthly financing is available. Even icemaker
coverage and tood spoilage protection is offered. You can rest easy; knowing that all votu" valuable
h(msehold products are protected against expensive repairs.
Place xotu" confidence in (;E and call us in the/J.S, toll-free at I'_tII).DZD.ZZZ_
_()I" i//oi'e iIl[()I'Ill_l[ioIl,
*All brands (oxer_ d. up to 20 years old. in the (omin_ real [.S.
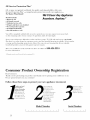
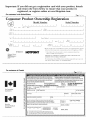
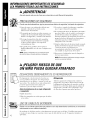
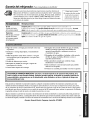
Consumer Product Ownership Registration
Dear Customer:
Thank you %r purchasing our product and thank you %r placing your confidence in us.
X_'eare proud to haxe you as a customer'.
Follow these three steps to protect your new appliance investment:
r
2omplete and mail
'roduct Ownership
Registration today;
Ilave the peace of
mind of knowing we
CHII COIIIHC[ VOll ill
the mflikel_ event of
a saibtv modification.
After mailing the
l)el_ _w,
this document
n a saft: pla( e.
It contains inf}_rlnation
you will need should
you require service.
Our service mlmber
ill the [SA is:
800.GI(.CARES
(800.432.2737).
) }'Oll
op( ral( }'Ol11" II(_W
applian(( prop€ rlv.
Model Number
I I I I I I I I I
Serial Number
I I I I I I I ]
2O
La page charge ...
La page charge ...
La page charge ...
La page charge ...
La page charge ...
La page charge ...
La page charge ...
La page charge ...
La page charge ...
La page charge ...
La page charge ...
La page charge ...
La page charge ...
La page charge ...
La page charge ...
La page charge ...
La page charge ...
La page charge ...
La page charge ...
La page charge ...
La page charge ...
La page charge ...
La page charge ...
La page charge ...
La page charge ...
La page charge ...
La page charge ...
La page charge ...
La page charge ...
La page charge ...
La page charge ...
La page charge ...
La page charge ...
La page charge ...
La page charge ...
La page charge ...
La page charge ...
La page charge ...
La page charge ...
La page charge ...
La page charge ...
La page charge ...
La page charge ...
La page charge ...
-
 1
1
-
 2
2
-
 3
3
-
 4
4
-
 5
5
-
 6
6
-
 7
7
-
 8
8
-
 9
9
-
 10
10
-
 11
11
-
 12
12
-
 13
13
-
 14
14
-
 15
15
-
 16
16
-
 17
17
-
 18
18
-
 19
19
-
 20
20
-
 21
21
-
 22
22
-
 23
23
-
 24
24
-
 25
25
-
 26
26
-
 27
27
-
 28
28
-
 29
29
-
 30
30
-
 31
31
-
 32
32
-
 33
33
-
 34
34
-
 35
35
-
 36
36
-
 37
37
-
 38
38
-
 39
39
-
 40
40
-
 41
41
-
 42
42
-
 43
43
-
 44
44
-
 45
45
-
 46
46
-
 47
47
-
 48
48
-
 49
49
-
 50
50
-
 51
51
-
 52
52
-
 53
53
-
 54
54
-
 55
55
-
 56
56
-
 57
57
-
 58
58
-
 59
59
-
 60
60
-
 61
61
-
 62
62
-
 63
63
-
 64
64


Hotpoint HSM22IFTASA Le manuel du propriétaire
- Catégorie
- Frigos
- Taper
- Le manuel du propriétaire
- Ce manuel convient également à
dans d''autres langues
Documents connexes
-
Hotpoint HSS22GFTFWW Le manuel du propriétaire
-
GE HSS25GFTWW Le manuel du propriétaire
-
GE HSS25GFPWW Le manuel du propriétaire
-
GE HSM22IFTSA Manuel utilisateur
-
-
-
-
GE HSS22BDMWH Manuel utilisateur
Autres documents
-
GE FUF14DUARWW Le manuel du propriétaire
-
-
GE Profile PSS25MGMABB Le manuel du propriétaire
-
-
-
GE PDW8700J10BB Le manuel du propriétaire
-
GE ZDI15CWWC Le manuel du propriétaire
-
-
Kenmore 36358897890 Le manuel du propriétaire
-
GE ZDI15CHBB Le manuel du propriétaire