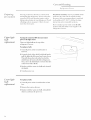
GE ZIF36NMHLH Le manuel du propriétaire
- Catégorie
- Frigos
- Taper
- Le manuel du propriétaire
Ce manuel convient également à

Monogram ®
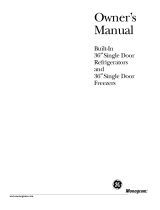
Owner's Manual
for Built-In
36" All Refrigerators
and 36" All Freezers
Z/)7_7_, YIT0 710_'_'(1117. COrn

Consmner In%rmation
Your new Monogram refiigera_or/fieezer makes an eloquem s_a_emem of s_yle, convenience
and kitchen planning flexibili F. Whed_er you chose i_for i_s puri_y of design, practical s_orage
arrangements or assiduous auenfion _o derail-or for all of d_ese reasons-you"ll find dm_ your
Monogram refiigermor/fieezeFs superior blend of fom_ and fhncfion will deligb you for years
to ( once.
The Monogram refiigermor/ffeezer was designed u) provide die flexibility _oblend in widi
your kitchen tabineu T. Decon_five door inser_ panels allow i__o nm_ch yore kitchen cabinets
or blend wid_ yore kitchen decor. Cusum_ handles are also aw_ilable u) fi_rd_er personalize
your reffigermor/fieezer. Through a series of produc_ and uim ki_ thoices, d_e Monogram
rehigermor/fieezer can be bem_fififlly imegrated imo the kiu hen.
Since riffs is designed u) be a bulb-in producL cusumi panels are required on d_e from of
d_e Monogram reMgerau_r/fieezer. Consuh your kiu:hen designer or cabinemmker for yore
(usV)nJzed look.
The information on die following pages _i]] help you operate and maimain your
refiigeralor/fieezer property.
lf_ou ha_e an) od_er questions, visi_ ore Websi_e m: w_<monogram.com.
Contents Consumer Services
Impollant Phone Numbers ................. 20
Model and Serial Numbers ................... 3
Problem Solver . ........................ 16, 17
Produ( _Regimmion ..................... 3, 22
SatFW h_structions ........................ 4-7
_Vmranty for Customers in ( anada .......... 93
WmTan_y fb_ Customers in d_e USA . .Back (over
Care and Cleaning
( Daning_-Omside and Inside ............... 13
Condenser ................................. l 3
Ligb Bulb Repla( emem ................... 14
Vacation ................................... 14
Operating Instructions
Amomafic lcemaker ......................... 9
Shebes ................................. l l, 12
Sto_ age l)_ m_,ers ............................ l 0
Temperature Controls ....................... 8
\Vate_ Fiber A( cesso<v ....................... 9
Vdne Rack ................................. lI
Prepm'ation
CDarances ................................. _5
Lex eling ................................... 15
Lo( ation ................................... 15
B@re
ro#igerator<
jf}_eZeT
Read dfis manual carefiflly. I_ is imended _o
help you operme and maintain yore new
re_i:igerator/fieezer properly.
Keep i_ handy for answers _oyore questions.
If xou•don _understandsome[hingorneed
more help:
Visit our Webslte at: www.monogram.com

g4ritc
dowry, the
model &
serial
You'll see them on a bbel i_side the
refriger_Hor/fleezer m_der the storage drk_wers.
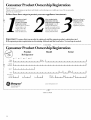
These fmmbers kH'e k_lso On the Cousu_ner
Product Ownership Regiswafion Card included
whh this manual.
Before sending in this card, please write these
numbers here:
Model Nm_d)er
Serial Nm_ber
Use these mmd)ers in _n? corresponden( e
555service calls (on(ernh?o vour
received
mc gvd
vfy4ger tor/
? vezer
lmmediatel? ( omact the dealer (or builder)
that sold you the refrigerator/freezer.
Savetime
Before you re(p_est ser_i(e (heck the Problem
Solver in the back of this manual.
h lists causes of minor operating problems that
)ou can correct yoreself.
To obtain service, see the (;onsm_er Services
page in the back of this manual.
We're proud of ore service and warn you to be
pleased. If for some reason you are not happy
with the servi(e you receive, here are steps to
For customers in the USA :
FIRST, contact the people who serviced yo_3r
appliance. Explain why you are not pleased.
In most cases, this will solve the problem.
NEXT, if you are still not pleased, write all the
details-including your phone mmfl)er-to:
Manager, Customer Relations
For customers in Canada:
FIRST, contact the people who se5viced yore
appliance. Explain why you are not pleased.
In most cases, this will solve the problem.
NEXT, if you are still not pleased, write all the
details-including your phone mmfl)er to:
Marsager, Consm_er Relations
Camco Inc.
I Factory Lane, Suite 31 0
Moncton, N.B. El C 9M3

IMPORTANT SAFETY INSTRUCTIONS
REAl.) AND SAVE THESE INSTRUCTIONS
"TAT d_ "Ir_"_ TTJ_ Tf'_
i li --When his
appliance, alirays exe5 cise bash' safe U
h_cluding the fbllowh_g:
° Use this appliance only for its intended
purpose as described in this Owner's Manual.
° This refrlgerator/freezer must be properly
installed in accordance with the Installation °
Instructions before it is used.
° Do not allow children to climb, stand or hang
on the sheNes in the ret¥1gerator/freezer.
They couk_ damage the reffigerator/heezer
and seriously ir@_re themselves.
• Do not touch the cold surfaces in the freezer
compartment when hands are damp or wet.
Skin may adhere to these extremely cold
surf2K:es.
• Do not store or use gasoline or other
flammable vapors and liquids in the vicinity
of this or any other appliance.
If your freezer has an automatic icemaker,
avoid contact with the moving parts of the
ejector mechanism, or with the heating
e]emem located on the bottom of the
icemaker. Do not place fingers o57hands on
the automatic icemaking mechanism while
the refiigerator/ffeezer is plugged in.
Unplug your refrlgerator/freezer before
cleaning and making repairs. NOTE: We
strongly recommend that any servicing be
performed by a qua]ified individua].
Before replacing a burned-out light bulb,
the refiigerator/ti eezer shouM be
unplugged in order to avoid contact with a
live wire filament. (A burned-out light bulb
may break when being replaced.) NOTE:
Tmning control to OFF does not remove
power to the light ciro_iu
Do not refreeze frozen foods which have
thawed completely.
DANGER: RISK OF CHIN) ENTRAPMENT
(him entrapment and suffocation are not
problems of the past.Junked or _bandoned
reffigerat or/freezers are still dangerous...even
if they wi]] sit tbr 'just a Dw days." I_you m:e
getting rid of your old re_iigerator/*ieezer,
please toi]ow the instructions below to help
Before You Throw Away Your Old
Refrlgerator/Freezer or Freezer:
• Take offthe doors.
° Leave the shebes in pk_ce so that (:hikken
may not easi]y (;]imb inside.
CFC DISPOSAL
Your old retiigerator/tieezer has a cooling
system that used CFCs (chlorofluorocarbons).
CFCs are believed to harm stratospheric ozone.
If you are throwing away your old
retiigerator/fleezer, make sure the (FC
retiigerant is removed tor proper disposal by
a qualified se_-icer. If you intentionally release
this CFC retiigerant you can be subject to
fines and imprisonment under provisions of
environmental legislation.

LIRE ET CONSERVER CES INSTR UC770 5
AVERTISSEMENT ".
LorsquewmsmJlisez le _dfi igdra_e_r/( ougdbHeur,
obsevvez _o_ioms _ermines prd_ m_dons de
b;4se, flO[_H_H_]elH :
" N'utillsez l'apparell que pour son usage
prSvu, tomme ddt ril darts ]e prdsem mam_e]
de Fmilisaleur.
. Installez le rS_¥1gSrateur/congSlateur
conformSment aux directives d'installation
avant de l'utillsero
• Ne laissez pas les enfants grlmper, s'asseoir,
se tend debout ni se pendre aux clayettes du
r5frlgSrateur/congSlateur. Ils pourraiem
endommager le rdfiigdra_eur e_ se blesser
• Une fols le congSlateur en marche,
ne touchez pas les surfaces froldes du
congSlateur, surtout sl vous avez les mains
humldes ou mouilli_es : la peau risque
d'adbdrer fices surf_ces trt-s fioides.
. N'entreposez et n'utillsez pas d'essence on
autres vapeurs et llquldes inflammables
proxlmlt5 de cet apparell ou de tout autre
apparell 51ectromSnagero
" Pour les rSfrlgSrateurs dot5 d'une machine g
glacons automatlque, dvi[ez le (omacl avec
les pi_ces mobiDs du mdcanisme _iecteur
ou avec l'4]4men_ cbauffam sired ;_tla parde
infdrieure de ]a machine 2lg]acons. Ne posez
pas ]es doig_s ou les mains sur le mdcanisme
de la machine a g]acons pendam que le
rdfi:igdra_em:/congdla_em es_ brancbd.
. DSbranchez votre rSfrlgSrateur/congSlateur
avant de le nettoyer et de le rSparero
REMARQUE : Nous vous recommandons
vivemem de contier _ome rdparadon ;iun
. Avant de remplacer une ampoule g_rillSe,
le rdfiigdra_eur/congdlaleur doi_ 4Ire
ddbrancb4 afin d'dvi_er _om comac_ avec un
fil sous _ensiom (lJne ampouD griHde peru se
briser pendam l'opdration). REMARQUE :
Lorsque vous p]acez in commande sur _,0-
(d_eim), Falimenmtion dlectrique de
Fampoule n'es_ pas coupde.
. Ne faltes PAS recongeler des aliments
surgeli_s qul out complStement di_gelSo
DANGER
: RISQUES POUR ENYANTS
Les environs pris au pi_ge ou mor_s d'aspbyxie
sore to_ioms d'acmali_d. Les appareils de
rdfl:igdradon abandonds sore _o_ioms aussi
dangereux, m_me si on r_ quektue
jours" pour s'en ddbarasser. Si vous ne gardez
pas vo_re ancien appareiL veuillez suivre les
directives ci-dessous atin de prdvenir les
accidents.
Avant de vous d_barasser de votre vleux
apparell de r_frlg_ratlon :
• l-)dmomez les por_es.
• Laissez les daye_es en place afin d'emp_cber
les enf?m_s de grimper ;_Fimdrieur.
SE DJEBARRASSER D U CFC
Les vieux appareils de rdfligdration out un
syst_?me de retioidissement qui a utilis_? les CFC
(chlorofluorocarbones). Les CF(s sontjug&
noci£s pour l'ozone stratosphdrique.
Sivous ddbarrassez de votre viel appareil de
rdtiigdration, assurez-vous que le tiigorig_?ne
avec CF( soit enlevd correctement par un
technicien qualifid. Si vous libdrez
intentionnellement ce tiigog_?ne avec CFC
VOUZ pouvez _tie SOUUliS aux coutraveutions
et a l'emprisonnement aprbs les stipulations
des lois sur l'environment.

IMPORTANT SAFETY INSTRUCTIONS
HOW TO CONNgCTELECTRICJTY
Do not, under arty circumstances, cut or
remove the third (ground) prong from the
power cord° For personal safety, this appliance
must be properly grounded.
The powe; cord of dfis appliance is equipped
wid_ a 3-prong (grounding) pb_g which mates
wh5 a standard 3-prong (g;ouuding) wall
oudet to minimhe the possibility of electric
shock hazard from riffs appSance,
Have d_e wall outlet and circuh checked by
a qualified electrician to make sure the oudet
is properly grounded,
Where a standard 2-prong wall oudet is
eucoume5 ed, it is your pe5 sonal 5espousibility
and obligation to have it replaced wid_ a
properly g;ounded 3-p;oug wall oudeu
The ref}igerato5/f_eezer sboukl always be
plugged into its own individual electsical outlet
which has a voltage ;afiug d_at matches the
This provides d_e best performance and also
pre_ eros oveHoadh_g house x_iriug cir(:uhs
which could cause a fise hazard flom
oveHleated x_bes,
Ne_er unplug your refl:igerausr/fleezer by
pulling on d_e po_er cord. Al_a) sgrip plug
fire, l) and pull straight out flom d_e oudeu
Repair 05replace immediately all power
(ords that have be(ome frayed or od_erwise
damaged, Do not use a (ord d_at shows c5acks
05abrasion damage along its leugd_ 05 at
ehhes end,
-\Vhen moving the refligesatos/freezer away
fl'om the wall, be (:arefhl not t() 5oll ()_er o5
damage d_e ps)x_er cord,
DO NOT USE AN ADAPTER PLUG TO
CONNECT THE REFRIGERATOR/FREEZER
TO A 2opRONG OUTLET.
DO NOT USE AN EXTENSION CORD
WITH THIS APPLIANCE.
SAVE THESE

i
RA CCORDE/ NT CTRIQUE
Ne coupez ni retirez en aucun cas la trolsiSme
broche (raise 5.la terre) de la fiche du cordon
d'allmentatlono Pour mire sScurltS, cet
apparell dolt 6Ire correctement mls fi la terre.
Le (oTdon d'alimenmtion de _e_ appm:eil es_
muni dhme fiche fi3 broches (raise fila _ene)
qui se bmnche dans m_e p_:ise mmal oldinaire
fi3 alv_oles (raise fi 1__ene) pour l<_duire au
n_inimum les risques du chocs _le( uiques.
Faites exmMne_: la p_ise de comant et le (i_cuit
par un ale( _ricien qualifie pour vous assurer
que la prise es_ (one(_emen_ raise fila _e_ e.
Si la pFise tamale es_ du _ype smndaFd fi2
alv_oles, il vous incombe de la faire remplacer
par m_e prise fi3 alvaoles (one( lemenl raise
fila le_ e,
Le _<-ffig<_ralem/cong_qaleur (]oil loujours #lle
b_anch< _ darts sa propre p_ise de couram, dora ia
tensionnomina]eesl idenliquefi(e]]eindiqu<_e
sin la plaque signaKlique.
N_UTILISEZ PAS UNE FICHE
D_ADAPTATION POUR RACCORDER
LE REFRIGERATEUR/CONGELATEUR
DANS UNE PRISE MURALE A 2ALVEOLESo
N'UTILISEZ PAS DE CORDONS
PROLONGATEURS AVEC CET APPAREIL,
(elle pF#camion esl recommand(_e pore
g;Hands un Fendemem opdmum el<-vilerune
smchmge des ci_cuils (qeclFiques de b!
r<'sidence, (e qui pom_ail (_<'e_un _isque
d'incendie pm sms(hauffe des fi]s.
Ne d_%Fanchez jamais l'appmeil en limnl le
(o_don d'alimenmdon. Saisissez _Fn_emem
la fiche du ( o_don el tirez (koil pore la reli_e_
de 1_prise.
R_'paFez ou _empla(ez imm_dimemenl lore
(oFdon eflilo(h< _ou endommag#. N'milisez
pas un co_don fendill# ou pr#senlanl des
LoFsque vous deplacez Fappareil du tour, fhiles
auemion de ne pas la fhire fouler sin le cordon
d'alimenlation afin de ne pas l'endommage_.
CONSERVEZ CES

Operating Instructions
Set the
temperature
control
WHEN YOU FIRST TURN THE
REFRIGERATOR/FREEZER ON,
SET THE CONTROL AT 5.
9 is tile coldest settiug, 1 is the warlnest.
For (older or warmer temperatures, adjust
the control one number at a time.
IMPORTANT: When first setting the
control, or adjusting it, allow 24 hours for
the refrigerator/freezer to get cold.
NOTE: Turning the control to the
OFF position stops cooling in the
refrigerator/freezer, but does not shut off
power to the refrigerator/freezer.
5 IS NORMAL
9 ISCOLDEST
How to test
temperatures
Use the milk test for the refrigerator. Place a
container of milk on the top shelf. Check it a
clay later. If the milk is too warm or too cold,
adjust the temperature control.
Use the ice cream test for the freezer. Place
a container of ice crealn in the center of the
fieezer. (heck it alter a clay. If it's too hard
or too soft, at!just the temperature COlm-ol.
Always allow 24 hours for the
refrigerator/freezer to reach the
temperature you set.

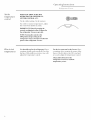
Amomatic ][cemaker (on some models)
Autom ttic
icemaher
(on some modet9
A newly-lnstalled refrigerator may take 12 to
24 hours to begin making ice.
The icemaker wiiI produ_ e seven (ubes per
cycle-approximately 100-130 cubes in a 24-horn
period, depending on f_eezer ( ompartment
tempe_atm e, room temperatm e, mm_ber of
door openings and other use conditions.
If your _efrige_ ator is operated be%_e die water
_onnecdon is made to the icemaker, set the
power switch to 0 (off).
When Hie refrigerator has been ( onne( ted to
the water supply, set thepower swit( h to t (on).
The g_een light will tome on.
The icemake_ will fill with wate_ when it _ools
13 °F_A newly-installed reflige_ato_ may take
12 to 24 horn's to begin making i(e cubes.
Throw away the first few bat(hes of i(e to allow
the water line to _lear.
Be sme nothing interferes with the sweep of the
feeler arm.
When Hie bin fills to the level of Hie feeler _rn_,
the icemaker will stop produ( ing ice.
PowerSwitch
G_ er
PowerLight FeelerArm
It is normal %r several cubes to be joined
Ifice is not used frequently, old ice cubes will
become cloudy, taste stale and shrink,
Kite cubes get stuck in t]_e icemaker, d_e green
power light wii] blink. To correct this, set the
power switch to O {off) and remove tile (ubes.
Set t]_e power switch to 8(on) to restm t t]_e
icemaker.
After d_eicemaker has been turned on again,
there will be a delay of about 43 minutes before
the iremaker resmnes operadons.
NOTE: In homes witt_ ]owerqhan-average water
p_essm e, you may hem d_e icemaker cycle
multiple dines when making one bat(h of i( e.
Water filter
(I€€eSSO_
The water fiher is an option at extra cost and is
available flom your dealer. Specii) WR97X0214.
It has complete installation instructions and
installs on 1/4" O.D. water line.

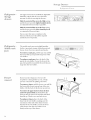
Storage Drawers
Refrigerator-
Storage
drawers
Tile upper drawers have indivichml, ac!justable
humidity controls that let you control the
amount of cold air entering the drawers.
Slide the control all the way to the High setting
and the drawer provides higher humidity levels
recommended ti)r most leats vegetables.
Slide the control all the way to the Low setting
and the drmver provides lower humidity levels
recommended ti)r most t]uits.
Excess watei that illay acctliiltllate iu tile
bottoln of the drawers should be emptied
and the dr awer s xdped dtT.
E_
Refrigerator-
Sealed snack
pans
The sealed snack pans retain high humidity
for the (onvenient storage of luncll meats and
cheese, hors d'oeuvres, spreads and suacks.
To remove a snack pan, pull tile pan out and lift
tile flont of the pan up until it snaps out of the
xdre holder.
To replace a snack pan, place tile back of the
pan in tile wire holder. I_ower tile flont of tile
pan, then push down until the fiont of the pan
snaps into the wire holder.
Drawers in the reffigerator/fieezer will
stop before coming all the way out, to help
prevent contents flOln spilling onto floor.
To remove a drawer, pull the drawer out and lift
tile fiont of tile drawer up and out of tile wire
holder. Lift tile back of the drawer up and out.
To remove the upper drawers when the door
cannot be opened fully, the shelf above tile
drawers must be removed. Push tile shelf back
then lift up. Tilt tile cover and take it out.
To replace a drawer, place tile back of the
drawer in the wire holder, making sure the
extensions of the side of the drawer fit into
the back of the wire holder. I_ower the flont
of the drawer into the wire holder. Press
firmly on the top of the drawer.
_0

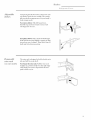
SheDes
Adjustable
shelves
Tempered glass shelves in the refligerator and
wire shelves in the fleezer enable you to make
efficient shelf arrangements to fit your tamily's
tood storage needs.
To remove shelves: Tilt shelf up at flont,
then lift it up and out of tracks on rear wall
of refligerator/fleezer.
To replace shelves: Select desired shelf height.
With shelffiont raised slightly, engage top hags
in tracks at rear of cabinet. Then lower fiont of
shelf until it locks into position.
Removable
wine ra&
(on some modeLO
The wine rack is designed to hold a bottle on its
side and will fit on any shelf.
To relocate the wine rack: Pull the wine rack
straight out, position its lip over the right edge
of the shelf you want to suspend it fiOln and
push it all the way in.
]1

SheDes
Door
shelves
Solile door shelves are adjustable and can be
moved up and down to meet your storage needs.
The deeper door shelves must be placed at the
bottom of the door.
To remove: I,ifl tile shelf up and slide it
towards you.
_2

Care and Cleaning
The door handles and trim (:an be cleaned wid_
a clod_ dampenedwid_ a soh_don ofmikt liquid
dishwashing de_ergem and water. Dry wid_ a
soft clod_, l-)on'_ use wax on d_e door handles
or trim_
The stainless steel panels and door handles
(on some models) {an be cleaned wid_ a
commercially available stainless steel cleaner
SllCh as SggliyH't.'ss St('(:[ J_](l_J{ TM ,
Stain:(.:ssSteegMog4(vv is available at Ace, True
Vah_e, Servistar, HWI and od_er leading stores.
I_is also available through GE Pa_s and
Accessories, 800.62&2002. Order part mmd)er
WXI OX15.
Do not use appliance;xax or polish on the
stainless s_eel.
Cleanz ¢g To help prevent odors,
leave an open box
ofbakh]g soda in d_e
Unplug the
refrlgerator/freezer
before cleaning° If this is
not pra( dcal, wring excess moisture out
of sponge or clod_ when cleaning around
switches, lights or controls.
Use warm water and baking soda solution-
about a tablespoon (15 ml) ofbaking soda to
a quar_ (1 liter) ofwater_ This bod_ cleans and
neutralizes odors. Rinse and wipe dry.
Other parts of the ret¥1gerator/freezer-
including door gaskets, meat and vegetaUe
drawers, ice storage bin and all plastic
parts-can be cleaned d_e same way_After
cleaning d_e door gaskets, apply a d_in layer of
petroleum jelly to the door gaskets at the hinge
side. This helps keep d_e gaskets f_om sdcking
and bending out of shape.
Avoid deanlng cold glass sheNes with hot water
because the extreme temperature difference
may cause them to break. Handle glass sheNes
carefully. Bumping tempered glass can cause it
to shatter.
Do not wash arty plastic refrigerator/freezer
parts in the dishwasher.
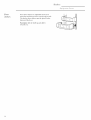
Condenser To clean the condenser fins:
First turn off the power at the circuit breaker
or fi_se box. Wait about 30 milmtes ti)r the
condenser area to cool. Then remove the
decorative panel by lifting up and toward you.
Use a soti bristle brush to loosen dust and lint
on the condenser fins. Use a vacuuln hose to
remove soil.
After cleaning: Recolmect power at the fi_se box
or circuit breaker.
Replace the decorative panel.
Decorative Panel
_3

Care and Cleaning
For long vat a_ions o5 absences, remove food
and mlplug _he ref}igera_o_/f_eezer, Move _he
( omro] to OFF, anti clean _he imer%r widl a
baking soda solm%n o_one tablespoon (15 ml)
of baking soda _oone quar{ (1 li_er) of water.
Leave the doors open.
For shorter vacations, remove perishable lioods
anti leave _he comrol at _he regular se_ing.
However, ff the room _emperamre is expe(_ed
to drop below 60°F (16°C), tbllow _he same
his[rue[ions as [or ex[ended vaca[ions.
Moxe icemaker power switch _o _he 0 (off)
position and shin oK I]le waler suppl} Io _he
Upper light
bulb
replacement
Turning the control to OFF does not remove
power to the fight circuit.
There are light bulbs at the top of the
refiigerator/ fieezer.
To replace a bulb:
1 Turn offpower at the circuit breaker or
fl_se box.
Grasp tile back of the shield with both hands,
pull tile light shield torward and rotate down.
This will release the tabs at the back of tile
shield tiom the back wall of the retiigerator.
Next, move the shield back to release the tabs
at the tiont of the shield.
3 Replace with tile same size bulb and reinstall
the shield.
4 Turn tile power on.
Lower light
bulb
reDlacement
To replace abulb:
1 Turn offpower at tile circuit breaker or fl_se
box.
2 Remove tile top two drawers.
3 Replace with tile same size bulb, reinstall tile
drawers, and turn the power on.
_4

Preparadon
Ref ig'e ato /
freezer
location
Do not install the refrigerator/freezer where
temperatures will be below 60 OF(16oC) because
it _dll not mn often enough to maintain proper
temperatures.
Do install it on a floor strong enough to support
a fully loaded refrigerator/freezer.
Cle(IY(ITICeS
If tile refligerator/fieezer is to be installed in a
corner, a 4" clearance is required on the hinge
side tot a 90 ° door opening and access to fiesh
tood drawers. A 1/!" clearance is required on the
hinge side to remove pans.
No other clearances at top, sides or back are
required.
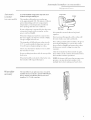
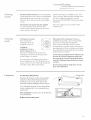
Leveling This model has 4-point leveling. All 4 corners
are supported by leveling legs. The fiont wheels
are non-a(!justable; they are only used for
positioning the unit.
• To level the ba(k of tile unit, mrn hex nut
located above tile ti'ont wheels.
I 'p
• To level tlle flont of the unit, use a 1/4 open
end xwen( h and adjust tlle leveling legs.
• Turn hex nut or flont leveling leg clockxdse
to raise tile unit, (ounter-(lo(kwise to lower
tl_e unit.
See the Installation Instructions (Pub. No.
49-60073) fi)r complete directions.
Hex Nut
W
Whe _e_
,,Leveling Leg
_5

7
The Problem Sol_ er
Questions ?
Use this
problem
solver.P
PROBLEM POSSIBLE CAUSE
REFRIGERATOR/
FREEZER DOES NOT
OPERATE
MOTOR OPERATES
FOR LONG PERIODS
OR CYCLES ON AND
(Modern refrigerators
and freezers with more
storage space and a
larger freezer require
more operating time.
They start and stop
often to maintain even
temperatures. )
VIBRATION OR
RAT-FLING
(Sllght vibration
is normal° )
OPERATING
SOUNDS
DOOR NOT CLOSING
PROPERLY
REFRIGERATOR/
FREEZER
TOO WARM
May be in deflost cy(le when motor does not operate fl_r about 30
minmes_
Temperature control in the OFF position.
If interior light is not on, re_iigerator/fieezer may not be plugged in
at wall outlet_
The fi_se is blown/circuit breaker is tripped. Replace rinse or reset
the breaker.
Normal when refligerator/freezer is first plugged in. Wait
24 horns for the refl igerator/freezer to completely cool (]own.
Often occms when large amom_ts of food are placed in
refrigerator/fleezer. This is normal.
Door left open or package holding door open.
Hot weather or fiequem door openings. This is normal.
Temperature control set at the coldest setting. See Temperature
Control.
Condenser needs cleaning. See Care and (;leaning.
See Le_ eling_
The high speed compressor motor re(pfired to maintain near zero
temperatures in the large fleezer m_y produce higher sound levels
than your old refiigerator/freezer.
Normal fire air flow--one f_m blows coM air thro_gh
refkigerator/fleezer-another fire cools the compressor motor.
These NORMAL sounds will also be heard from time to time:
l-)efiost timer switch clicks at defrost.
Temperature (ontrol ( li( ks ON or OFF.
Refl:igerant boiling 05 gmgling.
Cracking or popping of cooling (:oils caused by expansion and
contraction during deh ost and refligerafion following deft ost.
Ice (a_bes dropping into the bin and water running in pipes as
icemaker refills.
Refrigerator/fleezer not level See Leveling.
Temper_m_re control not set cold enough. See Temper>_mre
Control
Warm weather 05 _:equent door openings.
Door left open fbr long time.
Package m_y be holding door open.

Questions ?
Use this
problem
so[ver.P
PROBLEM POSSIBLE CAUSE
FROST OR ICE
CRYSTALS ON
FROZEN FOOD
(Frost within package
is normal, )
SLOW ICE CUBE
FREEZING
ICE CUBES HAVE
ODOR/TASTE
AUTOMATIC
ICEMAKER
DOES NOT W ORK
MOISTURE FORMS
ON OUTSIDE OF
REFRIGERATOR/
FREEZER
MOISTURE
COLLECTS INSIDE
REFRIGERATOR/
FREEZER
HAS ODOR
INTERIOR LIGHT
DOES NOT WORK
l-)oor left open or package homing door open.
Too fleq_lerlt or too long door openings.
Door may have been left open.
Tmn temperature control to a colder setting.
Old cubes need to be discarde(L
Ice storage bin needs to be emptied and washed.
Unsealed packages in t?eezer may be transmitting odor/taste to ice
cllbes,
Interior of fieezer needs (:leaning. See Care and Cleaning.
Poor-tasting incoming water. Install a water filter.
Icemaker power switch is in the O (off) position.
Water supply turned off or not connected.
Freezer too warm.
Piled up cubes in storage bin may cause icemaker to shut off too soon.
Level cubes by hand,
Not mmsual during periods of high hun_idity. Wipe smfi_ce dry.
Too fiequem or too long door openings.
In hm_id weather, air carries moisture into refiigerator/fkeezer when
doors are opened.
Foods wid_ strong odors should be tightly covered.
Check for spoiled ti_o(L
Interior needs cleaning. See Care and Cleaning.
l-)eflost water system needs cleaning.
Keep open box ofbaking soda in refligerator/fieezer; replace every
3months.
No power at omlet.
Light bulb needs replacing. See Care and Cleaning.
_7

Notes
_8

Notes
_9

Consumer Se_ lees
GE Answer
Center °
In the USA :
800.626.2000
With the purchase _-_your new Mionogram appliance, receive the
assurance that if you ever need infi_rmation or assistance from GE,
we'll be there. All you have to do is call-toll-free!
Whatever your question about any Monogram m_{ior apphan( e, GE Answer CenteK
info_ marion servi( e is available _o help. Your call-and yore question-will be answered
promptly and (oul leous]y. And you (an (all any time. GE Answer CenleK _se_vice is open
24 hours a day, 7 days a week.
In Canada, call 888.880.3030.
OR
Visit our D_bsite at: www.mono_ram.com
In-Home Repair
Service
ln the U8A:
800.444.1845
In Canada:
888.880.3030
A (;E consmne_ se, vice professional will provide expeF_ Fepah se_vice, s(hedu]ed a_ a time
thal's t onveniem %_"you. Many GE Consumel Se_vi( e company-operaled ]ocadons ofio_
you servi<e _oday oF tomorrow, o_ al yore convenient e (7:00 a.m. Io 7:00 p.m. weekdays,
9:00 a.m_ to 2:00 p_m_ SamFdays) _()m f_lclo_ y-uained _echnicians know your app]iant e
inside an(] out--so mos_ vepahs tan be handled injus_ one visiL
For Customers
With Special
Needs...
15_the USA :
800.626.2000
GE offers B_aille conlFols for a _aFie_y of (;E appliances, and a
b_ochme _o assis_ in planning a baF_iev-fvee kitchen fov persons
wid_ limited mobi]i b ,
Consumeis with impahed heaving oi speech who have access to a
TDD ov a conventional _e]eb'pewli_ev m O'call S00,TDD,(;EAC
(800,833A322) _o veques_ infovmafion ov sev_i(e,
Service Contracts
ln the USA:
800.626.2224
In Canada:
888.880.3030
You can have die secme feeling _hal GE ConsumeF Sevvice will still be diere after your
waFramy exphes_ Prochase a (;E tonUac_ while yore warFamy is still in ef}ec_ and you'll
ret eive a substantial dist ounL Wi_h a multiple-year t onuat L you're assured of fl_mle
se_vice a__oday' s p_ites.
Parts and
Accessories
lS_the USA:
800.626.2002
ln Canada:
888.880.3030
2O
IndDiduals qualified to service theD owr_appliances tan have paF_sor ac( essofies sere dhe( fly
to _hei_7home. The GE par_s system p_ovides access _o ove_747,000 pm_s_.and all (',E Genuine
Renewal PaF_s me ff_llywm_am ed. VISA, Mas_erCaFd anti l-)is(ove_7cmTdsme accep{ed_
User maintenance instructions contained in this manual cover procedures intended to be
performed by any user. Other servicing generally should be referred to qualified service
personnel Caution must be exercised, since improper servicing may cause unsafe operation.
La page charge ...
La page charge ...
La page charge ...
La page charge ...
-
 1
1
-
 2
2
-
 3
3
-
 4
4
-
 5
5
-
 6
6
-
 7
7
-
 8
8
-
 9
9
-
 10
10
-
 11
11
-
 12
12
-
 13
13
-
 14
14
-
 15
15
-
 16
16
-
 17
17
-
 18
18
-
 19
19
-
 20
20
-
 21
21
-
 22
22
-
 23
23
-
 24
24


GE ZIF36NMHLH Le manuel du propriétaire
- Catégorie
- Frigos
- Taper
- Le manuel du propriétaire
- Ce manuel convient également à
dans d''autres langues
- English: GE ZIF36NMHLH Owner's manual
Documents connexes
-
 GE Monogram Built In 36 Single Door Refrigerators and 36 Single Door Freezers Manuel utilisateur
-
GE ZDIC150WBBE Le manuel du propriétaire
-
GE ZDI15CWWC Le manuel du propriétaire
-
GE ZDI15CHBB Le manuel du propriétaire
-
-
-
GE ZGG48L42YSS Le manuel du propriétaire
-
-
-

Autres documents
-
Hotpoint HSM22IFTASA Le manuel du propriétaire
-
GE Profile PSS25MGMABB Le manuel du propriétaire
-
-
-
Defy DUF300 Le manuel du propriétaire
-
Accuride 7400 series Guide d'installation
-
-
Westinghouse LTV-32w1 Le manuel du propriétaire
-
-
Kenmore 36358897890 Le manuel du propriétaire