Yamaha PW-SE Original Instructions Manual
- Catégorie
- Motocyclettes
- Taper
- Original Instructions Manual
Ce manuel convient également à

ORIGINAL INSTRUCTIONS
NOTICE D‘UTILISATION
DRIVE UNIT • DISPLAY UNIT • BATTERY PACK • BATTERY CHARGER
ENGLISH // FRANÇAIS
YAMAHA PW-X & PW-SESYSTEM

Content / Sommaire
en - Original instructions 3
fr - Original instructions 50
2

OWNER’S MANUAL
* This ownerʼs manual is original instruction.
* Product and specifications are subject to change without notice.
Drive Unit
Display Unit
Battery Pack
Battery Charger
q Read this manual carefully before operating the system.
This manual should stay with this system if it is sold.
MY2019_E-KIT(X0R8)US英語_OWNERS MANUAL.indd 1 2018/04/27 13:36:14
3

MY2019_E-KIT(X0R8)US英語_OWNERS MANUAL.indd 2 2018/04/27 13:36:14
4

MY2019_E-KIT(X0R8)US英語_OWNERS MANUAL.indd 2 2018/04/27 13:36:14
Introduction
These original instructions have been prepared for your Drive Unit, display unit, battery
pack and battery charger.
TIP
This manual is not intended as a comprehensive use, service, repair or maintenance
manual. Please see your dealer for all service, repairs or maintenance. Your dealer may
also be able to refer you to classes, clinics or books on bicycle use, service, repair or
maintenance.
Drive Unit, Display Unit,
Battery Pack, Battery Charger
OWNER’S MANUAL
©2018 by Yamaha Motor Co., Ltd.
1st edition, April 2018
All rights reserved.
Any reprinting or unauthorized use
without the written permission of
Yamaha Motor Co., Ltd.
is expressly prohibited.
MY2019_E-KIT(X0R8)US英語_OWNERS MANUAL.indd 3 2018/04/27 13:36:14
5

Contents
General warning p. 1
1. Electric bike components p. 2
A. Introduction p. 2
B. Location of the warning and specication labels p. 3
C. Description p. 4
D. E-Bike Systems p. 5
The e-Bike Systems are designed to give you the optimal amount of power
assist. p. 5
Multiple power assist modes are available. p. 5
Conditions that could decrease remaining assist distance p. 6
E.
Safety information p. 7
F. Instrument and control functions p. 10
Display unit (Display A) p. 10
Display unit (Display X) p. 16
G. Battery pack and charging procedure p. 34
Appropriate charging environments p. 35
Inappropriate charging environments and solutions p. 36
Charging the battery pack mounted on the bicycle (Down tube type) p. 36
Charging the battery pack mounted on the bicycle (Multi location type) p. 37
Charging the battery pack removed from the bicycle p. 38
Reading the charging status for battery pack p. 42
Reading the charging status for display unit (Applies only to models
equipped with the Multi location type battery pack.) p. 43
Charging time guidelines p. 44
H. Checking the residual battery capacity p. 45
Residual battery capacity indicator display and estimate of residual battery
capacity for display unit p. 45
Display of the battery capacity indicator lamps and the estimate of the
residual battery capacity p. 46
I. Pre-operation check p. 47
J. Cleaning, maintenance and storage p. 47
Caring for the battery pack p. 47
Maintenance for the Drive Unit p. 47
Storage p. 48
Long storage period (1 month or longer) and using it again after a long
storage period p. 48
K. Transport p. 48
L. Consumer information p. 49
Disposal p. 49
M. Troubleshooting p. 50
E-Bike Systems p. 50
Power supply of external devices via USB connection p. 54
Wireless communication with Bluetooth low energy technology p. 55
Battery pack and charger p. 56
N. Specications p. 59
MY2019_E-KIT(X0R8)US英語_OWNERS MANUAL.indd 4 2018/04/27 13:36:15
Contents
General warning p. 7
1. Electric bike components p. 8
A. Introduction p. 8
B.Locationofthewarningandspecicationlabels p. 9
C. Description p. 10
D. E-Bike Systems p. 11
The e-Bike Systems are designed to give you the optimal amount of power
assist. p. 11
Multiple power assist modes are available. p. 11
Conditions that could decrease remaining assist distance p. 12
E. Safety information p. 13
F. Instrument and control functions p. 16
Display unit (Display A) p. 16
G. Battery pack and charging procedure p. 22
Appropriate charging environments p. 23
Inappropriate charging environments and solutions p. 24
Charging the battery pack mounted on the bicycle (Down tube type) p. 24
Charging the battery pack mounted on the bicycle (Multi location type) p. 25
Charging the battery pack removed from the bicycle p. 26
Reading the charging status for battery pack p. 30
Reading the charging status for display unit (Applies only to models
equipped with the Multi location type battery pack.) p. 31
Charging time guidelines p. 32
H. Checking the residual battery capacity p. 33
Residual battery capacity indicator display and estimate of residual battery
capacity for display unit p. 33
Display of the battery capacity indicator lamps and the estimate of the
residual battery capacity p. 34
I. Pre-operation check p. 35
J. Cleaning, maintenance and storage p. 35
Caring for the battery pack p. 35
Maintenance for the Drive Unit p. 35
Storage p. 36
Long storage period (1 month or longer) and using it again after a long
storage period p. 36
K. Transport p. 36
L. Consumer information p. 37
Disposal p. 37
M. Troubleshooting p. 38
E-Bike Systems p. 38
Power supply of external devices via USB connection p. 42
Wireless communication with Bluetooth low energy technology p. 43
Battery pack and charger p. 44
N.Specications p. 47
6

Contents
General warning p. 1
1. Electric bike components p. 2
A. Introduction p. 2
B. Location of the warning and specication labels p. 3
C. Description p. 4
D. E-Bike Systems p. 5
The e-Bike Systems are designed to give you the optimal amount of power
assist. p. 5
Multiple power assist modes are available. p. 5
Conditions that could decrease remaining assist distance p. 6
E. Safety information p. 7
F. Instrument and control functions p. 10
Display unit (Display A) p. 10
Display unit (Display X) p. 16
G. Battery pack and charging procedure p. 34
Appropriate charging environments p. 35
Inappropriate charging environments and solutions p. 36
Charging the battery pack mounted on the bicycle (Down tube type) p. 36
Charging the battery pack mounted on the bicycle (Multi location type) p. 37
Charging the battery pack removed from the bicycle p. 38
Reading the charging status for battery pack p. 42
Reading the charging status for display unit (Applies only to models
equipped with the Multi location type battery pack.) p. 43
Charging time guidelines p. 44
H. Checking the residual battery capacity p. 45
Residual battery capacity indicator display and estimate of residual battery
capacity for display unit p. 45
Display of the battery capacity indicator lamps and the estimate of the
residual battery capacity p. 46
I. Pre-operation check p. 47
J. Cleaning, maintenance and storage p. 47
Caring for the battery pack p. 47
Maintenance for the Drive Unit p. 47
Storage p. 48
Long storage period (1 month or longer) and using it again after a long
storage period p. 48
K. Transport p. 48
L. Consumer information p. 49
Disposal p. 49
M. Troubleshooting p. 50
E-Bike Systems p. 50
Power supply of external devices via USB connection p. 54
Wireless communication with Bluetooth low energy technology p. 55
Battery pack and charger p. 56
N. Specications p. 59
MY2019_E-KIT(X0R8)US英語_OWNERS MANUAL.indd 4 2018/04/27 13:36:15
1
General warning
FAILURE TO FOLLOW THE WARNINGS CONTAINED IN THIS MANUAL CAN
RESULT IN SERIOUS INJURY OR DEATH.
Particularly important information is distinguished in this manual by the following
notations:
This is the safety alert symbol. It is used to alert you to
potential personal injury hazards. Obey all safety messages
that follow this symbol to avoid possible injury or death.
A WARNING indicates a hazardous situation which, if not
avoided, could result in death or serious injury.
A NOTICE indicates special precautions that must be taken to
avoid damage to the vehicle or other property.
TIP
A TIP provides key information to make procedures easier or
clearer.
WARNING
NOTICE
MY2019_E-KIT(X0R8)US英語_OWNERS MANUAL.indd 1 2018/04/27 13:36:16
7

2
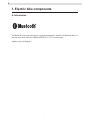
1. Electric bike components
The Bluetooth
®
word mark and logos are registered trademarks owned by the Bluetooth SIG, Inc.
and any use of such marks by YAMAHA MOTOR CO., LTD. is under license.
*Applies only to the Display X.
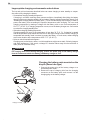
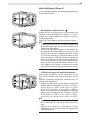
A. Introduction
MY2019_E-KIT(X0R8)US英語_OWNERS MANUAL.indd 2 2018/04/27 13:36:16
8

2
1. Electric bike components
The Bluetooth
®
word mark and logos are registered trademarks owned by the Bluetooth SIG, Inc.
and any use of such marks by YAMAHA MOTOR CO., LTD. is under license.
*Applies only to the Display X.
A. Introduction
MY2019_E-KIT(X0R8)US英語_OWNERS MANUAL.indd 2 2018/04/27 13:36:16
3
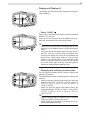
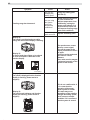
B.Locationofthewarningandspecicationlabels
Read and understand all of the labels on your battery pack and battery charger. These labels con-
tain important information for safe and proper operation. Never remove any labels from your bat-
tery pack and battery charger:
Familiarize yourself with the following pictograms and read the explanatory text, then make sure to
check the pictograms that apply to your model.
Read the Owner’s manual
Do not dispose of in a fire
Do not disassemble
Do not use with wet hands
Battery charger
Battery pack
36V 11.0Ah 400Wh
: PASB4
: X0R-00
Li-ion battery
CELL MADE IN JAPAN
PACK PROCESSED IN CHINA
YAMAHA MOTOR CO.,LTD.
Type
Model
To avoid sparking, burns, fire, and explosion:
Read owner’s manual before use.
Charge battery only with specified charger.
Use battery only for specified product – no
other use.
Do not place near fire or immerse in water.
Do not use battery if it has been dropped,
subject to impact, or visibly damaged.
Do not disassemble or modify the battery,
or short across its terminals.
Pour éviter les étincelles, les brûlures, les
incendies et les explosions :
Lire le manuel du propriétaire avant utilisation.
Charger la pile uniquement avec le chargeur
spécifié.
Utiliser la pile uniquement avec le produit
spécifié; aucune autre utilisation.
Ne pas placer près du feu ou immerger
dans l'eau.
Ne pas utiliser la pile si elle a été échappée,
a reçu un choc ou si elle est visiblement
endommagée.
•
•
•
•
•
•
•
•
•
•
•
•
Ne pas démonter ou modifier la pile ou
court-circuiter ses bornes.
WARNING
AVERTISSEMENT
WARNING AVERTISSEMENT
To avoid electric shock, burns, and fire:
Read owner’s manual before use.
Charge only PASB4 type batteries for Yamaha e-Bike
Systems. Other type of batteries may burst causing
injury to persons or damage.
Do not expose to rain.
Keep away from children and pets.
Do not expose to moisture or touch with wet hands.
Do not use near flammable objects.
Unplug power cord after use.
Do not use charger if it has been dropped, subject to
impact, visibly damaged, or has a damaged power cord.
•
•
•
•
•
•
•
•
•
Do not disassemble or modify charger.
Pour éviter les décharges électriques, les brûlures et les incendies :
Lire le manuel du propriétaire avant utilisation.
Ne charger que des batteries de type PASB4 pour systèmes
e-Bike Yamaha. Les autres types de batterie peuvent exploser
et provoquer des dommages corporels ou matériels.
Ne pas exposer a la pluie.
Tenir éloigné des enfants et des animaux.
Ne pas exposer à l'humidité ou toucher avec des mains humides.
Ne pas utiliser près d'objets inflammables.
Débrancher le cordon d'alimentation après utilisation.
Ne pas utiliser le chargeur s'il a été échappé, a reçu un choc,
est visiblement endommagé ou si le cordon d'alimentation est
endommagé.
•
•
•
•
•
•
•
•
•
Ne pas démonter ou modifier le chargeur.
YAMAHA MOTOR CO.,LTD.
BATTERY CHARGER
MADE IN CHINA
4BB0 E341308
BATTERY CHARGER
Type : PASC4
Model : X0R-00
See instructions if the input plug
does not fit the power outlet.
Backfeed Protection
How to disconnect the plug.
1.GRASP
2.PULL
MY2019_E-KIT(X0R8)US英語_OWNERS MANUAL.indd 3 2018/04/27 13:36:21
9

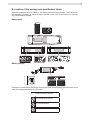
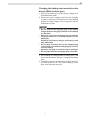
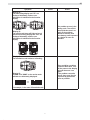
4
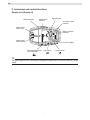
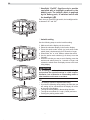
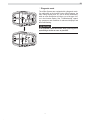
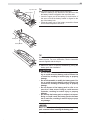
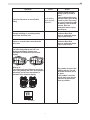
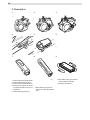
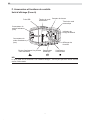
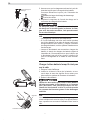
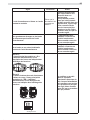
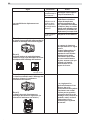
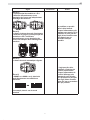
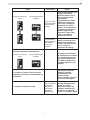
C. Description
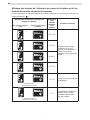
1 2 3
4 5 6
a
b
c
a
b
7 8 9
1. Drive Unit (PWseries SE)
2. Drive Unit (PW-X)
3. Drive Unit (PWseries TE)
4. Speed sensor set
a) Magnet sensor spoke type
b) Pick up
5. Display unit (Display A)
6. Display unit (Display X)
a) Display
b) Clamp
c) Switch
7. Battery pack (Down tube type
400 Wh/500 Wh)
8. Battery pack (Multi location
type 600 Wh)
9. Battery charger
MY2019_E-KIT(X0R8)US英語_OWNERS MANUAL.indd 4 2018/04/27 13:36:26
10

4
C. Description
1 2 3
4 5 6
a
b
c
a
b
7 8 9
1. Drive Unit (PWseries SE)
2. Drive Unit (PW-X)
3. Drive Unit (PWseries TE)
4. Speed sensor set
a) Magnet sensor spoke type
b) Pick up
5. Display unit (Display A)
6. Display unit (Display X)
a) Display
b) Clamp
c) Switch
7. Battery pack (Down tube type
400 Wh/500 Wh)
8. Battery pack (Multi location
type 600 Wh)
9. Battery charger
MY2019_E-KIT(X0R8)US英語_OWNERS MANUAL.indd 4 2018/04/27 13:36:26
5
D. E-Bike Systems
The e-Bike Systems are designed to give you the optimal amount of
power assist.
It assists you within a standard range based on factors such as your pedaling strength, bicycle
speed, and current gear.
The e-Bike Systems do not assist in the following situations:
• When the display unit’s power is off.
• When you are moving 20 mph (32 km/h) or faster.
• When you are not pedaling and the pushing assist switch is released.
• When there is no residual battery capacity.
• When the automatic power off function* is operating.
* Power turns off automatically when you do not use the e-Bike Systems for 5 minutes.
• When the assist mode is set to Off mode.
Multiple power assist modes are available.
Choose from Extra Power mode, High-Performance mode, Standard mode, Eco mode, +Eco
mode, Off mode and Automatic mode to suit your riding conditions.
See “Displaying and switching the assist mode” for information on switching between assist modes.
Extra Power mode
*1
Use when climbing rough terrain.
High-Performance mode
Use when you want to ride more comfortably, such as when
climbing a steep hill.
Standard mode Use when riding on flat roads or climbing gentle hills.
Eco mode
+Eco mode
Use when you want to ride as far as possible.
Off mode
Use when you want to ride without power assist. You can still use
the other display unit functions.
Automatic mode
*2
Use when you want the assist mode to change automatically to the
best suited mode depending on the riding conditions.
*1 Applies only to the Drive Unit (PW-X).
*2 Applies only to the Drive Unit (PWseries TE).
MY2019_E-KIT(X0R8)US英語_OWNERS MANUAL.indd 5 2018/04/27 13:36:26
11

6
Conditions that could decrease remaining assist distance
The remaining assist distance will decrease when riding in the following conditions:
• Frequent starts and stops
• Numerous steep inclines
• Poor road surface conditions
• When riding together with children
• Riding into a strong head wind
• Low air temperature
• Worn-out battery pack
• When using the headlight (applies only to models equipped with lights powered by the battery
pack)
• Frequent acceleration
• Heavier rider and luggage weight
• Higher assist mode
• Higher riding speed
Remaining assist distance will also decrease if the bicycle is not maintained properly.
Examples of inadequate maintenance that could decrease remaining assist distance:
• Low tire pressure
• Chain not turning smoothly
• Brake engaged constantly
MY2019_E-KIT(X0R8)US英語_OWNERS MANUAL.indd 6 2018/04/27 13:36:27
12

6
Conditions that could decrease remaining assist distance
The remaining assist distance will decrease when riding in the following conditions:
• Frequent starts and stops
• Numerous steep inclines
• Poor road surface conditions
• When riding together with children
• Riding into a strong head wind
• Low air temperature
• Worn-out battery pack
• When using the headlight (applies only to models equipped with lights powered by the battery
pack)
• Frequent acceleration
• Heavier rider and luggage weight
• Higher assist mode
• Higher riding speed
Remaining assist distance will also decrease if the bicycle is not maintained properly.
Examples of inadequate maintenance that could decrease remaining assist distance:
• Low tire pressure
• Chain not turning smoothly
• Brake engaged constantly
MY2019_E-KIT(X0R8)US英語_OWNERS MANUAL.indd 6 2018/04/27 13:36:27
7
E. Safety information
Never use this battery charger to charge other electrical appliances.
Do not use any other charger or charging method to recharge the special batter-
ies. Using any other charger could result in fire, explosion, or damage the batter-
ies.
This battery charger can be used by children aged from 8 years and above and
persons with reduced physical, sensory or mental capabilities or lack of experi-
ence and knowledge if they have been given supervision or instruction concern-
ing use of the battery charger in a safe way and understand the hazards in-
volved. Children shall not play with the battery charger. Cleaning and user
maintenance shall not be made by children without supervision.
Although the battery charger is waterproof, never allow it to become immersed
in water or other fluids. In addition, never use the battery charger if the terminals
are wet.
Never handle the power plug, charging plug or touch the charger contacts with
wet hands. This could result in electric shock.
Do not touch charger contacts with metallic objects. Do not allow foreign materi-
al to cause short circuit of the contacts. This could result in electric shock, fire,
or damage the battery charger.
Periodically remove dust from the power plug. Dampness or other issues could
reduce the effectiveness of the insulation, resulting in fire.
Never disassemble or modify the battery charger. This could result in fire or elec-
tric shock.
Do not use with a power strip or extension cord. Using a power strip or similar
methods may exceed rated current and can result in fire.
Do not use with the cable tied or rolled up, and do not store with the cable
wrapped around the charger main body. Cable damage can result in fire or elec-
tric shock.
Firmly insert the power plug and the charging plug into the socket. Failure to in-
sert the power plug and the charging plug completely can result in fire caused
by electric shock or overheating.
Do not use the battery charger near flammable material or gas. This could result
in fire or explosion.
Never cover the battery charger or place other objects on top of it while charg-
ing. This could result in internal overheating leading to fire.
Do not drop the battery charger or expose it to strong impacts. Otherwise, it
could cause a fire or electric shock.
Store the battery pack and battery charger out of reach of children.
MY2019_E-KIT(X0R8)US英語_OWNERS MANUAL.indd 7 2018/04/27 13:36:27
13

8
Do not touch the battery pack or battery charger while it is charging. As the bat-
tery pack or battery charger reaches 104–158 °F (40–70 °C) during charging,
touching it could result in burns.
Do not use if the battery pack case is damaged, cracked, or if you smell any unu-
sual odors. Leaking battery fluid can cause serious injury.
Do not short the contacts of the battery pack. Doing so could cause the battery
pack to become hot or catch fire, resulting in serious injury or property damage.
Do not disassemble or modify the battery pack. Doing so could cause the battery
pack to become hot or catch fire, resulting in serious injury or property damage.
If the power cable is damaged, stop using the battery charger and have it in-
spected at an authorized dealer.
Do not turn the pedals or move the bicycle while the battery charger is connect-
ed. Doing so could cause the power cable to become tangled in the pedals, re-
sulting in damage to the battery charger, power cable, and/or plug.
Handle the power cable with care. Connecting the battery charger from indoors
while the bicycle is outdoors could result in the power cable becoming pinched
and damaged in a doorway or window.
Do not run over the power cable or plug with the wheels of the bicycle. Doing so
could result in damage to the power cable or plug.
Do not drop the battery pack or subject it to impact. Doing so could cause the
battery pack to become hot or catch fire, resulting in serious injury or property
damage.
Do not dispose of the battery pack in a fire or expose it to a heat source. Doing
so could cause fire, or explosion, resulting in serious injury or property damage.
Do not modify or disassemble the e-Bike Systems. Do not install anything other
than genuine parts and accessories. Doing so could result in product damage,
malfunction, or increase your risk of injury.
When stopped, be sure to apply the front and rear brakes and keep both feet on
the ground. Placing one’s foot on the pedal when stopped may unintentionally
engage the power assist function, which could result in loss of control and seri-
ous injury.
Do not ride the bicycle if there is any irregularity with the battery pack or e-Bike
Systems. Doing so could lead to loss of control and serious injury.
Be sure to check the residual battery capacity before riding at night. The head-
light powered by the battery pack will turn off soon after the residual battery ca-
pacity has decreased to where power assisted riding is no longer possible. Rid-
ing without an operating headlight can increase your risk of injury.
Do not start off by running with one foot on a pedal and one foot on the ground
and then mounting the bicycle after it has reached a certain speed. Doing so
could result in loss of control or serious injury. Be sure to start riding only after
you are seated properly on the bicycle seat.
Do not press the pushing assist switch if the rear tire is off the ground. Other-
wise, the tire will turn at high speed in the air and you could be injured.
MY2019_E-KIT(X0R8)US英語_OWNERS MANUAL.indd 8 2018/04/27 13:36:27
14

8
Do not touch the battery pack or battery charger while it is charging. As the bat-
tery pack or battery charger reaches 104–158 °F (40–70 °C) during charging,
touching it could result in burns.
Do not use if the battery pack case is damaged, cracked, or if you smell any unu-
sual odors. Leaking battery fluid can cause serious injury.
Do not short the contacts of the battery pack. Doing so could cause the battery
pack to become hot or catch fire, resulting in serious injury or property damage.
Do not disassemble or modify the battery pack. Doing so could cause the battery
pack to become hot or catch fire, resulting in serious injury or property damage.
If the power cable is damaged, stop using the battery charger and have it in-
spected at an authorized dealer.
Do not turn the pedals or move the bicycle while the battery charger is connect-
ed. Doing so could cause the power cable to become tangled in the pedals, re-
sulting in damage to the battery charger, power cable, and/or plug.
Handle the power cable with care. Connecting the battery charger from indoors
while the bicycle is outdoors could result in the power cable becoming pinched
and damaged in a doorway or window.
Do not run over the power cable or plug with the wheels of the bicycle. Doing so
could result in damage to the power cable or plug.
Do not drop the battery pack or subject it to impact. Doing so could cause the
battery pack to become hot or catch fire, resulting in serious injury or property
damage.
Do not dispose of the battery pack in a fire or expose it to a heat source. Doing
so could cause fire, or explosion, resulting in serious injury or property damage.
Do not modify or disassemble the e-Bike Systems. Do not install anything other
than genuine parts and accessories. Doing so could result in product damage,
malfunction, or increase your risk of injury.
When stopped, be sure to apply the front and rear brakes and keep both feet on
the ground. Placing one’s foot on the pedal when stopped may unintentionally
engage the power assist function, which could result in loss of control and seri-
ous injury.
Do not ride the bicycle if there is any irregularity with the battery pack or e-Bike
Systems. Doing so could lead to loss of control and serious injury.
Be sure to check the residual battery capacity before riding at night. The head-
light powered by the battery pack will turn off soon after the residual battery ca-
pacity has decreased to where power assisted riding is no longer possible. Rid-
ing without an operating headlight can increase your risk of injury.
Do not start off by running with one foot on a pedal and one foot on the ground
and then mounting the bicycle after it has reached a certain speed. Doing so
could result in loss of control or serious injury. Be sure to start riding only after
you are seated properly on the bicycle seat.
Do not press the pushing assist switch if the rear tire is off the ground. Other-
wise, the tire will turn at high speed in the air and you could be injured.
MY2019_E-KIT(X0R8)US英語_OWNERS MANUAL.indd 8 2018/04/27 13:36:27
9
Do not use the wireless function with Bluetooth low energy technology in areas
such as hospitals or medical institutions where use of electronic equipment or
wireless equipment is prohibited. Otherwise, this could affect the medical equip-
ment, etc. and cause an accident.
When using the wireless function with Bluetooth low energy technology, keep
the display at a safe distance from heart pacemakers in use. Otherwise, the radio
waves could affect the heart pacemaker function.
Do not use the wireless function with Bluetooth low energy technology near au-
tomatic control equipment such as automatic doors, fire alarms, etc. Otherwise,
the radio waves could affect the equipment and cause an accident through pos-
sible malfunction or unintentional operation.
MY2019_E-KIT(X0R8)US英語_OWNERS MANUAL.indd 9 2018/04/27 13:36:27
15

10
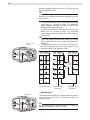
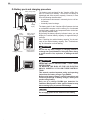
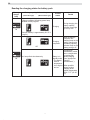
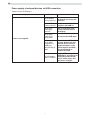
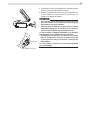
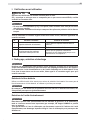
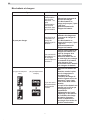
F. Instrument and control functions
Display unit (Display A)
Automatic mode
indicator
Assist mode
switch (down)
USB receptacle Assist mode
indicator
Speedometer
Power switch
Battery capacity
indicator
Function display
Pushing assist switch
*Not executable
Light switch
Assist mode
switch (up)
TIP
The USB receptacle is for connecting the designated YAMAHA tool; it cannot be used as a power
supply.
MY2019_E-KIT(X0R8)US英語_OWNERS MANUAL.indd 10 2018/04/27 13:36:31
16

10
F. Instrument and control functions
Display unit (Display A)
Automatic mode
indicator
Assist mode
switch (down)
USB receptacle Assist mode
indicator
Speedometer
Power switch
Battery capacity
indicator
Function display
Pushing assist switch
*Not executable
Light switch
Assist mode
switch (up)
TIP
The USB receptacle is for connecting the designated YAMAHA tool; it cannot be used as a power
supply.
MY2019_E-KIT(X0R8)US英語_OWNERS MANUAL.indd 10 2018/04/27 13:36:31
11
Display unit (Display A)
The display unit offers the following operations and infor-
mation displays.
2
Power “On/Off”
Each time you press the power switch, the power switches
between “On” and “Off”.
When you turn on the power, all of the displays come up.
After that, it transitions to the main riding display.
TIP
• When you turn on the power, the assist mode is auto-
matically set to Standard mode or High-Performance
mode.
• Keep your feet off the pedals when turning on the dis-
play unit. Also, do not start riding immediately after
turning on the display unit. Doing so could weaken the
assist power. (Weak assist power in either of these
cases is not a malfunction.) If you did either of the
above by accident, remove your feet from the pedals,
turn on the power again, and wait a moment (approxi-
mately two seconds) before starting to ride.
2
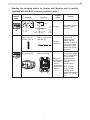
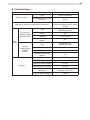
Displaying and switching the assist mode
You can select the assist mode by using the assist mode
switches (up & down).
The selected assist mode is displayed by the assist mode
indicator.
• When you press the assist mode switch (up), the mode
changes from “OFF” to “+ECO”, or from “+ECO” to
“ECO”, or “ECO” to “STD”, or “STD” to “HIGH”, or
“HIGH” to “EXPW”.
• When you press the assist mode switch (down), the
mode changes from “EXPW” to “HIGH”, or from “HIGH”
to “STD”, or “STD” to “ECO”, or “ECO” to “+ECO” or
“+ECO” to “OFF”.
TIP
• Bicycles equipped with the PWseries SE or PWseries
TE drive unit has no Extra Power mode.
• Further pressing of the assist mode switch will not cy-
cle the assist mode selections.
MY2019_E-KIT(X0R8)US英語_OWNERS MANUAL.indd 11 2018/04/27 13:36:33
17

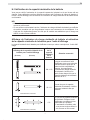
12
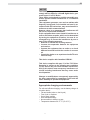
Bicycles equipped with the PWseries TE drive unit can
use the Automatic mode.
TIP
The automatic mode is a function enabling automatic
change to the optimized assist mode according to the rid-
ing conditions.
• To use the Automatic mode, press the assist mode
switch (up) for 1 second or longer. The Automatic
mode indicator will light up and the mode will be
changed to the Automatic mode.
• To cancel the Automatic mode, press the assist mode
switch (up) for 1 second or longer. The Automatic
mode indicator will go off and the Automatic mode will
be canceled.
TIP
• Even if you press the assist mode switch (up & down)
while in Automatic mode, the assist mode cannot be
changed.
• The Automatic mode is saved when the power is
turned off. When you turn on the power again, the as-
sist mode will be in the Automatic mode.
EXPW
Assist
mode
Assist mode
indicator
HIGH
STD
ECO
+ECO
OFF
Assist
mode
Assist mode
indicator
HIGH
STD
ECO
+ECO
OFF
Assist
mode
Assist mode
indicator
Automatic
mode
1 seconds
or longer
1 seconds
or longer
PW-X drive unit PWseries SE
drive unit
PWseries TE
drive unit
Assist
mode
Assist
mode
Assist
mode
Assist mode
indicator
Assist mode
indicator
Assist mode
indicator
HIGH
EXPW
STD
ECO
+ECO
OFF
HIGH
STD
ECO
+ECO
OFF
Auto-
matic
mode
1 second
or longer
1 second
or longer
2
Speedometer
The speedometer displays your bicycle speed (in kilome-
ter per hour or mile per hour). To select the km/mile, see
“km/mile setting”.
TIP
If your bicycle speed is less than 2.0 km/h or 1.2 MPH, the
speedometer displays “0 km/h or 0 MPH”.
Automatic mode
indicator
Speedometer
MY2019_E-KIT(X0R8)US英語_OWNERS MANUAL.indd 12 2018/04/27 13:36:36
18

12
Bicycles equipped with the PWseries TE drive unit can
use the Automatic mode.
TIP
The automatic mode is a function enabling automatic
change to the optimized assist mode according to the rid-
ing conditions.
• To use the Automatic mode, press the assist mode
switch (up) for 1 second or longer. The Automatic
mode indicator will light up and the mode will be
changed to the Automatic mode.
• To cancel the Automatic mode, press the assist mode
switch (up) for 1 second or longer. The Automatic
mode indicator will go off and the Automatic mode will
be canceled.
TIP
• Even if you press the assist mode switch (up & down)
while in Automatic mode, the assist mode cannot be
changed.
• The Automatic mode is saved when the power is
turned off. When you turn on the power again, the as-
sist mode will be in the Automatic mode.
EXPW
Assist
mode
Assist mode
indicator
HIGH
STD
ECO
+ECO
OFF
Assist
mode
Assist mode
indicator
HIGH
STD
ECO
+ECO
OFF
Assist
mode
Assist mode
indicator
Automatic
mode
1 seconds
or longer
1 seconds
or longer
PW-X drive unit PWseries SE
drive unit
PWseries TE
drive unit
Assist
mode
Assist
mode
Assist
mode
Assist mode
indicator
Assist mode
indicator
Assist mode
indicator
HIGH
EXPW
STD
ECO
+ECO
OFF
HIGH
STD
ECO
+ECO
OFF
Auto-
matic
mode
1 second
or longer
1 second
or longer
2
Speedometer
The speedometer displays your bicycle speed (in kilome-
ter per hour or mile per hour). To select the km/mile, see
“km/mile setting”.
TIP
If your bicycle speed is less than 2.0 km/h or 1.2 MPH, the
speedometer displays “0 km/h or 0 MPH”.
Automatic mode
indicator
Speedometer
MY2019_E-KIT(X0R8)US英語_OWNERS MANUAL.indd 12 2018/04/27 13:36:36
13
2
Battery capacity indicator
The battery capacity indicator displays an estimate of how
much capacity is left in the battery.
2
Function display
The function display can display the following functions.
• Odometer
• Trip meter
• Range (Remaining assist distance)
Push the assist mode switch (down) for 1 second or longer,
the display changes as follows:
Odometer → Trip meter → Range → Odometer
You can reset the data for trip meter.
7
Odometer
This displays the total distance (in kilometers or miles) rid-
den while the power was on.
The odometer cannot be reset.
7
Trip meter
This displays the total riding distance (in kilometers or
miles) since it was last reset.
When you turn off the power, the data up to that point will
remain in the display.
To reset the trip meter and begin counting a new total,
press the assist mode switch (up) and assist mode switch
(down) simultaneously for 2 seconds or longer when the
trip meter is displayed.
7
Range (Remaining assist distance)
This displays an estimate of the distance (in kilometers or
miles) that can be ridden with assist on the residual bat-
tery capacity of the battery installed. If you switch the as-
sist mode when the remaining assist distance is displayed,
the estimate of the distance that can be ridden with assist
changes.
The remaining assist distance estimate cannot be reset.
TIP
• The remaining assist distance changes depending on
the riding situation (hills, headwind, etc.) and as the
battery runs down.
• If in Off mode, “- - - -” is displayed.
Battery capacity indicator
Function display
MY2019_E-KIT(X0R8)US英語_OWNERS MANUAL.indd 13 2018/04/27 13:36:41
19

14
2
Headlight “On/Off” (Applies only to models
equipped with a headlight powered by the
battery pack. The taillight, which is powered
by the battery pack, is switched on/off with
the headlight.)
Each time you press the light switch, the headlight switch-
es between “On” and “Off”.
2
km/mile setting
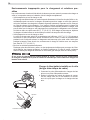
Use the following steps to set the km/mile setting.
1. Make sure that the display unit is turned on.
2. Select the odometer display in the function display.
3. Press the assist mode switch (up) and assist mode
switch (down) simultaneously for 2 seconds or longer.
4. When either “km” or “mile” flashes, release the switch.
5. Use the assist mode switches (up & down) to set the
“km/mile”.
6. While the unit that you want to set is flashing, press the
assist mode switch (down) for 1 second or longer, and
release the switch when the display returns to the main
riding display.
WARNING
For all setting procedures, be sure to stop the bicycle
and perform the required settings in a safe location.
Otherwise, lack of attention to surrounding traffic or
other hazards could cause an accident.
TIP
• The settings cannot be adjusted while riding.
• If you do the following during setting, the item that you
are setting will be canceled and the display will return
to the main riding display.
• Turning the crank (pedal) in the traveling direction
• Turning the rear wheel at 1.2 mph (2 km/h) and more
• Pushing the pushing assist switch
MY2019_E-KIT(X0R8)US英語_OWNERS MANUAL.indd 14 2018/04/27 13:36:44
20
La page charge ...
La page charge ...
La page charge ...
La page charge ...
La page charge ...
La page charge ...
La page charge ...
La page charge ...
La page charge ...
La page charge ...
La page charge ...
La page charge ...
La page charge ...
La page charge ...
La page charge ...
La page charge ...
La page charge ...
La page charge ...
La page charge ...
La page charge ...
La page charge ...
La page charge ...
La page charge ...
La page charge ...
La page charge ...
La page charge ...
La page charge ...
La page charge ...
La page charge ...
La page charge ...
La page charge ...
La page charge ...
La page charge ...
La page charge ...
La page charge ...
La page charge ...
La page charge ...
La page charge ...
La page charge ...
La page charge ...
La page charge ...
La page charge ...
La page charge ...
La page charge ...
La page charge ...
La page charge ...
La page charge ...
La page charge ...
La page charge ...
La page charge ...
La page charge ...
La page charge ...
La page charge ...
La page charge ...
La page charge ...
La page charge ...
La page charge ...
La page charge ...
La page charge ...
La page charge ...
La page charge ...
La page charge ...
La page charge ...
La page charge ...
La page charge ...
La page charge ...
La page charge ...
La page charge ...
La page charge ...
La page charge ...
La page charge ...
La page charge ...
La page charge ...
La page charge ...
La page charge ...
La page charge ...
-
 1
1
-
 2
2
-
 3
3
-
 4
4
-
 5
5
-
 6
6
-
 7
7
-
 8
8
-
 9
9
-
 10
10
-
 11
11
-
 12
12
-
 13
13
-
 14
14
-
 15
15
-
 16
16
-
 17
17
-
 18
18
-
 19
19
-
 20
20
-
 21
21
-
 22
22
-
 23
23
-
 24
24
-
 25
25
-
 26
26
-
 27
27
-
 28
28
-
 29
29
-
 30
30
-
 31
31
-
 32
32
-
 33
33
-
 34
34
-
 35
35
-
 36
36
-
 37
37
-
 38
38
-
 39
39
-
 40
40
-
 41
41
-
 42
42
-
 43
43
-
 44
44
-
 45
45
-
 46
46
-
 47
47
-
 48
48
-
 49
49
-
 50
50
-
 51
51
-
 52
52
-
 53
53
-
 54
54
-
 55
55
-
 56
56
-
 57
57
-
 58
58
-
 59
59
-
 60
60
-
 61
61
-
 62
62
-
 63
63
-
 64
64
-
 65
65
-
 66
66
-
 67
67
-
 68
68
-
 69
69
-
 70
70
-
 71
71
-
 72
72
-
 73
73
-
 74
74
-
 75
75
-
 76
76
-
 77
77
-
 78
78
-
 79
79
-
 80
80
-
 81
81
-
 82
82
-
 83
83
-
 84
84
-
 85
85
-
 86
86
-
 87
87
-
 88
88
-
 89
89
-
 90
90
-
 91
91
-
 92
92
-
 93
93
-
 94
94
-
 95
95
-
 96
96


Yamaha PW-SE Original Instructions Manual
- Catégorie
- Motocyclettes
- Taper
- Original Instructions Manual
- Ce manuel convient également à
dans d''autres langues
- English: Yamaha PW-SE
Documents connexes
Autres documents
-
Giant Momentum Le manuel du propriétaire
-
Trek G2 Le manuel du propriétaire
-
 Lapierre Startandgo Le manuel du propriétaire
-
Denver Orus E-8000 Instructions For Use And Maintenance Manual
-
RocketFish RF-GXBX011 Guide d'installation rapide
-
Shimano BT-E8035-L Manuel utilisateur
-
Magene P325CS Mode d'emploi
-
