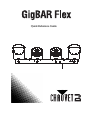
CHAUVET DJ GigBAR Flex Guide de référence
- Taper
- Guide de référence

Quick Reference Guide

EN
1
GigBAR Flex QRG Rev. 1
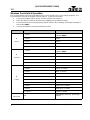
QUICK REFERENCE GUIDE
About This Guide
The GigBAR Flex Quick Reference Guide (QRG) has basic product information such as mounting, menu
options, and DMX values. Download the User Manual from www.chauvetdj.com for more details.
Disclaimer
The information and specifications contained in this QRG are subject to change without notice.
Safety Notes
These Safety Notes include important information about installation, use, and maintenance.
Contact
Outside the U.S., United Kingdom, Ireland, Mexico, or Benelux, contact your distributor to request support
or return a product. Visit www.chauvetdj.com
for contact information.
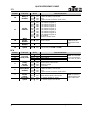
What is Included
• This product is not intended for permanent installation.
• ONLY connect this product to a grounded and protected circuit.
• DISCONNECT from power before cleaning or replacing the fuse.
• DO NOT look at the light source when the product is on.
• Make sure the power cord is not crimped or damaged.
• Never disconnect this product from power by pulling on the cord.
• When mounting this product overhead, ALWAYS use a safety cable.
• DO NOT allow flammable materials close to the product when it is operating.
• DO NOT touch the product’s housing when it is on because it will be hot.
• The voltage of the outlet to which you are connecting this product must be within the
range stated on the decal or rear panel of the product.
• This product is for indoor use only! (IP20) To prevent risk of fire or shock, do not
expose this product to rain or moisture.
• In the event of a serious operating problem, stop using immediately.
• Always mount this product in a location with adequate ventilation, at least 20 in (50
cm) from adjacent surfaces.
• Be sure that no ventilation slots on the unit’s housing are blocked.
• Never connect this product to a dimmer or rheostat.
• Replace the fuse with the same type and rating.
• Never carry the product by the power cord. Use only the handle to carry this product.
• The maximum ambient temperature is 104 °F (40 °C). Do not operate this product
at higher temperatures.
• DO NOT open this product. It contains no user-serviceable parts.
• To eliminate unnecessary wear and improve its lifespan, during periods of non-use
completely disconnect the product from power via breaker or by unplugging it.
• GigBAR Flex
•Power cord
• Carrying bag
• Wireless foot switch
•IRC-6
• Warranty Card
• Quick Reference Guide
00

2
EN
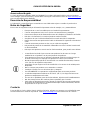
QUICK REFERENCE GUIDE
GigBAR Flex QRG Rev. 1
To Begin
Unpack your GigBAR Flex and make sure you have received all parts in good condition. If the box or
contents appear damaged, notify the carrier immediately, not Chauvet.
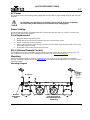
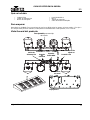
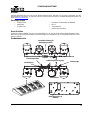
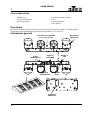
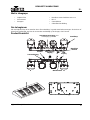
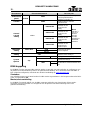
Overview
1
2
3
4
LED Display
DMX In/Out
Menu
Buttons
Power Out
Adjustment
Knobs x4
Power In
Wireless
Antenna
Adjustable Pass- Through
for Tripod mounting
9-Volt Battery
Cover
02

EN
3
GigBAR Flex QRG Rev. 1
QUICK REFERENCE GUIDE
AC Power
This product has an auto-ranging power supply that can work with an input voltage range of 100–240 VAC,
50/60 Hz.
Power Linking
For the maximum number of GigBAR Flex that can be power linked at 120 V or at 230 V, see the User
Manual or the label on the product.
Fuse Replacement
1. Disconnect the product from power.
2. Wedge the tip of a flat-head screwdriver into the slot of the fuse holder.
3. Pry the safety cap out of the housing.
4. Remove the blown fuse from the clip on the front of the safety cap and replace with a fuse of the
exact same type and rating.
5. Re-insert the fuse holder and reconnect power.
IRC-6 (Infrared Remote Control)
The GigBAR Flex is fully compatible with the Infrared Remote Control (IRC-6) from CHAUVET DJ. For
more information on the IRC-6 or to download instructions, go to www.chauvetdj.com
.
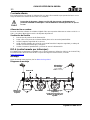
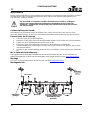
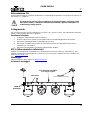
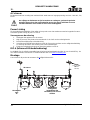
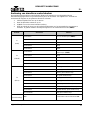
Mounting
Before mounting this product, read the Safety Notes. This product can be mounted to most tripods,
trussing (using appropriate clamps and with/without the included mounting brackets) or can be used floor/
surface mounted.
Mounting Diagram
To eliminate wear and improve its lifespan, during periods of disuse completely
disconnect the product from power via breaker or by unplugging it.
IR Sensor
Microphone
Mounting
Clamp
(such as CLP-
15 from
Chauvet)
Bracket
Adjustment
Knob
Tripod (sold separately)
Insertion Point w/
Adjustment Knob for
Tightening

4
EN
QUICK REFERENCE GUIDE
GigBAR Flex QRG Rev. 1
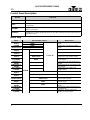
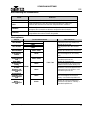
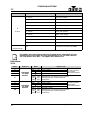
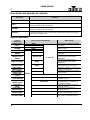
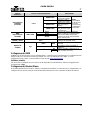
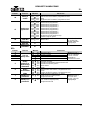
Control Panel Description
Menu Map
BUTTON FUNCTION
<MENU> Exits from the current menu or function
<UP>
Navigates upwards through the menu list and increases the numeric value when
in a function
<DOWN>
Navigates downwards through the menu list and decreases the numeric value
when in a function
<ENTER>
Enables the currently displayed menu or sets the currently selected value into the
selected function
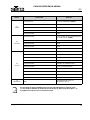
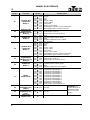
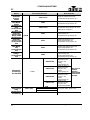
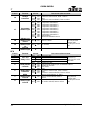
MODE PROGRAMMING LEVELS DESCRIPTION
AUTO Mixed
Effect
AM01
F 01–F 99
Selects the auto mixed effect
show
AM02
SOUND
Mixed Effect
SM01
Selects the sound mixed effect
show
SM02
Auto Par
Effect
SHOW
AP01–AP07 Selects the Par show
Auto Derby
Effect
AK01 Selects the Derby auto speed
Auto Strobe
Effect
AS01–AS22 Selects the auto strobe shows
Auto
Par+Derby
APK1
Selects the Par and Derby auto
show speed
Auto Par +
Strobe
APS1
Selects the Par and strobe show
speed
Auto Derby +
Strobe
AKS1
Selects the Derby and strobe auto
who speed
Par + Derby
+ Strobe
APKS
Selects the Par, Derby, and
strobe speed
Sound Par
Effect
SP01–SP07 Set Pars to Sound mode
Sound Derby
Effect
SK01 Sets Derby Lights to Sound mode
Sound
Strobe Effect
SS01–SS22
Sets strobes to Sound mode and
selects effect speed
Sound Par +
Derby
SPK1
Sets Pars and Derby Lights to
Sound mode
Sound Par +
Strobe
SPS1
Sets Pars and strobes to Sound
mode
Sound Derby
+ Strobe
SKS1
Sets Derby Lights and strobes to
Sound Mode
Par + Derby
+ Strobe
SPKS
Sets Pars, Derby Lights and
strobes to Sound mode

EN
5
GigBAR Flex QRG Rev. 1
QUICK REFERENCE GUIDE
DMX Linking
The GigBAR Flex can work with a DMX controller. Instructions for connecting and configuring this product
for DMX operation are in the User Manual. If you are not familiar with DMX or DIP-switch configuration,
download the DMX Primer from www.chauvetdj.com
.
Starting Address
To ensure full access to the two channels available in DMX mode, the highest recommended DMX address
is 510.
Master/Slave Connection
The GigBAR Flex uses the DMX data connection for its Master/Slave mode. Instructions for connecting
and configuring this product for Master/Slave operation are in the User Manual.
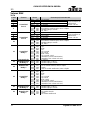
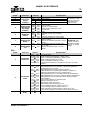
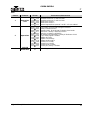
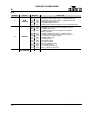
General
COLOR
Setting
CoLo
R000–R255
Sets both Par and
Derby red values
Note: ONLY
3 of the 4
colors may
be used at
the same
time.
G000–G255
Sets both Par and
Derby green
values
B000–B255
Sets both Par and
Derby blue values
U000–U255
Sets the UV
values for the Par
and strobes
DMX Mode
Setting
d001–d512
3 CH Sets DMX starting address;
selects the DMX personality DMX
range restricted by number of
channels in the selected DMX
mode
8 CH
20 CH
Master/Slave
Setting
Slav Sets to Slave mode
System
Options
Sys
dSET 1234 Changes arrangement of pods
rSEt Resets to factory defaults
WiFi
on
Turns on/off Wi-Fi antenna for
wireless footswitch
off
MODE PROGRAMMING LEVELS DESCRIPTION

6
EN
QUICK REFERENCE GUIDE
GigBAR Flex QRG Rev. 1
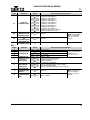
Wireless Foot-Switch Operation
The included wireless foot-switch provides quick access to preset colors, color-change programs, and
sound-activation through the GigBAR Flex microphone. To use the foot-switch:
1. Connect the GigBAR Flex to power. Turn the wireless foot-switch on.
2. Raise the wireless antennas located on the GigBAR Flex and the foot-switch.
3. Press pedal #1 (Auto) to activate Auto program controls. When working, all the lights will begin in
Auto mode (AM01).
4. Use the chart below to activate the desired function..
PEDAL ACTION FUNCTION
1
(Auto)
1 x press
Auto mode Pars, Derby Lights and
strobes (AM01)
2 x press AP01
3 x press AP02
4 x press AK01
5 x press APK1
2
(Sound)
1 x press
Auto mode Pars, Derby Lights and
strobes (SM01)
2 x press SP01
3 x press SP02
4 x press SK01
5 x press SPK1
3
(Color)
1 x press Red, no strobe
2 x press Green, no strobe
3 x press Blue, no strobe
4 x press UV, no strobe
5 x press Yellow, no strobe
6 x press Pink, no strobe
7 x press Cyan, no strobe
8 x press Dark Pink, no strobe
9 x press Dark Blue, no strobe
10 x press White, no strobe
4
(Blackout)
N/A
Immediately turns OFF all the light
fixtures

EN
7
GigBAR Flex QRG Rev. 1
QUICK REFERENCE GUIDE
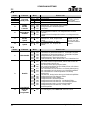
DMX Values
20Ch
The GigBAR Flex footswitch will work properly in any mode, with a maximum
unobstructed distance of 50 ft (15.24 m). You must turn on the WiFi on the
GigBAR Flex before using the footswitch.
CHANNEL FUNCTION VALUE PERCENT/SETTING
1
Par 1
000 255 Red 0-100%
Note: You are able
to use a maximum
of 3 colors at a time
2 000
255 Green 0-100%
3 000
255 Blue 0-100%
4 000
255 UV 0-100%
5
000
127
128
239
240
249
250
255
Dimmer 0-100%
Strobe speed, slow to fast
Strobe to sound
RGB 100%
6
Par 2
000
255 Red 0-100%
Note: You are able
to use a maximum
of 3 colors at a time
7 000
255 Green 0-100%
8 000
255 Blue 0-100%
9 000
255 UV 0-100%
10
000
127
128 239
240
249
250
255
Dimmer 0-100%
Strobe speed, slow to fast
Strobe to sound
RGB 100%
11
Derby 1
Control
000
024
025 049
050
074
075
099
100 124
125
149
150
174
175 199
200
224
225
255
Blackout
Red
Green
Blue
Red + Green
Red + Blue
Green + Blue
Red + Green + Blue
Automatic (single colors only)
Automatic (two colors at a time)
12
Derby 1
Strobe Rate
000
009
010 239
240
255
No function
Strobe, 0-30 Hz
Strobe to sound
13
Derby 1
Rotation
000
004
005
127
128 133
134
255
Stop
Rotate clockwise, slow to fast
Stop
Rotate counter-clockwise, slow to fast
14
Derby 2
Control
000
024
025
049
050
074
075
099
100
124
125 149
150
174
175
199
200 224
225
255
Blackout
Red
Green
Blue
Red + Green
Red + Blue
Green + Blue
Red + Green + Blue
Automatic (single colors only)
Automatic (two colors at a time)
15
Derby 2
Strobe Rate
000
009
010
239
240
255
No function
Strobe, 0-30 Hz
Strobe to sound

8
EN
QUICK REFERENCE GUIDE
GigBAR Flex QRG Rev. 1
8Ch
16
Derby 2
Rotation
000
004
005 127
128
133
134
255
Stop
Rotate clockwise, slow to fast
Stop
Rotate counter-clockwise, slow to fast
17
Strobe
Patterns
000
009
010 029
030
069
050
069
070 089
090
109
110
129
130 149
150
169
170
189
190
209
210 255
Blackout
Auto Strobe Program 1
Auto Strobe Program 2
Auto Strobe Program 3
Auto Strobe Program 4
Auto Strobe Program 5
Auto Strobe Program 6
Auto Strobe Program 7
Auto Strobe Program 8
Auto Strobe Program 9
All Strobing
Strobe to sound mode
18
White
Strobe
Dimmer
000
255 White 0-100%
Note: Channels 18
& 19 cannot be
used at the same
time.
19
UV Strobe
Dimmer
000
255 UV 0-100%
20
Strobe
Speed
000
255 Slow to fast (for CH18 or CH19)
CHANNEL FUNCTION VALUE PERCENT/SETTING
1
Pars and
Derby Color
000
255 Red 0-100%
Note: You are able
to use a maximum
of 3 colors at a time
2 000
255 Green 0-100%
3 000
255 Blue 0-100%
4 000
255 UV 0-100%
5
Pars and
Derby
Strobe
Controls
000
127
128
239
240
249
250 255
Dimmer 0-100%
Strobe speed, slow to fast
Strobe to sound
RGB 100%
6
Derby Motor
Rotation
000
004
005
127
128
133
134
255
Stop
Rotate clockwise, slow to fast
Stop
Rotate counter-clockwise, slow to fast
7
White
Strobe
Speed
000
054
055
255
White strobe dimmer, 0–100%
White strobe speed, slow to fast
Note: Channels 7
& 8 cannot be used
at the same time.
8
UV Strobe
Speed
000
054
055
255
UV strobe dimmer, 0–100%
UV strobe speed, slow to fast
CHANNEL FUNCTION VALUE PERCENT/SETTING

EN
9
GigBAR Flex QRG Rev. 1
QUICK REFERENCE GUIDE
3Ch
CHANNEL FUNCTION VALUE PERCENT/SETTING
1
LED
Operation
000
009
010 119
120
229
230
234
235 239
240
255
No function
Auto mixed mode 1, fast to slow
Auto mixed mode 2, fast to slow
Sound mixed mode 1
Sound mixed mode 2
Show setting,when channels 2 and 3 activated
2 Operation
000
009
010
026
027 043
044
060
061
077
078 094
095
111
112
128
129 145
146
161
162
178
179 196
197
213
214
230
231 255
No function
Pars on ONLY, doing all single Par show
Derby Lights on ONLY
Strobes on ONLY, doing all single strobe show
Auto Pars and Derby Lights ONLY
Auto Pars and strobes ONLY
Auto strobes and Derby Lights ONLY
Pars, Derby Lights, and strobes
Sound Par effect
Sound Derby effect
Sound strobe effect
Sound Par + Derby
Sound Par + strobe
Sound Derby + strobe
Sound pars, Derby and strobes
3 Auto Speed 000
255 Speed, when 061–111 in channel 2

10
ES
GUÍA DE REFERENCIA RÁPIDA
GigBAR Flex GRR Rev. 1
Acerca de esta guia
La Guía de Referencia Rápida (GRR) del GigBAR Flex contiene información básica sobre el producto,
como montaje, opciones de menú y valores DMX. Descargue el manual de usuario de www.chauvetdj.com
para una información más detallada.
Exención de Responsabilidad
La información y especificaciones contenidas en esta GRR están sujetas a cambio sin previo aviso.
Notas de Seguridad
Estas notas de seguridad incluyen información importante sobre el montaje, uso y mantenimiento.
Contacto
Fuera de EE.UU, Reino Unido, Irlanda, México o Bénelux, póngase en contacto con su distribuidor para
solicitar asistencia o devolver el producto. Visite www.chauvetdj.com
para información de contacto.
• Este producto no está concebido para una instalación permanente.
• Conecte este producto SOLO a un circuito con toma de tierra y protegido.
• Desconecte siempre de la alimentación antes de la limpieza o sustitución del fusible.
• NO mire a la fuente de luz cuando el producto esté encendido.
• Asegúrese de que el cable de alimentación no está retorcido ni estropeado.
• Nunca desconecte este producto del cable de alimentación agarrando o tirando del
cable.
• Cuando monte este producto en alto, use un cable de seguridad.
• NO permita la presencia de materiales inflamables cerca de la unidad cuando esté
en funcionamiento.
• NO toque este producto cuando esté en funcionamiento, pues podría estar caliente.
• La tensión del enchufe al que conecte este producto ha de estar en el rango
establecido en el grabado o en el panel posterior de producto.
• ¡Este producto es para uso en interiores solamente! (IP20) Para evitar riesgos de
incendio o descarga, no exponga este producto a la lluvia o la humedad.
• Monte siempre este producto en una ubicación con ventilación adecuada, al menos
a 20'' (50 cm) de superficies adyacentes.
• Asegúrese de que ninguna ranura de ventilación en la carcasa de la unidad queda
bloqueada.
• Nunca conecte este producto a un atenuador o reostato.
• Sustituya el fusible con uno del mismo tipo y categoría.
• Use SOLAMENTE los soportes de colgar/montar para mover este producto.
• La máxima temperatura ambiente es de 104 °F (40 °C). No haga funcionar este
producto a temperaturas más altas.
• En caso de un problema grave de funcionamiento, deje de usarlo inmediatamente.
• NO abra este producto. No contiene piezas reparables por el usuario.
• Para evitar un desgaste innecesario y alargar su vida útil, desconecte complemente
el producto de la alimentación, mediante el interruptor o desenchufándolo, durante
los periodos en los que no se use.
02

ES
11
GigBAR Flex GRR Rev. 1
GUÍA DE REFERENCIA RÁPIDA
Qué va incluido
Para empezar
Desembale su GigBAR Flex y asegúrese de que ha recibido todas las partes en buen estado. Si la caja o
los componentes parecen dañados, notifíqueselo inmediatamente al transportista, no a Chauvet.
Vista General del producto
• GigBAR Flex
• Cable de alimentacion
• Bolsa de transporte
• Pedal inalambrico
•IRC-6
• Tarjeta de Garantía
• Guía de Referencia Rápida
1
2
3
4
Pantalla LED
Entrada/
Salida DMX
Botones
de menú
Salida de
alimentación
Mando de
ajuste x4
Entrada
de
alimenta
Antena
Inalambrica
Paso ajustable para montaje
de trípode
Tapa pila 9-V
00

12
ES
GUÍA DE REFERENCIA RÁPIDA
GigBAR Flex GRR Rev. 1
Corriente alterna
Este producto tiene una fuente de alimentación con detección automática que puede funcionar con un
rango de tensión de entrada de 100~240 VCA, 50/60 Hz.
Alimentación en cadena
Para ver el máximo número de unidades GigBAR Flex que se pueden alimentar en cadena a 120 V o a
230 V, consulte el Manual de usuario o la etiqueta del producto.
Sustitución del fusible
1. Desconecte el producto de la alimentación.
2. Haga cuña con la punta de un destornillador plano en la ranura del portafusibles.
3. Saque la tapa de seguridad de la carcasa.
4. Quite el fusible fundido de la sujeción en la parte frontal de la tapa de seguridad y sustituya el
fusible con otro del mismo tipo y categoría.
5. Vuelva a insertar el portafusibles y conecte de nuevo la alimentación.
IRC-6 (control remoto por infrarrojos)
El GigBAR Flex es totalmente compatible con el control remoto por infrarrojos (IRC-6) de CHAUVET DJ.
Para información adicional sobre el IRC-6 o para descargar las instrucciones, consulte
www.chauvetdj.com
.
Montaje
Antes de montar este producto, lea las Notas de Seguridad.
Diagrama de montaje
Para evitar el desgaste y alargar su vida útil, desconecte completamente el
producto mediante el interruptor o desenchufándolo durante periodos en que no
se use.
Sensor IR
Microfono
Abrazadera
de Montaje
(como la CLP-
15N de Chauvet)
Mando de
ajuste del
soporte
Trípode (vendido por
separado)
Punto de inserción con
mando de ajuste para
apretar

ES
13
GigBAR Flex GRR Rev. 1
GUÍA DE REFERENCIA RÁPIDA
Descripción del panel de control
Mapa de Menú
BOTÓN FUNCIÓN
<MENU> Sale del menú o función actual
<UP>
Navega hacia arriba por la lista de menú y aumenta el valor numérico cuando está en
una función
<DOWN> Velocidad de rotación derecha
<ENTER>
Habilita el menú actualmente en pantalla o configura el valor seleccionado
actualmente dentro de la función seleccionada
MODO NIVELES DE PROGRAMACIÓN DESCRIPCIÓN
Efecto
mezclado
AUTO
AM01
F01-F99
Selecciona el show del efecto
mezclado automático
AM02
Efecto
mezclado
SONIDO
SM01
Selecciona el show del efecto
mezclado de sonido
SM02
Efecto foco
automático
SHOW
AP01–AP07
F 01–F 99
Selecciona el show del foco
Efecto Derby
automático
AK01
Selecciona el show del Derby
automático la velocidad del Derby
automático
Efecto
estroboscopio
automático
AS01–AS22
Selecciona los shows de
estroboscopio automático
Foco + Derby
automático
APK1
Selecciona la velocidad del show
automatico de foco y Derby
Foco +
estroboscopio
automático
APS1
Selecciona la velocidad del show
automático de foco y
estroboscopio
Derby +
estroboscopio
automático
AKS1
Selecciona la velocidad del show
automático de Derby y
estroboscopio
Foco + Derby
estroboscopio
APKS
Selecciona la velocidad del show
de foco, Derby y estroboscopio
Sound Par
Effect
SP01–SP07 Configura focos en modo Sonido
Sound Derby
Effect
SK01
Configura los Derby luces en
modo Sonido
Sound Strobe
Effect
SS01–SS22
Configura los estroboscopios en
modo Sonido y selecciona la
velocidad del efecto
Sound Par +
Derby
SPK1
Configura focos y Derby luces en
modo Sonido
Sound Par +
Strobe
SPS1
Configura focos y estroboscopios
en modo Sonido
Sound Derby
+ Strobe
SKS1
Configura Derby luces y
estroboscopios en modo Sonido
Par + Derby +
Strobe
SPKS
Configura focos, Derby luces y
estroboscopios en modo Sonido

14
ES
GUÍA DE REFERENCIA RÁPIDA
GigBAR Flex GRR Rev. 1
Enlace DMX
El GigBAR Flex puede funcionar con un controlador DMX. Las instrucciones para conectar y configurar
este producto para funcionamiento DMX están en el Manual de usuario. Si no está familiarizado con la
configuración de DMX o de conmutadores DIP, descargue el Manual DMX de www.chauvetdj.com
.
Ejemplo de dirección de inicio
Para asegurarse acceso total a los dos canales en modo DMX, la dirección DMX más alta que se
recomienda es 510.
Conexión Maestro/Esclavo
El GigBAR Flex usa la conexión de datos DMX para su modo Maestro/Esclavo. Las instrucciones para
conectar y configurar este producto para funcionamiento Maestro/Esclavo están en el Manual de usuario.
Funcionamiento del pedal inalámbrico
El pedal inalámbrico incluido proporciona acceso rápido a los colores preconfigurados, a los programas de
cambio de color y a la activación por sonido a través del micrófono del GigBAR Flex. Para usar el
conmutador de pie:
1. Conecte el GigBAR Flex a la alimentación.
2. Levante las antenas situadas sobre el GigBAR Flex y el conmutador de pie.
3. Pulse el pedal núm. 1 (Auto) para activar los controles del programa Automático. Cuando esté
funcionando, todas las luces empezarán en modo Automático (AM01).
4. Utilice la tabla inferior para activar la función deseada.
Configuración
de COLOR
General
CoLo
R000–R255
Configura los
valores de rojo de
foco y Derby
Note: Sólo
3 de los 4
colores se
pueden usar
al mismo
tiempo.
G000–G255
Configura los
valores de verde
de foco y Derby
B000–B255
Configura los
valores de azul de
foco y Derby
U000–U255
Configura los
valores de UV de
foco y
estroboscopios
Configuración
de modo DMX
d001–d512
3 CH
Selecciona la personalidad DMX8 CH
20 CH
Configuración
Maestro/
Esclavo
Slav Configura en modo Esclavo
Opciones de
Sistema
Sys
dSET 1234
Cambia la disposición de las
unidades
rSEt
Reinicia a la configuración de
fábrica
WiFi
on Apaga/enciende la antena Wi-
Fi™ para el conmutador de pie
inalámbrico
off
MODO NIVELES DE PROGRAMACIÓN DESCRIPCIÓN

ES
15
GigBAR Flex GRR Rev. 1
GUÍA DE REFERENCIA RÁPIDA
.
PEDAL SUBOPCIÓN FUNCIÓN
1
(Auto)
1 x pulsación
Focos, Derby luces, y estroboscopio
en modo Automático (AM01)
2 x pulsaciones AP01
3 x pulsaciones AP02
4 x pulsaciones AK01
5 x pulsaciones APK1
2
(Sound)
1 x pulsaciones
Focos, Derby luces, y estroboscopio
en modo Sonido (SM01)
2 x pulsaciones SP01
3 x pulsaciones SP02
4 x pulsaciones SK01
5 x pulsaciones SPK1
3
(Color)
1 x pulsaciones Rojo, sin estroboscopio
2 x pulsaciones Verde, sin estroboscopio
3 x pulsaciones Azul, sin estroboscopio
4 x pulsaciones UV, sin estroboscopio
5 x pulsaciones Amarillo, sin estroboscopio
6 x pulsaciones Rosa, sin estroboscopio
7 x pulsaciones Cian, sin estroboscopio
8 x pulsaciones Rojo oscura, sin estroboscopio
9 x pulsaciones Cian oscura, sin estroboscopio
10 x pulsaciones Blanco, sin estroboscopio
4
(Blackout)
N/A
inmediatamente todos los
dispositivos de luz
El conmutador de pie del GigBAR Flex funcionará adecuadamente en cualquier modo,
con una distancia máxima sin obstáculos de 100 ft (30,5 m). Debe encender la Wi-Fi™ en
el GigBAR Flex antes de usar el conmutador de pie
.

16
ES
GUÍA DE REFERENCIA RÁPIDA
GigBAR Flex GRR Rev. 1
Valores DMX
20Ch
CANAL FUNCIÓN VALOR PORCENTAJE/CONFIGURACIÓN
1
Control del
Foco 1
000 255 Rojo 0-100%
Nota: Usted es
capaz de utilizar un
máximo de 3
colores a la vez
2 000
255 Verde 0-100%
3 000
255 Azul 0-100%
4 000
255 UV 0-100%
5
000
127
128
239
240 249
250
255
Atenuador 0-100%
Velocidad de estroboscopio, lento a rápido
Estroboscopio por sonido
RVA 100%
6
Control del
Foco 2
000
255 Rojo 0-100%
Nota: Usted es
capaz de utilizar un
máximo de 3
colores a la vez
7 000
255 Verde 0-100%
8 000
255 Azul 0-100%
9 000
255 UV 0-100%
10
000
127
128
239
240 249
250
255
Atenuador 0-100%
Velocidad de estroboscopio, lento a rápido
Estroboscopio por sonido
RVA 100%
11
Control del
Derby 1
000
024
025
049
050 074
075
099
100
124
125 149
150
174
175
199
200 224
225
255
Blackout
Rojo
Verde
Azul
Rojo + Verde
Rojo + Azul
Verde + Azul
Rojo + Verde + Azul
Automático (colores individuales)
Automático (dos colores a la vez)
12
Frecuencia de
Estroboscopio
del Derby 1
000
009
010
239
240 255
Sin función
Estroboscopio, 0–30 Hz
Estroboscopio por sonido
13
Rotación del
Derby 1
000
004
005
127
128
133
134
255
Parada
Giro en sentido horario, lento a rápido
Parada
Rotar en sentido antihorario, lento a rápido
14
Control del
Derby 1
000
024
025 049
050
074
075
099
100 124
125
149
150
174
175 199
200
224
225
255
Blackout
Rojo
Verde
Azul
Rojo + Verde
Rojo + Azul
Verde + Azul
Rojo + Verde + Azul
Automático (colores individuales)
Automático (dos colores a la vez)
15
Frecuencia de
Estroboscopio
del Derby 1
000
009
010 239
240
255
Sin funcion
Estroboscopio, 0–30 Hz
Estroboscopio por sonido
16
Rotación del
Derby 1
000
004
005
127
128 133
134
255
Parada
Giro sentido horario
Parada
Giro sentido antihorario

ES
17
GigBAR Flex GRR Rev. 1
GUÍA DE REFERENCIA RÁPIDA
8Ch
17
Patrones
Estroboscopio
000
009
010
029
030
069
050 069
070
089
090
109
110 129
130
149
150
169
170 189
190
209
210
255
Blackout
Programa automático 1
Programa automático 2
Programa automático 3
Programa automático 4
Programa automático 5
Programa automático 6
Programa automático 7
Programa automático 8
Programa automático 9
Estroboscopio, lento a rápido
Estroboscopio por sonido
18
Blanco
Atenuador del
Estroboscopio
000
255 0-100%
Nota: Canales 18 y
19 no se pueden
utilizar al mismo
tiempo
19
UV Atenuador
del
Estroboscopio
000
255 0-100%
20
Velocidad del
Estroboscopio
000
255 Lento a rápido (Canales 18 y 19)
CANAL FUNCIÓN VALOR PORCENTAJE/CONFIGURACIÓN
1
Color de Focos
y Derby luces
000
255 Red 0-100%
Nota: Usted es
capaz de utilizar un
máximo de 3
colores a la vez
2 000
255 Green 0-100%
3 000
255 Blue 0-100%
4 000
255 UV 0-100%
5
Controles de
Estroboscopio
de Focos y
Derby luces
000
127
128
239
240
249
250 255
Todo 0–100%
Velocidad del estroboscopio
Estoboscopio por sonido
Todo Encendido
6
Rotación del
Motor del los
Derby luces
000
004
005
127
128
133
134 255
Parada del movimiento
Giro en sentido horario, lento a rápido
Parada del movimiento
Giro en sentido antihorario, lento a rápido
7
Velocidad del
Estroboscopio
(blanco)
000
054
055 255
Atenuador de estroboscopio blanco,
0–100%
Nota: Canales 7 y
8 no se pueden
utilizar al mismo
tiempo.
8
Velocidad del
Estroboscopio
(UV)
000
054
055
255
Velocidad de estroboscopio UV,
lento a rápido
CANAL FUNCIÓN VALOR PORCENTAJE/CONFIGURACIÓN

18
ES
GUÍA DE REFERENCIA RÁPIDA
GigBAR Flex GRR Rev. 1
3Ch
CANAL FUNCIÓN VALOR PORCENTAJE/CONFIGURACIÓN
1
LED
Operation
000
009
010
119
120 229
230
234
235
239
240 255
Sin función
Modo mezclado automático, rápido a lento
Modo 2 mezclado automático, rápido a lento
Modo mezclado por sonido
Modo 2 mezclado por sonido
Configuración del show cuando los canales 2 y 3 están
activados
2Operation
000
009
010
026
027
043
044
060
061
077
078
094
095 111
112
128
129
145
146 161
162
178
179
196
197 213
214
230
231
255
Blackout
SOLO focos encendidos, haciendo todos show de foco
único
SOLO Derby luces encendidos
SOLO estroboscopios encendidos, haciendo todos show de
estroboscopio único
SOLO focos y Derby luces automático
SOLO focos y estroboscopios automático
SOLO estroboscopios y Derby luces automático
Focos, Derby luces y estroboscopios
Efecto de foco por sonido
Efecto de Derby por sonido
Efecto de estroboscopio por sonido
Focos + Derby luces por sonido
Focos + estroboscopios por sonido
Derby luces + estroboscopios por sonido
Focos, Derby y estroboscopios por sonido
3 Auto Speed 000
255 Velocidad, cuando el canal 2 está en 061–111

FR
19
GigBAR Flex MdR Rev. 1
MANUEL DE RÉFÉRENCE
A Propos de ce Manuel
Le Manuel de Référence du GigBAR Flex reprend des informations de base sur cet appareil notamment
en matière de montage, d'options de menu et de valeurs DMX. Téléchargez le manuel d'utilisation sur
www.chauvetdj.com
pour de plus amples informations.
Clause de non Responsabilité
Les informations et caractéristiques contenues dans ce manuel sont sujettes à changement sans préavis.
Consignes de Sécurité
Ces consignes concernant la sécurité reprennent d'importantes informations en matière d'installation,
d'utilisation et de maintenance.
• Cet appareil n'est pas conçu pour être utilisé dans une installation permanente.
• Connectez UNIQUEMENT ce produit à un circuit protégé et relié à la terre.
• Débranchez toujours cet appareil avant de procéder à son nettoyage ou au
remplacement de son fusible.
• Ne regardez PAS la source lumineuse lorsque le produit fonctionne.
• Assurez-vous que le cordon d'alimentation n'est ni tordu ni endommagé.
• Ne débranchez jamais cet appareil en tirant sur le cordon.
• Utilisez TOUJOURS un câble de sécurité lorsque vous montez cet appareil en
hauteur.
• Veillez à ce qu'AUCUNE source inflammable ne se trouve à proximité de l'unité lors
de son fonctionnement.
• Ne touchez PAS cet appareil lors de son fonctionnement car il pourrait s'avérer
brûlant.
• La tension de la prise à laquelle vous connectez ce cet appareil doit être comprise
dans la plage de tensions reprise sur l'étiquette de l'appareil ou à l'arrière de ce
dernier.
• Cet appareil doit être utilisé en intérieur uniquement. (IP20). Afin d'éviter tout risque
d'incendie ou décharge électrique, veillez à n'exposer cet appareil ni à la pluie ni à
l'humidité.
• Montez toujours cet appareil dans en endroit bien ventilé, à au moins, 20 pouces (50
cm) des surfaces adjacentes.
• Assurez-vous qu'aucune fente de ventilation sur le boîtier ne soit obstruée.
• Ne connectez JAMAIS cet appareil ni à un gradateur ni à un rhéostat.
• Remplacez le fusible avec un de même type et même ampérage.
• Transportez/Suspendez cet appareil UNIQUEMENT au moyen du support dont il
est doté.
• La température ambiante maximale supportée par ce produit est de 104 °F (40 °C).
Ne le faites pas fonctionner à des températures plus élevées.
• En cas de sérieux problèmes de fonctionnement, arrêtez le système
immédiatement.
• N’ouvrez PAS ce produit. Il ne contient aucun composant susceptible d’être réparé
par l’utilisateur.
• Durant les périodes de non-utilisation, pour éviter tout usure inutile et pour prolonger
la durée de vie, déconnectez-entièrement l'appareil en le débranchant de
l'alimentation électrique ou en coupant le disjoncteur.
00
La page charge ...
La page charge ...
La page charge ...
La page charge ...
La page charge ...
La page charge ...
La page charge ...
La page charge ...
La page charge ...
La page charge ...
La page charge ...
La page charge ...
La page charge ...
La page charge ...
La page charge ...
La page charge ...
La page charge ...
La page charge ...
La page charge ...
La page charge ...
La page charge ...
La page charge ...
La page charge ...
La page charge ...
La page charge ...
La page charge ...
La page charge ...
La page charge ...
La page charge ...
La page charge ...
La page charge ...
La page charge ...
La page charge ...
La page charge ...
La page charge ...
La page charge ...
-
 1
1
-
 2
2
-
 3
3
-
 4
4
-
 5
5
-
 6
6
-
 7
7
-
 8
8
-
 9
9
-
 10
10
-
 11
11
-
 12
12
-
 13
13
-
 14
14
-
 15
15
-
 16
16
-
 17
17
-
 18
18
-
 19
19
-
 20
20
-
 21
21
-
 22
22
-
 23
23
-
 24
24
-
 25
25
-
 26
26
-
 27
27
-
 28
28
-
 29
29
-
 30
30
-
 31
31
-
 32
32
-
 33
33
-
 34
34
-
 35
35
-
 36
36
-
 37
37
-
 38
38
-
 39
39
-
 40
40
-
 41
41
-
 42
42
-
 43
43
-
 44
44
-
 45
45
-
 46
46
-
 47
47
-
 48
48
-
 49
49
-
 50
50
-
 51
51
-
 52
52
-
 53
53
-
 54
54
-
 55
55
-
 56
56


CHAUVET DJ GigBAR Flex Guide de référence
- Taper
- Guide de référence
dans d''autres langues
- italiano: CHAUVET DJ GigBAR Flex Guida di riferimento
- español: CHAUVET DJ GigBAR Flex Guia de referencia
- Deutsch: CHAUVET DJ GigBAR Flex Referenzhandbuch
- Nederlands: CHAUVET DJ GigBAR Flex Referentie gids
Documents connexes
-
CHAUVET DJ GigBAR 2 Manuel utilisateur
-
-
-
Chauvet CH-03 Guide de référence
-
-
-
-
-
-
Autres documents
-
Briteq BT-STR4 Manuel utilisateur
-
NOVISTAR LED Light Le manuel du propriétaire
-
 Ibiza Light DERBY-LAS Le manuel du propriétaire
-
-
-
Contest NightDerby Mode d'emploi
-
Eneo NTDF-AKS1 Installation And Operating Instructions Manual
