
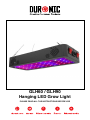
GLH60 / GLH90
Hanging LED Grow Light
PLEASE READ ALL THE INSTRUCTIONS BEFORE USE

2

3
English Manual
Manuel d’utilisation en français
Gebrauchsanleitung auf Deutsch
Manual de Instrucciones en Español
Manuale D’istruzioni In Italiano
Instrukcja obsługi. Polski
5
17
29
41
53
65
Contents

4

5
English Manual

6
Safety Instructions
PLEASE READ THIS MANUAL CAREFULLY AND RETAIN FOR FUTURE
REFERENCE
• For indoor household/domestic use only. Do not use outdoors.
• Do not operate this appliance if the power cable or plug is damaged. If
either is damaged return it to Duronic for service or repair by professional
technician.
• Avoid placing the lamp in direct sunlight.
• Keep away from moisture
• When not using this lamp, store in a safe place. Do not place heavy things on
top of it.
• Do not use in the presence of corrosive gas – use in a well-ventilated room.
• Please ensure the mains power supply is 220-240V / 50Hz.
• Never try to replace parts and repair the lamp by yourself.
The Duronic GLH hanging grow light has been designed specically for
supporting and enhancing the growth of indoor plants.
Equipped with a mixture of blue, white and red LED bulbs, the user can choose
how red or blue they want their light output to be.
Available in 2 sizes to suit different set ups, these lights are tted with an efcient
cooling system to ensure they do not overheat when in use for long periods of
time.

7
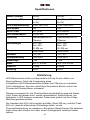
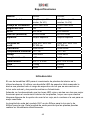
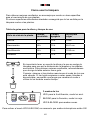
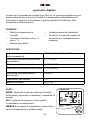
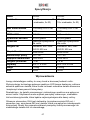
Specications
Model Number GLH60 GLH90
Number of LEDs 60 (39x red, 19x blue,
2x UV)
LED bulb wattage 10W COB LEDs 10W COB LEDs
LED angle 120° 120°
PPFD / PAR 863.38 lm 810 umol/m²
Bulb lifespan 50,000 hours 50,000 hours
Spectrum Special Spectrum for
plants
Special Spectrum for
plants
Wavelengths RED: 660
Blue: 450
IR: 935 nm
RED: 660
Blue: 450
IR: 935 nm
Frequency 50HZ-60HZ 50HZ-60HZ
Working -15°~ 55° -15°~ 55°
Voltage 100V-240V 100V-240V
Cable length 1.5M 1.5M
Dimensions 40 x 17 x 6 cm 40 x 18.5 x 6 cm
Weight 2.04kg 2.04kg
Power 600W 900W
LED grow lights are the newest trend for the cultivation of indoor plants. Using
an advanced full spectrum LED grow light will provide your plant/s with a broad
spectrum of light that is similar to natural sunlight and so enhances the process of
photosynthesis.
Red and blue LED lights have been proven best for encouraging plant
growth, and so this light provides the user with the option to use red, blue or a
combination of the two colours to obtain the best kind of light for their plant/s.
The main part of the GLH light is blue (peak 450nm) and red (peak 660nm), which
supplies the most efcient wavelength to enhance photosynthesis performance.
This model allows you to choose between having more red or blue light, or a
balance of the two.
Introduction
60 (39x red, 19x blue,
2x UV)

8
Before cleaning ensure the lamp is unplugged from the mains socket.
Do not submerge this lamp in water or any other liquid.
Do not use corrosive cleaning products on it.
To clean, simply use a dry cloth to dust and clean all over the lamp.
If not being used for a long period of time, store inside a protective box in a cool
dry place.
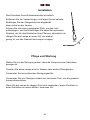
Care and Maintenance
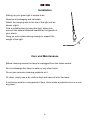
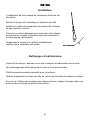
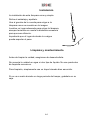
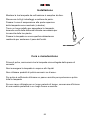
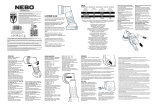
Setting up your grow light is simple to do.
Remove all packaging and set aside.
Attach the hanging wire to the top of the light unit as
shown (right).
Find a suitable place to hang the light, taking into
account the optimal distance needed for the growth of
your plants.
Hang up onto a place strong enough to support the
weight of the light.
Installation

9
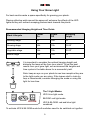
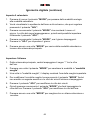
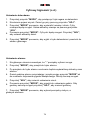
Using Your Grow Light
VEG BLOOM
Plant Lifecycle Power
On
Power
Off
Mounting
Height
Seeding stage 8h 16h 24”
Growing stage 14h 10h 22-24”
Vegetable stage 14h 10h 20-22”
Bloom stage 12h 12h 18”
For best results create a space specically for growing your plants.
Placing reective walls around the space will enhance the effects of the LED
lights as they will redirect escaping photons back towards the plants.
It is important to consider the optimal hanging height and
distance the lamp will be from your plants. To get the best
results from your grow light, we recommend the heights and
time cycles in the table above for a successful yield.
Note: keep an eye on your plants to see how receptive they are
to the light mode you are using. If the leaves start to look dry,
limp or discoloured, consider changing the mode or using the
light for less time.
The 3 Light Modes
VEG: blue light mode
BLOOM: red light mode
VEG & BLOOM: red and blue light
combined
Recommended Hanging Height and Time Guide
To activate VEG & BLOOM mode both switches need to be switched on together

10
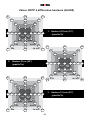
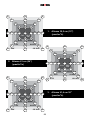
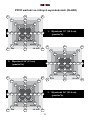
2. Height 24” (61cm)
(µmol/m2/s)
3. Height 36” (91.4cm)
(µmol/m2/s)
PPFD value at different heights (GLH60)
41 74 39
75 124 310
137 279
135
309625
457
452
628
2’x2’
3’x3’
4’x4’
454
453
603
602
137
133278
57 123
59 127
120
56
62
814 73
40 71 38
97 96 101
112 132 146
132 140
135
142144
149
144
147
2’x2’
3’x3’
4’x4’
143
145
152
151
134
131138
107 108
109 111
131
106
108
153 110
100 95 99
92 122 93
124 153 227
158 191
157
225250
230
226
252
2’x2’
3’x3’
4’x4’
227
229
244
242
160
155190
107 132
110 133
149
106
108
270 121
91 120 89
1. Height 12” (30.5cm)
(µmol/m2/s)
1’x1’30.5
cm
61cm
91.5cm
121.9cm
1’x1’30.5
cm
61cm
91.5cm
121.9cm
1’x1’30.5
cm
61cm
91.5cm
121.9cm

11
211 190 213
224 266 274
256 274
255
273285
269
284
287
2’x2’
3’x3’
4’x4’
288
286
290
287
254
251270
224 220
221 226
261
220
226
290 225
214 186 210
197 233 198
214 326 415
316 355
311
413470
435
430
473
2’x2’
3’x3’
4’x4’
433
432
448
446
312
312352
225 250
227 254
326
224
229
492 210
195 230 193
90 122 91
203 354 783
297 437
295
7821135
829
827
1137
2’x2’
3’x3’
4’x4’
828
828
933
930
296
293434
128 206
124 207
352
122
125
1260 201
89 120 87
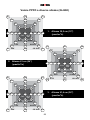
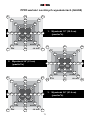
2. Height 24” (61cm)
(µmol/m2/s)
3. Height 36” (91.4cm)
(µmol/m2/s)
PPFD value at different heights (GLH90)
1. Height 12” (30.5cm)
(µmol/m2/s)
1’x1’30.5
cm
61cm
91.5cm
121.9cm
1’x1’30.5
cm
61cm
91.5cm
121.9cm
1’x1’30.5
cm
61cm
91.5cm
121.9cm

12
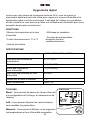
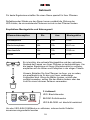
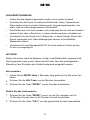
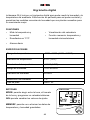
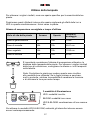
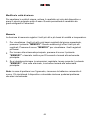
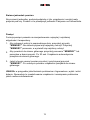
Included with your GLH grow light is a digital hygrometer which can be used to
measure the humidity and temperature in the surrounding environment. This is
ideal for using alongside your growing plants to monitor and ensure that they have
the correct amount of humidity for them to thrive and grow well.
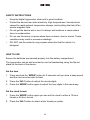
BUTTONS
MODE: allows you to switch between time – clock
format – set calendar/set the alarm.
ADJ: allows you to adjust the values when
changing the settings.
MEMORY: allows you to display or clear the saved
temperature and humidity values.
FUNCTIONS
Digital Hygrometer
Temperature measurement
range
-10°C~+50°C (-14°F~+122°F)
Temperature measurement
accuracy
±1°C (1.8°F)
Temperature resolution +0.1°C (0.2°F)
Humidity measurement
range
10%--99%RH
Humidity measurement
accuracy
±5%RH
Humidity resolution 1%
Battery required AAA 1.5V
SPECIFICATIONS
• Measures temperature and
humidity
• Provides measurements in both
°C/°F
• Daily alarm
• Calendar display
• Memory function: records minimum/
maximum temperature and humidity
TEMPERATURE
CLOCK / HUMIDITY
HTC-1
M
O
D
E
A
D
J
M
E
M
O
R
Y

13
SAFETY INSTRUCTIONS
• Keep the digital hygrometer clean and in good condition.
• Protect the device from static electricity, high temperatures, thermal shock
caused by rapid ambient temperature change, and anything that lets off an
electro-magnetic eld.
• Do not get the device wet or use it in damp/ wet locations or areas where
there is condensation.
• Do not use the device in areas where there is steam, dust or smoke. These
conditions may result in erroneous readings.
• DO NOT use the meter for any purpose other than that for which it is
designed.
HOW TO USE
Ensure the batteries are inserted properly into the battery compartment.
The hygrometer can be wall mounted or can be freestanding using the ip-out
stand on the back of the device.
Set the time
1. Press and hold the ‘MODE’ button for 2 seconds until you hear a beep sound
and the clock minutes start to ash.
2. Press the ‘ADJ’ button to adjust the minute digits.
3. Press the ‘MODE’ button again to adjust the hour digits in the same way.
Set the clock format
1. Press the ‘MODE’ button again you can set the clock to either a 12-hour
format or 24-hour format.
2. Press the ‘ADJ’ button to select which format you prefer.

14
Set the calendar
1. Press the ‘MODE’ button again to move from clock mode to calendar mode.
2. You will see the year show on the screen, which you can adjust by pressing
the ‘ADJ’ button.
3. Press the ‘MODE’ button again which will show the month and day. First the
month digits will be ashing, so you can set this by using the ‘ADJ’ button.
4. Next, press the ‘MODE’ button again, now the day will be ashing. Press the
‘ADJ’ to set the day.
5. Press ‘MODE’ once more to exit the calendar mode and return to the home
screen.
Set the alarm
1. From the home screen, you will see the ‘:’ between the time digits is ashing.
2. Press the ‘MODE’ button once to change the mode to ‘alarm mode’.
3. Once in ‘alarm mode’ the display will show the current alarm time set.
4. To change the alarm time, press and hold the ‘MODE’ button down until it
beeps and the minute digits start ashing.
5. Press the ‘ADJ’ button to change the minute digits.
6. Then press the ‘MODE’ button again which will make the hour digits ash.
Press the ‘ADJ’ button to change the hour digits.
7. Press ‘MODE’ once more to choose between a silent or sounded alarm.
Digital Hygrometer (continued)

15
Change the units of measurement
To change the units, lift up the kickstand on the back of the device and press the
small button underneath it. This will allow you to change it from Centigrade to
Fahrenheit.
Note: if you experience any issues with the hygrometer, remove the battery and
re-insert it again. This will resent the device and should resolve any problem you
were experiencing.
The Memory
The memory function records the highest and lowest levels of humidity and
temperature.
1. To view the recorded highest and lowest levels from the previous day, press
the ‘MEMORY’ button. This will show last recorded highest levels. Press
‘MEMORY’ again to show the lowest recorded levels.
2. To return to the home screen press the ‘MEMORY’ button again or leave it
idle for 20 seconds and it will return to the home screen.
3. If you want to delete the recorded measurements, press and hold the
‘MEMORY’ button. Once deleted, the screen will return back to the home
screen.

16
Warranty
1 Year Guarantee from Shine-Mart Ltd, Trademark owners of Duronic Products.
NOTE: THESE STATEMENTS DO NOT AFFECT YOUR STATUTORY RIGHTS AS A
CONSUMER
This product has been manufactured under the strictest or quality control procedures, and
using the highest quality of materials, to ensure excellent performance and reliability. It will
give very good and long lasting service, provided it is properly used and maintained. The
product is guaranteed for 1 years from the date of original purchase. If any defect arises due
to a faulty materials or poor workmanship, the faulty product must be returned to the original
place of purchase. Refund or replacement is at the discretion of that company.
Duronic Products are offered with a 1 year guarantee under the following conditions:
1. The product must be returned to the retailer with original proof of purchase.
2. The product must be installed and used in accordance with the instructions
contained in this operating manual.
3. It must be used only for domestic purposes.
4. It does not cover wear and tear, malicious damage, misuse, neglect,
inexpert repairs or consumable parts.
5. Shine-Mart Ltd has no responsibilities for accidental or consequential loss or damage.
6. Shine-Mart Ltd are not liable to carry out any type of servicing work,
under the guarantee
7. Valid in the UK only
This product is tted with CE:1363 plug and fuse
Imported by Shine-Mart Ltd, RM3 8SB
Information on waste Disposal for Consumers of
Electrical & Electronic Equipment.
This mark on a product and/or accompanying documents indicates that when it
is to be disposed of, it must be treated as Waste
Electrical & Electronic Equipment, (WEEE).
Any WEEE marked products must not be mixed with general household waste,
but kept separate for the treatment, recovery and recycling of the materials used.
For proper treatment, recovery and recycling; please take all WEEE marked
waste to your Local Authority Civic waste site,
where it will be accepted free of charge.
If customers dispose of Waste Electrical & Electronic Equipment correctly, they
will be helping to save valuable resources and preventing any potential negative
effects upon human health and the environment, of any hazardous materials that
the waste may contain.
Follow Us

17
Manuel d’utilisation en français

18
•
Instructions de sécurité
Cet appareil est conçu pour un usage intérieur/domestique. Ne l’utilisez pas à
l’extérieur.
• Si le câble ou la prise sont endommagés et/ou ne fonctionnent pas
correctement, contactez Duronic ou faites réparer l’appareil par un professionnel.
• Evitez de placer la lampe sous la lumière directe du soleil.
• Gardez la lampe et les composants électriques à l’abri de l’humidité.
• Lorsque vous n’utilisez pas cette lampe de croissance horticole, rangez-la dans
un endroit sécurisé. Ne placez pas d’objets lourds sur le dessus.
• N’utilisez pas cette lampe en présence de gaz corrosifs. Utilisez-la dans une
pièce bien ventilée.
• Assurez-vous que l’alimentation électrique principale soit de 220-240V / 50 Hz.
• N’essayez jamais de remplacer des parties ou de réparer la lampe par
vous-même.
Les lampes de croissance horticoles suspendues GLH de Duronic ont été
spécifiquement conçues pour supporter et accroître la pousse des plantes
d’intérieur.
Equipées d’un mélange d’ampoules LED bleues, rouges et blanches, l’utilisateur
peut choisir le niveau de rouge ou bleu qu’il souhaite avoir dans sa lumière.
Disponibles dans deux tailles différentes afin de convenir à différentes
installations, ces lampes sont équipées d’un système de refroidissement afin
d’assurer qu’elles ne surchauffent pas lorsqu’elles sont utilisées pendant une
longue période.
VEUILLEZ LIRE ATTENTIVEMENT CE MANUEL AVANT D’UTILISER LE
PRODUIT ET GARDEZ-LE POUR REFERENCE FUTURE.

19
Spécifications techniques
GLH60 GLH90
60 (39x rouge, 19x
bleu, 2x UV)
10W LED 10W
120° 120°
PPFD / PAR 863.38 lm 810 umol/m²
50,000 heures 50,000 heures
Spectre
Rouge: 660
Bleu: 450
IR: 935 nm
Roue: 660
Bleu: 450
IR: 935 nm
Fréquence50HZ-60HZ 50HZ-60HZ
Fonctionnement -15°~ 55° -15°~ 55°
100V-240V 100V-240V
1.5M 1.5M
Dimensions 40 x 17 x 6 cm 40 x 18.5 x 6 cm
600W 900W
Introduction
Modèle
Nombre d’ampoules
LED
Puissance des LED
Angle LED
Durée de vie des LED
Longueur d’onde
Tension
Longueur du câble
Poids
Puissance
COB LED COB
Spectre spécial pour
plantes
Spectre spécial pour
plantes
Les lampes LED de croissance horticole sont la nouvelle tendance quand il
s’agit de faire pousser des plantes à l’intérieur. Utiliser une lumière de
croissance LED à spectre complet avancée va fournir votre / vos plante/s
avec un large spectre de lumière similaire à la lumière du soleil et qui accroît
la photosynthèse.
Les lumières LED bleues et rouges ont été démontrées comme étant les plus
efficaces pour la pousse des plantes. Cette lampe de croissance horticole
vous donne l’option d’utiliser des LED rouges, bleues ou une combinaison
des deux afin d’obtenir la meilleure lumière possible pour votre / vos plante/s.
Les longueurs d’onde principales des lampes GLH sont bleues (pic à 450
nm) et rouges (pic à 660 nm) ce qui fournit les longueurs d’onde les plus
efficaces pour renforcer les performances de la photosynthèse. Ce modèle
vous laisse choisir les niveaux de lumières rouges ou bleues ou vous permet
de balancer les deux.
60 (39x rouge, 19x
bleu, 2x UV)
2.04kg 2.04kg

20
Avant de la nettoyer, assurez-vous que la lampe est débranchée de la prise.
Ne submergez pas cette lampe sous l’eau ou tout autre liquide.
N’utilisez pas de produits corrosifs pour la nettoyer.
Utilisez simplement un tissu sec afin de retirer la poussière et nettoyer la lampe.
Si vous ne l’utilisez pas pendant une longue période, rangez la lampe dans une
boîte protectrice dans un endroit frais et sec.
L’installation de votre lampe de croissance horticole est
très facile.
Retirez la lampe de l’emballage et placez-le de côté.
Attachez le câble de suspension au-dessus de la lampe
tel que montré ci-contre.
Trouvez un endroit adéquat pour accrocher votre lampe
en prenant en compte la distance optimale nécessaire
à la pousse de votre plante.
Suspendez la lampe à un endroit suffisamment
résistant pour supporter son poids.
Installation
Nettoyage et maintenance
La page est en cours de chargement...
La page est en cours de chargement...
La page est en cours de chargement...
La page est en cours de chargement...
La page est en cours de chargement...
La page est en cours de chargement...
La page est en cours de chargement...
La page est en cours de chargement...
La page est en cours de chargement...
La page est en cours de chargement...
La page est en cours de chargement...
La page est en cours de chargement...
La page est en cours de chargement...
La page est en cours de chargement...
La page est en cours de chargement...
La page est en cours de chargement...
La page est en cours de chargement...
La page est en cours de chargement...
La page est en cours de chargement...
La page est en cours de chargement...
La page est en cours de chargement...
La page est en cours de chargement...
La page est en cours de chargement...
La page est en cours de chargement...
La page est en cours de chargement...
La page est en cours de chargement...
La page est en cours de chargement...
La page est en cours de chargement...
La page est en cours de chargement...
La page est en cours de chargement...
La page est en cours de chargement...
La page est en cours de chargement...
La page est en cours de chargement...
La page est en cours de chargement...
La page est en cours de chargement...
La page est en cours de chargement...
La page est en cours de chargement...
La page est en cours de chargement...
La page est en cours de chargement...
La page est en cours de chargement...
La page est en cours de chargement...
La page est en cours de chargement...
La page est en cours de chargement...
La page est en cours de chargement...
La page est en cours de chargement...
La page est en cours de chargement...
La page est en cours de chargement...
La page est en cours de chargement...
La page est en cours de chargement...
La page est en cours de chargement...
La page est en cours de chargement...
La page est en cours de chargement...
La page est en cours de chargement...
La page est en cours de chargement...
La page est en cours de chargement...
La page est en cours de chargement...
La page est en cours de chargement...
La page est en cours de chargement...
-
 1
1
-
 2
2
-
 3
3
-
 4
4
-
 5
5
-
 6
6
-
 7
7
-
 8
8
-
 9
9
-
 10
10
-
 11
11
-
 12
12
-
 13
13
-
 14
14
-
 15
15
-
 16
16
-
 17
17
-
 18
18
-
 19
19
-
 20
20
-
 21
21
-
 22
22
-
 23
23
-
 24
24
-
 25
25
-
 26
26
-
 27
27
-
 28
28
-
 29
29
-
 30
30
-
 31
31
-
 32
32
-
 33
33
-
 34
34
-
 35
35
-
 36
36
-
 37
37
-
 38
38
-
 39
39
-
 40
40
-
 41
41
-
 42
42
-
 43
43
-
 44
44
-
 45
45
-
 46
46
-
 47
47
-
 48
48
-
 49
49
-
 50
50
-
 51
51
-
 52
52
-
 53
53
-
 54
54
-
 55
55
-
 56
56
-
 57
57
-
 58
58
-
 59
59
-
 60
60
-
 61
61
-
 62
62
-
 63
63
-
 64
64
-
 65
65
-
 66
66
-
 67
67
-
 68
68
-
 69
69
-
 70
70
-
 71
71
-
 72
72
-
 73
73
-
 74
74
-
 75
75
-
 76
76
-
 77
77
-
 78
78


Duronic GLH60 Le manuel du propriétaire
- Taper
- Le manuel du propriétaire
- Ce manuel convient également à
dans d''autres langues
- italiano: Duronic GLH60 Manuale del proprietario
- español: Duronic GLH60 El manual del propietario
- Deutsch: Duronic GLH60 Bedienungsanleitung
- polski: Duronic GLH60 Instrukcja obsługi
Autres documents
-
Eti 554221110-4PK Guide d'installation
-
NEBO NEB-WLT-1008-G Manuel utilisateur
-
 NEBO SL100 Luxtreme Manuel utilisateur
-
Danby DFG24A Le manuel du propriétaire
-
Danby DFG58D1BSS Manuel utilisateur
-
Wetelux 95 14 08 LED Plant Grow Light 24 W Manuel utilisateur
-
Xavax Growing Station Manuel utilisateur
-
-
Crosley FAFS4474LN0 Guide d'installation
-
Frigidaire 137168200A Manuel utilisateur
