Matrimatic GOLD Diamond series Manuel utilisateur
- Taper
- Manuel utilisateur


2
Hartelijk welkom in de wereld van de Matri naaimachines, sinds 1929.
Gefeliciteerd met uw aankoop van dit top product uit de Matrimatic Diamond serie.
In deze duidelijke handleiding staan de meest voorkomende handelingen.
Mocht u er toch niet uitkomen dan kunt u de filmpjes over de verschillende handelingen bekijken op onze site,
www.matrimatic.com.
Ook zijn op onze site extra accessoires voor deze machine te koop, zoals voetjes, spoeltjes, naalden en een grote
aanschuiftafel.
Achterin deze handleiding is een overzicht van mogelijke problemen en wat daar aan gedaan kan worden. In de
meeste gevallen kunt u deze heel goed zelf verhelpen. Op de site staan ook filmpjes met instructie.
Maar u weet als het niet lukt: Matri staat voor u klaar. Zorgt u er wel voor dat u de originele doos en verpakking
bewaart voor als de machine terug moet. Ook na de koop kunt u rekenen op Matri.
Veel plezier met uw aankoop.
Voor alle onderdelen en accessoires gaat u naar www.Matrimatic.com.
Voor nog meer informatie over alle soorten naai –, lockmachines, onderdelen en veel meer handige extras voor
enthousiaste hobby naaisters zoals paspoppen en garen kunt u terecht op www.matri.eu.
Welcome to the world of Matri, sewing machines since 1929.
Congratulations on your purchase of this product from the top of the range Matrimatic Diamond series.
This concise manual contains the most common operations.
If you still have trouble handling the machine you can always watch the informative videos on various topics
available on our website, www.matrimatic.com.
On our website you can also find all the extra accessories for this machine for online purchase such as special
presser feet, bobbins, needles and a large extension work table.
At the back of this manual you will find a global view of all possible problems you may encounter and what to do
about it. In most cases you can very easily fix them yourself. You can also find instructional videos on our web
site.
If you still have a problem you cannot solve, please note that we are here for you. Keep the original carton and
packaging so you can send the machine back to us. Be assured that you can count on Matri’s after sales service.
Enjoy your purchase !
For all spare parts and accessories, please go to www.Matrimatic.com. For additional information about all types
of sewing and overlock machines, spare parts and many handy extra parts for the enthusiastic amateur
seamstresses like mannequins and yarn, please visit www.matri.eu.

3
Bienvenue dans le monde de Matri, fabricant de machines à coudre depuis
1929.
Félicitations pour votre achat de ce produit de la série haut de gamme Diamant de Matrimatic.
Dans ce manuel vous trouverez des explications simples pour effectuer les opérations les plus courantes de votre machine à
coudre.
Pour une approche plus visuel des fonctionnalités, vous pouvez aussi voir les vidéos explicatifs disponibles sur notre site
Web, www.matrimatic.com.
Vous trouverez également sur notre site tout les accessoires supplémentaires pour cette machine à coudre, tel que les
pieds, les bobines, des aiguilles et tablettes d’extension.
A l’arrière de ce manuel vous trouverez une liste des petits problèmes courants qui pourront se résoudre très facilement par
vous-même ou avec l’aide des vidéos en ligne sur notre site.
Même si après tout cela vous n’y arrivez pas, Matri est là pour vous. Gardez bien le carton d’emballage original si vous
deviez renvoyez la machine. Matri se charge du Service après vente.
Nous vous souhaitons beaucoup de plaisir avec votre achat !
Pour toutes pièces détachées et accessoires vous pouvez consulter notre site www.Matrimatic.com.
Pour obtenir encore plus de renseignement sur toute sorte de machines à coudre, de surjeteuses, de pièces détachées ,
d’accessoires et autre petits outils indispensable pour la couturière enthousiaste comme les mannequins et les bobines de fil
vous pouvez consulter le site www.matri.eu.
Herzlich willkommen in der Welt der Matrimatic Nähmaschinen, seit 1929.
Herzlichen Glückwunsch zum Kauf dieses Spitzenprodukts aus der Matrimatic Diamond Serie. In dieser deutlichen
Betriebsanleitung finden Sie die meisten Grundlagen.
Sollten Sie dennoch weiterführende Erläuterungen benötigen können Sie sich die verschiedenen Handlungen anschauen auf
unserer Website, www.matrimatic.com.
Darüber hinaus bieten Wir auf unserer Website Nähzubehör zum Kauf an z.B. Füße, Spulen, Nadeln und eine große
anschiebbare Nähfläche.
Am Ende dieser Betriebsanleitung finden Sie eine Übersicht von möglichen Problemen und deren Behebung. In den meisten
Fällen können Sie dort die Lösung der meistvorkommenden Problemfälle finden. Auf unserer Website befinden sich auch
Videoanleitungen mit Instruktionen.
Sollten Sie dennoch nicht weiter wissen: Matri ist immer für Sie da. Bitten heben Sie die Originalverpakkung auf für den Fall
Sie die Maschine einschicken müssen. Auch nach dem Ankauf können Sie auf den Service von Matri rechnen.
Wir wünschen Ihnen viel Freude mit Ihrer neuen Maschine.
Für alle Ersatzteile und Zubehör steht unsere Website www.matrimatic.com zur Verfügung.
Für alle weiterführenden Informationen über unser Gesamtangebot an Nähmaschinen, Overlockmaschinen, Zubehör und
weitere Extras für Hobby Näherinnen z.B. Schneiderpuppen und Garn können Sie sich informieren auf unsere Site
www.matri.eu

4
Bienvenido/a al mundo de las máquinas de coser de Matri, desde 1929.
Le felicitamos por la compra de uno de los productos estrella de la serie Matrimatic Diamante.
En este manual puede encontrar las operaciones más comunes.
Si desea más información, puede mirar los vídeos demostrativos e informativos en nuestra página web,
www.matrimatic.com.
En esta página también puede encontrar una gran variedad de accesorios como prensatelas, canillas, agujas y
mesas de extensión.
Al final del manual encontrará un resumen de los problemas más comunes y como solucionarlos. En la mayoría
de los casos, puede solucionarlo usted mismo/a. En la página de Matri también encontrará vídeos con todas las
instrucciones.
Si no encuentra la solución a su problema; Matri siempre estará dispuesto a ayudarle. También, después de la
compra, puede contar un 100% con nuestro equipo profesional. No olvide guardar el embalaje original por si hay
que devolver la máquina para reparar o cambiarla.
Deseamos que disfrute mucho de su compra.
Para conseguir piezas y accesorios, visite nuestra página www.Matrimatic.com.
Para más información visite www.matri.eu ; aquí puede encontrar todas nuestros modelos de máquinas de coser,
bordar y remalladoras, accesorios, maniquíes y muchos extras para principiantes y aficionados/as de la moda.
Benvenuto nel mondo delle macchine da cucire MATRI, dal 1929.
Congratulazioni per l’acquisto di questo fantastico prodotto della Matrimatic Diamond Serie.
In questo manuale d’istruzione spieghiamo le più frequenti operazioni e capirà com’è facile utilizzare questa
macchina da cucire.
Se dopo aver letto il manuale rimangono ancora dei dubbi, può consultare i vari filmati che troverà sul nostro sito
web, www.matrimatic.com.
Sul nostro sito web vendiamo anche una vasta gamma di extra accessori per questa macchina da cucire, per
esempio piedini, spoline, aghi e un grande tavolo di prolunga.
Alla fine di questo manuale d’istruzione trova un riassunto dei possibili inconvenienti che può riscontrare e le
relative soluzioni. Molto spesso i problemi si possono risolvere facilmente a casa senza dover chiedere l’aiuto di
un centro assistenza. Abbiamo inoltre pubblicato sul nostro sito web dei filmati con istruzioni per risolvere
eventuali problemi.
Quando alla fine il problema non si risolve: MATRI è pronto ad aiutare. Conservi bene la scatola e l’imballaggio
originale per quando la macchina dovrà essere rispedito a Matri per riparazione. Anche dopo l’acquisto, si può
sempre contare su MATRI.
Buon divertimento con il Suo acquisto.
Per tutti i pezzi di ricambio e accessori: www.Matrimatic.com.
Per ulteriori informazioni su vari tipi di macchine da cucire, tagliacuci, ricambi e tanti utili accessori come per
esempio busti sartoriali e filati di qualità per tutte le sarte, visitare:
www.matri.eu
.


9
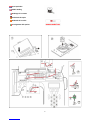
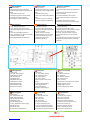
Bedieningsknoppen
A: Achteruit naaien
B: Naald positie knop (boven/beneden)
C: Snelheidsregelaar (alleen bij naaien zonder
pedaal)
D: “Verminder snelheid” knop
E: Start/stop knop (naaien zonder pedaal)
F: Transport bediening (in/uit werk)
G: Drukregelaar naaivoet (standaard 2)
Control buttons
A: Reverse sewing
B: Needle position button (up / down)
C: Speed dial (only for sewing without
pedal)
D: "Reduce Speed" button
E: Start / stop button (sewing without
pedal)
F: Transport control (on / off work)
G: Pressure regulator foot (default 2)
Boutons de commande
A: La marche arrière
B: Touche de positionnement de l’aiguille (haut
/ bas)
C: Commande de vitesse (uniquement pour
couture sans pédale)
D: Commande "Réduction de la vitesse"
E: Bouton Marche/arrêt (pour couture sans
pédale
F: Contrôle de l’entraînement du tissu
G: Régulateur de pression du pied (standard 2)
Bedienungstasten
A: Taste „Rückwärts/Vernähen“
B: Taste „Nadelposition“ (Oben/Unter)
C: Nähgeschwindigkeitsregler (nur nähen ohne
Pedal)
D: Taste “Geschwindigkeit reduzieren”
E: Taste „Start/Stopp“ (nur nähen ohne Pedal)
F: Transport Function (on/off)
G: Einstellung Nähfußdruck (standard 2)
Botones selectores
A: Selector de retroceso
B: Posición de aguja (arriba/abajo)
C: Regulador de velocidad (solamente
para coser sin pedal)
D: Botón “disminuir velocidad”
E: Botón Start/Stop (coser sin pedal)
F: Función de transporte (con/sin)
G: Regulador de presión del
prensatelas (estándar 2)
Pulsanti di funzionamento
A: Cucitura all’indietro
B: Pulsante di posizione ago (su/giù)
C: Regolatore della velocità di cucitura (soltanto
quando si cuce senza pedale reostato)
D: Pulsante “diminuire velocità di cucitura”
E: Pulsante Avvio/Stop (cucire senza pedale
reostato)
F: Controllo trasporto (trasporto si/trasporto no)
G: Regolazione pressione piedino premistoffa
(standard 2)
Bedieningspaneel
1: LCD scherm
2: CL=Clear-knop geheugen
3: ME=Geheugen functie
4: RE=Herhaal toets
5: MI=Spiegel toets
6: Aan& afhecht functie
7: Naaldpositie voorkeur
8: Steeklengte knopjes
9: Steekbreedte knopjes
10: Patroonkeuze cijfers
Control panel
1: LCD screen
2: CL = Clear button memory
3: ME = Memory function
4: RE = Repeat button
5: MI = Mirror button
6: Start and finish reinforcement
function
7: Preferred Needle Position
8: Stitch length buttons
9: Stitch width buttons
10: Pattern selection figures
Tableau de Commande
1: Ecran LCD
2: CL = Effacer la mémoire
3: ME = Mémoire
4: RE = Fonction répétition
5 : MI = fonction miroir
6: Point de renfort
7: Positionnement de préférence de l’aiguille
8. Réglage longueur de point
9: Réglage largeur de point
10. Numéros Sélection des motifs
Bedienungsplatte
1: LCD Display
2: CL=Clear Memory Taste
3: ME= Speicher/Memory
4: RE= Wiederholungstaste
5: MI=Spiegel Taste
6: Funktion Beginn/Ende
7: Taste „Nadelposition“ Bevorzugung
8: Stichlänge Taste
9: Stichbreite Taste
10: Stichmuster auswahl Zahlen
Panel de control
1: Pantalla LCD
2: CL= Clear Memoria tecla
3: ME= memoria
4: RE= tecla repetir
5: MI= tecla espejo
6: Función liberar/sujetar
7: Posición preferible de aguja
8: Teclas para longitud de puntadas
9: Teclas para anchura de puntadas
10: Números para elección del patrón
Pannello operativo
1: Schermo LCD
2: CL=Pulsante-clear memoria
3: ME=Funzione memoria
4: RE=Pulsante ripetizione
5: MI=Pulsante funzione specchio
6: Funzione punti di fermatura/rinforzo
7: pulsante di posizione ago
8: Pulsante lunghezza del punto
9: Pulsante larghezza del punto
10: Numeri per selezione punti

10
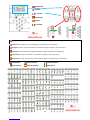
Bijvoorbeeld
Examples
Par exemple
Zum Beispiel
Ejemplo
Par Esempio
Let op! Niet alle steken kunnen in de lengte en breedte worden aangepast (bijv. knoopsagaten).
Careful! Not all stitches can be adjusted length and width wise. (ex. buttonholes)
Attention ! Pas tous les points peuvent être contrôlés en largeur et longueur (ex. boutonnière)
Achtung! Nicht alle Stiche können angepasst werden in Länge und Breite (z. B. Knopflöcher).
Importante! No todas las puntadas son ajustables en longitud y anchura (ej. ojales).
Attenzione! Non tutti i punti possono essere regolati in lunghezza e larghezza (per esempio asole).
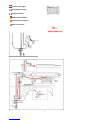
Stekentabel
Table of stitches
Tableau des Points
Stiche Tabelle Tabla de puntadas Tabella punti

11
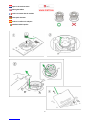
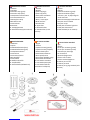
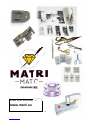
Standaard accessoires
1. Naalden
2. Spoeltjes
3. Garenklos stop (groot)
4. Garenklos stop (klein)
5. Steekplaat schroevendraaier
6. Schroevendraaier set
7. Kwastje/tornmesje
8. Blindzoom voet
9. Overlockvoet
10.Rritsvoet
11. Knoopsgatenvoet
12. Standaard voet (op de machine)
Standard
accessories
1. Needles
2. Bobbins
3. Spool cap (large)
4. Spool cap (small)
5. Stitch plate screwdriver
6. Screwdriver Set
7. Brush / seam ripper
8. Blind hem foot
9. Overlock foot
10. Zipper foot
11. Buttonhole foot
12. Standard foot (on the
machine)
Accessoires standard
1 Aiguilles.
2. Bobines
3. Capuchon de bobine (grand)
4. Capuchon de bobine (petit)
5. Tournevis pour la plaque aiguille
6. Jeu de tournevis
7. Brosse de nettoyage et découd-vite
8. Pied pour ourlet invisible
9. Pied pour surjet
10. Pied pour fermeture à glissière
11. Pied pour boutonnière
12. Pied standard (sur la machine)
Standard Zubehör
1. Nadelsatz
2. Spulen
3. Fadenablaufscheibe (klein)
4. Fadenablaufscheibe (groß)
5. Stichplattenschlüssel
6. Schlüssel set
7.Trennmesser/Pinsel
8. Blindstichfuß
9. Overlockfuß
10. Reißverschlussfuß
11. Knopflochfuß
12. Standard Fuß (auf Maschine)
Accesorios Estándar
1. Agujas
2. Canillas
3. Tapa del carrete (grande)
4. Tapa del carrete (pequeño)
5. Destornillador placa
6. Set de destornilladores
7. Abre-ojales/brocha
8. Prensatelas dobladillo ciego
9. Prensatelas sobrehilado
10. Prensatelas cremallera
11. Prensatelas para ojales
12. Prensatelas estándar
(colocada en la máquina)
Accessori inclusi standard
1. Aghi
2. Spoline
3. Fermo per rocchetto (grande)
4. Fermo per rocchetto (piccolo)
5. Cacciavite per placca ago
6. Kit di cacciaviti
7. Spazzolino/taglia asole
8. Piedino orlo invisibile
9. Piedino overlock/tagliacuci
10. Piedino per cerniere
11. Piedino per asole
12. Piedino per zig-zag standard (sulla
macchina)

12
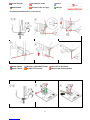
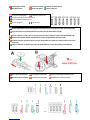
Knoopsgaten maken Buttonhole sewing Couture de boutonnières
Knopflochnähen Costura de Ojales Cucitura di asole
Plaats te gebruiken knoop in knoopsgatenvoetje (A) en haal knoopsgaten hendel naar beneden (B).
Place the button in the buttonhole foot (A) and lower the buttonhole lever (B).
Placez le bouton à coudre dans le pied à boutonnière (A) et abaissez le levier de la boutonnière (B)
Knopf auf Knopfloch Nähfuß legen(A) Ziehen Sie den Knopflochhebel herunteren (B).
Coloque el botón que quiere aplicar en el pie prensatelas para ojales (A) y baje la palanca para coser
ojales (B).
Inserire il bottone nel piedino per asole (A) quindi abbassare la leva del piedino premistoffa (B).
Naaivolgorde knoopsgaten Sewing Order buttonholes Etapes de façonnage de la boutonnière
Nähreihenfolge Knopflöcher Orden de coser para ojales Procedura per la cucitura di asole
8 soorten knoopsgaten
8 different buttonholes
8 différentes sortes de boutonnières
8 verschiedene Knopflochstiche
8 tipos de ojales 8 tipi di asole

13
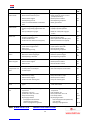
Site: www.matri.eu www.matrimatic.com
PROBLEEM
OORZAAK
OPLOSSING
BLZ.
/
SITE
Bovendraad
breekt steeds
Machine niet goed ingeregen
Bovendraad verstrikt om spoel
Naald verkeerd ingezet
Draadspanning te strak
Garen van slechte kwaliteit of verkeerde
dikte
Opnieuw inrijgen
Maak spoelhuis schoon en wind
spoeltje opnieuw op
Naald opnieuw inzetten
Draadspanning aanpassen
Beter garen kiezen
7
5
Site
Site
-
Onderdraad
breekt steeds
Spoeltje niet goed ingelegd
Spoeltje onregelmatig opgewonden of te
vol
Vuil bij onderspoel en grijper
Spoeltje opnieuw inleggen
Spoeltje opnieuw opwinden
Maak de onderspoel en grijper
schoon
6
5
Site
Machine slaat
steken over
Naald verkeerd ingezet
Kromme of verbogen naald
Verkeerde dikte naald
Verkeerde soort naald voor tricot/jersey
Naald opnieuw inzetten
Nieuwe naald inzetten
Neem juiste dikte naald (bv. jeans)
Gebruik naald voor tricot/jersey
Site
Site
Site
Site
Stof trekt samen Machine is verkeerd ingeregen
Spoel verkeerd opgewonden
Naald is bot
Draadspanning te hoog
Machine opnieuw inrijgen
Spoel opnieuw opwinden
Nieuwe naald inzetten
Draadspanning aanpassen
7
5
Site
Site
Machine maakt
lussen
Spoel is verkeerd ingelegd
Machine is verkeerd ingeregen
Draadspanning is verkeerd
Spoel opnieuw inleggen
Machine opnieuw inrijgen
Draadspanning aanpassen
6
7
Site
Draaddoorhaler
werkt niet goed
Naald staat niet in hoogste stand
Naald verkeerd ingezet
Naald is krom
Naald in hoogste stand zetten
Naald opnieuw inzetten
Nieuwe naald is inzetten
8-1/2
Site
Site
Machine
transporteert niet
goed
Transport is uitgeschakeld
Te veel pluizen en stof bij het
ondertransport
Transport inschakelen
Het ondertransport schoonmaken
9-F
Site
Naald breekt Aan stof trekken bij naaien
Naald botst op voetje
Naald verkeerd ingezet
Verkeerde maat naald of garen
Niet trekken bij naaien
Kies juiste steek en voetje
Naald opnieuw inzetten
Kies juist naald en garen
-
Site
Site
Site
Machine loopt
zwaar
Vuil en stof bij het ondertransport en
grijper
Verwijder naaldplaat en spoelhuis en
maak alles schoon
Site
Machine loopt
niet
Snoer zit niet (goed) in aansluiting of
stopcontact
Schakelaar is niet aan
Spoelwinder staat naar rechts
Voetje staat omhoog
Bij knoopsgat maken:
- Knoopsgat hendel staat niet
(voldoende) naar beneden
- Geen knoopsgatenvoet gebruikt
Duw snoer zit (goed) in aansluiting of
stopcontact
Zet schakelaar aan
Duw spoelwinder naar links
Laat voetje zakken
Bij knoopsgat maken:
- Duw knoopsgat hendel (voldoende)
naar beneden
- Bevestig knoopsgatenvoet
-
-
Site
8-1/2
12-B
12-AB

14
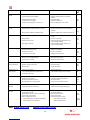
PROBLEM
CAUSES
CORRECTIONS
Page
/
Site
Upper thread
breaks
Machine is not properly threaded
Thread entwined around bobbin
Needle inserted incorrectly
Thread tension is too tight
Thread of poor quality, or incorrect size
Re-thread machine
Remove entwined thread and rewind
bobbin
Re-insert needle
Adjust thread tension
Only use high grade, new thread
7
5
Site
Site
-
Bobbin thread
breaks
Bobbin is not well adjusted
Bobbin thread is unevenly wound, or too full
Sewing lint has collected in bobbin holder
Remove and re-Insert bobbin
Rewind new bobbin do not wind thread
by hand
Remove needle plate, remove lint with brush
6
5
Site
Skipped stitches Needle is not inserted properly
Needle is bent
Needle size is incorrect
Wrong type of needle,
Insert the needle and push fully inside the
casing
Insert a new needle
Select the right thickness (Jeans for ex.
need stronger needles)
Check needle with type of fabric, (use
stretch needle needle)
Site
Site
Site
Site
Fabric puckers Machine is not properly threaded
Bobbin threaded incorrectly
Needle point is blunt
Thread tension is too high
Re-thread machine
Rewind a new bobbin
Insert a new needle
Adjust the thread tension
7
5
Site
Site
Thread loops Bobbin incorrectly inserted
Machine is incorrectly threaded
Thread tension is wrong
Rewind and re-insert bobbin
Re-thread the machine
Adjust the thread tension
6
7
Site
Threader does not
thread needle eye
Needle is not inserted in highest position
Needles inserted incorrectly
Needle is bent
Adjust needle height
Re-insert needle
Insert new needle
8-1/2
Site
Site
Machine does not
feed properly
Feed dogs are lowered
Too much fluff gathered in the transport
mechanism and casing
Raise the feed dogs
Clean bobbin casing and surroundings
9-F
Site
Needle breaks Fabric pulled while sewing
Needle hits presser foot
Needle is not inserted correctly
Wrong needle size or wrong thread
Do not push or pull fabric
Choose correct foot and pattern
Re-insert needle
Select correct needle and thread
-
Site
Site
Site
Machine runs with
difficulty
Fabric remnants and fluff gathered in the
transport mechanism and casing
Remove needle plate and clean bobbin
holder and surroundings thoroughly
Site
Machine does not
function
Machine is not plugged in properly
On/off switch is set off
Bobbin winder spindle is pushed to the right
Presser foot is not lowered
When making button holes:
- Buttonhole lever is not lowered completely
- Buttonhole foot is not attached
Push plug deep in socket
Set on/off switch on
Push spindle to the left
Lower presser foot
When making button holes:
- Lower button hole lever
- Attach buttonhole foot
-
-
Site
8-1/2
12-B
12-AB
Site: www.matri.eu www.matrimatic.com

15
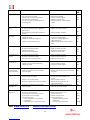
ANOMALIE
CAUSE
SOLUTION
Page
/
SITE
Le fil d’aiguille casse La machine n’est pas enfilée correctement
Le fil s’est pris dans la canette
L’aiguille n’est pas insérée correctement
La tension du fil est trop élevée
Le fil est d’une grosseur inappropriée ou de
mauvaise qualité
Enfilez à nouveau la machine
Retirez les fils emmêlés
Insérez à nouveau l’aiguille
Réajustez la tension du fil
Remplacez le fil par un fil de meilleure
qualité
7
5
Site
Site
-
Le fil de canette
casse
La cannette n’est pas enfilée correctement
La canette se déroule de façon irrégulière ou
est trop pleine
Des poussières se trouvent dans le boitier de
cannette
Enfilez à nouveau la canette
Refaites de nouveau la canete
Nettoyer le boitier à canette
6
5
Site
La machine saute
des points
L’aiguille n’est pas insérée correctement
L’aiguille est tordue
L’aiguille est trop fine ou trop grosse
L’aiguille n’est pas adaptée au tissu
Insérez à nouveau l’aiguille
Insérez une nouvelle aiguille
Choisissez une aiguille de grosseur
appropriée au tissu
Utilisez l’aiguille spéciale jersey ou spécial
coton
Site
Site
Site
Site
Le tissus fronce La machine n’est pas bien enfilée
La canette n’est pas bien enfilée
L’aiguille est émoussée
La tension du fil est trop élevée
Enfilez à nouveau la machine
Enfilez à nouveau la cannette
Insérez une nouvelle aiguille
Réajustez la tension du fil
7
5
Site
Site
La machine fait des
boucles
La canette n’est pas bien enfilée
La machine n’est pas bien enfilée
La tension du fil n’est pas appropriée
Enfilez à nouveau la canette
Enfilez à nouveau la machine
Réajustez la tension du fil
6
7
Site
L’enfile aiguille ne
fonctionne pas
L’aiguille n’est pas en position haute
L’aiguille n’est pas insérée correctement
L’aiguille est tordue
Relevez l’aiguille
Insérez à nouveau l’aiguille
Insérez une nouvelle aiguille
8-1/2
Site
Site
La machine
n’entraine pas le
tissu correctement
Les griffes d’entrainement sont abaissées
Peluches et poussières se sont accumulées
autour des griffes
Relevez les griffes
Nettoyez le boitier de cannete et tout autour
des griffes
9-F
Site
L’aiguille casse Le tissu a été tiré pendant la couture
L’aiguille piquée sur la plaque
L’aiguille n’est pans bien insérée
La taille de l’aiguille ou du fil n’est pas adaptée
Ne tirez pas sur le tissu
Sélectionnez un pied adapté à votre
couture
Insérez l’aiguille à nouveau
Sélectionnez une aiguille et un fil
approprié à votre tissu
-
Site
Site
Site
La machine avance
avec difficulté
Peluches et poussières se sont accumulées
autour des griffes
Retirez la plaque d’aiguille et nettoyez le
boitier de cannete et les griffes
Site
La machine ne
démarre pas
La machine n’est pas branchée
La machine n’est pas allumée
L’axe du bobinoir est poussé vers la droite
Le pied presseur n’est pas abaissé
En mode boutonnière
- Le levier boutonnière n’est pas abaissé
complètement
- Le pied boutonnière n’est pas mis en place
Insérez la fiche dans la prise
Mettez l’interrupteur sur “on”
Poussez l’axe vers la
Abaissez le pied presseur
En mode boutonnière
- Abaissez suffisamment le pied
boutonnière
- Fixer bien le pied boutonnière
-
-
Site
8-1/2
12-B
12-AB
Site: www.matri.eu www.matrimatic.com

16
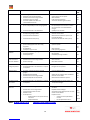
PROBLEM
URSACHE
LÖSUNG
PAG
/
SITE
Oberfaden reißt Falsch eingefädelt
Oberfaden in der Spule verheddert
Die Nadel wurde nicht richtig installiert
Fadenspannung ist zu niedrig
Schlechte Qualität oder Nähen mit
unterschiedlichen Garnen
Neu einfädeln
Spule reinigen und neu Spulen
Nadel wechseln
Fadenspannung regulieren
Verwenden Sie Garne gleicher Stärke
7
5
Site
Site
-
Unterfaden reißt Spule schlecht gespult
Spule und Spulenkapsel nicht richtig eingesetzt
Fusseln/Fadenreste in der Greiferbahn
Spule neu Spulen
Die Spulenkapsel herausnehmen und dann
den Transporteur und die Greiferbahn
reinigen
Spulkapsel neu einsetzen
6
5
Site
Fehlstiche Die Nadel wurde nicht richtig installiert
Stumpfe oder gebogene Nadel
Falsche Nadel für das Material
Falsche Nadel für Trikot/Jersey
Wechseln Sie die Nadel
Wechseln Sie die Nadel
Nadelstärke dem Material anpassen (zb
jeans/stretch Nadel)
Verwenden Sie Nadel für Trikot / Jersey
Site
Site
Site
Site
Nahtkräuseln Falsch eingefädelt
Spule schlecht gespult oder nicht richtig
eingesetzt
Stumpfe Nadel
Fadenspannung ist zu hoch
Neu einfädeln
Spule neu Spulen
Nadel wechseln
Fadenspannung regulieren
7
5
Site
Site
Schlaufen auf der
Stoffseite
Spulenkapsel nicht richtig eingesetzt
Schlecht eingefädelt
Falsche Spannung
Überprüfen Sie die Spulenkapsel
Neu einfadeln
Oberfadenspannung einstellen.
6
7
Site
Der Einfädler kommt
nicht automatisch
durch das Nadelöhr
Nadel ist nicht in ihrer höchste Position
Die Nadel wurde nicht richtig installiert
Nadel ist verbogen
Nadel in ihrer höchste Position bringen
Nadel wechseln
Neue Nadel einsetzen
8-1/2
Site
Site
Stoff wird nicht
richtig transportiert
Transporteur ist aus Funktion
Fusseln/Fadenreste in der Greiferbahn und/oder
Transporteur
Heben Sie den Transporteur
Reinigen des Transporteurs
9-F
Site
Nadeln brechen Sie haben während des Nähens am Stoff
gezogen
Die Nadel trifft den Nähfuß
Die Nadel wurde nicht richtig installiert
Falsche Nadel/Faden für das Material
Nicht am Material ziehen
Wählen Sie den richtigen Stich und Nähfuß
Wechseln Sie die Nadel
Nadelstärke dem Material anpassen
-
Site
Site
Site
Die Maschine läuft
sehr schwer
Fusseln/Fadenreste in der Greiferbahn und/oder
Transporteur
Stichplatte entfernen, Spule, Greifer und
Transporteur Reinigen
Site
Keine Funktion der
Maschine
Netzstecker ist nicht eingesteckt.
Die Maschine ist nicht eingeschaltet
die Spulenspindel steht nach links
Nähfuß ist unter
Für Knopflocher:
Knopflochhebel ist nicht (ausreichend)
nach unter
Knopflochfuß fehlt
Stecken Sie das Kabel in die Maschine und in
die Wand
EIN/AUS Schalter betätigen
Verschieben Sie die Spulenspindel nach links
Senken Sie den Nähfuß
Knopfloch nähen:
Ziehen Sie den Knopflochhebel
herunter
Den Knopflochfuß einsetzen
-
-
Site
8-1/2
12-B
12-AB
Site: www.matri.eu www.matrimatic.com

17
PROBLEMA
CAUSA
SOLUCION
PAG
/
SITE
El hilo superior
se rompe.
No ha enhebrado la máquina correctamente
El hilo superior se ha enganchado en la canilla
La aguja no está colocada correctamente
Tension del hilo demasiada floja
Hilo de mala calidad o grosor incorrecto
Enhebra de nuevo
Limpia la capsula y bobina el carrete de
nuevo
Inserte la aguja de nuevo
Ajuste la tension del hilo
Elige hilo de mejor calidad
7
5
Site
Site
-
El hilo inferior se
rompe.
Mal bobinado del carrete o está demasiado lleno
No se ha instalado correctamente el carrete o la
tapa del carrete
Hay suciedad por el carrete o el agarrador
Bobina de nuevo el carrete
Limpie la zona del transportador, carrete y
agarrador
Coloque de nuevo el carrete
6
5
Site
La máquina salta
puntadas.
La aguja no está colocada correctamente
La aguja está torcida o doblada
La aguja no es adecuada para el tipo de tela que
está utilizando
Aguja no adecuada para tricote/jersey
Coloque de nuevo la aguja
Inserte la aguja de nuevo
Elige el tamaño de aguja adecuada (ej. Aguja
para vaquero/jeans)
Utilize aguja para tricote/jersey
Site
Site
Site
Site
La tela está
arrugado.
No ha enhebrado la máquina correctamente
No ha bobinado bien el carrete o está demasiado
lleno
Aguja está poco afilada
Tensión del hilo demasiada alta
Enhebra la máquina de nuevo
Bobina de nuevo el carrete
Inserte una aguja nueva
Ajuste la tensión del hilo
7
5
Site
Site
Al coser el hilo hace
lazos (puntadas muy
sueltas)
No ha introducido bien el carrete
Mal enhebrado de la máquina
Tensión incorrecta
Spoel opnieuw inleggen
Enhebra la máquina de nuevo
Ajustar la tensión del hilo
6
7
Site
No se puede
utilizar el
enhebrador de
aguja.
Aguja no está en posición más elevada
La aguja no está colocada correctamente
La aguja está torcida
Ponga la aguja en posición elevada
Inserte la ajuga de nuevo
Utilize una aguja nueva
8-1/2
Site
Site
La máquina no
transporta la tela.
Transportador está desconectado
Hay demasiado polvo y pelusas por el transporte
inferior
Sube el transporte
Limpie el transporte inferior
9-F
Site
La aguja se
rompe.
Ha tirado de la tela mientras cosía
La aguja choca con el prensatelas
La aguja no está colocada correctamente
Tamaño de aguja o hilo equivocado
No estire de la tela al coser
Elige la puntada y prensatela correcta
Coloque de nuevo la aguja
Elige la aguja e hilo adecuado
-
Site
Site
Site
La máquina
funciona muy
pesada.
Hay suciedad por el transporte inferior, carrete o
el agarrador
Retira la placa carrete y capsula y limpie todo
la suciedad y polvo
Site
La máquina no
funciona.
El cable no está bien enchufado o conectado en la
máquina
Máquina no está encendida
El eje de la devanadora de carrete está hacia la
derecha
Pie prensatelas esta abajo
Para hacer ojales:
Palanca para ojales no está (lo suficiente)
bajada
No ha puesto el pie para ojales
Enchufe bien el cable en la máquina y en la
pared
Enciende la máquina
Mueve el eje de la devanadora a la izquierda
Baja el pie prensatelas
Para ojales:
Baje la palanca lo suficiente hacia
abajo
Ponga el pie prensatelas para ojales
-
-
Site
8-1/2
12-B
12-AB
Site: www.matri.eu www.matrimatic.com

18
PROBLEMA CAUSA SOLUZIONE BLZ./
Site
Il filo superiore si
spezza
La macchina non è infilato correttamente
Il filo è aggrovigliato, per esempio
nell’alloggiamento della spolina
L’ago non è inserito correttamente
La tensione del filo superiore è eccessiva
Il filo è di scarsa qualità o troppo grosso/fine
Infilare di nuovo la macchina
Togliere il filo aggrovigliato. Se il filo si è
aggrovigliato nella navetta, pulire il crochet
Togliere e inserire di nuovo l’ago
Diminuire la tensione
Scegliere filati di qualità migliore
7
5
Site
Site
-
Il filo inferiore si
spezza
Spolina non è inserita correttamente
Spolina non è infilata correttamente
Si è accumulata della polvere nell’alloggiamento
della spolina
Rimuovere e reinserire la spolina
Avvolgere la spolina correttamente
Pulire il crochet
6
5
Site
La macchina salta
dei punti
L’ago non è inserito correttamente
L’ago è piegato o smussato
La misura dell’ago è sbagliato
Ago sbagliato per tessuti
elasticizzati/jersey/maglina
Togliere e reinserire l’ago
Sostituire l’ago
Inserire un ago adatto al filo e al tessuto (es.
jeans)
Usare l’ago adatto per tessuti
elasticizzati/jersey/maglina
Site
Site
Site
Site
Il tessuto si arriccia Macchina non è stata infilata correttamente.
La spolina non è stata infilata correttamente
L’ago è smussato
La tensione del filo è eccessiva
Infilare di nuovo la macchina
Avvolgere di nuovo la spolina
Sostituire l’ago
Diminuire la tensione del filo
7
5
Site
Site
I punti si allentano La spolina non è inserita correttamente
La macchina non è stata infilata correttamente
La tensione del filo non è corretta
Togliere e reinserire la spolina
Infilare di nuovo la macchina
Controllare la tensione del filo
6
7
Site
L’infila ago non
funziona bene
L’ago non si trova nella posizione più alta
L’ago non è stato inserito correttamente
L’ago è piegato
Mettere l’ago nella posizione piu alta
Togliere e reinserire l’ago
Sostituire l’ago
8-1/2
Site
Site
Il tessuto non scorre
uniformemente
Le griffe di trasporto sono state abbassate
Si è accumulata polvere e lanugine nelle griffe di
trasporto
Sollevare le griffe di trasporto
Rimuovere la placca ago e pulire le griffe di
trasporto
9-F
Site
L’ago si rompe Il tessuto è tirato eccessivamente
E’ stato inserito un piedino sbagliato e/ l’ago
sbatte sul piedino
L’ago non è stato inserito correttamente
La misura dell’ago e/o del filo è sbagliata
Guidare il tessuto con delicatezza, non tirare il
tessuto
Montare il piedino premistoffa adatto e
scegliere il punto giusto
Togliere e reinserire l’ago
Inserire l’ago e/o il filo adatto al tessuto
-
Site
Site
Site
La macchina è
rumoroso e fa fatica
a cucire
Si è accumulata polvere e lanugine nelle griffe
del trasporto o nell’alloggiamento della spolina
Rimuovere la placca ago e pulire le griffe e il
crochet
Site
La macchina non
funziona
La macchina non è collegata (bene) al corrente
L’interruttore generale è spento
L’albero avvolgitore spolina è spostato a destra
Il piedino premistoffa è alzato
Durante la cucitura asole:
- Leva per asole non è abbassata (bene)
- Non è stato utilizzato il piedino per asole
Inserire (bene) la spina nella presa elettrica
Accendere l’interruttore generale
Spostare l’albero avvolgitore spolina a sinistra
Abbassare il piedino premistoffa
Durante la cucitura asole:
- Abbassare (bene) la leva per asole
- Montare il piedino per asole
-
-
Site
8-1/2
12-B
12-A/B
Site: www.matri.eu www.matrimatic.com

-
 1
1
-
 2
2
-
 3
3
-
 4
4
-
 5
5
-
 6
6
-
 7
7
-
 8
8
-
 9
9
-
 10
10
-
 11
11
-
 12
12
-
 13
13
-
 14
14
-
 15
15
-
 16
16
-
 17
17
-
 18
18
-
 19
19


Matrimatic GOLD Diamond series Manuel utilisateur
- Taper
- Manuel utilisateur
dans d''autres langues
Autres documents
-
Toyota ESG325 Le manuel du propriétaire
-
Toyota DFL Superior 2D Le manuel du propriétaire
-
-
BOMANN NM 6063 CB Mode d'emploi
-
Elna Switzerland 200-347-020 Mode d'emploi
-
Bernina Bernette 12 Le manuel du propriétaire
-
Pfaff creative 1469 Manuel utilisateur
-
Pfaff Varimatic 6089 Le manuel du propriétaire
-
-