
H:\PC169-186\ML\5034489111_HT-A3000_ML\00COV-HTA3000UC2\010COV_SD0_UC2.fm masterpage: Cover
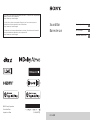
HT-A3000
5-034-489-11(1)
Sound Bar
Barre de son
HT-A3000
Operating Instructions US
Mode d’emploi FR
Manual de instrucciones ES
H:\PC169-186\ML\5034489111_HT-A3000_ML\5034489111\5034489111HTA3000UC2\00COV-
HTA3000UC2\170BCO_SD0_UC2.fm
masterpage: BCO
5-034-489-11(1)
HT-A3000
5-034-489-11(1)
©2022 Sony Corporation
Printed in China
Imprimé en China
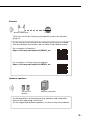
The software of this system may be updated in the future. To find out details on any available
updates, please visit the following URL.
https://www.sony.com/am/support
Le logiciel de ce système est susceptible d’être mis à jour. Pour en savoir plus sur les
éventuelles mises à jour disponibles, visitez l’URL suivante.
https://www.sony.com/am/support
El software de este sistema podría actualizarse en el futuro. Para obtener más información
sobre las actualizaciones disponibles, visite la siguiente URL.
https://www.sony.com/am/support

2US
Owner’s Record
The model and serial numbers are
located on the bottom of the bar
speaker. Record the serial number in the
space provided below. Refer to them
whenever you call upon your Sony
dealer regarding the speaker system.
Model No. HT-A3000
Serial No.
The speaker system is not disconnected
from the mains as long as it is connected
to the AC outlet, even if the speaker
system itself has been turned off.
To reduce the risk of fire, do not cover
the ventilation opening of the speaker
system with newspapers, tablecloths,
curtains, etc.
Do not expose the speaker system to
naked flame sources (for example,
lighted candles).
To reduce the risk of fire or electric
shock, do not expose this speaker
system to dripping or splashing, and do
not place objects filled with liquids, such
as vases, on the speaker system.
As the mains plug is used to disconnect
the speaker system from the mains,
connect the speaker system to an easily
accessible AC outlet. Should you notice
an abnormality in the speaker system,
disconnect the mains plug from the AC
outlet immediately.
Do not install the speaker system in a
confined space, such as a bookcase or
built-in cabinet.
CAUTION
Risk of explosion if the battery is
replaced by an incorrect type.
Do not expose batteries or appliances
with battery-installed to excessive heat,
such as sunshine and fire.
Do not place this product close
to medical devices.
This product (including accessories) has
magnet(s) which may interfere with
pacemakers, programmable shunt
valves for hydrocephalus treatment, or
other medical devices. Do not place this
product close to persons who use such
medical devices. Consult your doctor
before using this product if you use any
such medical device.
When connecting the speaker system to
the Internet, use the router (ADSL
modem or optical line termination
device with the router function supplied
with the Internet provider, or Wi-Fi
access point). If you connect to the
Internet without using the router, a
security problem may occur. If you are
not sure that the wall outlet for the
network line has the router function, ask
your manager of the apartment house or
Internet provider.
Indoor use only.
For the bar speaker
The nameplate is located on the bottom
of the bar speaker.
For customers in the U.S.A.
NOTE:
This speaker system has been tested
and found to comply with the limits for a
Class B digital device, pursuant to Part 15
of the FCC Rules. These limits are
designed to provide reasonable
protection against harmful interference
in a residential installation. This speaker
system generates, uses and can radiate
radio frequency energy and, if not
installed and used in accordance with
the instructions, may cause harmful
interference to radio communications.
WARNING

3US
However, there is no guarantee that
interference will not occur in a particular
installation. If this speaker system does
cause harmful interference to radio or
television reception, which can be
determined by turning the speaker
system off and on, the user is
encouraged to try to correct the
interference by one or more of the
following measures:
– Reorient or relocate the receiving
antenna.
– Increase the separation between the
speaker system and receiver.
– Connect the speaker system into an
outlet on a circuit different from that
to which the receiver is connected.
– Consult the dealer or an experienced
radio/TV technician for help.
Properly shielded and grounded cables
and connectors must be used for
connection to host computers and/or
peripherals in order to meet FCC
emission limits.
If you have any questions about this
speaker system:
Visit: https://www.sony.com/
electronics/support
Contact: Sony Customer Information
Service Center at 1-800-222-SONY (7669)
Write: Sony Customer Information
Service Center 12451 Gateway Blvd., Fort
Myers, FL 33913
Supplier’s Declaration of Conformity
Trade Name: SONY
Model No.: HT-A3000
Responsible Party: Sony Electronics Inc.
Address: 16535 Via Esprillo, San Diego,
CA 92127 USA
Telephone No.: 858-942-2230
This device complies with Part 15 of the
FCC Rules. Operation is subject to the
following two conditions: (1) This device
may not cause harmful interference, and
(2) this device must accept any
interference received, including
interference that may cause undesired
operation.
CAUTION
You are cautioned that any changes or
modifications not expressly approved in
this manual could void your authority to
operate this speaker system.
This speaker system must not be co-
located or operated in conjunction with
any other antenna or transmitter.
This speaker system complies with FCC
radiation exposure limits set forth for an
uncontrolled environment and meets
the FCC radio frequency (RF) Exposure
Guidelines. This speaker system should
be installed and operated keeping the
radiator at least 20 cm or more away
from person’s body.
Compliance with FCC requirement
15.407(c)
Data transmission is always initiated by
software, which is the passed down
through the MAC, through the digital
and analog baseband, and finally to the
RF chip. Several special packets are
initiated by the MAC. These are the only
ways the digital baseband portion will
turn on the RF transmitter, which it then
turns off at the end of the packet.
Therefore, the transmitter will be on only
while one of the aforementioned
packets is being transmitted. In other
words, this device automatically
discontinue transmission in case of
either absence of information to
transmit or operational failure.
Frequency Tolerance: ±20 ppm or less
For customers in Canada
Properly shielded and grounded cables
and connectors must be used for
connection to host computers and/or
peripherals.
US

4US
This speaker system contains license-
exempt transmitter(s)/receiver(s) that
comply with Innovation, Science and
Economic Development Canada’s
license-exempt RSS(s). Operation is
subject to the following two conditions:
This speaker system complies with ISED
radiation exposure limits set forth for an
uncontrolled environment and meets
RSS-102 of the ISED radio frequency (RF)
Exposure rules. This speaker system
should be installed and operated
keeping the radiator at least 20 cm or
more away from person’s body.
5.15 - 5.35 GHz band is restricted to
indoor operations only.
Data transmission is always initiated by
software, which is the passed down
through the MAC, through the digital
and analog baseband, and finally to the
RF chip. Several special packets are
initiated by the MAC.
These are the only ways the digital
baseband portion will turn on the RF
transmitter, which it then turns off at the
end of the packet. Therefore, the
transmitter will be on only while one of
the aforementioned packets is being
transmitted. In other words, this device
automatically discontinue transmission
in case of either absence of information
to transmit or operational failure.
(1) This speaker system may not cause
interference; and
(2) This speaker system must accept any
interference, including interference
that may cause undesired operation
of the speaker system.

5US
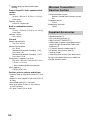
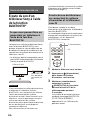
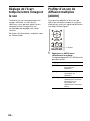
Table of Contents
About Manuals of the Speaker
System ......................................7
What You Can Do with the Speaker
System ..................................... 8
Guide to Parts and Controls .........10
Using the Home Menu ................. 14
Setting Up
Installing the Speaker System ...... 15
Connecting to a TV ....................... 17
When Your TV Has the S-CENTER
SPEAKER IN Jack .....................18
Connecting to the AC Outlet
(mains) ....................................19
Performing Initial Settings .......... 20
Connecting the Optional
Speaker ................................... 21
Watching Images
Watching TV .................................23
Listening to Music/Sound
Listening to Sony TV Sound with the
BLUETOOTH® Function .......... 24
Listening to Music/Sound with the
BLUETOOTH Function ............ 26
Listening to Music on a USB
Device .................................... 28
Listening to Sound of the Connected
TV or Device Using
Headphones .......................... 29
Listening to Music by
Connecting to a Network
What You Can Do by Connecting the
Speaker System to a
Network .................................. 31
Adjusting the Volume and
Sound Quality
Adjusting the Volume ..................33
Enjoying Surround Effect
(SOUND FIELD) ........................34
Making Dialogs Clearer
(VOICE) ....................................35
Enjoying Clear Sound with Low
Volume at Midnight
(NIGHT) ...................................35
Adjusting the Delay Between the
Picture and Sound ..................36
Enjoying Multiplex Broadcast Sound
(AUDIO) ...................................36
Adjusting the Dialog Volume While
the DTS:X Content is Played
Back ........................................37
Using the Speaker System by
Interlocking with a TV
Operating the Speaker System by
Interlocking with a TV (Control
for HDMI Function) .................38
Operating the Speaker System by
Interlocking with a TV
Compatible with the “BRAVIA”
Sync Function .........................39
Changing the Settings
Changing the Brightness of the
Front Panel Display and
Indicators (DIMMER) ............. 40
Saving Power in Standby
Mode ......................................41
Performing Easy Setup ................. 41
Performing Advanced
Settings ..................................42
Updating the Software .................43
Troubleshooting
Troubleshooting ...........................45
Resetting the Speaker System .....52
What’s in the Box
Startup Guide
(separate
document)

6US
Additional Information
Specifications ............................... 53
Playable Types of Audio Files ...... 55
Supported Input Audio
Formats .................................. 56
On BLUETOOTH
Communication ......................57
Precautions .................................. 58
Copyrights and Trademarks ........ 59
Index .............................................61

7US
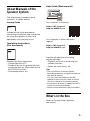
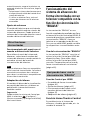
About Manuals of the
Speaker System
The information included in each
manual is as shown below.
Startup Guide
Introduces the initial procedures
concerning installation and connection
for using the speaker system, and
operations until you play music.
Operating Instructions
(this document)
Explains the basic operations.
– Connection with a TV
– Playback for music/sound of devices
connected with an HDMI cable or the
BLUETOOTH function
– Sound adjustment, etc.
Help Guide (Web manual)
For customers in Americas
https://rd1.sony.net/
help/ht/a3000/h_uc/
For customers in other countries/
regions
https://rd1.sony.net/
help/ht/a3000/h_zz/
Provides all operations including
advanced usage.
– Playback for music/sound with the
network function
– Details on menu items, etc.
Tips
• The instructions in these manuals
describe operations using the controls on
the remote control.
You can use the buttons on the bar
speaker if they have the same or similar
names as those on the remote control.
• Characters in brackets [ ] appear on the TV
screen or front panel display.
• Details are omitted from the illustrations.
What’s in the Box
Refer to Startup Guide (separate
document).
Sound Bar

8US
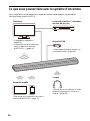
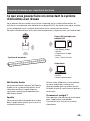
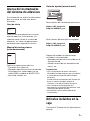
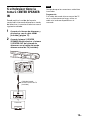
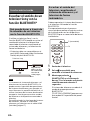
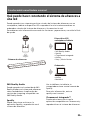
What You Can Do with the Speaker System
TV
The speaker system supports object-based audio formats such as Dolby Atmos
and DTS:X.
•“Watching TV” (page 23)
•“Listening to Sony TV
Sound with the
BLUETOOTH® Function”
(page 24)
“Listening to Sound of the Connected
TV or Device Using Headphones”
(page 29)
“Listening to Music/Sound with the
BLUETOOTH Function” (page 26)
Mobile device
Headphones
“Listening to Music on a USB
Device” (page 28)
Blu-ray Disc™ player, set-top
box, gaming console, etc.
USB device

9US
InternetWireless LAN router
Network
Optional subwoofer
Optional rear
speakers
For the operations of the optional rear speakers and subwoofer,
refer to their operating instructions.
For the supported optional speakers, confirm on the Sony website.
For the connecting method to the network and functions enabled
with the network connection, refer to Help Guide (Web manual).
For customers in Americas
https://rd1.sony.net/help/ht/a3000/h_uc/
For customers in other countries/regions
https://rd1.sony.net/help/ht/a3000/h_zz/
Optional speakers
“What You Can Do by Connecting the Speaker System to a Network”
(page 31)

10US
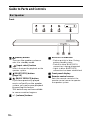
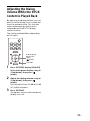
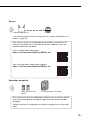
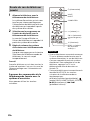
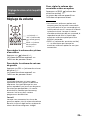
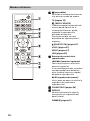
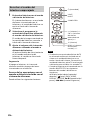
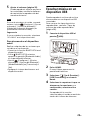
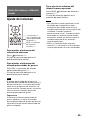
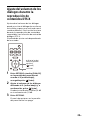
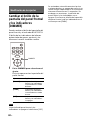
Guide to Parts and Controls
Front
(power) button
Turns on the speaker system or
sets it to standby mode.
(input select) button
Selects the input for playback on the
speaker system.
(BLUETOOTH) button
(page 24)
(MUSIC SERVICE) button
If you have previously played
music on Spotify on the speaker
system, you can resume playback
by pressing this button.
This button may not be available
in some countries/regions.
+/– (volume) buttons
BLUETOOTH indicator
– Flashes quickly in blue: During
pairing standby status
– Flashes in blue: BLUETOOTH
connection is being attempted.
– Lights in blue: BLUETOOTH
connection has been established.
Front panel display
Remote control sensor
Point the remote control at the
remote control sensor to operate
the speaker system.
Bar Speaker

11US
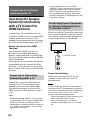
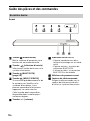
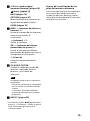
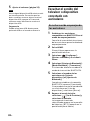
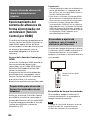
Rear
IR repeater
Transmits the remote signal of the
TV remote control to the TV.
AC inlet
S-CENTER OUT jack (page 18)
HDMI OUT (TV eARC/ARC) jack
Connect a TV that has an HDMI
input jack with an HDMI cable.
The speaker system is compatible
with eARC and ARC. ARC is the
function that sends TV sound to
an AV device such as the speaker
system from the TV’s HDMI jack.
eARC is an extension of ARC and
enables transmission of the
object audio and multi-channel
LPCM content that cannot be
transmitted with ARC.
(USB) port (page 28)
TV IN (OPT) jack

12US
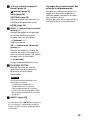
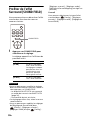
(power)
Turns on the speaker system or
sets it to standby mode.
TV (page 23)
(MUSIC SERVICE)
If you have previously played
music on Spotify on the speaker
system, you can resume playback
by pressing this button.
This button may not be available
in some countries/regions.
(BLUETOOTH) (page 26)
VOICE (page 35)
NIGHT (page 35)
USB (page 28)
Playback operation buttons
/ (previous/next)
Selects the previous/next track or
file.
Pressing and holding it searches
backward or forward (rewind/fast
forward) during playback.
(play/pause)*
Starts, pauses, or re-starts
playback (resume play).
SOUND FIELD (page 34)
DISPLAY
Displays stream information in the
front panel display.
DIMMER (page 40)
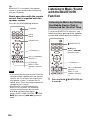
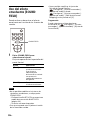
Remote Control

13US
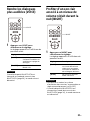
/// (up/down/left/right)
(page 14)
(enter) (page 14)
BACK (page 14)
OPTIONS (page 37)
Displays the options menu in the
front panel display.
HOME (page 14)
REAR (rear speakers volume)
+/–
Adjusts the volume of the
optional rear speakers when
connecting them.
(volume) +*/–
Adjusts the volume.
SW (subwoofer volume) +/–
Adjusts the volume of the built-in
subwoofer or optional subwoofer
when connecting it.
(muting)
Turns off the sound temporarily.
TV/AUDIO SYSTEM
Switches the output for the
connected TV sound between the
TV and speaker system.
This button works in the following
conditions.
– The connected TV is compatible with
the System Audio Control function.
– The Control for HDMI function of the
speaker system is set to on (page 38).
AUDIO* (page 36)
*The AUDIO, (play/pause), and
(volume) + buttons have a tactile dot. Use
it as a guide during operation.
About the replacement of
batteries for the remote control
When the speaker system does not
respond by operating with the remote
control, replace two batteries with new
batteries.
Use R03 (size AAA) manganese batteries
for replacement.
Note

14US
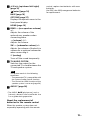
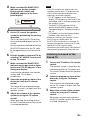
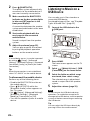
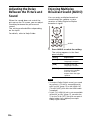
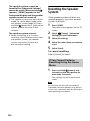
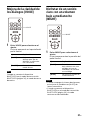
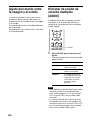
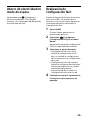
Using the Home Menu
You can display the home menu on the
TV screen by connecting the speaker
system and TV with an HDMI cable.
1Press HOME.
The home menu appears on the
TV screen.
2Press // (up/left/right) to
select the category that you want,
then press (down) or (enter).
The items for the selected
category appear under the
category list on the TV screen.
3Press /// (up/down/left/
right) to select the item that you
want, then press (enter).
The selected input or setting
display appears on the TV screen.
To return to the previous screen,
press BACK.
Category Explanation
[Watch
& Listen]
Selects the input of the
TV or audio device that
is connected to the
speaker system or
music service for
playing back on the
speaker system.
[Setup] Performs the basic
initial settings by using
[Easy Setup] or various
advanced settings of
the speaker system.
HOME
BACK
/// (up/
down/left/
right),
(enter)

15US
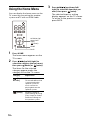
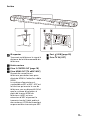
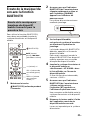
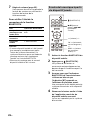
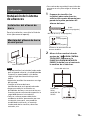
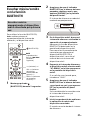
Installing the Speaker
System
For the installation, refer to Startup
Guide (separate document).
• Prepare screws (not supplied) that are
suitable for the wall material and stability.
Depending on the wall material, the wall
may be damaged.
• Fasten the screws securely in the wall
beam.
• Hang the bar speaker horizontally on the
reinforced wall.
• Have the installation done by a Sony
dealer or licensed contractor and pay
special attention to safety during the
installation.
• Sony shall not be held responsible for
accidents or damage caused by improper
installation, insufficient wall stability,
improper screw installation, natural
disasters, etc.
• Two or more persons are required to hang
the bar speaker for safety.
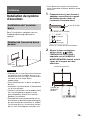
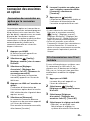
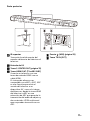
1Prepare two screws (not supplied)
that are suitable for the wall
mount holes on the rear of the bar
speaker.
2Align the vertical line above the
“ TV CENTER LINE” printed on
the WALL MOUNT TEMPLATE
(supplied) with the center of the
width of your TV.
Setting Up
Installing the Bar Speaker
Mounting the Bar Speaker on
a Wall
Notes
Bar speaker
Hole on the rear of the bar speaker
4 mm (3/16 in)
More than 30 mm (1 3/16 in)
5 mm
(7/32 in)
10 mm
(13/32 in)
Center of the TV
WALL MOUNT
TEMPLATE

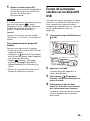
16US
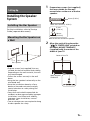
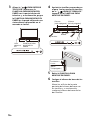
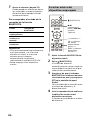
3Align the “ TV BOTTOM LINE”
printed on the WALL MOUNT
TEMPLATE with the bottom of your
TV, then adhere the WALL MOUNT
TEMPLATE on the wall with a
commercially available adhesive
tape, etc.
4Fasten the screws prepared in step
1 securely into the screw marks on
the “ SCREW LINE” printed on
the WALL MOUNT TEMPLATE.
5Remove the WALL MOUNT
TEMPLATE.
6Hang the bar speaker on the
screws.
Align the holes of the rear of the bar
speaker with the screws, then hang
the bar speaker on the two screws.
• When adhering the WALL MOUNT
TEMPLATE on the wall, smooth it out fully.
• Install the bar speaker apart from the TV
by 70 mm (2 7/8 in) or more.
Refer to the operating instructions of the
optional speakers.
WALL MOUNT
TEMPLATE
Adhesive
tape, etc.
Marks
270 mm
(10 3/4 in)
10 mm to
11 mm
Screws
270 mm
(10 3/4 in)
(approx.
7/16 in)
Notes
Installing the Optional
Speakers

17US
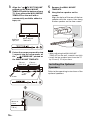
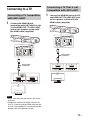
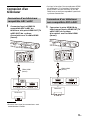
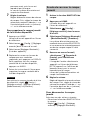
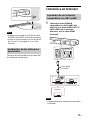
Connecting to a TV
1Connect the HDMI IN jack
compatible with ARC/eARC on the
TV and HDMI OUT (TV eARC/ARC)
jack on the speaker system with
the HDMI cable (supplied).
• Make sure that the connectors are firmly
inserted.
• Enable the Control for HDMI function on
the TV. If the Control for HDMI function on
the TV is not enabled, TV sound will not be
output from the speaker system.
1Connect the HDMI IN jack on the TV
and HDMI OUT (TV eARC/ARC) jack
on the speaker system with the
HDMI cable (supplied).
Connecting a TV Compatible
with ARC/eARC
Notes
TV
HDMI cable
(supplied)
Connecting a TV That Is not
Compatible with ARC/eARC
TV
HDMI cable
(supplied)

18US
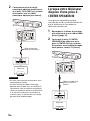
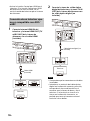
2Connect the optical digital output
jack on the TV and the TV IN (OPT)
jack on the speaker system with an
optical digital cable (not supplied).
• Make sure that the connectors are firmly
inserted.
• Insert a plug of the optical digital cable in
the correct direction by checking the
shape of the plug and connector on the
bar speaker and TV. If the plug is forcibly
inserted in the wrong direction, the
connector and plug may be damaged.
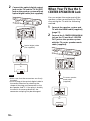
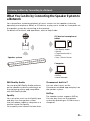
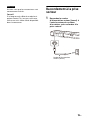
When Your TV Has the S-
CENTER SPEAKER IN Jack
You can output the center part of the
speaker system sound from the TV by
connecting the TV with the following
method.
1Connect the speaker system and
TV with the HDMI cable (supplied)
(page 17).
2Connect the S-CENTER SPEAKER IN
jack on the TV and the S-CENTER
OUT jack on the speaker system
with the TV center speaker mode
cable (supplied).
Notes
TV
Optical digital cable
(not supplied)
TV
TV center speaker
mode cable
(supplied)

19US
Make sure that the connectors are firmly
inserted.
Tip
If the length of the TV center speaker mode
cable is not sufficient, use a commercially
available stereo mini cable.
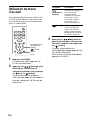
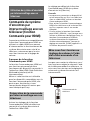
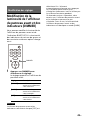
Connecting to the AC
Outlet (mains)
1Connect the AC power cord (mains
lead) (supplied) to the AC inlet on
the speaker system, then connect
to the AC outlet (mains).
Note
AC power cord (mains lead)
(supplied)

20US
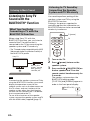
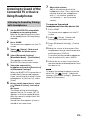
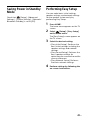
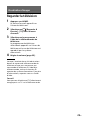
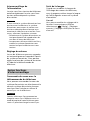
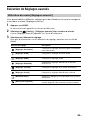
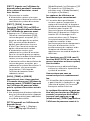
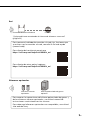
Performing Initial
Settings
1Press HOME on the remote control
supplied with the speaker system
to turn on the speaker system.
Operate the remote control by
pointing it toward the front of the
bar speaker.
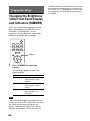
2Wait until [PLEASE WAIT] in the
front panel display disappears and
the next indication appears in the
front panel display.
3Turn on the TV.
4Follow the instructions on the
screen displayed on the TV to
perform initial settings.
If the initial setting screen is not
displayed, use the TV remote control
to switch the input on the TV to the
HDMI input that is connected to the
speaker system, then press HOME
on the remote control of the speaker
system.
•Press /// (up/down/left/
right) and (enter) to select the
item as instructed on the screen.
• If you use the optional subwoofer/
rear speakers, connect them by
following the instructions on the
[Checking Wireless Speaker
Connection] screen.
• Once [Setup is complete.] appears,
select [Learn more].
Depending on the order in which you turn
on the TV and the speaker system, the
speaker system may be muted and
[MUTING] is displayed on the front panel
display of the speaker system. If this
happens, turn all devices off, then turn on
the speaker system after turning on the TV.
HOME
/// (up/
down/left/
right),
(enter)
PLEASE WAIT
Note
Initial settings screen
La page est en cours de chargement...
La page est en cours de chargement...
La page est en cours de chargement...
La page est en cours de chargement...
La page est en cours de chargement...
La page est en cours de chargement...
La page est en cours de chargement...
La page est en cours de chargement...
La page est en cours de chargement...
La page est en cours de chargement...
La page est en cours de chargement...
La page est en cours de chargement...
La page est en cours de chargement...
La page est en cours de chargement...
La page est en cours de chargement...
La page est en cours de chargement...
La page est en cours de chargement...
La page est en cours de chargement...
La page est en cours de chargement...
La page est en cours de chargement...
La page est en cours de chargement...
La page est en cours de chargement...
La page est en cours de chargement...
La page est en cours de chargement...
La page est en cours de chargement...
La page est en cours de chargement...
La page est en cours de chargement...
La page est en cours de chargement...
La page est en cours de chargement...
La page est en cours de chargement...
La page est en cours de chargement...
La page est en cours de chargement...
La page est en cours de chargement...
La page est en cours de chargement...
La page est en cours de chargement...
La page est en cours de chargement...
La page est en cours de chargement...
La page est en cours de chargement...
La page est en cours de chargement...
La page est en cours de chargement...
La page est en cours de chargement...
La page est en cours de chargement...
La page est en cours de chargement...
La page est en cours de chargement...
La page est en cours de chargement...
La page est en cours de chargement...
La page est en cours de chargement...
La page est en cours de chargement...
La page est en cours de chargement...
La page est en cours de chargement...
La page est en cours de chargement...
La page est en cours de chargement...
La page est en cours de chargement...
La page est en cours de chargement...
La page est en cours de chargement...
La page est en cours de chargement...
La page est en cours de chargement...
La page est en cours de chargement...
La page est en cours de chargement...
La page est en cours de chargement...
La page est en cours de chargement...
La page est en cours de chargement...
La page est en cours de chargement...
La page est en cours de chargement...
La page est en cours de chargement...
La page est en cours de chargement...
La page est en cours de chargement...
La page est en cours de chargement...
La page est en cours de chargement...
La page est en cours de chargement...
La page est en cours de chargement...
La page est en cours de chargement...
La page est en cours de chargement...
La page est en cours de chargement...
La page est en cours de chargement...
La page est en cours de chargement...
La page est en cours de chargement...
La page est en cours de chargement...
La page est en cours de chargement...
La page est en cours de chargement...
La page est en cours de chargement...
La page est en cours de chargement...
La page est en cours de chargement...
La page est en cours de chargement...
La page est en cours de chargement...
La page est en cours de chargement...
La page est en cours de chargement...
La page est en cours de chargement...
La page est en cours de chargement...
La page est en cours de chargement...
La page est en cours de chargement...
La page est en cours de chargement...
La page est en cours de chargement...
La page est en cours de chargement...
La page est en cours de chargement...
La page est en cours de chargement...
La page est en cours de chargement...
La page est en cours de chargement...
La page est en cours de chargement...
La page est en cours de chargement...
La page est en cours de chargement...
La page est en cours de chargement...
La page est en cours de chargement...
La page est en cours de chargement...
La page est en cours de chargement...
La page est en cours de chargement...
La page est en cours de chargement...
La page est en cours de chargement...
La page est en cours de chargement...
La page est en cours de chargement...
La page est en cours de chargement...
La page est en cours de chargement...
La page est en cours de chargement...
La page est en cours de chargement...
La page est en cours de chargement...
La page est en cours de chargement...
La page est en cours de chargement...
La page est en cours de chargement...
La page est en cours de chargement...
La page est en cours de chargement...
La page est en cours de chargement...
La page est en cours de chargement...
La page est en cours de chargement...
La page est en cours de chargement...
La page est en cours de chargement...
La page est en cours de chargement...
La page est en cours de chargement...
La page est en cours de chargement...
La page est en cours de chargement...
La page est en cours de chargement...
La page est en cours de chargement...
La page est en cours de chargement...
La page est en cours de chargement...
La page est en cours de chargement...
La page est en cours de chargement...
La page est en cours de chargement...
La page est en cours de chargement...
La page est en cours de chargement...
La page est en cours de chargement...
La page est en cours de chargement...
La page est en cours de chargement...
La page est en cours de chargement...
La page est en cours de chargement...
La page est en cours de chargement...
La page est en cours de chargement...
La page est en cours de chargement...
La page est en cours de chargement...
La page est en cours de chargement...
La page est en cours de chargement...
La page est en cours de chargement...
La page est en cours de chargement...
La page est en cours de chargement...
La page est en cours de chargement...
La page est en cours de chargement...
La page est en cours de chargement...
La page est en cours de chargement...
La page est en cours de chargement...
La page est en cours de chargement...
La page est en cours de chargement...
La page est en cours de chargement...
La page est en cours de chargement...
La page est en cours de chargement...
La page est en cours de chargement...
La page est en cours de chargement...
La page est en cours de chargement...
La page est en cours de chargement...
La page est en cours de chargement...
La page est en cours de chargement...
La page est en cours de chargement...
La page est en cours de chargement...
La page est en cours de chargement...
-
 1
1
-
 2
2
-
 3
3
-
 4
4
-
 5
5
-
 6
6
-
 7
7
-
 8
8
-
 9
9
-
 10
10
-
 11
11
-
 12
12
-
 13
13
-
 14
14
-
 15
15
-
 16
16
-
 17
17
-
 18
18
-
 19
19
-
 20
20
-
 21
21
-
 22
22
-
 23
23
-
 24
24
-
 25
25
-
 26
26
-
 27
27
-
 28
28
-
 29
29
-
 30
30
-
 31
31
-
 32
32
-
 33
33
-
 34
34
-
 35
35
-
 36
36
-
 37
37
-
 38
38
-
 39
39
-
 40
40
-
 41
41
-
 42
42
-
 43
43
-
 44
44
-
 45
45
-
 46
46
-
 47
47
-
 48
48
-
 49
49
-
 50
50
-
 51
51
-
 52
52
-
 53
53
-
 54
54
-
 55
55
-
 56
56
-
 57
57
-
 58
58
-
 59
59
-
 60
60
-
 61
61
-
 62
62
-
 63
63
-
 64
64
-
 65
65
-
 66
66
-
 67
67
-
 68
68
-
 69
69
-
 70
70
-
 71
71
-
 72
72
-
 73
73
-
 74
74
-
 75
75
-
 76
76
-
 77
77
-
 78
78
-
 79
79
-
 80
80
-
 81
81
-
 82
82
-
 83
83
-
 84
84
-
 85
85
-
 86
86
-
 87
87
-
 88
88
-
 89
89
-
 90
90
-
 91
91
-
 92
92
-
 93
93
-
 94
94
-
 95
95
-
 96
96
-
 97
97
-
 98
98
-
 99
99
-
 100
100
-
 101
101
-
 102
102
-
 103
103
-
 104
104
-
 105
105
-
 106
106
-
 107
107
-
 108
108
-
 109
109
-
 110
110
-
 111
111
-
 112
112
-
 113
113
-
 114
114
-
 115
115
-
 116
116
-
 117
117
-
 118
118
-
 119
119
-
 120
120
-
 121
121
-
 122
122
-
 123
123
-
 124
124
-
 125
125
-
 126
126
-
 127
127
-
 128
128
-
 129
129
-
 130
130
-
 131
131
-
 132
132
-
 133
133
-
 134
134
-
 135
135
-
 136
136
-
 137
137
-
 138
138
-
 139
139
-
 140
140
-
 141
141
-
 142
142
-
 143
143
-
 144
144
-
 145
145
-
 146
146
-
 147
147
-
 148
148
-
 149
149
-
 150
150
-
 151
151
-
 152
152
-
 153
153
-
 154
154
-
 155
155
-
 156
156
-
 157
157
-
 158
158
-
 159
159
-
 160
160
-
 161
161
-
 162
162
-
 163
163
-
 164
164
-
 165
165
-
 166
166
-
 167
167
-
 168
168
-
 169
169
-
 170
170
-
 171
171
-
 172
172
-
 173
173
-
 174
174
-
 175
175
-
 176
176
-
 177
177
-
 178
178
-
 179
179
-
 180
180
-
 181
181
-
 182
182
-
 183
183
-
 184
184
-
 185
185
-
 186
186
-
 187
187
-
 188
188
-
 189
189
-
 190
190
-
 191
191


dans d''autres langues
- English: Sony HT-A3000 User manual
- español: Sony HT-A3000 Manual de usuario