Britax ROUNDABOUT 55 Le manuel du propriétaire
- Catégorie
- Siège de voiture
- Taper
- Le manuel du propriétaire

Roundabout
®
55
Canadian User Guide
Guide d’utilisation canadien
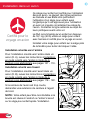
IMPORTANT : Lire attentivement et suivez tous les instructions avant d’installer
ce siège. Garder ce guide dans la pochette dessous la housse (Voir la page des
caractéristiques pour vous référer).
IMPORTANT: Thoroughly read and follow all instructions before installing
this child seat. Store this user guide in the pocket behind the cover (See
features pages for reference).


©2010 Britax Child Safety, Inc. All rights reserved. Printed in USA P417400_R2:09.10
This product and its components are subject to change without notice.
Safety Information .......................................................................................2
Warnings ...............................................................................................................2
Important Notes ....................................................................................................4
Certification ...........................................................................................................5
Registration ...........................................................................................................5
Important Child Seat Usage Information ............................................................6
Vehicle Compatibility ..................................................................................8
Compatible Vehicle Seat Belts ............................................................................8
Incompatible Vehicle Seat Belts ..........................................................................12
Vehicle Seating Positions .....................................................................................13
Child Seat Features .....................................................................................14
Child Seat Functions ...................................................................................16
Harness Height Adjustment.................................................................................16
Adjusting Buckle Position ....................................................................................18
Fastening the Buckle ...........................................................................................20
Releasing the Buckle ...........................................................................................20
Using the Chest Clip ...........................................................................................20
Using the Lock-Offs ..............................................................................................21
Infant Body Pillow .................................................................................................21
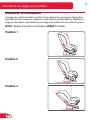
Recline Positions ..................................................................................................22
Using he Lower Universal Anchorage System (LUAS) ......................................24
Using the Lower Connectors ...............................................................................25
Using the Versa-Tether
®
.......................................................................................26
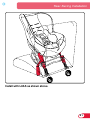
Rear-Facing Installation ..............................................................................30
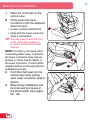
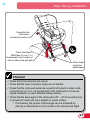
LUAS Installation ..................................................................................................30
Lap-Shoulder Belt Installation ..............................................................................34
Lap Belt Installation ..............................................................................................38
Forward-Facing Installation ........................................................................42
LUAS Installation ..................................................................................................42
Lap-Shoulder Belt Installation ..............................................................................46
Lap Belt Installation ..............................................................................................50
Aircraft Installation ......................................................................................54
Securing Your Child ....................................................................................55
Care and Maintenance ................................................................................58
Tips and Troubleshooting ...........................................................................65
Warranty .......................................................................................................66
Table of Contents

2
Section Title
• The restraint system must be used in a rear-facing position when it
is used for an infant.
• Use rear-facing for children who weigh between 2.3 and 18.1 kg
(5 – 40 lbs) and whose height is 116.8 cm (46 in.) or less. Use
forward-facing for children who weigh between 9.1 and 24.9 kg
(20 – 55 lbs) and whose height is 116.8 cm (46 in.) or less AND
are at least 1 year of age.
• Snugly adjust the belts provided with this child restraint around
your child.
• Secure the top tether strap provided with this child seat.
• The child restraint must be secured to the vehicle with a lower
connector system, if the restraint system is installed in a seating
position that is equipped with a Lower Universal Anchorage
System (LUAS), or a vehicle seat belt if the restraint system is
installed in a seating position that is not equipped with a LUAS
and by means of a tether strap.
• This child restraint system, even when unoccupied, must be firmly
secured to the vehicle.
• Follow all instructions on this child restraint and in the written
instructions located in the pocket behind the cover.
• Register your child restraint with the manufacturer.
• This child seat cannot be used in positions 1 or 2 when installed
rear-facing (see page 22).
• Use the inner buckle slot when installed rear-facing.
• Use the outer buckle slot when installing the child seat forward-
facing with a child weighing 13.6 kg (30 lbs) and above or if the
buckle is under the child in the inner position.
• This child seat cannot be used in position 3 when installed
forward-facing (see page 22).
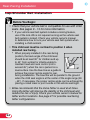
• To prevent injury due to deterioration or hidden damage,
discontinue use of this child seat if it is older than seven years or
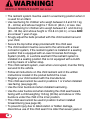
WARNING!
DEATH or SERIOUS INJURY can occur:

3
Section Title
has been in a moderate or severe crash (see page 4). See Serial
Number and Manufactured Date Label on child seat (page 15).
• This child seat can only be used in the following classes of
vehicles: multi-purpose passenger vehicles, passenger cars or
trucks.
• Based on crash statistics, Britax recommends that parents select
the back seat as the safest location for a properly installed child
seat. Please study Vehicle Seating Positions on page 13 to ensure
your child’s safety and consult your vehicle owner’s manual.
• When using in a vehicle with air bags, refer to your vehicle owner’s
manual for child seat installation instructions and precautions.
• Never use the harness adjuster strap to lift or carry this child seat.
Doing so could cause damage to harness adjuster and webbing.
Always carry this child seat by its shell or tether straps.
• The primary protection for occupants of a vehicle in a collision is
the body of the vehicle itself; a child seat will not protect a child
when a vehicle is seriously impacted. However, correctly installed,
a child seat will substantially improve chances for survival in most
crashes. Make sure all users fully understand the correct ways to
use this child seat in a vehicle.
• Refer to your vehicle owner’s manual or contact the vehicle
manufacturer for the maximum weight rating for their LUAS.
Use vehicle seat belt (not LUAS) for installations with children
who weigh more than the vehicle LUAS limit. Unless specified
otherwise by the vehicle manufacturer, assume a 18.1 kg (40 lb)
child is the vehicle LUAS limit.
• The use of non-Britax Child Safety, Inc., covers, inserts, toys,
accessories, or tightening devices is not approved by Britax. Their
use could cause this child seat not perform as intended in a crash.

4
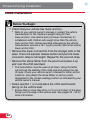
Important Notes
• Verify that the child seat is securely installed and the harness is
properly adjusted around the child each time the child seat is used
.
• Discontinue use of this child seat if it has been in a moderate
or severe crash. It is not necessary to replace a car seat after a
minor crash defined by the U.S. National Highway Traffic Safety
Administration as (NHTSA):
* The vehicle is driveable from the crash site.
* The vehicle door nearest the child seat was not damaged.
* No vehicle occupants were injured.
* There is no visible damage to the child seat.
* The airbags (if present) did not deploy.
• Adjust the harness to fit the clothes the child is wearing. Remove
bulky coats and/or jackets before putting the child in child seat.
• Cover the child seat when the vehicle is parked in direct sunlight.
Metal parts of child seat could become hot enough to burn a child.
• Store the child seat in a safe place when it is not being used. Avoid
placing heavy objects on top of it.
• Do not leave children alone in a vehicle, even for a short time.
• Do not, except as described in this booklet, attempt to disassemble
any part of the child seat or change the way the harness or vehicle’s
seat belts are used.
• Do not leave loose objects, e.g. books, bags, etc., in the back of
a vehicle. In the event of a sudden stop, loose objects will keep
moving, potentially causing serious injuries.
• Do not leave folding vehicle seats unsecured or unlatched. In the
event of a sudden stop, a loose seat back could cause the child seat
not to perform as intended.
• Do not allow children to play with this child seat.
• Do not use anything to raise the child seat off vehicle seat except as
described in these instructions. In a crash, this could cause the child
seat not to perform as intended.
Safety Information

5
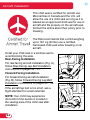
Certification
This child seat system conforms to all applicable Canadian Motor
Vehicle Safety Standards (CMVSS 213 and 213.1). This Restraint is
Certified For Use in Motor Vehicles and Aircraft.
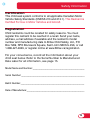
Registration
Child restraints could be recalled for safety reasons. You must
register this restraint to be reached in a recall. Send your name,
address, e-mail address if available and the restraint’s model
number and manufacturing date to Britax Child Safety, Ltd., P.O
Box 7289, RPO Brunswick Square, Saint John NB E2L 4S6, or call
1-888-427-4829, or register online at www.Britax.ca/registration.
For your convenience, record all the information about your
child seat below. Refer to the Serial Number & Manufactured
Date Label for all information, see page 15.
Model Name and Number:_____________________________________________
Serial Number:_______________________________________________________
Batch Number:_______________________________________________________
Date of Manufacture:__________________________________________________
Safety Information

6
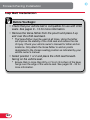
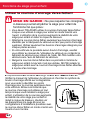
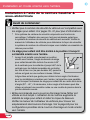
WARNING! REAR-FACING use of this child seat is ONLY for
children who meet ALL of the requirements below. If the child cannot
be secured within these requirements because they are too small, use
of the infant positioning insert or selection of a different child seat (such
as an infant car seat) may be required. If the child cannot be secured
within these requirements because the child is too large, review the
forward-facing guidelines on page 7.
Important Child Seat Usage Information
All infants must ride rear-facing at least until they have reached
1 year of age and weigh 9.1 kg (20 lbs).
Infant positioning insert may be necessary for small infants
to achieve a snug fit of the harness around your child. Infant
positioning insert sold separately.
Britax advises that parents strongly consider the following when
using this child seat.
• Children should be secured with a harness system until they exceed
the weight or height limits specified.
• Britax recommends that children ride rear-facing to the highest weight
or height specified.
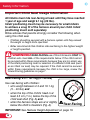
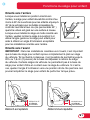
Rear-Facing: 2.3 – 18.1 kg (5 – 40 lbs)
Use rear-facing with children:
• who weigh between 2.3 and 18.1 kg
(5 – 40 lbs) and
• when the top of the child’s head is at
least 2.5 cm (1 in.) below the top of the
child seat shell (Fig. A) and
• when the harness straps are at or slightly
below the child’s shoulders (Fig. A).
IMPORTANT: See Harness Height Adjustment on page 16.
Safety Information
2.5 cm
1 inch
Rear-Facing
A

7
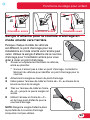
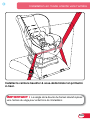
WARNING! FORWARD-FACING use of this child seat
is ONLY for children who meet ALL of the requirements below.
If the child cannot be secured within these requirements
because they are too large, another type of child seat (such
as a booster) may be required. If the child cannot be secured
within these requirements because the child is too small,
review the rear-facing information on page 6.
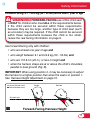
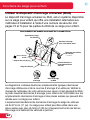
Forward-Facing: 9.1 – 24.9 kg (20 – 55 lbs) and at least 1 year of age
Use forward-facing only with children:
• who are at least one year of age and
• who weigh between 9.1 and 24.9 kg (20 – 55 lbs) and
• who are 116.8 cm (46 in.) or less in height and
• when the harness straps are at or above the child’s shoulders,
parallel to level ground (Fig. B).
IMPORTANT: When using position 2, it may be necessary to adjust
the harness to a higher position than when the seat is in position 1.
See Harness Height Adjustment on page 16.
Safety Information
Shoulder level
Above Shoulder Level
Below Shoulder Level
Upright Reclined
Forward-Facing Harness Height
b

8
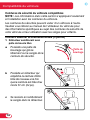
Compatible Vehicle Seat Belts
NOTE: The information in this section only applies to installation
with vehicle seat belts.
Vehicle seats and seat belts differ from vehicle to vehicle. Refer to
your vehicle owner’s manual for specific information about your
vehicle seat belts and their use with child seats.
Lap-Shoulder (3-Point) Belt
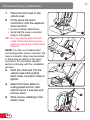
1.
ALR (Automatic Locking Retractor) with Sliding Latch Plate
a Has a latch plate that freely
slides along the vehicle seat
belt webbing.
b Has a retractor that stops the
belt from being pulled out
again once the belt webbing
has been pulled out at least
61 cm (24 in.).
c Tightens by feeding the
belt webbing back into the
retractor.
Vehicle Compatibility
Latch
plate

9
2. ELR (Emergency Locking Retractor) with Locking Latch Plate
a Has a latch plate that locks
the vehicle belt.
* This type of latch plate locks
the vehicle belt when the
vehicle belt and latch plate
lie flat. When using this
type of vehicle belt with a
child seat, ensure the latch
plat and vehicle belt lie flat
against the child seat or
the vehicle belt may remain
unlocked.
b
Has a retractor that locks
only in an emergency
situation such as sudden
stop or crash.
3.
Switchable Retractor in ALR Mode with Sliding Latch Plate
a Has a latch plate that freely
slides along the vehicle seat
belt webbing.
b Has a retractor that can be
switched to function as an
ALR. Pull the belt all the way
out of the retractor to set the
automatic locking function.
* To use a child seat with this
type of vehicle seat belt, you
will need to switch to the
ALR mode or use child seat
lock-offs.
Vehicle Compatibility
Latch
plate
Latch
plate

10
4. ELR (Emergency Locking Retractor) with a Sliding Latch Plate
a
Has a latch plate that freely
slides along the vehicle
seat belt webbing.
b Has a retractor that locks
only in an emergency
situation such as sudden
stop or crash.
IMPORTANT: This belt type requires
the use of the lock-offs built into the
seat for rear- and forward-facing
installations. See page 21 for information on using the lock-offs.
Lap Belt
5. ALR (Automatic Locking Retractor)
a
Has a latch plate that is
sewn into the webbing.
b Has a retractor that stops the
belt from being pulled out
again once the belt webbing
has been pulled out at least
61 cm (24 in. ).
Vehicle Compatibility
Latch
plate

11
c
Tightens by feeding the
belt webbing back into the
retractor.
6.
Locking Latch Plate
a
Has a latch plate that
prevents the webbing from
becoming loose.
b Tightens by pulling on the
belt webbing.
Vehicle Compatibility
Adjuster
Latch
plate

12
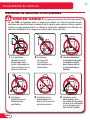
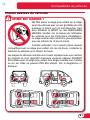
Incompatible Vehicle Seat Belts
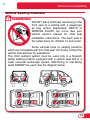
WARNING! The following types of vehicle seat belts are NOT
compatible with this child seat. If any of the belt types listed below are
in the chosen seating position, choose another vehicle seating position
or check your vehicle owner’s manual for information on installing a car
seat in your vehicle.
1 Lap-shoulder belts
with top or bottom
anchor points on
the vehicle door.
2 Motorized,
automatic vehicle
seat belts.
3 Lap-shoulder
belts that have a
separate retractor
each for the
lap section and
shoulder section.
4 Inflatable lap-
shoulder belts.
5 Lap belts forward
of the vehicle seat
bight.
6 Lap belts with a
sewn-in latch plate
that have a retractor
that locks only in case
of a sudden stop.
Vehicle Compatibility

13
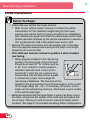
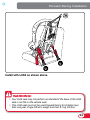
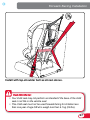
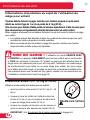
WARNING!
DO NOT place child seat rear-facing in the
front seat of a vehicle with a passenger
air bag unless deactivated. DEATH or
SERIOUS INJURY can occur. See your
vehicle owner’s manual for child seat
installation instructions. The back seat is
the safest place for children 12 and under.
Some vehicles have no seating positions
which are compatible with this child seat. If in doubt, contact the
vehicle manufacturer for assistance.
This child restraint system must be used only in a forward-
facing seating position equipped with a vehicle seat belt or a
lower universal anchorage system. Side-facing or rear-facing
seats CANNOT be used. See the diagram below.
Vehicle Seating Positions
Vehicle Compatibility

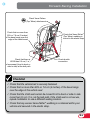
14
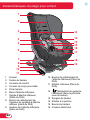
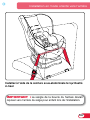
1 Cover
2 Harness Slots
3 Comfort Pads
4 Infant Body Pillow
5 Harness Holder
6 Lower Connector Bar
7 Lower Connector Strap (LUAS
component)
8 Lower Connector Adjuster
Release Button (LUAS
component)
9 Lower Connector Adjuster
(LUAS component)
10 Lower Connector Release
Button (LUAS component)
11 Lower Connector (LUAS
component)
12
User Guide Storage (in
pocket behind cover)
13 Harness Straps
14 Chest Clip
Child Seat Features
12
13
14
15
16
17
18
19
1
4
3
2
5
6
7
8
9
10
11

15
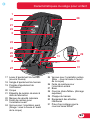
15 Harness Buckle
16 Belly Pad
17 Harness Adjuster
Lever (under cover)
18 Harness Adjuster Strap
19 Recline Adjustment Handle
20 Shell
21 Serial Number & Manufactured
Date Label
22 National Safety Mark
23 Forward-Facing Belt Slot
24 Forward-Facing Lock-Offs (Red
– under cover on front of shell)
25 Rear-Facing Lock-Offs (Blue –
under cover on front of shell)
26 Rear-Facing Belt Slot
27 Base
28 Versa-Tether
®
(Top Tether
Strap)
29 Harness Yoke
30 Lower Connector Storage
31 Versa-Tether
®
Carry Clip
Child Seat Features
28
13
29
30
31
1
21
22
20
23
24
25
2
26
6
27

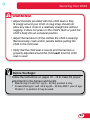
16
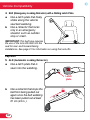
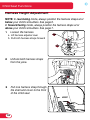
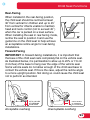
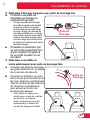
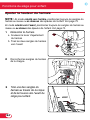
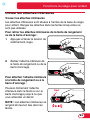
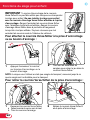
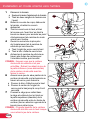
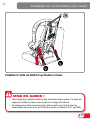
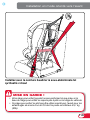
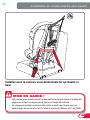
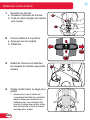
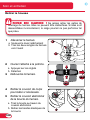
Harness Height Adjustment
NOTE:
In rear-facing mode, always position the harness straps at or
below your child’s shoulders. See page 6.
In forward-facing mode, always position the harness straps at or
above your child’s shoulders. See page 7.
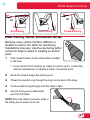
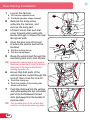
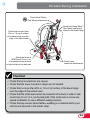
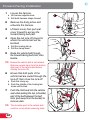
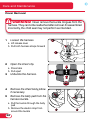
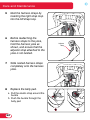
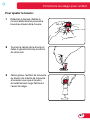
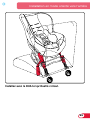
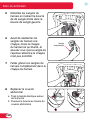
1 Loosen the harness.
a Lift harness adjuster lever
b Pull both harness straps forward
2
Unhook both harness straps
from the yoke.
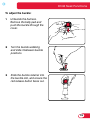
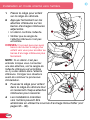
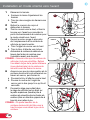
3 Pull one harness strap through
the shell and cover to the front
of the child seat.
Child Seat Functions
1b
1a

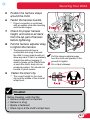
17
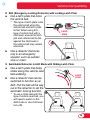
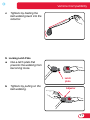
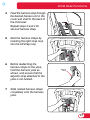
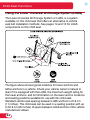
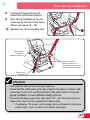
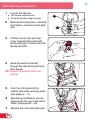
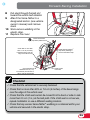
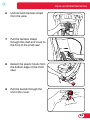
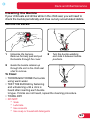
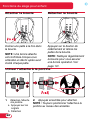
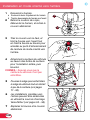
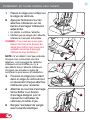
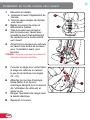
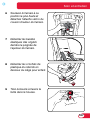
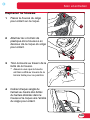
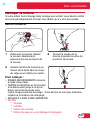
4
Feed the harness strap through
the desired harness slot in the
cover and shell to the back of
the child seat.
Repeat steps 3 and 4 for
second harness strap.
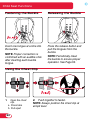
5 Nest the harness straps by
inserting the right strap loop
into the left strap loop.
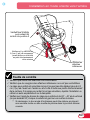
6 Before reattaching the
harness straps to the yoke,
hold the harness yoke as
shown, and ensure that the
adjuster strap attached to the
yoke is not twisted.
7 Slide nested harness straps
completely onto the harness
yoke.
Adjuster
Strap
Child Seat Functions

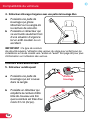
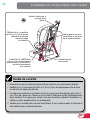
18
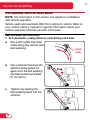
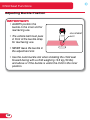
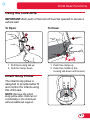
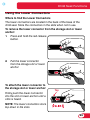
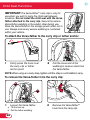
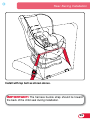
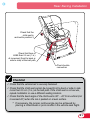
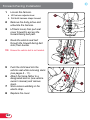
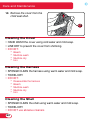
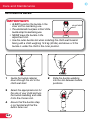
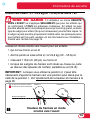
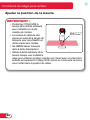
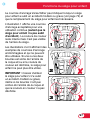
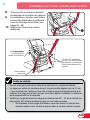
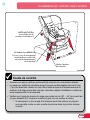
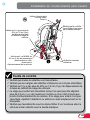
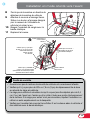
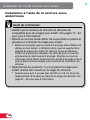
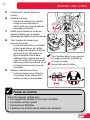
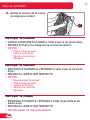
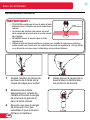
Adjusting Buckle Position
IMPORTANT:
• ALWAYS position the
buckle in the inner slot for
rear-facing use.
• The vehicle belt must pass
in front of the buckle strap
for rear-facing use.
• NEVER leave the buckle in
the adjustment slot.
• Use the outer buckle slot when installing the child seat
forward-facing with a child weighing 13.6 kg (30 lbs)
and above or if the buckle is under the child in the inner
position.
ADJUSTMENT
SLOT
Child Seat Functions
La page est en cours de chargement...
La page est en cours de chargement...
La page est en cours de chargement...
La page est en cours de chargement...
La page est en cours de chargement...
La page est en cours de chargement...
La page est en cours de chargement...
La page est en cours de chargement...
La page est en cours de chargement...
La page est en cours de chargement...
La page est en cours de chargement...
La page est en cours de chargement...
La page est en cours de chargement...
La page est en cours de chargement...
La page est en cours de chargement...
La page est en cours de chargement...
La page est en cours de chargement...
La page est en cours de chargement...
La page est en cours de chargement...
La page est en cours de chargement...
La page est en cours de chargement...
La page est en cours de chargement...
La page est en cours de chargement...
La page est en cours de chargement...
La page est en cours de chargement...
La page est en cours de chargement...
La page est en cours de chargement...
La page est en cours de chargement...
La page est en cours de chargement...
La page est en cours de chargement...
La page est en cours de chargement...
La page est en cours de chargement...
La page est en cours de chargement...
La page est en cours de chargement...
La page est en cours de chargement...
La page est en cours de chargement...
La page est en cours de chargement...
La page est en cours de chargement...
La page est en cours de chargement...
La page est en cours de chargement...
La page est en cours de chargement...
La page est en cours de chargement...
La page est en cours de chargement...
La page est en cours de chargement...
La page est en cours de chargement...
La page est en cours de chargement...
La page est en cours de chargement...
La page est en cours de chargement...
La page est en cours de chargement...
La page est en cours de chargement...
La page est en cours de chargement...
La page est en cours de chargement...
La page est en cours de chargement...
La page est en cours de chargement...
La page est en cours de chargement...
La page est en cours de chargement...
La page est en cours de chargement...
La page est en cours de chargement...
La page est en cours de chargement...
La page est en cours de chargement...
La page est en cours de chargement...
La page est en cours de chargement...
La page est en cours de chargement...
La page est en cours de chargement...
La page est en cours de chargement...
La page est en cours de chargement...
La page est en cours de chargement...
La page est en cours de chargement...
La page est en cours de chargement...
La page est en cours de chargement...
La page est en cours de chargement...
La page est en cours de chargement...
La page est en cours de chargement...
La page est en cours de chargement...
La page est en cours de chargement...
La page est en cours de chargement...
La page est en cours de chargement...
La page est en cours de chargement...
La page est en cours de chargement...
La page est en cours de chargement...
La page est en cours de chargement...
La page est en cours de chargement...
La page est en cours de chargement...
La page est en cours de chargement...
La page est en cours de chargement...
La page est en cours de chargement...
La page est en cours de chargement...
La page est en cours de chargement...
La page est en cours de chargement...
La page est en cours de chargement...
La page est en cours de chargement...
La page est en cours de chargement...
La page est en cours de chargement...
La page est en cours de chargement...
La page est en cours de chargement...
La page est en cours de chargement...
La page est en cours de chargement...
La page est en cours de chargement...
La page est en cours de chargement...
La page est en cours de chargement...
La page est en cours de chargement...
La page est en cours de chargement...
La page est en cours de chargement...
La page est en cours de chargement...
La page est en cours de chargement...
La page est en cours de chargement...
La page est en cours de chargement...
La page est en cours de chargement...
La page est en cours de chargement...
La page est en cours de chargement...
La page est en cours de chargement...
La page est en cours de chargement...
La page est en cours de chargement...
La page est en cours de chargement...
La page est en cours de chargement...
La page est en cours de chargement...
La page est en cours de chargement...
La page est en cours de chargement...
-
 1
1
-
 2
2
-
 3
3
-
 4
4
-
 5
5
-
 6
6
-
 7
7
-
 8
8
-
 9
9
-
 10
10
-
 11
11
-
 12
12
-
 13
13
-
 14
14
-
 15
15
-
 16
16
-
 17
17
-
 18
18
-
 19
19
-
 20
20
-
 21
21
-
 22
22
-
 23
23
-
 24
24
-
 25
25
-
 26
26
-
 27
27
-
 28
28
-
 29
29
-
 30
30
-
 31
31
-
 32
32
-
 33
33
-
 34
34
-
 35
35
-
 36
36
-
 37
37
-
 38
38
-
 39
39
-
 40
40
-
 41
41
-
 42
42
-
 43
43
-
 44
44
-
 45
45
-
 46
46
-
 47
47
-
 48
48
-
 49
49
-
 50
50
-
 51
51
-
 52
52
-
 53
53
-
 54
54
-
 55
55
-
 56
56
-
 57
57
-
 58
58
-
 59
59
-
 60
60
-
 61
61
-
 62
62
-
 63
63
-
 64
64
-
 65
65
-
 66
66
-
 67
67
-
 68
68
-
 69
69
-
 70
70
-
 71
71
-
 72
72
-
 73
73
-
 74
74
-
 75
75
-
 76
76
-
 77
77
-
 78
78
-
 79
79
-
 80
80
-
 81
81
-
 82
82
-
 83
83
-
 84
84
-
 85
85
-
 86
86
-
 87
87
-
 88
88
-
 89
89
-
 90
90
-
 91
91
-
 92
92
-
 93
93
-
 94
94
-
 95
95
-
 96
96
-
 97
97
-
 98
98
-
 99
99
-
 100
100
-
 101
101
-
 102
102
-
 103
103
-
 104
104
-
 105
105
-
 106
106
-
 107
107
-
 108
108
-
 109
109
-
 110
110
-
 111
111
-
 112
112
-
 113
113
-
 114
114
-
 115
115
-
 116
116
-
 117
117
-
 118
118
-
 119
119
-
 120
120
-
 121
121
-
 122
122
-
 123
123
-
 124
124
-
 125
125
-
 126
126
-
 127
127
-
 128
128
-
 129
129
-
 130
130
-
 131
131
-
 132
132
-
 133
133
-
 134
134
-
 135
135
-
 136
136
-
 137
137
-
 138
138


Britax ROUNDABOUT 55 Le manuel du propriétaire
- Catégorie
- Siège de voiture
- Taper
- Le manuel du propriétaire
dans d''autres langues
- English: Britax ROUNDABOUT 55 Owner's manual
Documents connexes
Autres documents
-
 R82 Quokka Manuel utilisateur
-
Graco MILESTONE LX GROUP 0-1 CAR SEAT Manuel utilisateur
-
Graco Milestone Manuel utilisateur
-
 R82 Quokka Mode d'emploi
-
Evenflo Triumph Manuel utilisateur
-
 R82 Quokka Manuel utilisateur
-
 R82 M1435 Wallaroo Mode d'emploi
-
Mad Catz ISPB024CB Manuel utilisateur
-
 R82 Wallaroo Manuel utilisateur
-
Peg-Perego FICA0401I22 Primo Viaggio Manuel utilisateur


