Star Micronics LC-100+ COLOUR Manuel utilisateur
- Taper
- Manuel utilisateur

USER’S MANUAL
GUIDE D’UTILISATION
BEDIENUNGSHANDBUCH
MANUALE OPERATIVO
LC-100 COLOUR
+
DOT MATRIX PRINTER
IMPRIMANTE MATRICIELLE
PUNKT-MATRIX-DRUCKER
STAMPANTE AD AGHI
HL 80825321

CE
Manufacturer’s Declaration of Conformity
EC Council Directive 89/336/EEC of 3 May 1989
This product, has been designed and manufactured in accordance with the
International Standards EN 50081-1/01.92 and EN 50082-1/01.92, following the
provisions of the Electro Magnetic Compatibility Directive of the European
Communities as of May 1989.
EC Council Directive 73/23/EEC and 93/68/EEC of 22 July 1993
This product, has been designed and manufactured in accordance with the
International Standards EN 60950, following the provisions of the Low Voltage
Directive of the European Communities as of July 1993.
The above statement applies only to printers marketed in EU.
Ambient Noise Statement
Machine Noise Information Ordinance 3. GSGV, January 18, 1991: The sound
pressure level at the operator position is equal or less than 70 dB(A) according to
ISO 7779.
The above statement applies only to printers marketed in EU.
Trademark acknowledgments
LC-10, LC-100, LC-100+, LC-200, NX-1000, NX-1020, NX-1040, PT-10DT,
SPC-8K: Star Micronics Co. Ltd.
EX-800, FX-850, LX-810, LX-850: Seiko Epson Corporation
IBM PC, IBM Proprinter, IBM Proprinter2, IBM Proprinter 3:
International Business Machines Corporation.
MS-DOS, Microsoft Windows, Windows 3.1, Windows 95: Microsoft Corporation
TrueType: Apple Computer Inc.
Notice
• All rights reserved. Reproduction of any part of this manual in any form
whatsoever, without STAR’s express permission, is strictly forbidden.
• The contents of this manual are subject to change without notice.
• All efforts have been made to ensure the accuracy of the contents of this manual
at the time of printing. However, should any errors be found, STAR would
greatly appreciate being informed of them.
• The above notwithstanding, STAR can assume no responsibility for any errors in
this manual.
© Copyright 1995 Star Micronics Co., Ltd
Déclaration de conformité CE du fabricant
Directive du conseil de la CE 89/336/EEC du 3 mai 1989
Ce produit a été conçu et fabriqué en accord avec les normes internationales EN
50081-1/01.92 et EN 50082-1/01.92, selon les dispositions de la Directive de mai
1989 de la CE, relative à la compatibilité électromagnétique.
Directives du conseil de la CE 73/23/EEC et 93/68/EEC du 22 juillet 1993
Ce produit a été conçu et fabriqué en accord avec les normes internationales EN
60950, selon les dispositions de la Directive de juillet 1993 de la CE, relative à la
basse tension.
Valable pour les imprimantes commercialisées en Europe seulement.
Déclaration sur les bruits ambiants
Ordonnance 3, GSVG,18 janvier 1991 Informations sur les bruits de machine: Le
niveau de pression acoustique à la position de l’opérateur est égal ou inférieur à 70
dB(A), conformément à la norme ISO 7779.
Valable pour les imprimantes commercialisées en Europe seulement.
Renseignements sur les marques de fabrique
LC-10, LC-100, LC-100+, LC-200, NX-1000, NX-1020, NX-1040, PT-10DT,
SPC-8K: Star Micronics Co.Ltd.
EX-800, FX-850, LX-810, LX-850: Seiko Epson Corporation
IBM PC, IBM Proprinter, IBM Proprinter II, IBM Proprinter III: International
Business Machines Corporation
MS-DOS, Microsoft Windows, Windows 3.1, Windows 95: Microsoft Corporation
True Type: Apple Computer Inc.
Remarque
• Tous droits réservés. La reproduction d’une partie de ce manuel sous quelque
forme que ce soit, sans la permission expresse de STAR, est strictement
interdite.
• Le contenu de ce manuel peut être modifié sans préavis.
• Des précautions ont été prises lors de l’impression de ce manuel pour garantir la
précision de son contenu. Cependant, en cas d’erreur dans ce manuel, STAR
apprécierait grandement d’en être informé.
• Cependant, STAR n’assume aucune responsabilité en cas d’erreurs dans ce
manuel.
© Copyright 1995 Star Micronics Co., Ltd.

CE
Konformitätserklärung des Herstellers
Direktive des EG-Rats 89/336/EEC vom 3. Mai 1989
Dieses Produkt, konstruiert und hergestellt entsprechend den internationalen
Normen EN 50081-1/01.92 und EN 50082-1/01.92, entspricht den Vorschriften der
Direktive für elektromagnetische Verträglichkeit der Europäischen Gemeinschaft,
Stand Mai 1989.
Direktive des EG-Rats 73/23/EEC und 93/68/EEC vom 22. Juni 1993
Dieses Produkt, konstruiert und hergestellt entsprechend den internationalen
Normen EN 60950, entspricht den Vorschriften der Direktive für Niederspannungen
der Europäischen Gemeinschaft, Stand Juli 1993.
Die obigen Feststellungen gelten für Drucker, die in der EU vertrieben werden.
Betriebsgeräusch
Maschinenlärminformationsverordnung 3. GSVG, 18.01, 1991: Der
arbeitsplatzbezogene Schalldruckpegel beträgt 70 dB(A) oder weniger gemäß ISO
7779.
Die obigen Feststellungen gelten für Drucker, die in der EU vertrieben werden.
Eingetragene Warenzeichen
LC-10, LC-100, LC-100+, LC-200, NX-1000, NX-1020, NX-1040, PT-10DT,
SPC-8K: Star Micronics Co., Ltd.
EX-800, FX-850, LX-810, LX-850: Seiko Epson Corporation
IBM PC, PBM Proprinter, PBM Proprinter II, IBM Proprinter III:
International Business Machines Corporation.
MS-DOS, Microsoft Windows, Windows 3.1, Windows 95: Microsoft Corporation
True Type: Apple Computer Inc.
Hinweis
• Alle Rechte vorbehalten. Kein Teil dieses Handbuches darf in irgendeiner Form
ohne ausdrückliche Genehmigung der Firma STAR reproduziert werden.
• Änderungen jederzeit ohne Angabe von Gründen möglich.
• Bei der Zusammenstellung von Texten und Abbildungen wurde mit größter
Sorgfalt vorgegangen. Trotzdem können Fehler nicht vollständig ausgeschlossen
werden. Für Hinweise auf eventuell vorgefundene Fehler ist der Herausgeber
dankbar.
• Die Firma STAR kann keine Verantwortung für Fehler in diesem Handbuch und
eventuell daraus entstehende Folgen verantwortlich gemacht werden.
© Copyright 1995 Star Micronics Co., Ltd.
CE
Dichiarazione di conformità del fabbricante
Direttiva del Consiglio CE 89/336/CEE del 3 maggio 1989
Questo prodotto è stato progettato e fabbricato secondo gli Standard Internazionali
EN 50081-1/01.92 e EN 50082-1/01.92, seguendo quanto previsto dalla Direttiva
sulla Compatibilità Elettromagnetica della Comunità Europea del maggio 1989.
Direttiva del Consiglio CE 73/23/CEE e 93/68/CEE del 22 luglio 1993
Questo prodotto è stato progettato e fabbricato secondo gli Standard Internazionali
EN 60950, seguendo quanto previsto dalla Direttiva sulla Bassa Tensione della
Comunità Europea del luglio 1993.
La dichiarazione di cui sopra è applicabile solo ai prodotti in vendita nell'UE.
Dichiarazione sulle emissioni di rumore nell’ambiente
Informazioni sul rumore delle apparecchiature, Decreto 3. GSGV, del 18 gennaio
1991: La soglia di rumore a livello dell’operatore è uguale o inferiore a 70 dB(A)
secondo la norma ISO 7779.
La dichiarazione di cui sopra è applicabile solo ai prodotti in vendita nell’UE.
Riconoscimento di marchio registrato
LC-10, LC-100, LC-100+, LC-200, NX-1000, NX-1020, NX-1040, PT-10DT,
SPC-8K: Star Micronics Co. Ltd.
EX-800, FX-850, LX-810, LX-850: Seiko Epson Corporation
IBM PC, IBM Proprinter, IBM Proprinter2, IBM Proprinter 3:
International Business Machines Corporation.
MS-DOS, Microsoft Windows, Windows 3.1, Windows 95: Microsoft Corporation
TrueType: Apple Computer Inc.
Avvertenze
• Tutti i diritti riservati. La riproduzione di qualsiasi parte di questo manuale in
qualsiasi forma o mezzo, senza il diretto consenso della STAR, è severamente
proibita.
• Le informazioni contenute nel presente manuale sono soggette a modifiche
senza preavviso.
• Malgrado siano state prese tutte le precauzioni per garantire l’accuratezza delle
informazioni contenute nel presente manuale al momento della stampa, la STAR
sarà ben lieta di ricevere segnalazioni degli eventuali errori riscontrati.
• Nonostante quanto citato sopra, la STAR non si assume nessuna responsabilità
per eventuali errori contenuti nel presente manuale.
© Copyright 1995 Star Micronics Co., Ltd.

About this manual
This manual describes how to set up, use, and care for the Star LC-100+ Colour
printer. The following is a list of what you can expect to find in each chapter.
Chapter 1 Choosing a place for your printer, unpacking and setup,
ribbon cassette installation, loading paper, connecting to your
computer.
Chapter 2 How to use the control panel
Chapter 3 How to use the printer’s Electronic DIP Switch (EDS) Mode
to set up the printer to match the needs of your system and
software
Chapter 4 Installing, starting up and using the User Setup Utility
Chapter 5 How to set up for printing with Microsoft Windows 3.1, how
to prepare for printing, how to print a document
Chapter 6 How to set up for printing with Microsoft Windows 95, how
to prepare for printing, how to print a document
Chapter 7 How to set up for printing with IBM OS/2 Warp, how to
prepare for printing, how to print a document
Chapter 8 How to set up for printing with MS-DOS
Chapter 9 Selecting the best type of paper, adjusting for paper
thickness, manual sheet feeding, clearing paper jams
Appendix A How to deal with printing problems
Appendix B Specifications
Appendix C Interface information
Appendix D Character sets
Appendix E Printer control codes
Appendix F Control panel operation guide
A propos de ce manuel
Ce manuel décrit l’installation, le fonctionnement et l’entretien de l’imprimante
couleur LC-100+ Colour Star. La liste suivante décrit le contenu de chaque chapitre.
Chapitre 1 Choix de l’emplacement de l’imprimante, déballage et
installation, mise en place de la cartouche de ruban,
chargement du papier et raccordements.
Chapitre 2 Utilisation du panneau de commande
Chapitre 3 Utilisation du mode EDS (Commutateurs DIP électroniques)
pour régler l’imprimante sur la configuration du système
informatique et du logiciel utilisé.
Chapitre 4 Installation, préparatifs et exploitation de l’utilitaire
d’impression fourni
Chapitre 5 Réglage de l’imprimante pour Microsoft Windows 3.1,
préparatifs pour l’impression et impression d’un document
Chapitre 6 Réglage de l’imprimante pour Microsoft Windows 95,
préparation pour imprimer, manière d’imprimer un document
Chapitre 7 Configuration pour imprimer avec Warp OS/2 IBM,
préparation pour imprimer, manière d’imprimer un document
Chapitre 8 Réglage pour imprimer avec MS-DOS
Chapitre 9 Sélection du papier, réglage de l’épaisseur du papier,
alimentation manuelle feuille à feuille et suppression des
bourrages de papier
Annexe A Dépistage et résolution des problèmes d’impression
Annexe B Spécifications
Annexe C Informations concernant l’interface
Annexe D Jeux de caractères
Annexe E Codes de contrôle de l’imprimante
Annexe F Guide d’utilisation des commandes

Über dieses Handbuch
In diesem Handbuch wird die Vorbereitung, Verwendung und Pflege des
Farbdruckers Star LC-100+ Colour beschrieben. Im folgenden ein kurzer Umriß der
Inhalte der einzelnen Kapitel.
Kapitel 1 Wahl eines Aufstellungsorts für den Drucker, Auspacken und
Aufstellung, Einlegen der Farbandkassette und des Papiers,
Anschluß am Computer
Kapitel 2 Beschreibung des Bedienfelds
Kapitel 3 Einstellung der elektronischen DIP-Schalter (EDS) zur
Anpassung an die Anforderung von vorhandener Hard- und
Software
Kapitel 4 Installation und Inbetriebnahme mit dem Drucker-
Installationsprogramm
Kapitel 5 Grungeinstellungen zum Drucken mit Microsoft Windows
3.1, vorbereitungen für den Druck, Drucken von
Dokumenten
Kapitel 6 Grundeinstellungen zum Drucken mit Microsoft Windows
95, Vorbereitungen für den Druck, Drucken von Dokumenten
Kapitel 7 Grundeinstellungen zum Drucken mit IBM OS/2 Warp,
Vorbereitungen für den Druck, Drucken von Dokumenten
Kapitel 8 Vorbereitung zum Drucken mit MS-DOS
Kapitel 9 Wahl des besten Papiertyps, Einstellung auf Papierstärke,
Einzelblatteinzug, Beheben von Papierstaus
Anhang A Beheben von Druckproblemen
Anhang B Technische Daten
Anhang C Schnittstelleninformationen
Anhang D Zeichensätze
Anhang E Drucker-Steuercodes
Anhang F Steuerung über Bedienfeld
Informazioni sul manuale
Questo manuale descrive come installare, usare e mantenere la stampante a colori
Star LC-100+ Colour. Segue una lista del contenuto di ciascun capitolo.
Capitolo 1 Scelta della collocazione per la stampante, disimballaggio
e installazione, inserimento della cartuccia del nastro,
caricamento della carta, collegamento della stampante
Capitolo 2 Uso del pannello comandi
Capitolo 3 Uso del modo interruttore DIP elettronico (EDS) della
stampante per configurare la stampante in base alle
esigenze del sistema e del software impiegati
Capitolo 4 Installazione, avvio e impiego dell’User Setup Utility
Capitolo 5 Preliminari per la stampa con Microsoft Windows 3.1,
preparativi per la stampa, come stampare un documento
Capitolo 6 Preliminari per la stampa con Microsoft Windows 95,
preparativi per la stampa, come stampare un documento.
Capitolo 7 Preliminari per la stampa con IBM OS/2 Warp, preparativi
per la stampa, come stampare un documento.
Capitolo 8 Preparativi per la stampa con MS-DOS
Capitolo 9 Selezione del tipo migliore di carta, regolazione per lo
spessore della carta, inserimento fogli manuale,
eliminazione di inceppamenti della carta
Appendice A Soluzione dei problemi di stampa
Appendice B Caratteristiche tecniche
Appendice C Informazioni sull’interfaccia
Appendice D Gruppi di caratteri
Appendice E Codici di controllo stampante
Appendice F Guida all’uso del pannello comandi

Contents
Chapter 1: Printer Setup ........................................................................ 1
Choosing a place for the printer ................................................................. 1
Unpacking the printer ................................................................................. 3
General guide ............................................................................................. 3
Installing the platen knob ........................................................................... 5
Opening the front cover ..............................................................................5
Installing the ribbon cassette ......................................................................7
Removing the ribbon cassette .................................................................. 11
Installing the paper guide ......................................................................... 11
Connecting to a power outlet and turning power on and off .................... 13
Loading fanfold paper .............................................................................. 15
Printing on fanfold paper .........................................................................19
Parking fanfold paper ............................................................................... 21
Unparking fanfold paper .......................................................................... 21
Using the tear-off function ....................................................................... 23
Connecting to your computer ................................................................... 25
Chapter 2: Control Panel Operations ............................................. 27
Switching between on-line and off-line ................................................... 27
Selecting a font ......................................................................................... 29
Entering the Font Lock Mode .................................................................. 29
Setting the character pitch ........................................................................ 31
Entering the Pitch Lock Mode ................................................................. 31
Line feed .................................................................................................. 33
Paper eject (cut-sheet paper) .................................................................... 33
Form feed (fanfold paper) ........................................................................ 33
Parking fanfold paper ............................................................................... 33
Micro feed ................................................................................................ 33
Setting the top of form position ...............................................................35
Tear-off function (fanfold paper) ............................................................. 35
Selecting the Quiet Print Mode ................................................................ 35
Changing the auto load position ............................................................... 37
Saving a macro ......................................................................................... 39
Clearing the printer’s buffer ..................................................................... 39
Initializing the printer ............................................................................... 41
Chapter 3: Using the EDS Mode ....................................................... 43
About EDS Mode settings ........................................................................ 43
Table des matières
Chapitre 1: Installation de l’imprimante ........................................ 1
Choix d’un emplacement pour l’imprimante ............................................. 1
Déballage de l’imprimante ......................................................................... 4
Schéma de l’imprimante ............................................................................ 4
Montage de la molette du cylindre ............................................................. 6
Ouverture du capot avant ........................................................................... 6
Mise en place de la cartouche de ruban ..................................................... 8
Retrait de la cartouche de ruban ............................................................... 12
Installation du guide-papier ..................................................................... 12
Branchement sur une prise secteur et mise sous et hors tension .............. 13
Chargement du papier .............................................................................. 16
Impression sur du papier continu ............................................................. 20
Mise en attente du papier continu ............................................................ 21
Remise en circulation du papier continu .................................................. 21
Utilisation de la fonction de découpe ....................................................... 23
Connexion de l’imprimante à votre ordinateur ........................................ 26
Chapitre 2: Utilisation du panneau de commande ................... 27
Alternance entre l’état en ligne et hors ligne ........................................... 27
Utilisation du panneau de commande ...................................................... 29
Mode de verrouillage de la police ............................................................ 29
Réglage du pas des caractères .................................................................. 31
Mode de verrouillage du pas .................................................................... 31
Avance du papier ...................................................................................... 33
Ejection du papier (feuilles séparées) ...................................................... 33
Saut de page (papier continu) ................................................................... 33
Mise en attente du papier continu ............................................................ 33
Alimentation du papier par micro-lignes ................................................. 33
Réglage du début de page ........................................................................ 35
Fonction de découpe (papier continu) ...................................................... 35
Sélection du mode d’impression silencieux ............................................. 35
Changement de la position de chargement automatique .......................... 37
Sauvegarde des réglages du panneau de commande ................................ 39
Vidage de la mémoire tampon de l’imprimante ....................................... 39
Réinitialisation de l’imprimante ............................................................... 41
Chapitre 3: Utilisation du mode EDS ............................................. 43
Au sujet des réglages en mode EDS ........................................................ 43
Entrée en mode EDS ................................................................................ 43

Inhaltsverzeichnis
Kapitel 1: Drucker-Setup ....................................................................... 2
Wahl eines Aufstellungsorts für den Drucker ............................................ 2
Auspacken .................................................................................................. 4
Allgemeine Anleitung ................................................................................ 4
Befestigung des Walzendrehknopfes ......................................................... 6
Öffnen der Frontabdeckung ....................................................................... 6
Einsetzen der Farbbandkassette ................................................................. 8
Entnehmen der Farbbandkassette ............................................................. 12
Ansetzen der Papierführung ..................................................................... 12
Anschluß an eine Steckdose und Ein-/Ausschalten der Netzversorgung . 14
Papier einlegen ......................................................................................... 16
Drucken auf Endlospapier ........................................................................ 20
Die Papier-Park Funktion ......................................................................... 22
Fortsetzung des Endlospapier-Druckbetriebs ...........................................22
Verwendung der Abreißfunktion .............................................................. 24
Anschluß an den Computer ...................................................................... 26
Kapitel 2: Bedienfeld .............................................................................. 28
Umschalten zwischen Online- und Offline-Betrieb ................................. 28
Wahl einer Schriftart ................................................................................ 30
Einstellen des Schriftart-Sperrmodus ...................................................... 30
Einstellen des Zeichenabstands ................................................................ 32
Einstellen des Zeichenabstand-Sperrmodus ............................................. 32
Zeilenvorschub ......................................................................................... 34
Blattauswurf (Einzelblattpapier) .............................................................. 34
Blattvorschub (Endlospapier) ................................................................... 34
Papier-Park Funktion ................................................................................ 34
Mikro-Papiertransport ..............................................................................34
Einstellen des Blattanfangs ...................................................................... 36
Abreißfunktion (Endlospapier) ................................................................ 36
Einstellen des Leisedruckmodus .............................................................. 36
Änderung der automatischen Papiereinzugposition ................................. 38
Speichern der Bedienfeldeinstellungen .................................................... 40
Löschen des Druckerspeichers ................................................................. 40
Initialisierung des Druckers / Reset ......................................................... 42
Kapitel 3: Verwendung des EDS-Modus ....................................... 44
Einstellungen des EDS-Modus ................................................................44
Einschalten des EDS-Modus .................................................................... 44
Indice
Capitolo 1: Installazione della stampante ....................................... 2
Scelta di una collocazione per la stampante ............................................... 2
Disimballaggio della stampante ................................................................. 4
Guida generale ........................................................................................... 4
Installazione della manopola del rullo ....................................................... 6
Apertura del coperchio anteriore ................................................................ 6
Inserimento della cartuccia del nastro ........................................................ 8
Rimozione della cartuccia del nastro ....................................................... 12
Installazione della guida della carta ......................................................... 12
Collegamento ad una presa di corrente e accensione e spegnimento ....... 14
Caricamento della carta ............................................................................ 16
Stampa su carta in modulo continuo ........................................................ 20
Parcheggio della carta in modulo continuo .............................................. 22
Riattivazione della carta in modulo continuo ........................................... 22
Uso della funzione di taglio ..................................................................... 24
Collegamento al computer ....................................................................... 26
Capitolo 2: Uso del pannello comandi ............................................ 28
Alternazione tra on-line e off-line ............................................................ 28
Selezione del font ..................................................................................... 30
Attivazione del modo font bloccato ......................................................... 30
Selezione del passo di stampa dei caratteri .............................................. 32
Attivazione del modo passo di stampa bloccato ...................................... 32
Avanzamento di riga ................................................................................ 34
Espulsione carta (carta in fogli) ............................................................... 34
Avanzamento pagina (carta in modulo continuo) .................................... 34
Parcheggio del modulo continuo .............................................................. 34
Avanzamento micrometrico ..................................................................... 34
Selezione della posizione di inizio stampa .............................................. 36
Funzione di taglio (carta in modulo continuo) ......................................... 36
Selezione del modo di stampa silenziosa ................................................. 36
Cambiamento della posizione di caricamento automatico ....................... 38
Memorizzazione delle regolazioni del pannello comandi ........................ 40
Liberazione del buffer della stampante .................................................... 40
Inizializzazione della stampante .............................................................. 42
Capitolo 3: Uso del modo EDS ........................................................... 44
Regolazioni del modo EDS ...................................................................... 44
Attivazione del modo EDS ....................................................................... 44

Entering the EDS Mode ........................................................................... 43
Selecting a bank ....................................................................................... 45
Selecting a switch ..................................................................................... 45
Changing a switch setting ........................................................................ 47
Printing the current switch settings .......................................................... 47
Exiting the EDS Mode ............................................................................. 47
EDS Mode Settings .................................................................................. 47
Chapter 4: User Setup Utility ............................................................. 59
Installing the User Setup Utility ............................................................... 59
Starting up the User Setup Utility ............................................................ 63
Changing the General, Font, Paper and Adjust Settings .......................... 63
To select a window .......................................................................... 63
To select a setting box ..................................................................... 65
To change a setting .......................................................................... 65
Adjusting the dot alignment ..................................................................... 65
Changing the printer port ......................................................................... 67
Saving setup data in a configuration file .................................................. 67
Importing setup data from a configuration file ......................................... 69
Returning to default settings .................................................................... 69
Exiting the User Setup Utility .................................................................. 69
Using the Help menu ................................................................................ 69
Chapter 5: Using the Printer with Windows 3.1 ........................ 71
Setting up for printing with Microsoft Windows 3.1 ............................... 71
Getting ready to print ............................................................................... 77
Printing a document ................................................................................. 79
Installing TrueType fonts ......................................................................... 81
Selecting fonts in Windows applications ................................................. 83
Chapter 6: Using the Printer with Windows 95 ......................... 85
Setting up the printer in Windows 95 ....................................................... 85
Preparing to print ..................................................................................... 93
Printing a document ................................................................................. 97
Installing TrueType fonts ......................................................................... 99
Sélection d’une banque ............................................................................ 45
Sélection d’un commutateur .................................................................... 45
Changement du réglage d’un commutateur ............................................. 47
Impression des réglages des commutateurs ............................................. 47
Sortie du mode EDS ................................................................................. 47
Réglages en mode EDS ............................................................................ 47
Chapitre 4: Utilitaire d’impression .................................................. 59
Installation de l’utilitaire d’impression .................................................... 59
Exploitation de l’utilitaire d’impression .................................................. 63
Changement des réglages de généralités, de la police,
du papier et des paramètres ............................................................... 63
Sélection d’une fenêtre .................................................................... 63
Sélection d’une case de réglage ...................................................... 65
Changement d’un réglage ............................................................... 65
Réglage de l’alignement des points ......................................................... 65
Changement du port de l’imprimante ...................................................... 67
Sauvegarde des données dans un fichier de configuration ....................... 67
Importation de données d’un fichier de configuration ............................. 69
Retour aux réglages par défaut ................................................................. 69
Sortie de l’utilitaire d’impression ............................................................ 69
Utilisation du menu d’aide ....................................................................... 69
Chapitre 5: Utilisation de l’imprimante sous Windows 3.1 .. 71
Configuration de l’impression sous Microsoft Windows 3.1 ................... 71
Préparation à l’impression ....................................................................... 77
Impression d’un document ....................................................................... 79
Installation des polices TrueType ............................................................. 81
Sélection des polices dans les applications Windows .............................. 83
Chapitre 6: Utilisation de l’imprimante sous Windows 95 ... 85
Configuration de l’imprimante sous Windows 95 .................................... 85
Préparation en vue d’impression .............................................................. 93
Impression de document .......................................................................... 97
Installation de polices TrueType .............................................................. 99

Wahl einer Gruppe ................................................................................... 46
Wahl eines Schalters ................................................................................ 46
Änderung der Schaltereinstellung ............................................................ 48
Ausdrucken der gegenwärtigen Schaltereinstellungen ............................ 48
Verlassen des EDS-Modus ....................................................................... 48
EDS-Modus-Einstellungen ...................................................................... 48
Kapitel 4: Drucker-Installationsprogramm ................................. 60
Installierung des Drucker-Installationsprogramms .................................. 60
Starten des Drucker-Installationsprogramms ........................................... 64
Änderung der Einstellungen unter Allgem., Font, Papier,
Justage und Port ................................................................................. 64
Wahl eines Fensters ......................................................................... 64
Wahl eines Feldes ........................................................................... 66
Änderung der Einstellung ............................................................... 66
Änderung des Bidirektionalen Druckertests ............................................ 66
Änderung der Schnittstelle ....................................................................... 68
Speichern der Einstelldaten in einer Konfigurationsdatei ........................ 68
Einlesen von Einstelldaten aus einer Konfigurationsdatei ....................... 70
Rückstellung auf die Standardeinstellungen ............................................ 70
Verlassen des Drucker-Installationsprogramms ....................................... 70
Verwendung der Hilfe .............................................................................. 70
Kapitel 5: Einsatz des Druckers unter Windows 3.1 ................ 72
Grundeinstellung (Setup) zum Drucken unter Microsoft Windows 3.1 ..72
Vorbereitung für den Druck ..................................................................... 78
Drucken eines Schriftstücks ..................................................................... 80
Installieren von TrueType-Schriftarten ....................................................82
Wahl von Schriftarten in Windows-Anwendungen .................................. 84
Kapitel 6: Drucker mit Windows 95 anwenden ......................... 86
Einstellung des Druckers für Windows 95 ............................................... 86
Ausdruck vorbereiten ............................................................................... 94
Ausdruck eines Dokumentes .................................................................... 98
TrueType Fonts installieren .................................................................... 100
Selezione di un gruppo ............................................................................. 46
Selezione di un interruttore ...................................................................... 46
Cambiamento della regolazione di un interruttore ................................... 48
Stampa delle regolazioni attuali degli interruttori .................................... 48
Disattivazione del modo EDS .................................................................. 48
Regolazioni del modo EDS ...................................................................... 48
Capitolo 4: User Setup Utility ............................................................. 60
Installazione di User Setup Utility ........................................................... 60
Lancio di User Setup Utility .................................................................... 64
Cambiamento delle impostazioni generali, font, carta e Tarature ............ 64
Per selezionare una finestra ............................................................. 64
Selezione di un riquadro di impostazione ....................................... 66
Per cambiare un’impostazione ........................................................ 66
Regolazione dell’allineamento dei punti .................................................. 66
Cambiamento della porta stampante ........................................................ 68
Salvataggio dei dati di impostazione in un file di configurazione ........... 68
Importazione di dati di impostazione da un file di configurazione .......... 70
Ritorno alle impostazioni default ............................................................. 70
Uscita da User Setup Utility ..................................................................... 70
Uso del menu Help ................................................................................... 70
Capitolo 5: Utilizzo della stampante con Windows 3.1 ........... 72
Installazione della stampante sotto Microsoft Windows 3.1 .................... 72
Impostazione della stampante .................................................................. 78
Stampa di un documento .......................................................................... 80
Installazione dei caratteri TrueType ......................................................... 82
Selezione dei caratteri all’interno delle applicazioni Windows ............... 84
Capitolo 6: Utilizzo della stampante con Windows 95 ............ 86
Installazione della stampante sotto Windows 95 ..................................... 86
Preparazione per la stampa ...................................................................... 94
Stampa di un documento .......................................................................... 98
Installazione dei caratteri TrueType ....................................................... 100

Chapter 7: Using the Printer with OS/2 Warp ......................... 103
Setting up for printing with OS/2 Warp ................................................. 103
Getting ready to print ............................................................................. 105
Printing a document ............................................................................... 105
Chapter 8: Using the Printer with MS-DOS .............................. 107
Setting up for printing with MS-DOS .................................................... 107
Chapter 9: Paper Handling ............................................................... 111
Selecting paper types .............................................................................. 111
Cut-Sheet Paper (Manual Feed) .................................................... 111
Cut-Sheet Paper (with Optional Automatic Sheet Feeder) ........... 111
Fanfold Paper ................................................................................ 111
Adjusting for paper thickness ................................................................ 113
Automatic fanfold feeding ..................................................................... 115
Manual sheet feeding ............................................................................. 115
Clearing paper jams ............................................................................... 117
Appendix A: Troubleshooting .........................................................119
Appendix B: Specifications ...............................................................145
Appendix C: Interface Pin Outs ..................................................... 149
Appendix D: Character Sets ............................................................ 150
Appendix E: Printer Control Codes ............................................. 153
Appendix F: Control Panel Operation Guide .......................... 157
Chapitre 7: Utiliser l’imprimante avec le logiciel OS/2 Warp .. 103
Configurer l’impression avec le logiciel OS/2 Warp IBM ..................... 103
Préparer l’impression ............................................................................. 105
Imprimer un document ........................................................................... 105
Chapitre 8: Utilisation de l’imprimante avec MS-DOS ........ 107
Réglage pour l’impression avec MS-DOS ............................................. 107
Chapitre 9: Manipulation du papier ............................................. 111
Sélection du papier ................................................................................. 111
Feuilles séparées (avance manuelle) ............................................. 111
Feuilles séparées (avec dispositif d’alimentation feuille à
feuille automatique en option) .................................................. 111
Papier continu ................................................................................ 111
Réglage de l’épaisseur du papier ........................................................... 114
Alimentation automatique du papier continu ......................................... 116
Alimentation manuelle feuille à feuille .................................................. 116
Suppression des bourrages de papier ..................................................... 117
Annexe A: Dépannage ........................................................................ 119
Annexe B: Caractéristiques techniques ...................................... 145
Annexe C: Broches du connecteur interface ............................ 149
Annexe D: Jeux de caractères ......................................................... 150
Annexe E: Codes de contrôle de l'imprimante ........................ 153
Annexe F: Guide de fonctionnement du panneau
de commande
............................................................ 157

Kapitel 7: Der Einsatz des Druckers unter OS/2 Warp ........ 104
Einrichtung für den Druck unter IBM OS/2 Warp ................................. 104
Druckvorbereitungen ..............................................................................106
Druck eines Dokumentes ....................................................................... 106
Kapitel 8: Verwendung des Druckers mit MS-DOS .............. 108
Einstellen zum Drucken unter DOS ....................................................... 108
Kapitel 9: Papierhandhabung .......................................................... 112
Wahl der besten Papiersorte ................................................................... 112
Einzelblattpapier (manueller Einzug) ............................................ 112
Einzelblattpapier (mit optionalem automatischem
Einzelblatteinzug) ..................................................................... 112
Endlospapier .................................................................................. 112
Einstellung der Papierstärke ................................................................... 114
Automatische Endlospapierzufuhr ......................................................... 116
Manueller Einzelblatteinzug .................................................................. 116
Beheben von Papierstaus ........................................................................ 118
Anhang A: Fehlersuche ...................................................................... 120
Anhang B: Technische Daten .......................................................... 146
Anhang C: Schnittstelleninformationen ..................................... 149
Anhang D: Zeichensätze .................................................................... 150
Anhang E: Drucker-Steuercodes ................................................... 153
Anhang F: Steuerung über Bedienfeld ........................................ 158
Capitolo 7: Utilizzo della stampante con OS/2 Warp ............ 104
Installazione della stampante sotto OS/2 Warp ...................................... 104
Impostazione della stampante................................................................. 106
Stampa di un documento......................................................................... 106
Capitolo 8: Uso della stampante con MS-DOS ......................... 108
Predisposizione per la stampa con MS-DOS ......................................... 108
Capitolo 9: Gestione della carta ....................................................... 112
Selezione dei tipi di carta ....................................................................... 112
Carta a fogli singoli (alimentazione manuale) .............................. 112
Carta a fogli singoli (con alimentatore automatico di fogli
singoli opzionale) ...................................................................... 112
Carta a modulo continuo ............................................................... 112
Regolazione per lo spessore della carta ................................................. 114
Avanzamento automatico del modulo continuo ..................................... 116
Inserimento manuale dei fogli ................................................................ 116
Eliminazione di inceppamenti della carta .............................................. 118
Appendice A: Soluzione di problemi ............................................ 120
Appendice B: Specifiche tecniche .................................................. 146
Appendice C: Uscite terminali interfaccia ................................ 149
Appendice D: Gruppi di caratteri ................................................. 150
Appendice E: Codici di controllo stampante ............................ 153
Appendice F: Guida all’uso del pannello comandi ................ 158

1
Chapter 1: Printer Setup
This chapter contains important information on setting up your printer. Be sure to
read this chapter carefully before using the printer for the first time. In this chapter
you will learn about:
❏ Choosing a place for the printer
❏ Unpacking and setting up the printer
❏ Installing the platen knob
❏ Installing the ribbon cassette
❏ Loading paper
❏ Connecting to your computer
Choosing a place for the printer
Before actually unpacking the printer, you should take a few minutes to think about
where you plan to use it. Remember the following points when doing this.
✓ Choose a firm, level surface where the printer will not be exposed to vibration.
✓ The power outlet you plan to connect to for power should be nearby and
unobstructed.
✓ Make sure that the printer is close enough to your computer for you to connect
the two with your printer cable.
✓ Allow six inches (15 centimeters) of free space on either side of the printer. If
you are going to use fanfold paper, make sure that there is adequate space for
paper behind the printer.
✓ Make sure that the printer is not exposed to direct sunlight.
✓ Make sure that the printer is well away from heaters.
✓ Make sure that the surrounding area is clean, dry, and free of dust.
✓ Make sure that the printer is connected to a reliable power outlet. It should not
be on the same electric circuit as copiers, refrigerators, or other appliances that
cause power spikes.
✓ Use a power outlet that matches the power rating noted on the label affixed to the
bottom of your printer.
✓ Make sure that the room where you are using the printer is not too humid.
Chapitre 1: Installation de l’imprimante
Ce chapitre contient des informations importantes concernant l’installation de
l’imprimante. Veuillez lire attentivement ce chapitre avant la mise en service de
l’imprimante. Ce chapitre contient les paragraphes suivants:
❏ Choix d’un emplacement pour l’imprimante
❏ Déballage et installation de l’imprimante
❏ Montage de la molette du cylindre
❏ Mise en place de la cartouche de ruban
❏ Chargement du papier
❏ Connexion de l’imprimante à votre ordinateur
Choix d’un emplacement pour l’imprimante
Avant d’installer votre imprimante, prenez le temps de choisir un emplacement
approprié en observant les précautions suivantes:
✓ Posez l’imprimante sur une surface plane qui n’est pas exposée à des vibrations.
✓ Branchez l’imprimante sur une prise placée à proximité et d’accès facile.
✓ Assurez-vous que l’imprimante est assez proche de l’ordinateur pour pouvoir les
raccorder avec le câble de l’imprimante.
✓ Laissez un espace de 15 cm de chaque côté de l’imprimante. Si vous prévoyez
d’utiliser du papier continu, laissez un espace suffisant à l’arrière de
l’imprimante.
✓ N’installez pas l’imprimante dans un endroit exposé aux rayons directs du soleil.
✓ Assurez-vous que l’imprimante ne se trouve pas à proximité d’un chauffage.
✓ Assurez-vous que la zone autour de l’imprimante est propre, sèche et sans
poussière.
✓ Branchez l’imprimante sur une prise fiable. Ne branchez pas l’imprimante sur
une prise qui dessert d’autres appareils générateurs de bruits parasites, tels un
copieur ou un réfrigérateur.
✓ Branchez l’imprimante sur une prise dont la tension correspond à celle indiquée
sur la plaque signalétique collée sous l’imprimante.
✓ Assurez-vous que la pièce dans laquelle se trouve l’imprimante n’est pas
humide.

2
Kapitel 1: Drucker-Setup
Dieses Kapitel enthält wichtige Informationen zur Vorbereitung Ihres Druckers.
Bitte lesen Sie dieses Kapitel sorgfältig durch, bevor Sie den Drucker zum ersten
Mal in Betrieb nehmen. In diesem Kapitel erfahren Sie Einzelheiten über:
❏ Wahl eines Aufstellungsorts für den Drucker
❏ Auspacken und Vorbereiten des Druckers
❏ Anbringen des Walzendrehknopfes
❏ Einsetzen der Farbbandkassette
❏ Einlegen von Papier
❏ Anschluß an den Computer
Wahl eines Aufstellungsorts für den Drucker
Bevor Sie den Drucker auspacken, sollten Sie einige Minuten damit verbringen,
einen geeigneten Aufstellungsort auszusuchen. Denken Sie dabei an die folgenden
Punkte:
✓ Stellen Sie den Drucker auf einem flachen, aber festen Untergrund auf, wo keine
Vibrationen vorhanden sind.
✓ Die verwendete Steckdose soll in der Nähe und frei zugänglich sein.
✓ Stellen Sie sicher, daß der Drucker nahe genug am Computer ist, um die Geräte
mit dem Druckerkabel verbinden zu können.
✓ Lassen Sie ca. 15 cm Abstand zu beiden Seiten des Druckers frei. Wenn Sie
Endlospapier verwenden wollen, stellen Sie sicher, daß ausreichend Platz für das
Papier hinter dem Drucker vorhanden ist.
✓ Stellen Sie sicher, daß der Drucker vor direktem Sonnenlicht geschützt ist.
✓ Stellen Sie sicher, daß der Drucker ausreichend weit von Heizkörpern entfernt
steht.
✓ Sorgen Sie dafür, daß die Umgebung des Druckers sauber, trocken und staubfrei
ist.
✓ Stellen Sie sicher, daß der Drucker an eine einwandfreie Stromzufuhr
angeschlossen ist. Er sollte nicht an Steckdosen angeschlossen werden, an denen
bereits Geräte mit möglichen Netzstörungen wie Kopierer, Kühlschränke u.a.
angeschlossen sind.
✓ Die Versorgungsspannung muß dem Spannungswert auf dem Typenschild an der
Unterseite des Druckers entsprechen.
✓ StellenSie den Drucker nicht an Orten mit hoher Luftfeuchtigkeit auf.
Capitolo 1: Installazione della stampante
Questo capitolo contiene informazioni importanti sull’installazione della stampante.
Leggere questo capitolo con attenzione prima di usare la stampante per la prima
volta. In questo capitolo spieghiamo quanto segue:
❏ Scelta di una collocazione della stampante
❏ Disimballaggio e installazione della stampante
❏ Installazione della manopola del rullo
❏ Inserimento della cartuccia del nastro
❏ Caricamento della carta
❏ Collegamento al computer
Scelta di una collocazione per la stampante
Prima di disimballare la stampante, considerare con cura dove si intende collocarla.
Tenere presenti i seguenti punti:
✓ Scegliere una superficie salda e in piano dove la stampante non sia esposta a
vibrazioni.
✓ La presa di corrente per la stampante dovrebbe essere vicina e non ostruita.
✓ Assicurarsi che la stampante sia abbastanza vicina al computer da poterla
collegare con il cavo stampante.
✓ Lasciare 15 centimetri di spazio libero sui lati della stampante. Se si usa carta in
modulo continuo, lasciare uno spazio sufficiente per la carta dietro la stampante.
✓ Assicurarsi che la stampante non sia esposta alla luce solare diretta.
✓ Assicurarsi che la stampante sia lontana da fonti di calore.
✓ Assicurarsi che l’area circostante sia pulita, asciutta e senza polvere.
✓ Assicurarsi che la stampante sia collegata a una fonte di alimentazione
affidabile. Non deve trovarsi sullo stesso circuito elettrico di copiatrici,
frigoriferi o altri elettrodomestici che causano picchi nell’alimentazione.
✓ Usare una presa di corrente sufficiente per i limiti di impiego indicati
sull’etichetta che si trova sul fondo della stampante.
✓ Assicurarsi che la stanza dove si impiega la stampante non sia troppo umida.

3
Unpacking the printer
Check to make sure that the carton contains each of
the items shown in the following illustration.
If anything is missing, contact the store where you
bought the printer and ask them to supply the missing
part. Note that it is a good idea to keep the original
box and all the packing materials just in case you
need to pack the printer up again and send it
somewhere at a later date.
A serial-to-parallel interface converter (SPC-8K), an
Automatic Sheet Feeder (SF-10DT) and monochrome
ribbon cassettes (LC9/LC9HD/LC9W) are also
available as options. Consult your dealer for details.
General guide
The following illustrations show the major
components of the your printer.
Important!
There are several versions of this printer designed
for different voltages. It is not possible to change the
voltage of a printer. If the voltage shown on the label
on the bottom of your printer does not match the
voltage for your area, contact your dealer
immediately.
3.5" Floppy disk
Disquette 3,5"
3,5-Zoll-Diskette
Floppy disk da 3,5"
Printer
Imprimante
Drucker
Stampante
User’s manual
Manuel de l’utilisateur
Bedienungsanleitung
Manuale dell’utilizzatore
Platen knob
Molette du cylindre
Walzendrehknopf
Manopola del rullo
Paper guide
Guide-papier
Papierführung
Guida della carta
Ribbon cassette
Cartouche de ruban
Farbbandkassette
Cartuccia del nastro
Adjustment lever
Levier de réglage
Kopfspalt-Einstellhebel
Leva di regolazione
Rear cover
Capot arrière
Traktorabdeckung
Coperchio posteriore
Tractors
Tracteurs
Stachelwalzen
Trattori
Ribbon cassette
Cartouche de ruban
Farbbandkassette
Cartuccia del nastro
Print head
Tête d’impression
Druckkopf
Testina di stampa
Front cover
Capot avant
Frontabdeckung
Coperchio anteriore
Entry slot
Fente d’entrée du papier
Papiereinzug
Feritoia di ingresso
Control panel
Panneau de commande
Bedienfeld
Pannello comandi
Paper guide
Guide-papier
Papierführung
Guida della carta
Interface connector
Connecteur interface
Schnittstellenanschluß
Connettore interfaccia
Platen knob
Molette du cylindre
Walzendrehknopf
Manopola del rullo
Release lever
Levier de dégagement
Papier wahlschalter
Leva di rilascio
Bail lever
Levier du presse-papier
Freigabehebel
Leva libera-carta
Power switch
Interrupteur d’alimentation
Netzschalter
Interruttore di alimentazione

4
Déballage de l’imprimante
Vérifiez que tous les accessoires illustrés ci-dessous
se trouvent dans le carton.
Si un accessoire manque, contactez immédiatement
le magasin où vous avez acheté l’imprimante pour le
réclamer. Pensez à conserver le carton et les
matériaux d’emballage au cas où vous auriez besoin
de transporter l’imprimante par la suite.
Un convertisseur interface série-parallèle (SPC-8K),
un bac d’alimentation automatique feuille à feuille
(SF-10DT) et des cartouches de ruban monochrome
(LC9/LC9HD/LC9W) sont disponibles en option.
Pour plus de détails sur les accessoires en option,
contactez votre revendeur.
Schéma de l’imprimante
Les illustrations suivantes indiquent les pièces
principales de l’imprimante.
Important!
Il existe plusieurs versions de cette imprimante avec
différentes tension de fonctionnement. La tension de
fonctionnement d’une imprimante ne peut pas être
changée. Par conséquent, si la tension de
fonctionnement indiquée sur la plaque signalétique
collée sous l’imprimante ne correspond pas à la
tension du courant secteur local, contactez
immédiatement votre revendeur.
Auspacken
Überprüfen Sie den Kartoninhalt, und vergewissern
Sie sich, daß alle unten abgebildeten Teile vorhanden
sind.
Falls Teile fehlen, wenden Sie sich zwecks
Nachlieferung bitte an den Fachhandel, bei dem das
Gerät gekauft wurde. Im Hinblick auf einen
eventuellen zukünftigen Transport des Druckers
empfiehlt es sich, den Lieferkarton und das gesamte
Verpackungsmaterial aufzubewahren.
Ein Seriell-Parallel-Adapter (SPC-8K), ein
automatischer Einzelblatteinzug (SF-10DT) und
Monochrom-Farbbänder in der Farbe schwarz (LC9/
LC9HD/LC9W) sind als Sonderzubehör erhältlich.
Allgemeine Anleitung
Die folgenden Abbildungen zeigen die Hauptbauteile
des Druckers.
Wichtig!
Dieser Drucker ist je nach der benötigten
Betriebsspannung in verschiedenen Modellversionen
erhältlich. Die Betriebsspannung ist nicht am
Drucker einstellbar. Wenden Sie sich deshalb bitte
umgehend an Ihren Fachhändler, falls die auf dem
Typenschild unten am Drucker angegebene
Betriebsspannung nicht der lokalen Netzspannung
entspricht.
Disimballaggio della stampante
Controllare che lo scatolone contenga tutti gli
elementi mostrati nell’illustrazione sotto.
Se mancasse qualcosa contattare il negozio presso
cui si è acquistata la stampante e richiedere
l’elemento mancante. Notare che è consigliabile
conservare lo scatolone originale e tutto il materiale
di imballaggio nel caso si debba reimballare la
stampante e spedirla a qualche destinazione in futuro.
Un convertitore interfaccia da seriale a parallelo
(SPC-8K), un alimentatore automatico fogli (SF-
10DT) e cartucce nastro monocromo (LC9/LC9HD/
LC9W) sono disponibili come opzioni. Consultare il
proprio rivenditore per dettagli.
Guida generale
Le seguenti illustrazioni mostrano i principali
componenti della stampante.
Importante!
Esistono varie versioni di questa stampante studiate
per tensioni diverse. Non è possibile cambiare la
tensione di una stampante. Se la tensione indicata
sull’etichetta sul fondo della stampante non
corrisponde alla tensione della propria zona,
contattare immediatamente il rivenditore.

5
Installing the platen knob
The platen knob is packed into a recess in the
packaging material.
❏ Install the knob on the shaft located inside the
large hole on the right side of the printer. Make
sure that the two splines of the platen shaft inside
the printer fit into the slots inside the knob’s
spindle. Press the knob carefully but firmly into
place as far as it will go.
Opening the front cover
❏ Lift up on the front cover while pressing in gently
on its sides.
❏ To close the front cover, simply lower it back into
place.
Caution!
The tear assist edge is rather sharp. Take care to
avoid injuring your hands.
Note:
You can completely remove the front cover from the
printer or you can stand it up without removing it.
You should normally leave the front cover closed,
because it protects against objects getting into the
printer, and it cuts down on printer nois
e.
Platen knob
Molette du cylindre
Walzendrehknopf
Manopola del rullo
Front cover
Capot avant
Frontabdeckung
Coperchio anteriore
Tear assist edge
Barre de découpe
Papierabrißkante
Listello di separazione

6
Montage de la molette du cylindre
La molette du cylindre se trouve dans un emballage
avec les autres accessoires.
❏ Installez la molette sur l’axe se trouvant dans le
grande orifice sur le côté droit de l’imprimante.
Assurez-vous que les deux saillies de l’axe du
cylindre rentrent dans les fentes sur la tige de la
molette. Appuyez fermement mais avec
précaution sur la molette pour l’enfoncer
complètement.
Ouverture du capot avant
❏ Soulevez le capot avant en appuyant de chaque
côté.
❏ Pour fermer le capot avant, abaissez-le tout
simplement.
Attention!
La barre de découpe est tranchante. Prenez garde de
ne pas vous blesser.
Remarque:
Vous pouvez enlever le capot avant de l’imprimante
ou le relever comme indiqué sur l’illustration.
Normalement, laissez le capot fermé car il empêche
des corps étrangers de pénétrer dans l’imprimante et
il réduit considérablement le bruit produit par
l’imprimante.
Befestigung des Walzendrehknopfes
Der Walzendrehknopf befindet sich in einer
Aussparung des Verpackungsmaterials.
❏ Stecken Sie den Walzendrehknopf auf die Welle
in dem großen Loch an der rechten Seite des
Druckers, indem Sie die beiden Nuten der
Walzenwelle im Drucker in die Kerben der
Walzendrehknopfspindel einpassen. Schieben Sie
den Knopf in dieser Position vorsichtig aber fest
bis zum Anschlag auf die Walze.
Öffnen der Frontabdeckung
❏ Drücken Sie leicht gegen die Seiten der
Frontabdeckung, und klappen Sie die Abdeckung
hoch.
❏ Schließen Sie die Frontabdeckung, indem Sie sie
einfach wieder herunterklappen.
Vorsicht!
Die Papierabrißkante ist ziemlich scharf. Achten Sie
darauf, sich nicht die Hand daran zu verletzen.
Hinweis:
Die Frontabdeckung des Druckers kann
abgenommen oder, wie in der Abbildung gezeigt,
hochgestellt werden. Die Frontabdeckung sollte
ansonsten stets zugeklappt bleiben, um das
Druckgeräusch zu dämpfen und das Eindringen von
Fremdkörpern in den Drucker zu vermeiden.
Installazione della manopola del rullo
La manopola del rullo è imballata in un incavo del
materiale di imballaggio.
❏ Installare la manopola sull’asta all’intero del
grande foro sul lato destro della stampante.
Verificare che le due sporgenze sull’asta del rullo
all’interno della stampante combacino con le
fessure sul perno della manopola. Premere la
manopola con cura ma fermamente in posizione
fino a che si blocca.
Apertura del coperchio anteriore
❏ Sollevare il coperchio anteriore premendo
delicatamente sui due lati.
❏ Per chiudere il coperchio anteriore basta
riabbassarlo in posizione.
Attenzione!
Il listello di separazione è affilato. Fare attenzione a
non ferirsi.
Nota:
È possibile rimuovere completamente il coperchio
anteriore dalla stampante o collocarlo verticalmente
come mostrato nell’illustrazione sotto. Normalmente
lasciare chiuso il coperchio anteriore, perché evita
la penetrazione di oggetti estranei nella stampante e
riduce il rumore di funzionamento.

7
Installing the ribbon cassette
❏ Make sure that the printer is unplugged from its
power outlet.
❏ Open the front cover of the printer.
❏ Remove the ribbon cassette from its package.
❏ Rotate the knob on the ribbon cassette
counterclockwise to take up any slack in the
ribbon.
❏ Carefully place the cassette onto the cartridge
holder making sure that the spindle of the holder
fits into the socket on the bottom of the cassette.
Also make sure that the side tabs fit into the
grooves on the sides of the cartridge holder.
❏ While guiding the ribbon between the print head
and print head shield, press down gently but
firmly on the cassette until the side tabs snap
securely into place.
❏ Rotate the knob on the cassette again to take up
any slack.
❏ Close the front cover of the printer. .
Printing that is poor quality or too light is almost
always due to a ribbon that is simply worn out or
“used up.” Check the following points whenever print
quality is not what you expect.
Caution!
Never move the print head while the printer is turned
on. Doing so can damage the printer. If you have just
finished printing, let the print head cool for a few
minutes before you touch it.
Note:
If you want to print with black only, use an optional
LC9, LC9HD, or LC9W monochrome ribbon
cassette. If you change to a monochrome ribbon, be
sure to make the required changes to the EDS
settings (page 53).
Tension knob
Bouton de tension
Farbband-Spannknopf
Manopola di tensione
Ribbon cassette
Cartouche de ruban
Farbbandkassette
Testina di stampa
Print head
Tête d’impression
Druckkopf
Protettore della testina di stampa
Print head shield
Enclume
Druckkopfblende
Cartuccia del nastro

8
Mise en place de la cartouche de ruban
❏ Assurez-vous que l’imprimante est débranchée
de la prise secteur.
❏ Ouvrez le capot avant de l’imprimante.
❏ Sortez la cartouche de ruban de son emballage.
❏ Tournez le bouton de la cartouche de ruban dans
le sens des aiguilles d’une montre pour tendre le
ruban.
❏ Posez soigneusement la cartouche sur le support
en vous assurant que la tige du support rentre
dans la douille sous la cartouche. Vérifiez
également que les ergots latéraux entrent dans les
rainures de chaque côté du support.
❏ Faites passer le ruban entre la tête d’impression
et l’enclume et en même temps appuyer
fermement sur la cartouche jusqu’à ce que les
ergots latéraux s’emboîtent.
❏ Tournez de nouveau le bouton sur la cartouche
pour tendre le ruban.
❏ Fermez le capot avant de l’imprimante.
Une impression de mauvaise qualité ou trop claire est
souvent due à un ruban usé ou épuisé. Quand la
qualité d’impression est décevante, vérifiez les points
suivants:
Attention!
Ne déplacez jamais la tête d’impression quand
l’imprimante est sous tension car l’imprimante
pourrait être endommagée. Si vous venez juste de
finir d’imprimer, attendez quelques minutes que la
tête d’impression refroidisse avant de la toucher.
Remarque:
Si vous souhaitez imprimer en noir uniquement,
utilisez une cartouche de ruban monochrome LC9,
LC9HD ou LC9W en option. Avant d’utiliser un
ruban monochrome, n’oubliez pas d’effectuer les
réglages EDS nécessaires (page 53).
Einsetzen der Farbbandkassette
❏ Achten Sie darauf, daß das Netzkabel aus der
Steckdose gezogen ist.
❏ Klappen Sie die Frontabdeckung des Druckers auf.
❏ Nehmen Sie die Farbbandkassette aus der
Verpackung heraus.
❏ Drehen Sie den Knopf an der Farbbandkassette
gegen den Uhrzeigersinn, um Schlaufen im
Farbband aufzuwickeln.
❏ Setzen Sie die Farbbandkassette vorsichtig auf
den Kassettenhalter. Achten Sie darauf, die
Spindel des Kassettenhalters in das Loch am
Boden der Farbbandkassette einzupassen.
Vergewissern Sie sich darüber hinaus, daß die
Seitenzapfen der Kassette in den Kerben an der
Seite des Kassettenhalters sitzen.
❏ Führen Sie das Farbband zwischen Druckkopf
und Druckkopfblende hindurch. Drücken Sie die
Farbbandkassette dabei gleichzeitig herunter, bis
die Seitenzapfen hörbar einrasten.
❏ Drehen Sie den Farbband-Spannknopf auf der
Kassette noch einmal, um das Band zu straffen.
❏ Schließen Sie die Frontabdeckung.
Schlechte oder zu schwache Druckqualität ist in
nahezu allen Fällen auf ein verschlissenes oder
“verbrauchtes” Farbband zurückzuführen. Ermitteln
Sie die Ursache der mangelhaften Druckqualität mit
Hilfe der folgenden Prüfpunkte.
Vorsicht!
Verschieben Sie niemals den Druckkopf bei
eingeschaltetem Drucker. Der Drucker kann
hierdurch beschädigt werden. Falls Sie soeben den
Druckbetrieb beendet haben, lassen Sie den
Druckkopf ein paar Minuten abkühlen, bevor Sie ihn
berühren.
Hinweis:
Verwenden Sie die Monochrom-Farbbandkassette
LC9, LC9HD oder LC9W, falls Sie nur in schwarz
drucken. Achten Sie darauf, nach dem Einsetzen
einer schwarzen Farbbandkassette die hierfür
notwendigen EDS-Einstellungen (Seite 54)
vorzunehmen.
Inserimento della cartuccia del nastro
❏ Assicurarsi che la stampante non sia collegata
alla presa di corrente.
❏ Aprire il coperchio anteriore della stampante.
❏ Estrarre la cartuccia del nastro dalla sua
confezione.
❏ Ruotare in senso orario la manopola sulla
cartuccia per eliminare eventuali allentamenti del
nastro.
❏ Collocare attentamente la cartuccia del nastro sul
supporto cartuccia assicurandosi che il perno del
supporto entri nel foro sul fondo della cartuccia.
Assicurarsi inoltre che le sporgenze laterali
entrino nelle scanalature sui lati del supporto
cartuccia.
❏ Facendo passare il nastro tra la testina di stampa
e il protettore della testina di stampa, premere
delicatamente ma fermamente in basso la
cartuccia in modo che le sporgenze laterali
scattino correttamente in posizione.
❏ Ruotare di nuovo la manopola della cartuccia per
eliminare eventuali allentamenti.
❏ Chiudere il coperchio anteriore della stampante.
Se la qualità di stampa non è buona o la stampa è
troppo leggera, la ragione è quasi sempre un nastro
usurato o esaurito. Controllare quanto segue goni
volta che la qualità di stampa non è soddisfacente.
Attenzione!
Non muovere mai la testina di stampa quando la
stampante è accesa. Tale azione può danneggiare la
stampante. Se si è appena finita la stampa, lasciar
raffreddare la testina di stampa per qualche minuto
prima di toccarla.
Nota:
Se si desidera stampare solo in nero, usare una
cartuccia nastro opzionale LC9, LC9HD o LC9W. Se
si passa ad usare un nastro monocromo, ricordarsi
di eseguire anche le relative regolazioni EDS
(pagina 54).

9
✓ Is your monochrome ribbon still in good shape?
If the ribbon material appears to be grey, it means
that the black ink has been used up and it is time
to replace the ribbon.
✓ Are you using a color ribbon to print mainly
black text? Doing so can cause the black part of
the color ribbon to be used up too quickly. Switch
to a monochrome ribbon whenever you plan to
print mainly black text. Remember to make any
necessary EDS changes when you change ribbon
types.
✓ Are you getting muddy-looking colors from a
color ribbon? The more green, orange, and purple
colors you use, the quicker the primary colors
(blue, red, yellow) will become mixed with other
colors. This will cause a drop in performance of
the ribbon.
✓ Remember that changing the ribbon before it
becomes frayed or completely out of ink extends
the life of your print head.
La page est en cours de chargement...
La page est en cours de chargement...
La page est en cours de chargement...
La page est en cours de chargement...
La page est en cours de chargement...
La page est en cours de chargement...
La page est en cours de chargement...
La page est en cours de chargement...
La page est en cours de chargement...
La page est en cours de chargement...
La page est en cours de chargement...
La page est en cours de chargement...
La page est en cours de chargement...
La page est en cours de chargement...
La page est en cours de chargement...
La page est en cours de chargement...
La page est en cours de chargement...
La page est en cours de chargement...
La page est en cours de chargement...
La page est en cours de chargement...
La page est en cours de chargement...
La page est en cours de chargement...
La page est en cours de chargement...
La page est en cours de chargement...
La page est en cours de chargement...
La page est en cours de chargement...
La page est en cours de chargement...
La page est en cours de chargement...
La page est en cours de chargement...
La page est en cours de chargement...
La page est en cours de chargement...
La page est en cours de chargement...
La page est en cours de chargement...
La page est en cours de chargement...
La page est en cours de chargement...
La page est en cours de chargement...
La page est en cours de chargement...
La page est en cours de chargement...
La page est en cours de chargement...
La page est en cours de chargement...
La page est en cours de chargement...
La page est en cours de chargement...
La page est en cours de chargement...
La page est en cours de chargement...
La page est en cours de chargement...
La page est en cours de chargement...
La page est en cours de chargement...
La page est en cours de chargement...
La page est en cours de chargement...
La page est en cours de chargement...
La page est en cours de chargement...
La page est en cours de chargement...
La page est en cours de chargement...
La page est en cours de chargement...
La page est en cours de chargement...
La page est en cours de chargement...
La page est en cours de chargement...
La page est en cours de chargement...
La page est en cours de chargement...
La page est en cours de chargement...
La page est en cours de chargement...
La page est en cours de chargement...
La page est en cours de chargement...
La page est en cours de chargement...
La page est en cours de chargement...
La page est en cours de chargement...
La page est en cours de chargement...
La page est en cours de chargement...
La page est en cours de chargement...
La page est en cours de chargement...
La page est en cours de chargement...
La page est en cours de chargement...
La page est en cours de chargement...
La page est en cours de chargement...
La page est en cours de chargement...
La page est en cours de chargement...
La page est en cours de chargement...
La page est en cours de chargement...
La page est en cours de chargement...
La page est en cours de chargement...
La page est en cours de chargement...
La page est en cours de chargement...
La page est en cours de chargement...
La page est en cours de chargement...
La page est en cours de chargement...
La page est en cours de chargement...
La page est en cours de chargement...
La page est en cours de chargement...
La page est en cours de chargement...
La page est en cours de chargement...
La page est en cours de chargement...
La page est en cours de chargement...
La page est en cours de chargement...
La page est en cours de chargement...
La page est en cours de chargement...
La page est en cours de chargement...
La page est en cours de chargement...
La page est en cours de chargement...
La page est en cours de chargement...
La page est en cours de chargement...
La page est en cours de chargement...
La page est en cours de chargement...
La page est en cours de chargement...
La page est en cours de chargement...
La page est en cours de chargement...
La page est en cours de chargement...
La page est en cours de chargement...
La page est en cours de chargement...
La page est en cours de chargement...
La page est en cours de chargement...
La page est en cours de chargement...
La page est en cours de chargement...
La page est en cours de chargement...
La page est en cours de chargement...
La page est en cours de chargement...
La page est en cours de chargement...
La page est en cours de chargement...
La page est en cours de chargement...
La page est en cours de chargement...
La page est en cours de chargement...
La page est en cours de chargement...
La page est en cours de chargement...
La page est en cours de chargement...
La page est en cours de chargement...
La page est en cours de chargement...
La page est en cours de chargement...
La page est en cours de chargement...
La page est en cours de chargement...
La page est en cours de chargement...
La page est en cours de chargement...
La page est en cours de chargement...
La page est en cours de chargement...
La page est en cours de chargement...
La page est en cours de chargement...
La page est en cours de chargement...
La page est en cours de chargement...
La page est en cours de chargement...
La page est en cours de chargement...
La page est en cours de chargement...
La page est en cours de chargement...
La page est en cours de chargement...
La page est en cours de chargement...
La page est en cours de chargement...
La page est en cours de chargement...
La page est en cours de chargement...
La page est en cours de chargement...
La page est en cours de chargement...
La page est en cours de chargement...
La page est en cours de chargement...
La page est en cours de chargement...
La page est en cours de chargement...
La page est en cours de chargement...
La page est en cours de chargement...
La page est en cours de chargement...
La page est en cours de chargement...
La page est en cours de chargement...
-
 1
1
-
 2
2
-
 3
3
-
 4
4
-
 5
5
-
 6
6
-
 7
7
-
 8
8
-
 9
9
-
 10
10
-
 11
11
-
 12
12
-
 13
13
-
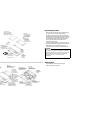 14
14
-
 15
15
-
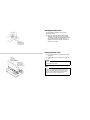 16
16
-
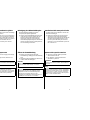 17
17
-
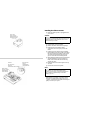 18
18
-
 19
19
-
 20
20
-
 21
21
-
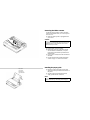 22
22
-
 23
23
-
 24
24
-
 25
25
-
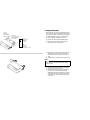 26
26
-
 27
27
-
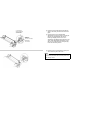 28
28
-
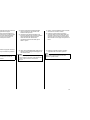 29
29
-
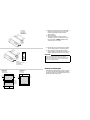 30
30
-
 31
31
-
 32
32
-
 33
33
-
 34
34
-
 35
35
-
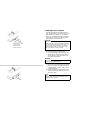 36
36
-
 37
37
-
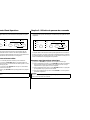 38
38
-
 39
39
-
 40
40
-
 41
41
-
 42
42
-
 43
43
-
 44
44
-
 45
45
-
 46
46
-
 47
47
-
 48
48
-
 49
49
-
 50
50
-
 51
51
-
 52
52
-
 53
53
-
 54
54
-
 55
55
-
 56
56
-
 57
57
-
 58
58
-
 59
59
-
 60
60
-
 61
61
-
 62
62
-
 63
63
-
 64
64
-
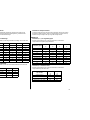 65
65
-
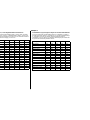 66
66
-
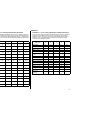 67
67
-
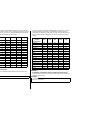 68
68
-
 69
69
-
 70
70
-
 71
71
-
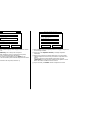 72
72
-
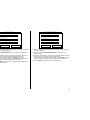 73
73
-
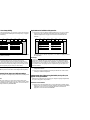 74
74
-
 75
75
-
 76
76
-
 77
77
-
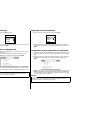 78
78
-
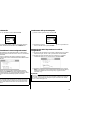 79
79
-
 80
80
-
 81
81
-
 82
82
-
 83
83
-
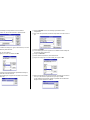 84
84
-
 85
85
-
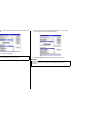 86
86
-
 87
87
-
 88
88
-
 89
89
-
 90
90
-
 91
91
-
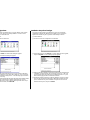 92
92
-
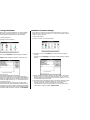 93
93
-
 94
94
-
 95
95
-
 96
96
-
 97
97
-
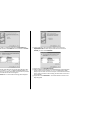 98
98
-
 99
99
-
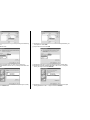 100
100
-
 101
101
-
 102
102
-
 103
103
-
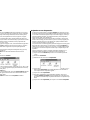 104
104
-
 105
105
-
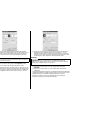 106
106
-
 107
107
-
 108
108
-
 109
109
-
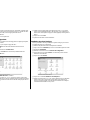 110
110
-
 111
111
-
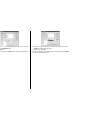 112
112
-
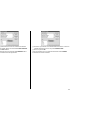 113
113
-
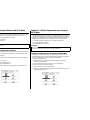 114
114
-
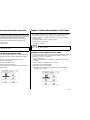 115
115
-
 116
116
-
 117
117
-
 118
118
-
 119
119
-
 120
120
-
 121
121
-
 122
122
-
 123
123
-
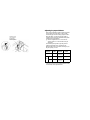 124
124
-
 125
125
-
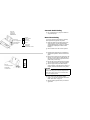 126
126
-
 127
127
-
 128
128
-
 129
129
-
 130
130
-
 131
131
-
 132
132
-
 133
133
-
 134
134
-
 135
135
-
 136
136
-
 137
137
-
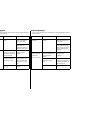 138
138
-
 139
139
-
 140
140
-
 141
141
-
 142
142
-
 143
143
-
 144
144
-
 145
145
-
 146
146
-
 147
147
-
 148
148
-
 149
149
-
 150
150
-
 151
151
-
 152
152
-
 153
153
-
 154
154
-
 155
155
-
 156
156
-
 157
157
-
 158
158
-
 159
159
-
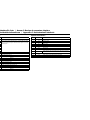 160
160
-
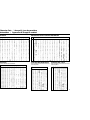 161
161
-
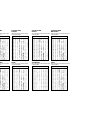 162
162
-
 163
163
-
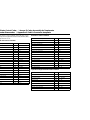 164
164
-
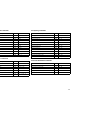 165
165
-
 166
166
-
 167
167
-
 168
168
-
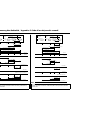 169
169
-
 170
170
-
 171
171
-
 172
172
-
 173
173
-
 174
174
-
 175
175
-
 176
176


Star Micronics LC-100+ COLOUR Manuel utilisateur
- Taper
- Manuel utilisateur
dans d''autres langues
Documents connexes
-
Star Micronics LC-8211 Manuel utilisateur
-
-
-
-
-
-
-
-
-
Autres documents
-
Godex EZ1105 series Guide de démarrage rapide
-
Epson LC-7211 Manuel utilisateur
-
Tally Genicom Printer T2145 Manuel utilisateur
-
TALLY T2130-24 Le manuel du propriétaire
-
TALLY T2240-24 Le manuel du propriétaire
-
Olivetti ARTJET 22 Le manuel du propriétaire
-
Epson LQ-300 - Impact Printer Guide de démarrage rapide
-
-
OKI 8810n Manuel utilisateur
-