La page est en cours de chargement...
La page est en cours de chargement...
La page est en cours de chargement...
La page est en cours de chargement...
La page est en cours de chargement...

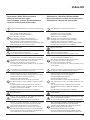
6
ON
OFF
ON
OFF
P
= –
= –
= –
= –
M
J2
J1
N
= –
= *1
P
= –
= –
= –
= –
M
J2
J1
N
= –
= –
BUS
PL S+
S-
N
= –
= –
T = –
S = –
P
= –
–
=
2
1
A
B
BUS5M 21 1
B
BUS5M 21 1
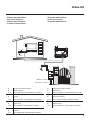
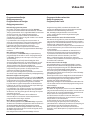
* • Il secondo posto interno ed il configuratore 3501/1 devono essere acquistati separatemente.
• The second internal unit and the 3501/1 configurator must be purchased separately.
• Le deuxième poste interne et le configurateur 3501/1 doivent être achetés séparément.
• Die zweite Hausstation und der Konfigurator 3501/1 werden getrennt verkauft.
• La segunda unidad interior y el configurador 3501/1 se han de comprar por separado.
• De tweede binnenpost en de configurator 3501/1 moeten apart worden gekocht.
• A segunda unidade interna e o configurador 3501/1 devem ser adquiridos separadamente.
*
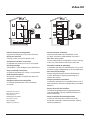
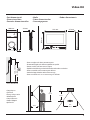
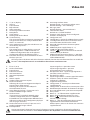
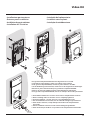
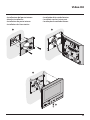
Bifamiliare - Two family
Monofamiliare - One family
• Schema bifamiliare
• Two-family diagram
• Schéma bi-familiale
• Schema
Zweifamilienhaus
• Esquema bifamiliar
• Schema tweegezins
• Esquema bifamiliar
• A Pulsante locale apertura serratura.
B Chiamata al piano.
S+ S- 18 V; 4 A impulsivi. 250 mA mantenimento (30 Ω max).
• A Door lock release local pushbutton.
B Floor call.
S+ S- 18 V; 4 A impulsive. 250 mA holding current (30 Ω max).
• A Bouton local ouverture serrure.
B Appel à l’étage.
S+ S- 18 V; 4 A impulsifs. 250 mA entretien (30 Ω max).
• A Lokale Schlossöffnungstaste.
B Etagenruf.
S+ S- 18 V; 4 A impulsstrom. 250 mA Haltestrom (30 Ω max).
• A Pulsador local apertura cerradura.
B Llamada al piso.
S+ S- 18 V; 4 A por impulsos. 250 mA mantenimiento (30 Ω max).
• A Lokale knop opening slot.
B Oproep aan verdieping.
S+ S- 18 V; 4 A impulsief; 250 mA onderhoud (30 Ω max).
• A Botão local de abertura da fechadura.
B Chamada ao piso.
S+ S- 18 V; 4 A instantâneos. 250 mA continuos (30 Ω max).

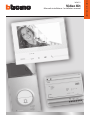
Video Kit
7
BUS
PL S+
S-
ON
OFF
ON
OFF
P
= –
= –
= –
= –
M
J2
J1
N
= –
= *1
P
= –
= –
= –
= –
M
J2
J1
N
= –
= –
N
= –
= –
T = –
S = –
P
= –
–
=
2
1
A
B
BUS5M 21 1
B
BUS5M
2
1
1
*
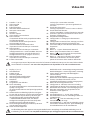
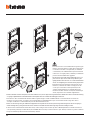
Bifamiliare - Two family
Monofamiliare - One family
* • Il secondo posto interno ed il configuratore 3501/1 devono essere acquistati separatemente.
• The second internal unit and the 3501/1 configurator must be purchased separately.
• Le deuxième poste interne et le configurateur 3501/1 doivent être achetés séparément.
• Die zweite Hausstation und der Konfigurator 3501/1 werden getrennt verkauft.
• La segunda unidad interior y el configurador 3501/1 se han de comprar por separado.
• De tweede binnenpost en de configurator 3501/1 moeten apart worden gekocht.
• A segunda unidade interna e o configurador 3501/1 devem ser adquiridos separadamente.
• Schema bifamiliare 2
• Two-family diagram 2
• Schéma bi-familiale 2
• Schema
Zweifamilienhaus 2
• Esquema bifamiliar 2
• Schema tweegezins 2
• Esquema bifamiliar 2
La page est en cours de chargement...
La page est en cours de chargement...

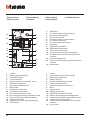
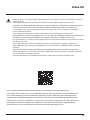
10
1
2
3
4
4
6
7
16
15
14
12
13
11
10
9
8
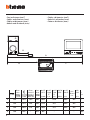
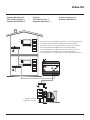
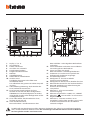
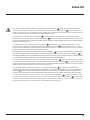
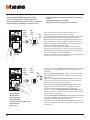
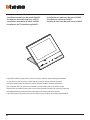
1 - Telecamera
2 - LED illuminazione campo di ripresa
3 - Morsetti di collegamento
4 - Pulsanti di chiamata
5 - Posizione antenna sensore badge
6 - LED connessione attiva
7 - LED indicazione porta aperta
8 - Microfono
9 - Regolazione microfono
10 - Regolazione altoparlante
11 - Switch mono/bifamiliare
12 - Pulsante programmazione badge/Reset
13 - Pannello LED per illuminazione pulsante di
chiamata
14 - Sede dei configuratori
15 - Sensore di luminosità per retroilluminazione
notturna
16 - Altoparlante
1 - Caméra
2 - Voyant éclairage champ de cadrage
3 - Bornes de branchement
4 - Boutons d’appel
5 - Position antenne lecteur badge
6 - Voyant connexion active
7 - Voyant indication porte ouverte
8 - Micro
9 - Réglage micro
10 - Réglage haut-parleur
11 - Commutateur mono/bi-familial
12 - Bouton de programmation badge/Reset
13 - Panneau Voyant d’éclairage bouton d’appel
14 - Logement des configurateurs
15 - Capteur de luminosité pour rétro-éclairage
nocturne
16 - Haut-parleur
1 - Camera
2 - Viewing field lighting LED
3 - Connection clamps
4 - Call pushbuttons
5 - Position of the key card reader aerial
6 - Active connection LED
7 - Open door notification LED
8 - Microphone
9 - Microphone adjustment
10 - Loudspeaker adjustment
11 - One-family/two-family switch
12 - Key card programming pushbutton / Reset
13 - LED panel for call pushbutton lighting
14 - Configurator socket
15 - Brightness sensor for night backlighting
16 - Loudspeaker
• Posto esterno
• Entrance panel
• Poste extérieur
• Türstation
• Placa exterior
• Externe plaats
• Unidade externa
5
La page est en cours de chargement...
La page est en cours de chargement...

Video Kit
13
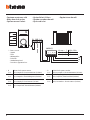
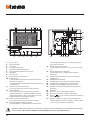
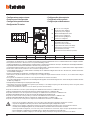
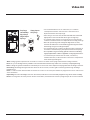
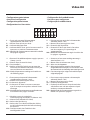
The image shows the device with all its functions enabled. Check on the Installer Manual how to enable the
functions. The complete manuals are available on the website: www.bticino.com
1 - 7” (16 : 9) display
2 - OFF key
3 - Date and time
4 - Bell exclusion
5 - Office activation
6 - Answering machine activation
7 - Microphone
8 - Quick actions
9 - Tactile guides for the blinds
10 - Connection key:
The green LED flashes to indicate an incoming call
The green LED comes on steady to indicate that
there is an active call
11 - Auto-switching on/Cycling: the red LED turns on
when the key is pressed
12 - Favorites Key:
The red LED turns on when the key is pressed
(Basic configuration = STAIRCASE LIGHT. For
a different configuration refer to the physical
configuration table in the following pages.)
13 - Door lock release key: the red LED turns on when
the key is pressed
14 - Answering machine Status:
Red LED steady = answering machine active
Red LED flashing = new recording/s
15 - Message status:
Red LED flashing = new unread note/s
16 - Call Exclusion Status:
Red LED on = Call bell disabled
17 - Functions (only the icons for the configured
functions are displayed)
18 - Configurator seat
19 - Configurator J1: remove for additional power supply
20 - J2 configurator: Master/Slave, remove for Slave
21 - Line termination ON/OFF micro-switch
22 - Mini USB socket for device Firmware update
23 - Loudspeaker
24 - Additional power supply clamps (1 - 2)
25 - 2 WIRE SCS/BUS connection clamps
26 - Clamps ( ) for the connection of an external
call to the floor pushbutton
27 - Additional bell connection clamps (1 - 5M) Point-
to-Point connections are required on the clamps
of the additional bells
1 - Écran 7” (16:9)
2 - Touche d’extinction
3 - Date et heure
4 - Exclusion sonneries
5 - Activation Bureau
6 - Activation Répondeur
7 - Micro
8 - Actions rapides
9 - Guides tactiles pour non-voyants
10 - Touche connexion :
l’allumage du voyant vert clignotant indique la
présence d’un appel entrant
l’allumage du voyant vert fixe indique la
communication en cours
11 - Auto-allumage/Cyclage : à la pression sur la
touche le VOYANT rouge s’allume
12 - Touche Favoris :
à la pression sur la touche le VOYANT rouge
s’allume (Configuration de base = LUMIÈRE
ESCALIER. Pour une configuration différente, faire
référence au tableau de la configuration physique
dans les pages suivantes.)
13 - Touche d’ouverture serrure: à la pression sur la
touche le VOYANT rouge s’allume
14 - État Répondeur:
Voyant rouge fixe = répondeur activé
Voyant rouge clignotant = présence
enregistrement(s) non visionné(s)
15 - État présence notes : voyant rouge clignotant =
nouvelle(s) note(s) non lue(s)
16 - État Exclusion appel:
Voyant rouge allumé = Sonnerie appel désactivée
17 - Fonctions (seules les icônes des fonctions
configurées s’affichent)
18 - Logement configurateurs
19 - Configurateur J1 : extraire pour alimentation
supplémentaire
20 - Configurateur J2: Master/Slave, extraire pour Slave
21 - Microinterrupteur ON/OFF de terminaison de ligne
22 - Prise miniUSB de mise à jour Firmware dispositif
23 - Haut-parleur
24 - Bornes (1 – 2) d’alimentation supplémentaire
25 - Bornes de branchement au BUS SCS 2 FILS
26 - Bornes ( ) de branchement d’un bouton
externe d’appel à l’étage
27 - Bornes (1 - 5M) de branchement d’une sonnerie
supplémentaire Le branchement doit être
effectué point - point sur les bornes des sonneries
supplémentaires
L’image représente le dispositif avec toutes les fonctions activées. Vérifier dans le Manuel Installateur le
mode d’activation des fonctions. Les manuels complets sont disponibles sur le site: www.bticino.com
La page est en cours de chargement...
La page est en cours de chargement...
La page est en cours de chargement...
La page est en cours de chargement...

18
1
2
3
4
5
• Die Kamera darf nicht vor starken Lichtquellen oder an Orten installiert werden, wo das Subjekt sich im Gegenlicht befindet. Farbkameras besitzen bei schlechter Beleuchtung
eine geringere Empfindlichkeit als Schwarz/Weiß Kameras. Wir empfehlen daher eine zusätzliche Beleuchtungsquelle vorzusehen.
• La telecámara no debe ser instalada delante de fuentes luminosas grande en lugares en donde el individuo filmado se encuentre demasiado en contraluz. Las
telecámaras en colores presentan, en condiciones de escasa luminosidad, una sensibilidad inferior respecto a las telecámaras en blanco/negro. Por lo tanto es
aconsejable en ambientes escasamente iluminados prever una fuente de iluminación extra.
• Installeer de camera niet tegenover grote lichtbronnen of op plaatsen waar de opname van het onderwerp door sterk tegenlicht wordt gestoord. Camera’s met zijn bij een
zwakke verlichting minder gevoelig dan zwart-wit camera’s. Daarom is het raadzaam om zwak verlichte omgevingen van extra verlichting te voorzien.
• A câmara não deve ser montada diante de fortes fontes de luz, ou então em lugares onde o elemento que deve ser filmado fique muito em contraluz. As câmaras em
cores apresentam, quando há pouca luminosidade, uma sensibilidade inferior em relação às câmaras em branco e preto. Portanto, recomenda-se, quando os ambientes
forem pouco iluminados providenciar uma fonte de iluminação adicional.
• La telecamera non deve essere installata di fronte a grandi sorgenti
luminose, oppure in luoghi dove il soggetto ripreso rimanga molto
in controluce. Le telecamere a colori presentano, in condizioni di
scarsa luminosità, una sensibilità inferiore rispetto alle telecamere
in bianco/nero. Si consiglia pertanto, in ambienti poco illuminati di
prevedere una fonte di illuminazione aggiuntiva.
• The camera must not be installed in front of large light sources, or in
places where the subject viewed remains in deep shadow. In poor
lighting conditions colour cameras are less sensitive than black/white
cameras. An extra lighting source should be added in poorly lit rooms.
• La télécaméra ne doit pas être installée en face de fortes sources
lumineuses, ou bien dans des endroits où le sujet pris reste très
à contre-jour. Les télécaméras couleurs présentent, dans des
conditions de faible luminosité, une sensibilité inférieure aux
télécaméras noir/blanc. Il est donc conseillé, dans des milieux peu
éclairés, de prévoir une source de lumière supplémentaire.

Video Kit
19
• Se si manifestasse il disturbo del fischio, (effetto Larsen), ridurre prima la potenza del microfono , agendo con un cacciavite sul potenziometro
corrispondente, fino ad un livello accettabile. Qualora il fenomeno persista, agire sul potenziometro dell’altoparlante
in modo da eliminare l’incon-
veniente. Se il volume è troppo basso, aumentare prima il volume dell’altoparlante ed eventualmente anche quello del microfono, tenendo presente che è
preferibile una trasmissione chiara e priva di disturbi, che una al limite dell’innesco (Larsen).
• In case of a whistle (Larsen effect), first reduce the microphones
power, adjusting the corresponding potentiometers with a screw driver, until an
acceptable level is reached. Should the whistle persist, adjust the loudspeakers
volume in order to eliminate the trouble. If the volume is too low level then,
increase first the potentiometer of the loudspeaker and secondly the one for the microphone, bearing in mind that a clear and noise free reception is preferable
than one just before whistling (Larsen).
• Lors de sifflement (effet de Larsen), reduire d’abord la puissance du micro sur le potentiomètre correspondant, à l’aide d’un tournevis, jusqu’à
l’obtention d’un niveau satisfaisant. Si le sifflement persiste, régler le potentiomètre du hautparleur
jusqu’à l’élimination de celui-ci. Si le volume
est trop bas, augmenter d’abord la puissance du haut-parleur et éventuellement celle du micro, en considérant qu’une réception claire et sans parasite est
préférable à une communication à la limite de l’accrochage (effet de Larsen).
• Beim etwaigen Auftreten eines Pfeiftones (Larsen-Effekt), zuerst die Lautstärke des Mikrophones bis auf einen annehmbaren Wert herabsetzen, indem man
das entsprechende Potentiometer mit einem Schraubendreher einstellt. Sollte die Störung weiterhin bestehen, dann das Potentiometer des Lautsprechers
bis
zur Beseitigung des Pfeiftones einstellen. Ist die Lautstärke nun zu niedrig, dann zuerst die des Lautsprechers und erst danach evtl. auch die des Mikrophones erhohen,
wobei ein deutlicher und störungsfreier Empfang einem an der Störungsgrenze liegendem (Larsen-Effekt) vorzuziehen ist.
• Si se manifesta el silbido de acoplamiento, (efecto Larsen), reducir primero la potencia del micrófono , girando con un destornillador el potenciómetro
correspondiente, hasta obtener un nivel aceptable. Si el fenómeno persistiera, regular el potenciómetro del altavoz
hasta eliminar la interferencia. Si
el volumen es demasiado bajo, aumentar primero el volumen del altavoz y eventualmente también el del micrófono, teniendo en cuenta que es preferible
una transmissión clara y limpia de interferencias, que una al limite del acoplo (Larsen).
• Als er een fluittoon hoorbaar is (effect van Larsen): verminder eerst het vermogen van de microfoon met behulp van een schroevendraaier zijn
stroomregelaar zo te regelen dat de geluidssterkte van het gefluit aanvaardbaar is. Als het verschijnsel niet verdwijnt, dan moet u ook de stroomregelaar van
de luidspreker bijstellen. Als de geluidssterkte nu te klein is, verhoog dan eerst de geluidssterkte van de luidspreker en daarna eventueel ook die van de
microfoon, en denk er bij het bijstellen aan dat een duidelijk hoorbaar en ongestoord geluid beter is dan een harder geluid op de grens van het Larsen effect.
• Se se manifestar uma interferência no som (efeito de Larsen), começar por diminuir a potência do microfone , rodando o potenciómetro correspon-
dente com uma chave de parafusos, até obter um nível aceitável. Se o fenómeno persistir, regular o potenciómetro do altifalante
de modo a eliminar
o problema. Se o volume estiver demasiado baixo, começar por aumentar o volume do altifalante e depois, se necessário, o do microfone, tendo presente
que é melhor ter uma transmissão clara e sem interferências, que uma no limiar de início de efeitos Larsen.

20
- Dispositivo di comunicazione contactless operante alla frequenza di 125kHz. Potenza di trasmissione < 66dBuA/m a 10m.
- Contactless communication device which works at the frequency of 125kHz. Transmission power < 66dBuA/m at 10m
- Dispositif de communication sans contact qui fonctionne à la fréquence de 125kHz. Puissance de transmission < 66dBuA/m à 10m.
- Kontaktloses Kommunikationsgerät mit einer Frequenz von 125kHz. Übertragungsleistung 66dBuA/m in 10m
- Dispositivo de comunicación sin contacto que trabaje con la frecuencia de 125kHz. Potencia de transmisión < 66dBuA/m a 10m.
- Contactloos communicatieapparaat dat werkt met een frequentie van 125kHz. Zendvermogen < 66dBuA/m a 10m.
- Dispositivo de comunicação sem contato que atua na frequência de 125 kHz. Potência de transmissão < 66dBuA/m a 10m.
• Configurazione posto esterno
• Entrance panel configuration
• Configuration poste extérieur
• Konfiguration Türstation
• Configuración placa exterior
• Configuratie externe plaats
•
Configuração unidade externa
P T S N
P
- Possono non essere configurati.
- They do not need to be configured.
- Ils peuvent ne pas être configurés
- Brauchen nicht konfiguriert zu werden.
- Pueden no precisar configuración.
- Kunnen niet worden geconfigureerd.
- Podem não serconfigurados.
N
S
T
- Temporizzatore serratura (vedi tabella).
- Door lock timer relay (see table).
- Temporisation serrure (voir tableau).
- Zeitgeber schlossrelaiscerradura (siehe Tabelle).
- Temporizador relé cerradura (véase la tabla).
- Timer deurslotrelais (zie de tabel).
- Temporizador do relé da fechadura (veja a tabela).
– 1 2 3 4 * 5 6 7
4 s 1 s 2 s 3 s
**
6 s 8 s 10 s
• Tutte le volte che si modifica la configurazione è necessario togliere e ridare l’alimentazione all’impianto, attendendo circa 1 minuto.
• Every time the configuration is altered the system must be switched off and back on again, waiting for about 1 minute.
• Chaque fois que l’on modifie la configuration, il faut retirer, puis redonner l’alimentation à l’installation, après avoir attendu environ 1 minute.
• Jedes Mal, wenn die Konfiguration geändert wird, den Strom abschalten, etwa 1 Minute warten und dann wieder einschalten.
• Cada vez que modifica la configuración, es necesario cortar y volver a dar alimentación a la instalación, después de esperar aproximadamente 1 minuto.
• Na iedere wijziging in de configuratie moet de installatie ongeveer 1 minuut van het elektriciteitsnet worden afgesloten.
• Todas as vezes que se modificar a configuração é necessário ligar e desligar a instalação da energia eléctrica, esperando cerca de 1 minuto.
* Funzionamento come pulsante per max. 10 sec. dopodichè entra in stand-by. Per estendere tale funzionamento oltre i 10 sec. utilizzare l’attuatore 346210 configurato con MOD=5.
** Come pulsante da Posto Interno o Pulsante locale. 4S con apertura tramite Badge residenti.
* Operation as pushbutton for 10 sec. max after which it goes in stand-by. In order to extend this type of operation over 10 seconds, use the actuator, item 346210 configured with MOD=5.
** As pushbutton from Internal Unit or local Pushbutton. 4S with release using resident Key cards.
* Fonctionnement comme bouton pendant 10 sec. max., ensuite passe en stand-by. Pour étendre ce fonctionnement au-delà de 10 sec., utiliser l’actionneur 346210 configuré sur MOD=5.
** Comme bouton de Poste interne ou Bouton local. 4S avec ouverture avec Badges résidents.
* Die Tastenfunktion dauert max. 10 sec.; danach schaltet sie auf Standby. Um diese Funktion zu verlängern und mehr als 10 sec. dauern zu lassen, den Aktor 346210 verwen-
den und mit MOD=5 konfigurieren.
** Als Taste einer Hausstation oder als lokale Taste. 4S mit Öffnung durch das Badge der Bewohner.
* Funcionamiento como pulsador durante al máx.10 s. después se pone en standby. Para ampliar dicho funcionamiento a más de 10 s., use el actuador 346210 configura-
do con MOD = 5.
** Como pulsador en la unidad interior o pulsador local. 4S con apertura mediante una credencial de residentes.
* 10 sec. lange werking als knop, vervolgens vindt de overschakeling naar stand-by plaats. Laat deze functie langer dan 10 sec. duren met behulp van de actuator 346210 die
als MOD=5 is geconfigureerd.
** Als knop binnenpost of lokale knop. 4S met opening met inwonersbadge.
* Funcionamento como botão por um máximo de 10 segundos, depois disto dispõe-se em standby. Para prolongar este funcionamento por mais de 10 segundos, utilizar
o atuador 346210 configurado com MOD=5.
** Como botão de Unidade Interna ou Botão local. 4S com abertura por meio dos Crachás residentes.

Video Kit
21
• Programmazione Badge
• Badge programming
• Programmation des badges
• Badge programmieren
• Programación de credenciales
• Badge Programmeren
•
Programação do Crachá
• Nuovo badge gestore impianto
Per motivi di sicurezza è previsto un badge “Gestore“
programmato direttamente dall’installatore. Per accedere
alla programmazione di un badge “RESIDENTE” è necessario
essere in possesso di un badge gestore impianto.
Il posto esterno segnalerà l’avvenuta accettazione o
cancellazione del badge con segnali acustici e visivi dei led
presenti sul posto esterno.
La presentazione di un badge non riconosciuto o un
errore di programmazione, comporta l’interruzione della
procedura e la segnalazione tramite un beep lungo e
l’accensione dei LED connessione e serratura.
Nota: Il badge gestore impianto non comanda la
serratura ma abilita solo la programmazione dei badge
residenti.
• New manager master badge
For safety reasons, a “MASTER” badge is required, directly
programmed by the installer. To access the programming of
a “RESIDENT” badge you must be in possession of a system
operator badge.
The entrance panel will notify that the badge has been
accepted or deleted by means of sound notifications, as well
as visual indications using the LEDs on the entrance panel.
The presentation of an unrecognised badge or a
programming error will lead to interruption of the procedure.
A signal will be given by means of a long beep and the
connection and door lock LED will light up.
Note: The system management key card does not control the
door lock but only enables the resident key card programming.
• Nouveau badge master de gestion
Pour des raisons de sécurité, est prévu un badge “MASTER“
programmé directement par l’installateur. Pour accéder à la
programmation d’un badge «RÉSIDENT», il est nécessaire
de disposer d’un badge master de gestion installation.
Le poste externe signale l’acceptation ou l’élimination du
badge par des signaux sonores et visuels et par l’allumage
des leds présents sur le poste externe.
La présentation d’un badge non reconnu ou une erreur de
programmation provoque l’interruption de la procédure
et l’émission d’un bip prolongé avec allumage des voyants
connexion et serrure.
Note: le badge administrateur de l’installation ne
commande pas la serrure mais active uniquement la
programmation des badges résidents.
• Neuer Master-Verwaltungs-Badge
Aus Sicherheitsgründen ist ein „MASTER“-Badge vorgesehen,
der direkt vom Installateur programmiert wird. Damit können
die anderen Badges (Bewohner) programmiert werden.
Die Türstation meldet die erfolgte Annahme oder Löschung
des Badges durch akustische und visuelle Led-Signale, die an
derselben vorgesehen sind.
Das Vorlegen eines nicht erkennbaren Badges oder ein
Programmierungsfehler, unterbricht die Prozedur und
erzeuge eine Meldung durch einen langen Piepton und das
Aufleuchten der LED Verbindung und Schloss.
N.B.: Das Badge Anlagenbetreiber steuert nicht das
Schloss sondern aktiviert nur die Programmierung der
Bewohnerbadges.
• Nueva credencial maestra de administrador
Por razones de seguridad se prevé una credencial “maestra”
programada directamente por el instalador. Para acceder a
programar una credencial “RESIDENTE” se ha de poseer una
credencial de administrador del sistema.
La placa exterior indicará si acepta o cancela unacredencial
con unaseñal acústica y visual de los leds incorporados en
la placa exterior.
La presentación de una credencial no reconocida o un
error de programación interrumpe el procedimiento y
se produce la indicación mediante un beep largo y el
encendido de los LEDs de conexión y cerradura.
Nota: La credencial gestor del sistema no acciona la
cerradura sino que habilita solamente la programación de
los credenciales residentes.
• Nieuwe master beheerder badge
Om veiligheidsredenen is een “beheerdersbadge” voorzien
die direct door de installateur wordt geprogrammeerd. Voor
toegang tot de programmering van een “INWONERSBADGE”
moet over een beheerdersbadge worden beschikt
Het externe punt geeft met behulp van geluids- en
lichtsignalen van de leds op het externe punt aan of de badge
geaccepteerd of gewist is.
Door de presentatie van een badge die niet herkend wordt of
een programmeringsfout wordt de procedure onderbroken.
Dit wordt aangegeven door een lange pieptoon en het
oplichten van de leds verbinding en slot.
Opmerking: de badge van de installatiebeheerder bedient het
slot niet maar activeert uitsluitend de programmering van de
inwonersbadges.
• Novo crachá master gestor
Por razões de segurança é previsto um crachá “MASTER“,
programado directamente pelo instalador. Para ter acesso à
programação de um crachá “RESIDENTE” é necessário estar
em posse de um crachá gestor da instalação.
A unidade externa sinalizará a ocorrida aceitação ou
cancelamento do crachá com sinais acústicos e visuais dos
led presentes na unidade externa.
A apresentação de um crachá não reconhecido ou
um erro de programação comporta a interrupção do
procedimento e a sinalização por meio de um beep longo e
o acendimento dos LED de conexão e fechadura.
Nota: O crachá gestor de instalação não comanda a
fechadura, mas habilita apenas a programação dos crachás
residentes.

22
• Tenere premuto il pulsante di programmazione fino al
lampeggio del LED Serratura e tono di conferma.
• Press and hold down the programming pushbutton until the Door
lock LED starts flashing, and a confirmation sound is heard.
• Maintenir enfoncée la touche de programmation jusqu’à ce que le
LED Serrure clignote et que la tonalité de confirmation soit émise.
• Programmierungstaste gedrückt halten, bis die LED des Schlosses
blinkt und das Bestätigungssignal ertönt.
• Mantenga apretado el pulsador de programación hasta que
parpadea el LED Cerradura y se emite el tono de confirmación.
• Houd de programmeringsknop ingedrukt tot de LED Slot knippert
en u ter bevestiging een geluidssignaal hoort.
• Mantenha carregado o botão de programação até o lampejo do
LED da Fechadura e o tom de confirmação.
1 beep
1 beep
1 beep
1 Piepton
1 bip
1 beep
1 beep
≥ 5s
• Programmazione badge gestore impianto
• System management key card programming
• Programmation badge administrateur installation
• Programmierung des Badges Anlagenverwalter
• Programación de la credencial del administrador del
sistema
• Programmering beheerdersbadge
• Programação do crachá gestor da instalação.
• Avvicinare al lettore il badge gestore impianto da memorizzare
e attendere l’accensione del LED Serratura e doppio tono di
conferma.
• Move the system manager badge reader to save close and wait
for the Door lock LED to switch on; a double confirmation sound
will be heard.
• Approcher le Badge administrateur installation à mémoriser
du lecteur et attendre que le LED Serrure s’allume et qu’une
double tonalité de confirmation soit émise.
• Dem Lesegerät das Badge des Anlagenbetreibers nähern, das
gespeichert werden soll und warten, bis die LED des Schlosses
aufleuchtet und das Bestätigungssignal zwei Mal ertönt.
• Acerque al lector la credencial del administrador del sistema
que desea memorizar y esperar el encendido del LED Cerradura
y doble tono de confirmación.
• Houd de installatiebeheerder badge die opgeslagen moet worden
voor het leesapparaat, wacht tot de LED slot gaat branden en u ter
bevestiging een dubbel geluidssignaal hoort.
• Aproxime ao leitor o Crachá gestor da instalação a memorizar
e espere o acendimento do LED da Fechadura e o duplo tom de
confirmação.
• Gestore impianto
• Manager master
• Master de gestion
• Master Verwaltung
• Credencial maestra de administrador
• Master beheerder
• Master gestor
2 beep
2 beep
2 beep
2 Piepton
2 bip
2 beep
2 beep

Video Kit
23
1 beep lungo
1 extended beep
1 bip prolongé
1 langer Piepton
1 bip largo
1 lange pieptoon
1 beep longo
• Se la memorizzazione non va a buon fine, si accendono
contemporaneamente i LED Serratura e Connessione e il
dispositivo emette un beep lungo.
• If the saving is not successful, the Door lock and Connection LED
light up at the same time and the device gives a long beep.
• Si la mémorisation échoue, les voyants Serrure et Connexion
s'allument simultanément et le dispositif émet un bip prolongé.
• Wenn die Speicherung nicht erfolgreich abgeschlossen wird,
leuchten die LED Schloss und Verbindung gleichzeitig auf und die
Vorrichtung erzeugt einen langen Piepton.
• Si la memorización no se realiza, los LEDs Cerradura y Conexión se
encienden al mismo tiempo y el dispositivo emite un beep largo.
• Als het opslaan niet goed verloopt, gaan de leds Slot en Verbinding
tegelijkertijd branden en laat het apparaat een lange pieptoon horen.
• Se a memorização não for bem-sucedida, acendem-se,
simultaneamente, os LED Fechadura e Conexão e o dispositivo
emite um beep prolongado.
• Nota: Il badge gestore impianto non comanda la serratura ma abilita solo la programmazione dei badge residenti
• Note: The system management key card does not control the door lock but only enables the resident key card programming
• Note: le badge de gestion installation ne commande pas la serrure mais active uniquement la programmation des badges résidents.
• Anmerkung: Das Badge Anlagenverwalter steuert nicht das Schloss, sondern gibt nur die Programmierung der Badge
Bewohner frei.
• Nota: La credencial del administrador del sistema no acciona la cerradura pero habilita la programación de las credenciales
de los residentes.
• Opmerking: De beheerdersbadge stuurt het slot niet aan, maar activeert uitsluitend de programmering van de inwonersbadge
• Nota: O crachá gestor da instalação não controla a fechadura, mas habilita unicamente a programação dos crachás residentes

24
• Cancellazione badge gestore impianto
• Deleting the manager master badge
• Élimination badge master de gestion
• Master-Verwaltungs-Badge löschen
• Cancelación de una credencial maestra de administrador
• Master beheerder badge wissen
• Cancelamento de crachá master gestor
• Tenere premuto il pulsante di programmazione fino al
lampeggio del LED Serratura e tono di conferma.
• Press and hold down the programming pushbutton until the Door
lock LED starts flashing, and a confirmation sound is heard.
• Maintenir enfoncée la touche de programmation jusqu’à ce que le
LED Serrure clignote et que la tonalité de confirmation soit émise.
• Programmierungstaste gedrückt halten, bis die LED des Schlosses
blinkt und das Bestätigungssignal ertönt.
• Mantenga apretado el pulsador de programación hasta que
parpadea el LED Cerradura y se emite el tono de confirmación.
• Houd de programmeringsknop ingedrukt tot de LED Slot knippert
en u ter bevestiging een geluidssignaal hoort.
• Mantenha carregado o botão de programação até o lampejo do
LED da Fechadura e o tom de confirmação.
1 beep
1 beep
1 beep
1 Piepton
1 bip
1 beep
1 beep
≥ 5s
≥ 10s
• Ripremere il pulsante di programmazione per 10 secondi.
Quando la cancellazione è avvenuta si accende il LED Serratura
e il dispositivo emette 2 beep.
• Press the programming pushbutton again for 10 seconds.
When the cancellation is completed, the Door lock LED comes, on
and the device emits 2 beeps.
• Appuyer à nouveau sur le bouton de programmation pendant
10 secondes.
Une fois l’effacement obtenu, le LED Serrure s’allume et le
dispositif émet 2 bips.
• Die Programmierungstaste 10 Sekunden lang drücken.
Nach erfolgter Löschung leuchtet die LED des Schlosses auf und die
Vorrichtung erzeugt 2 Pieptöne.
• Vuelva a apretar el pulsador de programación unos 10 segundos.
Cuando la cancelación se produce, se ilumina el LED Cerradura
y el dispositivo emite 2 bips.
• Druk nogmaals 10 seconden lang op de programmeringsknop.
De LED Slot gaat branden en u hoort een geluidssignaal als de
badge is gewist.
• Carregar de novo no botão de programação por 10 segundos.
Uma vez que interveio o cancelamento, acende-se o LED da
Fechadura e o dispositivo emite 2 beepw.
2 beep
2 beep
2 beep
2 Piepton
2 bip
2 beep
2 beep

Video Kit
25
• Avvicinare al lettore il badge gestore impianto fino al
lampeggio del LED Serratura e tono di conferma.
• Move the system manager badge close to the reader until the
Door lock LED flashes, and a confirmation sound is heard.
• Approcher le Badge administrateur installation du lecteur
et attendre que le LED Serrure clignote et qu’une tonalité
de confirmation soit émise.
• Dem Lesegerät das Badge des Anlagenbetreibers nähern, bis die
LED des Schlosses blinkt und das Bestätigungssignal ertönt.
• Acerque al lector la credencial del administrador del sistema
hasta que parpadea el LED de la Cerradura y se produzca el
tono de confirmación.
• Houd de installatiebeheerder badge voor het leesapparaat tot de
LED slot gaat knipperen en u ter bevestiging een geluidssignaal hoort.
• Aproxime ao leitor o Crachá gestor da instalação até o lampejo
do LED da Fechadura e o tom de confirmação.
1 beep
1 beep
1 beep
1 Piepton
1 bip
1 beep
1 beep
• Gestore impianto
• Manager master
• Master de gestion
• Master Verwaltung
• Credencial maestra
de administrador
• Master beheerder
• Master gestor
• Programmazione badge residente
• System management key card programming
• Programmation badge résident
• Programmierung des Badges Bewohner
• Programación de la credencial del residente
• Programmering inwonersbadge
• Programação de crachá residente
• Avvicinare al lettore il badge residente da memorizzare,
fino all’accensione del LED Serratura e tono di conferma.
Per programmare altri badge residenti, avvicinarli al
lettore entro 30 secondi dal precedente. Per confermare
la fine della programmazione avvicinare badge gestore
impianto oppure attendere 30 secondi. Due beep brevi
confermano l’avvenuta programmazione.
• Badge residente
• Resident badge
• Badge résident
• Bewohner-Badge
• Credencial residente
• Inwonerbadge
• Crechá residente
2 beep
2 beep
2 beep
2 Piepton
2 bip
2 beep
2 beep
• Move the resident badge to save close to the reader until the Door
lock LED flashes, and a confirmation sound is heard. If program-
ming other resident badges, move each one close to the reader
within 30 seconds from the previous one. To confirm that the
programming procedure has been completed move the system
manager badge close, or wait 30 seconds. Two short beeps confirm
that programming has been successful.
• Approcher le Badge résident à mémoriser du lecteur et at-
tendre que le LED Serrure clignote et qu’une tonalité de confir-
mation soit émise. Pour programmer d’autres badges résidents,
les approcher du lecteur dans les 30 secondes l’un après l’autre.
Pour confirmer la fin de la programmation, approcher le badge
master de gestion installation ou bien attendre 30 secondes.
Deux bips brefs confirment la programmation.
• Dem Lesegerät das Badge des Bewohners nähern, das gespeichert
werden soll, bis die LED des Schlosses blinkt und das Bestätigungs-
signal ertönt. Um weitere Badge zu programmieren, diese inner-
halb von 30 Sekunden nach dem vorhergehenden dem Lesegerät
nähern. Um das Ende der Programmierung zu bestätigen, das
Badge des Anlagetreibers nähern oder 30 Sekunden warten. Zwei
kurze Pieptöne bestätigen, dass die Programmierung erfolgt ist.
• Acerque al lector la credencial residente que desea memori-
zar hasta que parpadea el LED de la Cerradura y se produzca
el tono de confirmación. Para programar otras credenciales
residentes, es preciso acercarlas al lector antes de 30 segundos
La page est en cours de chargement...

Video Kit
27
• Riavvicinare per 2 volte consecutive il badge gestore impianto.
Quando la cancellazione è avvenuta si accende il LED Serratura
e il dispositivo emette 2 beep.
• Move the system manager badge close twice in succession. When
the cancellation is completed, the Door lock LED comes, on and the
device emits 2 beeps.
• Approcher à nouveau 2 fois de suite le badge master de gestion
installation. Une fois l’effacement obtenu, le LED Serrure
s’allume et le dispositif émet 2 bips.
• Das Badge des Anlagetreibers 2 Mal nähern. Nach erfolgter
Löschung leuchtet die LED des Schlosses auf und die Vorrichtung
erzeugt 2 Pieptöne.
• Acerque 2 veces seguidas la credencial maestra de
administrador del sistema. Cuando se produce la cancelación,
se ilumina el LED Cerradura y el dispositivo emite 2 bips.
• Houd de installatiebeheerder badge 2 maal voor het leesapparaat.
De LED slot gaat branden en u hoort 2 pieptonen als de badges
zijn gewist.
• Voltar a aproximar, por 2 vezes consecutivas, o crachá gestor da
instalação. Uma vez que interveio o cancelamento, acendese o
LED da fechadura e o dispositivo emite 2 beep.
• 2 volte Gestore impianto
• Twice Manager master
• 2 fois Master de gestion
• 2 Mal Master Verwaltung
• 2 veces Credencial maestra
de administrador
• 2 maal Master beheerder
• 2 vezes Master gestor
2 beep
2 beep
2 beep
2 Piepton
2 bip
2 beep
2 beep

28
• Reset
Nel caso si avesse la necessità di cancellare tutti i
badge (gestore impianto e residenti) precedentemente
memorizzati è possibile resettare il posto esterno.
• Reset
In order to cancel all the previously saved badges (system
manager and residents) the entrance panel can be reset.
• Réinitialisation
Dans le cas où il serait nécessaire d’éliminer tous les
badges (master de gestion installation et résidents)
précédemment mémorisés, il est possible de
réinitialiser le poste externe.
• Reset
Falls alle zuvor gespeicherten Badges (Anlagenbetreiber
und Bewohner) gelöscht werden sollen, kann die
Türstation zurückgestellt werden.
• Reset
En caso de que fuera necesario cancelar todas las
credenciales memorizadas(administrador del sistema y
residentes), es posible restablecer la placa exterior.
• Reset
U kunt alle badges (installatiebeheerder en
inwonerbadges) uit het geheugen wissen door het
externe punt te resetten.
• Rearme
No caso que houvesse a necessidade de cancelar
todos os crachás (gestor da instalação e residentes),
memorizados anteriormente, será possível fazer o
rearme (reset) da unidade externa.
• Togliere il BUS; tenendo premuto il pulsante di programmazione, ridare alimentazione. Mantenere premuto il pulsante di
programmazione fino all’accensione alternata dei LED Serratura e Connessione + beep lungo.
• Remove the BUS; press and hold down the programming pushbutton, reconnect the power supply. Press and hold down the
programming pushbutton until the Door lock and the Connection LEDs start flashing in succession; a long beep is also heard.
• Retirer le BUS ; rétablir l’alimentation en maintenant enfoncée la touche de programmation. Maintenir enfoncée la
touche de programmation jusqu’à ce que les LEDs Serrure et Connexion clignotent alternativement + bip long.
• Den BUS abtrennen, die Programmierungstaste gedrückt halten und wieder Strom geben. Die Programmierungstaste gedrückt
halten, bis die LEDs des Schlosses und der Verbindung abwechselnd aufleuchten und ein langes Bestätigungssignal ertönt.
• Desconecte el BUS, mantenga apretado el pulsador de programación y vuelva a conectar la alimentación. Mantenga
apretado el pulsador de programación hasta el encendido alternado de los LEDS Cerradura y Conexión + bip largo.
• Verwijder de BUS, houd de programmeringsknop ingedrukt en heractiveer de voeding.
• Houd de programmeringsknop ingedrukt tot de LED slot en de LED verbinding gaan knipperen en u een lange pieptoon hoort.
• Remova o BUS; mantendo carregado o botão de programação, volte a ligar a alimentação. Mantenha carregado o botão de
programação até o acendimento alternado dos LED da Fechadura e da Conexão + beep longo.
ON
ON
OFF
OFF
1 beep lungo
1 extended beep
1 bip prolongé
1 langer Piepton
1 bip largo
1 lange pieptoon
1 beep longo
La page est en cours de chargement...

30
• Installazione con base da tavolo 344632
• Installation with table-top base 344632
• Installation avec base de table 344632
• Installation auf Tischhalterung 344632
• Instalación con una base de mesa 344632
• Installatie op tafelsteun 344632
• Instalação com uma base de mesa 344632
• È possibile installare il dispositivo su base da tavolo (344632) acquistabile separatamente.
• It is possible to install the device on table-top base (344632) to be purchased separately.
• Il est possible d’installer le dispositif sur base de table (344632) vendue séparément.
• Das Gerät kann auf eine separat zu erwerbende Tischunterlage (344632) installiert werden.
• El dispositivo se puede instalar sobre una base de sobremesa (344632) en venta por separado.
• Het apparaat kan geïnstalleerd worden op de apart te bestellen tafelsteun (344632).
• É possível instalar o dispositivo em uma base para mesa (344632) adquirível separadamente.

Video Kit
31
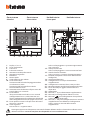
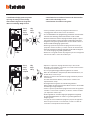
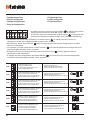
• Configurazione posto interno
• Internal unit configuration
• Configuration poste interne
• Konfiguration einer Hausstation
• Configuración de la unidad interior
• Het interne punt configureren
•
Configuração da unidade interna
J1 J2 N
P M
J1 = Estrai se è presente l’alimentazione
supplementare (morsetto 1 & 2)
J2 = Master/Slave (estrai per slave)
NN = Indirizzo del dispositivo
PP = Indirizzo del PE di cui apri la Serratura con PI a
riposo e a cui indirizzi l’autoaccensione
MM = Modalità di funzionamento secondo le tabelle
alle pagine seguenti.
J1 = Extraire en présence de l’alimentation
supplémentaire (bornes 1 et 2)
J2 = Master/Slave (extraire pour Slave)
NN = Adresse du dispositif
PP = Adresse du PE dont la serrure est ouverte
avec PI au repos et auquel est adressé l’auto-
allumage
MM = Modalité de fonctionnement conformément
aux tableaux des pages suivantes.
J1 = Extraiga con presencia de la alimentación
adicional (borne 1 & 2)
J2 = Master/Slave (extraiga para slave)
NN = Dirección del dispositivo
PP = Dirección PE de la que abre la Cerradura
con UI en reposo y a la que dirige el
autoencendido
MM = Modo de funcionamiento según las tablas de
las páginas siguientes.
J1 = Extrai caso esteja presente a alimentação
adicional (borne 1 & 2)
J2 = Master/Slave (extrai para Slave)
NN = Endereço do dispositivo
PP = Endereço da UE através da qual você abre
a fechadura com a UI em repouso e àqual
endereça o autoacendimento
MM = Modalidade de funcionamento segundo as
tabelas das próximas páginas.
J1 = Remove if the additional power supply is present
(clamp 1 and 2)
J2 = Master/Slave (remove for slave)
NN = Device address
PP = Address of the EP of which you can open the
Door Lock with Handset idle, and to which you
can send the auto-on command
MM = Mode of operation according to the tables on
the following pages
J1 = Abziehen, wenn ein zusätzliche
Stromversorgung vorhanden ist (Klemme 1&2)
J2 = Master/Slave (abziehen für Slave)
NN = Adresse der Vorrichtung
PP = Adresse der TS mit dem zu öffnenden Schloss,
mit HS im Ruhestand, der die Selbstschaltung
bestimmt ist
MM = Funktionsmodus laut Tabellen in den
nachfolgenden Seiten
J1 = Uitnemen als een extra voeding aanwezig is
(aansluitklem 1 & 2)
J2 = Master/Slave (uitnemen voor slave)
NN = Adres van het apparaat
PP = Adres van buitenpost waar het slot van wordt
ontgrendeld met binnenpost in ruststand en waar
de automatische inschakeling naar wordt gestuurd
MM = Functioneringswijze volgens de tabellen op de
volgende pagina’s
La page est en cours de chargement...

Video Kit
33
MM =
6
• Autoaccensione diretta del P+3
• P+3 direct auto-switching on
• Auto-allumage direct du P+3
• Direkte Selbstschaltung der P+3
• Autoencendido directo del P+3
• Directe automatische P+3
• Autoacendimento direto do P+3
P
+1
MOD=9
P
+1
P
2
3
1 32
346210
1
P
+2
MOD=9
P
+2
2
3
1 32
346210
1
P
+3
MOD=9
P
+3
2
3
1 32
346210
1
MM =
7
• Cercapersone
• Paging
• Cherche-personnes
• Personensuche
• Buscapersonas
• Buzzer
• Procura pessoas
MM =
8
• Intercom su se stesso
• Internal intercom
• Intercom sur soi-même
• Intercom auf sich selbst
• Intercomunicación en sí misma
• Intercom op zich
• Intercom sobre si mesmo
MM =
9
• Attivazione/Disattivazione studio
professionale
• Enabling/disabling Office function
• Activation/Désactivation Bureau
• Büro-Funktion aktivieren/deaktivieren
• Activación/Desactivación Oficina
Profesional
• Activering/Deactivering professionele
studio
• Ativação/Desativação do Estúdio
profissional
J1 J2 N
P M
• Il configuratore fisico MM – (decine) decide quali sono le 4 icone di AZIONI
RAPIDE che compaiono sulla HOME PAGE e che puoi attivare dal touch del
display. Ti riportiamo le possibili configurazioni nella tabella seguente.
• The MM - (tenths) physical configurator decides which are the 4 QUICK ACTIONS
icons that appear on the HOME PAGE, and can be activated by touching the
display. The possible configurations are shown in the following table.
• Le configurateur physique MM – (dizaines) établit quelles sont les 4 icônes d’ACTIONS RAPIDE qui s’affiche
sur la PAGE D’ACCUEIL et qu’il est possible d’activer depuis l’écran tactile. Dans le tableau suivant sont
indiquées les différentes configurations possibles.
• Der physische Konfigurator MM - (Zehner) entscheidet welche 4 Symbole der SCHNELLFUNKTIONEN auf der
HOMEPAGE angezeigt werden und über den Touchscreen aktiviert werden können. In nachstehender Tabelle sind
die möglichen Konfigurationen zusammengefasst.
• El configurador físico MM – (decenas) decide los 4 iconos de las ACCIONES RÁPIDAS que aparecen en la Página
de Inicio y que puede activar en la pantalla táctil. La tabla siguiente contiene las configuraciones posibles.
• De fysieke configurator MM – (tienden) bepaalt welke 4 iconen van de SNELTOETSEN op de HOMEPAGINA worden
weergegeven en op het touchscreen geactiveerd kunnen worden.
• O configurador físico MM - (dezenas) decide quais são os quatro ícones de AÇÕES RÁPIDAS que aparecem
na HOME PAGE e que você pode ativar mediante o toque do display. De volgende tabel bevat de mogelijke
configuraties.

34
IT - Legenda EN - Legend FR - Légende
P
+1
MOD=9
P
+1
P
+2
MOD=9
P
+2
P
P
+1
MOD=5
P
+1
P
+1
2
3
1 32
346210
1
P
+2
MOD=5
P
+2
P
+2
2
3
1 32
346210
1
P
+3
MOD=5
P
+3
P
+3
2
3
1 32
346210
1
P
+4
MOD=5
P
+4
P
+4
2
3
1 32
346210
1
1–+ 23 4
P
+3
MOD=9
P
+3
1–+ 23 4
2
3
1 32
346210
1
Attivazione del PE (confi-
gurato con P+1) in mo do
di ret to sen za la chia mata
op pu re at tivazione at tua to re
346200/346210 (con fi gu rato
con P+1 e MOD=9)
Activating the EP (configured
with P+1) directly without
the call or ac ti va ting actuator
346200/346210 (con fi gured
with P+1 and MOD=9)
Activation du PE (con fi guré
avec P+1) en mode direct
sans l’appel ou activation
actionneur 346200/346210
(configuré avec P+1 et
MOD=9)
P
+1
MOD=9
P
+1
P
+2
MOD=9
P
+2
P
P
+1
MOD=5
P
+1
P
+1
2
3
1 32
346210
1
P
+2
MOD=5
P
+2
P
+2
2
3
1 32
346210
1
P
+3
MOD=5
P
+3
P
+3
2
3
1 32
346210
1
P
+4
MOD=5
P
+4
P
+4
2
3
1 32
346210
1
1–+ 23 4
1–+ 23 4
P
+3
MOD=9
P
+3
1–+ 23 4
Apertura serratura del PE
(con fi gurato con P+1) in mo-
do di retto senza la chia mata
op pu re at ti va zione attua-
tore.346200/346210 (con-
figurato con P+1 e MOD=5)
op pu re at ti va zione attuatore
346230 (con figurato con P+1)
Door lock opening of EP
(con figured with P+1)
directly without the call
or activating the actuator
346200/346210 (con figured
with P+1 and MOD=5) or ac-
tivating the actuator 346230
(configured with P+1)
Ouverture serrure du PE (con-
fi gu ré avec P+1) en mode di-
rect sans l’appel ou ac ti vation
ac tion neur 346200/346210
(con fi gu ré avec P+1 et
MOD=5) ou ac ti va tion ac-
tion neur 346230 (con fi gu ré
avec P+1)
P
+1
MOD=9
P
+1
P
+2
MOD=9
P
+2
P
P
+1
MOD=5
P
+1
P
+1
2
3
1 32
346210
1
P
+2
MOD=5
P
+2
P
+2
2
3
1 32
346210
1
P
+3
MOD=5
P
+3
P
+3
2
3
1 32
346210
1
P
+4
MOD=5
P
+4
P
+4
2
3
1 32
346210
1
1–+ 23 4
1–+ 23 4
P
+3
MOD=9
P
+3
1–+ 23 4
Apertura serratura del PE
(con fi gurato con P+2) in mo-
do di retto senza la chia mata
op pu re at ti va zione attuatore
346200/346210 (con figurato
con P+2 e MOD=5) op pu re
at ti va zione attuatore 346230
(con figurato con P+2)
Door lock opening of EP
(con figured with P+2)
directly without the call
or activating the actuator
346200 (con figured with P+2
and MOD=5) or activating
the actuator 346230 (config-
ured with P+2)
Ouverture serrure du PE (con-
fi gu ré avec P+2) en mode di-
rect sans l’appel ou ac ti vation
ac tion neur 346200 (con fi gu ré
avec P+2 et MOD=5) ou
ac ti va tion ac tion neur 346230
(con fi gu ré avec P+2)
P
+1
MOD=9
P
+1
P
+2
MOD=9
P
+2
P
P
+1
MOD=5
P
+1
P
+1
2
3
1 32
346210
1
P
+2
MOD=5
P
+2
P
+2
2
3
1 32
346210
1
P
+3
MOD=5
P
+3
P
+3
2
3
1 32
346210
1
P
+4
MOD=5
P
+4
P
+4
2
3
1 32
346210
1
1–+ 23 4
1–+ 23 4
P
+3
MOD=9
P
+3
1–+ 23 4
Apertura serratura del PE
(con fi gurato con P+3) in mo-
do di retto senza la chia mata
op pu re at ti va zione attua-
tore346200/346210 (con-
figurato con P+3 e MOD=5)
op pu re at ti va zione attuatore
346230 (con figurato con P+3)
Door lock opening of EP
(con figured with P+3)
directly without the call
or activating the actuator
346200/346210 (con figured
with P+3 and MOD=5) or ac-
tivating the actuator 346230
(configured with P+3)
Ouverture serrure du PE (con-
fi gu ré avec P+3) en mode di-
rect sans l’appel ou ac ti vation
ac tion neur 346200/346210
(con fi gu ré avec P+3 et
MOD=5) ou ac ti va tion ac-
tion neur 346230 (con fi gu ré
avec P+3)
P
+1
MOD=9
P
+1
P
+2
MOD=9
P
+2
P
P
+1
MOD=5
P
+1
P
+1
2
3
1 32
346210
1
P
+2
MOD=5
P
+2
P
+2
2
3
1 32
346210
1
P
+3
MOD=5
P
+3
P
+3
2
3
1 32
346210
1
P
+4
MOD=5
P
+4
P
+4
2
3
1 32
346210
1
1–+ 23 4
1–+ 23 4
P
+3
MOD=9
P
+3
1–+ 23 4
Apertura serratura del PE
(con fi gurato con P+4) in mo-
do di retto senza la chia mata
op pu re at ti va zione attuatore
346200/346210 (con figurato
con P+4 e MOD=5) op pu re
at ti va zione attuatore 346230
(con figurato con P+4)
Door lock opening of EP
(con figured with P+4)
directly without the call
or activating the actuator
346200/346210 (con figured
with P+4 and MOD=5) or ac-
tivating the actuator 346230
(configured with P+4)
Ouverture serrure du PE (con-
fi gu ré avec P+4) en mode di-
rect sans l’appel ou ac ti vation
ac tion neur 346200/346210
(con fi gu ré avec P+4 et
MOD=5) ou ac ti va tion ac-
tion neur 346230 (con fi gu ré
avec P+4)
La page est en cours de chargement...

36
IT - Legenda EN - Legend FR - Légende
Intercom tra appartamenti in
impianti con interfaccia da
appartamento 346850.
Intercommunicability be-
tween apartments in systems
with
apartment interface 346850.
Intercommunication
entre appartements sur
installations avec interface
d’appartement 346850.
Intercom all’interno dell’ap-
partamento in impianti con
interfaccia di appartamento
346850; oppure intercom
tra appartamenti in impianti
senza interfaccia di appar-
tamento.
Intercommunicability inside
an apartment in systems with
apartment interface 346850
or intercommunicability be-
tween apartments in systems
without apartment interface.
Intercommunication à l’inté-
rieur de l’appartement sur
installations avec interface
d’appartement 346850
ou intercommunication
entre appartements sur
installations sans interface
d’appartement.
Intercom su se stesso, invia la
chiamata a tutti gli apparecchi
con uguale indirizzo
Intercom on itself, sends the
call to all the devices with the
same address.
Intercom sur lui-même,
envoie l’appel à tous les
appareils ayant une adresse
identique.
Cercapersone, effettua una
intercom generale, invia
una chiamata a tutti gli
apparecchi dell’impianto.
Paging, it makes general
intercom and sends a call to all
the handsets of the system.
Cherche-personne, effectue
une intercom générale,
envoie un appel à tous les
appareils de l’installation.
La page est en cours de chargement...

38
• In caso di riconfigurazione dell’apparecchio attendere un minuto prima di riconnetterlo all’impianto.
• When configuring the device, wait one minute before connecting it to the system again.
• En cas de nouvelle configuration de l’appareil, laisser s’écouler une minute avant de le rebrancher à l’installation.
• Falls das Gerät neu konfiguriert werden soll, eine Minute warten bevor es an die Anlage geschlossen wird.
P
+1
MOD=9
P
+1
2
3
1 32
346210
1
P
+1
MOD=9
P
+1
2
3
1 32
346210
1
N=2
N=1
N=1
N=2
P
+1
MOD=5
P
+1
P
+1
2
3
1 32
346210
1
P
+1
MOD=5
P
+1
P
+1
2
3
1 32
346210
1
P
+1
MOD=9
P
+1
2
3
1 32
346210
1
P
+2
MOD=5
P
+2
P
+2
2
3
1 32
346210
1
P
+2
MOD=5
P
+2
P
+2
2
3
1 32
346210
1
P
+1
MOD=5
P
+1
P
+1
2
3
1 32
346210
1
N=3
N=2
N=1
N=3
N=1
N=2
N=2
N=1
N=3
P
+1
MOD=5
P
+1
P
+1
2
3
1 32
346210
1
P
+2
MOD=5
P
+2
P
+2
2
3
1 32
346210
1
N=1
N=2
N=3
N=2
N=1
N=3
N=3
N=1
N=2
P
+1
MOD=5
P
+1
P
+1
2
3
1 32
346210
1
P
+2
MOD=5
P
+2
P
+2
2
3
1 32
346210
1
MOD = MM
1 2 3 4 5
La page est en cours de chargement...
La page est en cours de chargement...
La page est en cours de chargement...
La page est en cours de chargement...
La page est en cours de chargement...
La page est en cours de chargement...
La page est en cours de chargement...
La page est en cours de chargement...
La page est en cours de chargement...
La page est en cours de chargement...
-
 1
1
-
 2
2
-
 3
3
-
 4
4
-
 5
5
-
 6
6
-
 7
7
-
 8
8
-
 9
9
-
 10
10
-
 11
11
-
 12
12
-
 13
13
-
 14
14
-
 15
15
-
 16
16
-
 17
17
-
 18
18
-
 19
19
-
 20
20
-
 21
21
-
 22
22
-
 23
23
-
 24
24
-
 25
25
-
 26
26
-
 27
27
-
 28
28
-
 29
29
-
 30
30
-
 31
31
-
 32
32
-
 33
33
-
 34
34
-
 35
35
-
 36
36
-
 37
37
-
 38
38
-
 39
39
-
 40
40
-
 41
41
-
 42
42
-
 43
43
-
 44
44
-
 45
45
-
 46
46
-
 47
47
-
 48
48


dans d''autres langues
- italiano: Bticino 363611 Istruzioni per l'uso
- English: Bticino 363611 Operating instructions
- español: Bticino 363611 Instrucciones de operación
- Deutsch: Bticino 363611 Bedienungsanleitung
- Nederlands: Bticino 363611 Handleiding
- português: Bticino 363611 Instruções de operação
Documents connexes
Autres documents
-
Somfy 3 bracelets adulte pour serrure connectée Somfy Mode d'emploi
-
PRASTEL Easymini Le manuel du propriétaire
-
V2 Elettronica V2 Next Le manuel du propriétaire
-
AVS Electronics BIP 4 Manuel utilisateur
-
Key Gates 900 SEL Le manuel du propriétaire
-
Comelit Simple Key SK9000I Technical Manual
-
 SCS Sentinel XO 403 + CLES Le manuel du propriétaire
-
 WAFERLOCK C210 Outdoor Weatherproof Smart Padlock Manuel utilisateur
-
THEBEN ELPA 6 Le manuel du propriétaire

