Kaz HUT-200 Le manuel du propriétaire
- Catégorie
- Humidificateurs
- Taper
- Le manuel du propriétaire

HONEYWELL
TOP FILL ULTRASONIC
HUMIDIFIER
MODEL HUT-200 Series
IMPORTANT SAFETY
INSTRUCTIONS
READ AND SAVE THESE SAFETY
INSTRUCTIONS BEFORE USING
THIS HUMIDIFIER
When using electrical appliances, basic pre-
cautions should always be followed to reduce
the risk of fire, electric shock, and injury to
persons, including the following
1. Always place this humidifier on a firm, flat and
level surface. This humidifier may not work
properly on an uneven surface.
2. Place this humidifier in an area where it is not
accessible to children.
3. Do not place the humidifier near any heat
sources such as stoves, radiators, and heaters.
4. Do not use the humidifier outdoors.
5. Before using the humidifier, check the power
cord for any signs of damage. If the cord is
found to be damaged, DO NOT USE and return
the humidifier to the manufacturer under the
warranty agreement for repair.
6. This appliance has a polarized plug (one blade
is wider than the other). To reduce the risk of
shock, this plug is intended to fit only one way
in a polarized outlet. If the plug does not fit
securely in the outlet, reverse the plug. If it still
does not fit, contact a qualified electrician.
DO NOT attempt to defeat this safety feature.
7. To disconnect the humidifier, first turn controls
to the OFF position, then grip the plug and pull
it from the wall outlet. Never pull by the cord.
8. A loose fit between the AC outlet (receptacle)
and plug may cause overheating and a
distortion of the plug. Contact a qualified
electrician to replace loose or worn outlet.
9. The humidifier should always be unplugged
and emptied when not in operation or while
being serviced or cleaned.
10. Never tilt or attempt to move the humidifier
while it is operating or filled with water.
UNPLUG the humidifier before moving.
11. This humidifier requires regular cleaning. Refer
to the CLEANING instructions provided. Never
clean the humidifier in any manner other than
as instructed in this manual.
12. Do not direct moisture flow directly at
individuals, walls or furniture.
13. When a humidifier is used in a closed room
or small rooms, check periodically for proper
ventilation, as excessive humidity can cause
condensation stains on walls.
14. Turn the humidifier OFF if you notice
moisture on the inside of your windows. For
proper humidity reading use a hygrometer,
which is available in many hardware and
department stores, or by ordering one from the
manufacturer.
15. This product is intended for residential use
only.
The Honeywell trademark is used by Kaz, Inc. under license from Honeywell International Inc.
Honeywell International Inc. makes no representation or warranties with respect to this product.

2
Honeywell
Ultrasonic Humidifier
Model HUT-200 Series
Kaz, Inc.
250 Turnpike Road
Southborough, MA 01772
1-800-477-0457
This device complies with Part 18 of the FCC rules.
Warning: Changes or modifications to this unit not expressly approved
by the party responsible for compliance could void the user’s authority
to operate the equipment.
This equipment has been tested and found to comply with the limits for
Consumer ISM equipment, pursuant to Part 18 of the FCC rules. These
limits are designed to provide reasonable protection against harmful
interference in a residential installation. This equipment generates, uses
and can radiate radio frequency energy, and if not installed and used in
accordance with the instructions, may cause harmful interference with
radio communications. However, there is no guarantee that interference
will not occur in a particular installation. If this equipment does cause
harmful interference to radio or television reception, which can be de-
termined by turning the equipment off and on, the user is encouraged to
try to correct the interference by one or more of the following measures:
• Reorient or relocate the receiving antenna.
• Increase the separation between equipment and receiver.
• Connect the equipment into an outlet on a circuit different from
that to which the receiver is connected.
• Consult the dealer or an experienced radio TV technician for help.

3
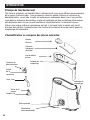
INTRODUCTION
How it Works:
The Easy to Care Ultrasonic Humidifier is designed to silently provide visible cool moisture.
Water is pumped from the water reservoir through the demineralization cartridge which helps
capture minerals in the water. Demineralized water flows into the misting tray where it is
turned into a fine visible mist through the action of ultrasonic sound waves. The mist is then
propelled into the air by a small fan providing relief from dry air.
The unique top fill design makes filling as easy as watering a plant. This unit is also equipped
with a water circulating feature which indicates when refilling is needed.
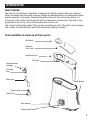
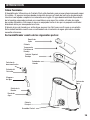
Your humidifier is made up of these parts:
Protective
Clear Cover
Water Hose
Mist Nozzle
Main Housing
Power/Output Control
Water Window
Demineralization
Cartridge
Water Pump
Top Housing/Tray
Cartridge
Inlet
Pump Outlet
Fill Funnel

4
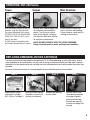
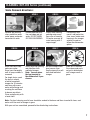
SETTING UP YOUR HUMIDIFIER
Remove from box
Remove packaging material. Remove and set aside instruction
manual. Recycle box and packaging materials or save box for end
of season storage.
To prevent water pump from shifting during transportation
it has been taped to the inside of your humidifier. Remove
top housing and locate the water pump in the bottom of the main
housing. Remove shipping tape located on water pump and place
water pump back in slot.
Make sure it is securely in place and hose is not bent or
crimped or unit will not operate.
Placement
Select a firm, level location at least 6” (15cm) from any
walls for proper airflow. Place the humidifier on a water-
resistant surface, as water can damage furniture and some
flooring.
Kaz will not accept responsibility for property damage
caused by water spillage.
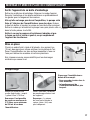
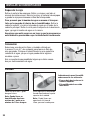
Filling
Fill pitcher or jug with up to
1 gallon of cool water.
Note: You can fill this
humidifier with as much as
1 gallon of water or as little
as a cup of water.
Pour water into the fill funnel
area located on the top of
the unit.
Note: Water can be added
up to, but not exceed the
Full line.
Indications that your humidifier
needs to be refilled are:
- Water will stop circulating
over the top housing.
- Your humidifier will start to
sound louder.
Figure 1

5
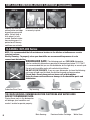
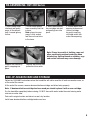
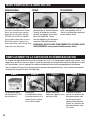
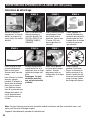
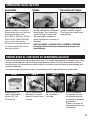
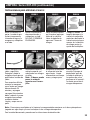
Replacement Demin-
eralization Cartridge
HDC-200 or Cartridge Q
With dry hands unplug
humidifier and carry to
kitchen or bathroom.
Remove top housing
and set aside.
Remove water hose
from demineralization
cartridge by gently
pulling and twisting.
Remove old deminer-
alization cartridge and
discard.
OPERATING: HUT-200 Series
Variable mist control allows you
to customize your humidifier
output. Turn the mist control
knob to the highest setting for
fast moisture and lower setting
for moisture maintenance.
Output
Direct moisture away from
walls, furniture and bedding.
Failure to do so could result in
wetting of these items.
Mist Direction
The demineralization cartridge should be changed every 20-30 fillings depending on your water quality. Keep in
mind, depending on your water quality, you may need to change your demineralization cartridge more frequently.
Indications that you should change your cartridge are white colored particles/dust settling around the base of your
humidifier.
For areas of extreme hard water it is recommended that you use distilled water in your humidifier.
REPLACING DEMINERALIZATION CARTRIDGE
STEP 1 STEP 2 STEP 3
STEP 4
Power
With the power switch in the OFF
position, plug the filled humidi-
fier into a polarized 120V outlet.
DO NOT FORCE THE POLARIZED
PLUG INTO THE OUTLET; It will
only fit one way.
DO NOT plug in humidifier with
wet hands to avoid electric shock.
NOTE: DO NOT OPERATE WITH TOP COVER REMOVED.
Doing so could result in water spilling from humidifier.

6
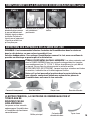
CLEANING: HUT-200 Series
Replace with new de-
mineralization cartridge
by gently pressing into
place. You will hear a
click when it is fully
seated. Reattach water
hose making sure it is
pushed on all the way
and there are no kinks.
Make sure water pump
is securely in place.
Replace top housing.
STEP 5 STEP 6
Weekly Cleaning: To properly clean your humidifier we recommend the process of scale
removal and disinfecting.
DISHWASHER SAFE:
The following parts are TOP RACK dishwasher
safe for residential dishwashers operating at temperatures below 70°C/158°F.
It is recommended that you run the dishwasher on the light duty or normal cycle.
Do not wash humidifier parts with soiled articles/dishes.
DO NOT USE DETERGENTS. If you use your dishwasher to clean the following
parts you will not need to follow the disinfecting and scaling procedure.
Please Note: Do not place parts on lower rack of dishwasher.
Using the lower rack could cause damage to the humidifier parts and
dishwasher.
NOTE: It is recommended that all maintenance be done in the kitchen or bathroom on a water
resistant surface.
STEP 7
REPLACING DEMINERALIZATION CARTRIDGE (Continued)
THE MAIN HOUSING, DEMINERALIZATION CARTRIDGE AND WATER HOSE
ARE NOT DISHWASHER SAFE.
Placing these parts in the dishwasher
will damage your humidifier and
render it unable to operate properly.
Water Pump
Main Housing
Demineralization Cartridge
Water Hose
Protective Clear Cover Top housing Mist Nozzle

7
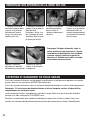
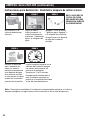
CLEANING: HUT-200 Series (continued)
Wash hose with soap
and warm water.
Rinse hose thoroughly
until all soap residue is
removed.
For tough stains, soak
the hose in a bowl
of white household
vinegar for 30 minutes
and rinse with warm
water while flexing and
crushing the soft hose
to loosen any debris.
Clean and wipe dry with
a hand cloth.
Gently wipe top housing
and nebulizer with
undiluted vinegar
Note: You can place
the top housing in
the dishwasher if you
choose.
Be sure to keep water
level sensor clean.
Gently wipe with a soft
cloth and undiluted
vinegar.
Soak for 20 minutes.
Rinse base and parts
not put in dishwasher
until vinegar smell is
gone.
STEP 4
STEP 6
STEP 7 STEP 8
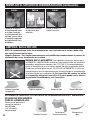
Scale Removal directions:
Remove top housing,
clear protective cover,
water pump and water
hose and set aside.
Remove demineraliza-
tion cartridge and set
aside. DO NOT WASH
OR SOAK IN VINEGAR.
Empty main housing,
pouring water away
from rear of housing.
Fill water reservoir of
main housing with 2
cups vinegar.
Place pump, mist
nozzle, and protective
clear cover inside main
housing in the vinegar
solution to soak or
follow the dishwasher
option.
STEP 1
STEP 2 STEP 3
Note: For best cleaning results hose should be soaked in the base and then rinsed with clean, cool
water until the smell of vinegar is gone.
With your unit un-assembled, proceed to the disinfecting instructions.
STEP 5

8
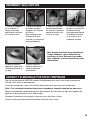
Disinfecting directions: Disinfect following scale removal
DO NOT DISINFECT
demineralization
cartridge
Set aside top housing,
clear protective cover,
water pump and water
hose.
Soak water pump,
mist nozzle and clear
protective cover in water
reservoir of the main
housing if these parts
were not cleaned on the
top rack of dishwasher.
NOTE: USING MORE
THAN 1 TB OF BLEACH
PER GALLON OF
WATER WILL RESULT
IN DAMAGE TO YOUR
HUMIDIFIER.
Add 1 TB of bleach to 1
gallon water. Add ½ to
¾ gallon of water/bleach
solution to water reservoir
of the main housing.
Wipe top cover with remaining
water bleach solution if these
parts were not placed in
dishwasher.
Soak for 15-20 minutes.
Thoroughly rinse base and any
parts not placed in dishwasher
until the smell of bleach is gone.
STEP 1
STEP 2
STEP 3
STEP 4
STEP 5
CLEANING: HUT-200 Series (continued)
Note: For best cleaning results hose should be soaked in the base and then rinsed with clean,
cool water until the smell of bleach is gone.

9
END-OF-SEASON CARE AND STORAGE
Follow the CLEANING instructions when the humidifier will not be used for at least one week or more, or
at the end of the season.
At the end of the season, remove demineralization cartridge and allow to dry properly.
Note: If demineralization cartridge has been used you should replace it with a new cartridge.
Dry the humidifier completely before storing. DO NOT store with water inside the main housing water
reservoir or water tube.
Pack unit in original carton and store in a cool, dry location.
Install new demineralization cartridge before next use.
Replace mist nozzle by
gently snapping into
place.
Note: Please be careful of clothing, rugs and
other non bleach resistant materials when
disinfecting. Spilling bleach on clothing, rugs
and certain surfaces may cause damage.
RE-ASSEMBLING: HUT-200 Series
1. Insert pump outlet
into hose and gently
press all the way on
until it cannot go any
further.
2. Insert water pump/
hose assembly into slot
in base.
Note: please be sure
pump is fully seated
and there are no kinks
in the hose.
3. Insert demineraliza-
tion cartridge into slot
and gently press into
place.
4. Attach water hose
opening to demineral-
ization cartridge
by gently inserting
cartridge outlet into
water hose opening.
Replace top housing and
protective clear cover.

10
FREQUENTLY ASKED QUESTIONS
Question Answer
How do I clean inside the water pump? You can clean the inside of the pump by turning
the cover counter-clockwise. Remove the cover
and you can clean the housing and disk.
What parts are dishwasher safe? The water hose, water pump, top housing,and
protective clear cover are all top rack dishwasher
safe
How do I assemble my humidifier after cleaning? See page 9 of your owners manual.
Can I use dish soap to clean my humidifier?
It is not recommended that you use dish soap to
clean your humidifier as it is very hard to remove
all the soap and this could cause damage to your
humidifier. The only part that we recommend
cleaning with soap is the water hose and this part
should be rinsed until all soap residue is removed.
Can I add water treatments to this humidifier?
You should only add water treatments to your
humidifier that are specifically made for ultrasonic
humidifiers such as the Protec
TM
Antimicrobial
Cleaning Cartridge, model PC-1 or PC-2. Using
water treatments that are not recommended for ul-
trasonic humidifiers could damage your humidifier.
If you are concerned about hard water it is recom-
mended you use distilled water in your humidifier.
Cleaning
ELECTRICAL RATINGS
The Honeywell HUT-200 Series models are rated at 120V, 60 Hz.
NOTE: IF YOU EXPERIENCE A PROBLEM, PLEASE CONTACT CONSUMER RELATIONS FIRST
OR SEE YOUR WARRANTY. DO NOT RETURN THE HUMIDIFIER TO THE ORIGINAL PLACE
OF PURCHASE. DO NOT ATTEMPT TO OPEN THE MOTOR HOUSING OR TAMPER WITH
INTERLOCK SWITCH YOURSELF, DOING SO MAY VOID YOUR WARRANTY AND CAUSE
DAMAGE TO THE PRODUCT OR PERSONAL INJURY.
CONSUMER RELATIONS
Mail questions or comments to:
Kaz, Incorporated
Consumer Relations Dept.
250 Turnpike Road, Southborough, MA 01772
Please be sure to specify model number.
Call us toll-free at: 1-800-477-0457
E-mail: consumerrelations@kaz.com
Or visit our website at: www.kaz.com
TO ORDER REPLACEMENT PARTS
HDC-200-Demineralization Cartridge
HUT-200-Tray
HUT-200-Tray Cover
HUT-200-Mist Nozzle
750/200-Pump
HUT-200-Hose
HUT-200-BLANK
PC-1/PC-2-Protec Antimicrobial Cleaning
Cartridge

11
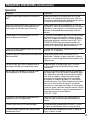
Question Answer
What setting should I put my humidifier on? You should run your humidifier on the highest
setting if your room is very dry. Once you are at a
more comfortable humidity you can turn your output
setting to a lower setting.
I ran my humidifier overnight in a very dry
room and the humidity barely changed but my
water level decreased quite a bit
It may take a few days for your humidity to increase.
Wood, rugs and other objects in your room will
absorb moisture before you can feel the effects,
if it is extremely dry.
Can I run my humidifier without a
demineralization cartridge?
Yes but it is recommended that you use a deminer-
alization cartridge to help reduce white dust. If you
choose to not use a demineralization cartridge you
will need to replace the demineralization cartridge
in your unit with HUT-200-BLANK for it to operate.
It is recommended that you use distilled water if you
chose not to use a demineralization cartridge.
How often should I change my
demineralization catridge?
In general the demineralization cartridge will last
20-30 fillings depending on water quality and
usage. White dust on surrounding surfaces could
indicate that your demineralization cartridge needs
to be replaced.
How do I know my humidifier is operating
properly
You will see visible mist coming from your
humidifier. Also, water will flow down the top
housing and you will notice a decrease in the
water level after 8 hrs of use.
The water window is illuminated but I do not
see any mist coming out of the mist nozzle.
Make sure unit has water.
See Troubleshooting Guide for more.
There is no water running through the water
flow area on the top housing.
First check to make sure there is water in your
humidifier. If yes, check your water pump to make
sure it is properly seated in the holding area.
Next check to make sure the water hose is firmly
attached to both the water pump and demineraliza-
tion cartridge. Last, make sure there is nothing
obstructing the water flow area on the top cover
or water hose. If these steps do not help, please
please see our Troubleshooting Guide or contact our
customer service department at 1-800-477-0457.
Why did my humidifier suddenly start sounding
loud?
Check your water level. If your humidifier is out of
water it is an indication that you need to refill your
humidifier.
How much water does my humidifier hold? Your humidifier can hold up to 1.0 Gallon of water. It
can be filled to the Full line.
How long will my humidifier run when full? Your humidifier will run up to 22 hrs on high and 44
hrs on low.
Operation
FREQUENTLY ASKED QUESTIONS (Continued)

12
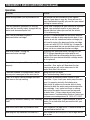
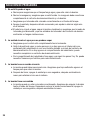
TROUBLESHOOTING
1. Water is not flowing
a. Check to be sure there is water in the tank and it is covering the pump.
b. Check hose to be sure there are no kinks. Hose should be pushed fully onto both the
demineralization cartridge and pump.
c. Make sure pump is fully seated properly in bottom of tank.
d. Turn unit off, then back on to help clear any air in the system.
e. If water still is not flowing, remove pump, disassemble and make sure pump
wheel can spin freely and there is nothing blocking pump inlet or demineralization
cartridge inlet.
2. Unit flows water but does not produce mist
a. Make sure control is rotated fully clockwise.
b. Remove mist nozzle and check to see if there is water inside the nebulizer cham-
ber which is the pocket located next to the demineralization cartridge. If there is
no water in the nebulizer chamber, you may need to replace your demineralization
cartridge.
c. If there is water in the nebulizer chamber and steps 2a and 2b have been followed,
you may need to call our toll free number for further instructions.
3. Pump makes a swishing sound
a. The pump may have sucked in air. Be sure there is enough water in the tank to cover
the pump.
b. After filling, turn the unit off for a few seconds, then turn it back on to clear the
system of air.
4. Pump makes a whirring sound
a. The pump may not be properly seated. Be sure to push pump fully into tank. After
seating the pump properly, turn the unit off for a few seconds, then turn it back on.

13
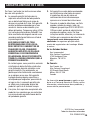
3 YEAR LIMITED WARRANTY
You should first read all instructions before
attempting to use this product.
A. This 3 year limited warranty applies to
repair or replacement of product found to be
defective in material or workmanship. This
warranty does not apply to damage resulting
from commercial, abusive, unreasonable use
or supplemental damage. It also does not
apply to the filter or Protec
™
Antimicrobial
Cartridge. Defects that are the result of
normal wear and tear will not be considered
manufacturing defects under this warranty.
KAZ IS NOT LIABLE FOR INCIDENTAL
OR CONSEQUENTIAL DAMAGES OF ANY
NATURE. ANY IMPLIED WARRANTY OF
MERCHANTABILITY OR FITNESS FOR A
PARTICULAR PURPOSE ON THIS PRODUCT
IS LIMITED IN DURATION TO THE
DURATION OF THIS WARRANTY.
Some jurisdictions do not allow the exclusion
or limitation of incidental or consequential
damages or limitations on how long an
implied warranty lasts, so the above
limitations or exclusions may not apply to
you. This warranty gives you specific legal
rights, and you also may have other rights
which vary from jurisdiction to jurisdiction.
This warranty applies only to the original
purchaser of this product from the original
date of purchase.
B. At its option, Kaz will repair or replace
this product if it is found to be defective in
material or workmanship.
C. This warranty does not cover damage
resulting from any unauthorized attempts
to repair or from any use not in accordance
with the instruction manual.
D. Return defective product to Kaz,
Incorporated with a brief description of the
problem. Include proof of purchase and a
$10 US/$15.50 CAN check or money order
for handling, return packing and shipping
charges. Please include your name, address
and a daytime phone number.
You must prepay shipping charges.
We suggest having tracking or delivery
confirmation. Send to:
In U.S.A.:
Kaz, Incorporated
Attn: Returns Department
4755 Southpoint Drive
Memphis, TN 38118
USA
In Canada:
Kaz Canada, Inc.
Attn: Returns Department
510 Bronte Street South
Milton, ON L9T 2X6
Canada
Please go to www.kaz.com and register
your product under the Customer Care Cen-
ter and receive product information updates
and new promotional offers.
©2010 Kaz, Incorporated. All Rights Reserved.
P/N: 31IMH200191

14
IMPORTANTES INSTRUC-
TIONS DE SÉCURITÉ
LIRE CES INSTRUCTIONS DE
SÉCURITÉ AVANT D’UTILISER
L’HUMIDIFICATEUR
L’utilisation d’appareils électriques nécessite
des précautions élémentaires afin de réduire
les risques d’incendie, de choc électrique
ou de blessures. Parmi les précautions à
observer, on compte les suivantes:
1. Il convient de toujours placer l’humidificateur
sur une surface ferme, dégagée et bien
horizontale, puisqu’il pourrait ne pas fonctionner
adéquatement sur une surface inégale.
2. Placer l’humidificateur hors de la portée des
enfants.
3. Ne pas placer l’appareil près de sources de
chaleur telles que poêles, radiateurs ou appareils
de chauffage.
4. Éviter d’utiliser l’humidificateur en plein air.
5. Avant d’utiliser l’humidificateur, vérifier que le
cordon d’alimentation n’est pas endommagé. Si
le cordon est endommagé, NE PAS UTILISER
L’APPAREIL, mais plutôt le retourner au fabricant
pour une réparation selon les termes de la
garantie.
6. Ce produit est équipé d’une fiche polarisée (fiche
dont l’une des lames est plus large que l’autre).
Afin de réduire les risques de choc électrique,
cette fiche ne peut êtreinsérée que d’une seule
manière dans la prise de courant polarisée. Si la
fiche nes’insère pas complètement dans la prise,
tourner la fiche. Si la fiche ne s’insère toujours
pas dans la prise, contacter un électricien.
ÉVITER de contourner le dispositif de sécurité que
constitue la fiche polarisée.
7. Pour débrancher l’appareil, régler le bouton de
contrôle à la position OFF, puis enlever la fiche
de la prise de courant. Ne jamais débrancher
l’appareil en tirant sur le cordon d’alimentation.
8. Une mauvaise connexion entre la sortie de
courant alternatif et la fiche peut provoquer un
échauffement excessif et une déformation de
la fiche. Demander à un électricien qualifié de
remplacer les prises de courant lâches ou usées.
9. Toujours débrancher et vider l’appareil quand
celui-ci ne sert pas ou durant son entretien ou
son nettoyage.
10. Éviter d’incliner ou de déplacer l’humidificateur
quand il fonctionne ou qu’il est rempli d’eau.
DÉBRANCHER l’appareil avant de le bouger.
11. Cet humidificateur nécessite un nettoyage
régulier. Consulter les instructions de NETTOYAGE
ci-jointes. Ne jamais nettoyer l’appareil d’une
autre manière que celle prescrite dans le présent
guide.
12. Éviter de diriger le flux de vapeur directement
vers des personnes, un mur ou un meuble.
13. Lorsqu’un humidificateur est utilisé dans une
pièce fermée ou une petite pièce, il convient
de vérifier périodiquement si la ventilation est
adéquate, puisqu’un taux d’humidité trop élevé
peut causer des taches de condensation sur les
murs.
14. Couper le fonctionnement de l’humidificateur si
de l’humidité se forme à l’intérieur des fenêtres.
Afin d’obtenir des relevés précis du degré
d’humidité, utiliser un hygromètre. Ils sont vendus
en quincaillerie et dans les grands magasins et
peuvent être commandés du fabricant.
15. Cet appareil est uniquement destiné à l’utilisation
résidentielle.
La marque de commerce Honeywell est utilisée par Kaz, Inc. avec l’autorisation de Honeywell International Inc.
Honeywell International Inc. ne fait aucune assertion et n’offre aucune garantie en ce qui concerne ce produit.
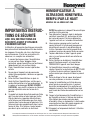
HUMIDIFICATEUR À
ULTRASONS HONEYWELL
REMPLI PAR LE HAUT
MODÈLE DE LA SÉRIE HUT-200

15
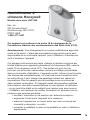
Humidificateur à
ultrasons Honeywell
Modèle de la série HUT-200
Kaz, Inc.
250 Turnpike Road
Southborough, MA 01772,
ÉTATS-UNIS
1-800-477-0457
Cet appareil est conforme à la partie 18 du règlement de la
Commission fédérale des communications des États-Unis (FCC).
Avertissement: Tous changements ou toutes modifications apportés,
quels qu’ils soient, n’étant pas expressément approuvés par le parti
responsable de la conformité risquent, pour l’utilisateur, d’annuler son
droit d’employer l’appareil.
Cet appareil a été soumis aux tests d’usage et déclaré conforme aux
limites établies pour appareils générateurs de fréquences ISM, selon la
partie 18 du règlement de la FCC. Ces limites ont pour but de
procurer une protection raisonnable contre le brouillage préjudiciable
dans un immeuble d’habitation. L’appareil produit, utilise et peut émettre
des fréquences radioélectriques; s’il n’est pas posé et employé selon
les instructions, il peut causer des parasites nuisant aux radiocom-
munications. Rien ne garantit que le brouillage ne se produira pas
dans certains immeubles. Si l’appareil cause des parasites nuisibles
à la réception des radiocommunications ou des signaux de télévision
– ce qui peut être établi en le mettant hors tension puis sous tension
– l’utilisateur peut essayer de rectifier la situation en adoptant une ou
plusieurs des mesures suivantes:
• modifier l’orientation ou la position de l’antenne réceptrice;
• augmenter l’écart entre l’appareil et le récepteur;
• brancher l’appareil sur un circuit autre que celui sur lequel est
connecté le récepteur; ou enfin
• consulter le détaillant ou bien un spécialiste en radio et télévision
expérimenté.

16
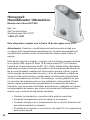
INTRODUCTION
Principe du fonctionnement
Très facile à entretenir, cet humidificateur à ultrasons est conçu pour diffuser silencieusement
de la vapeur froide et visible. L’eau pompée du réservoir passe à travers la cartouche de
déminéralisation, ce qui aide à capter les minéraux en suspension dans l’eau. L’eau purifiée
coule dans le plateau de brumisation où elle est pulvérisée par des oscillations ultrasoniques
puis dispersée dans l’air par un petit ventilateur, réhydratant ainsi l’air ambiant trop sec.
Grâce à son unique orifice de remplissage au haut, il est aussi facile à remplir qu’il serait
d’arroser des plantes. Il présente aussi une fonction d’écoulement d’eau qui avertit quand le
remplissage est nécessaire.
L’humidificateur se compose des pièces suivantes:
Couvercle
transparent
du plateau
Tuyau à eau
Buse de
diffusion
Boîtier principal
Alimentation/
commande de débit
Indicateur de
niveau d’eau
Cartouche de
déminéralisation
Pompe à eau
Haut du boîtier/
plateau
Entrée
de la
cartouche
Sortie de la
pompe
Entonnoir de
remplissage

17
MONTAGE ET MISE EN PLACE DE L’HUMIDIFICATEUR
Sortir l’appareil de sa boîte d’emballage
Retirer les matériaux d’emballage. Réserver le mode d’emploi.
Recycler l’emballage et les divers matériaux ou préférablement
les garder pour le rangement hors saison.
Afin qu’elle ne bouge pas durant l’expédition, la pompe a été
fixée à l’intérieur de l’humidificateur avec du ruban. Enlever
le haut du boîtier et repérer la pompe au fond du boîtier principal.
Retirer le ruban qui immobilise la pompe à eau puis placer celle-ci
dans la fente prévue à cet effet.
Veiller à ce que la pompe soit solidement adaptée et que
le tuyau ne soit ni cintré ni gaufré, ce qui empêcherait
l’appareil de fonctionner.
Mise en place
Choisir un endroit plat, rigide et d’aplomb, à au moins 6 po
(15 cm) des murs pour ne pas entraver la circulation de l’air.
Poser l’humidificateur sur une surface insensible à l’eau car
l’eau peut abîmer les meubles et certains planchers.
Kaz n’assume aucune responsabilité pour les dommages
matériels que cause l’eau.
Remplissage
Remplir un pichet ou une
cruche d’eau froide – jusqu’à
1 gallon US ou 3,75 litres.
Remarque: Il est possible
de verser un maximum de
3,75 litres ou un minimum
de 250 mL d’eau dans
l’humidificateur.
Verser l’eau dans l’entonnoir
de remplissage situé au haut
de l’appareil.
Remarque : Le niveau
de l’eau peut atteindre le
repère «plein» (full) mais
pas le dépasser.
Signes que l’humidificateur a
besoin d’être rempli:
- l’eau cesse de circuler dans le
haut du boîtier;
- le fonctionnement de
l’humidificateur devient plus
bruyant.
Figure 1

18
Cartouche de démi-
néralisation HDC-200
ou cartouche Q.
Débrancher
l’humidificateur (avec
les mains sèches) et le
porter dans la cuisine
ou la salle de bains.
Retirer le haut du
boîtier de l’appareil et le
mettre de côté.
Détacher le tuyau à
eau de la cartouche de
déminéralisation usée
en le tirant et en le
tournant délicatement.
Retirer la cartouche de
déminéralisation usée
et la jeter.
MODE D’EMPLOI DE LA SÉRIE HUT-200
Le variateur de débit permet de
personnaliser le fonctionnement.
Tourner le bouton du variateur
de débit au réglage le plus haut
pour vite réhydrater l’air ou
bien au réglage le plus bas pour
maintenir l’humidité ambiante.
Débit
Éloigner le débit de vapeur des
murs, des meubles et de la
literie, la nébulisation risquerait
de les imbiber d’eau.
Orientation
La cartouche de déminéralisation devrait être changée tous les 20 à 30 remplissages et parfois plus souvent – tout
dépend de la qualité de l’eau de la région. Lorsque des poussières ou des particules blanches se déposent à la base
de l’humidificateur, c’est un signe que la cartouche de déminéralisation doit immanquablement être changée.
Dans les régions où l’eau est très dure ou calcaire (contenant beaucoup de calcium), il est vivement recommandé
d’employer de l’eau distillée dans l’humidificateur.
REMPLACEMENT DE LA CARTOUCHE DE DÉMINÉRALISATION
ÉTAPE 1 ÉTAPE 2 ÉTAPE 3
ÉTAPE 4
Alimentation
L’interrupteur étant à l’ARRÊT,
brancher l’humidificateur rempli
d’eau sur une prise de courant
polarisée de 120 volts. NE PAS
FORCER LA FICHE POLARISÉE,
elle n’enfonce que dans un sens.
NE PAS brancher l’appareil les
mains mouillées, afin d’éviter tout
risque de choc électrique.
REMARQUE: NE PAS FAIRE FONCTIONNER CET APPAREIL SANS
SON COUVERCLE, sous peine d’éclaboussures d’eau.

19
ENTRETIEN DES APPAREILS DE LA SÉRIE HUT-200
Placer une cartouche de
déminéralisation neuve en
la pressant délicatement.
Un déclic signale sa bonne
installation. Rattacher le
tuyau à eau en le poussant
à fond et en veillant à ce
qu’il ne plisse pas.
S’assurer que la pompe
soit solidement
positionnée.
Replacer le haut du
boîtier.
ÉTAPE 5 ÉTAPE 6
Entretien hebdomadaire: Pour nettoyer l’humidificateur comme il le faut, nous conseillons de
procéder au détartrage en premier puis à la désinfection.
Pièces résistantes au lave-vaisselle: Les pièces suivantes vont
dans le PANIER SUPÉRIEUR des lave-vaisselle ménagers dont les tempéra-
tures ne dépassent pas 70 °C/158 °F. Utiliser de préférence le cycle délicat
ou normal. Ne pas laver les pièces avec de la vaisselle souillée.
NE PAS EMPLOYER DE DÉTERGENT. Lorsque les pièces suivantes sont lavées
en machine, la désinfection et le détartrage sont inutiles.
Noter qu’il ne faut pas mettre les pièces dans le panier inférieur du
lave-vaisselle, sous peine d’abîmer non seulement les pièces de
l’humidificateur, mais aussi le lave-vaisselle.
REMARQUE: Il est recommandé d’effectuer l’entretien de l’humidificateur dans la cuisine ou
dans la salle de bains, sur une surface insensible à l’eau.
ÉTAPE 7
REMPLACEMENT DE LA CARTOUCHE DE DÉMINÉRALISATION (suite)
LE BOÎTIER PRINCIPAL, LA CARTOUCHE DE DÉMINÉRALISATION ET
TUYAU À EAU NE
RÉSISTENT PAS AU
LAVE-VAISSELLE.
Les passer au lave-vaisselle
endommagera l’humidificateur
et l’empêchera de fonctionner
convenablement.
Couvercle transparent
Haut du boîtier
Pompe à eau
Buse de diffusion
Boîtier principal
Cartouche de
déminéralisation
Tuyau à eau

20
ENTRETIEN DES APPAREILS DE LA SÉRIE HUT-200 (suite)
Laver le tuyau à l’eau
chaude savon neuse.
Bien le rincer pour
éliminer toute trace de
savon.
Pour éliminer les taches
tenaces, tremper
pendant 30 minutes le
tuyau dans du vinaigre
blanc puis le rincer à
l’eau tiède en le cour-
bant et le pressant pour
déloger tous débris. Le
rincer abondamment
et l’assécher avec un
chiffon.
Essuyer délicatement
le haut du boîtier et le
nébuliseur avec un linge
imbibé de vinaigre non
dilué.
Remarque: Le haut
du boîtier peut être
mis au lave-vaisselle,
si désiré.
Soyez sur de garder
le niveau d’eau propre
capteur. Essuyez
doucement avec un
chiffon doux et vinaigre
non dilue.
Laisser tremper
pendant 20 minutes.
Rincer le réservoir du
boîtier principal et les
pièces n’ayant pas été
mises au lave-vaisselle
jusqu’à ce que l’odeur
de vinaigre ait disparu.
ÉTAPE 6
ÉTAPE 8
Directives de détartrage
Retirer le couvercle
transparent, le haut du
boîtier, la pompe et le
tuyau à eau; les mettre
de côté.
Sortir la cartouche de
déminéralisation et
la mettre de côté. NE
PAS LA LAVER OU LA
TREMPER DANS LE
VINAIGRE.
Vider le boîtier principal
en vidangeant l’eau
par le bord arrière
supérieur. Verser alors
2 tasses (500 mL)
de vinaigre dans le
réservoir.
Placer la pompe, la
buse de diffusion et le
couvercle dans le boîtier
principal pour les faire
tremper dans le vinaigre
ou bien les passer au
lave-vaisselle.
ÉTAPE 1
ÉTAPE 2
ÉTAPE 3
Note: For best cleaning results hose should be soaked in the base and then rinsed with clean, cool
water until the smell of vinegar is gone.
L’appareil étant démonté, procéder à la désinfection.
ÉTAPE 7
ÉTAPE 4
ÉTAPE 5
La page est en cours de chargement...
La page est en cours de chargement...
La page est en cours de chargement...
La page est en cours de chargement...
La page est en cours de chargement...
La page est en cours de chargement...
La page est en cours de chargement...
La page est en cours de chargement...
La page est en cours de chargement...
La page est en cours de chargement...
La page est en cours de chargement...
La page est en cours de chargement...
La page est en cours de chargement...
La page est en cours de chargement...
La page est en cours de chargement...
La page est en cours de chargement...
La page est en cours de chargement...
La page est en cours de chargement...
La page est en cours de chargement...
La page est en cours de chargement...
-
 1
1
-
 2
2
-
 3
3
-
 4
4
-
 5
5
-
 6
6
-
 7
7
-
 8
8
-
 9
9
-
 10
10
-
 11
11
-
 12
12
-
 13
13
-
 14
14
-
 15
15
-
 16
16
-
 17
17
-
 18
18
-
 19
19
-
 20
20
-
 21
21
-
 22
22
-
 23
23
-
 24
24
-
 25
25
-
 26
26
-
 27
27
-
 28
28
-
 29
29
-
 30
30
-
 31
31
-
 32
32
-
 33
33
-
 34
34
-
 35
35
-
 36
36
-
 37
37
-
 38
38
-
 39
39
-
 40
40


Kaz HUT-200 Le manuel du propriétaire
- Catégorie
- Humidificateurs
- Taper
- Le manuel du propriétaire
dans d''autres langues
- English: Kaz HUT-200 Owner's manual
- español: Kaz HUT-200 El manual del propietario
Documents connexes
Autres documents
-
Honeywell HUT-220W Manuel utilisateur
-
-
-
Sunbeam 696 Manuel utilisateur
-
-
-
Hamilton Beach 04700 Mode d'emploi
-
Vicks VUL570 Le manuel du propriétaire
-
-