SIGURO SGR-FC-H350W Manuel utilisateur
- Catégorie
- Humidificateurs
- Taper
- Manuel utilisateur

SGR-FC-H350W
Air Cooler, Heater & Air Purier 5-in-1
Air Cooler, Heater & Air Purier 5-in-1
Luftkühler, Heizgerät
und Luftreiniger 5-in-1
Ochlazovač vzduchu, Topidlo
a Čistička vzduchu 5 v 1
Ochladzovač vzduchu, Ohrievač
a Čistička vzduchu 5v1
Léghűtő & Melegítő & Légtisztító
5 az 1-ben
Refroidisseur d‘air, chauffage
et puricateur 5en1
Raffreddatore, riscaldatore
e puricatore d‘aria 5 in 1
Dispozitiv de răcire/încălzire
a aerului și puricator de aer 5 în 1
EN Translation of the operating instructions from the original language.
DE Übersetzung der Bedienungsanleitung aus der Originalsprache.
CZ Návodkpoužitívoriginálnímjazyce.
SK Prekladnávodunapoužitiezoriginálnehojazyka.
HU Ahasználatiutasításfordításaeredetinyelvről.
FR Traduction du mode d‘emploi à partir de la langue d‘origine.
IT Traduzione delle istruzioni per l‘uso dalla lingua originale.
RO Traducereainstrucțiunilordeutilizaredinlimbaoriginală.
Thisproductisonlysuitableforwellinsu-
lated spaces or occasional use.
Dieses Produkt ist nur für gut isolierte
Bereiche oder für den gelegentlichen
Gebrauch geeignet.
Tentovýrobekjevhodnýpouzeprodobře
izolovanéprostoryneboobčasnépouží-
vání.
Tentovýrobokjevhodnýlendodobreizo-
lovanýchpriestorovalebonapríležitostné
použitie.
Ezatermékcsakjólszigetelthelyisé-
gekbe,vagyalkalmankéntihasználatra
alkalmas.
Ce produit est uniquement adapté aux
espaces bien isolés ou à un usage occa-
sionnel.
Questo prodotto è adatto solo per spazi
ben isolati o per un uso occasionale.
Acest produs este potrivit doar pentru
spațiibineizolatesaupentruutilizare
ocazională.

ENGLISH 4
Safety information 4
Features and functions 9
Quick control guide 9
Installation 10
Use 11
Cleaning and maintenance 17
DEUTSCH 20
Sicherheitshinweise 20
Eigenschaften und funktionen 25
Begleiter durch schnelle bedienung 26
Installation 26
Anwendung 27
Reinigung und wartung 34
ČESKY 37
Bezpečnostní informace 37
Vlastnosti a funkce 42
Průvodce rychlým ovládáním 43
Instalace 43
Použití 44
Čištění a údržba 50
SLOVENSKY 53
Bezpečnostné informácie 53
Vlastnosti a funkcie 58
Sprievodca rýchlym ovládaním 59
Inštalácia 59
Použitie 60
Čistenie a údržba 66
MAGYAR 69
Biztonsági információk 69
Tulajdonságok és funkciók 74
Első lépések 75
Telepítés 75
Használat 76
Tisztítás és karbantartás 82
FRANÇAIS 85
Informations relatives à la sécurité 85
Paramètres et fonctions 90
Guide de contrôle rapide 91
Installation 91
Utilisation 92
Nettoyage et entretien 98
ITALIANO 101
Informazioni di sicurezza 101
Caratteristiche e funzioni 106
Guida rapida al controllo 107
Installazione 107
Uso 108
Pulizia e manutenzione 114
ROMÂNĂ 117
Informații privind siguranța 117
Caracteristici și funcții 122
Ghid de control rapid 123
Instalare 123
Utilizare 124
Curățare și întreținere 130

1
2
3
3
3
76
8
10
9
11
12
13
14
15

EN
EN - 4 EN - 5
Thank you for purchasing a SIGURO appliance. We are grateful for
your trust and are pleased to introduce the device to you on the
following pages and introduce you to all its functions and uses.
We believe in a fair and responsible company, and therefore we only work
with suppliers who meet our strict criteria of protecting the interests of their
employees, preventing their abuse and providing fair working conditions.
If you need help with extensive maintenance or repair of the product, which
requires intervention in its internal parts, our authorized service is available
at the email address siguro@alza.cz or operators at the seller's info line. For
your convenience in solving any problems with the product, we have unied
these contact points and the above contacts can be used in the event of any
complaints or post-warranty service.
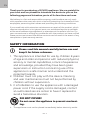
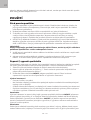
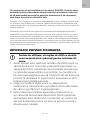
SAFETY INFORMATION
Please read this manual carefully before use and
keep it for future reference.
1. This appliance is intended for use by children 8 years
of age and older and persons with reduced physical,
sensory or mental capabilities, or lack of experience
and knowledge, provided they have been given
supervision or instruction concerning use of the
appliance in a safe manner and understand the
potential hazards.
2. Children must not play with the device. Cleaning
and user maintenance must not be performed by
children without supervision.
3. It is forbidden to use the appliance with a damaged
power cord. If the supply cord is damaged, contact
an authorized service center to have it replaced to
avoid a hazardous situation.
DO NOT COVER!
Do not cover the appliance to prevent overheat-
ing.
4. The appliance must not be placed immediately below electricity outlet.
ENGLISH

EN
EN - 4 EN - 5
ENGLISH
5. Do not use this appliance in the immediate vicinity of a bath, shower or
swimming pool.
6. WARNING: This appliance is not equipped with a room temperature
control device. Do not use this appliance in a small room if it is occupied
by people who are unable to leave this room on their own, unless
permanent supervision is provided.
7. This appliance is designed to be free-standing. This appliance is not
intended for wall mounting.
8. Attach the castors to the appliance according to the instructions in this
manual.
9. Children under the age of 3 should be denied access to the appliance
unless they are constantly supervised.
10. Children between the ages of 3 and 8 may only switch this appliance on
/ off if it has been placed or installed in its intended normal operating
position and if they are supervised or instructed in the safe use of the
appliance and understand the potential dangers. Children between the
ages of 3 and 8 must not insert the plug into the outlet, regulate and
clean the appliance or perform user maintenance.
11. WARNING: Some parts of this product may become very hot and cause
burns. Special attention must be paid to the presence of children and
handicapped people.
12. Do not use this appliance if it fell.
13. Do not use this appliance if there are visible signs of damage.
14. Use this appliance only on a level and stable surface. Do not use the
appliance attached to the wall.
15. WARNING: To reduce the risk of re, keep fabrics, curtains or any other
ammable material at least 1 m from the air outlet.
16. Make sure that the appliance is disconnected from the outlet before
removing the protective grille.
17. When lling the water tank, always observe the minimum and
maximum lines marked on the tank.
18. Follow the instructions in the "Cleaning and maintenance" section to
clean the appliance.
19. Pay attention when the appliance is in humidication mode, since it
produces water vapor.
20. When lling or cleaning, unplug the appliance by pulling the plug out of
the outlet.
21. The appliance is not intended for connection to water pipes.
22. Be aware that high humidity values can support the growth of biological
organisms in the environment.
23. Do not allow the area around the appliance to get moist or wet. If this
happens, switch the appliance to a lower power. If this is not possible, use
the appliance intermittently. Do not allow absorbent materials such as
carpets, curtains, drapes or tablecloths to become wet.
24. Never leave water in the tank when the appliance is not in use.
25. Empty and clean the water tank before storing the appliance. Clean it
before using the appliance again.
26. Before connecting the plug to the outlet, make sure that the voltage in

EN
EN - 6 EN - 7
your outlet corresponds to the voltage indicated on the type plate of the
appliance.
27. Only connect the appliance to a properly grounded outlet. The electrical
outlet to which you connect the appliance must be freely accessible so
that the power cable can be quickly disconnected from the power supply
if necessary.
28. Install the power cable so that nobody can trip over it.
29. Do not touch the power cord, its plug or the appliance when it is
connected to the electrical outlet with wet hands.
30. The appliance is intended for indoor use only. Do not use it outdoors.
31. Do not expose the appliance to heat or direct sunlight.
32. Make sure before each use that the appliance is assembled correctly.
33. Do not use the appliance to store objects.
34. When not in use, switch off the appliance, unplug it and clean it
according to the instructions in this manual.
35. Unplug the appliance by pulling on the plug, not the cord. Otherwise, the
power cord or outlet may be damaged.
36. Do not use this appliance with a program, timer, remote control system
or any other component that switches the appliance on automatically.
37. Make sure that the fan inside the appliance turns freely when the
appliance is in operation.
38. Do not insert any objects or ngers, hands, hair or loose clothing into or
near the inlets or outlets of the appliance. It could catch on the internal
fan and result in injury or damage to the appliance or property.
39. If the appliance is equipped with castors, take extra care when handling
it, so for example it does not fall down the stairs or sloping surface. To
prevent the appliance from tipping over, do not try to run the wheels
over the carpet, threshold, etc.
40. Take extra care when children move around the appliance, especially
when it is turned on.
41. Do not use the appliance in places where gasoline, paints or other
ammable substances are stored.
42. Always switch off the appliance and disconnect the plug from the outlet
when you are not using the appliance, if you leave it unattended, before
cleaning, disassembling, assembling or performing routine maintenance.
43. Use the appliance only in accordance with the instructions given in this
instruction manual.
44. Keep the appliance clean. Check it regularly.
45. Do not use the appliance without properly installed lters.
46. Always pour clean, cold water into the tank.
47. Move, store and transport the appliance in a vertical position.
48. Do not attempt to disassemble the outer casing of the appliance.
49. If you notice an unpleasant odor or noise during use, stop using the
appliance, switch it off and unplug the power cord from the outlet.
Contact an authorized service center.
50. The appliance's remote control uses a battery to power it. Do not swallow
the battery. There is a risk of chemical burns, even in a very short time,
which can lead to death. If a swallowing of battery is suspected, seek

EN
EN - 6 EN - 7
medical attention immediately.
51. Keep batteries out of the reach of children.
52. Dispose of used batteries in an environmentally friendly manner.

EN
EN - 8 EN - 9
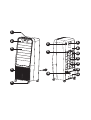
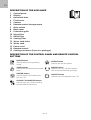
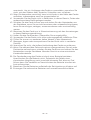
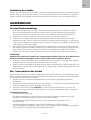
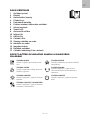
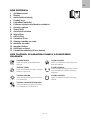
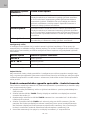
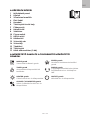
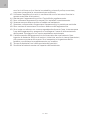
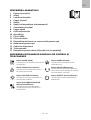
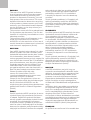
DESCRIPTION OF THE APPLIANCE
1 Control panel
2 Display
3 Horizontal slats
4 Front cover
5 Castors
6 Remote control storage space
7 Main switch
8 Back cover
9 Protective grille
10 Micro lter
11 HEPA lter
12 Cooling lter
13 Water tank locks
14 Water tank
15 Power cord
16 Remote control
17 Cooling containers (2 pcs in a package)
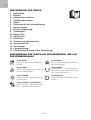
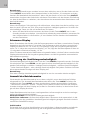
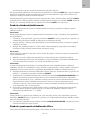
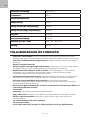
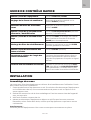
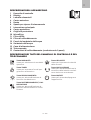
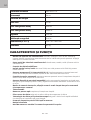
DESCRIPTION OF THE CONTROL PANEL AND REMOTE CONTROL
BUTTONS
MODE button
Used to select the operating
mode.
SPEED button
Used to set the fan speed.
TIMER button
Used to set the automatic shutoff
time.
SWING button
Used to turn on / off the rotation
of the vertical slats left and right.
HEATER button
Used to switch the heater func-
tion on / off.
ON/OFF button
Used to turn the appliance on / off.
COOLER / HUMIDIFIER button
Used to turn on / off the cooling
and humidier functions.
3

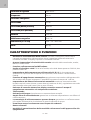
EN
EN - 8 EN - 9
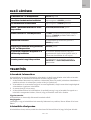
Input voltage 220–240 V ~
Frequency 50 Hz
Power consumption
Cool air 110 W
Warm air (low power) 1200 W
Warm air (high power) 2000 W
Noise ≤ 66 dB
Energy efciency 5 W / W
Dimensions (L x D x H) 346 x 314 x 823 mm
Weight 9.7 kg
FEATURES AND FUNCTIONS
• Operating modes of the fan: normal, smart, natural airow and sleep. Normal
mode is automatically set when turned on. The display is off in normal mode.
• Four fan speed settings: high, medium, low and very low fan speed.
• Cooling / humidication function
• Cool and hot air output: 110 W cold air, hot air: low power 1 200 W, high power
2 000 W.
• Setting temperature in range 15–35 °C. If the room temperature is higher than the
set temperature, the hot air output changes to cold.
• Automatic shutoff function: automatic shutoff of the appliance when the set time
elapses. You can set the time from 1 to 8 hours.
• Setting the airow as required: automatic rotation of the vertical slats left and
right (rotation by 80 °), manual adjustment of the horizontal slats up and down.
• Electronic button control, numeric display shows the automatic shutoff time
and room temperature
• Remote control
• Water tank: simple lling and maintenance
• Large cooling lter: ensures high evaporation and cooling effect
• Water spray cooling technology ensures faster cooling using circulation of large
amount of water.
• Protection against starting without water in the tank
• Universal castors
• Mode of storing the mode in the appliance memory at shutoff.

EN
EN - 10 EN - 11
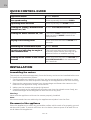
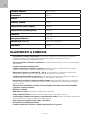
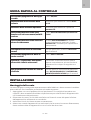
QUICK CONTROL GUIDE
Appliance On/Off Button ON/OFF
Fan speed setting Press repeatedly the button SPEED.
Operating mode selection Press repeatedly the MODE button
Turning the cooling / humidication
function on / off
Button COOLER/HUMIDIFIER
Turning the heater function on / off The button HEAT is used to set power
and the button MODE is used to set
temperature.
Drying of the cooling lter Press and hold the button SPEED for 3
seconds.
Switching the vertical slats on/off Button SWING
Opening and adjusting the angle of
the horizontal slats
The horizontal slats must be opened
manually either before starting the ap-
pliance or after an audible warning.
Turning off the volume of the control
buttons
Press and hold the buttons HEATER and
COOLER/HUMIDIER in the same time
for 3 seconds.
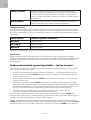
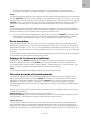
INSTALLATION
Assembling the castors
The castors are delivered separately from the factory and must be installed before use.
To install them proceed as follows:
1. Put the appliance carefully on the oor. We recommend laying a blanket or other
soft material on the oor to prevent damage to the appliance or the oor covering.
2. Remove the castors and screws from the package and fasten the castors to the
bottom of the appliance using a screwdriver.
3. Make sure the screws are properly tightened.
4. Carefully stand up the appliance and make sure that the wheels move freely, are
screwed straight and the appliance does not tilt to any side.
Warning:
Never use the appliance without the castors properly installed.
Note:
We recommend that two adults lay the appliance and place it on the oor.
Placement of the appliance
Place the appliance on a at, dry and stable surface within reach of a properly ground-
ed electrical outlet. To ensure sufcient air circulation, leave a space of at least 30 cm
on all sides of the appliance.

EN
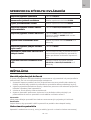
EN - 10 EN - 11
USE
Before rst use
1. Remove the appliance and its accessories from the packaging. Before disposing of
the packaging, be sure to remove all components. Check that the appliance and
any accessories are not damaged.
2. Remove all protective foils from the appliance and its accessories.
3. Remove the protective foam insert from the water tank and wash the tank in warm
water with a little kitchen detergent to remove dirt and possible unpleasant odor.
Rinse and wipe dry and put back in the appliance.
4. The HEPA lter is supplied packaged. The packaging must be removed before
using the appliance. First remove the protective grille and then take out the HEPA
lter. Remove the protective packaging from the HEPA lter. Then put it back in
the appliance and install the protective grille.
WARNING:
Never switch on the appliance with the packed HEPA lter, as this could seriously
damage the appliance and create a dangerous situation.
5. Wipe the outside of the appliance with a soft sponge slightly dampened in warm
water. Wipe dry.
6. To use the remote control, remove the protective lm from the battery
compartment. It protects the battery from discharge and damage during
transport.
Appliance On/Off
Every time before turning it on make sure that the appliance is correctly assembled
and that the tank is lled with water if you want to use the appliance in cooling / hu-
midifying mode.
1. Plug the power cord into a properly grounded electrical outlet.
2. Set the main switch to position "I". An audible warning sounds and the appliance
switches to standby mode.
3. Press briey the button ON/OFF, to turn on the appliance. An audible warning
sounds and the appliance starts running in default setting.
Default setting:
• Operating mode: normal
• The numeric display shows the room temperature and the room temperature light
comes on.
• The power light on the display is on, the other lights are off.
• Fan speed: medium speed is set for the rst 3 seconds, and then switches to low
speed. The low speed light is on.
Note:
The default setting starts always when you turn off the appliance using the ON/OFF
button, turn the main switch to the "O" position and disconnect the plug from the out-
let. If you turn off the appliance only with the ON/OFF button, the next time you switch
on the appliance, it will start in the last setting before it was switched off, except for the
automatic shutoff mode and the sleep mode.
Note:
If the lights are fully on for 1 minute without any action, they will dim after 30 minutes
to 30% of their original brightness. If you press any button, they will light up fully.
4. If you do not use the appliance, press the button ON/OFF to switch it to stanby

EN
EN - 12 EN - 13
mode. To switch off the appliance completely, switch the main switch to position
"O" and disconnect the plug from the outlet.
Numeric display
When the appliance is switched on, the numerical display shows the room tempera-
ture and the control "C" lights up. The temperature on the numeric display is displayed
between -10 ° C to 40 ° C. If the ambient temperature is lower than -10 ° C, "LO" will
appear on the numeric display; if the room temperature is higher than 40 ° C, "HI" will
appear on the numeric display.
If you set the automatic shutoff, the numeric display will alternate between the ambi-
ent temperature and the shutoff time.
Fan speed setting
Use the SPEED button to set the fan speed. Press repeatedly the button SPEED to
select the required fan speed in the following order: low speed – medium speed – high
speed – very low fan speed. Each time you press, the corresponding indicator light
comes on.
Note:
Very low fan speed is only possible in normal mode.
Operating mode selection
The operating mode can only be selected if the appliance is set for cooling. Use the
button MODE to select the operating mode. Press repeatedly the MODE button to
select the required mode: smart – natural airow – sleep – normal. Each time you press,
the corresponding indicator light turns on on the display, except for normal mode,
which has no indicator light on the display.
Each of the operating modes has a preset cycle of airow and fan speed.
Normal mode : the fan speed is constant.
Natural airow: the airow is controlled automatically depending on the selected fan
speed. This achieves the effect of a natural breeze.
Sleep mode
It is a combination of natural airow mode and gradual reduction of speed, which
prevents the unpleasant feeling of airow at high speed during sleep. Select the initial
fan speed (see section "Setting the fan speed"). The appliance will gradually lower the
speed according to predened rules.
Initial fan speed The course of sleep mode
High speed The appliance will run in natural airow mode for 30 min-
utes at high fan speed. After 30 minutes, the high fan speed
switches to medium speed. In another 30 minutes, the fan
speed will be reduced to a low level. The appliance stays
running at low fan speed.
Medium speed The appliance will run in natural airow mode for 30 min-
utes at medium fan speed. After 30 minutes, the medium
fan speed switches to low speed. The appliance stays run-
ning at low fan speed.
Low speed The appliance will operate in natural airow mode when the
fan speed is set low.

EN
EN - 12 EN - 13
Smart mode
It is not possible to set the fan speed in smart mode. It is adjusted automatically
based on room temperature analysis. After selecting the smart mode, the appliance
automatically starts sensing and analyzing the room temperature and adjusts the fan
speed accordingly.
Ambient tempera-
ture
Set fan speed
Under 25 °C Low speed
25 °C–29 °C Medium speed
Above 29 °C High speed
When the smart mode is selected, its indicator light ashes briey.
Recommendation:
To ensure proper operation of the appliance in smart mode and correct temperature
analysis, do not expose the appliance to direct sunlight or any heat sources. Place the
appliance in a place where the air around the appliance can ow freely.
Automatic appliance shutoff function - timer function
This function allows you to set the time for which the appliance will be in operation
and after which it will switch off automatically.
1. First select the operating mode and fan speed - see the previous section.
2. Press briey the TIMER button. The numeric display ashes and the indicator light
"h" lights up on the display.
3. Press repeatedly the TIMER button to set time from 1 to 8 hours in hourly steps.
4. Press and hold the TIMER button for 2 seconds to save the set time in memory. The
set time appears on the numeric display and the countdown starts. The numeric
display will gradually count down the set time in hourly steps, and the room
temperature and the set time will be displayed alternately.
5. When the set time has elapsed, "0" will appear on the display and the appliance
will automatically switch off and switch to standby mode.
If you do not conrm the set time by pressing and holding the TIMER button within 5
seconds or if you press another button, the whole automatic power shutoff would be
cancelled. The ambient temperature appears on the numeric display.
If you need to turn off the countdown of the set time, press briey the TIMER button,
then wait until the numeric display ashes and press repeatedly the TIMER button to
set the time to "0". Conrm by pressing and holding the TIMER button for 2 seconds.

EN
EN - 14 EN - 15
Cooling / humidication function
To be able to use the cooling/humidication function, the tank must rst be lled with
water.
Warning:
Never use the cooling/humidication function without water in the tank. Risk of dam-
age to the appliance.
1. Make sure that the appliance is turned off with the ON/OFF button, main switch is
in the "O" position and the plug is disconnected from the outlet.
2. Turn the locks on the back of the appliance to the horizontal position and carefully
remove the water tank.
3. Pour cold and clean water into the tank. Always follow the MIN (minimum amount
of water) and MAX (maximum amount of water) lines.
Warning:
Never ll the tank above the MAX line. Water could spill into the appliance and dam-
age it.
4. Insert the water tank into the appliance and turn the locks to the vertical position.
5. If you need to increase the cooling efciency, put the supplied cooling containers
in the freezer overnight and then put them in the water tank.
Warning:
Under no circumstances should you open, disassemble or otherwise damage the
cooling containers. The liquid in the containers is not intended for consumption. If the
container is opened and the contents are consumed, seek professional medical atten-
tion immediately.
6. Plug the power cord into the outlet, switch the main switch to position "I" and
switch on the appliance with the button ON/OFF.
7. Select the cooling/humidication function by pressing the COOLER/HUMIDIFIER.
button The cooling / humidication indicator lights up on the display. The
appliance starts to evaluate if there is water in the tank and then starts cooling /
humidifying. The evaluation may take a few seconds. Then the pump starts, which
pumps water into the internal system. You may hear the pump sound regularly
during operation. This is a normal occurrence.
8. As soon as a low water level in the tank is detected, the pump switches off
automatically and an audible alert sounds for 10 seconds. Fill the tank with water -
follow steps 1 - 4 above.
Warning:
Before removing and lling the water tank, always make sure that the appliance is
switched off with the ON/OFF button, the main switch is in the "O" position and the
plug is disconnected from the outlet.
9. After you ll the water tank, press the COOLER/HUMIDIFIER button to continue
operating the appliance in this function.
Cooling lter drying function
This function is only used to dry the internal cooling lter. If the device will not be used
for a long time and you want to store it, the cooling lter must be carefully dried to
protect it from the formation of mold and unwanted microorganisms.
Press and hold the button SPEED for 3 seconds to activate the drying function. The
fan speed will automatically change to high speed and run for 20 minutes. During this
time, the high fan speed indicator light will ash on the display.
It is not possible to change the appliance settings in this mode. Only the ON/OFF
button will be functional. After 20 minutes, the appliance automatically switches to

EN
EN - 14 EN - 15
standby mode.
If you turn of the appliance during drying with the ON/OFF button and then turn on
the appliance again, the appliance will operate in the last setting before you started
the dryng function. The appliance is not equipped with memory for this function. If
you want to resume the drying function, press and hold the SPEED button for 3 sec-
onds and the the appliance starts again for 20 minutes.
Heater function
The heater function allows you to heat the air at the set power and temperature. How-
ever, it is important that the main motor is running while the heater is on. Once the
heater is switched off, the main motor will run for about 30 seconds and then stop.
Power setting
1. While the appliance is on, press once the HEAT button to activate the heater
function. The appliance starts to heat and warm air starts to ow through the
outlets. The fan speed will automatically be set to very low. The fan speed cannot
be changed. The low power light comes on and the heater starts at low power.
2. Press the button HEAT again and after 10 seconds the heater starts operating at
high power. The high power light comes on.
3. Press the HEAT button the htird time and the heater turns off, the appliance stops
heating and after 10 second cool air starts owing from the outlets.
Note:
Press the button HEAT again to reactivate the heater function.
Setting the temperature
1. While the appliance is turnd on with the heater function, press again the MODE
button The numeric display will ash and the "° C" indicator light will appear on the
display.
2. Press again the MODE button and press it repeatedly to set temperature in the
range from 15 °C to 35 °C in 1 degree steps.
3. Press and hold the button MODE for 2 seconds to save the set temperature in
memory. The set temperature shows on the numerical display.
Note:
If you need to change the temperature, follow the steps above.
If you set the automatic shutoff function and the temperature of the heater, the auto-
matic shutoff time and room temperature will be alternately displayed on the numeric
display.
Heating to the set temperature starts after about 10 seconds. This is a normal occur-
rence. If the ambient temperature reaches or exceeds the set temperature, the heater
is switched off. The light indicator of heating power on the display turns off. Once the
ambient temperature drops at least 2 ° C below the set temperature, the heater starts
and the light indicator of the heater power appears on the display.
Turning on the movement of vertical slats
Press briey the SWING button to turn on the movement of the vertical slats left and
right. Press again the SWING button to cancel the movement.
Using horizontal slats
Whether using the appliance for cooling, cooling / humidifying or for heating in the
rst stage during normal use of horizontal slats are closed.
Open the horizontal slats manually before the appliance starts or open them after an
alert sounds. In this case, they should be open within 30 seconds.

EN
EN - 16 EN - 17
If the slats are not opened within 30 seconds the sound alert will continue to sound
until you open them, but the selected function/setting will be paused. When you open
the horizontal slats you will have to select again the function/setting.
Turning off the volume of the control buttons
Press and hold the button HEATER and COOLER/HUMIDIFIER in the same time for 3
seconds to mute the button sounds. To restore the volume, press and hold the buttons
for 3 seconds.
Using the remote control
The buttons on the remote control correspond to the buttons on the control panel.
The principle of control is the same as the above described procedures of setting
the appliance and its functions.
The remote control is supplied with inserted batteries from the manufacturer. To use
the remote control, remove the protective lm from the battery compartment. It pro-
tects the battery from discharge and damage during transport.
If you want to use the remote control, point it to the signal receiver on the appliance.
The maximum range of signal sent from the remote control is 6 m. If obstacles are
located between the remote control and the appliance, the signal cannot be transmit-
ted.
If the inserted battery is empty it needs to be replaced by the same type. Proceed as
follows:
1. Slide the cover with the battery compartment from the bottom of the remote
control.
2. Remove the depleted battery and insert a new 3V CR2032 battery. Observe correct
polarity when inserting a battery.
3. Insert cover with the compartment back into the remote control.
If you will not use the remote control for a long time, we recommend removing the
battery. If the battery leaks into the interior of the remote control, it could damage it.
Warning:
Never put batteries in re, short circuit or damage them in any way. After the end of
their lifetime, discard them in environmentally friendly manner. Never dispose of bat-
teries in household waste.
Protection against operation with empty water tank
If the appliance detects that the water tank is empty or there is too little water, an alert
will sound, the appliance’s operation is interrupted and the pump stops. Add water
into the tank Follow the instructions in "The cooling / humidication" section.
If you press the COOLER/HUMIDIFIER button three times within 3 seconds after
turning the appliance on, an audible alert sounds indicating quick detection of the
water level in the tank. Press the buttons ON/OFF and COOLER/HUMIDIFIER one after
another. The detection of the water level in the tank is evaluated within 5 seconds. If it
is empty, an audible alert sounds.
Cancel the quick detection by pressing again the ON/OFF button.
Function of saving settings in memory in the event of a power
failure
The appliance is equipped with a function for saving the settings made in memory if
there is a power outage.
If power is interrupted while the appliance has been switched on, an audible warning
sounds 10 times after the power supply is restored and after about 30 seconds, the
appliance starts in its original setting (except for the sleep function). When you press

EN
EN - 16 EN - 17
the ON/OFF button within 30 seconds after the power is restored the appliance should
turn on immediately.
If the power is interrupted while the appliance has been switched off (in standby
mode), it will remain switched off (in standby mode) when the power supply is re-
stored.
Automatic switch to standby mode
If the appliance is operated for 15 hours without changing the settings, it will automati-
cally switch off and switch to standby mode.
If you need to turn the function off, press and hold the buttons COOLER/HUMIDIFIER
and SPEED in the same time for 3 seconds. An audible alert sounds to conrm your
settings.
CLEANING AND MAINTENANCE
Before cleaning or any maintenance, always switch off the appliance, unplug the pow-
er cord from the outlet and allow it to cool down completely.
Warning:
Never immerse the appliance, the power cord or the plug of the power cord in water or
any other liquid.
Do not use plastic or metal scrapers, harsh cleaners, chemicals, petrol, solvents or
other similar substances to clean any parts of the appliance. The surface nish could
be seriously damaged.
Outer surface
Wipe the outside of the appliance with a cloth slightly dampened in warm water and
wipe dry with a clean cloth.
Water tank
Empty the water tank and rinse with clean water after use.
At least once a month, clean the water tank with a cloth dampened in lukewarm water
with a little kitchen detergent to remove calcium deposits and prevent the growth of
unwanted bacteria, microorganisms or fungi. Then rinse it thoroughly with clean water
and dry with a clean cloth.
Filter cleaning
During the use of the appliance, dirt settles on the lters (cooling, HEPA and micro
lter). These negatively affect the operation of the appliance and reduce its efcien-
cy, and therefore must be cleaned regularly. The cleaning frequency depends on the
frequency of use of the appliance, however, we recommend cleaning these lters
regularly at least once a month.
Warning:
Make sure that the appliance is turned off with the ON/OFF button before each clean-
ing of the lters and the main switch is in the "O" position and the plug is disconnect-
ed from the outlet.
1. Press the catch at the top of the protective grille and tilt it out together with the
microlter.
2. Then carefully remove the HEPA lter and cooling lter.
3. Soak the cooling lter in water with a little neutral detergent. Then squeeze gently
by hand.

EN
EN - 18 EN - 19
4. First remove the dirt from the HEPA lter and micro lter by careful tapping. We
recommend doing it outside. Then use a soft sponge slightly dampened in clean
water to remove the remaining dirt or you can use a vacuum cleaner with a brush
nozzle and a set to alow suction power.
5. Insert the cooling lter into the appliance rst, then the HEPA lter and nally the
micro lter.
6. Replace the protective grille and make sure it is securely locked. Correct locking is
signaled by a click.
7. To dry the cooling lter properly, switch on the drying function (more instructions
in the section "Cooling lter drying function").
Storage
Before storing, make sure that the appliance and its accessories are cool and clean.
Store the appliance and its accessories in a dry and well-ventilated place out of the
reach of children or pets.
Do not place any objects on the appliance.
Degree of protection against electric shock: II
Protection against electric shock is provided by double or reinforced
insulation.
DISPOSAL OF USED BATTERIES
Batteries contain materials harmful to the environment. Do not dispose of
batteries in a regular community waste. Dispose of used batteries properly at
collection points.

EN
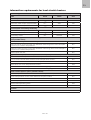
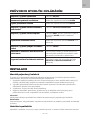
EN - 18 EN - 19
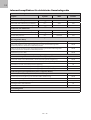
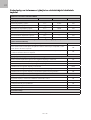
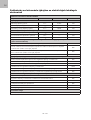
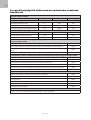
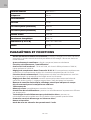
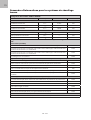
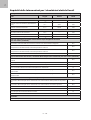
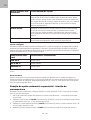
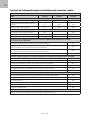
Information requirements for local electric heaters
Model designation: SGR-FC-H350W
Data Mark Value Unit
Heat output
Nominal heat output Pnom 2.000 kW
Minimum heat output (approximate) Pmin 1.157 kW
Maximum heat output Pmax,c 1.878 kW
Consumption of auxiliary electricity
At nominal heat output elmax ---- kW
At minimal heat output elmin ---- kW
In standby mode elSB 0.00027 kW
Only for storage electric local heaters: type of heat intake
(one possible value)
Manual heat storage control with integrated thermostat NO
Manual control of heat storage with feedback informing about room tempera-
ture and / or outdoor temperature NO
Electronic heat storage control with feedback informing about room tempera-
ture and / or outdoor temperature NO
Heat output with fan NO
Type of heat output / room temperature control (one possible value)
One level of heat output without room temperature control NO
Two or more manual levels, without room temperature control NO
With mechanical thermostat for room temperature control NO
With electronic room temperature control YES
With electronic room temperature control and daily program NO
With electronic room temperature control and weekly program NO
Other control options (more possible values)
Room temperature control with detection of the presence of persons NO
Room temperature control with detection of open window NO
With remote control NO
With adaptively controlled start NO
With limited operating time YES
With black ball sensor NO
Contact
Alza.cz, a.s., Jankovcova 1522/53, 170 00 Praha 7, Czech Republic

DE
DE - 20 DE - 21
Vielen Dank, dass Sie sich für ein Gerät von SIGURO entschieden
haben. Wir sind dankbar für Ihr Vertrauen und freuen uns, Ihnen
das Gerät auf den folgenden Seiten vorzustellen und Sie mit all
seinen Funktionen und Verwendungszwecken vertraut zu ma-
chen.
Wir glauben an ein faires und verantwortungsvolles Unternehmen und
arbeiten daher nur mit Lieferanten zusammen, die unsere strengen Kriterien
zum Schutz der Interessen der Mitarbeiter, zur Verhinderung von Missbrauch
und fairen Arbeitsbedingungen erfüllen.
Wenn Sie Hilfe bei der umfassenden Wartung oder Reparatur des Produkts
benötigen, die einen Eingriff in die Innenteile erfordert, stehen Ihnen unser
autorisierter Kundendienst unter der E-Mail-Adresse sigur[email protected] oder die
Hotline des Verkäufers zur Verfügung. Bei der Lösung von Problemen mit
dem Produkt haben wir diese Kontaktstellen vereinheitlicht. Die oben ge-
nannten Kontakte können auch bei Beschwerden oder Nachgarantieservice
genutzt werden.
SICHERHEITSHINWEISE
Lesen Sie vor der Anwendung dieses Benutzer-
handbuch durch und bewahren Sie es für den
künftigen Gebrauch auf.
1. Dieses Gerät können Kinder im Alter von 8 Jahren
und älter sowie Personen mit verminderten
physischen, sensorischen und mentalen Fähigkeiten
oder mangelnden Erfahrungen und Kenntnissen
benutzen, sofern diese beaufsichtigt werden
oder über die sichere Verwendung des Geräts
unterwiesen wurden und die möglichen Gefahren
verstehen.
2. Kinder dürfen nicht mit dem Produkt spielen. Kinder
dürfen keine Reinigungs- und Wartungsarbeiten
vornehmen, falls diese nicht beaufsichtigt sind.
3. Es ist verboten, das Gerät mit einem beschädigten
Netzkabel zu verwenden. Wenn das Netzkabel
beschädigt ist, wenden Sie sich an ein autorisierte
Kundendienststelle und lassen Sie es austauschen,
um eine gefährliche Situation zu vermeiden.
DEUTSCH
La page est en cours de chargement...
La page est en cours de chargement...
La page est en cours de chargement...
La page est en cours de chargement...
La page est en cours de chargement...
La page est en cours de chargement...
La page est en cours de chargement...
La page est en cours de chargement...
La page est en cours de chargement...
La page est en cours de chargement...
La page est en cours de chargement...
La page est en cours de chargement...
La page est en cours de chargement...
La page est en cours de chargement...
La page est en cours de chargement...
La page est en cours de chargement...
La page est en cours de chargement...
La page est en cours de chargement...
La page est en cours de chargement...
La page est en cours de chargement...
La page est en cours de chargement...
La page est en cours de chargement...
La page est en cours de chargement...
La page est en cours de chargement...
La page est en cours de chargement...
La page est en cours de chargement...
La page est en cours de chargement...
La page est en cours de chargement...
La page est en cours de chargement...
La page est en cours de chargement...
La page est en cours de chargement...
La page est en cours de chargement...
La page est en cours de chargement...
La page est en cours de chargement...
La page est en cours de chargement...
La page est en cours de chargement...
La page est en cours de chargement...
La page est en cours de chargement...
La page est en cours de chargement...
La page est en cours de chargement...
La page est en cours de chargement...
La page est en cours de chargement...
La page est en cours de chargement...
La page est en cours de chargement...
La page est en cours de chargement...
La page est en cours de chargement...
La page est en cours de chargement...
La page est en cours de chargement...
La page est en cours de chargement...
La page est en cours de chargement...
La page est en cours de chargement...
La page est en cours de chargement...
La page est en cours de chargement...
La page est en cours de chargement...
La page est en cours de chargement...
La page est en cours de chargement...
La page est en cours de chargement...
La page est en cours de chargement...
La page est en cours de chargement...
La page est en cours de chargement...
La page est en cours de chargement...
La page est en cours de chargement...
La page est en cours de chargement...
La page est en cours de chargement...
La page est en cours de chargement...
La page est en cours de chargement...
La page est en cours de chargement...
La page est en cours de chargement...
La page est en cours de chargement...
La page est en cours de chargement...
La page est en cours de chargement...
La page est en cours de chargement...
La page est en cours de chargement...
La page est en cours de chargement...
La page est en cours de chargement...
La page est en cours de chargement...
La page est en cours de chargement...
La page est en cours de chargement...
La page est en cours de chargement...
La page est en cours de chargement...
La page est en cours de chargement...
La page est en cours de chargement...
La page est en cours de chargement...
La page est en cours de chargement...
La page est en cours de chargement...
La page est en cours de chargement...
La page est en cours de chargement...
La page est en cours de chargement...
La page est en cours de chargement...
La page est en cours de chargement...
La page est en cours de chargement...
La page est en cours de chargement...
La page est en cours de chargement...
La page est en cours de chargement...
La page est en cours de chargement...
La page est en cours de chargement...
La page est en cours de chargement...
La page est en cours de chargement...
La page est en cours de chargement...
La page est en cours de chargement...
La page est en cours de chargement...
La page est en cours de chargement...
La page est en cours de chargement...
La page est en cours de chargement...
La page est en cours de chargement...
La page est en cours de chargement...
La page est en cours de chargement...
La page est en cours de chargement...
La page est en cours de chargement...
La page est en cours de chargement...
La page est en cours de chargement...
La page est en cours de chargement...
La page est en cours de chargement...
La page est en cours de chargement...
La page est en cours de chargement...
La page est en cours de chargement...
-
 1
1
-
 2
2
-
 3
3
-
 4
4
-
 5
5
-
 6
6
-
 7
7
-
 8
8
-
 9
9
-
 10
10
-
 11
11
-
 12
12
-
 13
13
-
 14
14
-
 15
15
-
 16
16
-
 17
17
-
 18
18
-
 19
19
-
 20
20
-
 21
21
-
 22
22
-
 23
23
-
 24
24
-
 25
25
-
 26
26
-
 27
27
-
 28
28
-
 29
29
-
 30
30
-
 31
31
-
 32
32
-
 33
33
-
 34
34
-
 35
35
-
 36
36
-
 37
37
-
 38
38
-
 39
39
-
 40
40
-
 41
41
-
 42
42
-
 43
43
-
 44
44
-
 45
45
-
 46
46
-
 47
47
-
 48
48
-
 49
49
-
 50
50
-
 51
51
-
 52
52
-
 53
53
-
 54
54
-
 55
55
-
 56
56
-
 57
57
-
 58
58
-
 59
59
-
 60
60
-
 61
61
-
 62
62
-
 63
63
-
 64
64
-
 65
65
-
 66
66
-
 67
67
-
 68
68
-
 69
69
-
 70
70
-
 71
71
-
 72
72
-
 73
73
-
 74
74
-
 75
75
-
 76
76
-
 77
77
-
 78
78
-
 79
79
-
 80
80
-
 81
81
-
 82
82
-
 83
83
-
 84
84
-
 85
85
-
 86
86
-
 87
87
-
 88
88
-
 89
89
-
 90
90
-
 91
91
-
 92
92
-
 93
93
-
 94
94
-
 95
95
-
 96
96
-
 97
97
-
 98
98
-
 99
99
-
 100
100
-
 101
101
-
 102
102
-
 103
103
-
 104
104
-
 105
105
-
 106
106
-
 107
107
-
 108
108
-
 109
109
-
 110
110
-
 111
111
-
 112
112
-
 113
113
-
 114
114
-
 115
115
-
 116
116
-
 117
117
-
 118
118
-
 119
119
-
 120
120
-
 121
121
-
 122
122
-
 123
123
-
 124
124
-
 125
125
-
 126
126
-
 127
127
-
 128
128
-
 129
129
-
 130
130
-
 131
131
-
 132
132
-
 133
133
-
 134
134
-
 135
135
-
 136
136


SIGURO SGR-FC-H350W Manuel utilisateur
- Catégorie
- Humidificateurs
- Taper
- Manuel utilisateur
dans d''autres langues
- italiano: SIGURO SGR-FC-H350W Manuale utente
- English: SIGURO SGR-FC-H350W User manual
- Deutsch: SIGURO SGR-FC-H350W Benutzerhandbuch
- slovenčina: SIGURO SGR-FC-H350W Používateľská príručka
- română: SIGURO SGR-FC-H350W Manual de utilizare
Documents connexes

Autres documents
-
 Pro Breeze PB-AC06-UK-FBA Manuel utilisateur
-
De'Longhi EV250WH Mode d'emploi
-
Domo DO158A Le manuel du propriétaire
-
Concept CA2010 Manuel utilisateur
-
Danby SHCC6026 Le manuel du propriétaire
-
-
Proline GR80W Operating Instructions Manual
-
Orbegozo AIR 80 Le manuel du propriétaire
-
Orbegozo AIR 37 Le manuel du propriétaire
-
Orbegozo Air 55 Le manuel du propriétaire
