Hayward 160 & 320 ColorLogic® and CrystaLogic 1.5” LED Lights Le manuel du propriétaire
- Catégorie
- Accessoires de piscine hors terre
- Taper
- Le manuel du propriétaire

\
USE ONLY HAYWARD GENUINE REPLACEMENT PARTS
Hayward Industries
400 Connell Drive, Suite 6100
Berkeley Heights, NJ 07922
Phone: (908) 355-7995
www.hayward.com
092532 RevJ
Contents
Safety Instructions..................................1
Introduction............................................2
Installation..............................................2
Operation...............................................9
Troubleshooting....................................11
Warranty................................................12
160 & 320
ColorLogic® and CrystaLogic
1.5” LED Lights
Owner’s Manual
LACUS11xxx, LYCUS11xxx
LACUN11xxx, LYCUN11xxx
LAWUS11xxx, LYWUS11xxx
LED Light Fixtures
TM

USE ONLY HAYWARD GENUINE REPLACEMENT PARTS
1
IMPORTANT SAFETY INSTRUCTIONS
SAFETY WARNING: Do not open. Light has no user serviceable parts inside. Improper installation
may result in death or serious injury to bathers or service personnel or others by way of electric
shock. Disconnect electrical power before installing or servicing this equipment. Read and follow all
instructions. This product to be installed by qualified personnel only.
INSTALLATION DEPTH REQUIREMENT: Except when the fixture is installed in an area of the swim-
ming pool that is not used for swimming and the lens is adequately guarded to keep any person
from contacting it, the fixture must be installed in a wall or on a floor of a pool, spa, or water feature
with the top of the lens opening not less than 4 in. and no more than 72 in. below the normal water
level of the pool.
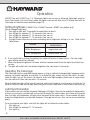
Model Input (Volts, Amps, Watts) Equivalent Brightness Lumens
LAW 14 VAC 60 Hz, 23 W 100W 1100
LYW, LAC 14 VAC 60 Hz, 13 W 60W 640
LYC 14 VAC 60 Hz, 9 W 40W 400
IMPORTANT WIRING CHECKLIST
Do not skip any steps in this or any section of the manual.
The above safety warnings and the complete installation instructions in this manual have
been read and followed.
A SAFETY LISTED POOL/SPA ISOLATION TRANSFORMER HAS BEEN USED TO SUPPLY
14 VOLTS TO THE FIXTURE.
The transformer output wiring HAS NOT been tied or shorted to ground.
The cord length has not been extended beyond the guidelines in this manual.
The cord jacket is not damaged, cut or spliced except as noted below.
Extensions or splices to the cord are only made in a safety listed Pool / Spa junction box
or junction box transformer system.
The luminaire is firmly secured to the pool wall and cannot be removed without the use
of a tool.
The luminaire has been installed by qualified personnel in compliance with the National
Electrical Code (NEC) or Canadian Electric Code (CE Code) and any applicable local
codes and/or regulations.
Installed by: ______________________ of company ____________________________
Date: __________________
LEAVE THESE INSTRUCTIONS WITH PROPERTY OWNER

USE ONLY HAYWARD GENUINE REPLACEMENT PARTS
2
Introduction
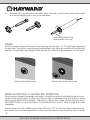
Congratulations on your purchase of a Hayward® ColorLogic® or CrystaLogicTM 1.5” LED Light.
Your Hayward ColorLogic and CrystaLogic 1.5” LED underwater light has these special features:
1. Long-lasting LED’s (light-emitting diodes) which can last up to 10 times longer than current
incandescent or halogen pool and spa lights.
2. ColorLogic models have multi color capability without any color wheels or moving parts to wear
out.
3. In Universal ColorLogic mode, the ColorLogic 1.5” light allows you to select any one of 17 dif-
ferent programs, 10 fixed colors, and 7 color shows in stand-alone mode.
4. In Omni Direct mode (requires either an OmniHub or OmniLogic pool controller), the LYCU-
S11xxx and LACUS11xxx lights offer 27 different programs; 20 fixed colors and 7 color shows
with full control over speed and brightness.
5. When networked with a Hayward Pro Logic® pool/spa controller (requires AQL-COLOR-MODHV),
LACUN11xxx and LYCUN11xxx light models are capable of 11 shows, 101 fixed light colors and
offer custom speed, brightness and motion control.
6. Offers spectacular brilliant light with low power consumption. Uses up to 86% less energy than
a typical incandescent pool light.
The 12 volt Hayward ColorLogic and CrystaLogic 1.5” LED (light-emitting diode) lighting fixtures
you have purchased are UL Listed and intended for use both in and out of water. Because of the all
plastic design with an impact resistant lens, these lights can be installed as little as 4 inches (10cm)
from below the normal water level of the pool or spa to the top of the lens. It can also be installed
upward facing on a floor without a rock guard for pools, spas, lighting ponds, fountains, or water falls.
Refer below for specific information about your 1.5” LED light model.
160 Models
LYWUS11xxx - white only, 100% brightness only
LYCUS11xxx - 100% brightness only
LYCUN11xxx - 100% brightness only, network support
320 Models
LAWUS11xxx - white only, selectable 50% or 100% brightness
LACUS11xxx - selectable 50% or 100% brightness
LACUN11xxx - selectable 50% or 100% brightness, network support
xxx - length of power cord
Installation
If replacing an existing light, remove power to the light at the panel before starting this installation.
Installation must be performed in accordance with Local and NEC codes.
Cord Length and Minimum Required Voltage
When installing ColorLogic/CrystaLogic 1.5” LED low voltage lights, the length of the cord has an
effect on performance. To prevent performance problems, verify the transformer is providing the
minimum required voltage according to the table below. To check this voltage, measure the voltage

USE ONLY HAYWARD GENUINE REPLACEMENT PARTS
3
at the transformer while the light is “on” and operating in “white” mode. In some cases, a voltage
greater than 12 volts is required due to a long cord run. Some transformers provide higher voltage
taps for this purpose; check your transformer manufacturer’s installation instructions for details.
When using Hayward or other transformers that offer a 14v option, we suggest that you always use
the 14 volt tap.
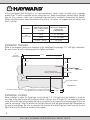
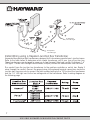
Installation Overview
Refer to the diagram below of an overview of the ColorLogic/CrystaLogic 1.5” LED light installation.
Be sure to read all of the following sections before installation.
Installation Location
When installed in water, the ColorLogic or CrystaLogic 1.5” LED light must be installed in a wall or
on a floor of the pool or spa with the top of the lens not less than 4 inches (10 cm) below the normal
water level of the pool except when the fixture is installed in an area of the swimming pool that is not
used for swimming. Select a location for the light fixture(s) that will give optimum light dispersion for
the pool or spa design. Be sure to consider the direction of emitted light and take care not to point
lights directly at the house or outdoor living spaces.
Product Total Cord Length
from Transformer
to Light
12v
Accent Light
Minimum Required
Voltage at
Transformer
30 ft
50 ft
100 ft - 150 ft
12 - 14 volts
13 - 14 volts
14 volts
Pool wall surface
4” min.
(top of lens)
4” min.
9” min.
11” min.
8” min.
Water line
to
12 VAC
Transformer
48”min.
SCH40 PVC 1.5” Pipe
¾” or 1” Conduit
INSIDE POOL
use Hayward SP0536,
SP0537, SP0538 wall fittings
for LYWUS11xxx, LAWUS11xxx, LACUS11xxx & LYCUS11xxx models
for LACUN11xxx & LYCUN11xxx models
long sweep only

USE ONLY HAYWARD GENUINE REPLACEMENT PARTS
4
PVC Conduit Run
Install Schedule 40 electrical conduit from the desired installation location of the light, back to the
transformer. For ease in pulling the ColorLogic/CrystaLogic’s cable, use long sweeps only (no more
than 3), no 90º elbows. Finish the run before installing the light. Do not attempt to glue PVC or fittings
while routing the cable.
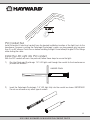
Install the LED Light into PVC conduit
With the PVC conduit secure in the pool wall, follow these steps to secure the light:
1) Run the ColorLogic/CrystaLogic 1.5” LED light cord through the conduit to the transformer or
junction box location.
2) Insert the ColorLogic/CrystaLogic 1.5” LED light fully into the conduit as shown. IMPORTANT:
Do not use silicone or any other type of sealant.
INSIDE POOL

USE ONLY HAYWARD GENUINE REPLACEMENT PARTS
5
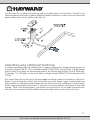
3) Assemble the included tool shown below. After assembly, insert the tool’s tabs into the light
face and handtighten until snug. Do not overtighen.
Plaster
Install the plaster shield onto the face of the ColorLogic/CrystaLogic 1.5” LED light before plastering
the pool walls. The shield is used to prevent gunite/plaster from coming in contact with the light face
and lens. Do not plaster over the light shield. Remove the shield when gunite/plaster has fully cured.
Install Junction Box or Junction Box Transformer
When using a wallmount low voltage transformer, a junction box should be installed to make the con-
nection to the pool/spa light. If using more than one light, an adequate amount of single or double
outlet junction boxes will be required. Alternatively, Hayward low voltage junction box transformer
kits (LTBUY11H65) can be used when in-line transformers are desired. Refer to page 8 for more
information.
Junction boxes must be installed not less than 48 inches (1.22 m) from the edge of the pool or spa.
Run conduit from the mounting location up to the junction box such that the junction box is not less
Hold handle steady while
rotating knob until snug
Install shield before plaster Remove after plaster has cured

USE ONLY HAYWARD GENUINE REPLACEMENT PARTS
6
than 8 inches (20 cm) above the maximum pool or spa water level, or not less than 4 inches (10 cm)
above the ground, whichever is greater. Additional conduit should be run from the junction box to the
power supply, switch panel, pool/spa controller, etc.
Install Wiring using a Wallmount Transformer
A suitable transformer must be installed which is agency listed for low-voltage swimming pool and
spa lights (Hayward LTBUY11300, Intermatic® model PX100/PX300, or equivalent). The transformer
must be rated at or above the total wattage used by all attached light fixtures. Up to 6 ColorLogic/
CrystaLogic 1.5” LED lights can be connected to a single Hayward LTBUY11300 transformer at the
14V tap.
Run conduit from the junction box to the low voltage transformer, pool/spa controller, or switch box.
Snake 2 wires through the conduit from the junction box to the power supply. If multiple lights are
being installed, run additional conduit/wires from the junction box to the additional junction box(es).
When wiring multiple lights to the same 12 volt source, do not exceed the transformers’s total rated
wattage. Refer to the manufacturer’s specifications and instructions for run length and wiring size.
Use wire nuts to connect the field-installed wiring to the light fixture cord in the junction box.

USE ONLY HAYWARD GENUINE REPLACEMENT PARTS
7
Install Wiring using a Hayward Junction Box Transformer
Hayward offers pool/spa light transformers designed to fit into various manufacturer’s junction boxes.
Refer to the table below to determine which model transformer will fit your type of junction box.
These transformers are designed to power up to two Hayward ColorLogic and/or CrystaLogic 1.5”
LED lights. If more than two lights are installed, multiple junction box transformers must be used.
Run conduit from the junction box transformer to the pool/spa controller or switch box. Snake 3
wires through the conduit. Connect the ground wires to the ground terminal connections inside the
junction box. Use wire nuts to connect the field-installed wiring to the 120V side of the transformer
and the 1.5” LED light cord to the low voltage side of the transformer. Refer to wiring diagram on
the following page.
To Hayward
1.5” LED Light
To Hayward
1.5” LED Light

USE ONLY HAYWARD GENUINE REPLACEMENT PARTS
8
For Network Control Only: Hayward LKBUN1000 Coupler
The Hayward LKBUN1000 is a coupler that is designed to be used with specific Hayward automa-
tion controls and an AQL-COLOR-MODHV Modem. Together, these components allow the user to
have complete network control over the installed ColorLogic light(s) using the Pro Logic Control-
ler. When using network control, custom colors and
custom light shows can be programmed for each
or all lights. An LKBUN1000 is required for each
transformer in use and is designed to install into
the Hayward LTBUY11300 300 Watt and Hayward
Junction Box transformers. Refer to the LKBUN1000
installation manual for mounting and wiring instruc-
tions. See “Networking” on page 10.
To Hayward
1.5” LED Light
120V
Black
(hot)
120V
White
(neutral)
Bonding wire
if plastic conduit
120V from pool
controller or switch
Low voltage
to 1.5” LED light
Ground
Yellow low
voltage leads

USE ONLY HAYWARD GENUINE REPLACEMENT PARTS
9
Operation
LACUS11xxx and LYCUS11xxx 1.5” ColorLogic lights can be used in Universal ColorLogic mode or
Omni Direct mode. For Omni Direct mode, the lights must be built after June 2018 and used with an
OmniLogic or OmniHub pool controller (page 10).
Setting Brightness (LAWUS11xxx, LACUS11xxx and LACUN11xxx models only)
How to change brightness:
1. Turn light on and wait 15 seconds for show/color to launch.
2. Turn off light for between 11-15 seconds, then turn on.
3. Turn off light for between 11-15 seconds, then turn on.
4. Turn off light for between 11-15 seconds, then turn on.
5. The light should blink once or twice indicating which brightness setting is in use. Refer to the
table below:
6. If you would like to change the setting, turn lights off and on 4 times quickly. The new bright-
ness setting should be indicated.
7. When the desired brightness has been selected, remove power from the lights for at least one
minute.
8. The light will restart with the desired brightness the next time it is turned on.
Operating the ColorLogic
The ColorLogic light is controlled through power-cycling: a method of changing light programs which
requires no special controller or interface. To activate the light, simply turn on the switch. To deac-
tivate the light, turn off the switch. To advance to the next light program (fixed color or color show),
turn the switch off, then back on within 10 seconds.
When the light has been off for over 60 seconds, and is first turned on, it will come on to white for 15
seconds for quick clear view of your pool, then go to the last fixed color or color show it was running.
Light Synchronization
If your pool or spa has multiple Hayward ColorLogic LED lights, they may be operated independently,
or they can be easily synchronized so they will all display the same colors and shows at the same
time. For light synchronization, all lights must be wired to the same switch. Once installed, all lights
should be automatically synchronized, however, if they get out of sync, they can be re-synchronized
easily.
To re-synchronize your lights, start with the lights off and follow the steps below:
1. Turn lights on.
2. Turn off light for between 11-15 seconds,.
3. Turn lights on.
Mode
100% Brightness
double blink red
50% Brightness
single blink red
Indication

USE ONLY HAYWARD GENUINE REPLACEMENT PARTS
10
When the lights come on, they should enter program #1 (Voodoo Lounge), and be synchronized.
Programs
When in Universal ColorLogic mode (default), the ColorLogic light has the capability to display 17 dif-
ferent programs; 10 fixed colors and 7 color-changing shows. These programs are advanced using
power-cycling (quickly powering the lights on, then off, then back on). The programs are listed below:
1. Show-Voodoo Lounge
2. Fixed-Deep Blue Sea
3. Fixed-Royal Blue
4. Fixed-Afternoon Skies
5. Fixed-Aqua Green
6. Fixed-Emerald
7. Fixed-Cloud White
8. Fixed-Warm Red
9. Fixed-Flamingo
10. Fixed-Vivid Violet
11. Fixed-Sangria
12. Show-Twilight
13. Show-Tranquility
14. Show-Gemstone
15. Show-USA
16. Show-Mardi Gras
17. Show-Cool Cabaret
Refer to the included color card as a quick reference to the available programs.
Omni Direct (Lights built after June, 2018)
LACUS11xxx and LYCUS11xxx 1.5” ColorLogic lights must be configured and controlled by a Hay-
ward OmniLogic or OmniHub pool control to use Omni Direct mode. This mode offers some unique
colors as well as speed and brightness control. The programs are listed below.
1. Show-Voodoo Lounge
2. Fixed-Deep Blue Sea
3. Fixed-Royal Blue
4. Fixed-Afternoon Skies
5. Fixed-Aqua Green
6. Fixed-Emerald
7. Fixed-Cloud White
8. Fixed-Warm Red
9. Fixed-Flamingo
10. Fixed-Vivid Violet
11. Fixed-Sangria
12. Show-Twilight
13. Show-Tranquility
14. Show-Gemstone
15. Show-USA
16. Show-Mardi Gras
17. Show-Cool Cabaret
18. Fixed-Yellow
19. Fixed-Orange
20. Fixed-Gold
21. Fixed-Mint
22. Fixed-Teal
23. Fixed-Burnt Orange
24. Fixed-Pure White
25. Fixed-Crisp White
26. Fixed-Warm White
27. Fixed-Bright Yellow
Refer to the OmniLogic or OmniHub manuals for Omni Direct configuration and operation information.
Networking
Using a ColorLogic modem AQL-COLOR-MODHV and Coupler LKBUN1000, owners of Pro Logic
automation controls can network their LACUN11xxx and LYCUN11xxx model lights allowing them
to fully control the color, speed, motion and brightness of preset light shows. If the lights will be
networked, refer to the AQL-COLOR-MODHV ColorLogic Network module for operation instructions.

USE ONLY HAYWARD GENUINE REPLACEMENT PARTS
11
Troubleshooting
If you have a problem with your Hayward ColorLogic or CrystaLogic light, please try the following tips
before calling for service:
PROBLEM: ColorLogic models will not advance to the next program when it is power-cycled
(turned “off” and then back “on”).
SOLUTION1: Do not power-cycle the switch too rapidly. Leave it off for at least 1 second before
turning it back on.
SOLUTION2: The light may be in Omni Direct mode. To manually go back to Universal ColorLogic
(UCL) mode, follow the procedure below:
1. Turn light on and wait 15 seconds for show/color to launch.
2. Turn off light for between 11-15 seconds, then turn on for 2 seconds.
3. Turn off light for between 11-15 seconds, then turn on for 2 seconds.
4. Turn off light for between 11-15 seconds, then turn on for 2 seconds.
5. Turn off light for between 11-15 seconds, then turn on for 2 seconds.
6. Turn off light for 1 minute. The light should return to UCL mode and operate
normally.
PROBLEM: The light goes to white whenever it is power-cycled (turned “off” and then back “on”).
SOLUTION: Be sure that you power-cycle the light for less than 10 seconds.
PROBLEM: Multiple ColorLogic lights are not correctly synchronized.
SOLUTION: Refer to page 9. Follow the steps in these instructions to re-synchronize the lights.
PROBLEM: Light will not come on.
SOLUTION: Check input power to transformer and then light. Check ground fault and reset if
necessary.
PROBLEM: Light will not come on or light cycles on and off.
SOLUTION: Depending on cord length and operating voltage, automatic thermal switch may be
cycling due to excessive air/pool water temperatures (over 105ºF). For ColorLogic
lights, temporarily switch to a cooler color (Deep Blue Sea, Royal Blue, etc.) until air/
water temperatures cool off.
PROBLEM: GFCI trips when lights are turned on or off.
SOLUTION: Install a Hayward GLX-HAL-XSNUB snubber capacitor across the primary leads (line to
neutral) of the transformer on the load side of the light switch or relay.

USE ONLY HAYWARD GENUINE REPLACEMENT PARTS
12
Hayward® Pool Products Limited Warranty
To original purchasers of this equipment, Hayward Pool Products, Inc. warrants its Universal
ColorLogic® and CrystaLogicTM pool and spa lights, niches, pool light transformers, and couplers
to be free from defects in materials and workmanship for a period of ONE (1) year from the date
of purchase, when used in single family residential applications.
The limited warranty excludes damage from freezing, negligence, improper installation, improper
use or care or any Acts of God. Parts that fail or become defective during the warranty period
shall be repaired or replaced, at our option, within 90 days of the receipt of defective product,
barring unforeseen delays, without charge.
Proof of purchase is required for warranty service. In the event proof of purchase is not available,
the manufacturing date of the product will be the sole determination of the purchase date.
To obtain warranty service, please contact the place of purchase or the nearest Hayward Autho-
rized Service Center. For assistance on your nearest Hayward Authorized Service Center please
visit us at www.hayward.com.
Hayward shall not be responsible for cartage, removal, repair or installation labor or any other
such costs incurred in obtaining warranty replacements or repair.
The Hayward Pool products warranty does not apply to components manufactured by others. For
such products, the warranty established by the respective manufacturer will apply.
The express limited warranty above constitutes the entire warranty of Hayward Pool Products with
respect to its’ pool products and is in lieu of all other warranties expressed or implied, including
warranties of merchantability or fitness for a particular purpose. In no event shall Hayward Pool
products be responsible for any consequential, special or incidental damages of any nature.
Some states do not allow a limitation on how long an implied warranty lasts, or the exclusion of
incidental or consequential damages, so the above limitation may not apply to you. This warranty
gives you specific legal rights, and you may also have other rights, which vary from state to state.

USE ONLY HAYWARD GENUINE REPLACEMENT PARTS
13
USE ONLY HAYWARD GENUINE REPLACEMENT PARTS
For further information or consumer
technical support, visit our website at
www.hayward.com
Hayward is a registered trademark and ColorLogic and CrystaLogic
are trademarks of Hayward Industries, Inc. © 2019 Hayward Industries, Inc.
All other trademarks not owned by Hayward are the property of their respective owners.
Hayward is not in any way affiliated with or endorsed by those third parties.
LACUS11xxx, LYCUS11xxx
LACUN11xxx, LYCUN11xxx
LAWUS11xxx, LYWUS11xxx
UTILIZAR SOLAMENTE PIEZAS DE REPUESTO ORIGINALES DE HAYWARDUSE ONLY HAYWARD GENUINE REPLACEMENT PARTS

\
UTILISEZ UNIQUEMENT DES PIÈCES DE RECHANGE HAYWARD D’ORIGINE
HaywardPool Products Canada
2880 Plymouth Drive, Oakville, ON L6H 5R4
Téléphone: 1-888-238-7665
www.haywardpiscine.ca
092532 RévJ
Table des matières
Consignes de sécurité..................................1
Introduction................................................2
Installation..................................................2
Utilisation...................................................9
Dépannage................................................11
Garantie.....................................................12
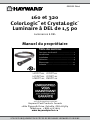
160 et 320
ColorLogicMD et CrystaLogicMC
Luminaire à DEL de 1,5po
Manuel du propriétaire
LACUS11xxx, LYCUS11xxx
LACUN11xxx, LYCUN11xxx
LAWUS11xxx, LYWUS11xxx
Luminaires à DEL

UTILISEZ UNIQUEMENT DES PIÈCES DE RECHANGE HAYWARD D’ORIGINE
1
CONSIGNES DE SÉCURITÉ IMPORTANTES
AVERTISSEMENTS DE SÉCURITÉ: Ne pas ouvrir. La lampe ne contient aucune pièce réparable par
l’utilisateur. Une installation incorrecte peut entraîner la mort ou des blessures graves par électrocu-
tion aux utilisateurs, au personnel d’entretien ou à d’autres personnes. Débranchez l’alimentation
électrique avant d’installer ou de réparer cet équipement. Lisez et suivez toutes les instructions. Ce
produit ne doit être installé que par du personnel qualié.
PROFONDEUR D’INSTALLATION REQUISE: S’il n’est pas installé dans une partie de la piscine qui n’est
pas utilisée pour la baignade en veillant à ce que le verre soit protégé de façon adéquate pour éviter tout
contact, le luminaire doit être installé dans un mur ou sur le sol de la piscine, du spa ou du jeu d’eau avec
le haut de l’ouverture du verre à au moins 4po et à au plus 72po sous le niveau normal de l’eau du bassin.
Modèle Entrée (Volts, Ampères,
Watts) Luminosité
équivalente Lumens
LAW 14VCA 60Hz, 23W 100W 1100
LYW, LAC 14VCA 60Hz, 13W 60W 640
LYC 14VCA 60Hz, 9W 40W 400
LISTE DE CONTRÔLE IMPORTANTE POUR LE CÂBLAGE
Ne pas sauter les étapes de cette partie ou de toute autre partie du manuel.
Les avertissements de sécurité ci-dessus et les instructions d’installation complètes de
ce manuel ont été lus et suivis.
UN TRANSFORMATEUR D’ISOLATION POUR PISCINES/SPAS HOMOLOGUÉ A ÉTÉ
UTILISÉ POUR FOURNIR 14VOLTS À CE LUMINAIRE.
Le câblage de sortie du transformateur N’A PAS été relié ou court-circuité à la terre.
La longueur du cordon n’a pas été prolongée au-delà des directives de ce manuel.
La gaine du cordon n’est pas endommagée, coupée ou épissée, sauf dans les cas
indiqués ci-dessous.
Les extensions ou épissures du cordon doivent être effectuées uniquement dans une
boîte de jonction pour piscine/spa ou un système de transformateur de boîte de jonction
homologué sur le plan de la sécurité.
Le luminaire est solidement xé à la paroi de la piscine et ne peut être retiré sans outil.
Le luminaire a été installé par du personnel qualié conformément au Code national de
l’électricité (NEC) ou au Code canadien de l’électricité (CE) et à tous les codes et
réglementations locaux applicables.
Installé par: ______________________ de la société ____________________________
Date: __________________
LE PROPRIÉTAIRE DOIT GARDER CES INSTRUCTIONS

UTILISEZ UNIQUEMENT DES PIÈCES DE RECHANGE HAYWARD D’ORIGINE
2
Introduction
Nous vous félicitons pour l’achat du luminaire à DEL de 1,5po ColorLogicMD ou CrystaLogicMC de HaywardMD.
Votre luminaire sous-marin à DEL de 1,5po ColorLogic et CrystaLogic de Hayward est doté de ces
caractéristiques spéciales:
1. Des DEL (diodes électroluminescentes) longue durée qui peuvent durer jusqu’à 10fois plus
longtemps que les lampes incandescentes ou halogènes actuelles pour piscines et spas.
2. Les modèles ColorLogic offrent la possibilité d’utiliser plusieurs couleurs sans qu’aucune roue
chromatique ou pièce mobile ne s’use.
3. En mode ColorLogic universel, le luminaire de 1,5po ColorLogic vous permet de sélectionner
l’un des 17programmes différents, 10couleurs xes et 7jeux de lumière en mode autonome.
4. En mode Omni Direct (nécessite un contrôleur de piscine OmniHub ou OmniLogic), les lumi-
naires LYCUS11xxx et LACUS11xxx offrent 27 programmes différents; 20 couleurs xes et
7jeux de lumière avec un contrôle total de la vitesse et de la luminosité.
5. Lorsqu’ils sont mis en réseau avec un contrôleur de piscine/spa Hayward Pro LogicMD (nécessite
AQL-COLOR-MODHV), les modèles de luminaires LACUN11xxx et LYCUN11xxx offrent 11jeux
de lumière, 101couleurs lumineuses xes et un contrôle personnalisé de la vitesse, de la
luminosité et du mouvement.
6. Offre une lumière brillante spectaculaire avec une faible consommation d’énergie. Utilise
jusqu’à 86% moins d’énergie que le luminaire de piscine à incandescence typique.
Les luminaires à DEL (diode électroluminescente) de12volts de 1,5po ColorLogic et CrystaLogic de
Hayward que vous avez achetés sont homologués UL et peuvent être utilisés aussi bien dans l’eau qu’en
dehors. Grâce à leur conception entièrement en plastique et un verre résistant aux chocs, ces luminaires
peuvent être installés à 10cm (4po) du niveau d’eau normal de la piscine ou du spa jusqu’au sommet
du verre. Elles peuvent également être installées vers le haut, sur un sol sans dispositif de protection des
roches, pour les piscines, les spas, les bassins d’éclairage, les fontaines ou les chutes d’eau.
Voir ci-dessous pour des informations spéciques à votre modèle de luminaire à DEL de 1,5po.
160modèles
LYWUS11xxx - blanc uniquement, luminosité de 100% uniquement
LYCUS11xxx - luminosité 100% uniquement
LYCUN11xxx - luminosité 100% uniquement, prise en charge réseau
320modèles
LAWUS11xxx - blanc uniquement, luminosité réglable à 50% ou 100%.
LACUS11xxx - luminosité réglable à 50% ou 100%.
LACUN11xxx - luminosité réglable de 50% ou 100%, prise en charge réseau.
xxx - longueur du cordon d’alimentation
Installation
Si vous remplacez un luminaire existant, coupez l’alimentation du luminaire au niveau du panneau avant
de commencer l’installation. L’installation doit être effectuée conformément aux codes locaux et NEC.
Longueur du cordon et tension minimale requise
Lors de l’installation de luminaires ColorLogic/CrystaLogic à DEL de 1,5po à basse tension, la longueur du

UTILISEZ UNIQUEMENT DES PIÈCES DE RECHANGE HAYWARD D’ORIGINE
3
cordon a une incidence sur les performances. Pour éviter les problèmes de performance, vériez que le trans-
formateur fournit la tension minimale requise suivant le tableau ci-dessous. Pour vérier cette tension, mesurez
la tension au niveau du transformateur lorsque le luminaire est «allumé» et fonctionne en mode «blanc».
Dans certains cas, une tension supérieure à 12volts est nécessaire à cause d’un cordon d’alimentation trop
long. Certains transformateurs ont des prises de tension plus élevées à cette n; consultez les instructions
d’installation du fabricant de votre transformateur pour en savoir plus. Lorsque vous utilisez des transformateurs
Hayward ou autres qui offrent une option 14volts, nous vous suggérons de toujours utiliser la prise 14volts.
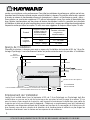
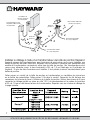
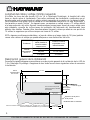
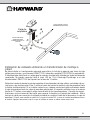
Aperçu de l’installation
Consultez le schéma ci-dessous pour avoir un aperçu de l’installation du luminaire à DEL de 1,5po Co-
lorLogic/CrystaLogic. Lisez attentivement toutes les parties suivantes avant de procéder à l’installation.
Emplacement de l’installation
Lorsqu’il est installé dans l’eau, le luminaire à DEL de 1,5po ColorLogic ou CrystaLogic doit être
installé dans un mur ou sur le sol de la piscine ou du spa avec le haut du verre à au moins 10cm
sous le niveau d’eau normal de la piscine, sauf lorsque le luminaire est installé dans une partie de
la piscine qui n’est pas utilisée pour la baignade. Choisissez un emplacement pour le(s) luminaire(s)
qui donnera une dispersion optimale de la lumière en fonction de la conception de la piscine ou du
spa. Assurez-vous de tenir compte de la direction de la lumière émise et veillez à ne pas diriger les
luminaires directement vers la maison ou les espaces de vie extérieurs.
Produit
Longueur totale du
cordon entre le
transformateur
et le luminaire.
12 v
Lumière
d’appoint
Tension minimale
requise au
transformateur
30 pi
50 pi
100 pi - 150 pi
12 - 14 volts
13 - 14 volts
14 volts
Surface du mur de la piscine
4 po minimum
(haut du verre)
4 po minimum
9 po
minimum
11 po
minimum
8 po minimum
Ligne de flottaison
48 po minimum
Tuyau de 1,5 po en PVC SCH40
Conduit de ¾ po ou de 1 po
À L’INTÉRIEUR
DE LA PISCINE
Utiliser les raccords muraux SP0536,
SP0537, SP0538 de Hayward.
Pour les modèles LYWUS11xxx, LAWUS11xxx, LACUS11xxx et LYCUS11xxx
Pour les modèles LACUN11xxx et LYCUN11xxx
Longs coudes uniquement
Vers le
transformateur
12 VCA.

UTILISEZ UNIQUEMENT DES PIÈCES DE RECHANGE HAYWARD D’ORIGINE
4
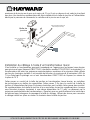
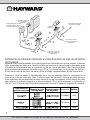
Passage des conduits en PVC
Installez un conduit électrique Schedule 40 depuis l’emplacement souhaité pour le luminaire,
jusqu’au transformateur. Pour faciliter le tirage du câble du ColorLogic/CrystaLogic, utilisez unique-
ment de longs coudes (pas plus de 3), pas de coudes à 90º. Terminez le passage avant d’installer le
luminaire. N’essayez pas de coller le PVC ou les raccords pendant le passage du câble.
Installer le luminaire à DEL dans le conduit en PVC
Une fois le conduit en PVC xé dans le mur de la piscine, suivez ces étapes pour xer le luminaire:
1) Faites passer le cordon du luminaire à DEL de 1,5po ColorLogic/CrystaLogic dans le conduit
jusqu’à l’emplacement du transformateur ou de la boîte de jonction.
2) Insérez complètement le luminaire à DEL de 1,5po ColorLogic/CrystaLogic dans le conduit,
comme illustré. IMPORTANT: Ne pas utiliser de silicone ou tout autre type de produit d’étanchéité.
4 pi (10 cm)
MINIMUM
À L’INTÉRIEUR DE LA PISCINE

UTILISEZ UNIQUEMENT DES PIÈCES DE RECHANGE HAYWARD D’ORIGINE
5
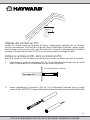
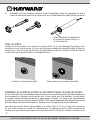
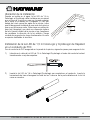
3) Assemblez l’outil fourni illustré ci-dessous. Après l’assemblage, insérez les languettes de l’outil à
l’avant du luminaire et serrez-les à la main jusqu’à ce qu’elles soient bien xées. Ne pas trop serrer.
Pose du plâtre
Installez le cache en plâtre sur le devant du luminaire à DEL de 1,5po ColorLogic/CrystaLogic avant
de plâtrer les murs de la piscine. Le cache est utilisé pour empêcher la gunite/le plâtre d’entrer en
contact avec l’avant et le verre du luminaire. Ne pas plâtrer par-dessus le cache du luminaire. Retirez
le cache lorsque la gunite/le plâtre a complètement durci.
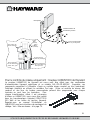
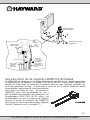
Installation de la boîte de jonction ou du transformateur de boîte de jonction
En cas d’utilisation d’un transformateur basse tension mural, une boîte de jonction doit être installée pour
le branchement du luminaire de la piscine/du spa. Si vous utilisez plus d’un luminaire, il faudra prévoir
un nombre sufsant de boîtes de jonction à sortie simple ou double. Les trousses de transformateurs
basse tension à boîte de jonction Hayward (LTBUY11H65) peuvent également être utilisées lorsque vous
souhaitez aligner plusieurs transformateurs. Reportez-vous à la page8 pour plus d’informations.
Les boîtes de jonction doivent être installées à au moins 48po (1,22m) du bord de la piscine ou
du spa. Faites passer un conduit de l’emplacement de montage jusqu’à la boîte de jonction de
manière à ce que la boîte de jonction ne soit pas à moins de 20cm (8po) au-dessus du niveau d’eau
Tenez fermement la poignée tout
en tournant le bouton jusqu’à ce
qu’il soit bien xé.
Installez le cache avant le plâtre Retirer après le durcissement du plâtre
La page est en cours de chargement...
La page est en cours de chargement...
La page est en cours de chargement...
La page est en cours de chargement...
La page est en cours de chargement...
La page est en cours de chargement...
La page est en cours de chargement...
La page est en cours de chargement...
La page est en cours de chargement...
La page est en cours de chargement...
La page est en cours de chargement...
La page est en cours de chargement...
La page est en cours de chargement...
La page est en cours de chargement...
La page est en cours de chargement...
La page est en cours de chargement...
La page est en cours de chargement...
La page est en cours de chargement...
La page est en cours de chargement...
La page est en cours de chargement...
La page est en cours de chargement...
La page est en cours de chargement...
-
 1
1
-
 2
2
-
 3
3
-
 4
4
-
 5
5
-
 6
6
-
 7
7
-
 8
8
-
 9
9
-
 10
10
-
 11
11
-
 12
12
-
 13
13
-
 14
14
-
 15
15
-
 16
16
-
 17
17
-
 18
18
-
 19
19
-
 20
20
-
 21
21
-
 22
22
-
 23
23
-
 24
24
-
 25
25
-
 26
26
-
 27
27
-
 28
28
-
 29
29
-
 30
30
-
 31
31
-
 32
32
-
 33
33
-
 34
34
-
 35
35
-
 36
36
-
 37
37
-
 38
38
-
 39
39
-
 40
40
-
 41
41
-
 42
42


Hayward 160 & 320 ColorLogic® and CrystaLogic 1.5” LED Lights Le manuel du propriétaire
- Catégorie
- Accessoires de piscine hors terre
- Taper
- Le manuel du propriétaire
dans d''autres langues
Documents connexes
Autres documents
-
Pentair MicroBrite Color and White LED Light Manuel utilisateur
-
Pentair Pool MICROBRITE Mode d'emploi
-
Jandy H0596700 WaterColors RGBW LED Underwater Large and Small Light Manuel utilisateur
-
-
-
Jandy SMARTSYNC60W Manuel utilisateur
-
Atlantic CCPL1 – 74094 Color Changing Single Pond Light Kit Manuel utilisateur