Technicolor UIW8001 Guide d'installation
- Catégorie
- Équipement musical supplémentaire
- Taper
- Guide d'installation
Ce manuel convient également à

UIW8001 and UIW4001
Ultra High-Definition IP
Set-Top Boxes
Installation Guide

2
3
Contents
Change the Way You Watch TV ..............................................................................................................................4
Identify Your Set-Top Box .............................................................................................................................................4
Safety First ..........................................................................................................................................................................5
Serial Number ...................................................................................................................................................................5
In This Manual ...................................................................................................................................................................5
Open Source Software Notification ........................................................................................................................5
UIW8001 and UIW4001 Front Panels ...................................................................................................................6
UIW8001 and UIW4001 Back Panels.....................................................................................................................7
Connecting the Set-Top Box.......................................................................................................................................8
Connecting to the In-Home Network ....................................................................................................................9
Connection for IPV5050 Wireless Set-Top Box.................................................................................................9
Connections for a High-Definition TV (HDTV) ........................................................................................... 10
Connections for a Standard-Definition TV (SDTV) .................................................................................... 11
Connections for a VCR or DVD Recorder .......................................................................................................12
Connections for an Over-the-Air Converter Box ........................................................................................... 12
Connecting to an HDTV with an HDMI Connector .................................................................................... 13
Connecting to an HDTV with a DVI Connector ............................................................................................14
Connecting to an HDTV with a Mini-DIN Connector ................................................................................15
Connecting to an SDTV with a Mini-DIN Connector .................................................................................16
Connecting to a Stereo VCR or DVD Recorder (optional) ...................................................................... 17
Troubleshooting .............................................................................................................................................................. 18
Frequently Asked Questions ....................................................................................................................................19
Picture Formats .............................................................................................................................................................20

4
5
Change the Way You Watch TV
Welcome to Internet Protocol Television (IPTV). The UIW8001 and UIW4001 Ultra High-Definition Set-Top
Boxes bring a rich, new set of interactive services directly to you through your TV and your in-home IP network.
Available services may include some or all of the following features:
• Digital Video Recorder (DVR)—Allows you to record your favorite programs so that you can still go to
your friend’s house for dinner and not miss your favorite TV show
• Pause Live TV—Allows you to pay for the pizza and come back to the show where you left it (Applies
to DVR models only)
• Ultra high-definition (UHD) - Provides crystal-clear pictures and sound when compared to high-
definition (HD) and standard-definition (SD) – you won’t want to watch television any other way once
you’ve experienced UHD
• Video-On-Demand (VOD)—Gives you access to a robust library of movies and programs that you
can watch – when you want to watch them
Note: Contact your service provider to find out if the DVR, HD, or VOD services are available and to
activate the services.
Identify Your Set-Top Box
This installation guide covers the following set-top box models. Use the following information to identify
your model.
• UIW4001 set-top box - TV set-top box that supports ultra high-definition (UHD), high-definition
(HD) and sandard-definition (SD) video with MPEG2, H.264, and H.265 (HEVC) decoding. Supports
480i, 480p, 576i, and 576p on the analog video ouputs and 720p, 1080i, 1080p24/30/50/60, and
4Kx2Kp24/25/30/50/60 on the HDMI output.
• UIW8001 set-top box - The UIW8001 is the same as the UIW4001, but with a 1TB HDD for DVR
capability.
Safety First
Before using the set-top box, read the Important Safety Instructions included in the
packaging with thie Set-Top.
Serial Number
At times your service provider may ask for the serial number. To find the serial number for your set-top
box, look on the bottom of the set-top box for the label. The serial number is a 9-digit numeric code to the
right of the letters “S/N” on the label.
Use the space provided here to record the serial number: _______________________________
In This Manual
This manual covers the information you need to connect your receiver to both your in-home IP network
and your entertainment system. The manual also outlines certain safeguards and installation information.
Open Source Software Notification
This product may contain certain open source software modules which are subject to Open Source
Software license terms.
A list of the Open Source Software used or provided under this release and their corresponding Licenses and
version number are available on Technicolor’s website at the following address: http://www.technicolor.com/
en/hi/minisites/open-software or at another address as Technicolor may provide from time to time.
If and where applicable, depending on the terms of the applicable Open Source Software licenses, the
source codes of the Open Source Software are available for free on Technicolor’s website at the following
address: http://www.technicolor.com/en/hi/minisites/open-software.
For avoidance of doubt, Open Source Software is only licensed by the original owner of the Open Source
Software under the terms set forth in the designated Open Source License.
Note: This illustration may vary from the actual product.
T16707

6
7
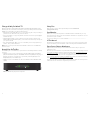
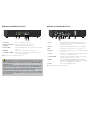
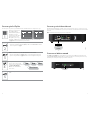
UIW8001 and UIW4001 Front Panel UIW8001 and UIW4001 Back Panel
1 WPS button Press to pair with Wireless Access Point.
2 Signal Strength Indicator Identifies the strength of the wireless connection.
3 Link LED Indicates network link status. The LED is green.
4 Bluetooth LED Indicates when a Blutooth Remote is paired with the set-top. The LED
is blue.
5 REC LED Indicates that a recording is in progress. The LED is red.
6 Power Button and LED Powers on the set-top box or places it in standby. The LED is green
when on and red when in standby.
Note: This illustration may vary from the actual product.
CAUTION: Your set-top box may be equipped with a hard disk drive to store programs
that you record and to allow you to rewind and pause live TV. Any time the set-top box is powered
on (power LED is illuminated) or a recording is in progress (the record LED is illuminated) the
hard disk drive is in use.
If you need to move the set-top box, complete the following steps to allow the hard disk drive to
shut down properly. First, make sure that no recording is in progress (record LED is o). Then,
turn o power by pressing the Power switch. Finally, unplug the unit and wait 10 seconds for the
hard disk drive to spin down (stop). At this point the unit can be moved safely.
You should handle this product with the same level of care that you would use when handling
other electronics containing a hard disk drive, such as a laptop computer or other hard disk
drive-equipped devices.
1 Power Connect the DC output of the AC power adapter (provided) to
deliver power to the set-top box. Use only the AC power adapter
provided with the set-top box.
2 Ethernet Connect to Ethernet (CAT-5) network at your home, if applicable.
3 DR Press and release to trigger a disaster recover recovery process.
4 Bluetooth Press and release to initiate Bluetooth remote control unit pairing with
wireless receiver.
5 Optical Connect to an optical cable to send a digital audio signal to a surround
sound system or other digital audio device.
6 Analog Mini-DIN Alternative method for video and audio connections. Oers analog
component, composite, and stereo audio outputs.
7 HDMI Connect an HDTV HDMI (High-Definition Multimedia Interface)
cable from the HDTV to the HDMI port. HDMI supports both digital
audio and video. See page 13 for more information
8 USB 3.0 Allows connectivity with USB 3.0 devices.
Note: This illustration may vary from the actual product.
T16708
1 2 3
4 6
5
DR
T16709
1 2 4 5 6 7 6
3

8
9
Because the connections for a
high-definition (HD) or
standard-definition (SD) TV
are dierent, you must
determine if your TV is HD or
SD. Your TV must receive
HD signals for you to enjoy
the benefits of HDTV. See the guide that came with your TV for more information.
See page 20 for more information on picture formats.
Make one of the following connections for your home network:
• If your home network uses Ethernet (CAT-5) cable, use the NETWORK connector
on the set-top box. See page 9
Connecting the Set-Top Box
To connect your set-top box to your network and home entertainment devices, complete these steps:
Identify the additional consumer
electronic devices that you will
connect to the set-top box and TV.
See page 12 through page
17and see the owner’s manual
for the device.
Plug the set-top box and the TV into an AC power source that is not controlled by a
switch.
Make the connections for your TV, VCR, and DVD recorder as follows:
• If you are using an HDTV, see page 10 and the connection diagrams in this guide.
• If you are using an SDTV, see page 11 and the connection diagrams in this guide.
1
2
3
5
4
Home Theater
Other
DVD
VCR
9
16
4
3
or
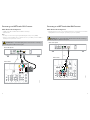
Connecting to the In-Home Network
The following diagrams illustrate examples of the connections that you can use to connect your set-top
box to your in-home network. Contact your service provider for the recommended connection method for
your home.
Note: The illustration below may vary from the actual product
Connection to
Wireless network
The UIW8001 and UIW4001 set-top box allows for easy and secure establishment of a wireless home
network through a Wireless Access Point. The signal strength indicator on the front panel of the set-top
box allows you to identify the strength of your wireless connection.
T16710
Signal Strength
Indicator
DR
In-Home
CAT-5
Network
Wall
T16711

10
11
Connections for a High-Definition TV (HDTV)
To use the set-top box with an HDTV, you must make one of the following connections to view the HD
content. See the owner’s manual for your TV and the cabling diagrams in this guide for more detailed
connection information.
Although all connections provide you with quality service, we list the connections in our recommended order.
Notes:
• The labeling on your set-top box or HDTV may vary slightly from the illustrations shown below
• Some cables shown in the connection diagrams may not be included with this set-top box
• Set the HD mode and select the output video format (480i, 480p, 720p, 1080i, 1080p) on the set-top box.
See page 20 for more information on picture formats
Connections for a Standard-Definition TV (SDTV)
When using the set-top box with an SDTV, you must make one of the following connections to view
content. Some SDTVs may not have all of these connections. See the owner’s manual for your TV
and the cabling diagrams in this guide for more detailed information.
Although all connections provide you with quality service, we list the connections in our recommended order.
Notes:
• The labeling on your set-top box or SDTV may vary slightly from the illustrations shown below
• Some cables shown in the connection diagrams may not be included with this set-top box
The YPbPr (red, blue, and green) connectors can
provide standard-definition component video
signals to an SDTV. A separate audio connection is
also needed.
Note: To connect YPbPr to an SDTV, you must
select the output video format. See page 20 for
more information on picture formats.
See the connection diagram on page 16 for an
example.
SDTV
Connections
Use One of These Required
Connections to an SDTV
Set-Top Box
Connections
The Video Out connector provides a video
connection to an SDTV. A separate audio
connection is also needed.
See the connection diagram on page 16 for an
example.
Video Out
VIDEO
IN
L R
Pr
Pb
Y
L R
YPbPr
Audio VideoAudio Video
Some HDTVs have a High-Definition Multimedia
Interface (HDMI) connector. The HDMI connector
provides both a digital video and audio connection. See
the connection diagram on page 13 for an example.
Note: The HDMI port on the TV must support
high-bandwidth digital content protection (HDCP).
HDTV
Connections
The HDMI connector can provide the connection
to an HDTV with a DVI input. If your HDTV has a
Digital Visual Interface (DVI) connector, you need
an HDMI-to-DVI adapter, and a separate audio
connection (either L/R or optical audio).
Note: The DVI port on the TV must support
high-bandwidth digital content protection (HDCP).
See the connection diagram on page 14 for an
example.
Use One of These Required
Connections to an HDTV
HDMI
HDMI
HDMI
DVI
Set-Top Box
Connections
The YPbPr (red, blue, and green) connectors
provide high-definition component video signals to
an HDTV, and a separate audio connection (either
L/R or optical audio).
See the connection diagram on page 15 for an
example.
Pr
Pb
Y
Audio/Video
Video
Video
DVI HDMIYPbPr
Some HDTVs have only RGB or RGB-HV
connectors. If you have one of these HDTVs,
you need a Component-to-RGB adapter, and
you need a separate audio connection.
B
G
V
H
R
Adapter Needed
Adapter Needed
Video
RGB
Audio
L R
OPTICAL
OPTICAL
INPUT
L R
Audio
OPTICAL
OPTICAL
INPUT
L R
Audio
or S/PDIF
or S/PDIF

12
13
Connections for a VCR or DVD Recorder
When using the receiver with a VCR or DVD recorder, you must make one of the following connections
to view content.
Although all connections provide you with quality service, we list the connections in our recommended
order.
Notes:
• The labeling on your receiver, VCR, or DVD recorder may vary slightly from the illustrations shown below.
• Some cables shown in the connection diagrams may not be included with this receiver.
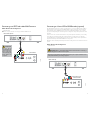
Connecting to an HDTV with an HDMI Connector
Cable Used in this Configuration
• 1 HDMI Cable
Notes:
• The HDMI port on the TV must support high-bandwidth digital content protection (HDCP)
• The HDMI interface supports Dolby Digital 5.1 audio
WARNING: Electric shock hazard! Unplug all electronic devices before connecting or
disconnecting any device cables to the set-top box.
For VCRs or DVD recorders with Video In and
Left and Right audio connectors, use the Video
Out and the Audio Out connectors (Left and
Right) on the receiver.
See the connection diagram on page 17 for
an example.
VCR/DVD Recorder
Connections
Use One of These Optional Connections
to a VCR or DVD Recorder
Receiver
Connections
VCR/DVD Recorder
Audio Video
VIDEO
IN
L R
Connections for an Over-the-Air Converter Box
You can connect an over-the-air converter box directly to your TV to receive certain local channels, but
do not connect the over-the-air converter box directly to your set-top box box.
Back of Set-Top Box
T16712
DR
Back of HDTV
HDMI
AUDIO
CENTER
CHANNEL IN
AUDIO IN
DVI/HDCP
ANT (75 )
INOUT
LR
ANT-1
HD 2
Y
OUT
ANT-2
PB
PR
L
R
VIDEO
L/
MONO
R
L/
MONO
R
AUDIO
IN
ON OFF
IN
HD 1
S-VIDEO
VIDEO
Y
PB
PR
L
R
AUDIOAUDIO

14
15
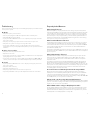
Connecting to an HDTV with a DVI Connector
Cables Used in this Configuration
• 1 HDMI-to-DVI cable or 1 HDMI cable and 1 HDMI-to-DVI adapter
• 1 Mini-DIN cable
Notes:
• The DVI port on the TV must support high-bandwidth digital content protection (HDCP)
• When you connect the HDMI connector to the DVI connector on your HDTV, you need an HDMI-to-
DVI adapter and a separate audio connection
Connecting to an HDTV with a Mini-DIN Connector
Cables Used in this Configuration
• 1 Mini-DIN cable (You can also use an optical cable [indicated by the dotted line] instead of the Audio
Left/Right Cable as shown in the diagram, dependent upon your TV’s capabilities.)
WARNING: Electric shock hazard! Unplug all electronic devices before connecting or
disconnecting any device cables to the set-top box.
WARNING: Electric shock hazard! Unplug all electronic devices before connecting or
disconnecting any device cables to the set-top box.
Back of Set-Top Box
DR
Back of HDTV
AUDIO
CENTER
CHANNEL IN
ANT (75 )
INOUT
ANT-1
HD 2
Y
OUT
ANT-2
PB
PR
L
R
VIDEO
L/
MONO
R
L/
MONO
R
AUDIO
IN
ON OFF
IN
HD 1
S-VIDEO
VIDEO
Y
PB
PR
L
R
AUDIOAUDIO
DVI/HDCP
IN
AUDIO IN
DVI/HDCP
LR
OPTICAL
INPUT
OR
T16713
T16714
Back of HDTV
HDMI
AUDIO
CENTER
CHANNEL IN
AUDIO IN
DVI/HDCP
ANT (75 )
INOUT
LR
ANT-1
HD 2
Y
OUT
ANT-2
PB
PR
L
R
VIDEO
L/
MONO
R
L/
MONO
R
AUDIO
IN
ON OFF
S-VIDEO
VIDEO
AUDIO
IN
HD 1
Y
PB
PR
L
R
AUDIO
OPTICAL
INPUT
Back of Set-Top Box
DR
OR

16
17
Connecting to an SDTV with a Mini-DIN Connector
Cables Used in this Configuration
• 1 Mini-DIN cable
Note: The set-top box must be set to the proper standard-definition mode.
WARNING:
Electric shock
hazard! Unplug all
electronic devices
before connecting
or disconnecting any
device cables to the
set-top box.
Connecting to a Stereo VCR or DVD Recorder (optional)
The diagram below shows how to connect a recording device to your receiver. Although it is possible to
watch TV using a connection through your VCR or DVD recorder to the TV, this connection may not
provide the best picture, and HDTV users are restricted to an SD format. In addition, some content is
copy protected and passing this content through the recording device may result in a picture that cannot
be viewed.
For these reasons, the connection shown is best used to provide only video and audio to your recording
device and not for normal TV viewing. The connection from the recording device to the TV (only
used for playback of recorded material) depends on the type of device being used, the outputs that are
supported, and the inputs that remain available for use on your TV.
Consult the owner’s manuals provided with your TV and recording device for more details on connection
options.
Cables Used in this Configuration
• 1 Mini-DIN cable
Connecting your TV directly to the Audio/Vido output of your set-top box will assure a more
vivid picture and enhance your viewing enjoyment.
WARNING: Electric shock hazard! Unplug all electronic devices before connecting or
disconnecting any device cables to the set-top box.
Back of SDTV
CABLE OUT/
ANT OUT
CABLE IN/
ANT IN
RL
AUDIO
IN
VIDEO
IN
RL
AUDIO
OUT
VIDEO
OUT
Y
PB
PR
Back of Set-Top Box
DR
T16715
Back of Stereo VCR
or DVD Recorder
RL
AUDIO
IN
VIDEO
IN
CABLE OUT/
ANT OUT
R
L
AUDIO
OUT
VIDEO
OUT
CABLE IN/
ANT IN
Back of Set-Top
DR
T16716

18
19
Troubleshooting
If the set-top box does not perform as expected, the following tips may help. If you need further assistance,
contact your service provider.
No Picture
• Verify that the power to your TV is turned on
• If the set-top box is plugged into a wall switch, verify that the switch is in the ON position
• Verify that all cables are properly connected
• If your system includes a VCR, DVD recorder, or stereo, verify that you have properly connected the
device to the set-top box
• Verify that you are using the proper input selection to the home theater set-top box or TV
• Verify that the set-top box is set to the proper screen type and resolution
• If you are using coaxial cable to connect to your TV, verify that the TV is tuned to the channel
designated by your service provider (usually channel 3). Contact your service provider for the channel
information
No Color or Incorrect Color
• Verify that the current TV program is broadcast in color
• Adjust the TV color controls
• If you are using a component video connection (YPbPr), check that all connectors are completely and
properly plugged into the set-top box and TV
• If you are using a component video connection (YPbPr) and your HDTV has only RGB or RGB-HV
connectors, you must use an adapter. You can obtain the adapter through an electronic parts retailer
No Sound
• If your setup includes a VCR, DVD recorder, or stereo, verify that you have properly connected the
device to the set-top box
• Verify that the volume is turned up
• Verify that the mute function is not on
• Verify the proper input selection to the home theater set-top box or TV
• If you are using coaxial cable to connect to your TV, verify that the TV is tuned to the correct channel
Frequently Asked Questions
What Is Digital Television?
Digital television (DTV) is a huge leap forward in television technology compared to analog television
that has been widely available since the 1940s. DTV is delivered and displayed using digital encoding, similar
to the way a PC operates. By using digital technology, there is no variation in picture and sound quality
from the origination point until it is displayed on your television. You always receive a high-quality picture
without the wavy lines or static you might sometimes get from a weak analog signal. Another feature of
digital television is digital surround sound using Dolby Digital technology, which is the same technology
used to produce the sound you hear in movie theaters.
What Is Standard-Definition Television?
Standard-definition television (SDTV) is a television system that uses a resolution that is not considered
to be high-definition television (HDTV 720p, 1080i, and 1080p). The two common SDTV signal types
are 576i, with 576 interlaced lines of resolution, derived from the European-developed PAL and SECAM
systems; and 480i, with 480 interlaced lines of resolution, based on the American National Television
System Committee (NTSC) system.
In North America, digital SDTV is broadcast in the same 4:3 aspect ratio as NTSC signals. In other parts of
the world that used the PAL or SECAM color systems, standard-definition television is now usually shown
with a 16:9 aspect ratio.
What Is High-Definition Television?
High-Definition Television (HDTV) is a high-quality video standard developed to replace older video
formats often referred to as SDTV (Standard-definition television). While HDTV’s video quality is
one of the most noticeable improvements over SDTV, HDTV includes a number of other important
improvements as well.
First of all instead of an analog signal, used by traditional NTSC broadcasts, HDTV is always digital. This
eliminates analog interference caused be electrical currents and magnetic fields. Secondly, HDTV uses a
dierent aspect ratio than SDTV. While previous broadcasts used a 4:3 ratio, HDTV uses a ratio of 16:9. This
wider aspect ratio more closely emulates how humans see the world, making the image appear more realistic.
This ratio is also better for watching widescreen movies, which are recorded in widescreen for the same
reason. HDTV signals are either 720p, 1080i or 1080p.
Are Local TV Stations or Other Programmers Broadcasting in HDTV?
Many local TV stations and programmers are transmitting digital signals. However, transmitting a
digital signal does not mean transmitting an HDTV signal. Some stations are using the new bandwidth
to broadcast several standard-definition channels. Most stations and programmers, once they begin
broadcasting in digital, are oering HD content from their parent network (for example, CBS, ABC, NBC,
Fox, and PBS). Contact your service provider for more information.
Why Aren’t All of the Shows that I Watch in High-Definition?
A high-definition program must originate in HD format and be broadcast in HD format. Having an HDTV
system does not mean that everything you watch will be viewed in high-definition. Getting the signal from
a digital source also does not mean it is high-definition.
What Is HDMI and Does it Support Dolby Digital 5.1 Audio?
The High-Definition Multimedia Interface (HDMI) is an uncompressed, all-digital audio/video interface.
The Dolby Digital audio format that provides up to 5.1 separate channels of surround sound, and is the
standard used for DVD-Video. HDMI supports standard, enhanced, or high-definition video, plus multi-
channel digital audio, such as Dolby Digital audio, on a single cable.

20
Picture Formats
What Is the Dierence Between a Standard-Screen and a Wide-Screen
HDTV?
The type of screen your HDTV has (wide-screen or standard-screen) determines how the set-top box
displays programs on the screen. The picture format for an HDTV is a combination of aspect ratio and
screen resolution and is dierent for standard-screen and wide-screen HDTVs.
What Is Aspect Ratio?
An aspect ratio is the ratio of the width to the height of the TV screen. The aspect ratios dier because
the television industry manufactures both standard-screen and wide-screen HDTVs to appeal to consumer
viewing preferences.
What Is the Screen Resolution?
The screen resolution indicates the amount of detail that the picture displays. Resolution is identified by
the number of display lines on the screen. The techniques that an HDTV uses to “paint” the picture on the
screen are referred to as progressive and interlaced.
With the progressive scanning method, the lines are drawn on the screen one at a time in sequential
order. Progressive scanning results in a more detailed image on the screen and is also less susceptible to the
flicker commonly associated with interlaced scanning. The interlaced method involves refreshing pixels in
alternation — first the odd lines and then the even lines.
For advanced setup, select the screen resolution that your TV can support. See your HDTV user manuals
to choose the proper screen resolution (480i, 576i, 720p, 1080i, or 1080p) for your setup.
For example, a screen resolution of 1080i indicates that the screen shows 1080 lines in an interlaced display,
and 720p indicates that the screens shows 720 lines in a progressive display.
A standard-screen SDTV has a 4x3
aspect ratio. The screen is 4 units wide for
every 3 units tall.
A wide-screen HDTV is one-third wider than
a standard-screen HDTV. The screen is 16 units
wide for every 9 units tall.
A screen resolution of 480i or 516i fills
the screen.
A screen resolution of 720p or 1080i fills
the screen.
9
16
4
3
TECHNICOLOR
1-5, rue Jeanne d’Arc
92130 Issy-les-Moulineaux
France
www.technicolor.com
Copyright 2016 Technicolor. All rights reserved.
All tradenames referenced are service marks,
trademarks, or registered trademarks of their respec-
tive companies. Specifications subject to change
without notice.
DMS3-CTC-25-XXX v1.0
Trademark and License Information
Rovi Disclaimer
Technicolor will not be responsible for any licensing fees payable to Rovi Corporation, and Technicolor
will not have any indemnification obligations relating to any claims asserted by Rovi Corporation, or by
any entity controlled by, controlling, or under common control with Rovi Corporation (“Rovi Entities”),
or any entity used to license intellectual property of the Rovi Entities, and the successors and assigns of
the foregoing entities, including any claim related to electronic programming guides alone or in
combination with any equipment provided by Technicolor.
Dolby
Manufactured under license from Dolby Laboratories. Dolby, Dolby Audio and the double-D symbol
are trademarks of Dolby Laboratories.
HDMI
The terms HDMI and HDMI High-Definition Multimedia Interface, and the HDMI Logo are
trademarks or registered trademarks of HDMI Licensing LLC in the United States and other countries.

TECHNICOLOR
1-5 rue Jeanne d’Arc
92130 Issy-les-Moulineaux
France
www.technicolor.com
*37542270*
37542270
Copyright 2016 Technicolor. All rights reserved.
All tradenames referenced are service marks, trademarks, or registered trademarks of their
respective companies. Specifications subject to change without notice.
DMS3-SAF-25-381 v1.0.
SAFETY INSTRUCTIONS AND REGULATORY NOTICES
BEFORE YOU START INSTALLATION OF
OR USE THIS PRODUCT, CAREFULLY
READ THESE INSTRUCTIONS
Applicability
These Safety Instructions and Regulatory Notices
apply to:
• Technicolor Set-Top Boxes
Important Safety Instructions
1 Read these instructions.
2 Keep these instructions.
3 Heed all warnings.
4 Follow all instructions.
5 Do not use this apparatus near water.
6 Clean only with dry cloth.
7 Do not block any ventilation openings. Install
in accordance with the manufacturer’s
instructions.
8 Do not install near any heat sources such as
radiators, heat registers, stoves, or other
apparatus (including amplifiers) that produce
heat.
9 Do not defeat the safety purpose of the
polarized or grounding-type plug. A
polarized plug has two blades with one wider
than the other. A grounding-type plug has
two blades and a third grounding prong. The
wide blade or the third prong are provided for
your safety. If the provided plug does not fit
into your outlet, consult an electrician for
replacement of the obsolete outlet.
10Protect the power cord from being walked on
or pinched particularly at plugs, convenience
receptacles, and the point where they exit
from the apparatus.
11 Only use attachments/accessories specified
by the manufacturer.
12Use only with the cart, stand, tripod, bracket,
or table specified by the manufacturer, or sold
with the apparatus. When a cart is used, use
caution when moving the cart/apparatus
combination to avoid injury from tip-over.
13Unplug this apparatus during lightning
storms or when unused for long periods of
time.
14Refer all servicing to qualified service
personnel. Servicing is required when the
apparatus has been damaged in any way,
such as a power-supply cord or plug is
damaged, liquid has been spilled or objects
have fallen into the apparatus, the apparatus
has been exposed to rain or moisture, does
not operate normally, or has been dropped.
!
When using this product, always follow
the basic safety precautions to reduce the
risk of fire, electric shock and injury to
persons, including the following:
• Always install the product as described
in the documentation that is included
with your product.
• Avoid using this product during an
electrical storm. There may be a
remote risk of electric shock from
lightning.
• Do not use this product to report a gas
leak in the vicinity of the leak.

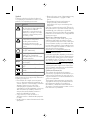
Symbols
Following symbols may be found in this and
accompanying documentation as well as on the
product or accompanying accessories:
Directive
Unless express and prior approval by Technicolor
in writing, you may not:
• Disassemble, de-compile, reverse engineer,
trace or otherwise analyze the equipment, its
content, operation, or functionality, or otherwise
attempt to derive source code (or the
underlying ideas, algorithms, structure or
organization) from the equipment, or from any
other information provided by Technicolor,
except to the extent that this restriction is
expressly prohibited by local law;
• Copy, rent, loan, re-sell, sub-license, or
otherwise transfer or distribute the equipment
to others;
• Modify, adapt or create a derivative work of the
equipment;
• Remove from any copies of the equipment any
product identification, copyright or other
notices;
• Disseminate performance information or
analysis (including, without limitation,
benchmarks) from any source relating to the
equipment.
Such acts not expressly approved by Technicolor
will result in the loss of product warranty and may
invalidate the user's authority to operate this
equipment. Technicolor disclaims all responsibility
in the event of use that does not comply with the
present instructions.
Open Source Software notification
This product may contain certain open source
software modules which are subject to Open
Source Software license terms. A list of the Open
Source Software used by or provided under this
product release and their corresponding Licenses
and version number are available on Technicolor's
website at the following address:
www.technicolor.com/en/hi/minisites/open-
software or at another address as Technicolor may
provide from time to time.
If and where applicable, depending on the terms
of the applicable Open Source Software licenses,
the source codes of the Open Source Software
are available for free on Technicolor's website at
the following address: www.technicolor.com/en/
hi/minisites/open-software.
For avoidance of doubt, Open Source Software is
only licensed by the original owner of the Open
Source Software under the terms set forth in the
designated Open Source License.
Software and Firmware Use
The software described in this document is
protected by copyright law and furnished to you
under a license agreement. You may only use or
copy this software in accordance with the terms of
your license agreement.
The firmware in this equipment is protected by
copyright law. You may only use the firmware in
the equipment in which it is provided. Any
reproduction or distribution of this firmware, or
any portion of it, without express written consent
from Technicolor is prohibited.
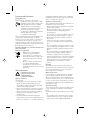
Symbol Indication
This symbol is intended to alert you
that uninsulated voltage within this
product may have sufficient
magnitude to cause electric shock.
Therefore, it is dangerous to make
any kind of contact with any inside
part of this product.
This symbol is intended to alert you
of the presence of important
operating and maintenance
(servicing) instructions in the
documentation accompanying this
product.
This symbol indicates for indoor use
only (IEC 60417-5957).
This symbol indicates Double
insulated Class II equipment
(IEC 60417-5172). Does not require
an earth connection.
This symbol indicates Alternating
Current (AC).
This symbol indicates Direct Current
(DC).
This symbol indicates Electrical
polarity.
This symbol indicates Fuse.
!

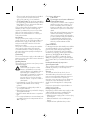
Environmental information
Energy efficiency
Energy savings - We have a role to play…
The accompanying product documentation not
only provides useful information on all the
features of your product, but also on its energy
consumption. We strongly encourage you to
carefully read the product documentation before
putting your equipment in service in order to get
the best service it can offer you.
By working together, we can reduce the impact we
have on our earth!
Batteries (if applicable)
Batteries use some hazardous
substances which pollute the
environment. Do not dispose of
them with other articles. Take care to
dispose them at special collecting
points.
Recycle or dispose of batteries in
accordance with the battery
manufacturer’s instructions and
local/national disposal and recycling
regulations.
Safety instructions
Climatic conditions
This product:
• Is intended for in-house stationary use; the
maximum ambient temperature must not
exceed 40 °C (104 °F); the relative humidity
must be between 20 and 80 %.
• Must not be mounted in a location exposed to
direct or excessive solar and/or heat radiation.
• Must not be exposed to heat trap conditions
and must not be subjected to water or
condensation.
• Must be installed in a Pollution Degree 2
environment (an environment where there is no
pollution or only dry, non-conductive pollution).
If applicable, batteries (battery pack or batteries
installed) must not be exposed to excessive heat
such as sunshine, fire or the like.
Ventilation and positioning
This equipment is intended to be used indoor in a
residential or office environment.
• Remove all packaging material before applying
power to the product.
• Place and use the product only in positions as
described in the accompanying product
documentation.
• Do not block or cover any ventilation openings;
never stand it on soft furnishings or carpets.
• Never push objects through the openings in
this product.
• Leave 7 to 10 cm (3 to 4 inches) around the
product to ensure that proper ventilation gets
to it.
• Do not install the product near any heat sources
such as radiators, heat registers, stoves, or other
apparatus (including amplifiers) that produce
heat.
• Do not put anything on it which might spill or
drip into it (for example, lighted candles or
containers of liquids). Do not expose it to
dripping or splashing, rain or moisture. If a liquid
enters inside the product, or if the product has
been exposed to rain or moisture, unplug it
immediately and contact the Customer
Service.
Cleaning
Unplug this product from the wall socket and
disconnect from all other devices before cleaning.
Do not use liquid cleaners or aerosol cleaners.
Use a damp cloth for cleaning.
Water and moisture
Do not use this product near water, for example
near a bathtub, washbowl, kitchen sink, laundry
tub, in a wet basement or near a swimming pool.
Transition of the product from a cold environment
to a hot one may cause condensation on some of
its internal parts. Allow it to dry by itself before re-
starting the product.
Electrical powering
The powering of the product must adhere to the
power specifications indicated on the marking
labels.
In case this product is powered by a power supply
unit:
• This power supply unit must be Class II and a
Limited Power Source in accordance with the
requirements of IEC 60950-1/EN 60950-1,
Technicolor is proud to offer you high-
standard products with a variety of eco-
friendly attributes. Next to carefully
selected plastics and packaging to
minimize our ecological footprint, our
products benefit from a unique
combination of hardware and software
features that reduce energy
consumption substantially.
!
• Read these instructions.
• Keep these instructions.
• Heed all warnings.
• Follow all instructions.

Clause 2.5 and rated as indicated on the label
on your product. It must be tested and
approved to national, or local standards.
• For US and Canada: This product is intended to
be supplied by a UL listed Direct Plug-in Power
Unit marked "Class 2" and rated as indicated
on the label on your product.
Only use the power supply unit that is supplied
with this product. The use of other types of
supplies is prohibited. If you are not sure of the
type of power supply needed, consult the
product's user documentation or contact your
local product dealer.
Accessibility
The plug on the power supply cord or power
supply unit serves as disconnect device. Be sure
that the mains supply socket outlet you use is
easily accessible and located as close to the
product as possible.
The power connections to the product and the
mains supply socket outlet socket must be
accessible at all times, so that you always can
disconnect the product quickly and safely from
the mains supply.
Overloading
Do not overload mains supply socket outlets and
extension power cords as this increases the risk of
fire or electric shock.
Handling batteries
This product (or its remote control) may contain
disposable batteries.
• Insert batteries correctly. There may be a risk of
explosion if the batteries are incorrectly
inserted.
• Do not attempt to recharge ‘disposable’ or
‘non-reusable’ batteries.
• Please follow instructions provided for charging
‘rechargeable’ batteries.
• Replace batteries with the same or equivalent
type.
• Do not expose batteries to excessive heat (such
as sunlight or fire) and to temperatures above
100 °C (212 °F).
Coin/button cell batteries
Cable Distribution
For this apparatus, the cable shield/screen shall be
grounded (earthed) as close as practical to the
point of entry of the cable into the building.
For products sold in the US and Canada, this
reminder is provided to call the system installer's
attention to ANSI/NFPA 70, the National
Electrical Code (NEC), in particular Section
820.93, Grounding of Outer Conductive Shield
of a Coaxial Cable (or Canadian Electrical Code
Part 1).
Limiting the human body exposure to
electromagnetic fields
This product should be installed and operated at
least 20 cm (8 inches) or more away from a
person’s body.
Servicing
To reduce the risk of electric shock, do not
disassemble this product. None of its internal
parts are user-replaceable; therefore, there is no
reason to access the interior. Opening or
removing covers may expose you to dangerous
voltages. Incorrect reassembly could cause
electric shock if the appliance is subsequently
used.
If service or repair work is required, take it to a
qualified service dealer.
Damage requiring service
Unplug this product from the mains supply socket
outlet and refer servicing to qualified service
personnel under the following conditions:
• When the power supply, power cord or its plug
are damaged.
• When the attached cords are damaged or
frayed.
• If liquid has been spilled into the product.
!
CAUTION
There is danger of explosion if the
battery is mishandled or incorrectly
replaced. Replace only with the same or
equivalent type of battery. Do not
disassemble it or attempt to recharge it
outside the system. Do not crush,
puncture, dispose of in fire, short the
external contacts, or expose to water or
other liquids.
!
CAUTION
Do not ingest coin or button cell batteries!
Chemical Burn Hazard
This product or remote control supplied
with this product may contains a coin/
button cell battery. If the coin/button
battery is swallowed, it can cause severe
internal burns in just 2 hours and lead to
death.
Keep new and used batteries away from
children. If the battery compartment
does not close securely, stop using the
product and keep it away from children. If
you think batteries might have been
swallowed or placed inside any part of
the body, seek immediate medical
attention.

• If the product has been exposed to rain or
water.
• If the product does not operate normally.
• If the product has been dropped or damaged in
any way.
• There are noticeable signs of overheating.
• If the product exhibits a distinct change in
performance.
Immediately disconnect the product if you notice
it giving off a smell of burning or smoke. Under no
circumstances must you open the equipment
yourself; you run the risk of electrocution.
Protect the product when moving it
Always disconnect the power source when
moving the product or connecting or
disconnecting cables.
Interface classifications (upon applicability)
The external interfaces of the product are
classified as follows:
• Cable: TNV circuit, not subjected to
overvoltages (TNV-1)
• MoCA, HPNA, RF: TNV circuit, not subjected
to overvoltages (TNV-1)
• All other interface ports (e.g. HDMI, analog
audio / video, Ethernet, USB,...), including the
low voltage power input from the AC mains
power supply: SELV circuits.
Regulatory information
You must install and use this device in strict
accordance with the manufacturer's instructions
as described in the user documentation that is
included with your product.
Before you start installation or use of this product,
carefully read the contents of this document for
device specific constraints or rules that may apply
in the country where you want to use this product.
In some situations or environments, the use of
wireless devices may be restricted by the
proprietor of the building or responsible
representatives of the organization.
If you are uncertain of the policy that applies on
the use of wireless equipment in a specific
organization or environment (e.g. airports), you
are encouraged to ask for authorization to use this
device prior to turning on the equipment.
Technicolor is not responsible for any radio or
television interference caused by unauthorized
modification of the device, or the substitution or
attachment of connecting cables and equipment
other than specified by Technicolor. The
correction of interference caused by such
unauthorized modification, substitution or
attachment will be the responsibility of the user.
Technicolor and its authorized resellers or
distributors are not liable for any damage or
violation of government regulations that may
arise from failing to comply with these guidelines.
North-America - Canada
Notification of Canadian Radio Frequency
Interference Statement
This Class B digital apparatus complies with
Canadian ICES-003.
This product meets the applicable Innovation,
Science and Economic Development Canada
technical specifications.
Canada - Industry Canada (IC)
In case this product is equipped with a wireless
transceiver, this device complies with Industry
Canada’s licence-exempt RSSs. Operation is
subject to the following two conditions: (1) This
device may not cause interference; and (2) This
device must accept any interference, including
interference that may cause undesired operation
of the device.
Canada - Radiation exposure statement
This equipment complies with IC radiation
exposure limits set forth for an uncontrolled
environment. This equipment should be installed
and operated with minimum distance 20 cm
(8 inches) between the radiator and your body.
Restricted frequency bands
In case this product is equipped with a wireless
transceiver operating in the 2.4 GHz band, it may
only use channels 1 to 11 (2412 to 2462 MHz) on
Canada territory.
In case this product is equipped with a wireless
transceiver operating in the 5 GHz band, it is for
indoor use only.
The availability of some specific channels and/or
operational frequency bands are country
dependent and are firmware programmed at the
factory to match the intended destination. The
firmware setting is not accessible by the end user.
North-America - United States of America
Important safety instructions
• The cable distribution system should be
grounded (earthed) in accordance with ANSI/
NFPA 70, the National Electrical Code (NEC),
in particular Section 820,93, Grounding of outer
Conductive Shield of a Coaxial Cable.
• Leave 5 to 8 cm (2 to 3 inches) around the
product to ensure proper ventilation to it.
• Never push objects through the openings in
this product.
Federal Communications Commission (FCC)
radio frequency interference statement

This equipment has been tested and found to
comply with the limits for a Class B digital device,
pursuant to Part 15 of the FCC Rules. These
limits are designed to provide reasonable
protection against harmful interference in a
residential installation. This equipment generates,
uses and can radiate radio frequency energy and,
if not installed and used in accordance with the
instructions, may cause harmful interference to
radio communications. However, there is no
guarantee that interference will not occur in a
particular installation. If this equipment does
cause harmful interference to radio or television
reception, which can be determined by turning
the equipment off and on, the user is encouraged
to try to correct the interference by one or more
of the following measures:
• Reorient or relocate the receiving antenna.
• Increase the separation between the equipment
and receiver.
• Connect the equipment into an outlet on a
circuit different from that to which the receiver
is connected.
• Consult the dealer or an experienced radio/TV
technician for help.
FCC Caution: Any changes or modifications not
expressly approved by the party responsible for
compliance could void the user's authority to
operate this equipment.
Responsible Party: Technicolor, 101W. 103rd St.,
Indianapolis, IN 46290 USA, 317-587-5466.
RF exposure statement
This equipment complies with FCC radiation
exposure limits set forth for an uncontrolled
environment. End users must follow the specific
operating instructions for satisfying RF exposure
compliance. To maintain compliance with FCC
RF exposure compliance requirements, please
follow operation instruction as documented in the
product documentation.
When the product is equipped with a wireless
interface, then it becomes a mobile or fixed
mounted modular transmitter and must have a
separation distance of at least 20 cm (8 inches)
between the antenna and the body of the user or
nearby persons. In practice, this means that the
user or nearby persons must have a distance of at
least 20 cm (8 inches) from the product and must
not lean on the product in case it is wall-mounted.
With a separation distance of 20 cm (8 inches) or
more, the M(aximum) P(ermissible) E(xposure)
limits are well above the potential this wireless
interface is capable to produce.
This transmitter must not be co-located or
operating in conjunction with any other antenna
or transmitter.
Restricted frequency bands
In case this product is equipped with a wireless
transceiver operating in the 2.4 GHz band, it may
only use channels 1 to 11 (2412 to 2462 MHz) on
U.S.A. territory.
In case this product is equipped with a wireless
transceiver operating in the 5 GHz band, it meets
all the other requirements specified in Part 15E,
Section 15.407 of the FCC Rules.
The availability of some specific channels and/or
operational frequency bands are country
dependent and are firmware programmed at the
factory to match the intended destination. The
firmware setting is not accessible by the end user.
This device complies with Part 15 of the
FCC Rules. Operation is subject to the
following two conditions: (1) this device
may not cause harmful interference, and
(2) this device must accept any
interference received, including
interference that may cause undesired
operation.

Si le produit est équipé d'un émetteur-récepteur
sans fil fonctionnant dans la bande des 2.4 GHz, il
utilise uniquement les canaux 1 à 11 (2 412 à
2 462 MHz) sur le territoire canadien.
Si le produit est équipé d'un émetteur-récepteur
sans fil fonctionnant dans la bande des 5 GHz, il
peut uniquement être utilisé dans un
environnement intérieur.
La disponibilité de certains canaux spécifiques et /
ou bandes de fréquences de fonctionnement sont
en fonction du pays et sont firmware programmé
en usine pour correspondre à la destination
prévue. Le réglage du firmware n’est pas
accessible par l’utilisateur.

ne peut être remplacée par un non-professionnel;
il n'y a dès lors pas de raison de l'ouvrir.
L'ouverture ou le retrait des couvercles peut vous
exposer à des tensions dangereuses. Un
remontage incorrect peut entraîner un choc
électrique lors de l’utilisation suivante.
Si votre appareil doit être réparé ou révisé,
confiez-le à un distributeur agréé.
Détérioration nécessitant une intervention
Débranchez ce produit de la prise murale et faites
effectuer la réparation par un service après-vente
qualifié dans les cas suivants :
• Si l'alimentation ou sa fiche sont
endommagées.
• Si un des câbles fournis est endommagé ou
effiloché.
• Si vous avez renversé du liquide dans le produit.
• Si le produit a été exposé à la pluie ou à de
l'eau.
• Si le produit ne fonctionne pas normalement.
• Si le produit est tombé ou a été endommagé
d'une façon quelconque.
• S’il y a un signe perceptible de surchauffe.
• Si le produit présente des variations
importantes au niveau des performances.
Débranchez immédiatement le produit si vous
remarquez qu'il s'en dégage une odeur de brûlé
ou de la fumée. Vous ne devez en aucun cas
ouvrir l'appareil vous-même car vous risquez
d'être électrocuté.
Protection du produit lors de son déplacement
Débranchez toujours le produit de sa source
d'alimentation lorsque vous le déplacez ou
lorsque vous branchez ou débranchez des câbles.
Classification des interfaces (sur l'applicabilité)
Les interfaces externes du produit sont spécifiées
comme suit :
• Cable (câble) : circuit TRT, non sujet à des
surtensions (TRT-1)
• MoCA, HPNA, RF : circuit TRT, non sujet à
des surtensions (TRT-1)
• Tous les autres ports d'interface (par example,
HDMI, audio / vidéo analogique, Ethernet,
USB, etc.) y compris l'entrée d'alimentation
basse tension depuis l'alimentation du réseau :
circuits TBTS
Avis réglementaire
L’appareil doit être installé et utilisé en stricte
conformité avec les instructions du fabricant,
énoncées dans la documentation accompagnant
le produit.
Avant d’installer ou d’utiliser le produit, lisez
attentivement ce document afin de prendre
connaissance des restrictions spécifiques à
l’appareil ou des règles en vigueur dans le pays où
vous comptez l’utiliser.
Dans certains environnements ou circonstances,
l’emploi de dispositifs sans fil peut être prohibé
par le propriétaire du bâtiment ou les
représentants responsables de l’organisation
concernée.
En cas de doute quant à la politique s’appliquant à
l’utilisation d’équipements sans fil dans une
organisation ou un environnement spécifique (par
exemple dans les aéroports), il est recommandé
de demander la permission d’utiliser l’appareil
avant de l’allumer.
Technicolor n’est pas responsable des
interférences avec les postes de radio ou de
télévision susceptibles de survenir à la suite d’une
modification non autorisée de l’appareil ou du
remplacement ou de la connexion de câbles et
d’équipements non agréés par Technicolor. C’est
par conséquent à l’utilisateur qu’il incombe de
remédier aux interférences causées par de telles
manipulations.
Technicolor et ses revendeurs et distributeurs
agréés déclinent toute responsabilité quant aux
dommages ou violation des réglementations
nationales découlant du non-respect de ces
instructions.
Amérique du Nord – Canada
Déclaration Canadienne d’interférence de
Fréquence Radio
Cet appareil numérique de Classe B est
conforme à la norme canadienne NMB-003.
Le présent produit est conforme aux
spécifications techniques applicables
d'Innovation, Sciences et Développement
Économique Canada.
Canada - Industrie Canada (IC)
Si le produit est équipé d'un émetteur-récepteur
sans fil, il est conforme aux CNR d’Industrie
Canada applicables aux appareils radio exempts
de licence. L’exploitation est autorisée aux deux
conditions suivantes : (1) l’appareil ne doit pas
produire de brouillage; (2) l’appareil doit accepter
tout brouillage radioélectrique subi, même si le
brouillage est susceptible d’en compromettre le
fonctionnement.
Canada - Avis radiation énoncées
Cet équipement est conforme avec les limites
d’exposition aux radiations IC énoncées pour un
environnement incontrôlé. Il doit être installé et
opéré avec une distance minimale de 20 cm
(8 pouces) entre la source de radiation et votre
corps.
Bandes de fréquences restreintes

Alimentation électrique
L'alimentation du produit doit respecter les
spécifications en matière d'alimentation figurant
sur les étiquettes.
Dans le cas où ce produit est alimenté par un bloc
d'alimentation :
• L'alimentation doit être de classe II, être une
source à puissance limitée conformément aux
exigences de la norme CEI 60950-1/
EN 60950-1, clause 2.5, aux caractéristiques
nominales comme indiquées sur l’étiquette
fixée sur le produit. Elle doit être testée et
répondre aux normes nationales ou locales.
• Pour États-Unis et Canada : Ce produit est
destiné à être alimenté par une source
d'alimentation directe certifiée UL de
«Classe 2» et considéré comme indiqué sur
l'étiquette de votre produit.
Utilisez uniquement le bloc d'alimentation livré
avec votre produit. L'utilisation d'autres types de
sources d'énergie est interdite. Si vous n'êtes pas
certain du type d'alimentation nécessaire, veuillez
consulter la documentation fournie avec le
produit ou contacter votre revendeur local.
Accessibilité
L'alimentation électrique est un moyen de
déconnecter ce produit. Assurez-vous donc que
le socle de la prise dans laquelle vous branchez le
cordon d'alimentation est facilement accessible,
et est située le plus près possible de l'équipement.
Les connexions d'alimentation au produit et la
prise d'alimentation doit être accessible à tout
moment, de sorte que vous pouvez toujours
déconnecter le produit rapidement et en toute
sécurité de l'alimentation.
Surcharge
Ne surchargez pas les prises du réseau
d'alimentation ni les rallonges car ceci augmente
les risques d'incendie et de choc électrique.
Manipulation des piles
Ce produit (ou sa télécommande) peuvent
contenir des piles jetables.
• Insérez les piles correctement. Il existe un risque
d'explosion si les piles ne sont pas insérées
correctement.
• N'essayez pas de recharger des piles «jetables»
ou «non rechargeables».
• Veuillez suivre les instructions fournies
concernant la charge de piles «rechargeables».
• Remplacez les piles uniquement par des piles
identiques ou équivalentes.
• N'exposez pas les piles à une chaleur excessive
(à la chaleur du soleil ou au feu, par exemple) et
des températures supérieures à 100 °C
(212 °F).
Piles bouton
Distribution par câble
Le blindage du câble coaxial de cet appareil doit
être relié à la terre le plus près possible du point
d’entrée du câble dans le bâtiment..
En ce qui concerne les produits vendus au
Canada, ce rappel vise à attirer l'attention de
l'installateur du système sur ANSI/NFPA 70,
National Electrical Code (NEC), en particulier
l'article 820.93 (ou Code canadien de l'électricité,
partie 1), qui fournissent les instructions pour une
mise à la terre correcte de la protection du câble
coaxial.
Limiter l'exposition du corps humain aux champs
électromagnétiques
Cet produit doit être installé et opéré avec une
distance minimale de 20 cm (8 pouces) entre la
source de radiation et votre corps.
Entretien
Pour réduire les risques de choc électrique, ne
démontez pas ce produit. Aucune de ses pièces
internes
!
AVERTISSEMENT
Il existe un risque d'explosion si les piles
ne sont pas correctement manipulées ou
remplacées. Ne remplacez les piles que
par des piles de même type. Ne
démontez pas et ne tentez pas de
recharger les piles hors du système.
N'écrasez pas les piles, ne les percez pas,
ne les jetez pas au feu, ne courtcircuitez
pas les contacts externes et ne les
exposez pas à l'eau ou à d'autres
matières liquides.
!
AVERTISSEMENT
Ne pas ingérer la pile!
Danger de brûlure chimique
Ce produit, ou la télécommande fournie
avec ce produit contient une pile bouton.
Si la pile bouton est avalée, elle peut
provoquer de graves brûlures internes en
2 heures seulement et peut entrainer la
mort.
Conserver les piles neuves et usées hors
des portée des enfants. Si le
compartiment pile ne se ferme pas
correctement, cesser d’utiliser le produit
et tenir hors de portée des enfants.
En cas de doute concernant le fait que
les piles pourraient avoir été avalées ou
introduites dans une partie quelconque
du corps, consulter immédiatement un
médecin.
La page est en cours de chargement...
La page est en cours de chargement...
La page est en cours de chargement...
-
 1
1
-
 2
2
-
 3
3
-
 4
4
-
 5
5
-
 6
6
-
 7
7
-
 8
8
-
 9
9
-
 10
10
-
 11
11
-
 12
12
-
 13
13
-
 14
14
-
 15
15
-
 16
16
-
 17
17
-
 18
18
-
 19
19
-
 20
20
-
 21
21
-
 22
22
-
 23
23


Technicolor UIW8001 Guide d'installation
- Catégorie
- Équipement musical supplémentaire
- Taper
- Guide d'installation
- Ce manuel convient également à
dans d''autres langues
Documents connexes
Autres documents
-
CONTINENTAL EDISON CELED43UHD21B7 Manuel utilisateur
-
Amazon GA5Z9L Fire TV Cube Handsfree Streaming Device Manuel utilisateur
-
Motorola VIP2502W Guide d'installation
-
-
 ARRIS Group ACQ-VIP5662W Manuel utilisateur
-
Sanyo HT30744 Le manuel du propriétaire
-
-
Philips 32PFL5332D/37 Le manuel du propriétaire
-
-
Philips 50PF7321D/37 Manuel utilisateur
