Whirlpool RMC305PVS00 Le manuel du propriétaire
- Catégorie
- Micro-ondes
- Taper
- Le manuel du propriétaire

W10192044A
BUILT-IN
MICROWAVEOVEN
For questions about features, operation/performance,
parts, accessories or service, call: 1-800-253-1301.
or visit our website at...
www.whirlpool.com
In Canada, call for assistance, installation or service, call:
1-800-807-6777 or visit our website at...
www.whirlpoola pplia nces.ca
FOURAMICRO.ONDES
ENCASTRE
Pour des questions b.propos des caract6ristiques, du fonctionnement/
rendement, des pieces, accessoires ou service, composez le :
1-800-807-6777.
ou visitez notre site Web
www.whirlpoola pplia nces.ca
Table of Contents/Table des matieres .......... 2
Models/ModUles
RM0275 RMC305

TABLEOFCONTENTS
MICROWAVE OVEN SAFETY ........................................................ 3
Electrical Requirements ............................................................... 4
MICROWAVE OVEN CONTROL .................................................... 5
MICROWAVE OVEN USE .............................................................. 5
Food Characteristics .................................................................... 5
Cooking Guidelines ...................................................................... 6
Cookware and Dinnerware .......................................................... 6
Aluminum Foil and Metal ............................................................. 7
Microwave Cooking Power .......................................................... 7
Cook Power .................................................................................. 8
Add A Minute ................................................................................ 9
CookA Bit More ........................................................................... 9
Memory ........................................................................................ 9
Interrupt Cooking ......................................................................... 9
Auto Cook .................................................................................... 9
Cooking in Stages ........................................................................ 9
Reheating ................................................................................... 10
Defrost ........................................................................................ 10
Popcorn ...................................................................................... 11
Beverage .................................................................................... 11
Baked Potato ............................................................................. 12
Warm Hold ................................................................................. 12
MICROWAVE OVEN CARE .......................................................... 12
General Cleaning ........................................................................ 12
TROUBLESHOOTING .................................................................. 13
ASSISTANCE OR SERVICE ......................................................... 14
WAR RANTY .................................................................................. 15
TABLEDESMATIERES
SI_CURITI_ DU FOUR .AMICRO-ONDES .................................... 16
Specifications electriques .......................................................... 17
COMMANDE DU FOUR .&MICRO-ONDES ............................... 18
UTILISATION DU FOUR .A MICRO-ONDES ............................... 18
Caracteristiques des aliments .................................................... 18
Guide de cuisson ........................................................................ 19
Ustensiles de cuisson et vaisselle .............................................. 19
Papier d'aluminium et metal ....................................................... 19
Puissance de cuisson des micro-ondes .................................... 20
Cook Power (puissance de cuisson) .......................................... 20
Add A Minute (ajouter une minute) ............................................ 21
Cook A Bit More (cuireun peu plus) .......................................... 21
Memory (memoire) ..................................................................... 21
Interruption de la cuisson ........................................................... 22
Auto Cook (cuisson automatique) .............................................. 22
Cuisson par etapes .................................................................... 22
Rechauffage ............................................................................... 23
Defrost (decong61ation).............................................................. 23
Ma'fs eclat6 ................................................................................. 24
Beverage (boisson)..................................................................... 24
Baked Potato (pomme de terre au four) .................................... 25
Warm Hold (garde au chaud) ..................................................... 25
ENTRETIEN DU FOUR ,&MICRO-ONDES ................................. 25
Nettoyage gen6ral ...................................................................... 25
DI_PAN NAGE................................................................................. 26
ASSISTANCE OU SERVICE ......................................................... 27
GARANTIE ..................................................................................... 27
2

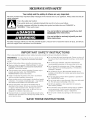
MICROWAVEOVENSAFETY
Your safety and the safety of others are very important.
We have provided many important safety messages in this manual and on your appliance. Always read and obey all
safety messages.
This is the safety alert symbol.
This symbol alerts you to potential hazards that can kill or hurt you and others.
All safety messages will follow the safety alert symbol and either the word "DANGER" or
"WARNING." These words mean:
You can be killed or seriously injured if you don't
immediately follow instructions.
You can be killed or seriously injured if you don't
follow instructions.
All safety messages will tell you what the potential hazard is, tell you how to reduce the chance of injury, and tell you
what can happen if the instructions are not followed.
iMPORTANT SAFETY iNSTRUCTiONS
When using electrical appliances basic safety precautions should be
WARNING: To reduce the risk of burns, electric shock,
fire, injury to persons, or exposure to excessive microwave
energy:
[] Read all instructions before using the microwave oven.
[] Read and follow the specific "PRECAUTIONS TO AVOID
POSSIBLE EXPOSURE TO EXCESSIVE MICROWAVE
ENERGY" found in this section.
[] The microwave oven must be grounded. Connect only to
properly grounded outlet. See "GROUNDING
INSTRUCTIONS" found in this section.
[] Install or locate the microwave oven only in accordance
with the provided Installation Instructions.
[] Some products such as whole eggs in the shell and sealed
containers = for example, closed glass jars = may explode
and should not be heated in the microwave oven.
[] Use the microwave oven only for its intended use as
described in this manual. Do not use corrosive chemicals
or vapors in the microwave oven. This type of oven is
specifically designed to heat, cook, or dry food. tt is not
designed for industrial or laboratory use.
[] Oversized foods or oversized metal utensils should not be
inserted in the microwave oven as they may create a fire or
risk of electric shock.
followed, including the following:
[] Do not clean with metal scouring pads. Pieces can burn off
the pad and touch electrical parts involving a risk of electric
shock.
[] Do not store any materials, other than manufacturer's
recommended accessories, in this oven when not in use.
[] Do not operate the microwave oven if it has a damaged
cord or plug, if it is not working properly, or if it has been
damaged or dropped.
[] Do not deep fry in oven. Microwavable utensils are not
suitable and it is difficult to maintain appropriate deep frying
temperatures.
[] Do not use paper products when appliance is operated in
the "PAN BROWN" mode.
[] Do not cover racks or any other part of the oven with metal
foil. This will cause overheating of the oven.
[] As with any appliance, close supervision is necessary
when used by children.
[] The microwave oven should be serviced only by qualified
service personnel. Contact nearest authorized service
company for examination, repair, or adjustment.
[] Do not cover or block any openings on the microwave
oven.
SAVE THESE INSTRUCTIONS

m
iMPORTANT SAFETY
Liquids, such as water, coffee, or tea are able to be
overheated beyond the boiling point without appearing to be
boiling. Visible bubbling or boiling when the container is
removed from the microwave oven is not always present.
THIS COULD RESULT IN VERY HOT LIQUIDS
SUDDENLY BOILING OVER WHEN THE CONTAINER tS
DISTURBED OR A SPOON OR OTHER UTENSIL tS
INSERTED INTO THE LtQUID.
To reduce the risk of injury to persons:
- Do not overheat the liquid.
- Stir the liquid both before and halfway through heating it.
- Do not use straight-sided containers with narrow necks.
= After heating, allow the container to stand in the
microwave oven for a short time before removing the
container.
= Use extreme care when inserting a spoon or other utensil
into the container.
INSTRUCTIONS
[] Do not store the microwave oven outdoors. Do not use this
product near water - for example, near a kitchen sink, in a
wet basement, or near a swimming pool, and the like.
[] See door surface cleaning instructions in the "Oven Care"
section.
[] To reduce the risk of fire in the oven cavity:
- Do not overcook food. Carefully attend the microwave
oven if paper, plastic, or other combustible materials are
placed inside the oven to facilitate cooking.
- Remove wire twist-ties from paper or plastic bags before
placing bags in oven.
- tf materials inside the oven should ignite, keep oven door
closed, turn oven off, and disconnect the power cord, or
shut off power at the fuse or circuit breaker panel.
= Do not use the cavity for storage purposes. Do not leave
paper products, cooking utensils, or food in the cavity
when not in use.
SAVE THESE INSTRUCTIONS
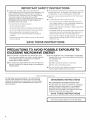
PRECAUTIONS TO AVOID POSSIBLE EXPOSURE TO
EXCESSIVE MICROWAVE ENERGY
(a) Do not attempt to operate this oven with the door open
since open-door operation can result in harmful exposure
to microwave energy. It is important not to defeat or
tamper with the safety interlocks.
(b) Do not place any object between the oven front face and
the door or allow soil or cleaner residue to accumulate on
sealing surfaces.
(c) Do not operate the oven if it is damaged. It is particularly
important that the oven door close properly and that there
is no damage to the:
(1) Door (bent),
(2) Hinges and latches (broken or loosened),
(3) Door seals and sealing surfaces.
(d) The oven should not be adjusted or repaired by anyone
except properly qualified service personnel.
The microwave oven is connected to a 110 volt side of the
240 volt circuit required for the lower oven. If the incoming
voltage to the microwave oven is less than 110 volts cooking
times may be longer. Have a qualified electrician check your
electrical system.
GROUNDmNG NSTRUCT ONS
For a permanently connected microwave oven:
The microwave oven must be connected to a grounded,
metallic, permanent wiring system, or an equipment
grounding conductor should be run with the circuit
conductors and connected to the equipment grounding
terminal or lead on the microwave oven.
SAVE THESE NSTRUCT ONS
I
This device complies with Part 18 of the FCC Rules.

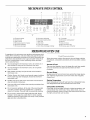
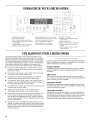
MICROWAVEOVENCONTROL
A
BAKE
TBMP
CUSTOM
BNOIL
©©
COOK DELAY
TIME TIME
©©
OVEN AUTO
LIGHT CLEAN
CCUBAKE
© BoN M,N @ ..........
;,,o; T,v ......
._.............................. LOWER OVEN
K
B CDEFGHI J
ooo
dda B AT b /_OST AUTO
mB_t_ COOK
9
L M N 0 P O R
A. Electronic display
B. Number pads
C.Add a minute
D. Microwave popcorn (3 sizes)
E.Microwave reheating
F. Microwave beverage
G. Microwave defrosting
H. Microwave baked potato
I. Auto cook
J. Warm hold
K. Lower oven controls
L. Micro time (multistage cooking)
M. "0" quantity
N. Microwave cooking power
O. Memory
P. Cook a bit more
Q. Start microwave oven
R. Microwave upper off/cancel
MICROWAVEOVENUSE
A magnetron in the microwave oven produces microwaves which
reflect off the metal floor, walls and ceiling and pass through the
turntable and appropriate cookware to the food. Microwaves are
attracted to and absorbed by fat, sugar and water molecules in
the food, causing them to move, producing friction and heat
which cooks the food.
• To avoid damage to the microwave oven, do not lean on or
allow children to swing on the microwave oven door.
• To avoid damage to the microwave oven, do not operate
when it is empty.
• Baby bottles and baby food jars should not be heated in
microwave oven.
• Clothes, flowers, fruit, herbs, wood, gourds, paper, including
brown paper bags and newspaper, should not be dried in
microwave oven.
• Paraffin wax will not melt in the microwave oven because it
does not absorb microwaves.
• Use oven mitts or pot holders when removing containers from
microwave oven.
• Do not overcook potatoes. At the end of the recommended
cook time, potatoes should be slightly firm. Let potatoes
stand for 5 minutes. They will finish cooking while standing.
• Do not cook or reheat whole eggs inside the shell. Steam
buildup in whole eggs may cause them to burst, requiring
significant cleanup of microwave oven cavity. Cover poached
eggs and allow a standing time.
When microwave cooking, the amount, size and shape, starting
temperature, composition and density of the food affect cooking
results.
Amount of Food
The more food heated at once, the longer the cook time needed.
Check for doneness and add small increments of time if
necessary.
Size and Shape
Smaller pieces of food will cook more quickly than larger pieces,
and uniformly shaped foods cook more evenly than irregularly
shaped food.
Starting Temperature
Room temperature foods will heat faster than refrigerated foods,
and refrigerated foods will heat faster than frozen foods.
Composition and Density
Foods high in fat and sugar will reach a higher temperature, and
will heat faster than other foods. Heavy, dense foods, such as
meat and potatoes, require a longer cook time than the same size
of a light, porous food, such as cake.

Covering
Covering food helps retain moisture, shorten cook time and
reduce spattering. Use the lid supplied with cookware. If a lid is
not available, wax paper, paper towels or plastic wrap approved
for microwave ovens may be used. Plastic wrap should be turned
back at one corner to provide an opening to vent steam.
Condensation on the door and cavity surfaces is normal during
heavy cooking.
Stirring and Turning
Stirring and turning redistribute heat evenly to avoid overcooking
the outer edges of food. Stir from outside to center. If possible,
turn food over from bottom to top.
Arranging
If heating irregularly shaped or different sized foods, arrange the
thinner parts and smaller sized items toward the center. If
cooking several items of the same size and shape, place them in
a ring pattern, leaving the center of the ring empty.
Piercing
Before heating, use a fork or small knife to pierce or prick foods
that have a skin or membrane, such as potatoes, egg yolks,
chicken livers, hot dogs, and sausage. Prick in several places to
allow steam to vent.
Shielding
Use small, flat pieces of aluminum foil to shield the thin pieces of
irregularly shaped foods, bones and foods such as chicken
wings, leg tips and fish tail. See "Aluminum Foil and Metal" first.
Standing Time
Food will continue to cook by the natural conduction of heat even
after the microwave cooking cycle ends. The length of standing
time depends on the volume and density of the food.
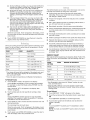
Cookware and dinnerware must fit on the turntable. Always use
oven mitts or pot holders when handling because any dish may
become hot from heat transferred from the food. Do not use
cookware and dinnerware with gold or silver trim. Use the
following chart as a guide, then test before using.
MATERIAL RECOMMENDATIONS
Aluminum Foil, See "Aluminum Foil and Metal" section.
Metal
Browning Dish Bottom must be at least 3/16" (5 mm)
above the turntable. Follow manufacturer's
recommendations.
Ceramic Glass, Acceptable for use.
Glass
China, Follow manufacturer's recommendations.
Earthenware
Melamine Follow manufacturer's recommendations.
Paper: Towels, Use nonrecycled and those approved by
Dinnerware, the manufacturer for microwave oven use.
Napkins
Plastic: Wraps, Use those approved by the manufacturer
Bags, Covers, for microwave oven use.
Dinnerware,
Containers
Pottery and Clay Follow manufacturer's recommendations.
Silicone Follow manufacturer's recommendations.
Bakeware
Straw, Wicker, Do not use in microwave oven.
Wooden
Containers
Wax Paper Acceptable for use.
To Test Cookware or Dinnerware for Microwave Use:
1. Place cookware or dinnerware in microwave oven with
1 cup (250 mL) of water beside it.
2. Cook at 100% cooking power for 1 minute.
Do not use cookware or dinnerware if it becomes hot and the
water stays cool.
6

Always use oven mitts or pot holders when removing dishes from
the microwave oven.
Aluminum foil and some metal can be used in the microwave
oven. If not used properly, arcing (a blue flash of light) can occur
and cause damage to the microwave oven.
OK for Use
Racks and bakeware supplied with the microwave oven (on some
models), aluminum foil for shielding, and approved meat
thermometers may be used with the following guidelines:
• To avoid damage to the microwave oven, do not allow
aluminum foil or metal to touch the inside cavity walls,
ceiling or floor.
• Always use the turntable.
• To avoid damage to the microwave oven, do not allow
contact with another metal object during microwave cooking.
Do Not Use
Metal cookware and bakeware, gold, silver, pewter, non-
approved meat thermometers, skewers, twist ties, foil liners
such as sandwich wrappers, staples and objects with gold or
silver trim or a metallic glaze should not be used in the
microwave oven.
Many recipes for microwave cooking specify which cooking
power to use by percent, name or number. For example,
70%=7=Medium-High.
Use the following chart as a general guide for the suggested
cooking power of specific foods.
PERCENT/NAME NUMBER USE
100%, High 10 Quick heating convenience
(default setting) foods and foods with high
water content, such as soups,
beverages and most
vegetables.
90% 9
8O%
Cooking small, tender pieces
of meat, ground meat, poultry
pieces and fish fillets.
Heating cream soups.
Heating rice, pasta or stirrable
casseroles.
Cooking and heating foods
that need a cook power lower
than high. For example, whole
fish and meat loaf.
70%, 7 Reheating a single serving of
Medium-High food.
60% 6 Cooking sensitive foods such
as cheese and egg dishes,
pudding and custards.
Cooking non-stirrable
casseroles, such as lasagna.
50%, Medium 5 Cooking ham, whole poultry
and pot roasts.
Simmering stews.
40% 4 Melting chocolate.
Heating bread, rolls and
pastries.
30%, Medium- 3 Defrosting bread, fish, meats,
Low, Defrost poultry and precooked foods.
20% 2 Softening butter, cheese, and
ice cream.
10%, Low 1 Taking chill out of fruit.

To Use:
1. Put food into oven and close door,
2. Touch number pads to set a length of time to cook, Oven
automatically cooks at high cook power,
3. Touch COOK POWER to set a cooking power other than
100%, Each time you touch Cook Power, the cook power will
decrease by 10%, Choose a cooking power using the
Cooking Power chart,
4. Touch START, The display will count down the cook time,
MICROWAVE COOK TIME CHART
NOTES:
• If you want to add more time during or after cooking, use Add
A Minute or Cook A Bit More.
• To reset the cooking time after setting the Cook Power, you
must type in 4 digits.
• To change cooking time after cooking has started, first open
and close the door. Then, enter the desired cooking time as
described above, and touch START.
• When cooking time ends, "End" will appear on the display,
and 4 tones will sound.
• For additional cooking and reheating information, see the
following Microwave Cook Time Chart.
These times are approximate and may need to be adjusted to suit individual taste.
FOOD COOK TIME (in minutes and seconds) COOK POWER
Meats, Poultry, Fish, Seafood
Ground Beef for Casseroles (1 Ib [0.45 kg]) 5:00-6:00 100%
Ground Beef Patties (2) Side 1: 2:00, Side 2:1:30-2:30 100%
Ground Beef Patties (4) Side 1: 2:30, Side 2:2:00-3:00 100%
Meat Loaf (1V2Ibs [0.7 kg]) 20:00-25:00 70%
Chicken Pieces (3-3.5 Ibs [1.36-1.59 kg]) 15:00-28:00 100%
Internal temperature should be 185°F (85°C) after standing.
Chicken Breast, Halves 5:30-7:30 100%
skinless, boneless (four-1.5 Ibs [0.68 kg] total weight)
Internal temperature should be 185°F (85°C) after standing.
Turkey Breast, Whole 10:00, then 100%,
Internal temperature should be 185°F (85°C) after standing. 30:00-40:00 50%
Fish Fillets, Unbreaded (1 Ib [0.45 kg]) 4:30-7:00 100%
Shrimp (1 Ib [0.45 kg]) 5:00-8:00 100%
Scallops (1.5 Ibs [0.68 kg]) 6:00-9:00 100%
Other
Baked Apples (4 large) 5:00-10:00 100%
Chocolate (melt 1 square) 1:00-2:00 50%
Eggs, Scrambled (2) 1:15-1:45 100%
Eggs, Scrambled (4) 2:00-3:00 100%
Eggs, Poached (1-2) 1:00-1:30 50%
Rice, Parboiled (1 cup [250 mL] uncooked) 5:00 then, 100%
13:00-15:00 50%
Nachos (large plate) 1:30-3:00 50%
Pie, reheated (1 slice) 0:45-1:00 70%
Pie, reheated (2 slices) 1:30-1:45 70%
8

Add A Minute lets you cook food for 1 minute at 100% cook
power or add 1 or more minutes to your Micro Time cooking
cycle. To add cooking time during Micro Time cooking, touch
ADD A MINUTE once for each extra minute.
• You can enter Add A Minute only after closing the door.
When cooking time ends, 4 tones will sound and repeat every
minute until you open the oven door or touch UPPER OFF/
CANCEL. This will clear the display.
Cook A Bit More lets you add time to original cook times of
4 minutes or less. You may use Cook A Bit More after or during
cooking.
Within a minute after cooking time ends, open the oven door. Do
not touch UPPER OFF/CANCEL. This gives you the opportunity
to check for doneness. Next, close the oven door and touch
COOK A BIT MORE. The oven will cook your food for a
percentage of the original cook time at the original cook power.
• During cooking, Cook A Bit More works with all other
microwave functions except Defrost, with original cooking
times of 4 minutes or less.
During multistage cooking, Cook A Bit More works only with the
final cooking stage.
By programming the Memory pad, you can recall the cooking
instructions previously placed in memory and begin cooking
quickly. For example, if you heat a roll every morning, program
the cooking steps into Memory.
Memory also lets you program a cooking time and cook power
for another person to cook at a later time.
To program Memory:
1. Set a cook time. For example for 20 seconds, touch 2 and 0,
":20" will appear in the display.
2. Touch COOK POWER. Touch repeatedly to set a Cook Power
other than 100%.
3. Touch and hold MEMORY for 5 seconds. "SAVED" will
appear in the display.
To use Memory:
1. Touch MEMORY. The oven will cook according to your
preprogrammed instructions.
When the cycle ends, "End" will appear in the display, 4 end-
of-cycle tones will sound, and the reminder tones will sound
every minute.
2. Touch UPPER OFF/CANCEL or open the door to clear the
display and/or stop reminder tones.
_H_:_}_ ¸___......_ ..........
........... }...,.OH s,,_
Youcan stop the oven during a cycle by opening the door. The
oven stops heating and the fanstops, but the light stays on. To
restart cooking, close the door and touch START.
If you do not want to continue cooking, close the door and the
light goes off, or touch UPPEROFF/CANCEL.
Times and cooking power have been preset for certain
microwavable foods. Use the following chart as a guide.
FOOD PAD QUANTITY
Frozen Entree 1 9 oz, 11 oz or 26 oz (255 g,
312 g or 454 g)
Casserole 2 2-8 cups (473 mL-1.89 L)
Frozen Vegetables 3 1-4 cups (250 mL-1 L)
Bacon* 4 1-6 slices, average
thickness
Fresh Vegetables 5 1-4 cups (250 mL-1 L)
Frozen Burrito 6 1-4 pieces
Hot Dogs 7 1-6 pieces
*Differences in the amount of fat, meat, thickness, and curing
process affect results. Average is 16 slices per pound.
To Use Auto Cook:
1. Touch AUTO COOK. "CODE" will appear on the display.
2. Touch number pad from chart
OR
Touch AUTO COOK repeatedly to scroll through foods.
3. Touch 0 QUANTITY (number pad "0") pad to enter quantity.
NOTE: You must use the 0 QUANTITY pad to select quantity
settings for a frozen entree, a casserole, bacon or hot dogs.
4. Touch START or wait 5 seconds for oven to start
automatically.
The display will count down the cook time.
When the cycle ends, "End" will appear in the display, 4 end-
of-cycle tones will sound, and then reminder tones will sound
every minute for 15 minutes.
5. Touch UPPER OFF/CANCEL or open the door to clear the
display and/or stop reminder tones.
6 i ok s{,i" <
The microwave oven can be set to cook at different cooking
powers for various lengths of time, up to 3 stages.
To Cook in Stages:
1. Touch the number pads to set a length of cook time for the
first stage.
2. Touch COOK POWER and then enter a cook power (if other
than 100%) from the Cooking Power chart. "TIME" will
appear in the display.
3. Touch MICRO TIME to start programming next stage.
4. Repeat the above steps for second and third stage
programming.
The numbers "1 ," "2" and/or "3" will appear in the upper oven
display during programming.
5. Touch START when cook times and cook powers have been
entered.
The oven display will count down each of the cook times. The
numbers "1 ," "2" or "3" will appear in the display during their
respective stages.

6=
During multistage cooking, you may use Add A Minute to
increase any stage's cooking time. When the stage you
want to change is active, touch ADD A MINUTE.
During the last stage, you may also touch COOK A BIT
MORE to increase the cooking time. Cook A Bit More
increases the last stage's remaining cooking time by
adding a percentage of the last stage's expired cooking
time.
• If the last stage is Micro Time, you may use Cook A Bit
More after cooking. Within 1 minute after cooking, open
the oven door to check for doneness. Then close the
oven door and touch COOK A BIT MORE. The food will
cook for a percentage of the last stage's cook time using
the last stage's cook power level.
• You may set up Warm Hold to follow multistage cooking,
and you may use Cook A Bit More with Warm Hold.
However, Warm Hold uses low cook power and lasts up
to 99 minutes.
When the cycle ends, "End" will appear in the display, 4 end-
of-cycle tones will sound, and then reminder tones will sound
every minute.
Touch UPPER OFF/CANCEL or open the door to clear the
display and/or stop reminder tones.
Times and cooking powers have been preset for reheating 7 food
types. You do not have to enter times or temperatures. Use the
following chart as a guide.
FOOD CODE QUANTITY
Dinner Plate 1 1 to 2 servings
Bread** 2 1 to 6 slices
Meats 3 1 to 6 servings
Cheese Dip* 4 1 to 3 cups (250-750 mL)
Soup* 5 1 to 4 cups (250 mL-1 L)
Sauce* 6 1 to 3 cups (250-750 mL)
Pizza 7 1 to 2 servings
*Four tones will sound at the midpoint of the reheat cycle, and
"STIR" will appear in the display. Stir food if desired, close
door, and touch START.
**Does not apply to bread slices at refrigerator temperatures.
To Reheat Foods:
1. Touch REHEAT. "CODE" will appear in the display.
Touch REHEAT repeatedly to scan and select food settings.
For example, to select the Bread setting, REHEAT must be
touched twice.
2=
After 3 seconds "QTY" will appear in the display, then
"SRVG" will appear.
Touch number pads to enter quantity (in servings, strips
or cups)
OR
Touch 0 QUANTITY (number pad "0") to scan and select
quantities. For example, to select the quantity of 2 servings,
0 QUANTITY must be touched twice.
3. Touch START or wait 5 seconds and the microwave oven will
start automatically.
The remaining time will count down.
When the cycle ends, "End" will appear in the display, 4 end-
of-cycle tones will sound, and then reminder tones will sound
every minute.
4. Touch upper oven UPPER OFF/CANCEL or open the door to
clear the display and/or stop reminder tones.
The Defrost feature can be used, or the microwave oven can be
manually set to defrost by using 20% cook power.
• Unwrap foods and remove lids (from fruit juice) before
defrosting. Remove any metal twist-ties and replace them
with strings or elastic bands.
• If food is foil wrapped, remove foil and place it in a suitable
container.
• Slit or pierce plastic pouches or packaging. Slit the skins, if
any, of frozen food such as sausage.
• Bend plastic pouches of food to ensure even defrosting.
• Always underestimate defrosting time. If defrosted food is still
icy in the center, return it to the microwave oven for more
defrosting.
• The length of defrosting time varies according to how solidly
the food is frozen.
• Shallow packages will defrost more quickly than deep blocks.
• Separate food pieces as soon as possible during or at the
end of a cycle for more even defrosting.
• Foods left outside the freezer for more than 20 minutes or
frozen ready-made food should not be defrosted using the
Custom Defrost feature, but should be defrosted manually.
• Use small pieces of aluminum foil to shield parts of food such
as chicken wings, leg tips and fish tails. See "Aluminum Foil
and Metal" first.
DEFROST CHART
The Custom Defrost system has 6 categories: Meat, Poultry, Fish,
Bagel, Fruit Juice, and Roll/Muffin. Use the following chart as a
guide.
FOOD CODE WEIGHT OR QUANTITY
SETTING
Meats* 1 0.1 to 6.6 Ibs (45 g to 3 kg)
Poultry* 2 0.1 to 6.6 Ibs (45 g to 3 kg)
Fish* 3 0.1 to 4.4 Ibs (45 g to 1.34 kg)
Bagel** 4 1 to 6 pieces
Fruit Juice 5 6, 12 or 16 oz (170, 340 or 454 g)
Roll/Muffin 6 1 to 6 pieces
*See Preparation chart at end of "Defrost" section for cuts,
sizes, and instructions.
**Bagel quantity settings 1 and 2 may appear to have longer
defrost times than necessary; however, longer times use less
cooking power.
To use Defrost:
1. Touch DEFROST. "CODE" will appear in the display.
2. Touch the number pad from the Defrost chart to select food
OR
Touch DEFROST repeatedly to scroll through foods.
3. Touch number pads from the Defrost chart to select the
weight or quantity
OR
Touch 0 QUANTITY (number pad "0") repeatedly to select
quantity.
NOTE: You must use 0 QUANTITY pad to select a fruit juice
quantity.
10

4=
5=
Touch START or wait 5 seconds, and the microwave oven will
start automatically.
The display will count down the defrost time. For better
results, a preset standing time is included in the defrosting
time. This may make the defrosting time seem longer than
expected.
If you have chosen settings 1,2 or 3, four tones will sound in
the middle of the cycle and "TURN" will appear in the display
for 5 seconds. Turn food if desired, close door, and touch
START.
When the cycle ends, "End" will appear in the display, 4 end-
of-cycle tones will sound, and then reminder tones will sound
every minute.
Touch UPPER OFF/CANCEL or open the door to clear the
display and/or stop reminder tones.
MEAT, POULTRY AND FISH DEFROST PREPARATION
Use the following chart as a guide when defrosting meat, poultry,
or fish. When setting the Defrost cycle, the net weight must be
entered in pounds and tenths of pounds.
MEAT
Beef."ground, steaks, roast, The narrow or fatty areas of
stew irregular shaped cuts should
be shielded with foil before
Lamb: stew and chops defrosting.
Pork: chops, ribs, roasts, Do not defrost less than
sausage 1AIb (113 g) or two
4 oz (113 g) patties.
Place all meats in microwave-
safe baking dish.
POULTRY
Chicken: whole and cut up Place in microwave-safe
baking dish, chicken breast
Cornish hens side up.
Turkey: breast Remove giblets from whole
chicken.
FISH
Fillets, Steaks, Whole, Place in microwave-safe
Shellfish baking dish.
BAG SIZE TOUCH PAD
3.5 oz (99 g) Once
3.0 oz (85 g) Twice
1.75 oz (50 g) Three times
To use POPCORN:
1. Touch POPCORN (3 SIZES).
The microwave oven will be set to automatically begin the
pop setting for the 3.5 oz (99 g) bag size.
Touch POPCORN (3 SIZES) repeatedly to scan and select
bag size.
2. Touch START or wait 5 seconds for the popping to begin
automatically.
The upper oven display will count down the popping time.
Time may be added to popping time by touching COOK A
BIT MORE during or after popping.
When the popcorn cycle ends, "End" will appear in the
display, 4 end-of-cycle tones will sound, and then reminder
tones will sound every minute.
Touch upper oven UPPER OFF/CANCEL or open the door to
clear the display and/or stop reminder tones.
The Beverage feature heats beverages based on beverage type
and serving temperature you choose.
To Use:
1. Touch BEVERAGE. "BEVRG" and "CODE" will appear in the
display.
2. Touch BEVERAGE repeatedly until the type of beverage you
want appears on the display. For example, "TEA."
OR
Touch number pad from chart to select beverage type.
TYPE OF TOUCH NUMBER PAD
BEVERAGE BEVERAGE PAD
Coffee Once 1
Tea Twice 2
Hot Chocolate 3 Times 3
Next, "SERVE" will appear in the display.
3. Touch BEVERAGE repeatedly to select serving temperature.
SERVING TEMPERATURE TOUCH BEVERAGE PAD
Warm Once
Hot Twice
Very hot 3 Times
4. Touch START or wait 5 seconds and the microwave oven will
start automatically.
The display will count down the time.
When the cycle ends, "End" will appear in the display, 4 end-
of-cycle tones will sound, and then reminder tones will sound
every minute.
IMPORTANT: Heated liquids can splash out during and after
heating. A wooden stir stick placed in the cup or bowl during
heating may help avoid this.
5. Touch UPPER OFF/CANCEL or open the door to clear the
display and/or stop reminder tones.
NOTE: During Popcorn function, as with all microwave cooking
functions, the microwave oven should be attended at all times.
Listen for popping to slow to 1 pop every 1 or 2 seconds, then
stop the cycle.
• To avoid damage to the microwave oven, do not use regular
paper bags or glass utensils.
• Pop only 1 package of popcorn at a time.
• Follow manufacturer's instructions when using a microwave
popcorn popper.
• For best cooking results, do not try to pop unpopped kernels.
• Use fresh bags of popcorn for optimal results.
• Cooking results may vary by brand and fat content.
Popping time has been preset based on commercially packaged
microwave popcorn. The oven is preset for the 3.5 oz (99 g) size,
but can be changed. Use the following chart as a guide.
11

One or more 10 oz (283 g) potatoes can be baked automatically
in the microwave oven by using the Baked Potato function.
To Bake Potatoes:
1. Touch BAKED POTATO. "QTY" will appear in the display.
2. Touch 0 QUANTITY (number pad "0") repeatedly to select
quantity or touch a number pad that matches the number you
want.
3. Touch START or wait 5 seconds for oven to start
automatically. The cooking time will count down.
When the cycle ends, "End" will appear in the display, 4 end-
of-cycle tones will sound, and then reminder tones will sound
every minute.
4. Touch UPPER OFF/CANCEL or open the door to clear the
display and/or stop reminder tones.
Food Poisoning Hazard
Do not let food sit in oven more than one hour before
or after cooking.
Doing so can result in food poisoning or sickness.
Hot cooked food can be kept warm in the microwave oven for up
to 99 minutes. You can use Warm Hold by itself, or to
automatically follow a cooking cycle.
Foods that are cooked covered and complete meals on dinner
plates should be covered while being kept warm. Pastry items,
such as pies and turnovers, should be uncovered while being
kept warm.
To Use:
1. Put hot, cooked food in oven and close the door.
2. Touch WARM HOLD. "WARM" will appear in the display.
To Follow a Micro Time Cycle:
Touch WARM HOLD after the cycle has started
OR
Program Warm Hold as the last stage in multistage cooking.
When the display reads "TIME," touch WARM HOLD.
When the last cooking cycle is over, 1 tone will sound. "WARM"
will come on while the oven continues to run.
MICROWAVEOVENCARE
IMPORTANT: Before cleaning, make sure all controls are off and
the oven is cool. Always follow label instructions on cleaning
products.
Soap, water and a soft cloth or sponge are suggested first unless
otherwise noted.
MICROWAVE OVEN DOOR AND EXTERIOR
The area where the oven door and frame touch when closed
should be kept clean.
Cleaning Method:
• Mild, nonabrasive soaps and detergents:
Rinse with clean water and dry with soft, lint-free cloth.
• Glass cleaner and paper towels or nonabrasive plastic
scrubbing pad:
Apply glass cleaner to towel, not directly to surface.
STAINLESS STEEL
NOTE: To avoid damage to stainless steel surfaces, do not use
soap-filled scouring pads, abrasive cleaners, Cooktop Cleaner,
steel-wool pads, gritty washcloths or some paper towels.
Rub in direction of grain to avoid damaging.
Cleaning Method:
• Stainless Steel Cleaner and Polish 31462 (not included):
See "Assistance or Service" section to order.
• Liquid detergent or all-purpose cleaner:
Rinse with clean water and dry with soft, lint-free cloth.
• Vinegar for hard water spots
12

CONTROL PANEL
Cleaning Method:
To avoid damage to the control panel, do not use abrasive
cleaners, steel-wool pads, gritty washcloths or some paper
towels.
• Glass cleaner and soft cloth or sponge: Apply glass cleaner
to soft cloth or sponge, not directly on panel.
• All-Purpose Appliance Cleaner Part Number 31662 (not
included):
See "Assistance or Service" section to order.
MICROWAVE OVEN CAVITY
To avoid damage to the microwave oven cavity, do not use soap-
filled scouring pads, abrasive cleaners, Cooktop Cleaner, steel-
wool pads, gritty washcloths or some paper towels.
On stainless steel models, rub in direction of grain to avoid
damaging.
The area where the oven door and frame touch when closed
should be kept clean.
Cleaning Method:
Average soil
• Mild, nonabrasive soaps and detergents:
Rinse with clean water and dry with soft, lint-free cloth.
Heavy soil
• Mild, nonabrasive soaps and detergents:
Heat 1 cup (250 mL) of water for 2 to 5 minutes in oven.
Steam will soften soil. Rinse with clean water and dry with
soft, lint-free cloth.
Odors
• Lemon juice or vinegar:
Heat 1 cup (250 mL) of water with 1 tbs (15 mL) of either
lemon juice or vinegar for 2 to 5 minutes in oven.
TURNTABLE
Replace turntable immediately after cleaning. Do not operate the
microwave oven without the turntable in place.
Cleaning Method:
• Mild cleanser and scouring pad
• Dishwasher
TROUBLESHOOTING
Try the solutions suggested here first in order to avoid the cost of an unnecessary service call.
Nothing will operate
• Has a household fuse blown, or has a circuit breaker
tripped?
Replace the fuse or reset the circuit breaker. If the problem
continues, call an electrician.
• Is the appliance wired properly?
See Installation Instructions.
Display shows messages
• Is the display showing "PF,.... PF id=27" or "PF id=30"?
There has been a power failure. Clear the display. For further
information, see the lower oven Use and Care Guide.
• Is the display showing a letter followed by a number?
Clear the display. For further information, see the lower oven
Use and Care Guide. If the message reappears, call for
service. See "Assistance or Service" section.
Microwave oven will not operate
• Is the door completely closed?
Firmly close door.
• Is the electronic oven control set correctly?
See the lower oven Use and Care Guide.
• On some models, is the Control Lock set?
See the lower oven Use and Care Guide.
• On combination oven models, is the lower oven self-
cleaning?
The upper oven will not work during the lower oven Self-
Cleaning Cycle.
• Is the magnetron working properly?
Heat 1 cup (250 mL) of cold water for 2 minutes at 100%
cooking power. If water does not heat, call for service. See
"Assistance or Service" section.
Microwave oven makes humming noise
• This is normal and occurs when the transformer in the
magnetron cycles on.
Microwave oven door looks wavy
• This is normal and will not affect performance.
Turntable will not operate
Is the turntable properly in place?
Make sure turntable is correct side up and is sitting securely
on the turntable support.
Is the turntable support operating properly?
Remove turntable. Remove and replace turntable support.
Replace turntable. Put in 1 cup (250 mL) of water, then restart
oven. If it is still not working, call for service. See "Assistance
or Service" section. Do not operate the oven without
turntable and turntable support working properly.
13

Turntable rotates both directions
• This is normal and depends on motor rotation at beginning of
cycle.
Display shows time countdown, but is not operating
• Is the Minute Timer in use?
See the lower oven Use and Care Guide.
Tones are not sounding
• Are tones disabled?
See the lower oven Use and Care Guide.
Cooking times seem too long
Is the cooking power set properly?
See "Cook Power" section.
Are large amounts of food being heated?
Larger amounts of food need longer cooking times.
Is the incoming voltage less than that specified in the
"Electrical Requirements" section?"
Have a qualified electrician check the electrical system of the
house.
ASSISTANCEORSERVICE
Before calling for assistance or service, please check
"Troubleshooting." It may save you the cost of a service call. If
you still need help, follow the instructions below.
When calling, please know the purchase date and the complete
model and serial number of your appliance. This information will
help us to better respond to your request.
If you need replacement parts
If you need to order replacement parts, we recommend that you
use only FSP®replacement parts. FSP®replacement parts will fit
right and work right because they are made with the same
precision used to build every new WHIRLPOOL ® appliance.
To locate FSP®replacement parts in your area, call us or your
nearest Whirlpool designated service center.
Accessories U.S.A.
To order accessories, call the Whirlpool Customer eXperience
Center toll free at 1-800-442-9991 and follow the menu prompts.
Or visit our website at www.whirlpool.com and click on "Parts &
Accessories."
Broiler Pan and Grid
Order Part Number 4396923
Stainless Steel Cleaner and Polish
(stainless steel models)
Order Part Number 31462
Call the Whirlpool Customer eXperience Center
toll free: 1-800-253-1301.
Our consultants provide assistance with:
Features and specifications on our full line of appliances.
Installation information.
Use and maintenance procedures.
Accessory and repair parts sales.
Specialized customer assistance (Spanish speaking, hearing
impaired, limited vision, etc.).
Referrals to local dealers, repair parts distributors and service
companies. Whirlpool designated service technicians are
trained to fulfill the product warranty and provide after-
warranty service, anywhere in the United States.
To locate the Whirlpool designated service company in your
area, you can also look in your telephone directory Yellow
Pages.
For further assistance
If you need further assistance, you can write to Whirlpool
Corporation with any questions or concerns at:
Whirlpool Brand Home Appliances
Customer eXperience Center
553 Benson Road
Benton Harbor, MI 49022-2692
All-Purpose Appliance Cleaner
Order Part Number 31682
Call the Whirlpool Canada LP Customer eXperience Centre toll
free: 1-800-807-6777.
Our consultants provide assistance with:
• Features and specifications on our full line of appliances.
• Use and maintenance procedures.
• Accessory and repair parts sales.
• Referrals to local dealers, repair parts distributors, and
service companies. Whirlpool Canada LP designated service
technicians are trained to fulfill the product warranty and
provide after-warranty service, anywhere in Canada.
For further assistance
If you need further assistance, you can write to Whirlpool
Canada LP with any questions or concerns at:
Customer eXperience Centre
Whirlpool Canada LP
1901 Minnesota Court
Mississauga, Ontario L5N 3A7
Please include a daytime phone number in your correspondence.
Please include a daytime phone number in your correspondence.
14

WHIRLPOOLCORPORATIONMAJORAPPLIANCEWARRANTY
LIM ITED WARRANTY
For one year from the date of purchase, when this major appliance is operated and maintained according to instructions attached to or
furnished with the product, Whirlpool Corporation or Whirlpool Canada LP (hereafter "Whirlpool") will pay for Factory Specified Parts
and repair labor to correct defects in materials or workmanship. Service must be provided by a Whirlpool designated service company.
This limited warranty is valid only in the United States or Canada and applies only when the major appliance is used in the country in
which it was purchased. Outside the 50 United States and Canada, this limited warranty does not apply. Proof of original purchase date
is required to obtain service under this limited warranty.
ITEMS EXCLUDED FROM WARRANTY
This limited warranty does not cover:
1. Service calls to correct the installation of your major appliance, to instruct you on how to use your major appliance, to replace or
repair house fuses, or to correct house wiring or plumbing.
2. Service calls to repair or replace appliance light bulbs, air filters or water filters. Consumable parts are excluded from warranty
coverage.
3. Repairs when your major appliance is used for other than normal, single-family household use or when it is used in a manner that is
contrary to published user or operator instructions and/or installation instructions.
4. Damage resulting from accident, alteration, misuse, abuse, fire, flood, acts of God, improper installation, installation not in
accordance with electrical or plumbing codes, or use of consumables or cleaning products not approved by Whirlpool.
5. Cosmetic damage, including scratches, dents, chips or other damage to the finish of your major appliance, unless such damage
results from defects in materials or workmanship and is reported to Whirlpool within 30 days from the date of purchase.
6. Any food loss due to refrigerator or freezer product failures.
7. Costs associated with the removal from your home of your major appliance for repairs. This major appliance is designed to be
repaired in the home and only in-home service is covered by this warranty.
8. Repairs to parts or systems resulting from unauthorized modifications made to the appliance.
9. Expenses for travel and transportation for product service if your major appliance is located in a remote area where service by an
authorized Whirlpool servicer is not available.
10. The removal and reinstallation of your major appliance if it is installed in an inaccessible location or is not installed in accordance
with published installation instructions.
11. Major appliances with original model/serial numbers that have been removed, altered or cannot be easily determined. This warranty
is void if the factory applied serial number has been altered or removed from your major appliance.
The cost of repair or replacement under these excluded circumstances shall be borne by the customer.
DISCLAIMER OF IMPLIED WARRANTIES; LIMITATION OF REMEDIES
CUSTOMER'S SOLE AND EXCLUSIVE REMEDY UNDER THIS LIMITED WARRANTY SHALL BE PRODUCT REPAIR AS PROVIDED
HEREIN. IMPLIED WARRANTIES, INCLUDING WARRANTIES OF MERCHANTABILITY OR FITNESS FOR A PARTICULAR PURPOSE,
ARE LIMITED TO ONE YEAR OR THE SHORTEST PERIOD ALLOWED BY LAW. WHIRLPOOL SHALL NOT BE LIABLE FOR
INCIDENTAL OR CONSEQUENTIAL DAMAGES. SOME STATES AND PROVINCES DO NOT ALLOW THE EXCLUSION OR LIMITATION
OF INCIDENTAL OR CONSEQUENTIAL DAMAGES, OR LIMITATIONS ON THE DURATION OF IMPLIED WARRANTIES OF
MERCHANTABILITY OR FITNESS, SO THESE EXCLUSIONS OR LIMITATIONS MAY NOT APPLY TO YOU. THIS WARRANTY GIVES
YOU SPECIFIC LEGAL RIGHTS, AND YOU MAY ALSO HAVE OTHER RIGHTS WHICH VARY FROM STATE TO STATE OR PROVINCE
TO PROVINCE.
If outside the 50 United States and Canada, contact your authorized Whirlpool dealer to determine if another warranty applies.
If you need service, first see the "Troubleshooting" section of the Use & Care Guide. After checking "Troubleshooting," you may find
additional help by checking the "Assistance or Service" section or by calling Whirlpool. In the U.S.A., call 1-800-253-1301. In Canada,
call 1-800-807-6777. 9/07
Keep this book and your sales slip together for future
reference. You must provide proof of purchase or installation
date for in-warranty service.
Write down the following information about your major appliance
to better help you obtain assistance or service if you ever need it.
You will need to know your complete model number and serial
number. You can find this information on the model and serial
number label located on the product.
Dealer name
Address
Phone number
Model number
Serial number
Purchase date
15

# # •
SECURITEDUFOURAMICRO-ONDES
Votre securite et celle des autres est tres importante.
Nous donnons de nombreux messages de s_curit_ importants dans ce manuel et sur votre appareil m_nager. Assurez-vous de
toujours lire tous les messages de s_curit_ et de vous y conformer.
Voici le symbole d'alerte de s_curit&
Ce symbole d'alerte de s_curit_ vous signale les dangers potentiels de d_c_s et de blessures graves h vous
et h d'autres.
Tousles messages de s_curit_ suivront le symbole d'alerte de s_curit_ et le mot "DANGER" ou
"AVERTISSEMENT". Ces mots signifient •
Risque possible de d_cbs ou de blessure grave si vous ne
suivez pas imm_diatement les instructions.
Risque possible de d_cbs ou de blessure grave si vous
ne suivez pas les instructions.
Tous les messages de s_curit_ vous diront quel est le danger potentiel et vous disent comment r_duire le risque de blessure et
ce qui peut se produire en cas de non-respect des instructions.
IIVlPORTANTES INSTRUCTIONS DE SECURIT¢:
Lors de Futilisafion d'appareils electrom6nagers, il convient d'observer certaines pr6cautions el6mentaires dont les suivantes •
AVERTISSEIVlENT • Pour r6duire le risque de [] Ne pas nettoyer avec un tampon h r6curer en m6tal. Des
brOlures, de choc electrique, d'incendie, de blessures aux parties se d_tachant du tampon peuvent toucher des
personnes et I'exposition excessive h I'energie des
micro-ondes :
[] Lire toutes les instructions avant d'utiliser le four h
micro-ondes.
[] Lire et observer les instructions sp6cifiques de
"PRECAUTIONS CONTRE LE RISQUE D'EXPOSITION
EXCESSIVE _, L'ENERGIE DES MICRO-ONDES"
pr6sent_es dans cette section.
[] Le four h micro-ondes doit 6tre relie h la terre. Brancher
Fappareil uniquement sur une prise de courant
convenablement re%e h la terre. Voir les "INSTRUCTIONS
DE MISE _, LA TERRE" pr6sent6es dans cette section.
[] Installer ou placer le four h micro-ondes uniquement selon
les instructions d'installation fournies.
[] Certains produits, comme les oeufs entiers dans leur
coquille et les r_cipients ferm4s - par exemple les bocaux
en verre ferm6s - peuvent exploser et on ne doit pas les
faire chauffer dans un four h micro-ondes.
[] Utiliser cet appareil uniquement pour les usages auxquels il
est destin6, tels qu'ils sont d6crits dans ce manuel. Ne pas
utiliser de vapeurs ou de produits chimiques corrosifs dans
le four h micro-ondes. Ce type de four est sp6cifiquement
congu pour chauffer, cuire ou s_cher des aliments, tl n'est
pas congu pour usage industriel ou de laboratoire.
[] Des aliments et des ustensiles de cuisson en m_tal de taille
excessive ne doivent pas 6tre plac6s darts le four &
micro-ondes car ils peuvent cr6er un incendie ou un risque
de choc electrique.
CONSERVEZ CES
pieces electriques, causant un risque de choc electrique.
[] Ne pas remiser dans le four non utilis6 des articles autres
que les accessoires recommandes par le fabricant.
[] Ne pas faire fonctionner lefour a micro-ondes si le cordon
d'alimentation ou la fiche de branchement est endommage,
s'il ne fonctionne pas correctement, s'il a subi des
dommages ou s'il est tombe sur le plancher.
[] Ne pas frire dans le four. Les ustensiles allant au four
micro-ondes ne conviennent pas et il est difficile de
maintenir des temp6ratures de friture appropriees.
[] Ne pas utiliser des produits en papier Iorsque I'appareil
fonctionne au mode "PAN BROWN" (brunissement).
[] Ne pas couvrir les grilles ou toute autre partie du four avec
du papier metallique. Un surchauffage du four surviendra.
[] Comme pour tout appareil m6nager, les enfants ne
devraient utiliser ce four que sous une supervision
adequate.
[] Tousles travaux de service doivent 6tre executes
exclusivement par un personnel d'entretien qualifi&
Contacter un centre de service autoris_ pour les operations
d'inspection, de r@aration ou de r_glage.
[] Ne pas couvrir ou obstruer une ouverture quelconque du
four a micro-ondes.
INSTRUCTIONS
16

IMPORTANTES INSTRUCTIONS DE S¢:CURIT¢:
Les Riquides tels que I'eau, Recaf6 ou Reth6 peuvent m Ne pas remiser le four & micro-ondes & I'ext@ieur. Ne pas
trop chauffer = au-del& du point d'ebullition = sans
sembler bouillir. II n'y a pas toujours des bulles ou une
ebullition Rorsq.u'onretire Rer6cipient du four &
micro-ondes. A CAUSE DE CECI, DES LIQUIDES
TRES CHAUDS POURRAIENT DJ_BORDER
LORSQU'ON BOUGE LE RECIPIENT OU QUE L'ON
UTILISE UNE CUILLERE OU UN AUTRE USTENSILE
POUR LE REMUER.
Pour r6duire Rerisque de blessures corporelles :
= Ne pas trop faire chauffer ReRiquide.
= Remuer ReRiquideavant et pendant Rechauffage.
= Ne pas utiliser de r@cipients a parois droites avec des
ouvertures etroites.
= Une fois chaud, laisser le r6cipient dans le four
micro-ondes un moment avant de le retirer.
= Faire tr@sattention Iorsqu'on utilise une cuillere ou un
autre ustensile dans le r6cipient.
m
m
utiliser cet appareil pres de I'eau, comme par exemple pr@s
d'un evier de cuisine, un sous-sol mouille ou pres d'une
piscine ou autres endroits sembables.
Voir les instructions de nettoyage de la surface de la porte
la section "Entretien du four & micro-ondes".
Pour r6duire le risque d'incendie dans la cavit6 du four :
= Ne pas faire cuire les aliments excessivement. Surveiller
attentivement le four a micro-ondes apr@sy avoir plac6
des produits en papier, en plastique ou autres mat@iaux
combustibles pour faciliter la cuisson des aliments.
= Enlever les attaches metalliques des sachets en papier
ou en plastique avant de placer les sachets dans le four.
= En cas d'inflammation de mat@iaux plac6s & I'int@ieur
du four, maintenir la porte du four ferm6e, arr@ter le four
et d@brancher le cordon de courant @lectrique, ou
interrompre I'alimentation @lectrique au niveau du tableau
de distribution (fusible ou disjoncteur).
= Ne pas utiliser la cavit@ du four comme espace de
rangement. Ne pas laisser dans le four des produits en
papier, ustensiles de cuisine ou produits alimentaires,
Iorsqu'il n'est pas utilis&
CONSERVEZ CES INSTRUCTIONS
PRI CAUTIONS CONTRE LE RISQUE D'EXPOSITION
EXCESSIVE .&.L'I NERGIE DES MICRO-ONDES
(a) Ne pas tenter de faire fonctionner ce four Iorsque la porte
est ouverte, car ceci pourrait susciter une exposition
dangereuse & I'@nergie des micro-ondes. II est important
de ne pas entraver le fonctionnement correct du dispositif
de verrouillage de s_curit&
(b) Ne pas placer d'objet entre la surface avant du four et la
porte, et ne jamais laisser des souillures ou r_sidus de
produits de nettoyage s'accumuler sur les surfaces
d'@tanch_it&
(c) Ne pas faire fonctionner le four Iorsqu'il est endommag& II
est particuli@ement important que la porte du four ferme
convenablement et que les composants suivants ne soient
pas endommag@s :
(1) Porte (d@formation),
(2) Charni@es et dispositif de verrouillage (bris_s ou
desserr_s),
(3) Joints de porte et surfaces d'@tanch6it&
(d) Seul un personnel d'entretien qualifi@ est habilit_
ex_cuter des r_parations ou r_glages sur cet appareil.
Le four a micro-ondes est connect@ du c6t@110 volts du circuit de 240 volts requis pour le four inf@rieur.Si la tension d'entr@e au four
micro-ondes est inf@rieure a 110 volts, les temps de cuisson risquent de s'allonger. Demander a un @lectricien qualifi@ de v@rifiervotre
syst@me @lectrique.
INSTRUCTIONS DE LIAISON
A LA TERRE
Pour un four a micro-ondes raccord_ en
permanence :
Le four & micro-ondes doit @treraccord_ & un syst_me
de c&blage permanent en m_tal reli_ & la terre, ou le
c&blage d'alimentation doit inclure un conducteur de
liaison & la terre connect_ & la borne ou & un fil de
liaison & la terre sur le four & micro-ondes.
CONSERVER CES INSTRUCTIONS
Ce dispositif est conforme & la section 18 des r@glements FCC. I
17

COMMANDEDUFOURAMICRO-ONDES
©©
Q OVEN AUTO
BAKE &_ LIGHT CLEAN
TBMB
CUSIOM
BROIL
&
HOUR
STOP
TIME
LOWER
A
COOKT,MB_T,ME.... _ T,_RT,MEROEECLOCK
....... "_ OVEN
B
Q QT@
OJQ)<
CDEFGH/ J
LJ -Xi_ \J k.J
0dd_..... ....... A_TO
mfnute COOK
K L M N 0 P Q R
A. Affichage _lectronique
B. Touches num_riques
C.Add a minute (ajouter une minute)
D. Mafs D_clater au four _ micro-ondes
(3 quantit_s)
E. R_chauffage au four _ micro-ondes
F. Boisson au four _ micro-ondes
G. D_cong_lation au four b micro-ondes
H. Pomme de terre au four b micro-ondes
I.Auto cook (cuisson automatique)
J. Warm hold (garde au chaud)
K. Commandes du four inf_rieur
L. Micro Time (cuisson par _tapes)
M. Touche" 0 "quantity
N. Puissance de chauffage du four
micro-ondes
O. Memory (m_moire)
R Cook a bit more (cuire un peu plus)
Q. Mise en marche du four _ micro-
ondes
R. Arr#t/annulation du four _ micro-
ondes sup_rieur
UTILISATIONDUFOURAMICRO-ONDES
Un magnetron dans le four h micro-ondes produit des micro-
ondes qui rebondissent de la base, des parois et de la voQte en
metal et qui passent a travers le plateau rotatif et les ustensiles
de cuisson appropries pour atteindre raliment. Les micro-ondes
sont attirees et absorbees par le gras, le sucre et les molecules
d'eau dans les aliments et font deplacer ces molecules, en
produisant une friction et une chaleur qui fait cuire les aliments.
• Pour eviter d'endommager le four a micro-ondes, ne pas
s'appuyer ou laisser les enfants se balancer sur la porte du
four a micro-ondes.
• Pour eviter d'endommager lefour a micro-ondes, ne pas faire
fonctionner le four a micro-ondes a vide.
• Les biberons et les petits pots d'aliments pour beb6s ne
doivent pas etre chauffes dans le four a micro-ondes.
• Les vetements, fleurs, fruits, herbes, bois, gourdes, papier, y
compris les sacs en papier brunet les journaux ne doivent
pas etre seches dans le four a micro-ondes.
• La paraffine ne fondra pas dans le four a micro-ondes car elle
n'absorbe pas les micro-ondes.
• Utiliser des mitaines de four ou des maniques Iors de
renlevement de contenants du four a micro-ondes.
• Ne pas faire cuire les pommes de terre excessivement. A la
fin de la duree de cuisson recommandee, les pommes de
terre devraient etre legerement fermes. Laisser les pommes
de terre reposer pendant 5 minutes. Elles ach6veront de cuire
pendant cette periode.
• Ne pas faire cuire ou rechauffer des ceufs entiers avec leur
coquille. La vapeur accumulee dans les ceufs entiers pourrait
les faire eclater, ce que exigerait le nettoyage significatif de la
cavite du four h micro-ondes. Recouvrir les ceufs poches et
les laisser reposer.
Lors de la cuisson au four h micro-ondes, la quantite, la taille, la
forme, la temperature de debut, la composition et la densite de
raliment affectent les resultats de cuisson.
Quantit_ d'aliments
La quantite d'aliments chauffes influencera la duree de cuisson.
Verifier le degre de cuisson et prolonger legerement la duree si
necessaire.
Taille et forme
Des morceaux plus petits d'aliments cuiront plus vite que les
gros morceaux, et les aliments uniformes cuiront plus egalement
que les aliments de forme irreguliere.
Temperature de d_but
Les aliments a temperature ambiante chaufferont plus vite que
les aliments refrigeres, et les aliments refrigeres chaufferont plus
vite que les aliments congeles.
Composition et densit_
Les aliments a haute teneur en gras et en sucre atteindront une
temperature plus elevee et chaufferont plus vite que les autres.
Les aliments Iourds et denses, tels que la viande et les pommes
de terre, demandent un temps de cuisson plus long qu'un
aliment de la meme taille, leger et poreux tel que les g&teaux.
18

Recouvrement
Le recouvrement des aliments aide a retenir I'humidite, reduire le
temps de cuisson et reduire les @laboussures. Utiliser le
couvercle fourni avec I'ustensile de cuisson. S'il n'y a pas de
couvercle disponible, du papier paraffine, un essuie-tout ou de la
pellicule de plastique approuvee pour les micro-ondes peuvent
_tre utilises. La pellicule de plastique doit _tre retournee &un coin
pour fournir une ouverture a I'@happement de la vapeur. La
condensation sur les surfaces de la porte et de la cavite est
normale pendant une cuisson intense.
Remuer et tourner
Remuer et tourner les aliments redistribue la chaleur de maniere
egale pour @iter la cuisson excessive des bords des aliments.
M61anger de I'exterieur vers le centre. Si possible, retourner les
aliments.
Disposition
S'il s'agit d'aliments de forme irreguliere ou de dimensions
differentes, les parties plus minces et les morceaux plus petits
doivent _tre disposes pres du centre. Si I'on cuit phsieurs
aliments de m_me taille et de m_me forme, les placer dans un
cercle, en laissant le centre du cercle vide.
D_gagement de la pression
Avant le chauffage, utiliser une fourchette ou un petit couteau
pour percer les aliments qui ont une peau ou une membrane, tels
que les pommes de terre, jaunes d'ceufs, foies de poulet, hot
dogs et saucisses. Percer en plusieurs endroits pour laisser
@happer la vapeur.
Protection
Utiliser du papier d'ahminium en petits morceaux plats pour
proteger les parties minces d'aliments de forme irreguliere, les
os, et des aliments tels que les ailes et pilons de poulet et les
queues de poisson. Voir en premier "Papier d'ahminium et
metal".
Temps de repos
Les aliments continueront a cuire par la conduction naturelle de
la chaleur m_me Iorsque le programme de micro-ondes sera
termin& La duree du temps de repos d@end du volume et de la
densite de I'aliment.
Les ustensiles de cuisson et la vaisselle doivent pouvoir _tre
places sur le plateau rotatif. Toujours utiliser des mitaines de four
ou des maniques Iors de la manipulation parce que tout plat peut
devenir chaud a cause de la chaleur transmise par les aliments.
Ne pas utiliser des ustensiles de cuisson ou de la vaisselle avec
une garniture en or ou en argent. Utiliser le tableau suivant
comme guide, ensuite faire un test avant I'utilisation.
MATI_RIAU RECOMMANDATIONS
Papier d'ahminium, Voir la section "Papier d'ahminium
metal et metal".
Plat brunisseur La base doit _tre au moins & 3/16"
(5 mm) au-dessus du plateau rotatif.
Suivre les recommandations du
fabricant.
Vitroceramique, verre Peut _tre utilis&
Porcelaine, fai'ence Suivre les recommandations du
fabricant.
MATERIAU RECOMMANDATIONS
M_lamine Suivre les recommandations du
fabricant.
Papier : essuie-tout, Utiliser des produits non recycles et
vaisselle, serviettes de ceux qui sont approuves par le
table fabricant pour utilisation au four
micro-ondes.
Plastique : pellicule, Utiliser des produits approuves par
sacs, couvercles, le fabricant pour utilisation au four
vaisselle, contenants micro-ondes.
Poterie et argile Suivre les recommandations du
fabricant.
Ustensile de cuisson en Suivre les recommandations du
silicone fabricant.
Paille, osier, contenants Ne pas utiliser au four a micro-
en bois ondes.
Papier paraffine Peut _tre utilis&
Pour tester I'ustensile de cuisson ou la vaisselle pour
utilisation au four & micro-ondes :
1. Placer I'ustensile de cuisson ou la vaisselle dans le four &
micro-ondes avec 1 tasse (250 mL) d'eau & c6te de I'article.
2. Faire cuire & la puissance de cuisson maximale pendant
1 minute.
Ne pas utiliser cet ustensile de cuisson ou cet article de vaisselle
s'il devient chaud alors que I'eau demeure froide.
Toujours utiliser des mitaines de four ou des maniques pour
enlever des plats du four µ-ondes.
Le papier d'ahminium et certains metaux peuvent _tre utilises
dans le four µ-ondes. Si ces articles ne sont pas bien
utilises, des arcs (un @lair bleu) peuvent survenir et causer des
dommages au four a micro-ondes.
Utilisation possible
Les grilles et les ustensiles de cuisson fournis avec le four &
micro-ondes (sur certains modeles), le papier d'ahminium pour
protection et les thermom_tres &viande approuves peuvent _tre
utilises avec les pr@autions suivantes :
• Pour @iter d'endommager le four & micro-ondes, ne pas
laisser le papier d'aluminium ou le metal toucher les parois, le
plafond ou le fond de la cavite interieure.
• Toujours utiliser le plateau rotatif.
• Pour @iter d'endommager le four & micro-ondes, ne pas
permettre un contact avec un autre objet en metal durant la
cuisson.
Utilisation & _viter
Les ustensiles de cuisson au four en metal, I'or, I'argent, I'etain,
les thermometres &viande non approuves, les brochettes, les
attaches, les doublures de papier d'aluminium telles que les
enveloppes & sandwich, les agrafes et objets avec garniture en or
ou en argent ou avec un enduit metallique ne doivent pas _tre
utilises dans le four a micro-ondes.
19

De nombreuses recettes de four µ-ondes precisent quelle
puissance de cuisson doit _tre utilisee en indiquant un
pourcentage, un nom ou un chiffre. Par exemple,
70 %=7=Moyen-elev&
Utiliser le tableau suivant comme guide gen6ral pour la
puissance de cuisson sugger6e pour des aliments specifiques.
POURCEN- CHIF- UTILISATION
TAGE/NOM FRE
100 %,
Elev6 (par
defaut)
10
Chauffage rapide d'aliments de
commodite et aliments avec haute
teneur en eau, tels que soupes,
boissons et la plupart des legumes.
90 %
Cuisson de petits morceaux tendres
de viande, viande hachee, morceaux
de volaille, filets de poisson.
Chauffage de soupes en cr_me.
8O %
Chauffage de riz, p&tes ou mets en
sauce remuables.
Cuisson et chauffage d'aliments qui
ont besoin d'une puissance de
chauffage inferieure & la puissance
elev6e. Par exemple, poisson entier
et pain de viande.
70 %, 7 Rechauffage d'une seule portion
Moyen-elev6 d'aliments.
60 % 6 Cuisson d'aliments sensibles tels
que les mets a base de fromage et
d'oeufs, pudding et cr_mes.
Cuisson de mets en sauce non
remuables tels que les lasagnes.
50%,
Moyen
Cuisson de jambon, de volaille
entiere et de morceaux de viande
braiser.
Mijotage de ragoQts.
40 % 4 Pour faire fondre le chocolat.
Chauffage du pain, des petits pains
et p&tisseries.
30 %, 3 Decong61ation de pain, poisson,
Moyen-faible, viande, volaille et aliments precuits.
Decong61ation
20 % 2 Amollir le beurre, le fromage et la
cr_me glacee.
10 %, Faible 1 Mettre les fruits a temperature
ambiante.
Utilisation :
1. Placer les aliments dans le four et fermer la porte.
2. Appuyer sur les touches numeriques pour regler une duree
de cuisson. Le four cuit automatiquement & la puissance de
cuisson elevee.
3. Appuyer sur COOK POWER pour regler une puissance de
cuisson autre que 100 %. A chaque fois qu'on appuie sur
Cook Power, la puissance de cuisson diminue de 10 %.
Choisir une puissance de cuisson en utilisant le tableau des
puissances de cuisson.
4. Appuyer sur START (mise en marche). L'affichage 3rocede
un compte a rebours de la duree de cuisson.
REMARQUES :
• Pour prolonger la duree de cuisson durant ou apres la
cuisson, utiliser la fonction Add A Minute (ajouter une minute)
ou Cook A Bit More (cuire un peu plus).
• Pour regler de nouveau la duree de cuisson apres avoir regle
la puissance de cuisson, il est necessaire de taper 4 chiffres.
• Pour modifier la duree de cuisson une fois que la cuisson a
debute, d'abord ouvrir la porte puis la refermer. Ensuite,
entrer la duree de cuisson desiree tel que decrit ci-dessus, et
appuyer sur START (mise en marche).
• A la fin de la duree de cuisson, "End" (fin) apparaitra sur
I'affichage, et 4 signaux sonores seront emis.
• Pour des renseignements supplementaires sur la cuisson et
le rechauffage, consulter le tableau des durees de cuisson au
micro-ondes qui suit.
20
La page charge ...
La page charge ...
La page charge ...
La page charge ...
La page charge ...
La page charge ...
La page charge ...
La page charge ...
-
 1
1
-
 2
2
-
 3
3
-
 4
4
-
 5
5
-
 6
6
-
 7
7
-
 8
8
-
 9
9
-
 10
10
-
 11
11
-
 12
12
-
 13
13
-
 14
14
-
 15
15
-
 16
16
-
 17
17
-
 18
18
-
 19
19
-
 20
20
-
 21
21
-
 22
22
-
 23
23
-
 24
24
-
 25
25
-
 26
26
-
 27
27
-
 28
28


Whirlpool RMC305PVS00 Le manuel du propriétaire
- Catégorie
- Micro-ondes
- Taper
- Le manuel du propriétaire
dans d''autres langues
- English: Whirlpool RMC305PVS00 Owner's manual