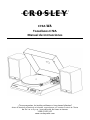
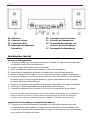
Crosley C72A Manuel utilisateur
- Catégorie
- Plaque tournante
- Taper
- Manuel utilisateur

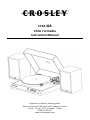
C72A-WA
C72A Turntable
Instruction Manual
Questions, problems, missing parts?
Before returning to the store, call Customer Service
8 a.m. – 6 p.m., EST, Monday – Friday
1-888-CROSLEY
www.crosleyradio.com

English
2
Important Safety Instructions
Read and understand this entire manual before using this product. Keep these
instructions for future reference.
1. Do not use this product near water.
2. This product should be operated only by the type of power source indicated on the
marking label or in this instruction manual.
3. Do not defeat the safety purpose of the polarized plug. A polarized plug has two
blades with one blade wider than the other. This plug will fit into the power outlet
only one way. If you are unable to insert the plug fully into the outlet try reversing
the plug. If the plug should still fail to fit, contact your electrician.
4. Protect the power cord from being walked on or pinched particularly at plugs,
convenience receptacles, and the point where they exit from the product.
5. Do not overload wall outlets, extension cords, or integral convenience receptacles
as this can result in a risk of fire or electric shock.
6. Never push objects of any kind into this product through openings as they may
touch dangerous voltage points or short-out parts that could result in a fire or
electric shock. Never spill liquid of any kind on the product.
7. Do not attempt to service this product yourself as opening or removing covers
may expose you to dangerous voltage or other hazards. Refer all servicing to
qualified service personnel.
8. Changes or modifications to this unit not expressly approved by the party
responsible for compliance could void the user’s authority to operate the
equipment.
9. Do not use attachments not recommended by the product manufacturer as they
may cause hazards.
10. A product and cart combination should be moved with care. Quick stops,
excessive force, and uneven surfaces may cause the product and cart
combination to overturn.
11. Slots and openings in the cabinet are provided for ventilation and to ensure
reliable operation of the product and to protect it from overheating. Do not block or
cover these openings.
12. Unplug the product during lightning storm or when unused for long periods of
time.

English
3
Items in this package
Before throwing away any packaging materials, please check thoroughly and make
sure you find the following items that come along with this package:
•
Turntable
•
Turntable Lid
•
Turntable Slip Mat
•
Turntable Platter
•
Tonearm Counterweight
•
Cartridge Alignment Protractor
•
Power Adaptor
•
45 RPM adapter
•
RCA cable
•
Speakers
•
Speaker Wire X 2
Please contact Crosley customer service if there is any accessory missing from the
package. Retain the original packaging materials for exchange or return
purposes.

English
4
Specifications
Crosley C72A
Power AC power adaptor, DC output 15V 2.4A
Power Consumption 50W
Speaker
Tweeter 8Ω 10W x 2
Woofer 4Ω 30W x 2
Turntable Speed 331/3, 45 RPM
Speed Variance +1.5%
Wow and Flutter <0.15%
Signal to Noise 72 dB
Downforce Range 3.0 – 4.3g
Effective Tonearm Length 8.74” (222 mm)
Overhang 0.75”
Product Dimensions (W x H x D) 16.46” x 5.04” x 15.31”, with lid open 16.46” x
15.46” x 15.31”
Weight 21.60 lbs
Needle: Crosley NP-5
Frequency Response 20Hz – 20kHz
Channel Balance <2.5 dB
Channel Separation >18 dB
Output Voltage 2.5 mV
Recommended Load Resistance 47k Ω
Amplifier connection MM – input
Recommended Tracking Pressure 3.5±0.5g
Weight 0.18oz
Note:
• Design and specifications are subject to change without notice.

English
5
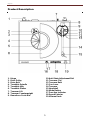
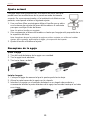
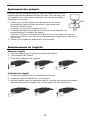
Product Description
1. Hinge
2. Drive Pulley
3. Drive Belt
4. Turntable Spindle
5. Turntable Hub
6. Turntable Platter
7. Tonearm Lift
8. Tonearm Counterweight
9. Downforce Scale Dial
10. Anti-Skate Adjustment Dial
11. Tonearm Clip
12. Tonearm Rest
13. Cue Lever
14. Tonearm
15. Headshell
16. Mode Button
17. Function Indicator
18. Speed Selector
19. Volume Knob

English
6
20. Speakers
21. Ground Connector
22. RCA Jacks
23. Auto-stop Switch
24. Phono/Line Switch
25. Power Jack
26. Spring clip speaker terminals
27. Power Switch
Initial Setup
Essential Setup
1. Place the unit on a flat and level surface. The selected location should be stable
and free from vibration.
2. Install the turntable lid to the hinges.
3. Remove the tie-wrap that is holding the tonearm.
4. Remove all packing material from underneath the turntable hub.
5. Install the turntable platter and drive belt accordingly.
6. Slide Tonearm Counterweight onto tonearm with the numbers facing the front of
the turntable, and twist it lightly onto the rear shaft of the tonearm.
7. Adjust the counterweight to set proper stylus pressure.
8. Place the slip mat on top of the turntable platter.
9. Connect the power adaptor to the Power Jack of the unit.
Note: Do not plug the power adaptor to the power outlet before all the assembly is
completed. Before turning the power on, make sure again all the connection settings are
correct. Always turn off the power when connecting or disconnecting.
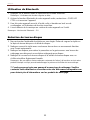
Turntable Platter and Belt Setup
1. Put the drive belt around the Turntable Hub, and then use the provided drive
belt assembly tool to help pull the belt to fit around the slot of motor pulley.
2. Place the turntable platter through the turntable spindle.

English
7
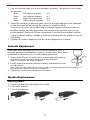
Tonearm Counterweight Adjustment for Stylus Pressure
1. Remove the stylus protector from the cartridge and avoid touching the stylus tip
during the adjustment.
2. Release the Tonearm Clip, gently hold the tonearm and move it away from the
Tonearm Rest. At this point, the tone arm is unbalanced and free to swing.
3. Lift the Tonearm from its rest and gently hold it. The tone arm is unbalanced at this
point.
4. Carefully rotate the Counterweight towards the front of the turntable until the
tonearm is horizontally balanced and hovers freely just above the platter without
the stylus touching the platter surface.
5. Return the tonearm to the Tonearm Rest and lock the Tonearm Clip.
6. While holding the counterweight steady without any rotation, rotate carefully only
the Downforce Scale Dial until the “0” on the scale lines up with the centerline
marked along the top of the tonearm.
7. Rotate the counterweight including the downforce scale dial counter-clockwise (as
seen from the front of the turntable) to adjust the pressure to the stylus
manufacturer recommendations.
Note:
- Each mark on the scale represents 0.05g (gram).
- The recommended pressure for the factory-installed cartridge is 3.5g.
- One full turn of the counterweight will provide a pressure 2.0g. In order to reach a stylus
pressure that is greater than 2.0 g keep rotating the counterweight forward.
Stereo System Connection
RCA Jacks
• The RCA Jacks of this unit can be used as either Phono output jacks or Line output
jacks. This is determined by using the Phono/Line Switch.
• To connect to active speakers, set Phono/Line switch to Line setting. To connect to
a phono pre-amp or the phono input of a stereo system, set Phono/Line switch to
Phono setting.
• The Red plug connects with the Right channel and the White plug connects with
the Left channel.
Note:
− If the Phono/Line switch is set at LINE position but RCA jacks connected to the stereo
system’s phono input, the sound might be distorted due to input overload and could damage
your stereo system.
− If the Phono/Line switch is set at PHONO position but RCA jack connected to the stereo
system’s line input, the volume will be very low due to lacking signal pre-amplification.
− RCA Jack is not designed to be connected directly to the passive/unpowered speakers and if it
does, the volume will be very low.
Spring clip speaker terminals
To connect to the speakers included with this system or other passive speakers,
connect one end of the speaker wire included with this package to the back of the

English
8
speakers and the other end to the Speaker Output Terminals. To do this, flip the spring
clips to the open position, insert the speaker wire, and flip the spring clips to the closed
position. Set the Phono/Line Switch to Line setting.
Turntable Operation
1. Press the Power Switch to turn on the power.
2. Press the Mode Button and select the Phono mode.
Note: The Function Indicator will be red
3. Set the Speed Switch accordingly.
4. Place the record on the turntable. Use the 45 RPM Adapter if necessary.
5. Remove the stylus protector from the stylus assembly.
Note: To avoid stylus damage, make certain the included stylus guard is in place whenever
the turntable is being moved or cleaned.
6. Release the Tonearm Clip.
Note: when the turntable is not in use, remember to lock the Tonearm clip.
7. Use the Cue Lever to lift the tonearm.
8. Gently move the tonearm over the record where play is desired to begin. Set the
Cue Lever back to the down position. The tonearm will descend slowly onto the
record and begin to playback.
9. When the record is finished playing, use the Cue Lever again to raise the tonearm
and then return it to the Tonearm Rest. Release the lever to let the tonearm sit
back at its rest. To suspend the playback, repeat the same steps.
10. Lock the Tonearm Clip to secure the tonearm.
Anti-skate Adjustment
• A small outward “anti-skating” force can be applied to the tone arm to compensate
for the “skating” force that pulls the arm toward the center of the record.
• For best performance during normal turntable usage, it is recommended to set the
anti-skate control knob to the same value as indicated by the downforce scale dial.
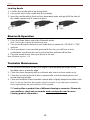
Cartridge Replacement
1. Before replacement, put the stylus protector back on the stylus to prevent damage
to the stylus during the replacement process.
2. Carefully remove the wire leads from the original cartridge.
3. Loosen the two screws on the headshell that are securing the cartridge and then
remove the original cartridge.
4. Mount the new cartridge to the headshell and tighten it lightly. Do not completely
tighten the screws at this moment.

English
9
5. Connect the wire leads to the new cartridge’s terminals. The wire lead color codes
are as below:
White Left channel positive (L+)
Black Left channel negative (L–)
Red Right channel positive (R+)
Black Right channel negative (R-)
6. Adjust the cartridge’s position to make sure it is precisely aligned on the headshell
so that the stylus will be tracking the grooves in parallel perfectly.
To achieve this, place the included paper cartridge alignment protractor over the
turntable spindle, carefully lift the tone arm and place the tip of the stylus on the
points marked 130mm and 250mm respectively. Fine tune the cartridge’s position
on the headshell until the cartridge is perfectly in parallel with the reference lines at
both points.
7. Tighten the screws completely once the perfect alignment is achieved.
Azimuth Adjustment
The needle must be perpendicular to the record groove in order to
track the groove wall modulations correctly. In rare cases, if the factory
installation is not perfect, you can make below adjustment:
1. Use an Allen Wrench to loosen the screw located at the bearing
end of the tonearm just enough to loosen the arm tube.
Note: Do not remove the screw completely.
2. Gently rotate the tonearm until the needle is perpendicular to the
record surface.
Note: Make sure the needle tip is not touching the record when adjustment is being made or it
will damage the needle and cantilever suspension.
3. Tighten the screw when adjustment is finished.
Needle Replacement
Removing Needle
1. Gently pull down the front edge of the needle.
2. Pull needle forward.
3. Pull out and remove.

English
10
Installing Needle
1. Position the needle with its tip facing down.
2. Line up the back of the needle with the cartridge.
3. Insert the needle with its front end at a downward angle and gently lift the front of
the needle upward until it snaps into place.
Bluetooth Operation
1. Press the Mode Button and select Bluetooth mode.
Note: The function indicator will be flashing blue.
2. Turn on the Bluetooth feature of your audio device, search for “CROSLEY C72A”
and pair.
3. Once your device is successfully paired with the unit, you will hear a short
confirmation sound from the unit, and the function indicator will be blue.
4. Play and stream music from your device to the unit.
Note: Bluetooth version – 5.0
Turntable Maintenance
1. Do not touch the stylus tip with your fingers. Avoid bumping the stylus on the
turntable mat or a record’s edge.
2. Clean the stylus frequently with a soft brush with a back-to-front motion only.
3. Clean the records to get rid of dust or grease with a record cleaning brush and
record cleaning solution.
4. Clean the turntable lid and turntable cabinet with a slightly damped microfiber cloth.
Note: Do not use cleansers that contains alcohol, benzene or any other harsh chemicals,
which might damage the paint and finish of the turntable.
** Crosley offers a product line of different cleaning accessories. Please ask
your retailer or check out our website www.crosleyradio.com for more
cleaning product information.

English
11
Troubleshooting
There is no power
• Power adaptor is not connected correctly.
• No power at the power outlet.
• To help save power consumption, some models will comply with ERP energy
saving standard. When there is no audio input for 20 minutes, their powers will
automatically cut-off. To turn power back on and resume playing, turn off the power
and turn it on again.
Power is on, but the platter does not turn
• Turntable’s drive belt is not installed or has slipped off.
Turntable is spinning, but there is no sound, or sound not loud enough
• Stylus protector is still on.
• Tone arm is lift up by the lever.
Record sounds too fast or too slow.
• Wrong speed selected for the record.
Strong hum on phono input
• The cable is not grounded correctly.
There is no sound
• Make sure the volume is turned up.
• Make sure the volume on your third party device is turned up.

English
12
FCC Statements
This device complies with part 15 of the FCC Rules. Operation is subject to the following two
conditions:
(1) This device may not cause harmful interference, and
(2) this device must accept any interference received, including interference that may cause
undesired operation.
Note: This equipment has been tested and found to comply with the limits for a Class B digital
device, pursuant to part 15 of the FCC Rules. These limits are designed to provide reasonable
protection against harmful interference in a residential installation. This equipment generates,
uses and can radiate radio frequency energy and, if not installed and used in accordance with the
instructions, may cause harmful interference to radio communications. However, there is no
guarantee that interference will not occur in a particular installation. If this equipment does cause
harmful interference to radio or television reception, which can be determined by turning the
equipment off and on, the user is encouraged to try to correct the interference by one or more of
the following measures:
− Reorient or relocate the receiving antenna.
− Increase the separation between the equipment and receiver.
− Connect the equipment into an outlet on a circuit different from that to which the receiver is
connected.
− Consult the dealer or an experienced radio/TV technician for help.
Note: The Grantee is not responsible for any changes or modifications not expressly approved by
the party responsible for compliance. such modifications could void the user's authority to operate
the equipment.
The device has been evaluated to meet general RF exposure requirement.
To maintain compliance with FCC's RF exposure guidelines, the distance must be at least 20 cm
between the radiator and your body, and fully supported by the operating and installation
configurations of the transmitter and its antenna(s).
SIMPLIFIED EU DECLARATION OF CONFORMITY
Hereby, Modern Marketing Concepts Inc. dba Crosley Brands, declares that the radio equipment
type is in compliance with Directive 2014/53/EU. The full text of the EU declaration of conformity
is available at the following internet address:
http://crosleybrands.com/euDoC

C72A-WA
Tocadiscos C72A
Manual de instrucciones
¿Tiene preguntas, ha tenido problemas o hay piezas faltantes?
Antes de devolver el producto a la tienda, comuníquese con nuestro Servicio al Cliente
de 8 a. m. a 6 p. m., hora del este, de lunes a viernes
1-888-CROSLEY
www.crosleyradio.com

Español
2
Instrucciones de seguridad importantes
Lea y comprenda este manual en su totalidad antes de usar este producto. Conserve
estas instrucciones para consultarlas en el futuro.
1. No use este producto cerca del agua.
2. Este producto debe ser utilizado solo con el tipo de fuente de alimentación
indicado en la etiqueta o en este manual de instrucciones.
3. No subestime el propósito de seguridad del enchufe polarizado. Un enchufe
polarizado posee dos hojas; una de ellas es más ancha que la otra. Este enchufe
encajará en el tomacorriente en un solo sentido. Si no logra insertar
completamente el enchufe en el tomacorriente, pruebe invirtiendo el enchufe. Si
aún así el enchufe no encaja, comuníquese con su electricista.
4. Proteja el cable de alimentación de ser pisado o pinzado, en especial en los
enchufes, los tomacorrientes y en el punto donde el cable sale del producto.
5. No sobrecargue los tomacorrientes de pared, cables de alargue, o receptáculos
integrales, ya que puede generar un riesgo de incendio o descarga eléctrica.
6. No introduzca objetos de ningún tipo en el producto a través de las ranuras, ya
que pueden hacer contacto con puntos de alto voltaje o provocar un cortocircuito
que ocasione fuego o una descarga eléctrica. No derrame líquidos de ningún tipo
sobre el producto.
7. No intente realizar tareas de mantenimiento por su cuenta, ya que abrir o remover
la cubierta puede exponerlo a un voltaje peligroso y a otros riesgos. Deje toda
tarea de mantenimiento en manos de un técnico de servicio calificado.
8. Los cambios o las modificaciones que no tengan la aprobación expresa de la
parte responsable del cumplimiento pueden anular el permiso del usuario para
utilizar el equipo.
9. No utilice accesorios que no son recomendados por los fabricantes del producto
porque pueden ser peligrosos.
10. Cualquier combinación de carro y producto debe moverse con cuidado. Las
paradas súbitas, el uso de fuerza excesiva y las superficies irregulares pueden
causar que el producto y el carro se vuelquen.
11. Las ranuras de ventilación y las aberturas del gabinete son provistas para la
ventilación y para asegurar el correcto funcionamiento del producto y evitar el
recalentamiento. No bloquee ni cubra estas aberturas.
12. Desconecte el producto durante las tormentas eléctricas o cuando no se utilice
durante períodos extendidos.

Español
3
Artículos en este empaque
Antes de deshacerse de cualquier material del empaque, revíselo con atención y
asegúrese de encontrar los siguientes artículos que se incluyen en este paquete:
• Tocadiscos
• Tapa de tocadiscos
• Cobertor deslizable del tocadiscos
• Bandeja del tocadiscos
• Contrapeso del brazo del tocadiscos
• Transportador de alineación de la cápsula
• Transformador
• Adaptador de 45 RPM
• Cable RCA
• Altavoces
• Cable de altavoz x 2
Comuníquese con el Servicio al Cliente de Crosley en caso de que faltara algún
accesorio en el empaque. Conserve el material de embalaje original para realizar
cambios o devoluciones.

Español
4
Especificaciones
Crosley C72A
Fuente de energía Transformador de CA, salida CC de 15V 2.4 A
Consumo de energía 50W
Altavoces
De agudos 8Ω 10W x 2
De graves 4Ω 30W x 2
Velocidad del tocadiscos 331/3, 45 RPM
Variación de velocidad +1.5 %
Fluctuación y trémulo <0.15 %
Señal a ruido 72 dB
Rango de fuerza descendente 3.0 – 4.3g
Longitud efectiva del brazo del tocadiscos 8,74” (222 mm)
Voladizo 0,75”
Dimensiones del producto (P x A x D) 16.46” x 5.04” x 15.31”, con la tapa
abierta 16.46” x 15.46” x 15.31”
Peso 21.60 lbs
Aguja: Crosley NP-5
Respuesta de frecuencia 20 Hz – 20 kHz
Balance de canal <2.5 dB
Separación de canal >18 dB
Voltaje de salida 2.5 mV
Resistencia de carga recomendada 47 k Ω
Conexión del amplificador MM –entrada
Presión de rozamiento recomendada 3.5±0.5g
Peso 0.18 oz
Nota:
• El diseño y las especificaciones están sujetos a cambios sin previo aviso.

Español
5
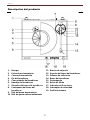
Descripción del producto
1. Bisagra
2. Polea de accionamiento
3. Correa de transmisión
4. Eje del tocadiscos
5. Concentrador del tocadiscos
6. Bandeja del tocadiscos
7. Elevador del brazo del tocadiscos
8. Contrapeso del brazo del
tocadiscos
9. Dial de fuerza descendente
10. Dial de ajuste antirresbalamiento
11. Broche de sujeción
12. Soporte del brazo del tocadiscos
13. Palanca de indicación
14. Brazo del tocadiscos
15. Portacápsula
16. Botón de Modo
17. Indicador de Funciones
18. Interruptor de velocidad
19. Perilla de volume

Español
20. Altavoces
21. Conector a tierra
22. Conectores RCA
23. Interruptor de detención
automática
24. Interruptor para Fono/Línea
25. Conector de alimentación
26. Terminales de parlantes con
conector de broche elástico
27. Interruptor de alimentación
Instalación inicial
Instalación indispensable
1. Coloque la unidad en una superficie plana y nivelada. El lugar seleccionado debe
ser estable y estar libre de vibraciones.
2. Instale la tapa del tocadiscos en las bisagras.
3. Quite la banda de sujeción que sostiene el brazo del tocadiscos.
4. Retire todo el material de embalaje de debajo del cubo del plato giratorio.
5. Instale la bandeja del tocadiscos y la correa de transmisión según corresponda.
6. Deslice el Contrapeso del brazo del tocadiscos hacia este último con los números
mirando hacia el frente del plato giratorio y gírelo suavemente hacia el mango
posterior del brazo del tocadiscos.
7. Ajuste el contrapeso para establecer la presión adecuada en la aguja fonográfica.
8. Coloque el cobertor deslizable sobre la bandeja del tocadiscos.
9. Conecte el adaptador de corriente al conector de alimentación de la unidad.
Nota: No enchufe el transformador de a un tomacorriente hasta terminar de ensamblar las
partes. Antes de encender el equipo, vuelva a asegurarse de que todos los ajustes de
conexión estén correctos. Siempre apague la unidad al conectarla o desconectarla.
Instalación de la bandeja y la correa del tocadiscos
1. Coloque la correa de transmisión alrededor de la bandeja pequeña que está
conectada al eje del tocadiscos y luego use la herramienta de ensamblaje de la
correa que se proporciona para tirar de la correa, de manera que encaje alrededor
de la ranura de la polea de motor.

Español
7
2. Coloque la bandeja del tocadiscos a través del eje.
Ajuste del Contrapeso del brazo del tocadiscos para la Presión de la aguja
fonográfica
1. Quite el protector de la aguja fonográfica de la cápsula y evite tocar la punta de la
aguja fonográfica durante el ajuste.
2. Suelte broche de sujeción del brazo del tocadiscos, sostenga suavemente el brazo
y aléjelo del Soporte del brazo. En este momento, el brazo del tocadiscos está
desequilibrado y puede balancearse libremente
3. Levante el brazo del tocadiscos de su soporte y sosténgalo suavemente. El brazo
del tocadiscos está desequilibrado en este momento.
4. Gire con cuidado el contrapeso hacia la parte delantera del tocadiscos hasta que
el brazo esté equilibrado en sentido horizontal y se mueva libremente sobre la
bandeja sin que la aguja fonográfica toque la superficie del disco.
5. Vuelva a colocar el brazo del tocadiscos en el soporte del brazo y trabe el Broche
de sujeción.
6. Mientras el contrapeso se mantenga estable sin girar, gire con cuidado solamente
el Dial de fuerza descendente hasta que el "0" en el dial esté alineado con la línea
central marcada en la parte superior del brazo del tocadiscos.
7. Gire el contrapeso junto con el dial de fuerza descendente en sentido antihorario
(si se mira desde la parte delantera del tocadiscos) para ajustar la presión según
las recomendaciones del fabricante de la aguja fonográfica.
Nota:
- Cada marca en la escala representa 0.05 g (gramo).
- La presión recomendada para la cápsula instalada de fábrica es de 3.5 g.
- Una vuelta completa del contrapeso proporcionará una presión de 2.0 g. Para alcanzar una
presión de aguja mayor a 2.0 g, continúe girando el contrapeso hacia adelante.
Conexión del sistema estéreo
Conectores RCA
• Los conectores RCA de esta unidad se puede utilizar como tomas de salida Phono
o tomas de salida de línea. Esto se determina utilizando el conmutador Phono /
Line.
• Para conectarse a altavoces activos, coloque el interruptor Phono / Line en la
configuración Line. Para conectar un preamplificador phono o la entrada phono de
un sistema estéreo, ajuste el interruptor Phono / Line en la configuración Phono
• El cable rojo se conecta en el canal derecho, y el cable blanco se conecta en el
canal izquierdo.
Nota:
− Si el Interruptor para Fono/Línea se ajusta en la posición LÍNEA pero los conectores RCA
están conectados a la entrada fono del sistema estéreo, es posible que el sonido se
distorsione debido a la sobrecarga de entradas y esto podría dañar su sistema estéreo.

Español
8
− Si el interruptor para Fono/Línea está en la posición FONO pero el conector RCA está
conectado a la entrada de línea del sistema estéreo, el volumen será muy bajo debido a la
falta de preamplificación de la señal.
− Los conectores RCA no están diseñados para conectarse directamente a parlantes pasivos y,
si se los conecta, el volumen será muy bajo.
Terminales de parlantes con conector de broche elástico
Para conectar los altavoces incluidos con este sistema u otros altavoces pasivos,
conecte un extremo del cable de altavoz incluido con este paquete a la parte posterior
de los altavoces y el otro extremo a los terminales de salida de altavoz. Para hacer
esto, gire los clips de resorte a la posición abierta, inserte el cable del altavoz y gire
los clips de resorte a la posición cerrada. Establezca el conmutador Phono / Line en la
configuración Line.
Funcionamiento del tocadiscos
1. Presione el interruptor de alimentación para encenderlo.
2. Pulse el botón Mode y seleccione el modo Phono.
Nota: el indicador de función estará rojo
3. Ajuste el Interruptor de velocidad según corresponda.
4. Coloque el disco en el tocadiscos. De ser necesario, utilice el Adaptador de
45 rpm.
5. Quite el protector de la aguja fonográfica de su ensamblaje.
Nota: Para evitar los daños de la aguja fonográfica, asegúrese de que el protector esté
ubicado correctamente cada vez que mueva o limpie el tocadiscos.
6. Suelte el Broche de sujeción del tocadiscos.
Nota: Cuando el tocadiscos no se utilice, recuerde volver a trabar el broche de sujeción.
7. Use la Palanca del brazo del tocadiscos para levantar el brazo.
8. Mueva suavemente el brazo del tocadiscos sobre el disco en la parte que desea
comenzar a reproducir. Ajuste la Palanca del brazo del tocadiscos de vuelta a la
posición hacia abajo. El brazo bajará lentamente hacia el disco y se comenzará a
reproducir.
9. Cuando el disco termine de reproducirse, utilice la Palanca del brazo del
tocadiscos una vez más para levantar el brazo y volver a colocarlo en el Soporte
del brazo. Suelte la palanca para permitir que el brazo vuelva a apoyarse sobre su
soporte. Para suspender la reproducción, siga los mismos pasos.
10. Trabe el Broche del brazo del tocadiscos para asegurarlo.
La page charge ...
La page charge ...
La page charge ...
La page charge ...
La page charge ...
La page charge ...
La page charge ...
La page charge ...
La page charge ...
La page charge ...
La page charge ...
La page charge ...
La page charge ...
La page charge ...
La page charge ...
La page charge ...
La page charge ...
La page charge ...
-
 1
1
-
 2
2
-
 3
3
-
 4
4
-
 5
5
-
 6
6
-
 7
7
-
 8
8
-
 9
9
-
 10
10
-
 11
11
-
 12
12
-
 13
13
-
 14
14
-
 15
15
-
 16
16
-
 17
17
-
 18
18
-
 19
19
-
 20
20
-
 21
21
-
 22
22
-
 23
23
-
 24
24
-
 25
25
-
 26
26
-
 27
27
-
 28
28
-
 29
29
-
 30
30
-
 31
31
-
 32
32
-
 33
33
-
 34
34
-
 35
35
-
 36
36
-
 37
37
-
 38
38


Crosley C72A Manuel utilisateur
- Catégorie
- Plaque tournante
- Taper
- Manuel utilisateur
dans d''autres langues
- English: Crosley C72A User manual
- español: Crosley C72A Manual de usuario
Documents connexes
-
Crosley T170A-WH Manuel utilisateur
-
Crosley C62 Manuel utilisateur
-
Crosley C6B-WA Manuel utilisateur
-
Crosley C6 Turntable C6B Manuel utilisateur
-
-
Crosley t150 Manuel utilisateur
-
-
Crosley T150B Manuel utilisateur
-
-