
706r
EN
NL
FR
IT
DE
ES
PT

2
Part No. 12656689 Issue 3
This product complies with the requirements of European Directive: 1995/5/EC (Radio
&Telecommunications Terminal Equipment Directive).

3
Fig. 1
3
5
3
4
2
1

4
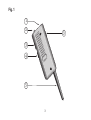
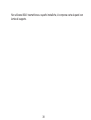
Fig 1. 706r Controls and Indicators
1. Activity LED
2. Control Button (grey)
3. PA Button (orange)
4. Lock Button (black)
5. Aerial
Fig 1. 706r Bediening en indicatie
1. Activiteiten LED
2. Controleknop (grijs)
3. Alarmknop (oranje)
4. Vergrendeling (zwart)
5. Antenne
Fig 1. Commandes et voyants de l’émetteur 706r
1. LED d’activité
2. Bouton de commande (gris)
3. Bouton Panique (orange)
4. Bouton de verrouillage (noir)
5. Antenne

5
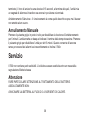
Figura 1. Controlli ed Indicazioni del 706r
1. LED di attività
2. Pulsante di Controllo (grigio)
3. Pulsante Allarme Panico (arancione)
4. Pulsante di Blocco (nero)
5. Antenna
Fig. 1 706r knapper og indikatorer
1. Aktivitets LED
2. Kontrolknap (grå)
3. PA knap (orange)
4. Sikringsknap (sort)
5. Antenne
Fig. 1. 706r Knapper og indikatorer
1. Aktivitets-LED
2. Kontrollknapp (grå)
3. PA knapp (oransje)
4. Låseknapp (svart)
5. Antenne

6
Fig. 1 706r knappar och indikatorer
1. Aktivitets LDC
2. Kontrollknapp (grå)
3. PA knapp (orange)
4. Säkringsknapp (svart)
5. Antenn
Abbildung 1: Regler und Anzeigen des 706r
1. Aktivitäts-LED
2. Schaltknopf (grau)
3. Notrufknopf (orange)
4. Sperrknopf (schwarz)
5. Antenne
Figura 1. 706r Controles e indicadores
1. LED de actividad
2. Botón de control (gris)
3. Botón AP (naranja)
4. Botón de bloqueo (negro)
5. Antena

7
Figura 1. Comandos e Indicadores do 706r
1. LED de Actividade
2. Botão de Comando (cinzento)
3. Botão Alarme de Pânico (laranja)
4. Botão de Bloqueio (preto)
5. Antena

8

9
EN
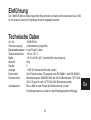
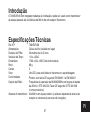
Introduction
The 706rEUR-00 has an integral tilt switch and can be used as a personal attack
transmitter up to 900m from a Scantronic receiver.
Specifications
Part No.:
Power Supply:
Battery Life:
706rEUR-00
Lithium power cell (soldered in place)
Typically 5 years.
Temperature Range: -10 to +55°C
Dimensions: 170H x 45W x 30D (including aerial)
Weight: 68 gms
Channels 2
Display One LED for transmitter activity and learning.
Compliance Product is CE tested to EN 50081-1 and EN 50082-1.
Radio Section Operating frequency 868.6625MHz at 20kHz bandwidth. I-ETS 300
220. CE tested to I-ETS 300 339 (draft standard).
Transmitter range Up to 900m free space (range depends on the receiver aerial and
the nature of the receiving path).

10
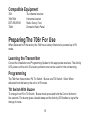
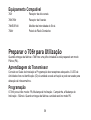
Compatible Equipment
762r Two channel receiver
8 channel receiver
Radio Survey Tool.
768r/769r
DET-RSURV01
7500r
Domestic Radio Panel
Preparing The 706r For Use
When delivered from the factory the 706r has a battery fitted and is powered up in PA
mode.
Learning the Transmitter
Consult the Installation and Programming Guides for the appropriate receivers. The Activity
LED pulses out the unit’s ID at every activation and can be used for infra red learning.
Programming
The 706r has three modes: PA, Tilt Switch - Buzzer, and Tilt Switch - Silent. When
delivered from the factory the unit is in PA mode.
Tilt Switch With Buzzer
To change from PA to Tilt Switch - Buzzer mode press and hold the Control button for
five seconds. The buzzer gives a double beep and the Activity LED flashes to signal the
change in mode.

11
EN
Tilt Switch - Silent
To change from PA to Tilt Switch - Silent mode press and hold the Control button for seven
seconds. After five seconds the 706r gives a double beep and the Activity LED flashes.
After a further two seconds the 706r gives another double beep to signal the change in
mode.
Note: While the 706r is in either of the Tilt Switch modes the Activity LED flashes once
every 10 seconds.
To Change Back to PA Mode
To change back to PA mode press and hold the Control button again for five seconds. The
buzzer gives a single beep to signal the change in mode.
Operation
Personal Attack
Press the two orange side buttons together. The transmitter does not signal if you press
only one button. Note the black button fitted below the left-hand orange button. This is a
safety lock to prevent false activations. Slide the black button upwards to lock the orange
button.

12
Tilt Switch
If the 706r is in Tilt Switch - Buzzer mode then the buzzer starts a warning tone
approximately 5 seconds after the unit tilts more than 45 degrees from vertical. The
warning tone lasts for 15 seconds while the unit is tilted. At the end of the warning tone
the unit sends an alarm signal to the receiver if it is still tilted. Restore the unit upright to
silence the warning tone.
Tilt Switch - Silent mode operates in a similar way to Tilt Switch - Buzzer mode, but the unit
does not give any warning tones.
Manual Over-Ride
If you wish to work for a short time with the 706r tilted past 45 degrees, then press the grey
button on top of the unit to temporarily disable the tilt switch. After you press the button the
unit ignores the tilt switch for 5 minutes. Press the grey button again for another delay.
This facility lets you work without causing false alarms by inadvertently tilting the 706r.
Servicing
The 706r does not contain any serviceable parts. The unit should be replaced within one
month of signaling "Low Battery"

13
EN
Battery Care
P
AY ATTENTION TO THE METHOD OF DISPOSAL. DO NOT:
DISPOSE OF THE BATTERY IN A FIRE.
ATTEMPT TO OPEN THE BATTERY.
HIT THE BATTERY WITH A HEAVY OBJECT.
SHORT CIRCUIT THE BATTERY - THERE IS A RISK OF EXPLOSION.
ATTEMPT TO RECHARGE THE BATTERY.
Contact Cooper Security Ltd. for further disposal information.
TESTING
Determine the limits of the transmitter’s range and inform the user of these limits. Check
that the unit will function in all areas where the user EXPECTS it to function and point out
any discrepancies.
To ensure good reception use the DET-RSURV survey tool to obtain accurate field
strength readings and audible and visual indication of the transmitter’s performance and
any interference present.

14
CAUTION
Transmitter range depends on the receiver aerial and the nature of the receiving path.
To reduce the problems, there are a number of simple guidelines that can be followed:
NEVER use the transmitter on a metal surface, including foil-backed wallpaper.

15
EN

16
© Cooper Security Limited 2005
Every effort has been made to ensure that the contents of this leaflet are correct . How-
ever, neither the authors nor Cooper Security Limited accept any liability for loss or dam-
age caused or alleged to be caused directly or indirectly by this leaflet. The contents of this
leaflet are subject to change without notice.

17
NL
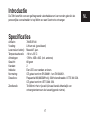
Introductie
De 706r beschikt over een geïntegreerde valschakelaar en kan worden gebruikt als
persoonlijke overvalmelder tot op 900m van een Scantronic-ontvanger.
Speci
ficaties
Artikelnr.: 706rEUR-00
Voeding: Lithium cel (gesoldeerd)
Levensduur batterij: Meestal 5 jaar.
Temperatuurbereik: -10 tot +55°C
Afmetingen: 170H x 45B x 30D (incl. antenne)
Gewicht: 68 gram
Kanalen: 2
Indicatie: Een LED voor zenden en leren.
Normering: CE getest conform EN 50081-1 en EN 50082-1.
Draadloos: Frequentie 868,6625MHz bij 20kHz bandbreedte. I-ETS 300 220.
CE getest conform I-ETS 300 339.
Zendbereik: Tot 900m in het vrije veld (Actueel bereik afhankelijk van
ontvangstantenne en de tussenliggende ruimte).

18
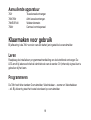
Aanvullende apparatuur
762r Twee-kanaalsontvanger.
768r/769r Acht-kanaalsontvanger.
790rEUR-00 Veldsterktemeter.
7500r Centraal controlepaneel
Klaarmaken voor gebruik
Bij aflevering is de 706r voorzien van een batterij en ingesteld als overvalmelder.
Leren
Raadpleeg de installatie en programmeerhandleiding van de betreffende ontvanger. De
LED zendt bij iedere activiteit de identiteitcode van de zender. Dit (infrarode) signaal kunt u
gebruiken bij het leren.
Programmeren
De 706r heeft drie standen: Overvalmelder, Valschakelaar – zoemer en Valschakelaar
– stil. Bij aflevering staat het toestel standaard op overvalmelder.

19
NL
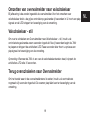
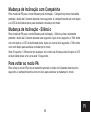
Omzetten van overvalmelder naar valschakelaar
Bij aflevering is de zender ingesteld als overvalmelder. Voor het omzetten naar
valschakelaar drukt u de grijze controleknop gedurende vijf seconden in. U hoort een piep-
signaal en de LED knippert ter bevestiging van de omzetting.
Valschakelaar - stil
Om over te schakelen van Overvalmelder naar Valschakelaar – stil, houdt u de
controletoets gedurende zeven seconden ingedrukt. Na vijf seconden begint de 706r
te piepen en knippert de activiteiten-LED. Twee seconden later hoort u opnieuw een
piepsignaal ter bevestiging van de omzetting.
Opmerking: Wanneer de 706r in een van de valschakelaarstanden staat, knippert de
activiteiten-LED elke 10 seconden.
Terug overschakelen naar Overvalmelder
Om het toestel weer in de overvalmelderstand te zetten, houdt u de controletoets
nogmaals vijf seconden ingedrukt. De zoemer piept één keer ter bevestiging van de
omzetting.

20
Werking
Persoonlijke overval
- Druk de twee oranje knoppen gelijktijdig in. De zender geeft geen
signaal als u slechts een knop indrukt. Let op de zwarte knop onder de linker oranje knop.
Dit is een beveiliging tegen ongewenste meldingen. Schuif de zwarte knop naar boven om
de oranje knop te blokkeren.
Valschakelaar - 5 seconden nadat de zender onder een hoek van 45° of meer staat
geeft de zoemer een waarschuwingssignaal. Dit signaal duurt 15 seconden gedurende
de periode dat de schakelaar schuin staat. Na het waarschuwingssignaal, als de zender
nog steeds schuin staat, zendt de zender een alarmsignaal naar de ontvanger. Houdt de
zender rechtop om het waarschuwingssignaal te stoppen.
Handmatig uitschakelen - Druk op de grijze knop om de valschakelaar tijdelijk uit te
schakelen. De zender negeert nu de valschakelaar gedurende vijf minuten. Na deze
periode geeft de zoemer een signaal ten teken dat de melder weer actief is. Druk
nogmaals de grijze knop in als u de periode wilt verlengen. Deze functie stelt u in staat om
alarmmeldingen te voorkomen tijdens gecoördineerde bewegingen.
Onderhoud
De 706r bevat niet alle onderdelen. De eenheid moet worden vervangen binnen een
maand na de signalering "Laag batterij
La page charge ...
La page charge ...
La page charge ...
La page charge ...
La page charge ...
La page charge ...
La page charge ...
La page charge ...
La page charge ...
La page charge ...
La page charge ...
La page charge ...
La page charge ...
La page charge ...
La page charge ...
La page charge ...
La page charge ...
La page charge ...
La page charge ...
La page charge ...
La page charge ...
La page charge ...
La page charge ...
La page charge ...
La page charge ...
La page charge ...
La page charge ...
La page charge ...
La page charge ...
La page charge ...
La page charge ...
La page charge ...
La page charge ...
La page charge ...
La page charge ...
La page charge ...
La page charge ...
La page charge ...
La page charge ...
La page charge ...
La page charge ...
La page charge ...
La page charge ...
La page charge ...
-
 1
1
-
 2
2
-
 3
3
-
 4
4
-
 5
5
-
 6
6
-
 7
7
-
 8
8
-
 9
9
-
 10
10
-
 11
11
-
 12
12
-
 13
13
-
 14
14
-
 15
15
-
 16
16
-
 17
17
-
 18
18
-
 19
19
-
 20
20
-
 21
21
-
 22
22
-
 23
23
-
 24
24
-
 25
25
-
 26
26
-
 27
27
-
 28
28
-
 29
29
-
 30
30
-
 31
31
-
 32
32
-
 33
33
-
 34
34
-
 35
35
-
 36
36
-
 37
37
-
 38
38
-
 39
39
-
 40
40
-
 41
41
-
 42
42
-
 43
43
-
 44
44
-
 45
45
-
 46
46
-
 47
47
-
 48
48
-
 49
49
-
 50
50
-
 51
51
-
 52
52
-
 53
53
-
 54
54
-
 55
55
-
 56
56
-
 57
57
-
 58
58
-
 59
59
-
 60
60
-
 61
61
-
 62
62
-
 63
63
-
 64
64


dans d''autres langues
- italiano: Eaton 706r Manuale utente
- English: Eaton 706r User manual
- español: Eaton 706r Manual de usuario
- Deutsch: Eaton 706r Benutzerhandbuch
- Nederlands: Eaton 706r Handleiding
- português: Eaton 706r Manual do usuário
Autres documents
-
BABYMOOV Digital Le manuel du propriétaire
-
Abus FURM50000 Mode d'emploi
-
SportDOG SD-800E Le manuel du propriétaire
-
Marmitek PR811 Manuel utilisateur
-
Cobra SPYBALL 6829 Troubleshooting guide
-
-
-
Key Gates KCOMW Mode d'emploi
-
Cooper 9448ES Fiche technique
-