Cleveland Range KGL-100 Manuel utilisateur
- Taper
- Manuel utilisateur

KGL-40, KGL-60, KGL-80, KGL-100
KGL-40-T, KGL-60-T, KGL-80-T
KGL-40-SH, KGL-60-SH,
KGL-40-TSH
KGL-40
KGL-40-T
SE95003-1 EN Rev. 8
February 2012
Cleveland
™
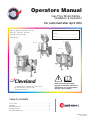
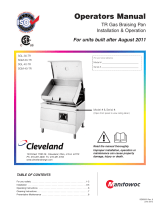
Operators Manual
Gas Floor Model Kettles -
Installation & Operation
For units built after April 2010
1333 East 179th St., Cleveland, Ohio, U.S.A. 44110
Ph: 216.481.4900 Fx: 216.481.3782
www.clevelandrange.com
For your future reference.
Model # ______________________________________
Serial # _______________________________________
Read the manual thoroughly.
Improper installation, operation or
maintenance can cause property
damage, injury or death.
K
GL-40SH
0
!
0
!
TABLE OF CONTENTS
For your safety . . . . . . . . . . . . . . . . . . . . . . . . . . . . . . . . . . . . . . . . . . . . . . . 1
Installation . . . . . . . . . . . . . . . . . . . . . . . . . . . . . . . . . . . . . . . . . . . . . . . . . . . 3
Operating Instructions . . . . . . . . . . . . . . . . . . . . . . . . . . . . . . . . . . . . . . . . . . 5
Cleaning Instructions . . . . . . . . . . . . . . . . . . . . . . . . . . . . . . . . . . . . . . . . . . . 6
Preventative Maintenance . . . . . . . . . . . . . . . . . . . . . . . . . . . . . . . . . . . . . . . 7

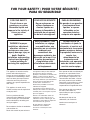
WARNING: Improper
installation, adjustment,
alteration, service or
maintenance can cause
property damage, injury or
death. Read the
installation and operating
instructions thoroughly
before installing or
servicing this equipment.
FOR YOUR SAFETY
Do not store or use
gasoline or any other
flammable liquids and
vapours in the vicinity of
this or any other
appliance.
This appliance is not to be used by
persons with reduced physical,
sensory or mental capabilities, or lack
of experience and knowledge, unless
they have been given supervision or
instruction concerning use of the
appliance by a person responsible for
their safety.
This appliance is not for use by
children and they must be supervised
not to play with it.
Post in a prominent location,
instructions to be followed in the event
the user smells gas. This information
shall be obtained by consulting your
local gas supplier.
Do not obstruct the flow of combustion
and ventilation air.
Retain this manual for your reference.
AVERTISSEMENT : Une
installation, un réglage,
une modification, une
réparation ou un entretien
inadéquat peut
occasionner des
dommages matériels, des
blessures ou la mort. Lire
la notice de montage et
d'exploitation avant
d'installer ou d'entretenir
cet équipement.
POUR VOTRE SÉCURITÉ
Ne pas entreposer ou
utiliser d'essence ou
d'autres liquides ou
vapeurs inflammables à
proximité de cet appareil
ou de tout autre appareil.
Cet appareil ne doit pas être utilisé par
des personnes dont les capacités
physiques, sensorielles ou mentales sont
réduites, ou des personnes dénuées
d'expérience ou de connaissance, sauf si
elles ont pu bénéficier, par l'intermédiaire
d'une personne responsable de leur
sécurité, d'une surveillance ou
d'instructions préalables concernant
l'utilisation de l'appareil.
Cet appareil n'est pas destiné à être
utilisé par des enfants et ils doivent être
surveillés pour s'assurer qu'ils ne jouent
pas avec l'appareil.
Affichez à un endroit bien visible les
instructions à suivre dans le cas où
l'utilisateur sent une odeur de gaz. Ces
informations seront obtenues auprès de
votre fournisseur de gaz local.
Ne pas obstruer le flux d'air de
combustion et de ventilation.
Conservez ce manuel pour votre
référence
ADVERTENCIA: La
instalación, el ajuste, la
alteración, el servicio o el
mantenimiento incorrectos
pueden ocasionar daños a
la propiedad, lesiones o la
muerte. Lea
detenidamente las
instrucciones de
instalación y de operación
antes de instalar o darle
servicio a este equipo.
PARA SU SEGURIDAD
No guarde ni use gasolina
o cualesquiera otros
líquidos o vapores
inflamables en las
cercanías de éste o
cualquier otro aparato.
Este aparato no debe ser utilizado por
personas con capacidades físicas,
sensoriales o mentales reducidas, o
que no tengan la experiencia y los
conocimientos adecuados, a menos
que estas personas hayan recibido
supervisión e instrucciones en cuanto
al uso del aparato por la persona
responsable de la seguridad de ellas.
Este aparato no debe ser usado por
los niños y ellos deben ser
supervisados para que no jueguen
con el aparato.
No obstruya el flujo del aire
combustión y de ventilación.
Guarde este manual para su
referencia.
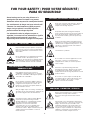
FOR YOUR SAFETY / POUR VOTRE SÉCURITÉ /
PARA SU SEGURIDAD
1.

0
Keep clear of pressure relief discharge. / Restez à
l'écart de la soupape de sureté. / Permanezca
alejado de la descarga de presión.
Keep hands away from moving parts and pinch
points. / Gardez les mains loin des pièces mobiles et
des points de pincement. / Mantenga las manos
lejos de piezas movibles y puntos de presión muy
localizada
.
0
Surfaces and product may be hot! Wear protective
equipment. /Les surfaces et le produit peuvent être
chauds! Portez un équipement de protection. / ¡Las
superficies y el producto pueden estar calientes!
Utilice equipo protector.
Hot! / Chauds ! / ¡Caliente!
Do not climb, sit or stand on equipment. /Il ne faut
pas monter, s'asseoir ni se tenir debout sur
l'équipement. /No subirse, ni sentarse ni pararse
sobre el equipo.
Stand clear of product discharge path when
discharging hot product. / Écartez-vous du chemin
de décharge d’un produit chaud. / Permanezca
alejado de la ruta de descarga del producto al vaciar
producto caliente.
Do not lean on or place objects on kettle lip. / Ne
vous appuyez pas et ne placez pas d’objets sur le
bec de la chaudière. / No se apoye o coloque
objetos en el borde de la marmita.
0
0
Inspect unit daily for proper operation. / Inspectez
l’unité tous les jours pour son bon fonctionnement. /
Inspeccione diariamente el funcionamiento correcto
de la unidad.
Do not fill kettle above recommended level marked
on outside of kettle. / Ne remplissez pas la
chaudière en excès du niveau recommandé marqué
sur la chaudière. / No llene la marmita arriba del
nivel recomendado marcado fuera de la marmita.
Remove electrical power prior to servicing. / Coupez
l'alimentation électrique avant l'entretien. /
Desconecte la energía eléctrica antes de darle
servicio.
Ensure kettle is at room temperature and pressure
gauge is showing zero or less prior to removing any
fittings. / Assurez-vous que la chaudière est à
température ambiante et que le manomètre est à
zéro ou moins avant de retirer des accessoires. /
Asegúrese de que la marmita esté a temperatura
ambiente y el manómetro esté mostrando cero o
menos antes de retirar cualquier accesorio.
IMPORTANT / IMPORTANT / IMPORTANTE
CAUTION / ATTENTION / PRECAUCIÓN
0
Keep appliance and area free and clear of
combustibles. / Gardez l'appareil et son entourage
libre de tous combustibles. / Mantenga el aparato y
el área libres de combustibles.
Do not attempt to operate this appliance during a
power failure. / N’essayez pas de faire fonctionner
cet appareil lors d'une panne de courant. / No
intente poner en marcha este aparato durante un
fallo de suministro eléctrico.
Shut gas supply off prior to servicing. / Fourniture de
gaz fermée au loin avant d'entretenir. / Suministro de
gas cerrado apagado antes del mantenimiento.
Unit exhaust contains carbon monoxide. Operate
only under a properly functioning hood with
adequate makeup air. / L'échappement de l'unité
émet du monoxyde de carbone. Exploiter
uniquement sous une hotte fonctionnant
correctement avec une source adéquate d'air
d'appoint. / El escape de la unidad contiene
monóxido de carbono. Operar solamente bajo una
campana en buen funcionamiento con aire de
relleno adecuado.
GAS APPLIANCES / APPAREILS À GAZ /
APARATOS A GAS
SERVICING / ENTRETIEN / SERVICIO
Hazard warnings are for your safey. Absence of a
warning does not mean the hazard is not present.
Unforeseen actions may result in unanticipated hazards.
Les avertissements de danger sont pour votre sécurité.
L’absence d'un avertissement ne signifie pas que le
danger n'est pas présent. Les actions imprévues
peuvent entraîner des dangers imprévus
Las advertencias sobre los peligros son para su
seguridad. La ausencia de una advertencia no significa
que el peligro no está presente. Las acciones
imprevistas podrían resultar en peligros no anticipados.
FOR YOUR SAFETY / POUR VOTRE SÉCURITÉ /
PARA SU SEGURIDAD
2.

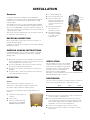
GENERAL
Insure gas and electrical supplies match rating plate.
Installation of the kettle must be accomplished by qualified
installation personnel working to all applicable local and
national codes.
This equipment is built to comply with applicable standards
for manufacturers. Included among those approval agencies
are: UL, NSF, ASME/N.Bd., CSA, ETL, and others. Many local
codes exist, and it is the responsibility of the owner/installer to
comply with these codes.
Observe all clearance requirements. Do not obstruct the flow
of combustion and ventilation air.
RECEIVING INSPECTION
Before unpacking visually inspect the unit for evidence of
damage during shipping.
If damage is noticed, do not unpack the unit, follow shipping
damage instructions.
SHIPPING DAMAGE INSTRUCTIONS
If shipping damage to the unit is discovered or suspected,
observe the following guidelines in preparing a shipping
damage claim.
1. Write down a description of the damage or the reason for
suspecting damage as soon as it is discovered. This will
help in filling out the claim forms later.
2. As soon as damage is discovered or suspected, notify
the carrier that delivered the shipment.
3. Arrange for the carrier's representative to examine the
damage.
4. Fill out all carrier claims forms and have the examining
carrier sign and date each form.
UNCRATING
Caution:
Straps under tension and will snap when cut.
Carton may contain staples and Skid contains Nails.
Use proper safety equipment and precautions.
Unit is heavy use adequate help or lifting equipment as
needed.
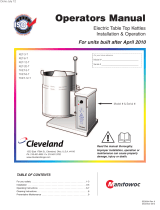
1. Carefully cut any straps from
container.
2. Lift off carton.
3. Inspect for hidden damage.
If found refer to “SHIPPING
DAMAGE INSTRUCTIONS”.
4. Cut strap holding unit.
5.
Remove lag bolts from feet.
6. Remove manual from
kettle pot. Write down
the
model# and serial#
of the
unit onto the front of this
manual.
7. Lift kettle off skid and
move kettle to its
installation location.
8. Discard packaging
material according to
local and or state
requirements.
VENTILATION
Gas fired kettles are only to be installed
under a ventilation hood in a room which
has provisions for adequate make up air.
Further information can be obtained by
referring to the U.S.A. National Fire
Protection Associations NFPA96
regulations. These standards have also been adopted by the
National Building Code in Canada.
POSITIONING
This unit must be installed in accordance with the clearances
shown on the rating label which is adhered to the unit.
RIGHT LEFT REAR
Tilting 003”
Stationary 3” 3” 3”
Allow 12” minimum on right for service.
1. Position the unit in it's permanent location, and level the
unit by turning the adjustable feet.
2. Once positioned and leveled, permanently secure the
unit's flanged feet to the floor using 5/16" lag bolts and
floor anchors (supplied by the installer). Three bolts are
required to secure each of the flanged feet.
3. Seal joints of flanged feet with a silicone sealant.
4. Remove any protective material covering the stainless
steel panels.
INSTALLATION
Model/
Serial#
M
odel/
Serial#
3.

GAS
ENSURE THE GAS SUPPLY MATCHES THE KETTLE'S
REQUIREMENTS AS STATED ON THE RATING PLATE.
Installation must conform, with local codes or in the absence
of local codes, with the National Fuel Gas Code ANSI
Z223.1/NFPA 54, or the Natural Gas and Propane Installation
Code, CSA B149.1.
The appliance and its individual shut-off valve must be
disconnected from the gas supply piping system during any
pressure testing of that system at test pressures in excess of
1/2 psi (3.45 kPa).
The appliance must be isolated from the gas supply piping
system by closing its individual manual shut-off valve during
any pressure testing of the gas supply piping system at test
pressures equal to or less than 1/2 psi (3.45 kPa).
It is recommended that a sediment trap (drip leg) be installed
in the gas supply line. If the gas pressure exceeds 1/2 psi
(3.45 kPa) water column, a pressure regulator must be
installed, to provide a maximum of 1/2 psi (3.45 kPa) water
column gas pressure to the gas control valve.
Use a gas pipe joint compound which is resistant to L.P. gas.
Test all pipe joints for leaks.
1. Removed supplied manual shut-off valve and establish
mounting location.
2. Add union and
piping as required.
3. Connect the gas
line to the manual
shut-off valve.
ELECTRICAL
ENSURE THE ELECTRICAL SUPPLY MATCHES THE
KETTLE'S REQUIREMENTS AS STATED ON THE RATING
LABEL.
A cord and plug are supplied with the unit. Simply plug the
unit into any grounded outlet rated for a minimum of 10 amps.
The kettle must be electrically installed and grounded in
accordance with local codes, or in the absence of local
codes, with National Electrical Code, ANSI/NFPA 70 (USA) or
the Canadian Electrical Code, CSA C22.2, (Canada).
Standard supply voltage is 115 volts A.C., however, optional
A.C. voltages can be supplied on special order. A separate
fused disconnect switch must be supplied and installed in the
high voltage electrical supply line.
The wiring diagram is located under the cover of electrical
box inside the back console.
NOTE: Units are tested on a in-house ground fault system.
However, there is no guarantee the unit will work on all
ground fault systems. If you are having problems you can
hard wire the unit.
WATER
The sealed jacket of the gas-fired kettle is precharged with
the correct amount of a water-based formula, and therefore,
no water connection is required to the kettle jacket. The kettle
can be equipped with optional hot and cold water taps,
requiring 1/2" copper tubing as supply lines.
CLEANING
After installation the kettle must be thoroughly cleaned and
sanitized prior to cooking.
INSTALLATION CHECKS
Although the kettle has been thoroughly tested before leaving
the factory, the installer is responsible for ensuring the proper
operation of kettle once installed.
1. Before turning the kettle on, read the vacuum/pressure
gauge. The gauge's needle should be in the green zone.
If the needle is in the "VENT AIR" zone, follow air venting
procedure.
2. Unit has been thoroughly checked for gas leaks at the
factory however the installer should check all connections
for any leaks which may have resulted from shipping or
installation.
3. Supply power to the kettle by placing the fused
disconnect switch to the "ON" position.
4. Open gas shut-off valve to turn on main gas supply.
5. Turn the temperature control knob to "1" (Min.). The green
LED light should remain lit, indicating the burner is lit, until
the set temperature is reached. Then the green light will
cycle on and off, indicating the burner is cycling on and off
to maintain temperature.
6. Tilt the kettle forward. After a few seconds the red "LOW
WATER" light should be lit when the kettle is in a tilted
position. This light indicates that the burner has
automatically been shut off by the kettle's safety circuit.
This is a normal condition when the kettle is in a tilted
position.
7. Raise the kettle to the upright position. The red "LOW
WATER" light should go out when the kettle is upright.
8. Turn the temperature control knob to "10"(Max.) and allow
the kettle to preheat. The green light should remain on
until the set temperature is reached. Then the green light
will cycle ON and OFF, indicating the burner is cycling
ON and OFF to maintain temperature.
9. Check carbon monoxide is less than 0.08 percent in an
air-free sample of the flue gases. See FREE AIR
CALCULATION procedure in “Maintenance Procedures &
Parts Lists” manual.
BACK OF KETTLE
UNION
NIPPLE
SHUT-OFF
VALVE
GAS
S
UPPLY
WARNING: Electrical Grounding Instructions.
This unit is equipped with a three-prong (grounding)
plug for your protection against shock hazard and
should be plugged directly into a properly grounded
three-prong receptacle. Do not cut or remove the
grounding prong from this plug.
4.

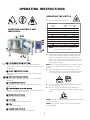
OPERATING THE KETTLE
1. Perform daily startup inspection.
2. Preheat the kettle by turning the
ON/OFF Temperature
Control
to the desired temperature setting. The Heat
Indicator Light (Green) will remain lit, indicating the
burner is on, until the temperature setting is reached.
When the green light goes off, the burners are off, and
preheating is complete.
NOTE: When cooking egg and milk products, the kettle should not
be preheated, as products of this nature adhere to hot cooking
surfaces.
3. Place food product into the kettle. The green Heat
Indicator Light will cycle on and off indicating the burners
are cycling on and off to maintain the set temperature.
4. When cooking is completed turn
Temperature Control
to
the "OFF' position.
5. Pour the contents of the kettle into an appropriate
container by tilting the kettle forward or using discharge
valve.
NOTE: Cleaning should be completed immediately after cooked
foods are removed.
NOTE: A five minute complete shut-of period is required
before relighting.
Temperature Approximate
Control Product Temperature
Setting °F °C
1. 120 49
2. 135 57
3. 150 66
4. 165 74
5. 180 82
6. 195 91
7. 210 99
8. 225 107
9. 245 118
10. 265 130
NOTE: Certain combinations of ingredients will
result in temperature variations
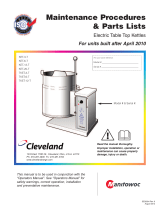
OPERATING CONTROLS AND
INDICATORS
OPERATING INSTRUCTIONS
3
4
2
1
6
4
7
9
8
5
1
1
.
.
L
L
O
O
W
W
W
W
A
A
T
T
E
E
R
R
I
I
N
N
D
D
I
I
C
C
A
A
T
T
O
O
R
R
L
L
I
I
G
G
H
H
T
T
(
(
R
R
E
E
D
D
)
)
When lit, indicates that the kettle is low on water and will not
operate in this condition. This will also light when the kettle is in the
tilted position.
2
2
.
.
O
O
N
N
-
-
O
O
F
F
F
F
T
T
E
E
M
M
P
P
E
E
R
R
A
A
T
T
U
U
R
R
E
E
C
C
O
O
N
N
T
T
R
R
O
O
L
L
Turns kettle ON/OFF and allows the operator to adjust the kettle
temperature.
3
3
.
.
H
H
E
E
A
A
T
T
I
I
N
N
D
D
I
I
C
C
A
A
T
T
O
O
R
R
L
L
I
I
G
G
H
H
T
T
(
(
G
G
R
R
E
E
E
E
N
N
)
)
When lit, indicates that the kettle's burner is on. Cycles ON-OFF
with burner.
4
4
.
.
V
V
A
A
C
C
U
U
U
U
M
M
/
/
P
P
R
R
E
E
S
S
S
S
U
U
R
R
E
E
G
G
A
A
U
U
G
G
E
E
Indicate steam pressure in PSI inside steam jacket and vacuum in
inches of mercury.
5
5
.
.
P
P
R
R
E
E
S
S
S
S
U
U
R
R
E
E
R
R
E
E
L
L
I
I
E
E
F
F
V
V
A
A
L
L
V
V
E
E
(
(
N
N
O
O
T
T
S
S
H
H
O
O
W
W
N
N
)
)
This valve is used to vent the kettle and in the unlikely event there
is an excess steam build-up in the jacket.
6
6
.
.
W
W
A
A
T
T
E
E
R
R
L
L
E
E
V
V
E
E
L
L
S
S
I
I
G
G
H
H
T
T
G
G
L
L
A
A
S
S
S
S
Displays water level in steam jacket.
7
7
.
.
T
T
I
I
L
L
T
T
W
W
H
H
E
E
E
E
L
L
Used for tilting the kettle on hand tilt models.
8
8
.
.
F
F
L
L
U
U
E
E
Exit for combustion gasses.
9
9
.
.
T
T
A
A
N
N
G
G
E
E
N
N
T
T
D
D
R
R
A
A
W
W
-
-
O
O
F
F
F
F
V
V
A
A
L
L
V
V
E
E
Used for draining product or wash water from kettle.
0
!
0
!
0
!
0
!
0
!
0
!
0
!
1
2
3
5
8
9
7
6
4
5.

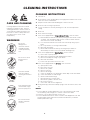
CARE AND CLEANING
Cooking equipment must be cleaned
regularly to maintain its fast, efficient
cooking performance and to ensure its
continued safe, reliable operation. The
best time to clean is shortly after each
use (allow unit to cool to a safe
temperature).
WARNINGS
Do not use
detergents or
cleansers that are
chloride based or
contain quaternary
salt.
Unit should never be
cleaned with a high
pressure spray hose.
Steel wool should
never be used for
cleaning the stainless
steel.
Do not leave water
sitting in unit when
not in use.
Do not use a metal
bristle brush or
scraper.
CLEANING INSTRUCTIONS
CLEANING INSTRUCTIONS
1. Turn unit off.
2. Remove drain screen (if applicable). Thoroughly wash and rinse the screen
either in a sink or a dishwasher.
3. Prepare a warm water and mild detergent solution in the unit.
4. Remove food soil using a nylon brush.
5. Loosen food which is stuck by allowing it to soak at a low temperature
setting.
6. Drain unit.
7. Rinse interior thoroughly.
8. If the unit is equipped with a
T
T
a
a
n
n
g
g
e
e
n
n
t
t
D
D
r
r
a
a
w
w
-
-
O
O
f
f
f
f
V
V
a
a
l
l
v
v
e
e
, clean as follows:
a) Disassemble the draw-off valve first by turning the valve knob counter-
clockwise, then turning the large hex nut counter-clockwise until the
valve stem is free of the valve body.
b) In a sink, wash and rinse the inside of the valve body using a nylon
brush.
c)
Use a nylon brush to clean tangent draw-off tube.
d) Rinse with fresh water.
e) Reassemble the draw-off valve by reversing the procedure for
disassembly. The valve's hex nut should be hand tight only.
9. If the unit is equipped with a
B
B
u
u
t
t
t
t
e
e
r
r
f
f
l
l
y
y
V
V
a
a
l
l
v
v
e
e
, clean as follows:
a) Place valve in open position.
b) Wash using a warm water and mild detergent solution.
c) Remove food deposits using a nylon brush.
d) Rinse with fresh water.
e) Leave valve open when unit is not in use.
10. If the unit is equipped with an
A
A
i
i
r
r
V
V
a
a
l
l
v
v
e
e
, clean as follows:
a) Open product valve.
b) Disconnect air hoses.
c) Remove air cylinder.
d) Remove valve tee.
e) Remove all O-rings.
f) Clean air cylinder, do not submerge in water. Wipe clean and sanitize.
g) Clean and sanitize tee and O-rings.
h) Grease and reinstall O-rings.
i) Reinstall valve tee to kettle outlet.
j) Reinstall air cylinder to bottom of tee.
k) Reconnect air hoses.
l) Close valve and check for alignment.
11. Using mild soapy water and a damp sponge, wash the exterior, rinse, and
dry.
NOTES
➩ For more difficult cleaning applications one of the following can be used:
alcohol, baking soda, vinegar, or a solution of ammonia in water.
➩ Leave the cover off when the kettle is not in use.
➩ For more detailed instructions refer to Stainless Steel Equipment Care and
Cleaning (www.nafem.org/resources/stainlesssteelfinal.doc) on Nafem’s
website (www.nafem.org).
Chloride Cleaners
Wire Brush &
Scrapers
Steel Pads
High Pressure
Spray Hose
Stagnant
Water
0
0
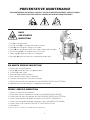
6.

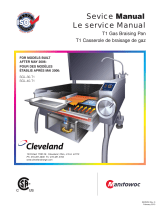
DAILY
PRE-STARTUP
INSPECTION
1. Flue (A) is not obstructed.
2. Draw-Off Valve (B) is installed and handle is in place.
3. Knob (C) not missing from spring assist handle.
4. Cover (D) lifts up and down freely and is held in place when fully open.
5. Pressure Gauge (E) is in the green when unit is cold.
6. Green Light (F) comes on when unit is energized.
7. Red Light (G) comes on when unit is tilted (tilting models only).
PREVENTATIVE MAINTENANCE
FOR MAINTENANCE AND REPAIRS CONTACT YOUR AUTHORIZED MANITOWOC SERVICE AGENCY
AND HAVE A QUALIFIED SERVICE TECHNICIAN MAINTAIN YOUR EQUIPMENT.
Shut off power at main
fuse disconnect prior
to servicing.
Ensure kettle is at room
temperature and pressure
gauge is showing zero or less
prior to removing any fittings.
Inspect unit daily for
proper operation.
0
S
hut off power at main
f
use disconnect prior
to servicing.
Ensure kettle is at room temperature
and pressure gauge is showing zero
or less prior to removing any fittings.
0
Do not fill kettle above
recommended level
marked on outside of kettle.
Surfaces may be
extremely hot! Use
protective equipment.
Keep
appliance
and area
free and
clear of
combustibles.
Unit exhaust
contains carbon
monoxide.
Operate only
under a properly
functioning hood
with adequate
makeup air.
Stand clear of product
discharge path when
discharging hot product.
Wear protective equipment
when discharging hot product.
Do not lean on or place
objects on kettle lip.
Do not
attempt to
operate this
appliance
during a
power
failure.
Keep clear of pressure
r
elief discharge.
Keep hands away from
m
oving parts and pinch points.
For your safety
SERVICING
IMPORTANT
CAUTION
DANGER
GAS APPLIANCES
0
!
0
!
0
!
SIX MONTH SERVICE INSPECTION
1. Perform daily startup inspection.
2. Gasket (H) around top cover is in good condition.
3. Tilt hand (J) wheel is tight.
4. Grease bearings on both trunnions.
5. Check for play in gears (adjust if required).
6. Fasteners securing panels are in place and tight.
7. Perform pressure relief valve periodic test (see PRESSURE RELIEF VALVE TESTING).
8. Adequate exhaust and makeup air is supplied to working area.
YEARLY SERVICE INSPECTION
1. Perform six month service inspection.
2. Check kettle maximum temperature setting (see CALIBRATING PROCEDURE).
3. Perform pressure relief valve periodic test (see PRESSURE RELIEF VALVE TESTING).
4. Inspect safety thermostat for proper connections (see SAFETY THERMOSTAT).
5. Inspect Low water probe for proper connections (see LOW WATER LEVEL PROBE).
6. Inspect safety valve installation (see SAFETY VALVE INSTALLATION).
7. Clean blower.
8. Perform free air calculation (see FREE AIR CALCULATION).
F
G
E
C
D
B
J
H
A
(not shown)
7.
-
 1
1
-
 2
2
-
 3
3
-
 4
4
-
 5
5
-
 6
6
-
 7
7
-
 8
8


Cleveland Range KGL-100 Manuel utilisateur
- Taper
- Manuel utilisateur
dans d''autres langues
- English: Cleveland Range KGL-100 User manual
Documents connexes


Autres documents
-
Cleveland KGT-25-T Mode d'emploi
-
Cleveland TMKDL-150-T Manuel utilisateur
-
Cleveland KGL-80 Manuel utilisateur
-
 Cleveland SE95004 R9 (Kettle Table Top Electric) Manuel utilisateur
-
 Cleveland SE95050 R8 (Skillets T1 Gas) Manuel utilisateur
-
Cleveland KEL-40 Manuel utilisateur
-
Cleveland KDP Manuel utilisateur
-
Cleveland KDT-12 -T Installation, Operation & Service Manual
-
Southbend DMS-20 Fiche technique

