Pfaff hobby 307 Le manuel du propriétaire
- Catégorie
- Machines à coudre
- Taper
- Le manuel du propriétaire
Ce manuel convient également à
La page est en cours de chargement...
La page est en cours de chargement...
La page est en cours de chargement...
La page est en cours de chargement...

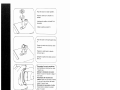
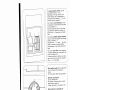
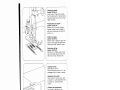
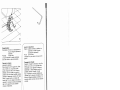
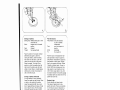
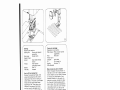
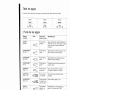
Parts
of
the
sewing
machine
1
Take-up
lever
2
Bobbin
windet
tension
3
Carrying
handle
4
Spool
pins
(remove
from
accessories
and
insert)
5
Bobbin
winder
6
Hand
wheel
7
Disengaging
knob
8
Stitch
length
control
9
Detachable
work
support
with
accessories
box
10
Free-arm
cover,
enclosing
sewing
hook
11
Needle
plate
12
Sewing
foot
holder
with
sewing
foot
13
Needle
holder
with
retaining
screw
14
Thread
guides
15
Threading
slots
16
Needle
thread
tension
17
Free
arm
18
Presser
bar
with
thread
cutter
19
Presser
bar
lifter
20
Zigzag-
and
utility-stitch
knob
(307)
21
Reverse
control
22
Stitch
pattern
setting
23
Zigzag
and
buttonhole
knob
Eéments
constitutifs
de
Ia
machine
coudre
1
Levier
releveur
de
til
2
Tension
du
dévidoir
3
Poignée
4
Broches
a
bobines
(jointes
aux
accessoires:
a
mettre
en
place)
5
Dévidoir
6
Volant
7
Disque
de
débrayage
8
Sélecteur
de
longueur
do
point
9
Boite
de
rangement
formant
plan
travail
10
Capot
couvrant
le
compartiment
di
crochet
11
Plaque
a
aiguille
12
Support
de
semelle
du
pied
press
avec
semelle
13
Pince-aiguille
avec
vis
de
fixation
14
Guide-fil
15
Passages
du
f
ii
16
Tension
du
fil
daiguille
17
Bras
libre
18
Barre
de
pied
presseur
avec
coupe-fil
19
Releveur
du
pied
presseur
20
Bouton
de
reglage
points
zigzags
et
utilitaires
(307)
21
Levier
de
marche
arriére
22
Bouton
de
réglage
points
utilitaire
points
elastiques
et
fantaisie
(309)
23
Bouton
de
reglage
points
zigzags
utilitaires
(309)
La page est en cours de chargement...

rescriptions
de
sécurité
pour
machi
es
a
coudre
familiales
selon
Ia
norme
N
60335-2-28
ou
IEC
335-2-28
1
Vu
le
mouvement
ascendant
et
des
cendant
de
laiguille,
lutilisateur
dolt
toujours
faire
preuve
de
prudence
et
surveiller
to
travail
en
permanence.
2.
Avant
de
quitter
Ia
machine,
en
cas
de
travaux
d’entretien
et
lors
de
rempacement
de
pièces
méca
niques
ou
d’accessoires,
ii
faut
toujours
couper
Ia
machine
du
réseau
en
retirant
Ia
fiche.
3.
La
puissance
maxi
admissible
do
lampoule
est
de
15
W
4.
Touours
confier
le
règlage
de
a
tension
de
a
courrole
de
transmis
sion
a
un
mécanicien
Pfaff.
5.
Mettre
a
machine
en
service
selon
es
indications
sur
a
plaque
signalé
tique.
6.
Ne
pas
enficher
d’objets
quelcon
ques
dans
es
orifices
de
Ia
machine.
7.
Ne
pas
utiliser
a
machine
en
cas
de:
—
dommages
apparents,
—
panne
de
fonctionnement,
—
humidité
(eau
de
condensation,
par
ex.).
8.
Ne
pas
retirer
a
fiche
secteur
par
to
céble.
9.
Aucune
garantie
ne
peut
être
assu
mée
pour
des
degâts
survenus
a
a
suite
dune
utilisation
inadequate
ou
erronée
de
a
machine.
10.
Pour
éviter
tout
risque
de
décharge
electrique,
ne
jamais
ouvrir
a
machine.
Celle-ci
ne
renferme
aucune
pièce
a
reparer
par
‘utilisa
teur.
Seul
le
service
après-vonte
Pfaff
est
habilité
a
réaliser
ce
travail.
11.
N’utiliser
quo
des
pièces
PFAFF
d’origine.
Environnement
Valeurs
recommandèes:
Temperature
ambiante
entre
—10Cot
+40
C
Humidité
de
air
entre
20
et
95°/a.
Cette
machine
a
coudre
est
un
appareil
electronique-mecanique
de
qualite
supe
rieure
dont
to
fonctionnement
dolt
tou
jours
ètre
surveillé.
Elle
ne
peut
être
utilisée
a
‘extérleur
et
no
dolt
pas
Otro
exposee
a
a
poussière,
a
une
forte
humidité.
aux
rayons
du
soleil,
a
‘electricité
statique,
a
des
objets
dègageant
de
Ia
chaleur,
a
des
produits
chinjiques
ou
des
liquides
corrosifs.
Pour
des
raisons
de
ventilation,
placer
Ia
machine
do
preference
sur
une
solide
base
plane.
Elle
dolt
être
eloignee
do
tout
champ
èlectromagnètique
puissant,
tel
que
los
fours
a
micro-ondes
ou
los
émetteurs
radioelectriques
peuvent
en
produire.
Manipulation
Veiller
a
no
pas
heurter
et
a
ne
pas
faire
tomber
a
machine.
Nettoyage
Bottler
ot
écran
d’affichage:
Pour
nettoyer
le
boitier
do
Ia
machine,
utiliser
un
chiffon
sec,
propre
et
doux,
no
seffilochant
pas.
En
as
d’encrassement,
utiliser
un
chif
fo
oux
imbibe
dalcool.
Attention!
N’utilisor
on
aucun
cas
d’insocticides
ou
do
produits
chimiques
tels
quo
l’essence
ou
des
produits
chimiques
fluides
pour
nettoyer
a
machine,
3
La page est en cours de chargement...
La page est en cours de chargement...
La page est en cours de chargement...

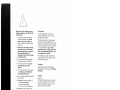
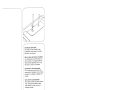
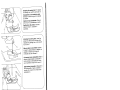
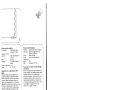
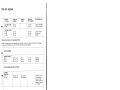
Mise
en
place
des
broches
a
bobines:
Aux
accessoires
sont
jointes
deux
bro
ches
a
bobines.
Los
engager
definitive
ment
dans
los
logements
prévus
a
cet
effet
dans
le
corps
de
Ia
machine.
Colocación
de
los
portacarretes:
En
los
accesorios
se
encuentran
dos
portacarretes.
Coloquelos
en
los
oriticios
previstos
en
Ia
máquina
y
déjelos
intro
ducidos.
Come
inserire
portarocchetti:
Nel
corredo
troverete
due
perni
portaroc
chetti,
Questi
devono
essere
inseriti
negli
appositi
fori
sulla
macchina
e
rimangono
montati.
4
Inserting
the
spool
pins:
Two
spool
pins
are
included
in
the
accessories.
Insert
these
in
the
holes
provided
in
the
machine.
7
La page est en cours de chargement...
La page est en cours de chargement...
La page est en cours de chargement...

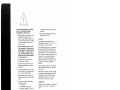
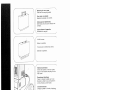
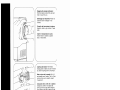
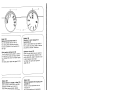
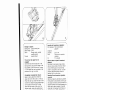
Bobbin
winding:
Pull
the
thread
from
the
spool
into
tensioner
2,
to
the
bobbin,
through
one
hole
of
the
bobbin,
then
hold
it
there.
Press
the
foot
control
to
wind
the
bobbin.
After
a
few
turns,
let
go
of
the
thread
again.
Push
the
filled
bobbin
to
the
left,
remove
it
and
cut
the
thread.
Devanado
del
hUo
(bobinado):
Tome
el
hilo
desde
el
carrete,
páselo
por
el
tensor
2,
llévelo
hacia
Ia
canilla,
introdüzcalo
en
uno
de
sus
agujeros
y
sujételo.
Pise
el
pedal
y
comience
a
devanar.
Después
de
unas
vueltas
de
devanado,
suelte
el
hilo.
Una
vez
lena
Ia
canilla,
empéjela
hacia
Ia
izquierda,
saquela
y
corte
el
hilo.
4
Bobinage:
Faire
passer
le
fil
de
Ia
bobine
dans
Ia
tension
2
et
vers
Ia
canette.
Einfiier
le
fil
de
I’intérieur
vers
l’extérieur
et
le
maintenir.
Appuyer
sur
le
rheostat
et
bobiner.
Lâcher
le
fil
après
quelques
tours.
Pousser
Ia
canette
gar
nie
vers
Ia
gauche,
Ia
retirer
of
couper
le
f
ii.
Bobinare:
Tirare
ii
fib
dal
rocchetto
nella
tensione
delbo
spolatore
2,
portarlo
verso
Ia
spolina,
infilarlo
in
un
fore
della
spolina
e
tenerlo
fermo.
Azionare
ii
reostato
e
bobinare.
Dopo
alcuni
girl
la
sciare
libero
il
capo
del
fib.
Premere
a
spolina
piena
verso
sinistra,
toglierla
e
tagliare
il
fib.
)
La page est en cours de chargement...
La page est en cours de chargement...

4
-
_-
I
//
NN:
\
C
—2
\.
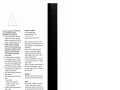
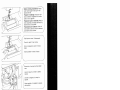
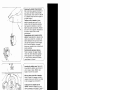
Upper
threading:
The
needle
and
the
take-up
lever
must
be
raised.
Pull
the
thread
into
guide
A,
slot
B,
behind
guide
C,
upwards
into
slot
D,
into
take-up
lever
1,
back
through
slot
D,
into
guides
E,
F
and
into
the
right
guide
of
the
needle
holder.
Passage
du
iii
d’aiguille:
Aiguille
et
releveur
de
fil
en
position
haute.
Tirer
le
hI
dans
le
guide
A,
dans
Ia
fente
B,
derriere
Ia
plaque
C,
vers
le
haut
dans
Ia
fente
D,
dans
le
releveur
de
Ill.
revenir
dans
Ia
fente
D,
dans
les
guide
fil
E,
F
et
dans
le
guide-fil
droit
au
pince
aiguille.
Enhebrado
del
hilo
superior:
La
aguja
y
Ia
palanca
tirahilos
deberán
estar
ele
vados.
Levante
el
pie
prensatelas.
Pase
el
hilo
desde
el
carrete
por
Ia
guia
A,
por
Ia
ranura
B,
por
detrás
de
Ia
chapa
gula
C,
hacia
arriba
en
Ia
ranura
D
hasta
Ilegar
a
Ia
palanca
tirahilos
1.
A
continuación
páselo
de
nuevo
por
Ia
ranura
D,
en
las
gulas
E,
F
y
en
el
guiahilos
derecho
del
portagujas.
Come
inserire
ii
fib
superiore:
Posi
zione
ago
e
eva
tendifilo
superiore.
Sollevare
II
piedino.
Tirare
1
fib
nella
guida
A
nella
fessura
B,
dietro
a
lamiera
di
guida
C,
verso
lalto
nella
fessura
D,
nella
leva
tendifilo
1
quindi
indietro
attraverso
Ia
fessura
D,
nelle
guide
E,
F
e
nella
guida
destra
sul
morsetto
dell’ago.
0
4
N
Thread
the
needle
from
front
to
back.
Enfiler
le
fil
d’aiguille
de
‘avant
en
arrière
par
le
chas
d’aiguille.
Enhebre
Ia
aguja
pasando
el
hilo
superior
desde
el
frente
hacia
atrás
por
el
ojo
de
Ia
aguja.
Infilare
il
fib
superiore
dal
davanti
verso
dietro
attraverso
Ia
cruna
dell’ago.
j
14

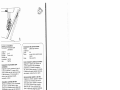
Drawing
up
the
bobbin
thread:
Hold
the
needle
thread
taut.
Turn
the
hand
wheel
towards
you
and
sew
a
stitch
until
both
needle
and
take-up
lever
are
up.
Pull
out
the
bobbin
thread
by
means
of
the
needle
thread.
Retenir
le
fil
daiguille.
Tourner
le
volant
vers
soi
et
coudre
un
point,
Arrêter
l’aiguille
et
le
releveur
de
fil
en
haut.
(
/
Tirer
le
fil
de
canette
vers
le
haut
a
‘aide
du
fil
d’aiguille.
Extracción
del
hilo
inferior:
Sujete
el
hilo
superior.
Gire
el
volante
o
hacia
el
frente
y
haga
una
puntada
hasta
que
a
aguja
y
Ia
palanca
tirahilos
se
hallen
en
su
posiciOn
más
alta.
Saque
el
hilo
inferior
tirando
del
hilo
superior.
Tenere
fermo
il
fib
superiore.
Girare
il
volantino
in
avanti.
Cucire
un
punto.
L’ago
e
Ia
leva
tendifilo
devono
essere
in
alto.
Tirare
Il
fib
inferiore
verso
l’alto
con
l’aiuto
del
fib
superiore.
“ace
both
threads
towards
the
right
under
the
sewing
foot.
Coucher
les
deux
fils
vers
l’arrière
a
—
‘
droite
sous
le
pied
presseur.
Coboque
ambos
hibos
hacia
Ia
derecha
debajo
del
prensatelas.
if
Porre
1
fili
superiore
ed
inferiore
sotto
il
piedino.
Close
free-arm
cover
10.
Fermer
le
capot
10.
Cierre
Ia
tapa
10.
Chiudere
bo
sportellino
10.
La page est en cours de chargement...

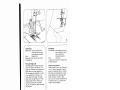
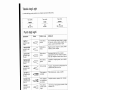
Theckng
the
needle
thread
tension:
rhe
normal
setting
is
in
the
white
range
)etween
3
and
5.
The
higher
the
iumber,
the
tighter
the
tension.
To
Theck
the
tension,
set
the
machine
at
a
vide
zigzag
stitch.
Sew
a
short
seam.
fhe
threads
should
interlock
in
the
,iddle
of
the
material.
N
/Operating
the
foot
control:
The
fartherN
you
press
the
pedal
down
the
faster
the
machine
runs.
Abaisser
Ia
pédale
du
rheostat.
Plus
Ia
pedale
sera
abaissée.
plus
Ia
machine
coudra
vite.
Accionamiento
del
pedal:
Cuanto
más
profundo
pise
el
pedal
tanto
mayor
será
Ia
velocidad
de
costura
de
Ia
máquina.
Premere
II
reostato.
PiU
a
fondo
si
preme
il
pedale.
piU
veloce
cuce
Ia
in
f
Needle
thread
tension
16
A
=
Setting
mark.
Tension
du
fil
d’aiguille
16
A
=
repere
de
reglage
Tension
del
hilo
superior
16
A
=
Marca
para
a
regulacion.
Tensione
superiore
16
A
=
marcatura
per
a
regolazione
4
Tensions
des
tils:
Position
de
reglage
normale
dans
Ia
plage
blanche,
entre
3
et
5.
Tension
dautant
plus
forte
que
le
chiffre
est
grand.
ContrOler
a
‘aide
d’un
point
zigzag
large.
Coudre
quelques
points.
Les
fils
doivent
se
nouer
dans
I’épais
seur
des
tissus.
/VVWv
LI
VA)
La page est en cours de chargement...

19
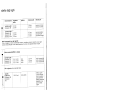
Setting
the
stitch
length
(8):
Set
the
required
stitch
length,
from
0
to
4
mm,
at
mark
A.
The
red
setting
range
from
0
to
1
is
for
sewing
buttonholes.
Selection
de
Ia
longeur
du
point
(8):
Tourner
le
bouton
8
jusqu’à
ce
que
Ia
longueur
de
point
désirée,
entre
0
et
4
mm,
soit
placée
face
au
repère
A.
La
plage
rouge,
entre
0
et
1,
sert
a
coudre
es
boutonnières.
Regulacion
del
largo
de
puntada
(8):
Gire
el
botón
hasta
quo
el
largo
de
puntada
deseado
entre
0
y
4
coincida
con
Ia
marca
A.
La
zona
roja
entre
0
y
1
se
usa
para
coser
ojales.
Regolazione
della
Iunghezza
del
punto
(8):
Si
regola
Ia
Iunghezza
del
punto
deside
rata
girando
tra
0
e
4
sulla
marcatura
A.
II
settore
rosso
tra
0
e
1
serve
per
Ia
cucitura
degli
occhielli.
2
4
Reverse
sewing:
Press
down
control
21.
The
machine
sews
backwards
as
long
as
the
control
key
is
held
down.
Couture
en
arrière:
Abaisser
Ia
touche
21.
La
machine
coud
en
arrière
aussi
Iongtemps
que
cette
touche
est
tenue
abaissée.
Costura
en
retroceso:
Pulse
el
botón
21
hacia
abajo.
La
maquina
cose
hacia
atrás
mientras
el
botôn
esté
pulsado.
Cucire
indietro:
Premere
1
tasto
21.
Fintanto
che
1
tasto
rimane
premuto,
Ia
macchina
cuce.

For
sewing
stretch
stitches,
set
the
stitch
lenght
control
a
“S.
S.’
Depending
on
the
type
of
fabric,
the
stretch
stitches
can
be
lengthened
by
turning
the
control
towards
“i-
“
or
shor
tened
by
turning
it
towards
Pour
coudre
le
point
elastique.
le
bou
ton
sélecteur
de
point
8
devra
ètre
place
sur
le
symbole
S.
S.
Suivant
le
genre
de
tissu.
le
point
élas
tique
peut
être
agrandi
par
rotation
du
bouton
vers
+
ou
raccourci
par
rotation
vers
Para
coser
puntadas
elásticas
(stretch)
hay
que
colocar
el
regulador
de
puntada
sobre
el
simbolo
S.
S.
Girando
hacia
“+
‘
o
hacia
“-“
se
puede
alargar
o
acortar
a
puntada
elástica
para
adaptarse
a
las
caracteristicas
del
tejido
Per
cucire
i
punti
flexi
occorre
regolare
ii
bottone
regolatore
per
Ia
lunghezza
del
punto
sul
simbolo
S.
S.
A
seconda
del
tipo
di
stoffa
si
pub
allun
gare
o
accorciare
1
punto
flexi,
girando
verso
+
o
-
Ia
manopola.
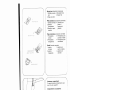
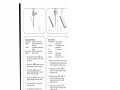
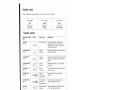
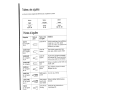
Stitch
pattern
knob
20:
(for
model
307)
Turn
the
required
stitch
symbol
to
mark
A.
For
stitch
pattern
table
see
page
22/23.
Sélecteur
de
points
20
pour
es
modèles
307
Par
rotation
du
bouton,
placer
le
point
désiré
face
au
repère
A.
Tableau
des
points,
voir
pages
22.
23.
Botón
selector
de
puntadas
20:
Modelo
307
Gire
el
botón
de
forma
que
el
tipo
de
puntada
deseado
coincida
con
Ia
marca
A.
Véase
Ia
tabla
de
puntadas
en
las
pbginas
22
y
23.
Bottone
regolatore
dei
punti
20
nei
modelli
307
Portare
ii
motive
desiderato
sotto
Ia
marcatura
A.
Vedere
Ia
tabella
dei
motivi
a
pagina
22,
23.
4

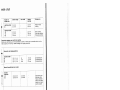
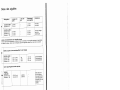
Stitch
pattern
setting
knob
22
Turn
the
desired
stitch
pattern
to
mark
B.
For
sewing
the
utility
and
fancy
stitches,
turn
zigzag
knob
23
at
the
widest
zigzag
stitch.
For
stitch
pattern
table
see
pages
22,
23.
Modelo
309
Botón
selector
de
zigzag
y
ojales
(20).
Gire
el
botOn
de
forma
que
a
puntada
deseada
coincida
con
Ia
marca
A.
Para
coser
estas
puntadas,
deberá
ajustarse
el
botón
23
como
se
muestra
en
Ia
figura
de
Ia
derecha.
Botón
selector
de
puntadas
(22).
Gire
el
botón
de
forma
que
el
tipo
de
puntada
deseado
coincida
con
Ia
marca
B.
Para
coser
puntadas
utilitarias
y
decora
tivas,
el
botón
selector
de
zigzag
(22)
deberá
estar
colocado
sobre
el
zigzag
más
ancho.
La
tabla
de
puntadas
se
halla
en
las
paginas
22
y
23.
4
Model
309
Zigzag
and
buttonhole
knob
23
Turn
the
desired
stitch
to
mark
A.
For
sewing
these
stitches
set
setting
knob
22
as
shown
in
the
illustration
on
the
right.
Modèle
309
Sélecteur
de
point
zigzag
et
de
boutonniere
23
Placer
le
point
désiré
face
au
repére
A.
Pour
coudre
ces
points,
régler
le
bouton
23
comme
le
montre
l’illustration.
Sélecteur
de
motif
22
Placer
le
motif
désiré
sous
le
repere
B.
Pour
coudre
es
points
utilitaires
et
les
points
décoratifs,
regler
le
bouton
22
sur
le
point
zigzag
le
plus
large.
Le
tableau
des
points
est
reproduit
pages
22,
23.
Modelli
309
Bottone
regolatore
dello
zig-zag
e
per
occhielli
23:
Portare
1
punto
desiderato
sotto
Ia
marcatura
A.
Per
cucire
questi
punti
é
necessario
regolare
il
bottone
23
come
si
mostra
nella
figura
destra.
Bottone
regolatore
del
motivi
22:
Portare
il
motivo
desiderato
sotto
Ia
mar
catura
B.
Per
cucire
i
punti
utili
e
cia
ricamo
occorre
regolare
1
bottone
regolatore
per
Jo
zig-zag
22
sullo
zig-zag
massimo.
Vedere
Ia
tabella
dei
motivi
a
pagina
22,
23.
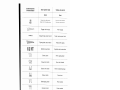
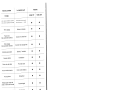
21

Symbol/Symbole
Stitch
pattern
table
Tableau
des
points
Simbolo/Simboli
Stitch
Point
Sira
ght
St
teh
mrddte
position
P0
St
droit
posit
on
medians
c::
Straight
stitch
olt
needs
position
Point
drot.
position
gatiche
Zigzag
stitch
range
Pot
zigzag
Straight
triple
stretch
stitch
Triple
couture
point
droit
\yt\/vVvA
Zigzag
triple
stretch
stitch
Triple
point
zigzag
1J
Buttonhole
symf
Symboles
de
boutonniere
I..
tAAi
‘
It!
Elastic
seam
Point
zigzag
piqué
vv
Honeycomb
stitch
Point
nid
dabeille
jLJ\,
Elastic
blind
stitch
Point
invisible
elastique
nt
tricot
-
‘\[\[
Shell-edging
stitch
Point
cocotte
-
-
I
\
\\
Overlock
stitch
Point
overlock
IlHII1IjjIlI
Fancy
stitch
Point
fantaisie
-_
I
•
9
IHIlIhIJ
111111
I’ll’’
h1
Fancy
stitch
Fancy
stitch
Fancy
stitch
Point
tantaisie
Point
fantaisie
Point
fantaisie
22
La page est en cours de chargement...
La page est en cours de chargement...
La page est en cours de chargement...
La page est en cours de chargement...
La page est en cours de chargement...

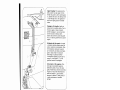
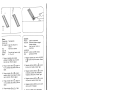
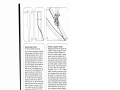
Surpiquage:
Pied
presseur:
pied
presseur
normal
ou
pied
a
semelle
en
plexi
glas
et
guide-droit
(accessoire
special)
Point:
point
droit
Le
guide-droit
A
convient
a
presque
tous
les
pieds
presseurs.
Fixation
du
guide-droit:
Glisser
le
guide
A
par
le
trou
B
et
serrer
Ia
vis
C.
Suivant
‘application,
regler
le
guide
sur
l’écartement
désiré.
Le
guide
droit
facilite
considérablement
les
surpi
qüres
paralleles
et
le
surpiquage
des
bords.
Ce
faisant,
le
bord
du
tissu
(fig.
D)
ou
bien
Ia
piqure
précédente
suit
le
guide-droit
(fig.
E).
La
couture
sera
toujours
nette
et
reguliere.
r
)
—
0
C
4
D
1
4-.
Topstitching:
Sewing
foot:
Ordinary
sewing
foot
or
clear-view
foot
and
edge
guide
(special
accessory):
Stitch:
straight
stitch
Edge
guide
A
can
be
used
with
nearly
all
sewing
feet.
Fitting
the
edge
guide
Push
edge
guide
A
through
hole
B
and
secure
it
in
position
with
screw
C.
The
guide
can
be
adjusted
to
the
desired
stit
ching
margin
for
various
applications.
With
the
edge
guide
attached,
it
is
easy
to
sew
parallel
lines
of
stitches
or
to
stitch
parallel
to
the
edge.
The
guide
either
follows
an
edge
(Fig.
D)
or
when
making
parallel
lines
of
stitches
runs
along
the
preceding
line
of
stitches
(Fig.
E).
The
seam
thus
made
looks
neat
and
accurate.
-I
La page est en cours de chargement...

4
—
__
\9
4
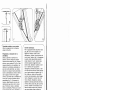
Point
invisible
elastique:
Pied
presseur:
Pied
a
points invisibles
Tension:
Fil
d’aiguille moms
tendu
Fil:
Fil
a
coudre
Point:
Point
invisible
élastique
Longueur
do
point:
3
a
4
Aiguille:
Grosseur
70
ou
80
Reglage
de
Ia
jetee
du
point:
Poser
l’ourlet
prepare
sous
le
pied
a
points
invisibles.
La
cassure
du
tissu
extérieur
longe
Ia
butée
B
du
pied
a
points
invisibles.
A
‘aide
de
Ia
vis
de
reglage
A,
déplacer
Ia
butée
B
vers
Ia
gauche
do
sorte
quo
l’aiguille,
au point
gauche,
no
saisisse
qu’un
fil
du
tissu
extérieur
(fig.
C
et
D).
Réaliser
tout
d’abord
une
couture
d’essai
sur
une
chute
do
tissu.
Elastic blind
stitch:
Sewing
foot:
blindstitch
foot
Tension:
needle
thread
tension
a
little
slack.
ordinary sewing
thread
elastic
blind
stitch
Thread:
Stitch:
Stitch
length:
Needle:
3—4
size
70
or 80
How
to
regulate
the
needle
penetration:
Place
the
prepared
hem
under
the
blind-
stitch
sewing
foot.
The
crease
line
of
the
outer
fabric
runs
along
edge
guide
B
of
the
blindstitch
ewing
foot.
Turn
screw
A
to
adjust
edge
guide
B
so
far
to
the
left
that
the
needle
picks
up
only
one
thread
of
the outer
fabric
when
penetrating
on
the
left
side
(Figs.
C
and
D).
First
make
a
sewing
test
using
a
piece
of
waste
material.
J
30
La page est en cours de chargement...

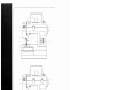
Stitch
length:
Needle:
1.
Set
utility-stitch
knob
20
at
jJ
and
sew
the
first
buttonhole
seam.
Raise
the
needle.
2.
Set
knob
20
at
and
sew
four
to
six
tacking
stitches.
Raise the
needle.
3.
Set
knob
20
at
1and
sew
the
second
buttonhole
seam
as
long
as
the
first.
Raise
the
needle.
4.
Set
knob
20
at
lIT
and
sew
four
to
six
tacking
stitches.
Raise
the
needle.
5.
Set
knob
20
atSD
and
sew
a
few
securing
stitches.
6.
Cut
buttonhole
with
special
knife
(special
accessory).
Pied
a
semelle
transparente
Fil
daiguille
un
peu
moms
tendu
Eu
a
broder
fin
Plage
rouge
(boutonniere)
Grosseur
70
a
80
1.
Regler
le
bouton
20/23
(points
utilitai
res)
sur
et
coudre
Ia
premiere
lèvre.
Arréter
I’aiguille
en
position
haute.
2.
Rdgler
le
bouton
20/23
sur
et
coudre
4
a
6
points
d’arrèt.
Arrèter
laiguille
en
haut.
3.
Regler
le
bouton
20/23
sur
et
coudre
Ia
deuxieme
lèvre
aussi
longue
que
Ia
premiere.
Arréter
laiguille
en
haut.
4.
Régler
le
bouton
20/23
sur
ElIet
coudre
4
a
6
points
darrêt.
Arréter
laiguille
en
haut.
5.
Regler
le
bouton
20/23
sur
€E)
et
coudre
quelques
points
de
nouage.
Sewing
buttonholes:
Sewing
foot:
clear-view
sewing
foot
Tension:
needle
thread
tension
a
little
slack
Thread:
fine
machine
embroidery
thread
buttonhole
range
(red)
sizes
70
to
80
N
Boutonniéres:
Pied
presseur:
Tension:
Fi
I:
Longeur
du
point:
Aiguille:
6.
Ouvrir
a
boutonniere
au
Découvit
(contre
supplement).
La page est en cours de chargement...

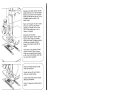
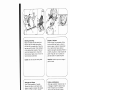
Place
the
button
in
the
location
marked
beforehand
and
push
it
under
the
sewing
foot
holder.
Lower
the sewing
foot
holder
into
the
button.
Lower
the
needle
into
the
left
hole
of
the
button.
Raise
the
needle.
Turn
knob
20
to
a
position
in
which
the
needle
enters
the
right
hole
of
the
button
when
the
hand
wheel
is
turned.
Sew
six
to
eight
zigzag
stitches
and
a
number
of
securing
stit
ches
in
the
left
only
(A).
Sewing
on
buttons
with
stems
(for
large
buttons
in
heavy
materials):
Lower
the
needle
into
the
left
hole.
Place
a
match
on
the
middle
of
the
button.
Lower
the
sewing
foot
(B).
Sew
a
num
ber
of
zigzag
stitches
and leave
a
thread
end
of
about
6
inches.
Pull
the
needle-
and
bobbin
threads
through
(C).
Wrap
the
stem
(D)
and
tie
off
the
threads.
Point:
Griffe:
Fil:
Poser
le
bouton
a
lemplacement
mar-
qué
auparavant
et
sous
le
support
du
pied
presseur.
Descendre
le
support
du
pied
presseur
et
faire
piquer
laiguille
dans
le
trou
gauche
du
bouton.
Arréter
laiguille
en position
haute. Tourner
le
bouton
20/23
dans
Ia
plage
‘poInt
zig
zag”
jusqu’à
ce
que laiguille,
en
tour
nant
le
volant.
pique
dans
le
trou
droit
du
bouton.
Executer
6
a
8
points
zigzags
et
quelques
points
sur place
dans
le
trou
gauche
du
bouton
(A).
Boutons
a
tige:
Grands
boutons
sur
tissus
lourds.
Faire
piquer
l’aiguille
dans
le
trou
gauche
du
bouton.
Poser
une
allumette
sur
le
milieu
du
bouton.
Descendre
le
pied
esseur
(B)
et
coudre
quelques
points
zigzags
et
laisser
dépasser
env.
15
cm
de
fil.
Passer
es
fils
sur
le
tissu
(C)
et
es
enrouler
sur
les
fils
aches
sous
le
bouton pour former
a
tige
(D).
Nouer
es
fils.
4
Sewing
on
buttons:
Sewing
foot:
wiThout
sewing
foot
or
with
clear-view
foot
Stitch:
straight
stitch,
left
needle
position
Feed:
dropped
Thread:
fine
sewing
thread
4
Pose
de
boutons:
Pied
presseur:
sans
pied
presseur
ou
pied
a
semelle
transparente
point
droit
déporté
a
gauche
escamotée
fil
a
coudre
fin
34
La page est en cours de chargement...

This
is
how
the
zipper
foot
is
engaged:
Insert
the
foot
with
the
back
pin
in
the
back
groove
E
and
push
the
shoe
of
the
foot
upwards,
until
the
front
pin
F
snaps
in.
The
zipper
foot
can
be
pushed
to
the
positions:
left,
right,
or
centre.
Completely
concealed
zip
closure:
Baste
in
zip
by
hand
first.
Push
the
zipper
foot
to
the
left
as
far
as
it
will
go.
Place
the
open
zip
under
the
foot
so
that
its
teeth
run
along
the
right
guiding
edge
on
the
sole
of
the
foot
(Fig.
B).
Sew
about
half
the
length
of
the
zip
at
the
required
width.
Leave
the
needle
down
in
the
material,
raise
the
zipper
toot
and
close
the
zip
(Fig.
C).
Lower
the
zipper
foot
again,
continue
the
seam
and
then
sew
across
the
end.
Sew
the
other
side
of
the
zip
at
the
same
margin.
Shortly
before
the
end
of
the
seam
leave
the
needle
down
in
the
material,
raise
the
zipper
toot
and
open
the
zip
(Fig.
D).
Lower
the
zipper
foot
again
and
sew
to
the
end.
2
a
3
mm
Point
droit
en
position
médiane
Fil
a
coudre
Mise
en
place
du
pied
a
fermeture
a
glissiere:
Accrocher
le
pied
avec
sa
tige
arrière
dans
Ia
rainure
arrière
E
et
faire
remon
ter
Ia
semelle
jusqu’a
ce
que
Ia
tige
avant
F
s’accroche
a
son
tour.
Le
pied
presseur
peut
étre
glissO
a
droite,
a
gauche
(fig.
A)
ou
au
milieu.
Insertion
d’une
fermeture
a
glissiere
couverte:
Bãtir
tout
d’abord
Ia
fermeture
a
glissiere.
Faire
glisser
le
pied
presseur
vers
Ia
gau
che
jusqu’a
a
butée:
poser
Ia
fermeture
a
glissiere
ouverte
sous
le
pied
presseur
de
sorte
que
es
dents
longent
Ia
barrette
droite
(fig,
B).
Surpiquer
Ia
fermeture
a
glissiere
jusqu’au
milieu
environ
a
Ia
distance
voulue.
L’aiguille
restant
dans
I’ouvrage.
remonter
le
pied
presseur
et
fermer
Ia
termeture
a
glissiere
(fig.
C).
Rabaisser
le
pied
presseur,
continuer
a
coudre
jusqu’a
I’extrémité
de
Ia
fermeture
a
glissiere
et
faire
Ia
couture
transver
sale.
Coudre
parallelement
Ia
deuxième
bande
de
Ia
termeture
a
glissiere
a
distance
egale.
Peu
avant
Ia
fin
de
Ia
couture.
laisser
I’aiguille
dans
le
tissu,
remonter
le
pied
presseur
et
ouvrir
Ia
fermeture
a
glissiere
(fig.
D).
Rabaisser
le
pied
presseur
et
terminer
Ia
couture.
Sewing
in
zippers:
Sewing
foot:
zipper
sewing
foot
Stitch
length:
2
to
3
Stitch:
Straight
stitch,
middle
needle
position
Thread:
sewing
thread
Insertion
de
fermetures
a
glissiere:
Pied
presseur:
Pied
a
fermeture
a
glissiere
Longueur
de
point:
Point:
Fil:
I
36
La page est en cours de chargement...

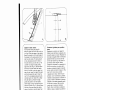
How
the
zipper
is
prepared
and
inserted:
Press
the
edges
of
the
placket.
Fold
out
the
left
seam
allowance
(Fig.
A).
Place
the
left
side
of
the
open
zip
in
position
so
that
its
teeth
protrude
a
little
beyond
the
pressed
edge
(Fig.
B).
The
seam
is
sewn
along
this
edge.
Move
the
zipper
foot
to
the
middle
so
that
the
needle
stit
ches
into
the
middle
opening.
The
zip
teeth
run
into
the
left
guiding
groove
in
the
foot
(Fig.
C).
At
the
beginning
of
the
seam
lift
up
the
teeth
a
little
to
feed
them
into
the
guiding
groove.
Sew
the
seam
to
the
end
and
secure
it.
Close
zip.
Pin
other
side
of
zip
to
material
at
beginning
of
seam
(Fig.
D).
Open
zip.
Remove
the
pin,
turn
out
the
right
seam
allowance
with
the
zip
tape,
and
pin
the
latter
to
the
fabric,
as
shown
in
Fig.
E.
The
zip
teeth
now
run
into
the
right
gui
ding
groove
in
the
foot
(Fig.
F).
Finish
sewing
the
zip.
Now
sew
down
the
zip
tape
letting
the
zip
teeth
run
along
the
guiding
edge
of
the
foot
(Fig.
G).
Fermeture
a
glissiere
invisible:
Reglage
de
Ia
machine
voir
page
36.
Voici
comment
il
faudra
procéder
pour
insérer
Ia
fermeture
ft
glissière:
Repasser
les
bords
de
Ia
braguette.
Replier
le
relarge
gauche
du
tissu
vers
l’extérieur
(fig.
A).
Ouvrtr
Ia
fermeture
ft
glissiere
et
mettre
Ia
bande
gauche
en
place,
comme
le
montre
Ia
figure
B,
les
dents
dépassant
quelque
peu
le
bord
repassé.
La
piqüre
se
trouve
dans
Ia
cassure.
Aligner
le
pied
presseur
au
milieu
de
sorte
que
laiguille
pique
exactement
dans
le
trou
d’aiguille
median.
Les
dents
de
Ia
fermeture
ft
glis
sière
s’engagent
dans
Ia
rainure
gauche
du
pied
(fig.
C).
Au
debut
de
Ia
couture,
afin
d’introduire
es
dents
dans
Ia
rainure,
les
dresser
quelque
peu.
Terminer
Ia
cou
ture
et
coudre
quelques
points
de
fixation.
Fermer
Ia
fermeture
ft
glissiere.
Epingler
Ia
deuxième
partie
de
Ia
fermeture
ft
glis
sière
au
debut
de
a
couture
(fig.
D)
et
ouvrir
a
fermeture
ft
glissiere.
Replier
le
relarge
droit
du
tissu
avec
Ia
bande
de
Ia
fermeture
vers
l’extérieur,
mais
enlever
d’abord
les
epingles
et
comme
le
montre
Ia
figure
E,
epingler
Ia
bande
de
Ia
ferme
ture
ft
glissiere
sur
le
relarge
de
couture.
Les
dents
de
Ia
fermeture
ft
glissiere
s’engagent
dans
Ia
rainure
droite
du
pied
(fig.
F).
Terminer
l’insertion
de
Ia
fer
meture
ft
glissiere.
Surpiquer
Ia
bande
de
Ia
fermeture
ft
glissiere
ft
une
distance
correspondant
ft
Ia
largeur
du
pied
pres
seur.
Les
dents
de
Ia
fermeture
a
glissiere
ongent
Ia
barrette
a
l’extérieur
(fig.
G).
)
4
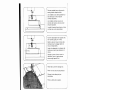
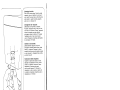
Seamlike
zipper
closure:
For
machine
setting
see
page
36.
4
38
La page est en cours de chargement...

N
40
ITI
—Q
4
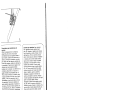
Zippers
in
ladies’
slacks:
For
machine
setting
see
page
30.
Move
the
zipper
foot
to
the
left
as
far
as
it
will
go.
Press
the
edges
of
the
placket.
Baste
the
closed
zip
to
the
right
edge
of
the
placket
on
the
wrong
side
so
that
its
teeth
are
still
visible.
Pin
facing
strip
D
to
the
underside
and
stitch
it
down
at
the
same
time
as
you
sew
the
zip.
The
zip
teeth
run
along
the
right
guiding
edge
of
the
foot
(Fig.
A).
Shortly
before
the
end
of
the
seam
leave
the
needle
down
in
the
fabric,
raise
the
zipper
foot,
open
the
zip,
lower
the
zipper
foot
again
and
finish
sewing
the
seam.
Close
the
zip.
Pin
the
overlapping
edge
along
the
intended
seam
line.
Baste
left
zip
edge
(Fig.
B).
Open
zip.
Attach
the
edge
guide
and
position
it
for
the
desired
seam
margin
so
that
it
moves
along
the
edge
of
the
fabric
(Fig.
C).
Shortly
before
the
end
of
the
seam
leave
the
needle
down
in
the
fabric,
raise
the
zipper
foot
and
close
the
zip.
Lower
the
zipper
foot
and
finish
sewing
the
seam.
Secure
the
end
of
the
zip
seam
with
a
bartack.
Fermeture
a
glissiere
pour
pantalon
dame:
Reglage
de
a
machine
voir
page
30.
Glisser
le
pied
fermeture
a
glissiere
vers
Ia
gauche
jusqu’à
Ia
butée.
Repasser
les
bords
de
Ia
braguette.
Bátir
Ia
fermeture
a
glissiere
fermée
sous
le
bord
droit
de
Ia
fente
de
manieère
que
les
dents
de
Ia
fermeture
soient
encore
visibles.
Epingler
Ia
sous-patte
D
et
assembler
le
tout
par
une
couture.
Les
dents
de
Ia
fermeture
a
glissiere
longent
Ia
barrette
droite,
comme
le
montre
Ia
figure
A.
Peu
avant
Ia
fin
de
Ia
couture,
laisser
l’aiguille
dans
le
tissu.
relever
le
pied
presseur,
ouvrir
la
fermeture
a
glissiere,
rabaisser
le
pied
presseur
et
terminer
Ia
couture,
Fermer
Ia
fermeture
a
glissiere.
Epingler
Ia
sous-patte
dépassante
selon
le
trace
de
Ia
couture.
Bátir
Ia
partie
gauche
de
Ia
fermeture
a
glissiere
(fig.
B).
Ouvrir
a
fermeture
a
glissiere.
Mettre
en
place
et
aligner
le
guide-droit
sur
Ia
largeur
de
Ia
piqOre
de
sorte
que
le
guide-droit
longe
le
bord
du
tissu
(fig.
C).
Peu
avant
Ia
fin
de
a
couture,
laisser
laiguille
dans
le
tissu,
remonter
le
pied
presseur
et
fermer
a
fermeture
a
glissiere.
Rabaisser
le
pied
presseur
et
terminer
Ia
couture.
A
Ia
fin
de
Ia
cou
ture,
coudre
un
arrèt.
La page est en cours de chargement...

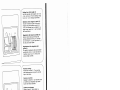
Ease
needle
thread
tension
Fine
machine
embroidery
thread
Size
70
dropped
How
to
fit
the
darning
toot:
Remove
the
sewing
foot
holder,
then
secure
the
darning
foot
with
screw
A,
making
sure
that
wire
B
is
resting
on
screw
shank
C.
First
draw
up
the
bobbin
thread
and
hold
both
threads
when
beginning
to
sew.
Then
make
a
few
stitches
in
the
matenal.
Stitch
back
and
forth
over
the
damaged
area
in
serpentine
fashion,
as
shown
in
Fig.
D,
rounding
the
end
of
each
line.
When
the
damaged
spot
is
covered
evenly,
turn
the
fabric
through
90
and
darn
over
the
preceding
rows
of
stitches
(Fig.
E)
until
the
damaged
spot
is
covered.
On
this
type
of
work
you
determine
the
stitch
length
yourself
by
moving
the
fabric
back
and
forward.
Point:
Tension
du
fil
d’aiguille:
Fi
I:
Aiguille:
Griffe:Abaissée
Mise
en
place
du
pied
a
repriser:
Enlever
le
support
de
pied
presseur:
a
‘aide
de
Ia
vis
A,
fixer
le
pied
repriser
tout
eb
veillant
a
ce
que
l’étrier
B
repose
sur
a
tige
C
du
pince-aiguille.
Faire
remonter
dabord
le
fil
de
canette.
Au
debut
de
Ia
couture,
maintenir
les
deux
fils.
Executer
d’abord
quelques
points
dans
le
tissu.
Placer
les
fils
étroitement
l’un
coté
de
l’autre
et
couvrir
l’endroit
endommage
(voir
fig.
D).
En
bout
de
couture,
former
un
arc
comme
le
montre
Ia
figure
E.
L’emplacement
a
repriser
étant
couvert
regulierement,
tourner
le
tissu
a
angle
droit
et
coudre
ces
fils
sur
ceux
tendus
préalablement
(fig.
E),
jusqu’a
ce
que
l’emplacement
a
repriser
soit
complétement
couvert.
Pendant
cette
operation.
Ia
Iongueur
de
point
est
déterminée
par
I’operatrice.
4
Darning:
Preparing
the
machine:
Sewing
foot:
Darning
foot
(special
accessory)
Stitch
type:
Straight
stitch
Needle
thread
tension:
Travaux
de
reprisage:
Preparation
de
a
machine:
Pied
presseur:
Pied
repriser
(contre
supplement)
Point
droit
Thread:
Needle:
Feld
dog:
moms
forte
Fil
a
broder
fin
Grosseur
70
Afl
La page est en cours de chargement...

Pulizia
e
lubrificazione:
Alzare
ago
e
piedino.
Svitare
le
due
viti
di
fissaggio
e
togliere
a
placca
dago.
Pulire
ii
trasporto
con
un
pennello.
Aprire
i
fermi
del
chrochet
A
verso
lesterno.
Estrarre
anelle
B
e
chrochet
C.
Pulire
Ia
corsiera
del
crochet.
Mettere
ogni
tanto
qualche
goccia
d’olio.
Attenzione:
non
lasciare
cadere
ii
crochet.
1°
4
C’eaning
and
011mg:
Raise
the
needle
and
the
sewing
foot.
Remove
the
two
needle
plate
screws
and
take
off
the
needle
plate.
Clean
the
feed
dog
with
the
brush.
Push
catches
A
of
the
sewing
hook
outwards.
Take
out
ring
B
and
sewing
hook
C.
Clean
the
hook
raceway.
Apply
a
drop
of
oil
to
the
hook
raceway
occasionally.
Caution:
Do
not
drop
the
sewing
hook.
4
Engrase
y
limpieza:
Eleve
a
aguja
y
el
prensatelas.
Afloje
los
dos
tornillos
de
filacion
y
retire
a
placa
de
aguja.
Limpie
el
transportador
con
un
pincel.
Dire
hacia
afuera
el
pestillo
A
del
garfio
(Ianzadera).
Retire
el
anillo
B
y
el
garfio
C.
Limpie
a
pista
del
garfio.
Ponga
de
vez
en
cuando
una
gota
de
aceite
en
a
pista
del
garfio.
Atención!
cuide
de
que
no
se
caiga
el
garfio
al
suelo.
f
Nettoyage
et
huilage:
Lever
le
pied
presseur
et
laiguille.
Dévisser
es
deux
vis
de
fixation
de
Ia
plaque
a
aiguille
et
enlever
cette
plaque.
Nettoyer
a
griffe
a
laide
du
pinceau.
Basculer
los
verrous
A
de
a
coursière
vers
l’extérieur.
Retirer
lanneau
B
et
le
crochet
C.
Nettoyer
Ia
coursière.
De
temps
a
autre,
donner
une
goutte
dhuile
dens
Ia
coursière
de
crochet.
Attention:
Veiller
a
no
pas
laisser
tom
ber
le
crochet.
)
La page est en cours de chargement...
La page est en cours de chargement...
La page est en cours de chargement...
La page est en cours de chargement...
La page est en cours de chargement...
La page est en cours de chargement...
La page est en cours de chargement...
La page est en cours de chargement...
La page est en cours de chargement...
La page est en cours de chargement...
La page est en cours de chargement...
La page est en cours de chargement...
La page est en cours de chargement...
La page est en cours de chargement...
La page est en cours de chargement...
La page est en cours de chargement...
La page est en cours de chargement...
La page est en cours de chargement...
La page est en cours de chargement...
La page est en cours de chargement...
La page est en cours de chargement...
La page est en cours de chargement...
La page est en cours de chargement...
La page est en cours de chargement...
La page est en cours de chargement...
La page est en cours de chargement...
-
 1
1
-
 2
2
-
 3
3
-
 4
4
-
 5
5
-
 6
6
-
 7
7
-
 8
8
-
 9
9
-
 10
10
-
 11
11
-
 12
12
-
 13
13
-
 14
14
-
 15
15
-
 16
16
-
 17
17
-
 18
18
-
 19
19
-
 20
20
-
 21
21
-
 22
22
-
 23
23
-
 24
24
-
 25
25
-
 26
26
-
 27
27
-
 28
28
-
 29
29
-
 30
30
-
 31
31
-
 32
32
-
 33
33
-
 34
34
-
 35
35
-
 36
36
-
 37
37
-
 38
38
-
 39
39
-
 40
40
-
 41
41
-
 42
42
-
 43
43
-
 44
44
-
 45
45
-
 46
46
-
 47
47
-
 48
48
-
 49
49
-
 50
50
-
 51
51
-
 52
52
-
 53
53
-
 54
54
-
 55
55
-
 56
56
-
 57
57
-
 58
58
-
 59
59
-
 60
60
-
 61
61
-
 62
62
-
 63
63
-
 64
64
-
 65
65
-
 66
66
-
 67
67
-
 68
68
-
 69
69
-
 70
70
-
 71
71
-
 72
72
-
 73
73
-
 74
74


Pfaff hobby 307 Le manuel du propriétaire
- Catégorie
- Machines à coudre
- Taper
- Le manuel du propriétaire
- Ce manuel convient également à
dans d''autres langues
- italiano: Pfaff hobby 307 Manuale del proprietario
- English: Pfaff hobby 307 Owner's manual
- español: Pfaff hobby 307 El manual del propietario
Documents connexes
-
Pfaff hobby 340-751 Le manuel du propriétaire
-
-
-
-
-
-
-
-
-