Schumacher SP-1500 15 Watt Solar Charger/Maintainer with SPC-7A Charge Controller Le manuel du propriétaire
- Catégorie
- Chargeurs de batterie de voiture
- Taper
- Le manuel du propriétaire
Ce manuel convient également à

0099001194-04
PLEASE SAVE THIS OWNERS MANUAL AND READ BEFORE EACH USE. This
manual will explain how to use the product safely and effectively. Please read and
follow these instructions and precautions carefully.
POR FAVOR CONSERVE ESTE MANUAL DEL USUARIO Y LEALO ANTES
DE CADA USO. En este manual le explica cómo utilizar el producto de manera
segura y conable. Por favor, lea y siga las siguientes instrucciones y precauciones.
ESSAYER DE GARDER LE MANUEL D’INSTRUCTIONS ET LE LIRE AVANT
CHAQUE UTILISATION. Ce manuel explique comment utiliser l’unité d’une façon
sûre et efcace. S’il vous plaît lisez et suivez ces instructions et précautions.
MODEL / MODELO / MODÈLE :
SP-1500
Solar Battery Charger/Maintainer
with charge controller
Cargador/mantenedor solar de baterías
con controlador de carga
Dispositif d’entretien / chargeur
de batterie solaire avec régulateur de charge
OWNER’S MANUAL
MANUAL DEL USUARIO
GUIDE D’UTILISATION

CONTENTS
IMPORTANT SAFETY INSTRUCTIONS .....................................................................................4
PERSONAL PRECAUTIONS .......................................................................................................4
PREPARING TO MAINTAIN OR CHARGE .................................................................................. 5
SOLAR PANEL LOCATION .......................................................................................................... 5
DC CONNECTION PRECAUTIONS ............................................................................................5
FOLLOW THESE STEPS WHEN BATTERY IS INSTALLED IN VEHICLE ..................................5
FOLLOW THESE STEPS WHEN BATTERY IS OUTSIDE VEHICLE ..........................................6
ASSEMBLY AND MOUNTING INSTRUCTIONS .........................................................................6
FEATURES ...................................................................................................................................7
USING THE SOLAR CHARGE CONTROLLER ........................................................................... 7
OPERATING INSTRUCTIONS .....................................................................................................8
MAINTENANCE INSTRUCTIONS ...............................................................................................9
MOVING AND STORAGE INSTRUCTIONS ................................................................................9
BEFORE RETURNING FOR REPAIRS .......................................................................................9
SPECIFICATIONS ........................................................................................................................ 9
LIMITED WARRANTY ................................................................................................................10
WARRANTY CARD ....................................................................................................................27
CONTENIDOS
INSTRUCCIONES IMPORTANTES DE SEGURIDAD ............................................................... 11
PRECAUCIONES PERSONALES ............................................................................................. 11
PREPARACIÓN PARA EL MANTENIMIENTO O CARGA .........................................................12
UBICACIÓN DEL TABLERO SOLAR .........................................................................................12
PRECAUCIONES DE CONEXIÓN A CC ...................................................................................12
SIGA ESTOS PASOS CUANDO LA BATERÍA ESTÉ COLOCADA EN EL VEHÍCULO .............13
SIGA ESTOS PASOS CUANDO LA BATERÍA SE ENCUENTRE FUERA DEL VEHÍCULO ......13
INSTRUCCIONES DE MONTAJE Y ENSAMBLE ...................................................................... 14
CARACTERÍSTICAS ..................................................................................................................14
UTILIZANDO EL CONTROLADOR DE CARGA SOLAR ........................................................... 15
INSTRUCCIONES DE OPERACIÓN .........................................................................................15
INSTRUCCIONES DE MANTENIMIENTO .................................................................................16
INSTRUCCIONES PARA EL TRASLADO Y ALMACENAMIENTO ............................................17
ANTES DE DEVOLVER A REPARACIONES ............................................................................. 17
ESPECIFICACIONES ................................................................................................................17
GARANTÍA LIMITADA ................................................................................................................ 18
TARJETA DE GARANTÍA ...........................................................................................................27

TABLE DES MATIÈRES
CONSIGNES DE SÉCURITÉ IMPORTANTES ..........................................................................19
PRÉCAUTIONS PERSONNELLES............................................................................................19
SE PRÉPARER À CONSERVER OU DE CHARGE .................................................................20
EMPLACEMENT DU PANNEAU SOLAIRE ...............................................................................20
PRÉCAUTIONS DE RACCORDEMENT CC ..............................................................................20
ÉTAPES À SUIVRE SI LA BATTERIE EST INSTALLÉE DANS LE VÉHICULE ........................21
ÉTAPES À SUIVRE SI LA BATTERIE EST HORS DU VÉHICULE ...........................................21
ASSEMBLAGE ET MONTAGE ..................................................................................................22
CARACTÉRISTIQUES ............................................................................................................... 22
UTILISER LE RÉGULATEUR DE CHARGE SOLAIRE ..............................................................23
MODE D’EMPLOI .......................................................................................................................23
ENTRETIEN ...............................................................................................................................24
DÉPLACEMENT ET RANGEMENT ...........................................................................................25
SI DES RÉPARATIONS SONT NÉCESSAIRES ........................................................................ 25
SPÉCIFICATIONS ...................................................................................................................... 25
GARANTIE LIMITÉE ..................................................................................................................26
CARTE DE GARANTIE ..............................................................................................................28

• 4 •
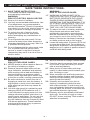
1. IMPORTANT SAFETY INSTRUCTIONS
SAVE THESE INSTRUCTIONS.
1.1 SAVE THESE INSTRUCTIONS –
This manual contains important safety
and operating instructions.
WARNING:
RISK OF ELECTRIC SHOCK OR FIRE.
1.2 Keep out of reach of children.
1.3 Use only recommended attachments. Use
of an attachment not recommended or
sold by Schumacher
®
Electric Corporation
may result in a risk of re, electric shock or
injury to persons or damage to property.
1.4 To reduce the risk of electric shock,
unplug the clips from the solar panel
before attempting any maintenance or
cleaning.
1.5 Do not operate the solar panel if it has
received a sharp blow, been dropped or
otherwise damaged in any way; take it to
a qualied service person.
1.6 Do not disassemble the solar panel; take
it to a qualied service person when
service or repair is required. Incorrect
reassembly may result in a risk of re or
electric shock.
WARNING:
RISK OF EXPLOSIVE GASES.
1.7 WORKING IN THE VICINITY OF A
LEAD-ACID BATTERY IS DANGEROUS.
BATTERIES GENERATE EXPLOSIVE
GASES DURING NORMAL BATTERY
OPERATION. FOR THIS REASON, IT IS
OF UTMOST IMPORTANCE THAT YOU
FOLLOW THE INSTRUCTIONS EACH
TIME YOU USE THE SOLAR PANEL.
1.8 To reduce the risk of a battery explosion,
follow these instructions and those
published by the battery manufacturer
and the manufacturer of any equipment
you intend to use in the vicinity of the
battery. Review the cautionary markings
on these products and on the engine.
1.9 Locate this solar panel 18 inches (45.72 cm)
or more above oor level. Do not place on
wet ground, anywhere it could be accidently
stepped on or in a place or position where it
could fall while being used.
2. PERSONAL PRECAUTIONS
WARNING:
RISK OF EXPLOSIVE GASES.
2.1 NEVER smoke or allow a spark or ame in
the vicinity of a battery or engine.
2.2 Remove personal metal items such as
rings, bracelets, necklaces and watches
when working with a lead-acid battery. A
lead-acid battery can produce a short-
circuit current high enough to weld a ring
or the like to metal, causing a severe burn.
2.3 Be extra cautious to reduce the risk of
dropping a metal tool onto the battery. It
might spark or short-circuit the battery or
other electrical part that may cause an
explosion.
2.4 Use this solar panel for maintaining and
charging LEAD-ACID batteries only. It
is not intended to supply power to a low
voltage electrical system other than in a
starter-motor application. Do not use this
solar panel for maintaining or charging
dry-cell batteries that are commonly used
with home appliances. These batteries
may burst and cause injury to persons
and damage to property.
2.5 NEVER maintain or charge a frozen battery.
2.6 Consider having someone close enough
by to come to your aid when you work
near a lead-acid battery.
2.7 Have plenty of fresh water and soap
nearby in case battery acid contacts your
skin, clothing or eyes.
2.8 Wear complete eye and body protection,
including safety goggles and protective
clothing. Avoid touching your eyes while
working near the battery.
2.9 If battery acid contacts your skin or
clothing, immediately wash the area
with soap and water. If acid enters your
eye, immediately ood the eye with cold
running water for at least 10 minutes and
get medical attention right away.
2.10 If battery acid is accidentally swallowed,
drink milk, the whites of eggs or water.
DO NOT induce vomiting. Seek medical
attention immediately.

• 5 •
3. PREPARING TO MAINTAIN OR CHARGE
WARNING: RISK OF CONTACT WITH
BATTERY ACID. BATTERY ACID IS A
HIGHLY CORROSIVE SULFURIC ACID.
3.1 If it is necessary to remove the battery
from the vehicle to maintain or charge
it, always remove the grounded terminal
rst. Make sure all of the accessories in
the vehicle are off to prevent arcing.
3.2 Be sure the area around the battery is
well ventilated while the battery is being
maintained or charged.
3.3 Clean the battery terminals before
maintaining or charging the battery.
During cleaning, keep airborne corrosion
from coming into contact with your eyes,
nose and mouth. Use baking soda and
water to neutralize the battery acid and
help eliminate airborne corrosion. Do not
touch your eyes, nose or mouth.
3.4 Add distilled water to each cell until the
battery acid reaches the level specied
by the battery manufacturer. Do not
overll. For a battery without removable
cell caps, such as valve regulated lead
acid batteries (VRLA), carefully follow the
manufacturer’s recharging instructions.
3.5 Read, understand and follow all
instructions for the solar panel, battery,
vehicle and any equipment used near
the battery and solar panel. Study all
of the battery manufacturer’s specic
precautions while in use.
3.6 Determine the voltage of the battery by
referring to the vehicle owner’s manual
and make sure that the output voltage of
the solar panel is the correct voltage.
3.7 Make sure that the solar panel cable clips
make tight connections.
4. SOLAR PANEL LOCATION
WARNING: RISK OF EXPLOSION AND
CONTACT WITH BATTERY ACID.
4.1 Locate the solar panel as far away from the
battery as the DC cables permit.
4.2 Never place the solar panel directly above
the battery being charged or maintained;
gases from the battery will corrode and
damage the solar panel.
4.3 Do not set the battery on top of the solar
panel.
4.4 Never allow battery acid to drip onto the
solar panel when reading the electrolyte
specic gravity or lling the battery.
4.5 Do not operate the solar panel in a
closed-in area or restrict the ventilation
in any way.
5. DC CONNECTION PRECAUTIONS
5.1 Never allow the clips to touch each other. 5.2 Attach the clips to the battery and chassis,
as indicated in sections 6 and 7.
6. FOLLOW THESE STEPS WHEN BATTERY IS INSTALLED IN VEHICLE
WARNING: A SPARK NEAR THE
BATTERY MAY CAUSE A BATTERY
EXPLOSION. TO REDUCE THE RISK
OF A SPARK NEAR THE BATTERY:
6.1 Position the DC cables to reduce the
risk of damage by the hood, door and
moving or hot engine parts. NOTE: If it
is necessary to close the hood during
the maintaining or charging process,
ensure that the hood does not touch the
metal part of the battery clips or cut the
insulation of the cables.
6.2 Stay clear of fan blades, belts, pulleys
and other parts that can cause injury.
6.3 Check the polarity of the battery posts.
The POSITIVE (POS, P, +) battery post
usually has a larger diameter than the
NEGATIVE (NEG, N, -) post.
6.4 Determine which post of the battery is
grounded (connected) to the chassis.
If the negative post is grounded to the
chassis (as in most vehicles), see step
6.5. If the positive post is grounded to the
chassis, see step 6.6.
6.5 For a negative-grounded vehicle, connect
the POSITIVE (RED) clip from the solar
panel to the POSITIVE (POS, P, +)
ungrounded post of the battery. Connect
the NEGATIVE (BLACK) clip to the
vehicle chassis or engine block away from
the battery. Do not connect the clip to the
carburetor, fuel lines or sheet-metal body
parts. Connect to a heavy gauge metal
part of the frame or engine block.
6.6 For a positive-grounded vehicle, connect
the NEGATIVE (BLACK) clip from the
solar panel to the NEGATIVE (NEG, N, -)
ungrounded post of the battery. Connect
the POSITIVE (RED) clip to the vehicle
chassis or engine block away from the
battery. Do not connect the clip to the
carburetor, fuel lines or sheet-metal body
parts. Connect to a heavy gauge metal
part of the frame or engine block.

• 6 •
6.7 Using the quick-connect connector, plug
the clips into the solar panel.
6.8 When disconnecting the solar panel, unplug
the clips from the solar panel, remove the
clip from the vehicle chassis, then remove
the clip from the battery terminal.
7. FOLLOW THESE STEPS WHEN BATTERY IS OUTSIDE VEHICLE
WARNING: A SPARK NEAR THE
BATTERY MAY CAUSE A BATTERY
EXPLOSION. TO REDUCE THE RISK
OF A SPARK NEAR THE BATTERY:
7.1 Check the polarity of the battery posts.
The POSITIVE (POS, P, +) battery post
usually has a larger diameter than the
NEGATIVE (NEG, N, -) post.
7.2 Attach at least a 24-inch (61 cm) long
6-gauge (AWG) (13 mm
2
) insulated
battery cable to the NEGATIVE (NEG, N, -)
battery post.
7.3 Connect the POSITIVE (RED) solar panel
clip to the POSITIVE (POS, P, +) post of
the battery.
7.4 Position yourself and the free end of
the cable you previously attached to the
NEGATIVE (NEG, N, -) battery post as far
away from the battery as possible – then
connect the NEGATIVE (BLACK) solar
panel clip to the free end of the cable.
7.5 Do not face the battery when making the
nal connection.
7.6 Using the quick-connect connector, plug
the clips into the solar panel.
7.7 When disconnecting the solar panel,
always do so in the reverse order of the
connecting procedure and break the rst
connection while as far away from the
battery as practical.
7.8 A marine (boat) battery must be removed
and maintained or charged on shore.
To maintain or charge it onboard
requires equipment specially designed
for marine use.
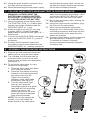
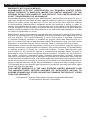
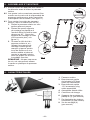
8. ASSEMBLY AND MOUNTING INSTRUCTIONS
8.1 Remove all cord wraps and uncoil the
cables prior to using the solar panel.
8.2 The included four foot pads can be
mounted to the corners of the solar
panel to help increase heat dissipation
(see gure 1).
8.3 To mount the solar panel (in a dry
location off the ground):
1. Place the solar panel face down
on a clean at surface.
2. Place the four plastic mounting
brackets in the desired location
and rotate each one 90°.
Tighten the mounting
brackets, using a at blade
screwdriver (see gure 2).
3. Turn the solar panel right
side up, and using the
mounting brackets as a guide,
mark and drill four mounting
holes on a secure, at
surface and mount the solar
panel with the four stainless
steel screws provided.
NOTE: Do not over tighten the
screws, or you will break the
plastic frame of the solar panel.
Fig. 1
Fig. 2

• 7 •
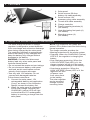
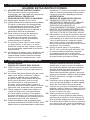
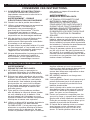
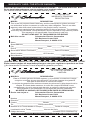
9. FEATURES
1
3
2
4
1. Solar panel
2. Quick-connect 50 Amp
battery clip cable assembly
3. Quick-connect 12V
accessory plug cable assembly
4. Tinned wire cable assembly
5. Charge controller
6. Plastic mounting brackets (4)
(not shown)
7. Heat-dissipating foot pads (4)
(not shown)
8. Mounting screws (4)
(not shown)
5
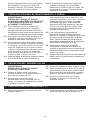
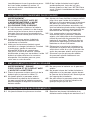
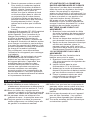
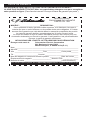
10. USING THE SOLAR CHARGE CONTROLLER
The solar charge controller or charge
regulator is designed to protect batteries
from overcharge and excessive discharge
when being charged by the solar panel.
The controller functions to automatically
assure the battery is fully charged and
keep the battery fully charged without
damages to the battery.
WARNING: Connect and disconnect
battery lead only when solar panel and
load are disconnected.
• Do not exceed the maximum input ratings.
• Do not misconnect battery, solar panel
and load, as this could cause reverse
polarity. Avoid contact with water.
• Use only with 12V batteries. Do not
connect with damaged batteries.
Follow these instructions:
1. Connect the solar panel, 12V
rechargeable battery and application
(if any), as shown in the illustration.
Always connect the battery rst.
2. When the solar panel is connected
to the solar charge controller, the
CHARGING (yellow) LED will light
to show that the 12V rechargeable
battery is receiving a charge from the
solar panel.
NOTE: It is normal for the green and
yellow LED to icker back and forth during
normal operation.
The charge controller provides the
following protections for the whole system:
• Charging: When the CHARGING (Yellow)
LED is lit, the regulator is charging the
battery.
• Over-discharge protection: When the
LOW VOLTAGE (Red) LED is lit, the
charge regulator will shut off the power
output to prevent damage to the battery.
• Overcharge protection: When the
HIGH VOLTAGE (Green) LED is lit, the
regulator will shut
off power input
from solar panel
to the battery.
The solar regulator
can be mounted
through its three
mounting holes.

• 8 •
11. OPERATING INSTRUCTIONS
WARNING: This solar panel must be
properly assembled in accordance with the
assembly instructions before it is used.
The solar panel does not have an ON/
OFF switch. The On and Off commands
are controlled by placing the solar panel in
the sun only after the battery connections
have been made.
You MUST disconnect the solar panel
from the 12 volt power outlet or battery
when starting the engine or driving
the vehicle. Electrical surges from the
alternator when starting and running may
damage the solar panel.
NOTE: The clips and 12V output are
always live.
CHARGING AND MAINTAINING
A BATTERY
1. Ensure that all of the solar panel
components are in place and in good
working condition, for example, the
plastic boots on the battery clips.
2. Decide whether you are going to use
the 12 volt accessory plug or the 50
Amp battery clips to connect the solar
panel to the vehicle. Connect the
proper cable to the solar panel making
sure the connection is secure.
• If using the 12 volt accessory plug, plug
the connector into the vehicle’s power
outlet making sure the connection is
secure.
• If using the 50 Amp battery clips, connect
the battery following the precautions
listed in sections 6 and 7.
3. Place the solar panel in the sun. For
optimum solar panel output, face the
front (glass) side of the solar panel
towards the sun, making sure there are
no shadows being cast on the panel by
the vehicle or other objects. The best
orientation to place the solar panel is in
a south to north direction with the panel
tilted at a suitable angle. The best angle
would be the same as your local latitude.
4. To disconnect, reverse the procedure.
The Schumacher SP-1500 charges small
batteries and maintains large 12 volt
batteries, keeping them at full charge.
However, if you were to use this unit to
charge a large battery, you may lose
some of the battery’s capacity. This would
cause the battery to be unable to hold a
charge and become useless.
NOTE: The maintain mode technology
allows you to safely maintain a
healthy battery for extended periods
of time. However, problems with the
battery, electrical problems in the
vehicle, improper connections or other
unanticipated conditions could cause
excessive current draws. As such,
occasionally monitoring your battery and
the maintaining process is recommended.
USING THE QUICK-CONNECT
CABLE ASSEMBLIES
Connect either of the two output cable
assemblies to the solar panel. Do not
place on wet ground, anywhere it could
be accidently stepped on or in a place
or position where it could fall while being
used. Never use the output cables together
or for other applications, as reverse polarity
and/or overcharge conditions will occur.
50 AMP BATTERY CLIP CABLE
ASSEMBLY
1. Connect the end of the solar charge
controller output cable to the end of
the 50 amp battery clips cable.
2. Follow the steps in sections 6 and 7 to
connect the output clips to the battery.
3. After a good electrical connection is
made to the battery, connect the solar
panel to the charger controller and
place it in the sun, per the instructions
in step 4 of the solar panel location
section.
12V ACCESSORY PLUG CABLE
ASSEMBLY
Maintain or charge your battery without
lifting the hood.
1. Connect the end of the 12V accessory
plug cable to the solar charge
controller.
2. Insert the 12V accessory plug into the
12V accessory outlet.
3. Route the power cord from the solar
panel through the vehicle’s open window.
4. Place the solar panel in the sun, per
the instructions in step 3 of Operating
Instructions.

• 9 •
12. MAINTENANCE INSTRUCTIONS
12.1 After use and before performing
maintenance, unplug and disconnect the
solar panel (see sections 6, 7 and 8).
12.2 Use a dry cloth to wipe all battery
corrosion and other dirt or oil from the
battery clips, cords and the solar panel.
12.3 The solar panel uses a glass substrate;
handle with care.
12.4 Always keep the glass surface clean
using a soft cloth in order to ensure its
maximum output.
12.5 Ensure that all of the solar panel
components are in place and in good
working condition, for example, the plastic
boots on the battery clips.
12.6 Servicing does not require opening the unit,
as there are no user-serviceable parts.
12.7 All other servicing should be performed by
qualied service personnel.
13. MOVING AND STORAGE INSTRUCTIONS
13.1 Store the solar panel unplugged, in an
upright position.
13.2 Store inside, in a cool, dry place.
13.3 Do not store the clips clipped together, on
or around metal, or clipped to cables.
13.4 If the solar panel is moved around the
shop or transported to another location,
take care to avoid/prevent damage to
the cords, clips and solar panel. Failure
to do so could result in personal injury or
property damage.
14. BEFORE RETURNING FOR REPAIRS
14.1 When a maintaining or charging problem
arises, make certain that the battery is
capable of accepting a normal charge.
Double check all connections, the solar
panel clips for correct polarity and the
quality of the connections from the cables
to the clips and from the clips to the
battery system. The clips must be clean.
14.2 When a battery is very cold, partially
charged or sulfated, it will not draw the
full rated amperes from the solar panel.
It is both dangerous and damaging to a
battery to force higher amperage into it
than it can effectively use in recharging.
14.3 When an UNKNOWN OPERATING
PROBLEM arises, please read the
complete manual and call the customer
service number for information. This will
usually eliminate the need for return.
If these solutions do not eliminate the problem, or for more information
about troubleshooting, contact customer service for assistance:
www.batterychargers.com
or call 1-800-621-5485
For REPAIR OR RETURN, contact Customer Service at 1-800-621-5485. DO NOT SHIP
UNIT until you receive a RETURN MERCHANDISE AUTHORIZATION (RMA) number
from Customer Service at Schumacher Electric Corporation.
15. SPECIFICATIONS
Peak power output ................................................................................................ 15 Watts
Tested under standard condition ............................................... AM1.5, 100mW/cm
2
, 25°C
Optimum working voltage .......................................................................................17.50 V
Optimum working current ........................................................................................850 mA
Operating temperature ........................................................-40° F–185° F (-40° C–85° C)

• 10 •
16. LIMITED WARRANTY
WARRANTY NOT VALID IN MEXICO.
SCHUMACHER ELECTRIC CORPORATION, 801 BUSINESS CENTER DRIVE,
MOUNT PROSPECT, IL 60056-2179, MAKES THIS LIMITED WARRANTY TO THE
ORIGINAL RETAIL PURCHASER OF THIS PRODUCT. THIS LIMITED WARRANTY
IS NOT TRANSFERABLE OR ASSIGNABLE.
Schumacher Electric Corporation (the “Manufacturer”) warrants this solar panel for one (1)
year from the date of purchase at retail against defective material or workmanship that
may occur under normal use and care. If your unit is not free from defective material
or workmanship, Manufacturer’s obligation under this warranty is solely to repair or
replace your product with a new or reconditioned unit at the option of the Manufacturer.
It is the obligation of the purchaser to forward the unit, along with proof of purchase and
mailing charges prepaid to the Manufacturer or its authorized representatives in order
for repair or replacement to occur.
Manufacturer does not provide any warranty for any accessories used with this product
that are not manufactured by Schumacher Electric Corporation and approved for use
with this product. This Limited Warranty is void if the product is misused, subjected
to careless handling, repaired, or modied by anyone other than Manufacturer or if
this unit is resold through an unauthorized retailer. Manufacturer may void this Limited
Warranty if a “warranty may be void if removed” label is removed from the product.
Manufacturer makes no other warranties, including, but not limited to, express, implied or
statutory warranties, including without limitation, any implied warranty of merchantability
or implied warranty of tness for a particular purpose. Further, Manufacturer shall
not be liable for any incidental, special or consequential damage claims incurred by
purchasers, users or others associated with this product, including, but not limited to,
lost prots, revenues, anticipated sales, business opportunities, goodwill, business
interruption and any other injury or damage. Any and all such warranties, other than the
limited warranty included herein, are hereby expressly disclaimed and excluded. Some
states do not allow the exclusion or limitation of incidental or consequential damages or
length of implied warranty, so the above limitations or exclusions may not apply to you.
This warranty gives you specic legal rights and it is possible you may have other rights
which vary from this warranty.
THIS LIMITED WARRANTY IS THE ONLY EXPRESS LIMITED WARRANTY AND
THE MANUFACTURER NEITHER ASSUMES OR AUTHORIZES ANYONE TO
ASSUME OR MAKE ANY OTHER OBLIGATION TOWARDS THE PRODUCT OTHER
THAN THIS WARRANTY.
Schumacher
®
and the Schumacher logo
are registered trademarks
of Schumacher Electric Corporation.

• 11 •
1. INSTRUCCIONES IMPORTANTES DE SEGURIDAD
GUARDE ESTAS INSTRUCCIONES.
1.1 GUARDE ESTAS INSTRUCCIONES –
Este manual contiene instrucciones
operativas y de seguridad de importancia.
ADVERTENCIA: RIESGO DE
DESCARGA ELÉCTRICA O INCENDIO.
1.2 Manténgalo alejado de los niños.
1.3 Utilice solamente accesorios recomendados.
El uso de un accesorio no recomendado
o suministrado por Schumacher
®
Electric
Corporation puede provocar riesgo de
incendio, descarga eléctrica o lesiones a
personas o daños a la propiedad.
1.4 Para reducir el riesgo de descarga
eléctrica, desenchufe las pinzas
del tablero solar antes de intentar
llevar a cabo cualquier actividad de
mantenimiento o limpieza.
1.5 No utilice el panel solar si este recibió
un golpe fuerte, si se cayó o si sufrió
daños de cualquier tipo. Hágalo revisar
por una persona capacitada que efectúe
reparaciones.
1.6 No desarme el tablero solar; hágalo revisar
por una persona apacitada que efectúe
reparaciones cuando necesite efectuar
algún servicio de mantenimiento o una
reparación. Si vuelve a ensamblar el panel
solar en forma incorrecta puede provocar
riesgo de incendio o descarga eléctrica.
ADVERTENCIA:
RIESGO DE GASES EXPLOSIVOS.
1.7 TRABAJAR CERCA DE A UNA
BATERÍA DE PLOMO ES PELIGROSO.
LAS BATERÍAS GENERAN GASES
EXPLOSIVOS DURANTE SU
FUNCIONAMIENTO NORMAL. POR ESTE
MOTIVO, ES DE SUMA IMPORTANCIA
QUE SIGA LAS INSTRUCCIONES CADA
VEZ QUE UTILIZA EL TABLERO SOLAR.
1.8 Para reducir el riesgo de explosión de una
batería, siga estas instruccione y aquellas
publicadas por el fabricante de la batería
y por el fabricante de cualquier equipo
que intente utilizar cerca de la batería.
Revise las pautas de precaución en estos
productos y en el motor.
1.9 Utilice el panel solar a 18 pulgadas
(45,72 cm) o más del nivel del suelo. No
lo coloque sobre supercies mojadas,
en lugares donde se lo podría pisar
accidentalmente ni en un lugar de donde
se podría caer mientras se utiliza.
2. PRECAUCIONES PERSONALES
ADVERTENCIA:
RIESGO DE GASES EXPLOSIVOS.
2.1 NUNCA fume ni permita la presencia de
chispas o llamas cerca de una batería o
un motor.
2.2 No utilice elementos personales de metal
tales como anillos, pulseras, collares
y relojes al trabajar con una batería
de plomo-ácido. Una batería de plomo
ácido puede producir una corriente
de cortocircuito lo sucientemente
elevada como para soldar un anillo o
provocar efectos similares sobre el metal,
causando una quemadura de gravedad.
2.3 Tenga especial cuidado para reducir el
riesgo de dejar caer una herramienta
de metal sobre la batería. Esto podría
provocar chispas o un cortocircuito en la
batería o en cualquier otra pieza eléctrica
que podría provocar una explosión.
2.4 Utilice este tablero solar solamente para
mantener baterías de PLOMO-ÁCIDO. Este
tablero solar no está destinado a suministrar
energía a sistemas eléctricos de baja
tensión que no sea un motor de arranque.
No utilice este tablero solar para mantener
baterías de pila seca que por lo general
se utilizan con artefactos domésticos.
Estas baterías podrían explotar y provocar
lesiones a personas o daños a la propiedad.
2.5 NUNCA mantener o carga una batería
congelada.
2.6 Considere tener a alguna persona cerca
suyo que pueda ayudarlo cuando trabaje
cerca de una batería de plomo-ácido.
2.7 Cuente con una gran cantidad de agua
potable y jabón a mano en caso de que el
ácido de la batería entre en contacto con
la piel, la ropa o los ojos.
2.8 Utilice protección visual y corporal
completa, incluso gafas de seguridad y
prendas de protección. Evite tocarse los
ojos mientras trabaje cerca de la batería.
2.9 Si el ácido de la batería entra en contacto
con la piel o la ropa, lave de inmediato el
área afectada con agua y jabón. En caso

• 12 •
de que ingrese ácido en los ojos, lávelos
de inmediato con agua corriente fría
durante al menos 10 minutos y busque
atención médica en forma urgente.
2.10 Si el ácido de la batería se ingiere de
manera accidental, se recomienda
beber leche, clara de huevo o agua. NO
se provoque el vómito. Busque ayuda
médica de inmediato.
3. PREPARACIÓN PARA EL MANTENIMIENTO O CARGA
ADVERTENCIA:
RIESGO DE CONTACTO CON EL
ÁCIDO DE LA BATERÍA. EL ÁCIDO DE
LA BATERÍA ES ÁCIDO SULFÚRICO
ALTAMENTE CORROSIVO.
3.1 Si es necesario quitar la batería del
vehículo para mantenerla o cargarla,
siempre quite la terminal a tierra primero.
Asegúrese de que todos los accesorios en
el vehículo se apaguen para evitar chispas.
3.2 Asegúrese de que el área alrededor de
la batería esté bien ventilada mientras la
batería se mantiene o se cargue.
3.3 Limpie las terminales de la batería antes
de mantener o cargar la batería. Durante
la limpieza, que la corrosión en el aire no
entre en contacto con los ojos, la nariz o
la boca. Use bicarbonato de sodio y agua
para neutralizar el ácido de la batería
para prevenir corrosión en el aire. No se
toque los ojos, la nariz o la boca.
3.4 Agregue agua destilada a cada pila hasta
que el ácido de la batería alcance el
nivel especicado por el fabricante. No
provoque derrames. En lo que concierne
a baterías que no cuentan con tapas
extraíbles para pilas, como baterías
de plomo-ácido reguladas por válvulas
(VRLA, por sus siglas en inglés), siga
cuidadosamente las instrucciones de
recarga del fabricante.
3.5 Lea, comprenda y siga todas las
instrucciones para el tablero solar, la
batería, el vehículo y cualquier equipo que
se utilice cerca de la batería y el panel
solar. Controle todas las precauciones
especícas establecidas por el fabricante
de la batería al realizar la carga.
3.6 Determine la tensión de la batería
consultando el manual del usuario del
vehículo y asegúrese de que la tensión de
salida del tablero solar se encuentre en la
tensión correcta.
3.7 Asegúrese de que las pinzas del cable del
tablero solar se encuentren fuertemente
conectados.
4. UBICACIÓN DEL TABLERO SOLAR
ADVERTENCIA:
RIESGO DE CONTACTO CON EL
ÁCIDO DE LA BATERÍA.
4.1 Ubique el tablero solar a la mayor
distancia posible de la batería como lo
permitan los cables de CC.
4.2 Nunca ubique el tablero solar
directamente sobre la batería que se
carga. Los gases de la batería corroerán
y dañarán el tablero solar.
4.3 No ubique la batería sobre el panel solar.
4.4 Nunca permita que el ácido de la batería
gotee sobre el panel solar cuando lea el
peso especíco del electrolito o cuando
realice el mantenimiento de la batería.
4.5 No utilice el panel solar en un área
cerrada ni restrinja la ventilación en
cualquier forma.
5. PRECAUCIONES DE CONEXIÓN A CC
5.1 Nunca permita que las pinzas entre en
contacto entre sí.
5.2 Sujete las pinzas a la batería y al chasis
como se indica en las secciones 6 y 7.

• 13 •
6. SIGA ESTOS PASOS CUANDO LA BATERÍA ESTÉ COLOCADA EN EL VEHÍCULO
ADVERTENCIA: UNA CHISPA
PROVOCADA CERCA DE LA BATERÍA
PUEDE CAUSAR LA EXPLOSIÓN
DE LA BATERÍA. PARA REDUCIR EL
RIESGO DE PROVOCAR CHISPAS
CERCA DE LA BATERÍA:
6.1 Posicione bien los cables de CC para
reducir el riesgo de daños por el cofre,
puertas y partes movibles o calientes
del motor o en movimiento. NOTA: Si es
necesario cerrar el cofre durante el proceso
de mantenimiento o de carga, asegúrese
de que el cofre no rose o toque la parte
metálica de los clips de la batería o corte el
aislamiento de los cables.
6.2 Manténgase alejado de las paletas del
ventilador, de las correas, poleas y otras
piezas que podrían provocar lesiones.
6.3 Verique la polaridad de los bornes de
la batería. El borne POSITIVO (POS,
P, +) de la batería generalmente posee
un diámetro mayor al borne NEGATIVO
(NEG, N, -).
6.4 Determine qué borne de la batería hace
descarga a tierra (se encuentra conectado)
con el chasis. Si el borne negativo hace
descarga a tierra con el chasis (como en la
mayoría de los vehículos), vea el paso 6.5.
Si el borne positivo hace descarga a tierra
con el chasis, vea el paso 6.6.
6.5 En un vehículo con descarga a tierra
por borne negativo, conecte la pinza
POSITIVA (ROJA) del tablero solar al
borne POSITIVO (POS, P, +) sin descarga
a tierra de la batería. Conecte la pinza
NEGATIVA (NEGRA) al chasis del
vehículo o al bloque motor alejado de la
batería. No conecte la pinza al carburador,
a líneas de combustible ni a cuerpos
metálicos. Conéctela a una pieza metálica
gruesa de la carrocería o del bloque motor.
6.6 En un vehículo con descarga a tierra
por borne positivo, conecte la pinza
NEGATIVA (NEGRA) del panel solar
al borne NEGATIVO (NEG, N, -) sin
descarga a tierra de la batería. Conecte
la pinza POSITIVA (ROJA) al chasis del
vehículo o al bloque motor alejado de la
batería. No conecte al carburador, a líneas
de combustible ni a cuerpos metálicos.
Conéctela a una pieza metálica gruesa de
la carrocería o del bloque motor.
6.7 Con el conector de conexión rápida,
conecte las pinzas en el tablero solar.
6.8 Al desconectar el tablero solar, desconecte
las pinzas del panel solar, retire la pinza
del chasis del vehículo y luego retire la
pinza del terminal de la batería.
7. SIGA ESTOS PASOS CUANDO LA BATERÍA SE ENCUENTRE FUERA DEL VEHÍCULO
ADVERTENCIA: UNA CHISPA
PROVOCADA CERCA DE LA BATERÍA
PUEDE CAUSAR LA EXPLOSIÓN
DE LA BATERÍA. PARA REDUCIR EL
RIESGO DE PROVOCAR CHISPAS
CERCA DE LA BATERÍA:
7.1 Verique la polaridad de los bornes de
la batería. El borne POSITIVO (POS,
P, +) de la batería generalmente posee
un diámetro mayor al borne NEGATIVO
(NEG, N, -).
7.2 Sujete al menos un cable aislado de
batería de 24 pulgadas (61 cm) de largo
calibre 6 (AWG) (13 mm
2
) al borne
NEGATIVO (NEG, N, -) de la batería.
7.3 Conecte la pinza POSITIVA (ROJA) del
tablero solar al borne POSITIVO (POS,
P, +) de la batería.
7.4 Ubíquese junto al extremo libre del
cable que previamente sujetó al borne
NEGATIVO (NEG, N, -) de la batería a
la mayor distancia posible de la batería.
Luego conecte la pinza NEGATIVA
(NEGRA) del tablero solar al extremo
libre del cable.
7.5 No se ubique en posición frontal a la
batería al realizar la conexión nal.
7.6 Con el conector de conexión rápida
conecte las pinzas en el tablero solar.
7.7 Al desconectar el tablero solar, siempre
hágalo en forma inversa al procedimiento
de conexión y realice la primera conexión
tan lejos de la batería como sea posible.
7.8 Una batería marina (de barco) se debe
quitar para mantener cargar fuera. Para
mantener o cargarla a bordo requiere de
un equipo especialmente diseñado para
uso marino.

• 14 •
8. INSTRUCCIONES DE MONTAJE Y ENSAMBLE
8.1 Desenrede todos los cordones y
extienda los cables antes de usar
el tablero solar.
8.2 Los cuatro cojines de patas se
pueden instalar en las esquinas
del tablero solar para ayudar a
aumentar la disipación de calor
(ver gura 1)
8.3 Para montar el tablero solar (en un
lugar seco que no toque tierra):
1. Coloque el tablero solar boca
abajo sobre una supercie
plana y limpia.
2. Coloque los cuatro soportes de
montaje de plástico en el lugar
deseado y gírelos a 90°. Apriete
los soportes de montaje con un
desarmador de punta plana (ver
gura 2).
3. Gire el lado lateral derecho
del tablero solar, y, utilizando
los soportes de montaje como
guía, marque y taladre cuatro
agujeros de montaje en una
supercie plana y segura,
después monte el tablero solar
con los cuatro tornillos de
acero inoxidable incluidos en el
paquete.
NOTA: No ajuste demasiado los
tornillos ya que podría quebrar el
marco del tablero solar.
9. CARACTERÍSTICAS
1
3
2
4
1. Panel solar
2. Conexión rápida
de la batería 50 amperios
de ensamble de cable
3. Conexión rápida
12V accesorios enchufe
del cable de la Asamblea
4. Cables de alambre
forrado para ensamble
5. Controlador de carga
6. Soportes para montaje
de plástico (4) (no se
muestra)
7. Cojines de Pie para
disipación del calor (4)
(no se muestra)
8. Tornillos para
ensamblaje (4)
(no se muestra)
5
Fig. 1
Fig. 2

• 15 •
10. UTILIZANDO EL CONTROLADOR DE CARGA SOLAR
El controlador de carga solar o regulador
de carga está diseñado para proteger
las baterías de sobrecargas y descargas
excesivas al momento de ser cargadas por
el tablero solar. El controlador de funciones
asegura automáticamente que la batería
esté totalmente cargada y mantiene la
batería totalmente cargada, sin dañarla.
ADVERTENCIA: Conecte y desconecte el
cable de la batería sólo cuando el tablero
solar y la carga estén desconectados.
• No exceda el nivel máximo de entrada
• No mal conecte la bacteria, el panel y la
carga, ya que podría provocar la inversión
de polaridad. Evite el contacto con el agua.
• Uselo sólo con baterías de 12 V. No
conecte baterías dañadas.
Siga las siguientes instrucciones:
1. Conecte el tablero solar, batería
recargable de 12V y el otro aparato
(si existe), como se muestra en la
ilustración. Siempre conecte la batería
primeramente.
2. Cuando el tablero solar se conecta
el controlador de carga solar, la
luz LED de CARGANDO (amarilla)
se encenderá, para mostrar que
la batería recargable de 12V está
recibiendo una carga del tablero solar.
NOTA: es normal que las luces LED
verde y amarilla parpadéen durante la
operación normal.
El controlador de carga proporciona las
siguientes protecciones para todo el
sistema:
• Cargando: Cuando se esté realizando
la carga, la luz LED (Amarilla) estará
encendida, el regulador está cargando la
batería.
• Protección en el exceso de descarga:
Cuando la BAJA TENSIÓN, luz LED
(Roja) está encendida, el regulador de
carga bloqueará la salida de corriente
para evitar daños a la batería.
• Protección de sobrecarga: Cuando el
ALTO VOLTAJE,
luz LED (Verde)
está encendida, el
regulador de carga
bloqueará la de
entrada desde el
tablero solar a la
batería.
El regulador solar
se puede montar a
través de sus tres
oricios de montaje.
11. INSTRUCCIONES DE OPERACIÓN
ADVERTENCIA: Antes de utilizar
este tablero solar, debe ensamblarlo
correctamente de acuerdo con las
instrucciones.
El panel solar carece de interruptor
para ENCENDIDO Y APAGADO. Los
comandos para encendido y apagado se
controlan colocando el tablerol solar al sol
sólo después de que las conexiones de la
batería se hayan realizado.
DEBE desconectar el tablero solar del
tomacorriente de 12V o de la batería
mientras conduce el vehículo o arranca
el motor. Una sobrecarga del alternador
podría dañar el panel solar mientras se
arranca o maneja el vehículo.
NOTA: Las pinzas y el enchufe de salida
de 12V tienen corriente.
MANTENIENDO Y CARGANDO
UNA BATERÍA
1. Asegúrese de que todas las piezas
del tablero solar estén bien instaladas
y en buenas condiciones para
funcionar. Por ejemplo, asegúrese
de que las botas de plástico son los
ganchos de la batería.
2. Decida si va a utilizar el enchufe de 12
voltios o las pinzas de la batería de 50
Amps., para conectar el controlador
solar al vehículo. Conecte el cable
adecuado al controlador solar,
asegurándose de que la conexión
esté segura.
• Si usa el enchufe de 12 voltios de
accesorios, enchufe el conector en el
encendedor del vehículo asegurándose
de que la conexión esté rme.
• Si se utiliza el 50 clips amperios de la
batería, conecte la batería teniendo en
cuenta las precauciones que guran
en las secciones 6 y 7.

• 16 •
3. Coloque el tablero solar en el sol.
Para que la salida del mantenedor
solar de baterías sea óptima, coloque
el frente (vidrio) del panel solar hacia
el sol, cerciorándose de que no haya
sombras originadas por el vehículo ni
otros objetos sobre el panel. La mejor
orientación para colocar el panel solar
es en dirección sur-norte con el panel
inclinado a un ángulo conveniente.
El mejor ángulo sería igual que la
latitud local.
4. Para desconectar el tablero solar,
proceda en forma inversa.
El modelo Schumacher SP-1500 carga
baterías pequeñas y mantiene baterías
de 12 volts., manteniéndolas en completa
carga. De modo que, si usted desea
cargar una batería más grande, esta
perderá algo de su capacidad. Esto
originará que la batería no mantenga la
carga y sea inservible.
NOTA: El modo de mantenimiento es una
tecnología que le permite mantener de
manera segura una batería que funcione
correctamente durante períodos de tiempo
prolongados. Sin embargo, problemas
con la batería, problemas eléctricos del
vehículo, conexiones equivocadas y otras
condiciones que podrían surgir, pueden
llegar a causar absorción de corriente
excesiva. De modo que se recomienda
enérgicamente supervisar la batería y el
proceso de carga.
USO DE LA CONEXIÓN RÁPIDA
MONTAJES DE CABLE
Conectar cualquiera de los dos conjuntos
de cables de salida al controlador de carga
solar. No coloque el regulador solar en
la tierra húmeda, en lugares donde se
lo podría pisar accidentalmente ni en un
lugar de donde se podría caer mientras se
utiliza. Nunca junta los cables ni los use
para otros propósitos, esto ocasionará
polaridad invertida o sobrecarga.
50 AMPERIOS DE LA BATERÍA CLIP
DE ENSAMBLAJE DE CABLES
1. Conecte la punta del cable de salida
del tablero solar de baterías a la punta
del cable con pinzas de la batería de
50 amperes.
2. Siga los pasos descritos en las
secciones 6 y 7 para hacer la
conexión a las pinzas de la batería.
3. Después de hacer una buena conexión
eléctrica a la batería, coloque el tablero
solar en el sol, por las instrucciones del
paso 4 de la sección para la ubicación
del tablero solar.
12V ACCESORIOS ENCHUFE DEL
CABLE DE LA ASAMBLEA
Para mantener o cargar la batería sin
necesidad de levantar el cofre.
1. Conecte el extremo del cable del
enchufe de 12 Volts del accesorio al
controlador de carga solar.
2. Inserte el enchufe accesorio de 12V a
la salida de 12V.
3. Introduzca el cable de corriente del
tablero solar por la ventanilla abierta
del vehículo.
4. Exponga el tablero solar directo al sol,
de acuerdo con las instrucciones que
guran en el paso 3 de la sección
Instrucciones de Operación.
12. INSTRUCCIONES DE MANTENIMIENTO
12.1 Desenchufe y desconecte el tablero solar
después de usarlo y antes de realizar el
mantenimiento (vea las secciones 6, 7 y 8).
12.2 Utilice un paño seco para limpiar la
corrosión de la batería y cualquier
suciedad o aceite de las pinzas de la
batería, los cables y el panel solar.
12.3 El tablero solar usa un sustrato de vidrio;
manéjelo con cuidado.
12.4 Mantenga la supercie del vidrio limpia,
utilizando un paño suave para asegurar
un rendimiento máximo.
12.5 Asegúrese de que todas las piezas del
tablero solar estén bien instaladas y en
buenas condiciones para funcionar, por
ejemplo, los protectores de plástico de las
pinzas de la batería.
12.6 Para realizar mantenimiento no es
necesario abrir la unidad, ya que no
existen piezas a las cuales puede
realizarle mantenimiento el usuario.
12.7 Cualquier otro servicio debe realizarse
por personal calicado.

• 17 •
13. INSTRUCCIONES PARA EL TRASLADO Y ALMACENAMIENTO
13.1 Guarde el tablero solar desenchufado en
posición vertical.
13.2 Almacénelo en el interior, en un lugar
fresco y seco.
13.3 No guarde las pinzas entrelazadas entre
sí, sobre metales o cerca de ellos, ni
enganchadas a cables.
13.4 Si el tablero solar se mueve a otro sitio
del taller o se transporta a otro lugar, trate
de evitar o prevenir que los cables, las
pinzas y el tablero solar sufran daños.
Si ignora estas recomendaciones podría
sufrir lesiones personales o causar daños
en la propiedad.
14. ANTES DE DEVOLVER A REPARACIONES
14.1 Cuando un problema de mantenimiento o
carga surge, asegúrese de que la batería
es capaz de aceptar una carga normal.
Revise doblemente todas las conexiones,
las pinzas del tablero solar para asegurar
la polaridad y la calidad de las conexiones
de los cables a las pinzas y de las pinzas
de la batería del sistema. Las pinzas
deben estar limpias.
14.2 Cuando la batería está muy fría,
parcialmente cargada o sulfatada no
obtendrá todo el índice de amperes del
tablero solar . Es peligroso y perjudicial
para la batería forzar un amperaje mayor
al que puede utilizar efectivamente en
una recarga.
14.3 Cuando surja un PROBLEMA DE
FUNCIONAMIENTO DESCONOCIDO,
lea todo el manual y comuníquese con el
número de atención al cliente para recibir
más información, que generalmente
eliminará la necesidad de devolución.
Si estas soluciones no eliminan el problema o
si desea obtener más información
sobre la solución de problemas, póngase en contacto
con el departamento de servicio al cliente para recibir asistencia:
www.batterychargers.com
o llame 1-800-621-5485
Para REPARACIÓN O DEVOLUCIÓN, comuníquese con Servicios al Cliente al
1-800-621-5485. NO ENVÍE LA UNIDAD hasta que usted reciba AUTORIZACIÓN
DE DEVOLUCIÓN DE MERCANCÍA (RMA) de Servicios al Cliente de Schumacher
Electric Corporation.
15. ESPECIFICACIONES
Salida máxima de energía ..........................................................................................15 W
Probado en condición normal ................................................... AM1,5; 100mW/cm
2
, 25°C
Tensión óptima de funcionamiento .........................................................................17,50 V
Corriente óptima de funcionamiento ....................................................................... 850 mA
Temperatura de funcionamiento ..................................... -40 ° F–185 ° F (-40 ° C–85 ° C)

• 18 •
16. GARANTÍA LIMITADA
GARANTÍA NO VÁLIDA EN MÉXICO.
SCHUMACHER ELECTRIC CORPORATION, 801 BUSINESS CENTER DRIVE,
MOUNT PROSPECT, IL 60056-2179, OTORGA LA PRESENTE GARANTÍA LIMITADA
AL COMPRADOR MINORISTA ORIGINAL DE ESTE PRODUCTO. LA PRESENTE
GARANTÍA LIMITADA NO PUEDE TRANSFERIRSE NI CEDERSE.
Schumacher Electric Corporation (el “Fabricante”) otorga garantía por este tablero solar,
por un plazo de un (1) año a partir de la fecha de compra al por menor, por cualquier
defecto de material o de mano de obra que pudieran surgir por su uso y cuidado
normal. Si su unidad tiene defectos de material o de mano de obra, el Fabricante
tendrá la obligación de reparar o sustituir el producto por uno nuevo o por una unidad
reparada (a elección del fabricante), conforme a la presente garantía. Es la obligación
del comprador enviar la unidad con comprobante de compra y los gastos de envío
prepagos al Fabricante o a sus representantes autorizados para que estos reparen o
reemplacen el producto.
El Fabricante no otorga garantía por lo accesorios utilizados con este producto que no
sean los fabricados por Schumacher Electric Corporation y que no estén aprobados
para su uso con este producto. La presente Garantía Limitada será nula si el producto
se utiliza en forma errónea, se trata de manera inadecuada, es reparado o modicado
por personas que no sean el Fabricante o si esta unidad es revendida a través de un
vendedor minorista no autorizado. El fabricante pudiera anular esta Garantía Limitada
si la etiqueta “warranty may be void if removed” es removida del producto.
El Fabricante no otorga ninguna otra garantía, incluidas, a título enunciativo, las
garantías expresas, implícitas o legales, incluyendo, a modo de ejemplo, las garantías
implícitas de comerciabilidad o adecuación a un n especíco. Asimismo, el Fabricante
no será responsable ante reclamos por daños accidentales, especiales ni directos en
los que incurran los compradores, usuarios u otras personas asociadas al producto,
incluidos, a título enunciativo, reclamos por ingresos y ganancias no percibidos, ventas
anticipadas, oportunidades comerciales, fondo de comercio, la interrupción de la
actividad comercial o cualquier otro daño que haya provocado. Todas las garantías,
excepto la garantía limitada incluida en el presente documento quedan expresamente
anuladas y excluidas. Algunos estados no permiten la exclusión ni la limitación de los
daños accidentales ni directos o el plazo de garantía implícita, por lo que las limitaciones
o exclusiones mencionadas anteriormente podrían no corresponder con su caso. La
presente garantía le otorga derechos legales especícos y es probable que usted
cuente con otros derechos que podrían diferir de los incluidos en la presente garantía.
LA PRESENTE GARANTÍA LIMITADA ES LA ÚNICA GARANTÍA LIMITADA EXPRESA
Y EL FABRICANTE NO ASUME NI AUTORIZA A NADIE A ASUMIR O A ADQUIRIR
NINGUNA OTRA OBLIGACIÓN RESPECTO DEL PRODUCTO QUE NO SEA LA
PRESENTE GARANTÍA.
Schumacher
®
y el logo Schumacher
son marcas registradas
de Schumacher Electric Corporation.

• 19 •
1. CONSIGNES DE SÉCURITÉ IMPORTANTES
CONSERVER CES INSTRUCTIONS.
1.1 CONSERVER CES INSTRUCTIONS –
Ce manuel contient des instructions
importantes concernant la sécurité et le
fonctionnement.
AVERTISSEMENT : RISQUE
D’ÉLECTROCUTION OU D’INCENDIE.
1.2 Garder hors de la portée des enfants.
1.3 Utiliser uniquement avec les accessoires
recommandés. L’utilisation d’un
accessoire non recommandé ou
pas fourni par Schumacher
®
Electric
Corporation peut poser un risque
d’incendie, d’électrocution, de blessures
corporelles ou de dommages matériels.
1.4 An de réduire le risque d’électrocution,
débrancher les pinces du panneau
solaire avant d’entreprendre toute tâche
d’entretien ou de nettoyage.
1.5 Ne pas utiliser le panneau solaire s’il a subi
un choc important, s’il est tombé ou s’il est
endommagé d’une manière quelconque;
l’apporter à un technicien qualié.
1.6 Ne pas désassembler le panneau solaire;
l’apporter à un technicien qualié si
de l’entretien ou des réparations sont
nécessaires. L’assemblage incorrect
peut poser un risque d’incendie ou
d’électrocution.
AVERTISSEMENT :
RISQUE DE GAZ EXPLOSIFS
1.7 LE TRAVAIL À PROXIMITÉ D’UNE
BATTERIE PLOMB-ACIDE EST
DANGEREUX. CES BATTERIES
PRODUISENT DES GAZ EXPLOSIFS
DURANT LEUR FONCTIONNEMENT
NORMAL. POUR CETTE RAISON, IL
EST EXTRÊMEMENT IMPORTANT
D’OBSERVER LES DIRECTIVES POUR
TOUTE UTILISATION DU PANNEAU
SOLAIRE.
1.8 An de réduire le risque d’explosion de la
batterie, observer ces directives et celles
publiées par les fabricants de la batterie et
de tout matériel qui sera utilisé à proximité
de la batterie. Consulter les avertissements
sur ces produits et sur le moteur.
1.9 Placer le panneau solaire à au moins 18
po (46 cm) du sol. Ne pas le placer sur le
sol mouillé, à un endroit où l’on pourrait
marcher dessus accidentellement ni dans
un endroit ou une position d’où il pourrait
tomber durant l’utilisation.
2. PRÉCAUTIONS PERSONNELLES
AVERTISSEMENT :
RISQUE DE GAZ EXPLOSIFS.
2.1 NE JAMAIS fumer ou permettre la
présence d’étincelles ou de ammes à
proximité d’une batterie ou d’un moteur.
2.2 Enlever tout objet métallique tel que des
bagues, des bracelets, des colliers et des
montres lors du travail sur une batterie
plomb-acide. Une batterie plomb-acide
peut produire un court-circuit sufsant
pour souder une bague ou autre bijou
à une pièce métallique et causer des
brûlures graves.
2.3 Faire preuve d’une prudence extrême
an de réduire le risque de laisser tomber
un outil métallique sur la batterie. Cela
pourrait causer de l’étincelage ou court-
circuiter la batterie ou d’autres composants
électriques et causer une explosion.
2.4 Utiliser ce dispositif d’entretien de batterie
solaire seulement sur des batteries
PLOMB-ACIDE. Il n’est pas conçu pour
alimenter un système électrique à basse
tension autre qu’un démarreur. Ne pas
utiliser ce panneau solaire pour l’entretien
de piles sèches qui sont couramment
utilisées dans des appareils domestiques.
Ces batteries peuvent exploser et
causer des blessures corporelles ou des
dommages matériels.
2.5 NE JAMAIS maintenir ou charge une
batterie gelée.
2.6 Il est préférable d’avoir une personne qui
puisse facilement venir à son secours
lorsque l’on travaille à proximité d’une
batterie plomb-acide.
2.7 Avoir à portée de la main une quantité
abondante d’eau et de savon en cas de
contact de l’acide de la batterie avec la
peau, les yeux ou les vêtements.
2.8 Porter une protection complète pour les
yeux et le corps, y compris des lunettes
de sécurité et des vêtements protecteurs.
Éviter de se toucher les yeux alors qu’on
travaille à proximité de la batterie.
2.9 Si l’acide de la batterie entre en contact
avec la peau ou les vêtements, laver
immédiatement la zone à l’eau et au
savon. Si l’acide pénètre dans un œil,

• 20 •
immédiatement rincer à grande eau avec
de l’eau froide pendant au moins 10
minutes et obtenir immédiatement des
soins médicaux.
2.10 Si de l’acide de batterie est ingéré
accidentellement, boire du lait, des
blancs d’œufs ou de l’eau. NE PAS faire
vomir. Obtenir immédiatement des soins
médicaux.
3. SE PRÉPARER À CONSERVER OU DE CHARGE
AVERTISSEMENT :
RISQUE DE CONTACT AVEC DE
L’ACIDE DE BATTERIE. L’ACIDE
DE BATTERIE EST UN ACIDE
SULFURIQUE TRÈS CORROSIF.
3.1 S’il est nécessaire d’enlever la batterie
du véhicule pour maintenir ou de charge,
retirez toujours la borne terre en premier.
Assurez-vous que tous les accessoires
du véhicule sont éteints pour éviter un arc
électrique.
3.2 Soyez sûr la zone autour la batterie
est bien ventilé tandis la batterie est
maintenue ou facturés.
3.3 Nettoyez les terminaux batterie avant
maintenir ou charger la batterie. Pendant
le nettoyage, gardez la corrosion
aéroportée d’entrer en contact avec
vos yeux, le nez et la bouche. Utilisez
bicarbonate et eau pour neutraliser l’acide
batterie et aidera éliminer la corrosion
aéroportés. Ne touchez pas vos yeux,
votre nez ou votre bouche.
3.4 Ajouter de l’eau distillée à chaque cellule
jusqu’à ce que l’acide de la batterie
atteigne le niveau prescrit par le fabricant.
Ne pas trop remplir. Si la batterie n’est
pas munie de bouchons amovibles, tel
que les batteries plomb-acide à régulation
par soupape, observer attentivement les
instructions de recharge du fabricant.
3.5 Lire, comprendre et suivre toutes les
instructions pour le panneau, batterie
solaire, des véhicules et des équipements
utilisés à proximité du panneau de la
batterie et de solaire. Étudier toutes les
précautions spéciques du fabricant de
batteries en cours d’utilisation.
3.6 Déterminer la tension de la batterie en
consultant le manuel du propriétaire du
véhicule et veiller à ce que la tension de
sortie du panneau solaire soit la bonne.
3.7 S’assurer que les pinces des câbles
du panneau solaire établissent une
connexion solide.
4. EMPLACEMENT DU PANNEAU SOLAIRE
AVERTISSEMENT : RISQUE
D’EXPLOSION ET DE CONTACT AVEC
L’ACIDE DE LA BATTERIE.
4.1 Placer le panneau solaire aussi loin de la
batterie que le permet le câble CC.
4.2 Ne jamais placer le panneau solaire
directement au-dessus de la batterie ;
les gaz corrosifs de la batterie causeront
des dommages au dispositif d’entretien de
batterie solaire.
4.3 Ne pas poser la batterie sur le panneau
solaire.
4.4 Ne jamais laisser de l’acide de batterie
dégoutter sur le panneau solaire durant
la mesure de la densité de l’électrolyte ou
de l’appoint de la batterie.
4.5 Ne pas utiliser le panneau solaire dans
un espace clos ou limiter l’aération de
quelque façon que ce soit.
5. PRÉCAUTIONS DE RACCORDEMENT CC
5.1 Ne jamais laisser les pinces se toucher. 5.2 Brancher les pinces à la batterie et au
châssis comme indiqué aux sections 6 et 7.
La page est en cours de chargement...
La page est en cours de chargement...
La page est en cours de chargement...
La page est en cours de chargement...
La page est en cours de chargement...
La page est en cours de chargement...
La page est en cours de chargement...
La page est en cours de chargement...
-
 1
1
-
 2
2
-
 3
3
-
 4
4
-
 5
5
-
 6
6
-
 7
7
-
 8
8
-
 9
9
-
 10
10
-
 11
11
-
 12
12
-
 13
13
-
 14
14
-
 15
15
-
 16
16
-
 17
17
-
 18
18
-
 19
19
-
 20
20
-
 21
21
-
 22
22
-
 23
23
-
 24
24
-
 25
25
-
 26
26
-
 27
27
-
 28
28


Schumacher SP-1500 15 Watt Solar Charger/Maintainer with SPC-7A Charge Controller Le manuel du propriétaire
- Catégorie
- Chargeurs de batterie de voiture
- Taper
- Le manuel du propriétaire
- Ce manuel convient également à
dans d''autres langues
Documents connexes
-
Schumacher SP-1500 15 Watt Solar Charger/Maintainer with SPC-7A Charge Controller Le manuel du propriétaire
-
Schumacher SP-400 4.8W Solar Charger/Maintainer Le manuel du propriétaire
-
-
-
-
-
-
-
-