
1390218
22-06-2015
Troncatrice per legno con funzione sega da banco
ISTRUZIONI PER L’USO E ISTRUZIONI DI SICUREZZA
Istruzioni originali
Wood cutting off machine comprising a bench saw
INSTRUCTION MANUAL AND SAFETY INSTRUCTIONS
Original instructions
Tronçonneuse pour bois ayant fonction de scie à table
INSTRUCTIONS POUR L’UTILISATION ET CONSIGNES DE SÉCURITÉ
Instructions d’origine
Tronzadora para madera con función de sierra de banco
INSTRUCCIONES PARA EL USO E INSTRUCCIONES DE SEGURIDAD
Instrucciones originales
Ìç÷áíÞ êïðÞò ãéá îýëï ìå ëåéôïõñãßá óÝãáò ðÜãêïõ
ÅÃ×ÅÉÑÉÄÉÏ ÏÄÇÃÉÙÍ ×ÑÇÓÇÓ ÊÁÉ ÏÄÇÃÉÙÍ ÁÓÖÁËÅÉÁÓ
Ðñùôüôõðåò ïäçãßåò
ATTENZIONE! Prima di usare la macchina, leggete attentamente le istruzioni per l’uso
CAUTION! Before starting the machine, read the operating instructions carefully
ATTENTION! Avant la mise en service de la machine, lire scrupuleusement le mode d’emploi
ATENCIÓN! Antes de usar la máqiuna, leer atentamente las instrucciones de empleo
ÐÑÏÓÏ×Ç! Ðñéí ÷ñçóìïðïéÞóåôå ôï ìç÷Üíçìá äéáâÜóôå ðñïóåêôéêÜ ôéò ïäçãßåò ÷ñÞóçò
TLS250N

- 2 -

- 3 -

- 4 -

- 5 -

- 6 -
- Lancio di materiale e polvere verso gli occhi ed il corpo dell’operatore.
Indossate occhiali di protezione e maschera antipolvere.
- Material and dust flying towards the operator’s eyes and body. Use
eye protection and an anti-dust mask.
- Projection de matériel et de poussières vers les yeux et le corps
de l’opérateur. Mettez des lunettes de protection et un masque
anti-poussière.
- Lanzamiento de material y polvo hacia los ojos y el cuerpo del operador.
Lleve puestas gafas de protección y una careta antipolvo.
- Åêôüîåõóç õëéêïý êáé óêüíçò ðñïò ôá ìÜôéá êáé ôïõ óþìá ôïõ
÷åéñéóôÞ. Íá öïñÜôå ðñïóôáôåõôéêÜ ãõáëéÜ êáé ìÜóêá.
- Rumore elevato generato dalla macchina. Indossate cuffie a pro-
tezione dell’udito.
- Loud noise generated by the machine. Use ear protection.
- Bruit élevé engendré par la machine. Mettez des protecteurs d’o-
reilles.
- Generación de un alto nivel de ruido por parte de la máquina. Utilice
cascos de protección auditiva.
- Õøçëüò èüñõâïò ðáñáãüìåíïò áðü ôç ìç÷áíÞ. Íá öïñÜôå
ùôïáóðßäåò.
- Rischio di scossa elettrica con pericolo di morte. Non toccate le parti in
tensione elettrica e mantenete una distanza di sicurezza. Prima di ogni
manutenzione scollegate la spina dalla presa di alimentazione.
- Risk of electric shock and danger of death. Do not touch the electrically
live parts and keep a safe distance. Before any maintenance operations,
unplug the machine from the power supply.
- Risque d’électrocution et de danger de mort. Ne touchez pas les com-
posants sous tension électrique et maintenez une distance de sécurité.
Avant chaque utilisation, débranchez la fiche de la prise d’alimentation.
- Riesgo de electrocución con peligro de muerte. No toque las partes que se
encuentran bajo tensión eléctrica y mantenga una distancia de seguridad.
Antes de efectuar cualquier operación de mantenimiento desconecte el
enchufe de la toma de alimentación.
- Êßíäõíïò çëåêôñïðëçîßáò ìå êßíäõíï èáíÜôïõ. Ìçí
áããßæåôå ôá ìÝñç õðü çëåêôñéêÞ ôÜóç êáé äéáôçñåßôå
ìéá áðüóôáóç áóöáëåßáò. Ðñéí áðü êÜèå óõíôÞñçóç íá
âãÜæåôå ôï âýóìá áðü ôçí ðñßæá ôñïöïäïóßáò.
RISCHI RESIDUI
RESIDUAL RISkS
RISqUES RÉSIDUELS
RIESGOS RESIDUALES
Queste illustrazioni mostrano i rischi residui nell’uso della macchina. Leggete attentamente il libretto istruzioni della macchina.
These illustrations show the main risks involved with using the machine. Read the machine instruction manual carefully.
Ces illustrations montrent les principaux risques quand on utilise la machine. Lisez attentivement le manuel d’instructions de la machine.
Estas ilustraciones muestran los principales riesgos que comporta el uso de la máquina. Lea atentamente el manual de instrucciones.
Ïé áðåéêïíßóåéò áõôÝò äåß÷íïõí ôïõò êõñéüôåñïõò êéíäýíïõò óôç ÷ñÞóç ôçò ìç÷áíÞò. ÄéáâÜóôå ðñïóåêôéêÜ ôï ã÷åéñßäéï ïäçãéþí ôçò ìç÷áíÞò.
- Lama e schegge di legno che provocano ferite alle mani. Indossate
guanti protettivi e mantenete una distanza di sicurezza dalla zona
di taglio.
- Blade and sharp burrs which could cut hands. Wear protective
gloves and keep a safe distance from the cutting area.
- Les organes en mouvement et les bavures peuvent provoquer des
blessures aux mains. Mettez des gants de protection et maintenez une
distance de sécurité par rapport à la zone de coupe.
- Partes en movimiento y rebabas cortantes que provocan heridas en
las manos. Póngase guantes de protección y mantenga una distancia
de seguridad con respecto a la zona de corte.
- Êéíïýìåíá ìÝñç êáé áé÷ìçñÜ ãíÜöáëá ðïõ ðñïêáëïýí
ôñáýìáôá óôá ÷Ýñéá. Íá öïñÜôå ðñïóôáôåõôéêÜ ãÜíôéá êáé
íá äéáôçñåßôå ìéá áðüóôáóç áóöáëåßáò áðü ôçí ðåñéï÷Þ
ëåßáíóçò/êïðÝò.

- 7 -
i
AVVERTENZE DI SICUREZZA GENERALI
1) I SACCHI DI NYLON NON SONO DEI GIOCATTOLI
ATTENZIONE! Pericolo di soffocamento. I sacchi di nylon presenti nell’imballaggio
possono provocare soffocamento se infilati sul capo e devono essere tenuti lontani
dai bambini; se non più riutilizzabili devono essere tagliati e smaltiti nei rifiuti.
2) PERSONE ABILITATE ALL’USO DELLA MACCHINA
L’uso della macchina è vietato ai bambini, alle persone inesperte non perfettamente
a conoscenza delle istruzioni d’uso contenute nel presente manuale ed agli estranei.
Leggi e regolamenti locali possono prevedere una età minima per l’uso della macchi-
na. L’operatore deve essere adeguatamente addestrato all’utilizzo, alla regolazione e
al funzionamento in sicurezza della macchina.
3) RESPONSABILITA’ DELL’OPERATORE
L’operatore è responsabile verso terzi di eventuali incidenti o danni a persone e cose
causati dall’uso della macchina.
4) MANTENETE UNA POSIZIONE DI LAVORO STABILE E SICURA
Quando lavorate mantenete una posizione di lavoro stabile e sicura, non sbilanciatevi.
5) FATE ATTENZIONE ALLA ZONA DI LAVORO
Fate attenzione alle mani, al pezzo in lavorazione, all’utensile di taglio, ai trucioli
prodotti dalla lavorazione e in generale a tutte le parti in movimento.
6) OPERATE CON ATTENZIONE
Non distraetevi e controllate sempre quello che state facendo: usate il buon senso.
Non usate mai la macchina in condizioni di stanchezza, malessere, sotto l’effetto di
alcool, droghe o farmaci che riducono la vigilanza.
7) MANTENETE UNA DISTANZA DI SICUREZZA
Mantenete le persone e gli animali lontano dalla vostra zona di lavoro e dalla macchina.
Non toccate le parti che sono in tensione elettrica.
8) PROTEGGETE IL VOSTRO CORPO
L’uso della macchina genera rumore, calore, polveri, fumi, vibrazioni, il lancio di
trucioli e schegge. Operate sempre con dei dispositivi di protezione individuale a
norma per evitare lesioni al corpo, alle mani, agli occhi, all’udito, alle vie respiratorie.
Indossate abbigliamento robusto con maniche e polsini stretti, occhiali di protezione,
guanti da lavoro, cuffie antirumore, maschera antipolvere e calzature antinfortunisti-
che. Non indossate abbigliamento largo, sciarpe, nastri di tessuto e gioielli perché
potrebbero impigliarsi nelle parti in movimento della macchina. Indossare copricapi
di protezione per raccogliere i capelli lunghi. Gli occhiali da vista non sono adatti a
proteggere gli occhi.
9) EFFICIENZA DELLA MACCHINA
Controllate sempre l’efficienza e l’integrità della macchina; se in cattivo stato può
provocare gravi incidenti. Non utilizzate la macchina se l’interruttore non consente
di accendere o spegnere la macchina. Se necessario sostituite l’inserto del piano di
lavoro.
10) INTEGRITA’ DELLA MACCHINA
Non togliete alcun componente dalla macchina se non espressamente indicato nelle
presenti istruzioni e non modificate in alcun modo la configurazione originale.
11) NON SMONTATE LA MACCHINA
Non smontate per alcun motivo la macchina. Non utilizzate la macchina senza le
protezioni in posizione in posizione, specialmente dopo un cambio di modalità.
12) NON MANOMETTETE ALCUN COMPONENTE DELLA MACCHINA
Non manomettete, non modificate, non togliete alcun componente della macchina.
13) VERIFICATE LA SOLIDITA’ DELLA MACCHINA
Verificate periodicamente il serraggio della viteria della macchina e il fissaggio della
lama.
14) UTILIZZATE LA MACCHINA IN UN LUOGO BEN AERATO E VENTILATO
La macchina deve essere utilizzata in un luogo ben aerato e ventilato in modo
assicurare un sufficiente raffreddamento e un ricambio d’aria del locale.
15) NON UTILIZZATE LA MACCHINA IN AMBIENTI PERICOLOSI
Non utilizzate la macchina in un ambiente con pericolo di esplosione e/o incendio,
in locali poco ventilati, in presenza di liquidi, umidità, gas, vapori, acidi ed elementi
infiammabili e/o esplosivi.
16) TRASPORTO DELLA MACCHINA
Le operazioni di trasporto della macchina devono essere eseguite con attenzione.
Trasportatela solo in posizione banco sega afferrandola con due mani sul basamento.
Non trasportate la macchina tirandola per il cavo di alimentazione o altre sue parti.
17) POSIZIONAMENTO DELLA MACCHINA
Posizionate e fissate la macchina mediante bulloneria sopra un banco da lavoro o
piedistallo con superficie piana, solida e ininfiammabile che dovrà supportare il peso
totale e le sollecitazioni derivate dall’uso. E’ vietato usare la macchina senza fissarla
solidamente e su superfici infiammabili come legno, plastica ecc. Periodicamente
verificate il fissaggio.
18) LAVORATE CON LUMINOSITA’ ADEGUATA
Lavorate solo durante le ore di buona luminosità o con una illuminazione artificiale
corrispondente.
19) NON ESPONETE LA MACCHINA AGLI AGENTI ATMOSFERICI
Non lasciate la macchina esposta agli agenti atmosferici quali pioggia, nebbia, sole,
alte o basse temperature.
20) NON TOCCATE LA MACCHINA SE SIETE BAGNATI
Non usare la macchina a piedi nudi o bagnati. Non toccare la macchina con le mani
bagnate.
21) CONTROLLO PRIMA DI AVVIARE LA MACCHINA
Prima di inserire la spina alla rete elettrica verificare che l’interruttore sia su OFF “O”
(spento), che il pezzo in lavorazione sia ben posizionato e supportato, che la testa
di taglio sia regolata e che le chiavi di servizio siano state tolte. Non utilizzate la
macchina se gli inserti sono usurati e le protezioni lama sono rotte o non funzionano.
22) VERIFICHE CORRETTO MONTAGGIO
Non utilizzate la macchina se il tubo dell’aspiratrucioli/polvere (non in dotazione) è
scollegato e l’aspiratore (non in dotazione) è spento.
23) VERIFICHE DELLE PROTEZIONI
Controllate che le protezioni della lama non siano danneggiate. La protezione inferiore
lama deve seguire il movimento di salita/discesa della testa di taglio; non utilizzate
la macchina se la protezione non copre la lama nella posizione di riposo.
24) POSIZIONATE BENE IL PEZZO IN LAVORAZIONE
E’ molto importante per la vostra sicurezza che il pezzo in lavorazione sia ben posizio-
nato contro la guida poggiapezzo, che sia serrato dalla morsa, e che sia supportato
alle due estremità mediante piedistalli (non in dotazione). Il pezzo deve avere lati
piani e perpendicolari come tavole, listelli ecc.; non tagliate rami, tronchi d’albero o
a sezione circolare. Non tagliate pezzi che contengono chiodi o viti, oppure avvolti
da nastro, corde o altro. Non tagliate pezzi in costa ma appoggiate il lato lungo sulla
base della macchina. Non tagliate pezzi a sezione piccola che non possono essere
serrati dalla morsa e/o che si spezzerebbero durante il taglio.
25) MATERIALI NON CONSENTITI
Non è consentita la lavorazione di metalli, materiali plastici, materiali infiammabili ed
esplodenti, materiali che generano polveri e nebbie pericolose o nocive alla salute.
26) PREVENITE POSSIBILI INCIDENTI
Effettuate sempre una prova di funzionamento a vuoto prima di iniziare il lavoro;
durante questo periodo fate in modo che nessuno si avvicini alla macchina e
mantenete una distanza di sicurezza. Utilizzate sempre dei dispositivi di protezione
individuale. A macchina in funzione non toccate la lama, pericolo di lesioni gravi!
Dopo aver sostituito dei componenti effettuate sempre un controllo generale prima
di accingervi alla lavorazione.
27) UTILIZZATE SOLO LAME SPECIFICATE DAL FABBRICANTE
Questa macchina è stata progettata per utilizzare lame specifiche per il taglio del legno;
è vietato utilizzare lame adatte ad altri materiali e dischi abrasivi. Non utilizzate lame
realizzate in acciaio super rapido HSS. La velocità max stampigliata sulla lama deve
essere sempre maggiore a quella indicata nei dati tecnici della macchina. Utilizzate
lame conformi alle normative in vigore nel paese in cui vi trovate.
28) MANEGGIATE LA LAMA CON ATTENZIONE
La lama ha parti molto taglienti: maneggiatela con attenzione e indossate sempre
guanti protettivi, pericolo di lesioni gravi!
29) UTILIZZATE SOLO LAME IN PERFETTE CONDIZIONI
Non utilizzate lame danneggiate o deformate; se usurata sostituitela con una nuova.
30) NON SOLLECITATE LA LAMA
Non sottoponete la lama a sollecitazioni quali: urti, flessioni, pressioni eccessive,
tensioni termiche, variazioni irregolari di velocità, vibrazioni. In queste condizioni
l’utensile ha una durata limitata e può rompersi senza preavviso con pericoloso
lancio di frammenti.
31) A MACCHINA IN FUNZIONE NON TOCCATE LE PARTI IN MOVIMENTO
ATTENZIONE! Pericolo di ferite gravi! Durante il funzionamento non toccate la
lama e tutte le parti in movimento. Fate attenzione a come muovete le braccia e
le mani. Togliete il pezzo solo dopo aver spento la macchina e scollegato il cavo
di alimentazione dalla presa elettrica.
32) MACCHINA NON OPERATIVA
Posizionare l’interruttore su OFF “O” (spento), staccate l’alimentazione elettrica
scollegando la spina della macchina quando: non la usate, la lasciate incustodita,
la trasportate, il cavo di alimentazione è danneggiato, fissate e smontate il pezzo in
lavorazione, effettuate le regolazioni, la manutenzione e la pulizia.
33) ATTENDETE L’ARRESTO COMPLETO DELLA MACCHINA
Il motore, le parti meccaniche rotanti e la lama girano ancora per diversi secondi
dopo aver spento la macchina. Durante la fase di arresto queste parti non devono
essere toccate, pericolo di lesioni gravi!
34) NON ABBANDONATE LA MACCHINA FINCHE’ E IN FUNZIONE
Non abbandonate la macchina finché è in funzione e nella fermata rimanete accanto
fino al completo arresto delle parti in movimento.
35) MANTENETE PULITO E IN ORDINE IL POSTO DI LAVORO
Il disordine e la mancanza di pulizia sono fonti di pericolo. Fate in modo che attorno
alla macchina non ci siano attrezzi od oggetti che potrebbero essere danneggiati. Non
posizionate attrezzi od oggetti sulla macchina che potrebbero cadere accidentalmente.
Eliminate frequentemente i residui di taglio dalla macchina e dal pavimento.
36) POLVERI DANNOSE ALLA SALUTE
ATTENZIONE! Le polveri di alcuni tipi di legno sono molto dannose alla salute.
Indossate le protezioni alle vie respiratorie, evacuate i trucioli dalla macchina e
dotate il locale di un estrattore per il ricambio dell’aria.
37) LE RIPARAZIONI DEVONO ESSERE EFFETTUATE DA PERSONALE AUTORIZZA-
TO
Non tentate di riparare la macchina o di accedere a organi interni, rivolgetevi sempre
presso i centri assistenza autorizzati. Interventi effettuati da personale non autorizzato
fa decadere immediatamente la garanzia e potrebbe generare pericolo. Conservate
la prova d’acquisto per eventuali interventi in garanzia.
38) RICHIEDETE E FATE INSTALLARE SOLO RICAMBI ORIGINALI
Richiedete e fate installare solo ricambi originali, rivolgetevi al vostro rivenditore di
fiducia. L’utilizzo di ricambi non originali fa decadere la garanzia e potrebbe generare
pericolo.
39) RIPONETE LA MACCHINA IN UN LUOGO SICURO
Quando non la usate, riponete la macchina in un luogo asciutto e lontano dalla portata
dei bambini.
40) RISCHI RESIDUI
ATTENZIONE! La scrupolosa osservanza di queste istruzioni con l’utilizzo dei mezzi
di protezione individuale minimizzano i rischi di incidente ma non li eliminano
completamente.
41) ATTENETEVI SEMPRE A QUESTE ISTRUZIONI
Utilizzate la macchina solo nei modi descritti in queste istruzioni. Non utilizzatela per
scopi a cui non è destinata.

- 8 -
AVVERTENZE DI SICUREZZA ELETTRICHE
1) NON TOCCATE LE PARTI IN TENSIONE ELETTRICA
ATTENZIONE! Pericolo di scossa elettrica. Alcune parti della macchina sono in
tensione elettrica.
2) MANTENETE I BAMBINI E GLI ANIMALI LONTANI DAGLI APPARECCHI ELETTRICI
I bambini e gli animali devono essere tenuti lontani dagli apparecchi collegati alla
rete elettrica.
3) VERIFICATE LA TENSIONE DI ALIMENTAZIONE
La tensione di alimentazione deve corrispondere a quella dichiarata sulla targhetta
dati tecnici. Non utilizzate altro tipo di alimentazione.
4) UTILIZZATE UN APPARECCHIO SALVAVITA
È consigliato l’uso di un apparecchio salvavita sulla linea di alimentazione elettrica per
un campo di intervento secondo le normative vigenti nel Paese di utilizzo; consultate
il vostro elettricista di fiducia.
5) COLLEGAMENTO ALLA RETE ELETTRICA
Prima di collegare o scollegare la macchina dalla rete di alimentazione, assicuratevi
che l’interruttore si trovi nella posizione OFF “O” (spento).
6) NON MANOMETTETE IL CAVO DI ALIMENTAZIONE
Non manomettete il cavo di alimentazione. Non sostituite la spina del cavo di ali-
mentazione; utilizzate solo una presa adattata alla spina della macchina. Utilizzate il
cavo di alimentazione esclusivamente per gli scopi a cui è destinato.
7) CONTROLLATE IL CAVO DI ALIMENTAZIONE
Il cavo di alimentazione e il cavo di prolunga (se presente) devono essere controllati
periodicamente e prima di ogni uso per vedere se presentano segni di danneggia-
mento o di invecchiamento. Se non risultassero in buone condizioni scollegate
immediatamente il cavo e non usate la macchina ma fatela riparare presso un centro
di assistenza autorizzato.
8) MANTENETE IL CAVO DI ALIMENTAZIONE IN POSIZIONE SICURA
Tenete il cavo di alimentazione e il cavo di prolunga (se presente) lontani dalla zona di
lavoro e dall’utensile di taglio, da superfici umide, bagnate, oliate, da bordi taglienti,
da fonti di calore, da combustibili e da zone di transito veicolare e pedonale.
9) NON CALPESTATE O SCHIACCIATE IL CAVO DI ALIMENTAZIONE
Non passate mai sopra il cavo di alimentazione. Siate coscienti della sua posizione
in ogni momento.
10) NON USATE LA MACCHINA IN PRESENZA DI LIQUIDI
Non bagnate la macchina con liquidi e non esponetela ad ambienti umidi. Non
lasciatela all’aperto.
11) UTILIZZATE UN CAVO DI PROLUNGA IDONEO ALLA MACCHINA
Utilizzate solamente cavo per prolunga omologato idoneo alla potenza della macchina
che utilizzate e dimensionato in base alla sua lunghezza; consultate il vostro elettricista
di fiducia.
12) SCOLLEGATE LA MACCHINA IMPUGNANDO SOLO LA SPINA
Per estrarre la spina dalla presa impugnate solo la spina ; non tirare il cavo!
13) EVITATE IL CONTATTO DEL CORPO CON SUPERFICI MESSE A MASSA O A TERRA
Evitate il contatto del corpo con superfici messe a massa o a terra, come frigoriferi,
termosifoni, tubi e serramenti metallici ecc. E’ consigliato l’utilizzo di una pedana
che isoli elettricamente l’utilizzatore dal pavimento.
______________________________________________________________
Ci congratuliamo con Voi per l’ottima scelta. Il Vostro nuovo apparecchio, prodotto
secondo elevati standard di qualità, Vi garantirà rendimento e sicurezza nel tempo.
Questo istruzioni riportano le informazioni e quanto ritenuto necessario per il buon uso, la
conoscenza e la normale manutenzione della macchina. Esse non riportano le informazioni
sulle tecniche delle lavorazioni del legno alle macchine utensili né trattano l’argomento sulle
tipologie e grado di lavorabilità dei vari tipi di legno; l’utilizzatore troverà maggiori notizie
su libri e pubblicazioni specifiche o partecipando a corsi di specializzazione.
Le avvertenze d’uso e le norme di manutenzione si riferiscono a necessità normali di
esercizio. Dalla loro osservanza e dall’adempimento di quanto prescritto, dipende il
regolare funzionamento, la durata e l’economia di esercizio della macchina.
Queste istruzioni sono parte integrante della macchina e devono accompagnarla in caso
di riparazione o di rivendita. Conservate con cura ed a portata di mano la documentazione
fornita in modo da poterla consultare in caso di necessità.
Per eventuali riparazioni o revisioni che comportino operazioni di una certa complessità è ne-
cessario rivolgersi ai Centri di Assistenza autorizzati che dispongono di personale specializzato.
La Ditta costruttrice declina qualsiasi responsabilità per danni dovuti a negligenza,
alla mancata osservanza di quanto descritto nel presente manuale e a danni diretti e/o
indiretti causati da un uso improprio della macchina.
La negligenza a quanto indicato, un cattivo ed inadeguato uso della macchina e l’e-
secuzione di modifiche non autorizzate, possono essere causa di annullamento della
garanzia. La prevenzione di qualsiasi inconveniente è quindi vincolata alla scrupolosa
osservanza di quanto prescritto.
Verificate, all’atto dell’acquisto, che la macchina sia integra e completa.
ATTENZIONE! Prima di usare la macchina, per eseguire correttamente il trasporto,
la messa in servizio, l’avviamento, l’uso, l’arresto e la manutenzione, leggete ed
applicate attentamente le istruzioni di seguito riportate che fanno riferimento alle
figure ed ai dati tecnici. Prima di iniziare il lavoro prendete familiarità con i comandi
e con il corretto uso della macchina assicurandovi di saper arrestarla in caso di
emergenza. L’uso improprio della macchina può provocare gravi ferite e danni alle
cose. Pensate sempre alla vostra e altrui sicurezza e comportatevi di conseguenza.
ATTENZIONE! La macchina è idonea ad eseguire tagli su pezzi di legno a forma
di parallelepipedo, come tagli trasversali, inclinati, obliqui. Non è consentita la
lavorazione di metalli, materiali plastici, materiali infiammabili e materiali che
generano polveri e nebbie pericolose o nocive alla salute. Ogni altro impiego,
diverso da quello indicato in queste istruzioni, può recare danno alla macchina e
costituire serio pericolo per le persone e le cose.
DESCRIZIONE MACCHINA (FIG. A)
1 Interruttore troncatrice
2 Interruttore banco sega
3 Impugnatura
4 Pulsante di sblocco testa troncatrice
5 Protezione motore ripristinabile (se presente)
6 Lama a disco
7 Protezione inferiore lama
8 Basamento
9 Piano girevole troncatrice
10 Guida di appoggio pezzo
11 Vite fissaggio piano girevole
12 Inserto del piano girevole
13 Supporti laterali
14 Morsa bloccapezzo
15 Protezione superiore lama
16 Protezione lama amovibile
17 Piano di lavoro banco sega
18 Inserto del piano di lavoro
19 Guidapezzo
20 Motore
21 Pomello per bloccaggio/sbloccaggio testa troncatrice
22 Vite per bloccaggio/sbloccaggio sollevamento piano di lavoro
23 Leva per inclinazione testa troncatrice
24 Viti fissaggio supporti laterali
25 Leva per bloccaggio/sbloccaggio sollevamento piano di lavoro
26 Collettore per aspirazione trucioli/polvere
27 Coltello divisore banco sega
28 Supporto antiribaltamento
29 Viti fissaggio coltello divisore
30 Sacchetto raccoglitrucioli (se presente)
31 Spina e cavo di alimentazione
32 Spingipezzo
33 Vite regolazione perpendicolarità lama (fig.P)
34 Vite regolazione inclinazione lama (fig.P)
DESCRIZIONE ACCESSORI
Per esigenze di produzione e in base al modello della macchina, alcuni accessori posso-
no differire dall’elenco sotto riportato e/o possono essere già installati sulla macchina.
Troncatrice: - supporti laterali
- morsa bloccapezzo
- leva
Banco sega: - guidapezzo
- spingipezzo
Macchina: - sacchetto raccoglitrucioli
- set chiavi di servizio
- protezione amovibile
DESCRIZIONE MARCATURE E SIMBOLI (FIG. B)
1 Modello macchina e dati tecnici.
2 Numero di lotto e anno di fabbricazione della macchina. Le prime 2 cifre indicano
l’anno.
3 I rifiuti elettrici ed elettronici possono contenere sostanze pericolose per l’ambiente
e la salute umana; non devono pertanto essere smaltiti con quelli domestici ma
mediante una raccolta separata negli appositi centri di raccolta o riconsegnati al
venditore nel caso di una apparecchiatura nuova analoga. Lo smaltimento abusivo
dei rifiuti comporta l’applicazione di sanzioni amministrative.
4 ATTENZIONE!
5 Leggete attentamente le istruzioni prima dell’uso.
6 Attenzione! Pericolo taglio e schiacciamento mani. E’ obbligatorio indossare
guanti di protezione.
7 Attenzione! Pericolo lancio materiale e polveri dannose. E’ obbligatorio indossare
occhiali di protezione e una maschera a difesa delle vie respiratorie.
8 Attenzione! Pericolo rumore elevato. E’ obbligatorio indossare cuffie a difesa
dell’udito.
9 Attenzione! Pericolo di scossa elettrica. Alcune parti della macchina sono in
tensione elettrica, non toccatele e mantenete una distanza di sicurezza.
10 Attenzione! Pericolo di taglio ed impigliamento. Mantenete le mani lontano
dalla lama.
11 Attenzione! Prima di ogni controllo, regolazione o manutenzione, staccate l’ali-
mentazione elettrica scollegando la spina della macchina. Se li cavo di alimen-
tazione è danneggiato, estraete la spina dalla presa della rete di alimentazione
prima di procedere ad un controllo.
12 Attenzione! Pericolo di taglio e schiacciamento mani. Mantenete una distanza di
sicurezza dalla lama e dalla zona di taglio.
DATI TECNICI
Tensione di aliment. e frequenza nomin. ______________________ 230V ~50Hz
Potenza nominale motore ____________________________________ 1800 W
Velocità max di rotazione a vuoto _____________________________4900 min-1
Classe isolamento macchina _______________________________________ II
Spessore coltello divisore (banco sega) ____________________________2 mm
Pressione acustica LpA _____________________________________ 98 dB(A)
Potenza acustica LwA _____________________________________ 106 dB(A)
Vibrazioni sull’impugnatura _________________________________ <2,5 m/s2
Peso macchina ______________________________________________13 kg

- 9 -
Lama circolare per legno, corpo in acciaio e denti con placchette di metallo duro
Diametro est./int.________________________________________ 250/30 mm
Spessore di taglio __________________________________________ 2,8 mm
Prestazioni:
Inclinazione testa di taglio per tagli inclinati: 0°- 45° verso sinistra.
Rotazione testa di taglio per tagli obliqui: 0°- 45° a destra / 0°- 45° a sinistra
con 19 posizioni di arresto predefinite.
Dim. max di taglio altezza x profondità (HxP):
Inclinazione testa 0° Inclinazione testa 45°
Rotazione testa 0° 70x130 mm 50x125 mm
Rotazione testa 45° 70x90 mm 50x105 mm
Sega da banco (H) 40 mm -
TERMINOLOGIA ADOTTATA
MACCHINA
Assieme di tutti i componenti elettrici e meccanici.
TRONCATRICE
Macchina destinata al taglio di pezzi di legno come tavole, listelli ecc. con lati piani e
perpendicolari; il pezzo rimane fermo mentre la testa di taglio effettua tutti i movimenti.
BANCO SEGA
Macchina destinata al taglio di pezzi di legno come tavole, listelli ecc. con lati piani e
perpendicolari; la lama è fissa mentre il pezzo effettua il movimento rettilineo.
TESTA DI TAGLIO
Parte composta dal motore, lama di taglio, impugnatura, interruttore e protezioni mobili/
fisse che trasla rispetto al pezzo.
INTERRUTTORE
Parte il cui azionamento ha funzione di avviare e spegnere la macchina.
UTENSILE O LAMA
Attrezzo circolare destinato ad asportare materiale dal pezzo.
CONTRACCOLPO
Troncatrice: movimento improvviso verso l’alto della testa di taglio durante la fase di
troncatura, dovuto al contatto della lama con elementi duri come chiodi, viti, nodi del
legno ecc. E’ possibile che il pezzo venga eiettato verso l’operatore.
Banco sega: movimento improvviso del pezzo verso l’operatore durante il taglio, dovuto
al contatto della lama con elementi duri come chiodi, viti, nodi del legno ecc.
OPERATORE - UTILIZZATORE
E’ la persona incaricata di installare, far funzionare, regolare, manutenzionare, pulire la
macchina. E’ la persona responsabile della macchina.
TRASPORTO E SOLLEVAMENTO (FIG. A)
!ATTENZIONE! La Ditta Costruttrice declina ogni responsabilità per gli eventuali
danni diretti e/o indiretti causati da errati trasporti o sollevamenti.
Le operazioni di trasporto e sollevamento della macchina devono essere eseguite con
attenzione per evitare incidenti e danni.
1) Posizionate la macchina nella modalità sega da banco (vedi capitoli seguenti).
2) Verificate che la lama sia completamente protetta e che la spina elettrica sia scol-
legata dalla presa.
3) Sollevate la macchina con estrema cautela afferrandola con entrambe le mani sul
basamento e trasferitela lentamente, senza scosse o movimenti bruschi.
Non trasportatela tirandola per il cavo di alimentazione, per l’impugnatura o altre sue
parti.
MESSA IN SERVIZIO (FIG. A)
ATTENZIONE! La Ditta Costruttrice declina ogni responsabilità per gli eventuali
danni diretti e/o indiretti causati da errate installazioni e allacciamenti.
ATTENZIONE! Prima di effettuare le seguenti operazioni assicuratevi che la spina
della macchina sia scollegata dalla rete elettrica.
La macchina è fornita con alcuni componenti smontati e prima di usarla deve essere
pulita ed installata.
Nella scelta della posizione della macchina è opportuno considerare:
-che la posizione prevista non sia umida e sia al riparo dagli agenti atmosferici.
-che la zona di appoggio risulti perfettamente in piano, su di un pavimento antisdrucciolo
e con una capacità di carico adeguata al peso della macchina.
-che attorno alla macchina sia prevista un’ampia zona operativa libera da impedimenti.
-che il locale sia custodito e chiuso per impedire il libero accesso.
-che vi sia una buona illuminazione.
-che sia posizionata in vicinanza dell’interruttore generale con differenziale.
-che la temperatura ambiente sia compresa tra 10° e 35° C.
-che l’ambiente di lavoro non sia in atmosfera esplosiva.
Togliete la parte superiore dell’imballo e verificate visivamente la perfetta integrità della
macchina e dei componenti; a questo punto eliminate l’imballo e procedete ad una
accurata pulizia per togliere gli eventuali oli protettivi utilizzati per il trasporto.
1) Procuratevi un banco (non incuso) su cui appoggerete la macchina e una serie di
bulloneria (non incuso) per fissarla ad esso.
2) Estraete completamente il supporto antiribaltamento (pos.28), posizionate la
macchina e fissatela in maniera ben salda utilizzando i fori presenti sulla base (con
bulloneria non inclusa). Verificate che la macchina sia fortemente fissata al banco.
3) Procedete al montaggio dei componenti come illustrato in figura; in caso di dubbio
rivolgetevi al vostro rivenditore. Alcuni componenti devono essere montati solo se
necessari alla lavorazione che vi accingete ad effettuare.
4) Montate i due supporti laterali (pos.13), la morsa bloccapezzo (pos.14), il sacchetto
raccoglitrucioli (pos.30) e, da usarsi solo per il banco sega, il guidapezzo (pos.19).
5) Avvitate la vite per il fissaggio del piano girevole (pos.11).
6) Fissate la testa di taglio mediante la leva (pos.23) togliendo prima il dado avvitato
sulla macchina che serve per il trasporto.
7) Verificate che lama (pos.6) sia ben fissata e che possa ruotare liberamente (per
fissaggio vedere capitoli seguenti).
8) Verificate il corretto funzionamento della protezione inferiore lama (pos.7) in modalità
troncatrice: abbassando e sollevando la testa di taglio la protezione in automatico
scopre o racchiude la lama. In caso di guasto al meccanismo, non avviare la macchina
ma rivolgetevi ad un centro assistenza autorizzato.
9) Verificate l’arresto della protezione superiore lama (pos.15) in modalità troncatrice:
tirandola leggermente verso l’alto non deve sollevarsi. In caso di guasto al mecca-
nismo, non avviare la macchina ma rivolgetevi ad un centro assistenza autorizzato.
10) Togliete lo spingipezzo (pos.32) dal suo supporto sotto la tavola (pos.17) ed
appoggiatelo a lato della macchina.
11) Verificare la presenza della protezione amovibile (pos.16); senza di essa non è
possibile passare alla modalità “banco sega”.
Assicuratevi di avere montato correttamente tutte le parti, verificate la solidità dell’as-
semblaggio e la stabilità della macchina.
MODALITA’ OPERATIVA (FIG. A)
ATTENZIONE! Prima di ogni modifica operativa posizionate l’interruttore su OFF”O”
(spento), staccate l’alimentazione elettrica scollegando la spina ed attendete che
la macchina sia completamente ferma.
MODALITA’ SEGA DA BANCO
La macchina viene fornita in modalità banco sega; per utilizzarla in questo modo, montate
il guidapezzo (pos.19) sulla feritoia posta sul piano di lavoro.
Verificate che il piano (pos.9) si trovi su 0° e fissatelo con la vite (pos.11).
MODALITA’ TRONCATRICE
Smontate il guidapezzo (pos.19).
Per passare dalla funzione banco sega alla funzione troncatrice e viceversa, leggete
attentamente le seguenti istruzioni.
Attenzione! Rotture e/o guasti dovuti ad errate operazioni non sono coperti dalla garanzia.

- 10 -
REGOLAZIONI
!ATTENZIONE! Prima di ogni controllo o regolazione posizionate l’interruttore su OFF”O”
(spento) e staccate l’alimentazione elettrica scollegando la spina della macchina.
La macchina viene fornita già regolata e non necessita di particolari regolazioni; se
necessario effettuate le seg. operazioni.
REGOLAZIONE DISTANZA TRA LAMA E COLTELLO DIVISORE (fig.N)
La distanza tra i denti della lama (pos.6) e il coltello divisore (pos.27) deve essere
compresa come illustrato in fig.N.
In modalità banco sega allentate leggermente le due viti (pos.29), che sono poste sul
fianco sinistro sotto il piano di lavoro (sono visibili 2 fori sulla scocca), regolate la
distanza e rifissate le 2 viti.
REGOLAZIONE PERPENDICOLARITA’ LAMA 90° (fig.P)
Per effettuare la regolazione della perpendicolarità della lama rispetto al piano girevole,
intervenite sulla vite (pos.33); utilizzare una squadretta a 90° (non in dotazione) posta
tra lama e piano.
REGOLAZIONE INCLINAZIONE LAMA 45° (fig.Q)
Per effettuare la regolazione dell’inclinazione a 45° della lama rispetto al piano girevole,
intervenite sulla vite (pos.34); utilizzare un goniometro (non in dotazione) posto tra
lama e piano.
AVVIAMENTO E ARRESTO
!ATTENZIONE! Prima di avviare la macchina è obbligatorio indossare occhiali,
guanti, cuffie e maschera di protezione (non in dotazione alla macchina).
!ATTENZIONE! Durante l’avviamento e l’arresto della macchina fate in modo che
nessuno si avvicini alla macchina. Mantenete una distanza di sicurezza da tutte le
parti in movimento e dalla zona di taglio.
!ATTENZIONE! Il motore, le parti meccaniche rotanti e la lama girano ancora per
diversi secondi dopo aver spento la macchina. Durante la fase di arresto queste
parti non devono essere toccate, pericolo di lesioni gravi!
Prima di mettere in funzione la macchina, verificate l’integrità dei componenti e controllate
che le viteria sia serrata.
La macchina è dotata di due interruttori, uno per la modalità troncatrice e uno per la
modalità banco sega.
AVVIAMENTO TRONCATRICE
1) Approntare la macchina in modalità “troncatrice”.
2) Verificate che le chiavi di servizio siano state riposte.
3) Inserite la spina del cavo di alimentazione alla presa.
4) Posizionatevi di fronte alla macchina ed assicuratevi che persone ed animali siano
lontani.
5) Con la mano destra afferrate saldamente l’impugnatura (pos.3)
6) Per avviare premete l’interruttore (pos.1) situato sull’impugnatura.
L’interruttore è del tipo ad “azione mantenuta”; pertanto la macchina rimarrà accesa
per il tempo che voi mantenete premuto l’interruttore.
Se osservate delle anomalie di funzionamento spegnete la macchina e consultate il
capitolo “Ricerca guasti ed interventi ammessi”.
ARRESTO TRONCATRICE
Per arrestare la macchina rilasciate l’interruttore (pos.1).
AVVIAMENTO BANCO SEGA
1) Approntare la macchina in modalità “banco sega”.
2) Verificate che le chiavi di servizio siano state riposte.
3) Inserite la spina del cavo di alimentazione alla presa.
4) Posizionatevi di fronte alla macchina ed assicuratevi che persone ed animali siano
lontani.
5) Per avviare premete l’interruttore (pos.2) ON “I” acceso, situato sul lato destro
della macchina.
Se osservate delle anomalie di funzionamento spegnete la macchina e consultate il
capitolo “Ricerca guasti ed interventi ammessi”.
ARRESTO BANCO SEGA
Per arrestare la macchina premete l’interruttore (pos.2) OFF “O” spento.
Quando non lavorate spegnete la macchina e staccate la spina dalla presa.
Protezione motore (se presente)
La macchina può essere equipaggiata con un protezione motore (pos.5) che interviene
per prevenire guasti elettrici. Nel caso intervenisse durante l’utilizzo, è sufficiente premere
il pulsante di ripristino e successivamente il pulsante di avvio per riavviare la macchina.
ISTRUZIONI D’USO
!ATTENZIONE! Prima di ogni controllo o regolazione posizionate l’interruttore su
OFF”O” (spento) e staccate l’alimentazione elettrica scollegando la spina della
macchina.
Dopo aver letto attentamente i capitoli precedenti, seguite scrupolosamente queste
avvertenze e consigli che vi permetteranno di ottenere il massimo delle prestazioni
dalla vostra macchina. Procedete con calma, solo dopo aver acquisito una buona
esperienza riuscirete a sfruttarne a fondo le potenzialità. Per prendere familiarità con
tutti i comandi, fate delle prove di utilizzo a vuoto senza montare pezzi in lavorazione.
MODALITA’ TRONCATRICE
OPERATORE
La posizione normale dell’operatore è quella davanti la macchina, con mano destra
sull’impugnatura; solo in questa posizione è possibile eseguire il taglio.
!Attenzione! Mantenete le mani e il viso lontano dalla lama e dalla zona di taglio,
pericolo di lesioni gravi!
PIANO DI LAVORO
Il piano di lavoro (pos.17) deve posizionarsi correttamente prima di iniziare le lavorazioni,
per questo può traslare verso l’alto o verso il basso:
- nella posizione più alta per la modalità troncatrice.
- nella posizione più bassa per la modalità banco sega
E’ vietato posizionare il piano ad una altezza intermedia.
Mediante la vite (pos.22) e la leva (pos.25) si deve bloccare o liberare il movimento del
piano di lavoro; durante le lavorazioni la vite deve essere ben serrata e la leva ruotata
verso l’alto a bloccare il piano.
Per agevolare il movimento il piano di lavoro è dotato di una coppia di molle, che lo
spingono verso l’alto nella posizione corretta; verificare comunque che raggiunga il
punto più alto prima di passare nella modalità troncatrice.
Seguire scrupolosamente quanto descritto nel capitolo “Modalità operativa” per
movimentare il piano nel modo corretto.
PEZZO IN LAVORAZIONE
Il pezzo che tagliarete dovrà avere forma, dimensioni e peso compatibili con la macchina.
Sul pezzo segnate con una riga la linea di taglio; posizionatelo sopra la base della
macchina (pos.8-9), facendo attenzione a non toccare la lama, ed appoggiatelo bene
contro la guida di appoggio (pos.10). Il lato più largo del pezzo deve essere appoggiato
alla base; non tagliate pezzi con lato maggiore messo in verticale.
Allineate la linea precedentemente tracciata con il piano teorico che la lama effettuerà
nel movimento verso il basso.
Attenzione! Per la vostra sicurezza è importante che la macchina sia fissata al
banco o piedistallo.
Su questa macchina si possono montare pezzi di dimensioni definite (spessore H e
profondità P, vedasi cap. Dati Tecnici) a seconda del tipo di taglio; per supportare i pezzi
lunghi è necessario dotarsi di una coppia di piedistalli (non in dotazione) da sistemare
a destra e a sinistra della macchina, che impediscono ai 2 spezzoni di ribaltarsi con

- 11 -
pericolo per l’operatore.
Attenzione! Per la vostra sicurezza è importante che il pezzo sia correttamente
bloccato. Non tagliate pezzi corti. Non tagliate pezzi a sez. circolare, legni vecchi
o fragili, legni irregolari, legni con crepe, legni con chiodi o viti, rami o tronchi.
Effettuate sempre uno scrupoloso controllo visivo del pezzo.
Attenzione! Rammentate sempre che un contraccolpo provoca il sollevamento im-
provviso della testa di taglio ed è possibile che l’impugnatura vi sfugga dalla mano.
La morsa (pos.14) é indispensabile per bloccare il pezzo: avvitate la vite contro il
pezzo per serrarlo.
DISCO LAMA
Verificate prima di ogni utilizzo la sua perfetta integrità, l’assenza di rotture e deforma-
zioni. Periodicamente controllate l’affilatura della lama.
Quando è necessario sostituirla seguite le indicazioni dei capitoli seguenti.
Attenzione! L’efficienza e la perfetta integrità della lama producono un miglior
risultato e minimizzano il rischio di incidenti.
ASPIRAZIONE TRUCIOLI E POLVERE
La macchina è dotata di un collettore (pos.26) per l’aspirazione dei trucioli/polvere. E’
comunque da tener presente che durante il taglio parte del materiale asportato verrà
scagliato anche attorno alla macchina e sul pezzo.
Per un taglio singolo è sufficiente montare il sacchetto raccoglitrucioli (pos.30, se
presente), che deve essere infilato a fondo sul collettore come illustrato in fig.A; a fine
taglio svuotate il sacchetto.
Per un numero di tagli maggiore e soprattutto per una aspirazione ottimale, collegate il
collettore ad un aspiratore di trucioli di legno, mediante un tubo flessibile in materiale
plastico (entrambi non forniti con la macchina); il vostro rivenditore di fiducia potrà
consigliarvi nella scelta più idonea.
Attenzione! Non avviate la macchina se non è montato il tubo di aspirazione. Non
infilate all’interno del collettore le dita o attrezzi per tentare di estrarre il materiale,
pericolo di lesioni gravi!
LAVORAZIONE, TAGLI E MOVIMENTI
Il pezzo in lavorazione è fermo sulla macchina, mentre l’utensile si muove manualmente
rispetto al pezzo per asportare il materiale.
Il motore fornisce l’energia per il movimento rotatorio dell’utensile, mediante un gruppo
ingranaggi.
Seguite le seguenti avvertenze che sono valide per tutti i tipi di taglio:
- verificate che leve e viti siano avvitate in modo da fissare saldamente le parti mobili
- il pezzo in lavorazione deve essere ben serrato
- il pezzo deve appoggiarsi contro la guida di appoggio (pos.10)
- non tagliate più pezzi contemporaneamente
- mantenete ben salda l’impugnatura (pos.3)
- mantenete una distanza di sicurezza dalla zona di taglio
- avvicinate con gradualità ed attenzione la lama verso il pezzo
- il taglio deve avvenire in un’unica passata
- non caricate troppo il gruppo di taglio sul pezzo per non sollecitare la lama e il motore
- sollecitazioni eccessive provocano la rottura della lama e del pezzo
- non sollecitate lateralmente la lama
- non eseguite scanalature
- la lama ferma non deve toccare il pezzo
- non avviare la macchina se la lama è a contatto del pezzo
- non avviare la macchina se la lama è scoperta dalla protezione inferiore (pos.7)
- non avviare la macchina se la lama è scoperta dalla protezione superiore (pos.15)
- per pulire la zona di taglio utilizzate un pennello con impugnatura lunga.
La macchina permette di eseguire vari tipi di tagli:
- taglio trasversale
- taglio inclinato (da 0° a 45°)
- taglio obliquo (da 0° a +45° e da 0° a -45°)
- taglio combinato inclinato/obliquo
TAGLIO TRASVERSALE (fig.D)
Posizione iniziale:
- approntare la macchina in modalità “troncatrice”
- piano girevole (pos.9) bloccato dalla vite (pos.11) su 0°
- testa di taglio fissata dalla leva (pos.23) su 0°
Esecuzione taglio:
- spingere il pezzo contro la guida di appoggio (pos.10) e serrarlo con la morsa (pos.14)
in maniera ben salda
ATTENZIONE! Mantenere la mano lontano dalla zona di taglio.
- con la mano destra afferrare l’impugnatura (pos.3), premere l’interruttore (pos.1)
per avviare la macchina
- sbloccare il fermo di discesa premendo sul pulsante (pos.4)
- abbassare lentamente e completamente la testa di taglio fino a tagliare il pezzo
- alzare lentamente la testa di taglio e non appena la lama è fuori dal pezzo rilasciare
l’interruttore per spegnere la macchina
- accompagnare la testa di taglio fino alla posizione di riposo.
TAGLIO INCLINATO (fig.E)
ATTENZIONE! L’esecuzione di questo taglio espone maggiormente la lama e il pe-
ricolo di gravi ferite è maggiore: prestate attenzione alle vostre mani e mantenete
una distanza di sicurezza.
Posizione iniziale:
- approntare la macchina in modalità “troncatrice”
- piano girevole (pos.9) bloccato dalla vite (pos.11) su 0°
- testa di taglio bloccata dalla leva (pos.23) su un angolo compreso tra 0° e 45°
Esecuzione taglio:
- spingere il pezzo contro la guida di appoggio (pos.10) e serrarlo con la morsa (pos.14)
in maniera ben salda
ATTENZIONE! Mantenere le mani lontano dalla zona di taglio.
- con la mano destra afferrare l’impugnatura (pos.3), premere l’interruttore (pos.1)
per avviare la macchina
- sbloccare il fermo di discesa premendo sul pulsante (pos.4)
- abbassare lentamente e completamente la testa di taglio fino a tagliare il pezzo
- alzare lentamente la testa di taglio e non appena la lama è fuori dal pezzo rilasciare
l’interruttore per spegnere la macchina
- accompagnare la testa di taglio fino alla posizione di riposo.
TAGLIO OBLIQUO (fig.F)
Posizione iniziale:
- approntare la macchina in modalità “troncatrice”
- piano girevole (pos.9) bloccato dalla vite (pos.11) su un angolo compreso tra -45° e
+45° (per facilitare la scelta il piano ha dei fermi sugli angoli caratteristici, è comunque
possibile impostare un qualsiasi angolo)
- testa di taglio fissata dalla leva (pos.23) su 0°
Esecuzione taglio:
- spingere il pezzo contro la guida di appoggio (pos.10) e serrarlo con la morsa (pos.14)
in maniera ben salda
ATTENZIONE! Mantenere le mani lontano dalla zona di taglio.
- con la mano destra afferrare l’impugnatura (pos.3), premere l’interruttore (pos.1)
per avviare la macchina
- sbloccare il fermo di discesa premendo sul pulsante (pos.4)
- abbassare lentamente e completamente la testa di taglio fino a tagliare il pezzo
- alzare lentamente la testa di taglio e non appena la lama è fuori dal pezzo rilasciare
l’interruttore per spegnere la macchina
- accompagnare la testa di taglio fino alla posizione di riposo.
TAGLIO COMBINATO INCLINATO E OBLIQUO (fig.G-H)
ATTENZIONE! L’esecuzione di questo taglio espone maggiormente la lama e il pe-
ricolo di gravi ferite è maggiore: prestate attenzione alle vostre mani e mantenete
una distanza di sicurezza.
Posizione iniziale:
- approntare la macchina in modalità “troncatrice”
- piano girevole (pos.9) bloccato dalla vite (pos.11) su un angolo compreso tra -45° e
+45° (per facilitare la scelta il piano ha dei fermi sugli angoli caratteristici, è comunque
possibile impostare un qualsiasi angolo)
- testa di taglio bloccata dalla leva (pos.23) su un angolo compreso tra 0° e 45°
Esecuzione taglio:
- spingere il pezzo contro la guida di appoggio (pos.10) e serrarlo con la morsa (pos.14)
in maniera ben salda
ATTENZIONE! Mantenere le mani lontano dalla zona di taglio.
- con la mano destra afferrare l’impugnatura (pos.3), premere l’interruttore (pos.1)
per avviare la macchina
- sbloccare il fermo di discesa premendo sul pulsante (pos.4)
- abbassare lentamente e completamente la testa di taglio fino a tagliare il pezzo
- alzare lentamente la testa di taglio e non appena la lama è fuori dal pezzo rilasciare
l’interruttore per spegnere la macchina
- accompagnare la testa di taglio fino alla posizione di riposo.
MODALITA’ SEGA DA BANCO
OPERATORE
La posizione normale dell’operatore è quella davanti la macchina, con entrambe le
mani a spingere il pezzo verso la lama e contemporaneamente nell’esercitare una
leggera pressione sul tavolo; nella fase finale del taglio si utilizza una sola mano con
l’uso dello spingipezzo (fig.L).
Attenzione! Mantenete le mani e il viso lontano dalla lama e dalla zona di taglio,
pericolo di lesioni gravi!
PIANO DI LAVORO
Il piano di lavoro (pos.17) deve posizionarsi correttamente prima di iniziare le lavorazioni,
per questo può traslare verso l’alto o verso il basso:
- nella posizione più alta per la modalità troncatrice.
- nella posizione più bassa per la modalità banco sega
E’ vietato posizionare il piano ad una altezza intermedia.
Mediante la vite (pos.22) e la leva (pos.25) si deve bloccare o liberare il movimento del
piano di lavoro; durante le lavorazioni la vite deve essere ben serrata e la leva ruotata
verso l’alto a bloccare il piano.
Per agevolare il movimento il piano di lavoro è dotato di una coppia di molle, che lo
spingono verso l’alto nella posizione corretta; verificare comunque che raggiunga il
punto più alto prima di passare nella modalità troncatrice.
Seguire scrupolosamente quanto descritto nel capitolo “Modalità operativa” per
movimentare il piano nel modo corretto.
PEZZO IN LAVORAZIONE
Il pezzo che tagliarete dovrà avere forma, dimensioni e peso compatibili con la macchina.
Sul pezzo segnate con una riga la linea di taglio; posizionatelo sopra la tavola della
macchina (pos.17), facendo attenzione a non toccare la lama, ed appoggiatelo late-
ralmente contro il guidapezzo (pos.19) che avrete precedentemente regolato. Il lato
più largo del pezzo deve essere appoggiato sulla tavola; non tagliate pezzi con lato
maggiore messo in verticale.
Attenzione! Per la vostra sicurezza è importante che la macchina sia fissata al
banco o piedistallo.
Su questa macchina si possono montare pezzi di dimensioni definite (spessore H, vedasi
cap. Dati Tecnici); per supportare i pezzi lunghi è necessario dotarsi di un di piedistallo
(non in dotazione) da sistemare dietro la macchina, che impedisce ai 2 spezzoni di
ribaltarsi con pericolo per l’operatore.
Allineate la linea precedentemente tracciata con il piano teorico che il movimento
rettilineo del pezzo effettuerà attraverso la lama.
ATTENZIONE! Per la vostra sicurezza è importante che il pezzo sia correttamente
bloccato. Non tagliate pezzi a sez. circolare, legni vecchi o fragili, legni irregolari,
legni con crepe, legni con chiodi o viti, rami o tronchi. Effettuate sempre uno scru-
poloso controllo visivo del pezzo.
ATTENZIONE! Rammentate sempre che un contraccolpo provoca il rifiuto del pezzo
che viene spinto verso l’operatore.

- 12 -
DISCO LAMA
Verificate prima di ogni utilizzo la sua perfetta integrità, l’assenza di rotture e deforma-
zioni. Periodicamente controllate l’affilatura della lama.
Quando è necessario sostituirla seguite le indicazioni dei capitoli seguenti.
Attenzione! L’efficienza e la perfetta integrità della lama producono un miglior
risultato e minimizzano il rischio di incidenti.
ASPIRAZIONE TRUCIOLI E POLVERE
La macchina è dotata di un collettore (pos.26) per l’aspirazione dei trucioli/polvere. E’
comunque da tener presente che durante il taglio parte del materiale asportato verrà
scagliato anche attorno alla macchina e sul pezzo.
Per un taglio singolo è sufficiente montare il sacchetto raccoglitrucioli (pos.30, se
presente), che deve essere infilato a fondo sul collettore come illustrato in fig.A; a fine
taglio svuotate il sacchetto.
Per un numero di tagli maggiore e soprattutto per una aspirazione ottimale, collegate il
collettore ad un aspiratore di trucioli di legno, mediante un tubo flessibile in materiale
plastico (entrambi non forniti con la macchina); il vostro rivenditore di fiducia potrà
consigliarvi nella scelta più idonea.
Attenzione! Non avviate la macchina se non è montato il tubo di aspirazione. Non
infilate all’interno del collettore le dita o attrezzi per tentare di estrarre il materiale,
pericolo di lesioni gravi!
SPINGIPEZZO
Prima di eseguire il taglio mantenere lo spingipezzo a portata di mano. Se non utilizzato
riporlo lontano dalle parti in movimento.
COLTELLO DIVISORE
É un componente importante per la sicurezza e deve essere regolato rispetto il disco
lama (Fig.N). Lo spessore del coltello divisore deve essere inferiore alla larghezza della
scanalatura di taglio e superiore allo spessore del disco metallico della lama.
LAVORAZIONE, TAGLI E MOVIMENTI
La lama è fissa sulla macchina, mentre il pezzo si muove manualmente in modo rettilineo
e parallelo rispetto alla lama.
Il motore fornisce l’energia per il movimento rotatorio dell’utensile, mediante un gruppo
ingranaggi.
Seguite le seguenti avvertenze che sono valide per tutti i tipi di taglio:
- verificate che leve e viti siano avvitate in modo da fissare saldamente le parti mobili
- mantenete ben saldo il pezzo in lavorazione
- il pezzo deve appoggiarsi contro la tavola (pos.17) e il guidapezzo (pos.19)
- non tagliate più pezzi contemporaneamente
- mantenete una distanza di sicurezza dalla zona di taglio
- avvicinate con gradualità ed attenzione il pezzo verso la lama
- il taglio deve avvenire in un’unica passata
- non forzate troppo il pezzo sulla lama per non sollecitare la lama e il motore
- sollecitazioni eccessive provocano la rottura della lama e del pezzo
- non sollecitate lateralmente la lama
- il pezzo non deve toccare la lama se è ferma
- non avviare la macchina se la lama è a contatto del pezzo
- non avviare la macchina se la lama è scoperta dalla protezione superiore (pos.15)
- non avviare la macchina se la lama è scoperta dalla protezione amovibile (pos.16)
sotto il piano di lavoro
- per pulire la zona di taglio utilizzate un pennello con impugnatura lunga
La macchina permette di eseguire vari tipi di tagli:
- taglio lungo l’asse del pezzo
- taglio obliquo
TAGLIO LUNGO L’ASSE DEL PEZZO (fig.L)
Posizione iniziale:
- approntare la macchina in modalità “banco sega”
- piano girevole (pos.9) bloccato dalla vite (pos.11) su 0°
- testa di taglio fissata dalla leva (pos.23) su 0°
- guidapezzo (pos.19) installato sul piano di lavoro come illustrato in fig.L
Esecuzione taglio:
- premere l’interruttore (pos.2) per avviare la macchina
- con entrambe le mani spingere il pezzo contro la lama (racchiusa dalla protezione)
a velocità uniforme e contemporaneamente premere il pezzo sul piano di lavoro e sul
guidapezzo; il pezzo provocherà il sollevamento della protezione superiore (pos.15)
che poi si adagerà sul pezzo mantenendo protetta la lama
ATTENZIONE! Mantenere le mani lontano dalla zona di taglio.
- quando le mani si avvicinano alla lama utilizzare lo spingipezzo per completare il taglio
- a taglio avvenuto, spegnere la macchina.
TAGLIO OBLIQUO
ATTENZIONE! L’esecuzione di questo taglio comporta che le mani si trovino nella
zona adiacente al taglio e perciò il pericolo di gravi ferite è maggiore: prestate
attenzione alle vostre mani e mantenete una distanza di sicurezza.
ATTENZIONE! E’ vietato eseguire questo tipo di taglio su pezzi lunghi, come tavole,
travi ecc.; impiegate solo pezzi a lunghezza limitata.
Posizione iniziale:
- approntare la macchina in modalità “banco sega”
- piano girevole (pos.9) bloccato dalla vite (pos.11) su 0°
- testa di taglio fissata dalla leva (pos.23) su 0°
- guidapezzo (pos.19) installato sul piano di lavoro sulla sede parallela alla lama e
regolato su un angolo
Esecuzione taglio:
- premere l’interruttore (pos.2) per avviare la macchina
- con entrambe le mani afferrate il pezzo e il guidapezzo e spingeteli in avanti, facendo
scorrere il guidapezzo lunga la feritoia e contemporaneamente premere il pezzo sul
piano di lavoro; il pezzo provocherà il sollevamento della protezione superiore (pos.15)
che poi si adagerà sul pezzo mantenendo protetta la lama
ATTENZIONE! Mantenere le mani e il guidapezzo lontano dalla zona di taglio.
- completare il taglio
- spegnere la macchina.
DISCO LAMA
ATTENZIONE! La parte tagliente può provocare gravi ferite, utilizzate guanti di
protezione!
- Utilizzate lame di qualità specificate dal fabbricante con caratteristiche idonee alla
macchina che utilizzate in base ai dati tecnici della stessa; il vostro rivenditore di
fiducia potrà aiutarvi nella scelta più idonea. Osservate anche le eventuali istruzioni
fornite a corredo.
- Non utilizzate lame di dubbia provenienza e prive dei dati tecnici. Esse devono riportare
le dimensioni nominali, il numero di denti, il numero di giri massimo, la freccia che
indica il senso di rotazione.
- Il numero di giri e le dimensioni sono elementi basilari per la scelta. Il suo numero
di giri deve essere sempre maggiore o uguale a quello riportato sulla macchina. Le
dimensioni devono essere uguali a quelle riportate sui dati della macchina.
- Utilizzate lame conformi alle normative in vigore nel paese in cui vi trovate.
- Non utilizzate lame in acciaio super rapido HSS (high speed steel) o dischi abrasivi
da troncatura.
- Eseguire sempre un controllo visivo: non deve presentare deformazioni, rotture o danni.
- Usate solo lame affilate.
La nostra azienda fornisce una serie completa di lame adatte alla vostra macchina, che
possono essere acquistate presso il vostro rivenditore di fiducia.
SOSTITUZIONE DELLA LAMA (FIG. M)
!ATTENZIONE! Prima di ogni sostituzione posizionate l’interruttore su OFF”O”
(spento) e staccate l’alimentazione elettrica scollegando la spina della macchina.
!ATTENZIONE! A fine taglio la lama raggiunge temperature elevate: attendete il
suo raffreddamento prima di sostituirla.
!ATTENZIONE! Anche se la lama è ferma è comunque molto tagliente: per evitare
ferite gravi utilizzate i guanti.
!ATTENZIONE! Il montaggio della lama deve essere eseguito a perfetta regola
d’arte. Un montaggio errato genera pericoli molto gravi.
Per eseguire la sostituzione procedete come di seguito indicato. L’operazione deve
essere fatta da una persona esperta; in caso di dubbio rivolgetevi ad un centro assi-
stenza autorizzato.
1) Staccate la spina dalla presa elettrica e approntate la macchina in modalità troncatrice
2) Per eseguire correttamente il successivo rimontaggio, osservate attentamente i vari
componenti prima di procedere
3) Svitare completamente la vite ( fig. M1) che fissa la leva di apertura protezioni.
4) Con le 2 chiavi in dotazione svitare la vite fissalama. Attenzione: la vite ha filetto
sinistro e per svitarla girare in senso orario (fig.M2)
5) Aprire le protezioni ( fig.M3), togliere la flangia esterna ed estrarre la lama verso il
basso (la flangia interna deve rimanere montata sull’albero motore). Fare attenzione
se sono presenti anelli di adattamento o di spessoramento.
8) Pulire i componenti e la lama nuova
9) Montare la nuova lama prestando attenzione a rispettare il senso di rotazione: la
freccia della lama deve corrispondere a quella stampigliata sulla macchina
10) Rimontare la flangia esterna prestando attenzione al foro sagomato della stessa
che dovrà essere infilato sull’albero sagomato del motore
11) Avvitare bene la vite in senso antiorario senza colpire la chiave con un martello
o altro ( fig. M2)
12) Riposizionare la leva di apertura protezioni e fissarla con l’apposita vite ( fig. M1)
13) Verificare con attenzione che tutte le protezioni lama funzionino correttamente
14) Verificare che la lama giri liberamente senza irregolarità
15) Effettuare una prova di funzionamento a vuoto.
MANUTENZIONE
!ATTENZIONE! Prima di ogni controllo o manutenzione posizionate l’interruttore
su OFF”O” (spento), staccate l’alimentazione elettrica scollegando la spina della
macchina e verificate che la testa di taglio sia bloccata.
!ATTENZIONE! Non manomettete o tentate di riparare parti del motore o parti
elettriche.
La durata e il costo d’esercizio della macchina dipendono anche da una costante e
scrupolosa manutenzione, osservate sempre le seguenti istruzioni.
PULIZIA DOPO OGNI UTILIZZO
- Pulite regolarmente ed abbiate cura della vostra macchina, vi garantirete una perfetta
efficienza ed una lunga durata della stessa.
- Rimuovete i trucioli/polvere utilizzando una spazzola morbida e un aspiratore; conse-
gnate il materiale ad un punto di raccolta per il riciclaggio.
- Rimuovete le tracce di resina che si attaccano sulla macchina.
- Non spruzzate o bagnate d’acqua la macchina.
- Non usate infiammabili, detergenti o solventi vari, potreste rovinare irrimediabilmente
la macchina. Le parti in plastica sono aggredibili da agenti chimici.
- Non utilizzate un getto d’aria compressa per la pulizia: pericolo lancio trucioli e schegge!
- Prestate particolare attenzione alla pulizia degli interruttori, dell’impugnatura, alle
feritoie di ventilazione del motore, alla lama, alle leve di comando, al piano girevole,
alla base, agli inserti del piano girevole e del banco sega.

- 13 -
Per la vostra sicurezza verificate periodicamente lo stato dei seg. componenti, se
danneggiati o usurati fateli sostituire:
- interruttori
- lama
- protezioni lama
- guida di appoggio pezzo
- collettore di scarico
- inserti in plastica del piano girevole e del banco sega
- spina e cavo di alimentazione
SPAZZOLE
Il motore di questa macchina è equipaggiato con una coppia di spazzole in grafite;
la verifica e la sostituzione deve essere eseguita da un centro assistenza autorizzato.
L’usura completa delle spazzole comporta l’impossibilità all’avviamento della macchina.
RICERCA GUASTI E INTERVENTI AMMESSI
LA MACCHINA NON SI AVVIA OPPURE SI ARRESTA E NON RIPARTE:
Mancanza di energia elettrica:
- Controllate che il cavo elettrico e la prolunga (se presente) non siano danneggiati.
- Controllate l’interruttore generale dell’impianto di alimentazione.
Intervento della protezione motore:
- Premete il pulsante di ripristino della protezione motore.
Spazzole in grafite usurate:
- Rivolgetevi ad un centro assistenza autorizzato.
Guasto elettrico:
- Rivolgetevi ad un centro assistenza autorizzato.
LA TESTA DI TAGLIO NON SI ABBASSA:
Fermo interno inserito:
- Premere il pulsante di sblocco e contemporaneamente abbassare la testa di taglio.
LA TESTA DI TAGLIO NON RIMANE ABBASSATA PER POSIZIONARE LA MACCHINA
IN MODALITA’ BANCO SEGA:
Manca la protezione amovibile:
- Montare correttamente la protezione amovibile.
IL PIANO DI LAVORO NON SCORRE VERSO L’ALTO O VERSO IL BASSO:
Vite di bloccaggio avvitata e/o leva bloccata:
- Svitare di un paio di giri la vite e bloccare la leva verso il basso.
Residui di taglio che impediscono il movimento:
- Pulire accuratamente la zona sotto il piano di lavoro.
LA MACCHINA VIBRA ECCESSIVAMENTE:
Lama senza tagliente, danneggiata o deformata:
- Sostituite la lama.
Lama montata in modo errato:
- Smontate la lama e rimontatela correttamente seguendo le istruzioni
Fissaggio insufficiente della macchina al banco:
- Migliorate il fissaggio della macchina.
LA MACCHINA FA FATICA A TAGLIARE:
Lama senza tagliente o danneggiata:
- Sostituite la lama.
IL PIANO GIREVOLE NON RUOTA O SI SPOSTA CON DIFFICOLTA’:
Residui di taglio sotto il piano girevole:
- Pulire.
Vite di fissaggio avvitata:
- Svitare di alcuni giri la vite di fissaggio.
ATTENZIONE! Se dopo aver eseguito gli interventi sopra descritti la macchina non
funziona correttamente o in caso di anomalie diverse da quelle indicate, spegnetela
e portatela presso un centro di assistenza autorizzato o fate intervenire un tecnico
autorizzato richiedendo ricambi originali. Fate sempre riferimento al modello
macchina e numero di matricola riportati sull’etichetta dati tecnici.
RIMESSAGGIO
- Scollegate la macchina dalla rete elettrica.
- Effettuate una accurata pulizia di tutta la macchina e sue parti accessorie (vedi
paragrafo Manutenzione).
- Proteggete le parti metalliche non verniciate con un olio protettivo.
- Riponete la macchina lontano dalla portata dei bambini, in posizione stabile e sicura e
in luogo asciutto, temperato e libero da polveri. Al locale di rimessaggio non devono
avere accesso i bambini e gli estranei.
- Proteggete la macchina dalla luce diretta, tenetela possibilmente al buio o in penombra.
- Non chiudete la macchina in sacchi di nylon, potrebbe formarsi dell’umidità e dan-
neggiare la macchina.
- Utilizzate l’imballo originale per proteggere la macchina.
DEMOLIZIONE
I rifiuti elettrici ed elettronici possono contenere sostanze pericolose per l’ambiente
e la salute umana; non devono pertanto essere smaltiti con quelli domestici ma mediante
una raccolta separata negli appositi centri di raccolta o riconsegnati al venditore nel
caso di acquisto di una apparecchiatura nuova analoga. Lo smaltimento abusivo dei
rifiuti comporta l’applicazione di sanzioni amministrative.
Modifiche: testi, figure e dati corrispondono allo standard aggiornato all’epoca della
stampa del presente manuale. Il costruttore si riserva la facoltà di aggiornare la docu-
mentazione qualora venissero apportate delle variazioni alla macchina, senza incorrere
per questo in alcun obbligo.
Nessuna parte di questa pubblicazione e della documentazione allegata alla macchina
può essere riprodotta senza un permesso scritto del costruttore.
GARANZIA
Il prodotto è tutelato a norma di legge contro ogni non conformità rispetto alle ca-
ratteristiche dichiarate purché sia stato utilizzato esclusivamente nel modo descritto
nel presente manuale d’uso, non sia stato manomesso in alcun modo, non sia stato
riparato da personale non autorizzato e, ove previsto, siano utilizzati solamente ricambi
originali. Sono comunque esclusi materiali di consumo e/o componenti soggetti a
particolare usura come ad esempio batterie, lampadine, elementi di taglio e finitura
etc. Consegnate il prodotto al rivenditore o ad un centro di assistenza autorizzato,
esibendo la prova d’acquisto.
DICHIARAZIONE DI CONFORMITÀ
La ditta:
Valex - via Lago Maggiore, 24 36015 SCHIO (VI) ITALY
Dichiara sotto la propria responsabilità che la macchina:
PRODOTTO: Troncatrice sega da banco per legno TLS250N
COD. PRODOTTO: 1390218
è conforme ai requisiti di sicurezza e salute delle direttive:
2006/42/CE, 2014/30/CE
SCHIO, 06-2015
Un procuratore
ARRIGO ZANELLA

- 14 -
g
GENERAL SAFETY REGULATIONS
1) NYLON BAGS ARE NOT TOYS
WARNING! Suffocation hazard. Nylon packaging bags can cause suffocation if
placed on the head and must be kept out of the reach of children. If they cannot
be reused they must be cut up and thrown in the garbage.
2) PEOPLE AUTHORISED TO USE THE MACHINE
This machine must not be used by children or any persons not fully aware of the
instructions for use contained in this manual. Local laws and regulations may
establish a minimum age for use of the machine. The operator must be adequately
trained to use, adjust and safely operate the machine.
3) OPERATOR’S RESPONSIBILITY
The operator is responsible for other people as far as accidents or damage to people
or property caused by the use of the machine is concerned.
4) MAINTAIN A STABLE AND SAFE WORKING POSITION
When working, maintain a stable, safe position and do not lose balance.
5) PAY ATTENTION IN THE WORK AREA
Be careful of hands, the piece to be processed, the cutting tool, chips produced
during work and, in general, all parts in motion.
6) USE CAUTION WHILE WORKING
Do not allow yourself to be distracted and always pay attention to what you are
doing. Use your common sense. Never use the machine when tired, ill or under the
influence of alcohol, drugs or medicines that reduce alertness.
7) KEEP A SAFE DISTANCE FROM THE MACHINE
Keep people and animals away from the machine and your work area. Do not touch
electrically-powered parts.
8) PROTECT YOUR BODY
The use of the machine generates noise, heat, dust, smoke, vibrations, flying chips
and splinters. Always use personal protective equipment in accordance with the
law to prevent injury to the body, hands, eyes, hearing and respiratory tracts. Wear
strong clothing, with tight sleeves and cuffs, eye protection, working gloves, safety
earmuffs, dust masks and safety shoes. Do not wear loose clothing, scarves, ribbons
and jewellery that could be caught in moving parts of the machine. Wear a protective
hairnet to gather long hair. Normal glasses are not suitable for protecting your eyes.
9) EFFICIENCY OF THE MACHINE
Always make sure the machine is in good working order and integral; it could cause
serious accidents if in poor conditions. Do not use the machine if the switch does
not allow you to switch the machine on or off. If necessary, replace the insert of
the work plan.
10) INTEGRITY OF THE MACHINE
Do not remove any components from the machine unless expressly indicated in
these instructions and do not modify the original configuration in any way.
11) DO NOT DISASSEMBLE THE MACHINE
Do not disassemble the machine for any reason. Do not use the machine without
the guards installed in position, especially after a mode change.
12) DO NOT TAMPER WITH ANY OF THE MACHINE’S COMPONENTS
Do not tamper, modify or remove any component from the machine.
13) VERIFY THE SOLIDITY OF THE MACHINE
Periodically check screw and blade tightness.
14) USE THE MACHINE IN A WELL-VENTILATED ROOM
The machine must be used in a well-ventilated area in order to ensure sufficient
cooling and air circulation.
15) DO NOT USE THE MACHINE IN DANGEROUS ENVIRONMENTS
Do not use the machine in areas with a risk of explosion and/or fire, in poorly ventilated
spaces or in the presence of inflammable and/or explosive materials, dampness,
gases, vapours, and acids.
116) MOVING OF THE MACHINE
The machine should be moved with caution. Hold it only with two hands under the
base to move it. Do not attempt to move the machine by pulling on the power
cable or other machine parts.
17) POSITIONING OF THE MACHINE
Use the nuts and bolts to position and secure the machine on the work bench or stand
with a flat, solid and non-flammable surface that must support the total machine
weight and vibrations caused by use. Using the machine without securing it and
on flammable surfaces such as wood, plastic, etc. is prohibited. Periodically check
fastenings.
18) WORK WITH ADEQUATE LIGHTING
Only work when there is sufficient daylight or suitable artificial lighting.
19) DO NOT EXPOSE THE MACHINE TO ATMOSPHERIC AGENTS
Do not expose the machine to the elements such as rain, fog, sun, high, and low
temperatures.
20) DO NOT TOUCH THE MACHINE IF YOU ARE WET
Never use this machine with bare or wet feet. Do not touch the machine with wet
hands.
21) CHECK BEFORE STARTING UP THE MACHINE
Before plugging the machine in, make sure the switch is OFF “O”, that the piece
in process is well positioned and supported, the cutting head is adjusted, and the
service keys are removed. Do not use the machine if the surface inserts are worn
and the blade guards are broken or do not function.
22) CHECK CORRECT ASSEMBLY
Do not use the machine if the chip/dust vacuum tube (not supplied) is disconnected
and the vacuum (not supplied) is off.
23) CHECKING THE PROTECTIONS
Make sure the blade guards are not damaged. The lower blade guard must follow
the ascending/descending motion of the cutting head. Do not use the machine if the
guard does not cover the blade in the resting position.
24) MAKE SURE THAT THE PIECE TO BE PROCESSED IS WELL POSITIONED
It is very important for your safety that the piece in process is well positioned against
the appropriate supporting guide, that it is locked against the vice and that its two
extremities rest on specific pedestals (not supplied). The piece must have flat and
perpendicular sides such as tables, panels, etc.; do not cut branches, tree trunks or
circular sections. Do not cut pieces that contain nails or screws or wrapped in tape,
cord or other. Do not cut pieces on a slant. Rest them on the base of the machine. Do
not cut in pieces coast but place the long side on the machine base. Uncut section
pieces small that they can not be tightened from the grip and / or that they would
break during the cutting.
25) PROHIBITED MATERIALS
Cutting metal, plastic, flammable materials, and materials that generate harmful or
toxic dust and vapours is prohibited.
26) PREVENT POSSIBLE ACCIDENTS
Always test operations without a work piece before beginning work; at this stage,
make sure no one gets close to the machine and keep safety distances. Always
use personal safety devices. When the machine is running, do not touch the blade.
Serious injury hazard! After replacing components, always run a general check before
starting work.
27) ONLY USE BLADES SPECIFIED BY MANUFACTURER
This machine was designed to use specific blades to cut wood; using blades suited
for other materials and for abrasive disks is prohibited. Do not use HSS, high speed
steel blades. The maximum speed stamped on the blade must always be higher than
that indicated on the machine’s technical specifications. Use blades which conform
to the regulations in force in the country of use.
28) HANDLE THE BLADE WITH CAUTION
The blade has very sharp edges: handle it with caution and always wear protective
gloves. Serious injury hazard!
29) ONLY USE BLADES IN PERFECT WORKING CONDITIONS
Do not use damaged or deformed blades; if worn, replace them with new blades.
30) DO NOT FORCE THE BLADE
Do not subject the blade to: collision, bending, excessive pressure, heat, irregular
speed changes, vibrations. In these conditions, the tool has a limited working life
and may break without warning with the risk of flying fragments.
31) DO NOT TOUCH MOVING PARTS WHILE THE MACHINE IS RUNNING
WARNING! Serious injury hazard! Do not touch the blade or any part in motion
while the machine is running. Be careful as to how you move your arms and
hands. Only remove the work piece after turning off and unplugging the machine.
32) MACHINE MALFUNCTION
Turn the switch to OFF “O” (switched off), disconnect the power supply to the
machine by removing the plug from the socket when: Not in use, left unattended,
moved, the power cable is damaged, when fixing or removing the work piece, during
adjustments, maintenance and cleaning.
33) WAIT FOR THE MACHINE TO STOP COMPLETELY
The motor, the moving parts and the blade continue to run for a short while after the
machine is switched off. During this time, these parts must not be touched. Serious
injury hazard!
34) DO NOT LEAVE THE MACHINE UNATTENDED WHILE RUNNING
Do not leave the machine unattended while running and wait until all moving parts
fully stop before leaving the machine after turning it off.
35) KEEP THE WORKPLACE CLEAN AND TIDY
Mess and dirt are sources of danger. Make sure there are no tools or objects around
the machine that could be damaged. Do not place tools or objects on the machine
that could accidentally fall. Frequently eliminate cutting residues from the machine
and floor.
36) HARMFUL DUST
WARNING! The dust produced by some types of wood is very harmful to your
health. Wear appropriate masks, extract the saw dust from the machine and
equip the room with an extractor for air exchange.
37) REPAIRS MUST BE CARRIED OUT BY AUTHORISED PERSONNEL
Do not attempt to repair this machine or to gain access to its internal parts. Always
contact an authorised assistance centre. Service by unauthorised personnel will
cause the warranty to be annulled and could create a dangerous situation. Keep
proof of purchase for warranty service.
38) REQUEST AND HAVE ORIGINAL SPARE PARTS ONLY INSTALLED
Request and use only original spare parts. Please contact your dealer. The use of
non-original spare parts will cause the warranty to be annulled and could create a
dangerous situation.
39) STORE THE MACHINE IN A SAFE PLACE
When not in use, keep the machine in a dry place out of reach of children.
40) RESIDUAL RISKS
WARNING! Strict observance of the instructions with the use of individual means
of protection minimalists risks of accidents but does not completely rule them out.
41) ALWAYS FOLLOW THESE INSTRUCTIONS
Only use this machine as described in these instructions. Do not use it for purposes
for which it was not intended.
ELECTRICAL SAFETY REGULATIONS
1) DO NOT TOUCH LIVE PARTS
WARNING! Risk of electric shocks. Some parts of the machine are electrically-
powered.
2) KEEP CHILDREN AND ANIMALS AWAY FROM THE ELECTRICAL DEVICES
Keep children and animals away from the devices connected to the power supply.
3) CHECK THE POWER SUPPLY VOLTAGE
The power supply voltage must correspond to that indicated on the technical data
plate. Do not use any other type of power supply.
4) USE A TRIP SWITCH
It is advisable to fit a trip switch on the power supply line that trips at the levels laid
down in standards currently in force in the Country in which the machine is used.
Contact your local electrician.
5) CONNECTION TO THE POWER SUPPLY
Before connecting or disconnecting the machine to or from the power supply, make
sure that the switch is in the OFF “O” position.
6) DO NOT TAMPER WITH THE POWER CABLE
Do not tamper with the power cable. Do not replace the power cable plug; only use
a socket suited for the machine plug. Only use the power cable as intended.

- 15 -
7) CHECK THE POWER CABLE
The power cable and extension cable (where applicable) must be checked periodically
and must be checked for signs of damage and wear every time they are used. If they
are not found to be in good condition disconnect them immediately and do not use
the machine until an authorised assistance centre has repaired them.
8) KEEP THE POWER CABLE IN A SAFE POSITION
Keep the power cable and extension cable (where applicable) away from the working
area, damp, wet or oily surfaces, or surfaces with sharp edges, heat sources, fuel
and transit areas for vehicles or pedestrians.
9) 10) DO NOT STEP ON OR FLATTEN THE POWER CABLE
Never step on the power cable. Be aware of its position at all times.
10) DO NOT USE THE MACHINE IN THE PRESENCE OF LIQUIDS
Do not wet it with liquids and do not expose it to damp environments. Do not leave
it out in the open.
11) USE AN EXTENSION CABLE SUITABLE FOR THE MACHINE
Only use an extension cable that is suitable for the power of the machine you are
using and sised according to its length; consult your local electrician.
12) DISCONNECT THE MACHINE BY PULLING THE PLUG ONLY
To remove the plug from the socket, pull on the plug only and not the power cable!
13) AVOID TOUCHING SURFACES THAT ARE EARTHED
Avoid body contact with earthed surfaces such as refrigerators, radiators, pipes and
metallic fixtures, etc. Using a platform to electrically insulate the user from the floor
is recommended.
______________________________________________________________
Congratulations on your excellent choice. Your new tool has been manufactured accor-
ding to the highest quality standards, guaranteeing you long term service and safety.
This manual contains information deemed necessary for proper use, knowledge
and standard machine maintenance. It does not include information on machine tool
woodworking tech niques nor does it discuss the types and processing capabilities of
the various types of wood; the user will find further information in specific books and
publications or by attending special training courses.
Warnings on use and maintenance regulations refer to normal operating needs. Normal
machine operations, working life and economy depend on their observance.
These instructions are an integral part of the machine and must accompany it in the
case of repair or resale. Carefully keep the documentation supplied with the machine
close at hand for consultation in case of need.
For any repairs or revisions that require complex operations, please contact authorised
service centres which have specialised personnel.
The manufacturer is not liable for damages due to negligence, failure to observe the
instructions in this manual and direct and/or indirect damages caused by improper
use of the machine.
Failure to observe the indications, poor and inadequate machine use and unauthorised
tampering may void the warranty. Accident prevention therefore depends on the strict
observance of what is established in this manual.
Upon purchase, make sure the machine is integral and complete.
WARNING! Before using the machine, in order to ensure that handling, initial start-
up, starting, use, stopping, and maintenance are carried out properly, read the
instructions below that refer to the drawings and technical data and apply them
carefully. Before starting work you should be familiar with the controls and the correct
use of this machine, making sure that you know how to stop it in the event of an
emergency. Incorrect use of this machine may result in serious injury and damage
to property. Always consider your safety and the safety of others and act accordingly.
WARNING! The machine is suitable for making cross, tilted and slanted cuts on
parallelepiped shaped wood. Cutting metal, plastic, fabric, flammable materials
and materials that generate harmful or toxic dust and vapours is prohibited. Any
use other than that indicated in these instructions may damage the machine and
constitute a serious risk to both people and property.
MACHINE DESCRIPTION (FIG. A)
1 Cutting off machine switch
2 Saw bench switch
3 Hand grip
4 Cutting off machine head release button
5 Resettable motor protection (where fitted)
6 Disc blade
7 Lower blade guard
8 Base
9 Cutting off machine rotary table
10 Piece supporting guide
11 Rotary table fixing screw
12 Rotary table insert
13 Side supports
14 Piece-locking vice
15 Upper blade guard
16 Removable blade guard
17 Saw bench work surface
18 Work surface insert
19 Piece guide
20 Motor
21 Knob for locking/unlocking the cutting off machine head
22 Screws for locking/unlocking the work surface lifting
23 Tilting lever for cutting off machine head
24 Side supports fixing screws
25 Lever for locking/unlocking the work surface lifting
26 Sawdust/chip manifold
27 Saw bench divider knife
28 Anti-tilt support
29 Divider knife fixing screws
30 Dust/chip bag (where fitted)
31 Power supply plug and cable
32 Piece pusher
33 (Fig.P) Blade perpendicularity adjustment screw
34 (Fig.P) Blade inclination adjustment screw
DESCRIPTION OF ACCESSORIES
For production requirements or according to the machine model, some accessories may
differ from those listed below and/or may already have been installed on the machine.
Cutting off machine: - side supports
- piece-locking vice
- lever
Saw bench: - piece guide
- piece pusher
Machine: - dust/chip bag
- service key set
- removable guard.
DESCRIPTION OF MARKS AND SYMBOLS (FIG. B)
1 Machine model and technical specifications.
2 Lot number and year of manufacture. The first 2 figures indicate the year.
3 Electric and electronic waste may contain potentially hazardous substances for the
environment and human health. It should therefore not be disposed of with domestic
waste, but by means of differentiated collection at specific centres or returned to the
vendor in the event of purchasing a new identical tool. The illegal disposal of such
equipment may result in prosecution to the full extent of the law.
4 WARNING!
5 Read these instructions carefully before using the machine.
6 Important! Risk of cutting and crushing hands. It is compulsory to wear protection
gloves.
7 Important! Risk of material ejection and dangerous dust emission. It is compulsory
to wear eye protection and a mask to protect your respiratory tracts.
8 Important! Risk of loud noise. It is compulsory to use ear protection.
9 Important! Risk of electric shocks. Some parts of the machine are electrically-
powered. Do not touch them and keep a safe distance.
10 Important! Risk of cutting and getting trapped. Keep your hands away from the
blade.
11 Important! Before any control, adjustment or maintenance, always disconnect the
machine from the power supply by unplugging it. Should the power supply cable
be damaged, remove the plug from the power supply socket before inspecting it.
12 Important! Risk of cutting and crushing hands. Keep a safe distance from the
blade and the cutting area.
TECHNICAL DATA
Power voltage and nominal frequency ________________________230V ~50Hz
Nominal engine power ________________________________________1800 W
Idle maximum rotation speed ________________________________ 4900 min-1
Machine insulation class ___________________________________________ II
Divider knife thickness (saw bench)_______________________________ 2 mm
Acoustic pressure LpA ______________________________________ 98dB(A)
Acoustic power level LwA ___________________________________ 106 dB(A)
Hand grip vibrations _______________________________________ <2.5m/s2
Machine weight ______________________________________________ 13 kg
Circular blade for wood, steel body and teeth with carbide tips
Ext./int. diameter _________________________________________ 250/30mm
Cutting thickness ___________________________________________ 2,8mm
Performance:
Cutting head angle for cuts on a slope: 0° - 45° towards the left.
Cutting head rotation for angle cuts or cuts on a slope: 0° - 45° on the right / 0° - 45°
on the left
with 19 pre-set stop positions.
Maximum cutting dimensions height x depth (HxD):
Head angle 0° Head angle 45°
Head rotation 0° 70x130 mm 50x125 mm
Head rotation 45° 70x90 mm 50x105 mm
Saw for bench (H) 40 mm -
TERMINOLOGY USED
MACHINE
Assembly of all electrical and mechanical units.
CUTTING OFF MACHINE
Machine designed for cutting wooden pieces such as tables, panels etc. featuring flat
and perpendicular sides. The piece stays still while the cutting head carries out all the
movements.

- 16 -
SAW BENCH
Machine designed for cutting wooden pieces such as tables, panels etc. featuring flat
and perpendicular sides. The blade is fixed while the piece moves in a straight motion.
CUTTING HEAD
Unit consisting of the engine, cutting blade, hand grip, switch and fixed / mobile guards,
which moves in relation to the piece.
SWITCH
If activated, this part switches the machine on and off.
BLADE OR TOOL
Circular tool designed to remove material from the piece.
KICKBACK
Cutting off machine: sudden upward movement of the cutting head during the truncation
stage, caused by the blade’s contact with hard parts such as nails, screws, wood knots
etc. The piece may be ejected in the direction of the operator.
Saw bench: sudden movement of the piece towards the operator while cutting, caused
by the blade’s contact with hard parts such as nails, screws, wood knots etc.
OPERATOR - USER
The person responsible for installing, operating, adjusting, maintaining and cleaning
the machine. It is the person in charge of the machine.
TRANSPORT AND LIFTING (FIG. A)
!WARNING! The manufacturer is not liable for any direct and/or indirect damage
caused by incorrect transport or lifting.
The machine must be transported and lifted with caution to avoid accidents and damage.
1) Position the machine in saw bench mode (see following chapters).
2) Ensure that the blade is fully protected and that the electrical plug is unplugged.
3)Lift the machine with extreme caution, holding it with both hands under the base and
moving it slowly, without jerky or sudden movements.
Do not attempt to move the machine by pulling it by the power cable or by holding
other machine parts.i.
STARTING UP (FIG. A)
WARNING! The manufacturer is not liable for any direct and/or indirect damage
caused by incorrect installation or connections.
WARNING! Before carrying out the following operations, make sure that the machi-
ne’s plug is disconnected from the mains.
The machine is supplied with some disassembled components and before using it, it
must be cleaned and installed.
When choosing where to put the machine, the following should be considered:
- that the planned position is not damp and is protected from the elements.
- that the area where it will be placed is completely flat, on a non-slip floor and with
appropriate load capacity.
- that there should be a large operational area around the machine free from obstacles.
- that the room should be attended and closed in order to prevent free access.
- that there is good lighting.
- that it needs to be positioned close to the general differential switch.
- that the room temperature should be between 10° and 35° C.
- that the work environment is not in an explosive atmosphere.
Remove the upper part of the packaging and visually check that the machine and its
components are perfectly intact. Then remove the packaging and proceed to carefully
clean the machine in order to remove any protective oils used for transport.
1) Get a bench (not provided) to rest the machine on and a series of nuts and bolts
(not provided) for fixing it to the bench.
2) Complete remove the anti-tilt support (pos.28), position the machine and fix it
so that it is well secured using the holes present on the base (with hardware not
included). Make sure that the machine is strongly fixed to the bench.
3) Proceed to assemble the components as illustrated in the figure. If in any doubt,
please contact your retailer. Some components only need to be assembled if they
are required for the process that you wish to carry out.
4) Assemble the two side supports (pos.13), the piece-locking vice (pos.14), the dust/
chip bag (pos.30) and, only for saw bench use, the piece guide (pos.19).
5) Tighten the screw for fixing the rotary table (pos.11).
6) Fix the cutting head using the lever (pos.23) after removing the nut (used for tran-
sportation) screwed onto the machine.
7) Make sure the blade (pos. 6) is correctly positioned and can rotate freely (for as-
sembling instructions see following chapters).
8) Make sure that the lower blade’s guide (pos. 7) functions correctly in cutting off
mode: when lowering and lifting the cutting head the guard automatically uncovers or
encases the blade. In case of failure of the mechanism, do not start up the machine
but contact an authorised service centre.
9) Check that the upper blade guard (pos.15) stops in cutting off mode: Pulling it gently
upwards it should not lift. In case of failure of the mechanism, do not start up the
machine but contact an authorised service centre.
10) Remove the piece pusher (pos.32) from its support under the surface (pos.17)
and place it to the side of the machine.
11) Make sure that the removable guard is in place (pos.16). Without it, it is not possible
to move the machine into “saw bench” mode.
Make sure that all the parts have been properly and securely assembled and that the
machine is stable before starting it.
OPERATING MODE (FIG. A)
WARNING! Before any operational change, turn the switch to the OFF “O”, unplug the
machine from the electric power supply and wait for the machine to stop completely.
SAW BENCH MODE
The machine is provided in saw bench mode, in order to use it this way assemble the
piece guide (pos. 19) in the slot situated on the work surface.
Check that the surface (pos.9) is on 0° and fix it with the screw (pos.11).
CUTTING OFF MODE
Disassemble the piece guide (pos.19).
In order to move from the saw bench mode to the cutting off mode and vice versa, read
the following instructions carefully.
Warning! Breakages and/or damages due to incorrect operation are not covered by
the warranty.
FROM SAW BENCH FUNCTION TO CUTTING OFF MACHINE FUNCTION (see label on
work surface)
1. With one hand press the surface downwards whilst you unscrew the screw by a
couple of turns and lower the lever with the other hand.
2. Move the surface upwards using your hand. Check that the surface is at the highest
point, tighten the screw well and lift the lever to lock it.
3. Press the cutting head downwards and pull the locking pin outwards to the end of
its stroke. Make sure the blade is fully protected and does not protrude above the
work surface.
4. Slowly move the cutting head which will be lifted.
5. Remove the removable guard.
FROM CUTTING OFF MACHINE FUNCTION TO SAW BENCH FUNCTION (see label on
work surface)
1. Assemble the removable guard.
2. Check that the locking pin is pulled completely outwards. Press the motion release
button and lower the cutting head to the lowest position
3. Press the cutting head downwards and push the locking pin inwards making sure
that the cutting head remains locked.
4. Unscrew the screw by a couple of turns and lower the lever. With both hands push
the work surface downwards and check that it is in the lowest point.
5. With one hand, keep the surface pressed downwards whilst you tighten the screw
well and lift the lever to lock it with the other hand.
ADJUSTMENTS!
!WARNING! Before conducting checks and adjustments, turn the switch to the
OFF “O” and unplug the machine from the electric power supply.
The machine is supplied factory adjusted and does not require special adjustments; if
necessary, perform the following operations.
ADJUSTMENT OF DISTANCE BETWEEN THE BLADE AND THE DIVIDER KNIFE (Fig. N)
The distance between the blade teeth (pos.6) and the dividing knife (pos. 27) must be
as illustrated in fig. N.
In saw bench mode slightly unscrew the two screws (pos.29), which are located on the
left side under the work surface (2 holes are visible on the body), adjust the distance
and re-fix the 2 screws.
90° PERPENDICULAR BLADE ADJUSTMENT (fig. P)
To adjust the blade perpendicularity in relation to the rotary table, adjust the screw (pos.
33); use a 90° square (not supplied) between the blade and surface.
45° BLADE INCLINATION ADJUSTMENT (fig. Q)
To adjust the blade inclination at 45° in relation to the rotary table, adjust the screw (pos.
34); use a goniometer (not supplied) between the blade and surface.
STARTING AND STOPPING
!WARNING! Before starting the machine it is compulsory to put on goggles, gloves,
headphones and dust mask (not provided with the machine).
!WARNING! Whilst starting and stopping, make sure that nobody approaches the
machine. Keep safety distance from all moving parts and from the cutting area.
!WARNING! The motor, the moving parts and the blade continue to run for a short
while after the machine is switched off. During this time, these parts must not be
touched. Serious injury hazard!
Before starting the machine check the integrity of all the components and that all the
bolts and couplings are tight.
The machine is equipped with two switches, one to activate the cutting off mode and
the other to activate the saw bench mode.
CUTTING OFF MACHINE START-UP
1) Set the machine in “cutting off” mode.
2) Make sure service keys are inserted.
3) Insert the power cable plug into the socket.
4) Stand in front of the machine and make sure people and animals are kept away.
5) Firmly grip the hand grip with your right hand (pos.3)
6) To start press the switch (pos. 1) located on the hand grip.
The switch is a ‘maintained action’ switch so the machine will stay on when you keep
the switch pressed.
If you notice any working defects, switch off the machine and consult the chapter
“troubleshooting and permitted operations”.

- 17 -
STOPPING THE CUTTING OFF MACHINE
To stop the machine release the switch (pos. 1).
SAW BENCH START-UP
1) Set the machine in “saw bench” mode.
2) Make sure service keys are inserted.
3) Insert the power cable plug into the socket.
4) Stand in front of the machine and make sure people and animals are kept away.
5) To start press the ON ‘I’ switch (pos. 2) located on the right side of the machine.
If you notice any working defects, switch off the machine and consult the chapter
“troubleshooting and permitted operations”.
STOPPING THE SAW BENCH
To stop the machine, press the OFF “O” switch (pos. 2).
When not using the machine, turn it off and disconnect the plug from the socket.
Motor protection (where fitted)
The machine can be equipped with a motor trip switch (pos.5), designed to prevent
electrical failures. Should the switch operate during use, just press the reset button
followed by the start-up button in order to restart the machine.
USE INSTRUCTIONS
!WARNING! Before conducting checks and adjustments, turn the switch to the
OFF “O” and unplug the machine from the electric power supply.
After having read the previous chapters carefully, apply these tips scrupulously to obtain
maximum performance from your machine. Proceed calmly. You will only be able to
make full use of the machine’s potential after gaining sufficient experience. Acquaint
yourself with all controls. Run tests without work pieces.
CUTTING OFF MODE
OPERATOR
The normal operator position is the one in front of the machine, with the right hand on
the hand grip; cutting is only possible from this position.
!Warning! Keep your hands and face far from the blade and cutting area. Serious
injury hazard!
WORK SURFACE
The work surface (pos. 17) must be positioned correctly before starting any operation,
for this reason it can be moved upwards or downwards:
- to the highest position in cutting off mode
- to the lowest position in saw bench mode
It is forbidden to position the surface at an intermediate height.
Using the screw (pos. 22) and the lever (pos. 25) the movement of the work surface
can be locked or freed; whilst working the screw must be kept tightened well and the
lever must be turned upwards to lock the surface.
In order to facilitate movement, the work surface has a pair of springs, which push
it upwards into the correct position. However, check that it reaches the highest point
before switching over to cutting off mode.
Follow the indications reported in the “Operational procedures” chapter carefully
in order to move the surface correctly.
WORK PIECE
The shape, size and weight of the piece to be cut must be compatible with the machine.
Trace the cutting line on the piece with a ruler; place the piece on machine’s base
(pos. 8-9), being careful not to touch the blade and rest it against the supporting guide
appropriately (pos. 10). The wider side of the piece must rest on the base; do not cut
pieces with the wider side upright.
Align the line traced previously with the theoretical surface the blade shall create with
its downwards movement.
Warning! For your safety, it is important that the machine is secured to the bench
or stand.
Specifically sised pieces can be used on this machine (thickness H and depth P, see
Technical Data), depending on the type of cut. In order to support long pieces, you
must be equipped with a couple of pedestals to arrange on the right and left sides of
the machine. These will prevent the 2 pieces from tipping over, which would pose an
hazard to the operator.
Warning! For your safety, it is important that the piece is correctly locked. Do not cut
short pieces. Do not cut circular sections, old or fragile wood, irregular wood, cracked
wood, wood with nails or screws, branches or trunks. Always carefully inspect the piece.
Warning! Always remember that a kickback can suddenly lift the cutting head and
that you may lose hold of the hand grip.
The vice (pos. 14) is essential for locking the piece in place: Screw the screw onto
the piece.
TOOL
Make sure the blade is integral, without cracks or deformations before use. Periodically
check blade sharpness.
When necessary, replace it following the instructions in the next chapters.
Warning! Blade efficiency and perfect integrity provide better results and minimize
accident risks.
CHIP AND DUST VACUUM
The machine can be equipped with a manifold (pos. 26) for the suction of sawdust.
Please remember that the part of material removed while cutting will also be thrown
around the machine and on the piece.
For a single cut it is sufficient to assemble the dust/chip bag (pos.30 if applicable),
which must be inserted at the bottom on the manifold as shown in fig.A; after cutting
empty the bag.
In order to increase the number of cuts and, most of all, to obtain best results, connect
the manifold to a wood sawdust suction system, using a plastic flexible tube (both not
supplied with the machine); your dealer can suggest the most suitable choice.
Warning! Do not start the machine if the vacuum tube is not installed. Do not insert your
fingers or tools in the manifold in the attempt to remove material. Serious injury hazard!
OPERATIONS, CUTTING AND MOVEMENTS
The work piece remains still on the machine while the tool moves manually in relation
to the piece to remove material.
The motor provides power to rotate the tool, using a set of gears.
Observe the following warnings that apply to all types of cuts:
- make sure that levers and screws are tightened to firmly secure mobile parts
- the piece in process must be locked well in place
- the piece must rest against the supporting guide (pos. 10)
- do not cut several pieces simultaneously
- firmly grip the hand grip (pos. 3)
- keep a safety distance from the cutting area
- gradually and cautiously move the piece against the blade
- cut in a single stroke
- do not overload the cutting unit so as not to strain the blade and the engine
- excessive strains cause the blade and/or piece to suddenly break
- do not strain the blade laterally
- do not executed grooves
- the idle blade should not touch the piece
- do not start the machine if the blade is in contact with the piece
- do not start the machine if the lower guard is not positioned over the blade (pos. 7)
- do not start the machine if the higher guard is not covering the blade (pos.15)
- to clean the cutting area, use a brush with a long handle.
The machine can make various types of cuts:
- cross cut
- tilted cut (from 0° to 45°)
- slanted cut (from 0° to +45° and from 0° to -45°)
- tilted/slanted combined cut
CROSS CUT (fig. D)
Initial position:
- set the machine in “cutting off” mode
- the rotary table (pos. 9) is locked at 0° with the screw (pos. 11)
- the cutting head is fixed at 0° by the lever (pos. 23)
Cutting:
- push the piece against the supporting guide (pos.10) and lock it into place with the
vice (pos.14) securely
WARNING! Keep hands away from the cutting area.
- take hold of the hand grip (pos. 3) with your right hand, press the switch (pos.1) to
start the machine
- unlock the down stop by pressing the button (pos. 4)
- gradually lower the cutting head completely until the piece is cut
- slowly lift the cutting head and, as soon as the blade has left the piece, release the
switch to turn off the machine.
- follow the cutting head until it is in the resting position.
TILTED CUT (fig. E)
WARNING! This cut requires the blade to be more exposed, increasing the risk of
serious injuries: take care of your hands and keep a safe distance.
Initial position:
- set the machine in “cutting off” mode
- the rotary table (pos. 9) is locked at 0° with the screw (pos. 11)
- the cutting head is blocked by the lever (pos. 23) at an angle between 0° and 45°
Cutting:
- push the piece against the supporting guide (pos.10) and lock it into place with the
vice (pos.14) securely
WARNING! Keep hands away from the cutting area.
- take hold of the hand grip (pos. 3) with your right hand, press the switch (pos.1) to
start the machine
- unlock the down stop by pressing the button (pos. 4)
- gradually lower the cutting head completely until the piece is cut
- slowly lift the cutting head and, as soon as the blade has left the piece, release the
switch to turn off the machine.
- follow the cutting head until it is in the resting position.
SLANTED CUT (fig. F)
Initial position:
- set the machine in “cutting off” mode
- the rotary table (pos. 9) is locked by the screw (pos. 11) at an angle between -45° and
+45° (in order to simplify the choice the table has catches at typical angles, however
it can be set at any angle)
- the cutting head is fixed at 0° by the lever (pos. 23)
Cutting:
- push the piece against the supporting guide (pos.10) and lock it into place with the
vice (pos.14) securely
WARNING! Keep hands away from the cutting area.
- take hold of the hand grip (pos. 3) with your right hand, press the switch (pos.1) to
start the machine
- unlock the down stop by pressing the button (pos. 4)
- gradually lower the cutting head completely until the piece is cut
- slowly lift the cutting head and, as soon as the blade has left the piece, release the
switch to turn off the machine.
- follow the cutting head until it is in the resting position.

- 18 -
TILTED/SLANTED COMBINED CUT (fig. G-H)
WARNING! This cut requires the blade to be more exposed, increasing the risk of
serious injuries: take care of your hands and keep a safe distance.
Initial position:
- set the machine in “cutting off” mode
- the rotary table (pos. 9) is locked by the screw (pos. 11) at an angle between -45° and
+45° (in order to simplify the choice the table has catches at typical angles, however
it can be set at any angle)
- the cutting head is blocked by the lever (pos. 23) at an angle between 0° and 45°
Cutting:
- push the piece against the supporting guide (pos.10) and lock it into place with the
vice (pos.14) securely
WARNING! Keep hands away from the cutting area.
- take hold of the hand grip (pos. 3) with your right hand, press the switch (pos.1) to
start the machine
- unlock the down stop by pressing the button (pos. 4)
- gradually lower the cutting head completely until the piece is cut
- slowly lift the cutting head and, as soon as the blade has left the piece, release the
switch to turn off the machine.
- follow the cutting head until it is in the resting position.
SAW BENCH MODE
OPERATOR
The normal operator position is in front of the machine, with both hands pushing the
piece towards the blade while exerting slight pressure on the surface. During the final
stage, the operator uses the piece pusher with one hand only (fig. L).
Warning! Keep your hands and face far from the blade and cutting area. Serious
injury hazard!
WORK SURFACE
The work surface (pos. 17) must be positioned correctly before starting any operation,
for this reason it can be moved upwards or downwards:
- to the highest position in cutting off mode
- to the lowest position in saw bench mode
It is forbidden to position the surface at an intermediate height.
Using the screw (pos. 22) and the lever (pos. 25) the movement of the work surface
can be locked or freed; whilst working the screw must be kept tightened well and the
lever must be turned upwards to lock the surface.
In order to facilitate movement, the work surface has a pair of springs, which push
it upwards into the correct position. However, check that it reaches the highest point
before switching over to cutting off mode.
Follow the indications reported in the “Operational procedures” chapter carefully
in order to move the surface correctly.
WORK PIECE
The shape, size and weight of the piece to be cut must be compatible with the machine.
Mark the cutting line on the piece with a ruler. Position it on the machine surface (pos.17),
taking care not to touch the blade, and rest it sideways against the piece guide (pos.19)
that you previously adjusted. The wider side of the piece must rest on the surface; do
not cut pieces with the wider side upright.
Warning! For your safety, it is important that the machine is secured to the bench
or stand.
Two pieces of defined dimensions (thickness H, see chap. Technical Data) can be
assembled on this machine. To support long pieces it is necessary to use a stand to be
arranged behind the machine, which prevents the 2 pieces from tipping over, causing
danger for the operator.
Align the line traced previously with the theoretical surface the piece shall create with
its straight motion through the blade.
WARNING! For your safety, it is important that the piece is correctly locked. Do not
cut circular sections, old or fragile wood, irregular wood, cracked wood, wood with
nails or screws, branches or trunks. Always carefully inspect the piece.
WARNING! Always remember that a kickback causes the rejection of the piece,
which is ejected towards the operator.
TOOL
Make sure the blade is integral, without cracks or deformations before use. Periodically
check blade sharpness.
When necessary, replace it following the instructions in the next chapters.
Warning! Blade efficiency and perfect integrity provide better results and minimize
accident risks.
CHIP AND DUST VACUUM
The machine can be equipped with a manifold (pos. 26) for the suction of sawdust.
Please remember that the part of material removed while cutting will also be thrown
around the machine and on the piece.
For a single cut it is sufficient to assemble the dust/chip bag (pos.30 if applicable),
which must be inserted at the bottom on the manifold as shown in fig.A; after cutting,
empty the bag.
In order to increase the number of cuts and, most of all, to obtain best results, connect
the manifold to a wood sawdust suction system, using a plastic flexible tube (both not
supplied with the machine); your dealer can suggest the most suitable choice.
Warning! Do not start the machine if the vacuum tube is not installed. Do not insert
your fingers or tools in the manifold in the attempt to remove material. Serious
injury hazard!
PUSH STICK
Before performing the cutting maintain the pusher at hand. If not used, store it away
from moving parts.
KNIFE DIVIDER
It is a comp onente important for safety and must be adjusted with respect the disc
blade (Fig. N). The thickness of the riving knife must be less than the width of the cut
groove and supeiore to the thickness of the metal disc of the blade.
OPERATIONS, CUTTING AND MOVEMENTS
The blade is fixed to the machine, while the piece moves manually in a straight and
parallel line in relation to the blade.
The motor provides power to rotate the tool, using a set of gears.
Observe the following warnings that apply to all types of cuts:
- make sure that levers and screws are tightened to firmly secure mobile parts
- keep the work piece firmly
- the piece must rest against the surface (pos.17) and the piece guide (pos.19)
- do not cut several pieces simultaneously
- keep a safety distance from the cutting area
- gradually and cautiously near the piece to the blade
- cut in a single stroke
- do not force the piece against the blade so as not to strain the blade and the engine
- excessive strains cause the blade and/or piece to suddenly break
- do not strain the blade laterally
- the idle blade should not touch the piece
- do not start the machine if the blade is in contact with the piece
- do not start the machine if the higher guard is not covering the blade (pos.15)
- do not start the machine if the removable guard is not positioned over the blade
(pos. 16) underneath the work surface
- to clean the cutting area, use a brush with a long handle
The machine can make various types of cuts:
- cut along the axis of the piece
- slanted cut
CUT ALONG THE AXIS OF THE PIECE (fig. L)
Initial position:
- set the machine in “saw bench” mode
- the rotary table (pos. 9) is locked at 0° with the screw (pos. 11)
- the cutting head is fixed at 0° by the lever (pos. 23)
- the piece guide (pos. 19) must be installed on the work surface as shown in fig. L.
Cutting:
- press the switch (pos. 2) to start the machine
- using both hands, push the piece against the blade (enclosed in the guard) at a uniform
speed and, at the same time, press the piece onto the work surface and on the piece
guide. The part will cause the upper guard to lift (pos. 15) and to rest onto the piece
keeping the blade protected
WARNING! Keep hands away from the cutting area.
- when your hands get closer to the blade, use the piece pusher to complete the cut
- once you have finished cutting, switch off the machine.
SLANTED CUT
WARNING! Carrying out this cut means that the hands are located in the area
adjacent to the cut and the danger of serious injury is therefore greater: take care
of your hands and keep a safe distance.
WARNING! It is forbidden to carry out this type of cut on long pieces, such as planks,
beams, etc. Only use pieces of a limited length.
Initial position:
- set the machine in “saw bench” mode
- the rotary table (pos. 9) is locked at 0° with the screw (pos. 11)
- the cutting head is fixed at 0° by the lever (pos. 23)
- piece guide (pos.19) installed on the work surface parallel to the blade and adjusted
at an angle
Cutting:
- press the switch (pos. 2) to start the machine
- grasp the piece and the piece guide with both hands and push them forwards, making
the piece guide slide along the slot and at the same time, press the piece onto the work
surface. The piece will cause the upper guard to be lifted (pos.15) that will then rest
on the piece, keeping the blade protected.
WARNING! Keep hands and the piece guide far from the cutting area.
- finish cutting
- turn off the machine.
BLADE
WARNING! The cutting part can cause serious injuries – use protection gloves!
- Use good quality blades with the same characteristics as the machine based on its
technical data – your retailer will be able to help you make the correct choice. Also
observe any instructions provided with the equipment.
- Do not use blades if you do not know where they are from or without technical speci-
fications. They must show the nominal dimensions, the number of teeth, the maximum
number of revolutions and the arrow indicating the rotation direction.
- The number of revolutions and the dimensions are the basic elements for making your
choice. The number of revolutions must always be higher or equal to that shown on the
machine. The dimensions must be equal to those shown on the machine.
- Use blades which conform to the regulations in force in the country of use.
- Do not use HSS (high speed steel) blades or abrasive truncating discs.
- Always carry out a simple visual check: there must be no deformations, breakages
or damages.
Our company provides a complete series of blades suitable for your machine, which
you can buy from your retailer.

- 19 -
REPLACING THE BLADE (FIG. M)
WARNING! Before conducting any replacement, turn the switch to the OFF “O”
position and unplug the machine from the electric power supply.
WARNING! After cutting the blade reaches high temperatures: Wait for it to cool
down before replacing it.
WARNING! Even if the blade has stopped, it is still very sharp: Use gloves to prevent
serious injuries.
WARNING! The assembly of the blade must be carried out with absolute precision.
Incorrect assembly causes very serious danger.
When replacing the blade, proceed as follows. The operation must be carried out by
an expert; if in doubt please contact an authorised service centre.
1) Unplug the machine from the electric power supply and set the machine in cutting
off mode.
2) For correct reassembly, observe carefully the various components before proceeding.
3) Unscrew the screw ( Fig. M1) that secures the lever protections.
4) With 2 keys supplied, unscrew the screw securing the blade. Attention: the screw
has lefthand thread ; turn clockwise to unscrew it ( fig.M2 ).
5) Open the protections ( fig.M3 ), remove the outer flange and pull the blade down
(the inner flange must be mounted on the motor shaft). Be careful if there are rings
of adaptation or shimming.
8) Clean the components and the new blade.
9) Install the new blade being careful to follow the direction of rotation: the arrow of
the blade must be the same as that printed on the machine.
10) Replace the outer flange paying attention to the same shaped hole that will be stuck
on the contoured shaft of the motor.
11) Tighten the screw counterclockwise without hitting the key with hammer or other
tools ( fig. M2).
12) Replace the lever guards and secure it with the screw (Fig. M1).
13) Carefully check that all blade guards are operating properly.
14) Make sure that the blade spins freely without irregularities.
15 ) Carry out a test of unloaded run.
MAINTENANCE
WARNING! Before conducting checks or maintenance, turn the switch to OFF “O”
and unplug the machine from the electric power supply.
WARNING! Do not tamper with or attempt to repair motor or electrical parts.
Machine working life and costs also depend on constant and meticulous maintenance.
Always observe the following instructions.
CLEANING AFTER USE
- Routinely clean and care for your machine to ensure that it remains perfectly efficient
and has a long working life.
- Remove sawdust using a soft brush and vacuum; take scrap material to a recycling
centre.
- Remove any traces of resin that stick to the machine.
- Do not spray or soak the machine with water.
- Do not use any inflammable substances, detergents or solvents as these may damage
the machine beyond repair. The plastic parts can easily be damaged by chemical agents.
- Do not use compressed air for cleaning: Risk of flying chips and splinters!
- Pay the utmost attention when cleaning switches, hand grip, engine fan slots, blade,
control levers, rotary table, the base, rotary table inserts and the saw bench.
For your safety, periodically check the conditions of the following components.
Replace them if damaged or worn:
- switches
- blade
- guards
- supporting guide for the piece
- exhaust manifold
- rotary table plastic inserts and the saw bench
- power supply plug and cable
BRUSHES
The motor of this machine is equipped with a pair of graphite brushes. They must be
checked and replaced by an authorised service centre. Complete wear of the brushes
makes it impossible to start the machine.
TROUBLESHOOTING AND PERMITTED OPERATIONS
THE MACHINE DOES NOT START OR IT STOPS AND DOES NOT RESTART:
No power:
- Make sure the power cable and extension (if applicable) are not damaged.
- Check the power supply system’s main switch.
Circuit breaker trip:
- Press the button to reset the motor guard.
Worn graphite brushes:
- Contact an authorised assistance centre.
Electrical fault:
- Contact an authorised assistance centre.
THE CUTTING HEAD DOES NOT LOWER
Internal inserted stop:
- Press the release button and, at the same time, lower the cutting head.
THE CUTTING HEAD DOES NOT STAY DOWN AND DOES NOT ALLOW TO SET THE
MACHINE TO SAW BENCH MODE:
The removable guard is absent:
- assemble the removable guard correctly.
THE WORK SURFACE DOES NOT SLIDE UPWARDS OR DOWNWARDS:
Locking screw tightened and/or lever locked:
- Unscrew the screw by a couple of turns and lock the lever downwards.
Cutting residues that prevent movement:
- Clean the area underneath the work surface carefully.
THE MACHINE VIBRATES EXCESSIVELY:
Dull, damaged or deformed blade:
- Replace the blade.
Incorrectly assembled blade:
- Remove the blade and reassemble it correctly following the instructions
Machine insufficiently secured to the bench:
- Improve machine fastening.
THE MACHINE HAS TROUBLE CUTTING:
Dull or damaged blade:
- Replace the blade.
THE ROTARY TABLE DOES NOT ROTATE OR MOVES WITH DIFFICULTY:
Cutting residues that prevent movement:
- Clean.
The locking screw is tightened:
- Loosen the fixing screw by a few turns.
WARNING! If the machine still fails to function correctly after you have carried
out the above operations, or in the event of anomalies other than those described
above, turn the machine off and take it to an authorised service centre or have an
authorised technician repair it with original spare parts. Always provide the machine
model and serial number shown on the technical data label.
STORAGE
- Disconnect the machine from the power supply.
- Clean the machine and all its accessories thoroughly (see “Maintenance” section).
- Protect unpainted metal parts with protective oil.
- Keep the machine out of reach of children, in a stable safe position, in a dry place not
subject to extreme temperatures and free from dust. Keep children and unauthorised
personnel out of the storage room.
- Protect the machine from direct sunlight, keeping it in the dark where possible, or
in the shade.
- Do not close the machine in nylon bags as damp could form and damage the machine.
- Use original packaging to protect the machine.
DEMOLITION
Electric and electronic refuse may contain potentially hazardous substances for
the environment and human health. It should therefore not be disposed of with domestic
waste, but by means of differentiated collection at specific centres or returned to the
vendor in the event of purchasing a new identical appliance. The illegal disposal of such
equipment may result in prosecution to the full extent of the law.
Amendments: The texts, figures and data correspond to the standard in place on the date
of printing of this manual. The manufacturer reserves the right to update the documen-
tation if changes are made to the appliance, without being bound by any obligations.
No part of this publication or the documentation enclosed with the appliance may be
reproduced without written permission by the manufacturer.
WARRANTY
This product is guaranteed by law against non conformities with regards to the characte-
ristics declared, provided that is has been used exclusively as described in this operator’s
manual, has not been tampered with in any way, has not been repaired by unauthorised
persons, and, only if original replacement parts were installed as needed. In any case,
consumable materials and/or components subject to wear, like batteries, light bulbs,
cutting and finishing components, etc. are excluded from this warranty. Return the product
to a retailer or an authorised customer service centre together with proof of purchase.
DECLARATION OF CONFORMITY
The company:
Valex - via Lago Maggiore, 24 36015 SCHIO (VI) ITALY
Declares, under its own responsibility, that the tool:
PRODUCT: Cutting off machine saw bench for wood TLS250N
PRODUCT CODE: 1390218
complies with health and safety directives:
2006/42/EC, 2014/30/EC
SCHIO, 06-2015
Attorney
ARRIGO ZANELLA

- 20 -
f
NORMES GÉNÉRALES DE SÉCURITÉ
1) LES SACHETS EN NYLON NE SONT PAS DES JOUETS
ATTENTION ! Risque d’étouffement. Les sachets en nylon présents dans l’emballage
peuvent provoquer l’étouffement s’ils sont mis sur la tête ; c’est pourquoi ils doivent
être gardés hors de la portée des enfants ; s’il n’est plus possible de les utiliser à
nouveau, ils doivent être coupés et éliminés.
2) PERSONNES AUTORISÉES À UTILISER LA MACHINE
Il est interdit aux enfants, aux personnes non concernées et à celles ne connaissant pas
parfaitement les instructions d’utilisation contenues dans ce manuel d’utiliser la machine. Il
se peut que des lois et des règlements locaux prévoient un âge minimum pour l’utilisation
de la machine. L’opérateur doit être formé de manière appropriée pour utiliser, régler et
mettre la machine en fonction en toute sécurité.
3) RESPONSABILITÉ DE L’OPÉRATEUR
L’opérateur est responsable vis-à-vis des tiers pour les éventuels dommages aux personnes
et aux choses, suite à l’utilisation de la machine.
4) MAINTENEZ UNE POSITION DE TRAVAIL STABLE ET SURE
Quand vous travaillez, maintenez une position de travail stable et sûre et ne vous penchez
pas.
5) SURVEILLEZ LA ZONE DE TRAVAIL
Faites attention à vos mains, à la pièce à usiner, à l’outil de coupe, aux copeaux produits par
l’usinage et, de manière générale à tous les organes en mouvement.
6) AGISSEZ AVEC ATTENTION
Ne soyez pas distraits et contrôlez toujours ce que vous êtes en train de faire : agissez avec
bon sens. N’utilisez jamais la machine quand vous êtes fatigués, malades, sous l’effet de
l’alcool, de drogues ou de médicaments réduisant l’attention.
7) GARDEZ UNE DISTANCE DE SÉCURITÉ
Ne laissez pas s’approcher les personnes et les animaux de votre zone de travail et de la
machine. Ne touchez pas les composants sous tension électrique.
8) PROTÉGEZ VOTRE CORPS
L’utilisation de la machine engendre du bruit, de la chaleur, des fumées, des vibrations,
la projection de copeaux et d’éclats. Travaillez toujours en portant des équipements de
protection individuelle conformes aux normes afin d’éviter des lésions au corps, aux
mains, aux yeux, à l’ouïe et aux voies respiratoires. Mettez des vêtements résistants
avec des manches et des poignets serrés, des lunettes de sécurité, des gants de travail,
des protecteurs d’oreilles, un masque anti-poussière et des chaussures de sécurité. Ne
portez pas des vêtements amples, des écharpes, des rubans de tissus ni de bijoux car ils
pourraient se prendre dans les organes en mouvement de la machine. Mettez des coiffures
de protection pour recueillir les cheveux longs. Les lunettes de vue ne remplacent pas les
lunettes de sécurité spécifiques.
9) EFFICACITÉ DE LA MACHINE
Contrôlez toujours que la machine est intacte et qu’elle fonctionne correctement, autrement
on risque de graves accidents. N’utilisez pas la machine si l’interrupteur ne permet pas de
mettre en marche et/ou arrêter la machine. Si nécessaire, remplacez l’insert du plan de
travail.
10) ÉTAT DE LA MACHINE
N’enlevez aucun composant de la machine, sauf quand cela est expressément indiqué dans
ces instructions, et ne modifiez en aucune façon la configuration d’origine.
11) NE DÉMONTEZ PAS LA MACHINE
Ne démontez en aucun cas la machine. N’utilisez pas la machine dépourvue de ses
protections en position, en particulier après un changement de mode.
12) NE MODIFIEZ PAS LES PIÈCES DE LA MACHINE
Ne modifiez et n’enlevez aucune pièce de la machine.
13) CONTRÔLEZ LA SOLIDITE DE LA MACHINE
Vérifiez périodiquement le bon serrage des vis de la machine et la bonne fixation de la lame.
14) UTILISEZ LA MACHINE DANS UN ENDROIT CORRECTEMENT AÉRÉ ET VENTILÉ
La machine doit être utilisée dans un endroit bien aéré et ventilé afin d’assurer un
refroidissement suffisant et un bon rechange d’air dans le local.
15) N’UTILISEZ PAS LA MACHINE DANS DES ENDROITS DANGEREUX
N’utilisez pas la machine dans un lieu présentant des risques d’explosion et/ou incendie,
dans des locaux fermés ou peu ventilés, en présence de liquides, humidité, gaz, vapeurs,
acides et éléments inflammables et/ou explosifs.
16) TRANSPORT DE LA MACHINE
Les opérations de transport de la machine doivent être effectuées avec le maximum
d’attention. Déplacez-la uniquement en position de scie à table en empoignant la base des
deux mains. Ne déplacez pas la machine en la tirant par le cordon d’alimentation ou d’autres
parties.
17) POSITIONNEMENT DE LA MACHINE
Positionnez et fixez la machine par des boulons sur un établi ou un piédestal à surface
plane, solide et ininflammable pouvant supporter le poids total et les sollicitations dérivant
de l’utilisation. Il est strictement défendu d’utiliser la machine sans l’avoir préalablement
fixée solidement et sur des surfaces inflammables comme le bois, le plastique, etc. Vérifiez
périodiquement la fixation.
18) TRAVAILLEZ AVEC UN ÉCLAIRAGE ADÉQUAT
Travaillez uniquement pendant le jour avec une excellente luminosité ou avec un éclairage
artificiel adéquat.
19) N’EXPOSEZ PAS LA MACHINE AUX AGENTS ATMOSPHÉRIQUES
Ne laissez pas la machine exposée aux agents atmosphériques comme pluie, brouillard,
soleil, hautes ou basses températures.
20) NE TOUCHEZ PAS LA MACHINE SI VOUS ÊTES MOUILLÉ
N’utilisez pas la machine pieds nus ou avec les pieds mouillés. Ne touchez pas la machine
avec les mains mouillées.
21) CONTRÔLES AVANT DE METTRE EN MARCHE LA MACHINE
Avant d’insérer la fiche au réseau électrique, vérifiez que l’interrupteur est sur OFF « O »
(arrêt), que la pièce est bien posée et soutenue, que la tête de coupe est réglée et que les
clés de service ont été enlevées. N’utilisez pas la machine si les inserts sont usés et les
protections de la lame sont cassées ou ne fonctionnent pas.
22) VÉRIFICATIONS POUR UN BON MONTAGE
N’utilisez pas la machine si le tuyau de l’aspirateur de copeaux/poussière (non fourni) est
débranché et l’aspirateur (non fourni) est éteint.
23) CONTROLE DES PROTECTIONS
Contrôlez que les protections de la lame ne sont pas endommagées. La protection inférieure
de la lame doit suivre le mouvement de montée/descente de la tête de coupe ; n’utilisez pas
la machine si la protection ne couvre pas la lame au repos.
24)POSITIONNER CORRECTEMENT LA PIÈCE À USINER
Il est très important pour votre sécurité que la pièce à usiner soit bien positionnée contre le
guide d’appui, qu’elle soit bloquée dans l’étau et qu’elle soit soutenue aux deux extrémités par
des supports (non fournis). La pièce doit avoir des faces planes et perpendiculaires (comme
par exemple des planches, des lattes, etc.). Ne coupez pas des branches, des troncs d’arbre
ou des pièces à section circulaire. Ne coupez pas des pièces contenant des clous ou des vis
ou entourées de ruban adhésif, des cordes ou autres. Le côté le plus large de la pièce devra
être posé sur la table ; ne coupez pas des pièces ayant le côté plus grand mis à la verticale. Ne
coupez pas dans la côte morceaux, mais placer le côté le plus long sur la base de la machine.
Profilés non coupés petits qu’ils ne peuvent pas être serrés de l’emprise et / ou qu’elles se
rompre au cours de la coupe.
25) MATÉRIAUX NON ADMIS
La machine n’est pas appropriée pour les usinages sur des métaux, des matières plastiques,
des matières inflammables et explosives, des matières qui produisent des poussières et des
vapeurs dangereuses ou nocives pour la santé.
26) PRÉVENEZ LES ACCIDENTS PRÉVISIBLES
Effectuez toujours un essai de fonctionnement à vide avant de commencer le travail ; durant
cette période, faites en sorte que personne ne s’approche à la machine et gardez une
distance de sécurité. Utilisez toujours des équipements de protection individuelle. Quand
la machine est en fonction, ne touchez absolument pas la lame, cela est très dangereux
! Après avoir remplacé des pièces, effectuez toujours un contrôle général avant de vous
mettre au travail !
27) UTILISEZ SEULEMENT DES LAMES SPÉCIFIÉ PAR LE FABRICANT
Cette machine a été conçue pour utiliser des lames spécifiques pour la coupe du bois ; il
est interdit d’utiliser des lames appropriées pour d’autres matériaux et disques abrasifs.
N’utilisez pas des lames réalisées en acier super rapide HSS. La vitesse max. estampillée
sur la lame doit toujours être supérieure à celle qui est indiquée dans les données
techniques de la machine. Utilisez des lames conformes aux normes en vigueur dans le
pays d’utilisation.
28) MANIPULEZ LA LAME AVEC ATTENTION
La lame possède des parties très coupantes : manipulez-la avec très attention et portez
toujours des gants de protection car il existe un risque de lésions graves !
29) UTILISEZ SEULEMENT DES LAMES EN PARFAITES CONDITIONS
N’utilisez pas de lames endommagées et déformées ; remplacez les lames usées.
30) NE SOLLICITEZ PAS LA LAME
Ne soumettez pas la lame à des sollicitations telles que : chocs, flexions, pressions
excessives, contraintes thermiques, variations de vitesse irrégulières, vibrations. Dans ces
conditions, l’outil aura une durée limitée et pourra se casser subitement d’où danger de
projections de fragments.
31) NE TOUCHEZ PAS LES ORGANES EN MOUVEMENT QUAND LA MACHINE EST EN
FONCTION
ATTENTION ! Danger de blessures graves ! Pendant le fonctionnement, ne touchez pas
la lame ainsi que tous les organes en mouvement. Prêtez attention aux mouvements de
vos bras et de vos mains. Enlevez la pièce seulement après avoir éteint la machine et
avoir débranché le cordon d’alimentation de la prise électrique.
32) MACHINE NE FONCTIONNANT PAS
Positionnez l’interrupteur sur OFF « O » (arrêt), coupez l’alimentation électrique en
débranchant la fiche de la machine quand : vous ne l’utilisez pas, vous la laissez sans
surveillance, vous la transportez, le cordon d’alimentation est endommagé, vous fixez et
démontez la pièce en usinage, vous effectuez les réglages, l’entretien et le nettoyage.
33) ATTENDEZ QUE LA MACHINE SOIT COMPLÈTEMENT ARRÊTÉE
Le moteur et les pièces mécaniques mobiles ainsi que la lame tournent encore pendant
quelques instants après que l’on a arrêté la machine. Lors de la phase d’arrêt, ces parties
ne doivent pas être touchées car il existe un réel danger de lésions graves !
34) N’ABANDONNEZ PAS LA MACHINE QUAND ELLE EST EN FONCTION
N’abandonnez pas la machine quand elle est en fonction et quand elle s’arrête, restez
jusqu’à l’arrêt total des parties en mouvement.
35) MAINTENEZ LE POSTE DE TRAVAIL PROPRE ET EN ORDRE
Le désordre et un nettoyage insuffisant peuvent entraîner des risques. Assurez-vous
qu’autour de la machine, il n’y a pas d’outils ou d’objets qui pourraient être endommagés. Ne
mettez pas des outils et des objets sur la machine qui pourraient tomber accidentellement.
Eliminez souvent de la machine et du sol tous les résidus de la coupe.
36) POUSSIÈRES DANGEREUSES POUR LA SANTÉ
ATTENTION ! Les poussières de certains types de bois sont très dangereuses pour la
santé. Portez des protections des voies respiratoires, aspirez les copeaux de la machine
et installez un ventilateur d’extraction dans le local pour le rechange de l’air.
37) LES RÉPARATIONS DOIVENT ÊTRE EFFECTUÉES PAR DU PERSONNEL AUTORISÉ
N’essayez pas de réparer la machine ou d’accéder à des composants internes, adressez-
vous toujours à des centres d’assistance agréés. L’exécution d’interventions de la part de
personnel non autorisé entraîne immédiatement la perte de la garantie et peut comporter
des risques. Conservez la preuve d’achat pour les éventuelles interventions en garantie.
38) DEMANDEZ ET FAITES INSTALLER UNIQUEMENT DES PIÈCES DE RECHANGE D’ORIGINE
Demandez et faites installer uniquement des pièces de rechange d’origine, adressez-vous
à votre revendeur. L’utilisation de pièces de rechange non d’origine entraîne la perte de la
garantie et peut comporter des risques.
39) RANGEZ LA MACHINE DANS UN ENDROIT SÛR
Quand vous n’utilisez pas la machine, rangez-la dans un endroit sec et hors de la portée des
enfants.
40) RISQUES RÉSIDUELS
ATTENTION ! Le respect scrupuleux de ces instructions et l’utilisation des équipements
de protection individuelle réduisent au minimum les risques d’accident, mais ne
peuvent pas les éliminer complètement.
41) RESPECTEZ TOUJOURS CES INSTRUCTIONS
Utilisez la machine uniquement de la façon décrite dans ces instructions. Ne l’utilisez pas
pour des utilisations auxquelles elle n’est pas destinée.
La page est en cours de chargement...
La page est en cours de chargement...
La page est en cours de chargement...
La page est en cours de chargement...
La page est en cours de chargement...
La page est en cours de chargement...
La page est en cours de chargement...
La page est en cours de chargement...
La page est en cours de chargement...
La page est en cours de chargement...
La page est en cours de chargement...
La page est en cours de chargement...
La page est en cours de chargement...
La page est en cours de chargement...
La page est en cours de chargement...
La page est en cours de chargement...
La page est en cours de chargement...
La page est en cours de chargement...
La page est en cours de chargement...
La page est en cours de chargement...
-
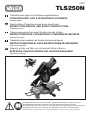 1
1
-
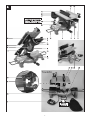 2
2
-
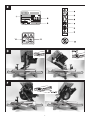 3
3
-
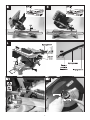 4
4
-
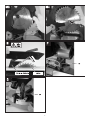 5
5
-
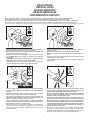 6
6
-
 7
7
-
 8
8
-
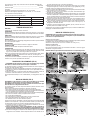 9
9
-
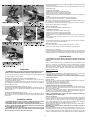 10
10
-
 11
11
-
 12
12
-
 13
13
-
 14
14
-
 15
15
-
 16
16
-
 17
17
-
 18
18
-
 19
19
-
 20
20
-
 21
21
-
 22
22
-
 23
23
-
 24
24
-
 25
25
-
 26
26
-
 27
27
-
 28
28
-
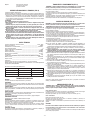 29
29
-
 30
30
-
 31
31
-
 32
32
-
 33
33
-
 34
34
-
 35
35
-
 36
36
-
 37
37
-
 38
38
-
 39
39
-
 40
40


dans d''autres langues
- italiano: Valex 1390218 Manuale del proprietario
- español: Valex 1390218 El manual del propietario
- slovenčina: Valex 1390218 Návod na obsluhu
Documents connexes
-
 Valex 1390216 Le manuel du propriétaire
-
 Valex 1432525 Le manuel du propriétaire
-
 Valex 1410219 Le manuel du propriétaire
-
 Valex 1390116 Le manuel du propriétaire
-
 Valex 1493911 Le manuel du propriétaire
-
 Valex 1494738 Le manuel du propriétaire
-
 Valex 1402063 Le manuel du propriétaire
-
 Valex 1421367 Le manuel du propriétaire


