Omcan 47045 Manuel utilisateur
- Catégorie
- Scelleuses sous vide
- Taper
- Manuel utilisateur

Vacuum Packaging Machine
Model VP-CN-5100
Item 47045
Instruction Manual
Revised - 11/18/2021
Toll Free: 1-800-465-0234
Fax: 905-607-0234
Email: [email protected]
www.omcan.com

2
Page
--------------------------------------------------------------------------- 3 - 4
--------------------------------------------------------------------------- 4 - 7
-------------------------------------------------------------------------- 7
--------------------------------------------------------------------------------------- 8 - 11
--------------------------------------------------------------------------------- 11 - 12
----------------------------------------------------------------------------- 12 - 13
---------------------------------------------------------------------------- 14 - 15
---------------------------------------------------------------------------- 16
------------------------------------------------------------------------------------------- 17 - 18
---------------------------------------------------------------------------- 19
Table of Contents
Section
General Information
Safety and Warranty
Technical Specications
Operation
Maintenance
Troubleshooting
Parts Breakdown
Electrical Schematics
Notes
Warranty Registration
Model VP-CN-5100

3
General Information
Omcan Manufacturing and Distributing Company Inc., Food Machinery of America, Inc. dba Omcan
and Omcan Inc. are not responsible for any harm or injury caused due to any person’s improper or
negligent use of this equipment. The product shall only be operated by someone over the age of 18, of
sound mind, and not under the inuence of any drugs or alcohol, who has been trained in the correct
operation of this machine, and is wearing authorized, proper safety clothing. Any modication to the
machine voids any warranty, and may cause harm to individuals using the machine or in the vicinity of
the machine while in operation.
CHECK PACKAGE UPON ARRIVAL
Upon receipt of an Omcan shipment please inspect for external damage. If no damage is evident on the
external packaging, open carton to ensure all ordered items are within the box, and there is no concealed
damage to the machine. If the package has suered rough handling, bumps or damage (visible or concealed),
please note it on the bill of lading before accepting the delivery and contact Omcan within 24 hours, so we may
initiate a claim with the carrier. A detailed report on the extent of the damage caused to the machine must be
lled out within three days, from the delivery date shown in the shipping documents. Omcan has no recourse
for damaged products that were shipped collect or third party.
Before operating any equipment, always read and familiarize yourself with all operation and safety
instructions.
Omcan would like to thank you for purchasing this machine. It’s of the utmost importance to save
these instructions for future reference. Also save the original box and packaging for shipping the
equipment if servicing or returning of the machine is required.
---------------------------------------------------------------------------------------------------------------------------------------------------
Omcan Fabrication et distribution Companie Limité et Food Machinery d’Amerique, dba Omcan et
Omcan Inc. ne sont pas responsables de tout dommage ou blessure causé du fait que toute personne
ait utilisé cet équipement de façon irrégulière. Le produit ne doit être exploité que par quelqu’un de
plus de 18 ans, saine d’esprit, et pas sous l’inuence d’une drogue ou d’acohol, qui a été formé pour
utiliser cette machine correctement, et est vêtu de vêtements de sécurité approprié. Toute modication
de la machine annule toute garantie, et peut causer un préjudice à des personnes utilisant la machine
ou des personnes à proximité de la machine pendant son fonctionnement.
VÉRIFIEZ LE COLIS DÈS RÉCEPTION
Dès réception d’une expédition d’Omcan veuillez inspecter pour dommages externes. Si aucun dommage
n’est visible sur l’emballage externe, ouvrez le carton an de s’assurer que tous les éléments commandés
sont dans la boîte, et il n’y a aucun dommage dissimulé à la machine. Si le colis n’a subi aucune mauvaises
manipulations, de bosses ou de dommages (visible ou cachée), notez-le sur le bond de livraison avant
d’accepter la livraison et contactez Omcan dans les 24 heures qui suivent, pour que nous puissions engager
une réclamation auprès du transporteur. Un rapport détaillé sur l’étendue des dommages causés à la machine
doit être rempli dans un délai de trois jours, à compter de la date de livraison indiquée dans les documents
d’expédition. Omcan n’a aucun droit de recours pour les produits endommagés qui ont été expédiées ou cueilli
par un tiers transporteur.

4
General Information
Avant d’utiliser n’importe quel équipement, toujours lire et vous familiariser avec toutes les opérations
et les consignes de sécurité.
Omcan voudrais vous remercier d’avoir choisi cette machine. Il est primordial de conserver ces
instructions pour une référence ultérieure. Également conservez la boîte originale et l’emballage pour
l’expédition de l’équipement si l’entretien ou le retour de la machine est nécessaire.
---------------------------------------------------------------------------------------------------------------------------------------------------
Omcan Empresa De Fabricacion Y Distribucion Inc. Y Maquinaria De Alimentos De America, Inc. dba
Omcan y Omcan Inc. no son responsables de ningun daño o perjuicío causado por cualquier persona
inadecuada o el uso descuidado de este equipo. El producto solo podra ser operado por una persona
mayor de 18 años, en su sano juicio y no bajo alguna inuencia de droga o alcohol, y que este ha sido
entrenado en el correcto funcionamiento de esta máquina, y ésta usando ropa apropiada y autorizada.
Cualquier modicación a la máquina anúla la garantía y puede causar daños a las personas usando la
máquina mientras esta en el funcionamiento.
REVISE EL PAQUETE A SU LLEGADA
Tras la recepcion de un envio Omcan favor inspeccionar daños externos. Si no hay daños evidentes en el
empaque exterior, Habra el carton para asegurararse que todos los articulos solicitados ésten dentro de la
caja y no encuentre daños ocultos en la máquina. Si el paquete ha sufrido un manejo de poco cuidado, golpes
o daños (visible o oculto) por favor anote en la factura antes de aceptar la entrega y contacte Omcan dentro
de las 24 horas, de modo que podamos iniciar una reclamación con la compañia. Un informe detallado sobre
los daños causados a la máquina debe ser llenado en el plazo de tres días, desde la fecha de entrega que se
muestra en los documentos de envío. Omcan no tiene ningun recurso por productos dañados que se enviaron
a recoger por terceros.
Antes de utilizar cualquier equipo, siempre lea y familiarizarse con todas las instrucciones de
funcionamiento y seguridad.
Omcan le gustaría darle las gracias por la compra de esta máquina. Es de la mayor importancia para
salvar estas instrucciones para futuras consultas. Además, guarda la caja original y el embalaje para el
envío del equipo si servicio técnico o devolución de la máquina que se requiere.
Safety and Warranty
IMPORTANT POINTS FOR YOUR SAFETY
Read and fully understand all instructions and warnings prior to using this machine. Your safety is
most important!
1. Read the instructions carefully.
2. Do not allow the appliance to be used as a toy.

5
Safety and Warranty
3. This appliance should not be operated by children.
4. Do not operate the appliance with a damaged power cord or plug.
5. Do not use the appliance on a wet or hot surface, or near a heat source.
6. Always use the appliance on a level surface.
7. Do not immerse any part of the appliance, power cord or plug into water or other liquid.
8. To disconnect, unplug the power cord from the electrical outlet. Do not disconnect by pulling on the cord.
Always unplug the appliance before cleaning and when not in use.
9. Do not operate the appliance if it malfunctions or is any way damaged. If the cord or the machine is
damaged, please return it to our after-sales department for proper service, replacement or repair.
10. Close supervision is required when this product is used near children.
11. The appliance is not for commercial use. If sealing more than 20 bags continuously, wait at least 25
minutes before resuming use of your appliance.
12. Keep the upper lid of the appliance unlocked when not in use.
This appliance is for HOUSEHOLD USE ONLY.
Do not attempt to service this product. Service should be performed by an authorized service representative.
A short power-supply cord is provided to reduce the risk resulting from becoming entangled in or tripping over
a longer cord. Extension cords are not prohibited from being used when care is exercised in their use. When
an extension cord is used the marked electrical rating of the extension cord shall be no less than the marked
electrical rating of the appliance. The longer cord shall be arranged so that it does not drape over the counter-
top or tabletop where it is capable of being tripped over, snagged, or pulled on unintentionally, especially by
children.
FOOD STORAGE & SAFETY
IMPORTANT: Vacuum packaging is NOT a substitute for refrigeration or freezing. Any perishable foods
that require refrigeration must still be refrigerated or frozen after vacuum packaging.
For best result in extending the life of foods, it is important to vacuum package foods that are fresh. Once food
has begun to deteriorate, vacuum packaging may only slow the deterioration process. Vacuum sealing cannot
prevent the growth of mold. Other disease causing microorganisms can still grow in low oxygen environments
and may require further measures to be eliminated.
FOOD PREPARATION HINTS AND TIPS FOR AIR-TIGHT VACUUM SEALING
Cooking, Thawing and Reheating – Simmering in a vacuum bag helps food retain its avor and it helps with the
clean up as well. No dirty saucepans. When reheating foods in the microwave using your vacuum bags, always
puncture open the bag to allow hot air to escape. You can also reheat foods in the vacuum bags by placing
them in water at a low simmer below 170°F (75°C).
IMPORTANT: Always thaw foods in either refrigerator or microwave – do not thaw perishable foods at
room temperature.

6
Safety and Warranty
PREPARATION HINTS FOR MEAT AND FISH
Try pre-freezing meats and sh for 1-2 hours before vacuum packaging. This helps retain the juice and shape,
and provides for a better seal. If you can’t, place a folded paper towel between the food and top of the bag,
but below seal area. Leave paper towel in bag to absorb excess moisture and juices during vacuum packaging
process.
PREPARATION HINTS FOR CHEESES
Vacuum package cheese after each use. If you make your bag just a little longer than needed, you can re-seal
the bag after each use.
IMPORTANT: Due to the risk of anaerobic bacteria, soft cheeses should never be vacuum packaged.
PREPARATION GUIDELINES FOR VEGETABLES
Blanching is a process that should be done before vacuum packaging vegetables. This process stops
the enzyme action that could lead to loss of avor, color and texture. To blanch vegetables, place them in
Simmering water or in a microwave until they are cooked, but still crisp. Blanching times can range from 1 to 2
minutes for leafy greens and peas; 3 to 4 minutes for snap peas, sliced zucchini or broccoli; give your carrots
about 5 minutes; and 7 to 11 minutes for corn on the cob. After blanching, immerse vegetables in cold water to
stop the cooking process.
NOTE: All vegetables (including broccoli, Brussels sprouts, cabbage, cauliower, kale, turnips)
naturally emit gases, during storage. Therefore, after blanching, it’s best if they’re stored in the freezer.
MORE ON VEGETABLES
Vegetables are a great candidate for portion control; when storing vegetables, try pre-freezing them for 1
to 2 hours, then separate them into meal portions within your vacuum bags. After they have been vacuum
packaged, return them to the freezer.
IMPORTANT: Due to the risk of anaerobic bacteria, fresh mushrooms, onions & garlic should never be
vacuum packaged.
PREPARATION HINTS FOR POWDERY FOODS
When vacuum packaging powdery items like our, it’s best to use their original packaging inside of the vacuum
bags. The ne powder could get sucked into the machine and cause enough damage to shorten the life of the
sealer.
PREPARATION HINTS FOR LIQUIDS
Before you vacuum package liquid such as soup stock, pre-freeze in a casserole dish, loaf pan or ice cube tray
until solid. Remove frozen liquid from pan and vacuum package in the vacuum bags. You can then stack in
the freezer. When you’re ready to use, just cut corner of bag and place in either a microwave dish or drop into
water at a low simmer, below 170°F (75°C).
RESIDENTIAL USERS: Vendor assumes no liability for parts or labor coverage for component failure
or other damages resulting from installation in non-commercial or residential applications. The right
is reserved to deny shipment for residential usage; if this occurs, you will be notied as soon as
possible.
1 YEAR PARTS AND LABOUR BENCH WARRANTY

7
Safety and Warranty
Technical Specications
Within the warranty period, contact Omcan Inc. at 1-800-465-0234 to schedule a drop o to either
an Omcan authorized service depot in the area, or to an Omcan Service warehouse to repair the
equipment.
Unauthorized maintenance will void the warranty. Warranty covers electrical and part failures, not
improper use.
Please see https://omcan.com/disclaimer for complete info.
WARNING:
The packaging components are classied as normal solid urban waste and can therefore be disposed of
without diculty.
In any case, for suitable recycling, we suggest disposing of the products separately (dierentiated
waste) according to the current norms.
DO NOT DISCARD ANY PACKAGING MATERIALS IN THE ENVIRONMENT!
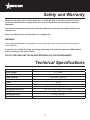
Model VP-CN-5100
Sealer Length 12” / 300mm
Sealer Width 0.1” / 3mm
Pump Capacity Two Pumps (14L/min)
Vacuum Pressure -0.6 to -0.8bar
Power 140 W
Electrical 110V-120V / 60Hz / 1
Dimensions 14.8” x 6.1” x 3.1” / 375 x 155 x 80mm
Packaging Dimensions 16.4” x 4.6” x 7.6” / 416 x 118 x 194mm
Weight 20.5 lbs. / 9.3 kgs.
Packaging Weight 21.6 lbs. / 9.8 kgs.
Item Number 47045

8
Operation
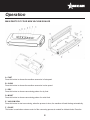
MAIN PARTS OF YOUR NEW VACUUM SEALER
A - FAST
Press this button to choose the machine vacuumize in fast speed.
B - SLOW
Press this button to choose the machine vacuumize in slow speed.
C - DRY
Press this button to choose vacuumizing pattern for dry food.
D - MOIST
Press this button to choose vacuumizing pattern for moist food.
E - VACUUM SEAL
Press this button to start vacuumizing, when the process is done, the machine will seal the bag automatically.
F - PULSE
This button is used when extreme control of the vacuuming process is needed for delicate foods. Press the

9
Operation
button and the pump turns on, release the button and it shuts o.
G - SEAL /CANCEL
Press to create a seal when making bags from bag roll.
Press twice immediately to stop the vacuum process and begin sealing the bag.
H - SILICON SEALING LINE
I - SEALING FOAM RING
J - LOCKS
Press left and right side locks to close or open the cover.
K - HEATING BAR COVERED BY MEGA TAPE
L - CANISTER FUNCTION
This function is used when the machine is connected to a vacuum canister.
M - MARINATE FUNCTION
This function is used when user wants to marinate food packed in vacuum canister.
N - ACCESSORY PORT
Allows vacuum packaging with Canisters and Accessories.
O - CUTTER GROOVE
P - BAG CUTTER
Q - WIRE BRACKET
R - SILICONE PAD
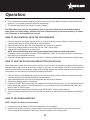
HOW TO MAKE CUSTOM SIZED BAGS
REMARK: When the sealer is used for the rst time, the double sealing line may not be well done, It is
recommended to wait 15 seconds for the machine to warm up before starting the rst vacuum packing.
This vacuum sealer is equipped with small bag cutter compatible with various vacuum sealing bags. Use the
removable cutter on the sealer to cut desired bag length from bag roll. Make sure to cut in a straight line. Plug
in power cord.
1. Open lid. Place one end of cut bag onto sealing strip, don’t worry if you accidently place any material onto
the gasket area.
2. Close lid by pressing down on both sides until two “click” sound heard.
3. Now that lid has been locked, press the “SEAL” button to create a custom sized bag. The indicator light
illuminates during the seal process.

10
Operation
4. Once completed the indicator light of seal button will turn o; press the lock buttons on both sides of the
machine, it is now safe to take out the newly created bag.
5. The custom sized bag is now ready for vacuum sealing.
CAUTION: Make sure you give the appliance time to cool down. Wait at least 20 seconds between
seals. Under very heavy usage, appliance will shut o automatically to prevent overheating. If it does,
wait 25 minutes to allow appliance to cool o.
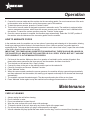
HOW TO VACUUM SEAL WITH THE VACUUM BAGS
1. Place the item(s) to be sealed into the pre-cut or custom sized bag. Leave at least 2 inches between the
contents and the top of the bag to allow for bag contraction.
2. Open lid and place the open end of the bag down into the vacuum chamber.
3. Close lid by pressing down on both sides until two “click” sound heard.
4. Choose low or high speed, dry or moist food.
NOTE: When vacuumizing moist food, please choose low speed and moist food pattern.
5. To begin the vacuum process, press the “VACUUM&SEAL” button. The unit will continue to vacuum and
then seal once air has been removed.
6. Once the indicator light has turned o, press the lock buttons on both sides of the machine to get the bag.
HOW TO USE THE PULSE VACUUM BUTTON (PULSE VAC)
Since the pressure under the normal vacuum function is set to be high, sometimes it is easy to destroy some
delicate items by high pressure in the vacuum bags. In this case, you can use the “PULSE” vacuum function to
control the vacuum time and pressure, and prevent crushing delicate items. When packing some juicy foods,
you can also use this function and prevent liquid being sucked out.
1. Place the item(s) to be sealed into the pre-cut or custom sized bag. Leave at least 2 inches between the
contents and the top of the bag to allow for bag contraction.
2. Open lid and place the open end of the bag down into the vacuum chamber.
3. Close lid by pressing down on both sides.
4. Press the “PULSE” button continually, till it reaches the pressure that you want. You can watch the vacuum
bag to decide the pressure. During this process, you can stop vacuum by stop pressing this button; and
press it again to vacuum again.
5. When the pressure reaches what it needs, press “SEAL ONLY” button to start sealing.
6. Once the indicator light has turned o, press the lock buttons on both sides of the machine to release the
bag.
HOW TO VACUUM CANISTERS
NOTE: Canister and hose are not included.
1. Connect the vacuum sealer to the mains and open the lid of machine.
2. Introduce the product you wish to vacuum pack in the canister. Place the lid on top of the canister and
close it using the side fasteners. Select the “Vacuum” position of the canister valve.

11
Operation
Maintenance
3. Connect the vacuum sealer and the canister via the connecting gasket. You must connect one of the ends
to the canister valve and the other end to the accessory port of the machine.
4. To start the vacuum process, press the “Canister” button.
5. This model of vacuum sealer is designed to operate in automatic mode. The machine is equipped with a
vacuum measurement sensor, which stops the vacuum process once the vacuum level is reached within
the canister. To cancel the vacuum process, press the “Canister” button again.
6. Once the vacuum process is complete, the machine stops automatically. Select the “CLOSE” position of
the canister valve and disconnect the connector gasket from the machine.
HOW TO MARINATE FOODS
In the marinate mode, the machine can run two cycles of vacuuming and releasing air to the canister, allowing
foods to get optimum pickle infusion in the least amount of time. Vacuum canister is a perfect partner to
marinating foods. The reason that foods can be marinated in such a short time is that, it opens the micro-holes
of the foods, allowing pickle infusion very quickly.
IMPORTANT TIPS: WHEN USING CANISTER FOR MARINATING, THERE SHOULD BE A KNOB ON
THE CANISTER LID. MAKE SURE THE CANISTER LID IS IN “OPEN” STATUS BUT NOT “VACUUM”
STATUS WHEN IT IS IN THE MARINATE PROCESS.
1. Put items in the canister. Make sure there is no powder or food debris on the canister lid gasket. Also
please allow some space after the items are put into the canister. And then close the lid.
2. Turn the knob on the canister lid to “Open” position.
3. Connect the hose to the port on the machine and the port on the canister lid.
4. Close lid of machine and choose “Marinate” function.
5. Press “Marinate” button.
6. When the vacuum sealer reaches the vacuum pressure, the machine will stop vacuumizing automatically
and then release air into the canister, this working cycle repeats continually for 30 minutes and then stops
automatically.
7. The machine vacuums the canister again. The above mentioned cycle will be run two times.
8. Press “Marinate” button again to stop the machine’s all working processes and turn o the sealer.
CARE & CLEANING
1. Always unplug the unit before cleaning.
2. Do not immerse in water.
3. Do not use abrasives to clean the unit.
4. Wipe the outer surface with a soft, damp cloth and soap.
5. To clean the inside of the unit, wipe away any food or liquid with a paper towel.
6. Dry all parts thoroughly before you plug in and operate the unit again.
7. Vacuum chamber may trap liquids that were drawn from the bag; it can be removed from the sealer, use

12
Maintenance
Troubleshooting
a mild dish washing soap and a warm, damp cloth to wipe away any left behind liquid from the vacuum
chamber. Dry thoroughly.
8. Keep the upper lid of the appliance unlocked when not in use.
NOTHING HAPPENS WHEN I PRESS THE “VACUUM” BUTTON:
• Make sure the power cord is correctly plugged into the electrical outlet.
• Make sure the power cord is not damaged in any way.
• Make sure the electrical outlet is operative by plugging in another appliance. If it’s not, please check the
circuit breakers or fuses in your home.
• Make sure you have turned on the power switch on the back of the machine.
• Make sure the bag is positioned correctly down in the vacuum chamber.
• Press down on both sides of the lid and make sure it is locked in place.
• Wait 25 minutes to allow appliance to cool o, and then try using again.
AIR IS NOT VACUUMED FROM THE BAG:
• Check that there are no gaps, folds, wrinkles or holes in the pre-sealed bags.
• Check for loose, worn or cracked Upper and Lower sealing gaskets.
• Foods with high liquid contents may prevent the bag from sealing properly. Cut bag open and wipe top
inside of bag and reseal.
• Check to see if bag is properly inserted into the vacuum chamber.
• Make sure you’ve placed the bag in the proper place. When making a bag from a roll, make sure end of cut
piece is on the sealing strip.
BAG MELTS:
• The sealing strip may have been too hot during the sealing process. Allow the unit to cool for 20 seconds
between uses. If the bag continues to melt, allow unit to cool with the lid in the upright position for 25
minutes before using.
AIR HAS SEEPED BACK INTO THE VACUUMED BAG:
• Check the seal of the bag. There may be a hole or wrinkle that is allowing air to reenter the bag. Carefully
cut the bag open and re-seal it, or use an entirely new bag.
• Make sure here is no moisture or liquid from the food present within the bag seal. You may need to cut
open the bag and re-seal it, or use an entirely new bag. Partially freeze foods with excess liquids, prior to
vacuum sealing.
• Make sure there are no food items with sharp edges that may have punctured the bag. If you nd a
puncture hole, seal the item in an entirely new bag.
• Make sure no liquids were drawn to the sealing strip area.
• Check for loose, worn or cracked Upper and Lower sealing gaskets.
• Moisture of foods with high liquid content will prevent the bag from sealing properly. Cut bag open and wipe
top inside of bag and reseal.

13
Troubleshooting
BAG WILL NOT SEAL:
• Check that there aren’t any gaps, folds, wrinkles or holes in pre-sealed edges.
• Moisture of foods with high liquid content will prevent the bag from sealing properly. Cut bag open and wipe
top inside of bag and reseal.
• Make sure you’ve placed the bag in the proper place. When making a bag from a roll, make sure end of cut
piece is on the sealing strip.
• Make sure you’ve given the appliance time to cool down. Wait 20 seconds between seals.

14
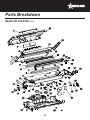
Parts Breakdown
Model VP-CN-5100 47045

15
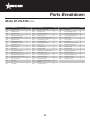
Parts Breakdown
Model VP-CN-5100 47045
Item No. Description Position Item No. Description Position Item No. Description Position
AI504 Control Panel for 47045 1 AI522 NTC Pressing Plate for 47045 19 AI540 Fan for 47045 37
AI505 #370 Motor for 47045 2 AI523 Main PCB for 47045 20 AI541 Release Button (Right) for 47045 38
AI506 Control PCB for 47045 3 AI524 Lower Enclosure for 47045 21 AI542 Release Button Holder (Right) for 47045 39
AI507 Upper Side Plate (Left) for 47045 4 AI525 Rubber Feet for 47045 22 AI543 Lower Side Plate (Right) for 47045 40
AI508 Foam Sealing Gasket for 47045 5 AI526 #370 Shockproof Foam Gasket for 47045 23 AI544 Washer for 47045 41
AI509 Heating Wire for 47045 6 AI527 Cutter Housing (Left) for 47045 24 AI545 Lock Slot for 47045 42
AI510 Heating Wire Spring for 47045 7 AI528 Cutter Holder for 47045 25 AI546 Latch for 47045 43
AI511 Foam Sealing Gasket for 47045 8 AI529 Cutter Housing (Right) for 47045 26 AI547 Silicone Pad for Heating Wire for 47045 44
AI512 Main Plastic Body for 47045 9 AI530 Blade for 47045 27 AI548 Heating Wire Groove for 47045 45
AI513 Microswitch for 47045 10 AI531 Key Spring for 47045 28 AI549 Mica Sheet for 47045 46
AI514 Hinge for 47045 11 AI532 Screw Plug for 47045 29 AI550 Teon Tape for 47045 47
AI515 Lower Side Plate (Left) for 47045 12 AI533 #370 Shockproof Foam Gasket for 47045 30 AI551 Silicone Sealing Strip for 47045 48
AI516 Release Button (Left) for 47045 13 AI534 Right Angle Joint for 47045 31 AI552 Silicone Groove for 47045 49
AI517 Release Button Holder (Left) for 47045 14 AI535 Constant Height Screw for 47045 32 AI553 Upper Side Plate (Right) for 47045 50
AI518 Release Button Holder (Left) for 47045 15 AI536 Three-Way Valve for 47045 33 AI554 Lid Inner Cover for 47045 51
AI519 Silicone Tube for 47045 16 AI537 Solenoid Valve for 47045 34 AI555 Lid Enclosure for 47045 52
AI520 NTC for 47045 17 AI538 Keys (Canister and Marinate Function)
for 47045 35
AI521 Fuse for 47045 18 AI539 Control PCB 2 for 47045 36

16
Electrical Schematics
Model VP-CN-5100 47045

17
Notes
________________________________________________________________________________________
________________________________________________________________________________________
________________________________________________________________________________________
________________________________________________________________________________________
________________________________________________________________________________________
________________________________________________________________________________________
________________________________________________________________________________________
________________________________________________________________________________________
________________________________________________________________________________________
________________________________________________________________________________________
________________________________________________________________________________________
________________________________________________________________________________________
________________________________________________________________________________________
________________________________________________________________________________________
________________________________________________________________________________________
________________________________________________________________________________________
________________________________________________________________________________________
________________________________________________________________________________________
________________________________________________________________________________________
________________________________________________________________________________________
________________________________________________________________________________________
________________________________________________________________________________________
________________________________________________________________________________________
________________________________________________________________________________________

18
Notes
________________________________________________________________________________________
________________________________________________________________________________________
________________________________________________________________________________________
________________________________________________________________________________________
________________________________________________________________________________________
________________________________________________________________________________________
________________________________________________________________________________________
________________________________________________________________________________________
________________________________________________________________________________________
________________________________________________________________________________________
________________________________________________________________________________________
________________________________________________________________________________________
________________________________________________________________________________________
________________________________________________________________________________________
________________________________________________________________________________________
________________________________________________________________________________________
________________________________________________________________________________________
________________________________________________________________________________________
________________________________________________________________________________________
________________________________________________________________________________________
________________________________________________________________________________________
________________________________________________________________________________________
________________________________________________________________________________________
________________________________________________________________________________________

19
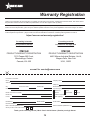
Warranty Registration
Gracias por comprar un producto Omcan usted. Para registrar su garantía para este producto, complete la información a continuación,
cortar la tarjeta en la perforación y luego enviarlo a la dirección indicada a continuación. También puede registrarse en línea en:
Merci d’avoir acheté un produit Omcan. Pour enregistrer votre garantie pour ce produit, complétez les informations ci-dessous, détachez la
carte au niveau de la perforation, puis l’envoyer à l’adresse spécié ci-dessous. Vous pouvez également vous inscrire en ligne en visitant:
Thank you for purchasing an Omcan product. To register your warranty for this product, complete the information below, tear o the card at
the perforation and then send to the address specied below. You can also register online by visiting:
OMCAN
PRODUCT WARRANTY REGISTRATION
3115 Pepper Mill Court,
Mississauga, Ontario
Canada, L5L 4X5
https://omcan.com/warranty-registration/
or email to: [email protected]
Purchaser’s Information
Name: Company Name:
Address:
Telephone:
City: Province or State: Postal or Zip: Email Address:
Country: Type of Company:
Restaurant Bakery Deli
Dealer from which Purchased: Butcher Supermarket Caterer
Dealer City: Dealer Province or State: Institution (specify):
Invoice: Other (specify):
Model Name: Model Number: Serial Number:
Machine Description:
Date of Purchase (MM/DD/YYYY): Date of Installation (MM/DD/YYYY):
Would you like to extend the warranty? Yes No
Por correo en Canadá
Pour postale au Canada
For mailing in Canada
Por correo en los EE.UU.
Pour diusion aux États-Unis
For mailing in the US
OMCAN
PRODUCT WARRANTY REGISTRATION
4450 Witmer Industrial Estates, Unit 4,
Niagara Falls, New York
USA, 14305
Thank you for choosing Omcan | Merci d’avoir choisi Omcan | Gracias por elegir Omcan

Since 1951 Omcan has grown to become a leading distributor of equipment and supplies to the North
American food service industry. Our success over these many years can be attributed to our commitment
to strengthen and develop new and existing relationships with our valued customers and manufacturers.
Today with partners in North America, Europe, Asia and South America, we continually work to improve
and grow the company. We strive to offer customers exceptional value through our qualied local sales
and service representatives who provide convenient access to over 6,500 globally sourced products.
Depuis 1951 Omcan a grandi pour devenir un des “leaders” de la distribution des équipements et
matériel pour l’industrie des services alimentaires en Amérique du Nord. Notre succès au cours de ces
nombreuses années peut être attribué à notre engagement à renforcer et à développer de nouvelles
et existantes relations avec nos clients et les fabricants de valeur. Aujourd’hui avec des partenaires en
Amérique du Nord, Europe, Asie et Amérique du Sud, nous travaillons continuellement à améliorer et
développer l’entreprise. Nous nous efforçons d’offrir à nos clients une valeur exceptionnelle grâce à
nos ventes locales qualiées et des représentants de service qui offrent un accès facile à plus de 6500
produits provenant du monde entier.
Desde 1951 Omcan ha crecido hasta convertirse en un líder en la distribución de equipos y suministros
de alimentos en América del Norte industria de servicios. Nuestro éxito en estos años se puede atribuir
a nuestro compromiso de fortalecer y desarrollar nuevas relaciones existentes con nuestros valiosos
clientes y fabricantes. Hoy con socios de América del Norte, Europa, Asia y América del Sur, que trabajan
continuamente para mejorar y crecer la empresa. Nos esforzamos por ofrecer a nuestros clientes valor
excepcional a través de nuestro local de ventas y representantes de los servicios que proporcionan un
fácil acceso a más de 6,500 productos con origen a nivel mundial.
-
 1
1
-
 2
2
-
 3
3
-
 4
4
-
 5
5
-
 6
6
-
 7
7
-
 8
8
-
 9
9
-
 10
10
-
 11
11
-
 12
12
-
 13
13
-
 14
14
-
 15
15
-
 16
16
-
 17
17
-
 18
18
-
 19
19
-
 20
20


Omcan 47045 Manuel utilisateur
- Catégorie
- Scelleuses sous vide
- Taper
- Manuel utilisateur
dans d''autres langues
- English: Omcan 47045 User manual
