C2G 89015 Mode d'emploi
- Catégorie
- Composants de commutateur réseau
- Taper
- Mode d'emploi
La page charge ...

1
Table of Contents
TABLE OF CONTENTS
Introduction ............................................................... 2
Features ................................................................... 3
System Requirements ............................................... 4
Package Contents..................................................... 5
Device Overview ....................................................... 6
Device Installation ..................................................... 7
Device Installation Diagrams ..................................... 9
Device Operation .................................................... 10
Technical Specifications .......................................... 12
Cables To Go One Year Warranty ........................... 13
Important Safety Information ................................... 14
TABLE DES MATIERES
Introduction .............................................................. 2
Fonctions ................................................................. 3
Configuration du système ......................................... 4
Contenu du pack ...................................................... 5
Vue générale du périphérique ................................... 6
Installation du périphérique ....................................... 7
Schémas d'installation du périphérique ..................... 9
Fonctionnement du périphérique............................. 10
Caractéristiques techniques .................................... 12
Garantie d'un an Cables To Go ............................... 13
Informations de sécurité importantes ...................... 14
INHOUDSOPGAVE
Inleiding .................................................................... 2
Onderdelen ............................................................... 3
Systeemvereisten ...................................................... 4
Inhoud verpakking ..................................................... 5
Overzicht apparaat .................................................... 6
Installatie apparaat .................................................... 7
Installatiediagrammen apparaat................................. 9
Bediening apparaat ................................................. 10
Technische specificaties.......................................... 12
Cables To Go 1 jaar garantie ................................... 13
Belangrijke veiligheidsinformatie .............................. 14
INHALTSVERZEICHNIS
Einführung ................................................................ 2
Merkmale .................................................................. 3
Systemanforderungen ............................................... 4
Packungsinhalt .......................................................... 5
Geräteübersicht......................................................... 6
Geräteinstallation ...................................................... 7
Geräteinstallationsdiagramme ................................... 9
Gerätebetrieb .......................................................... 10
Technische Daten ................................................... 12
Einjährige Garantie von Cables To Go..................... 13
Wichtige Sicherheitshinweise .................................. 14
ÍNDICE
Introduzione .............................................................. 2
Caratteristiche .......................................................... 3
Requisiti di Sistema .................................................. 4
Contenuto della confezione ....................................... 5
Panoramica del dispositivo........................................ 6
Installazione del dispositivo ....................................... 7
Schemi di installazione del dispositivo ....................... 9
Funzionamento del dispositivo ................................ 10
Specifiche tecniche ................................................. 12
Cables To Go One un anno di garanzia .................. 13
Importanti informazioni sulla sicurezza .................... 14
ÍNDICE
Introducción .............................................................. 2
Características ......................................................... 3
Requisitos del sistema .............................................. 4
Contenido del paquete .............................................. 5
Descripción general del dispositivo ........................... 6
Instalación del dispositivo ......................................... 7
Diagramas de instalación del dispositivo ................... 9
Funcionamiento del dispositivo ............................... 10
Especificaciones técnicas ....................................... 12
Un año de garantía Cables to Go ............................ 13
Información de seguridad importante ...................... 14

2
INTRODUCTION
Thank you for purchasing the Deluxe Component Video/Digital Audio 6 In / 2 Out Matrix Switch. This Matrix Switch allows you to connect up to six audio and video components to two
televisions or monitors. The 89015 allows you to route any of six source device’s outputs to either of two TV/Monitors You can also route the same output to two TV/Monitors. This switch
supports video resolutions (480i, 480p, 720p, 1080i, and 1080p) which meet the indispensable needs of high definition video/audio equipment. This matrix switch allows you to treat each
output as a separate “zone”. For example, Output 1 can be designated as the home theater zone, and Output 2 can be the master bedroom zone. This will allow you to, for example, play a
video game in the living room and at the same time, and watch a high-definition cable/satellite broadcast in the bedroom. We recommend that you read this manual thoroughly and retain
for future reference.
EINFÜHRUNG
Vielen Dank, dass Sie den Deluxe Component Video/Digital Audio Matrix-Switch mit 6 Eingängen und 2 Ausgängen gekauft haben. Mit diesem Matrix-Switch können Sie bis zu sechs Audio-
und Videogeräte an zwei Fernsehgeräte oder Monitore anschließen. Mit dem 89015 können Sie einen von sechs Ausgängen für Quellgeräte zu einem von zwei Fernsehgeräten/Monitoren
weiterleiten. Sie können außerdem denselben Ausgang an bis zu zwei Fernsehgeräte/Monitore weiterleiten. Dieser Switch unterstützt Videoauflösungen (480i, 480p, 720p, 1080i und 1080p),
die die Anforderungen hochauflösender Video-/Audiogeräte erfüllen. Mit diesem Matrix-Switch können Sie jeden Ausgang als getrennte „Zone“ behandeln. Zum Beispiel kann Ausgang 1 als
Heimkinozone und Ausgang 2 als Hauptschlafzimmerzone bestimmt werden. Damit können Sie zum Beispiel ein Videospiel im Wohnzimmer spielen und gleichzeitig hochauflösendes Kabel-
/Satellitenfernsehen im Schlafzimmer genießen. Bitte lesen Sie dieses Handbuch sorgfältig durch und bewahren Sie es zum zukünftigen Nachschlagen auf.
INTRODUCTION
Merci d’avoir acheté le commutateur de matrice 6 entrées/2 sorties de composant audio/vidéo Deluxe. Ce commutateur de matrice permet de connecter jusqu’à six composants vidéo et
audio sur deux téléviseurs ou moniteurs. Le produit référencé 89015 permet d’acheminer l'une des six sorties du dispositif source à l'un des deux téléviseurs/moniteurs. Vous pouvez aussi
acheminer la même sortie sur deux TV/moniteurs
.
Ce commutateur prend en charge les résolutions vidéo (480i, 480p, 720p, 1080i et 1080p) qui répondent aux besoins indispensables des
appareils vidéo/audio haute définition
.
Il permet de traiter chaque sortie en tant que « zone » indépendante
.
Par exemple, la sortie 1
peut être désignée comme la zone du dispositif de cinéma à
domicile et la sortie 2 peut être la zone de la chambre principale
.
Cela permettra, par exemple, de jouer à un jeu vidéo dans le salon et en même temps de regarder une émission haute
définition diffusée par satellite, ou par le câble, dans la chambre
.
Nous recommandons de lire attentivement ce manuel et de le conserver pour toute référence ultérieure.
INTRODUZIONE
Grazie per aver acquistato il matrix switch Deluxe per video componente/audio digitale a 6 ingressi/2 uscite. Questo Matrix Switch consente di collegare fino a sei componenti audio e video a
due televisori o monitor. Il modello 89015 consente di instradare una qualsiasi delle sei uscite per dispositivi sorgenti ai due televisori/monitor. Questo switch supporta diverse risoluzioni video
(480i, 480p, 720p, 1080i e 1080p) per soddisfare i requisiti fondamentali dei dispositivi video/audio al alta definizione. Il matrix switch consente di utilizzare ciascuna uscita come “zona”
separata. Ad esempio, l’uscita 1 può essere utilizzata come zona dedicata all’home theater e l’uscita 2 come zona dedicata alla camera da letto. Ciò consente, ad esempio, all’utente di
giocare a un videogioco in salotto e, contemporaneamente di guardare una trasmissione via cavo/satellitare ad alta definizione in camera da letto. Si consiglia di leggere il presente manuale
attentamente e di conservarlo per riferimento futuro.
INLEIDING
Hartelijk dank voor de aanschaf van de Deluxe Component Video/Digital Audio 6 In / 2 Out matrixschakelaar. Deze matrixschakelaar maakt het u mogelijk om maximaal zes audio- en
videocomponenten op twee televisietoestellen of beeldschermen aan te sluiten. De 89015 maakt het u mogelijk om al uw zes bronapparaat uitgangen te herrouteren naar een van de twee
televisietoestellen/beeldschermen. U kunt dezelfde uitvoer ook naar twee televisietoestellen/beeldschermen routeren. Deze schakelaar ondersteunt videoresoluties (480i, 480p, 720p, 1080i
en 1080p) die voldoen aan de onmisbare benodigdheden voor hoge definitie video-/audioapparatuur. Deze matrixschakelaar maakt het u mogelijk iedere uitgang als een aparte "zone" te
behandelen. Output 1 kan bijvoorbeeld worden toegewezen aan de zone hometheater, en output 2 kan in de slaapkamerzone zijn. Dit maakt het u bijvoorbeeld mogelijk om een videospelletje
in de woonkamer te spelen en tegelijkertijd een hoge definitie kabel/satellietuitzending in de slaapkamer te kijken. We raden u aan deze handleiding goed door te lezen en te bewaren voor
gebruik in de toekomst.
INTRODUCCIÓN
Gracias por haber adquirido el conmutador de matriz de audio digital/vídeo por componentes con 6 entradas/2 salidas primero en su clase. Este conmutador de matriz le permite conectar
hasta seis componentes de vídeo y audio a dos televisores o monitores. El modelo 89015 le permite dirigir cualquiera de las salidas de los seis dispositivos de partida hacia cualquiera de los
dos televisores/monitores. También puede dirigir la misma salida hacia ambos televisores/monitores. Este conmutador es compatible con las resoluciones de vídeo (480i, 480p, 720p, 1080i y
1080p) que cumplen las necesidades indispensables de los equipos de vídeo/audio de alta definición. Este conmutador de matriz le permite tratar cada salida como una “zona” separada. Por
ejemplo, la salida 1 puede considerarse la zona del cine en casa y la salida 2, la zona del dormitorio principal. De este modo, podrá, por ejemplo, reproducir un videojuego en el salón y, a la
vez, ver un programa de televisión por cable/satélite de alta definición en el dormitorio. Le recomendamos que lea este manual detalladamente y lo conserve para futuras consultas.
INTRODUCTION

3
FEATURES
FEATURES
Two Component Video/ TOSLINK Outputs
Component Video Inputs
TOSLINK Optical Inputs
Standard Stereo RCA Connectors
Easy Selection Illuminating Push-Buttons
Slim Line Remote Control
FONCTIONS
Deux sorties de composant vidéo/TOSLINK
Entrées de composant vidéo
Entrées optiques TOSLINK
Connecteurs RCA stéréo standards
Boutons poussoirs lumineux faciles à sélectionner
Télécommande peu encombrante
FUNZIONI
Due uscite video componente/TOSLINK
Ingressi video componente
Ingressi ottici TOSLINK
Connettori RCA stereo standard
Pulsanti a illuminazione di facile selezione
Telecomando Slim Line
KENMERKEN
Twee componentvideo/TOSLINK uitgangen
Componentvideo ingangen
TOSLINK optische ingangen
Standaard stereo RCA-connectoren
Verlichte druktoetsen voor gemakkelijk kiezen
Slim Line afstandsbediening
CARACTERÍSTICAS
Dos salidas de TOSLINK/vídeo por componentes
Entradas de vídeo por componentes
Entradas ópticas TOSLINK
Conectores RCA estéreo estándar
Botones que se iluminan y permiten una fácil
selección
Mando a distancia compacto
MERKMALE
Zwei Component Video-/TOSLINK-Ausgänge
Component Video-Eingänge
Optische TOSLINK-Eingänge
Standard-Stereo-RCA-Stecker
Einfache Auswahl über beleuchtete Drucktasten
Flache Fernbedienung

4
System Requirements
SYSTEM REQUIREMENTS
Audio/video devices with component video (Y, Pb,
Pr) output
Displays with component video (Y, Pb, Pr) inputs
REQUISITOS DEL SISTEMA
Dispositivos de audio/vídeo con salida de vídeo
por componentes (Y, Pb, Pr)
Pantallas con entradas de vídeo por componentes
(Y, Pb, Pr)
SYSTEEMVEREISTEN
Audio-/videoapparaten met videocomponent (Y, Pb,
Pr) uitgang
Display met videocomponent (Y, Pb, Pr) ingangen
REQUISITI DI SISTEMA
Dispositivi audio/video con uscita video
componente (Y, Pb, Pr)
Display con ingressi video componente (Y, Pb, Pr)
SYSTEMANFORDERUNGEN
Audio-/Videogeräte mit Component Video-Ausgang
(Y, Pb, Pr)
Anzeigegeräte mit Component Video-Eingängen (Y,
Pb, Pr)
CONFIGURATION DU SYSTEME
Périphérique audio/vidéo avec sortie de
composant vidéo (Y, Pb, Pr)
Affichage avec entrées de composant vidéo (Y,
Pb, Pr)

5
STEP 1
PACKAGE CONTENTS
PACKAGE CONTENTS
6 x 2 component matrix switch
Rack mount ears and hardware
Universal (UK-EU) Power Adapter
PACKUNGSINHALT
6 x 2 Component-Matrix-Switch
Rackmount Ears und Hardware
Universal-Netzadapter (UK-EU)
CONTENIDO DEL PAQUETE
Conmutador de matriz de componentes 6x2
Altavoces y hardware de montaje en estante
Adaptador de corriente universal (RU-UE)
INHOUD VERPAKKING
6 x 2 component matrixschakelaar
Klemmen voor rekbevestiging en hardware
Universele (GB-EU) Stroomadapter
CONTENUTO DELLA CONFEZIONE
Matrix switch per 6 x 2 componenti
Alette per montaggio in rack e hardware
Adattatore di alimentazione (UK-EU) Universal
CONTENU DU PACK
Commutateur de matrice de composant 6 x 2
Matériel et châssis de montage
Adaptateur universel (RU-UE)
La page charge ...

7
GERÄTEINSTALLATION
Hinweis: Verwenden Sie ein Component Video-Kabel mit
RCA-Steckern (nicht im Lieferumfang enthalten) für alle
Component Video-Anschlüsse. Um optimale Leistung zu
erhalten, sollten Sie hochwertige Audio-/Videokabel
verwenden. Verwenden Sie keine Audiokabel zur
Übertragung von Videosignalen.
Hinweis: Die farbcodierten Buchsen des Switch
erleichtern den Anschluss von Geräten. Grüne – blaue –
rote Buchsen (mit Y, Pb und Pr gekennzeichnet) werden
für Component Video verwendet, rote Buchsen sind für
den rechten Audiokanal und weiße Buchsen für den
linken Audiokanal.
Schritt 1
Schalten Sie alle Komponenten aus, die an diesen Switch
angeschlossen werden sollen.
Schritt 2
Entfernen Sie den Plastikstopfen, der die optische
TOSLINK-Buchse des Switch vor Staub schützen soll.
Bewahren Sie den Plastikstopfen für den späteren
Gebrauch auf.
Schritt 3
Entfernen Sie die Schutzkappe von der TOSLINK-
Verkabelung (nicht im Lieferumfang enthalten).
Schritt 4
Schließen Sie die Component Video-Ausgänge der
Geräte (DVD-Player, HD-Kabel/-Satellit,
Videospielkonsole usw.) an die Component Video-
Eingänge des Matrix-Switch an.
Schritt 5
Schließen Sie die Audioausgänge der Geräte an die
entsprechenden Eingänge des Matrix Switch an
(TOSLINK an TOSLINK , RCA an RCA, RCA an 3,5 mm
oder 3,5 mm an 3,5 mm).
Schritt 6
Schließen Sie die Component Video-Ausgänge am
Matrix-Switch an den Eingang der gewünschten
Anzeigegeräte an.
Schritt 7
Schließen Sie die Audio-Ausgänge des Matrix-Switch an
die entsprechenden Eingänge des Anzeigegeräts an
(TOSLINK an TOSLINK , RCA an RCA).
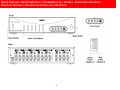
Note
: Use a component video cable with RCA plugs (not
supplied) for all component video connections. For
optimal performance, use high-quality audio video cables.
Do not use audio cables for transmission of video signals.
Note: The switch’s color-coded jacks make it simple to
connect devices to the switch. Green – blue – red jacks
(marked as Y, Pb and Pr) are used for component video,
red jacks are for right channel audio and white jacks for
left channel audio.
Step 1
Power down all components that will be connected to this
switch.
Step 2
Remove the plastic plug that protects the switch’s optical
TOSLINK jack from dust. Keep plastic plug for future use.
Step 3
Remove the protective cap from TOSLINK cabling (not
supplied)
Step 4
Connect device component video outputs (DVD player,
HD cable/satellite, video game console, etc.) to the
component video inputs of the matrix switch.
Step 5
Connect device audio outputs to corresponding inputs of
the Matrix switch (TOSLINK to TOSLINK, RCA to RCA,
RCA to 3.5mm or 3.5mm to 3.5mm)
Step 6
Connect component video outputs on the matrix switch to
the input of desired displays.
Step 7
Connect matrix switch audio outputs to corresponding
inputs of the display (TOSLINK to TOSLINK, RCA to
RCA)
INSTALLATION DU PERIPHERIQUE
Remarque : utiliser un câble de composant vidéo avec
prises RCA (non fourni) pour toutes les connexions de
composant vidéo. Pour des performances optimales,
utiliser des câbles audio/vidéo de qualité supérieure. Ne
pas utiliser de câble audio pour la transmission de
signaux vidéo.
Remarque : les prises jack à code couleur du commutateur
facilitent la connexion des périphériques. Les prises verte,
bleue et rouge (marquées Y, Pr et Pb) sont utilisées pour le
composant vidéo, les prises rouges pour le canal audio droit,
et les prises blanches pour le canal audio gauche.
Étape 1
Éteindre tous les composants qui seront connectés à ce
commutateur.
Étape 2
Retirer la prise plastique qui protège les prises optiques
TOSLINK du commutateur de la poussière. Garder la
prise plastique pour une utilisation future.
Étape 3
Retirer le capuchon de protection du câblage TOSLINK
(non fourni).
Étape 4
Connecter les sorties de composant vidéo du
périphérique (lecteur DVD, câble/satellite HD, console de
jeux vidéo, etc.) aux entrées de composant vidéo du
commutateur de matrice.
Étape 5
Connecter les sorties audio du dispositif aux entrées
correspondantes du commutateur de matrice (TOSLINK à
TOSLINK, RCA à RCA, RCA à 3,5 mm, 3,5 mm à 3,5 mm)
Étape 6
Connecter les sorties de composant vidéo sur le
commutateur de matrice aux entrées des écrans
souhaités.
Étape 7
Connecter les sorties audio du commutateur de matrice
aux entrées correspondantes de l’écran (TOSLINK à
TOSLINK, RCA à RCA).
DEVICE INSTALLATION
La page charge ...
La page charge ...

10
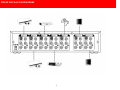
DEVICE OPERATION
Operating the
switch from the IR remote control
Step 1
Press POWER ON to turn on the switch.
Step 2
Press 1 - 6 on either the green or red panels to route your
preferred playback device to output 1 or 2.
(Green panel represents output 1. Red panel represents
output 2. )
Operating the switch from the front panel
Step 1
Press POWER button to turn on the switch
Step 2
Press MODE button to select output mode first.
- If the MODE switch is illuminated green,
Input 1-6 selected in the next step will be routed to Output 1.
- If the MODE switch is illuminated red,
Input 1-6 selected in the next step will be routed to Output 2.
- If the MODE switch is illuminated orange,
Input 1-6 selected in the next step will be routed to Output 1
and Output 2 at the same time.
Step 3
Press one or two of the Input 1-6 buttons on the front panel
(according to what front or rear inputs are being used by a
device) to route the materials from selected playback device
to desired output chosen in the last step.
Example – You would like to route your DVD player
connected to Input 3 over to Output 1. Press the MODE button
until it is illuminated green, then press 3 on the front panel.
The LED of Input 3 on the front panel will be illuminated
green.
GERÄTEBETRIEB
Betrieb des Switch mit der IR-Fernbedienung
Schritt 1
Drücken Sie POWER ON, um die switch einzuschalten.
Schritt 2
Drücken Sie 1 - 6 auf dem grünen oder roten Bedienfeld,
um Ihr bevorzugtes Wiedergabegerät zu Ausgang 1 oder
2 weiterzuleiten.
(Das grüne Bedienfeld repräsentiert Ausgang 1. Das rote
Bedienfeld repräsentiert Ausgang 2. )
Betrieb des Switch über das Bedienfeld an der
Vorderseite
Schritt 1
Drücken Sie die POWER-Taste, um den Switch
einzuschalten.
Schritt 2
Drücken Sie die MODE-Taste, um zuerst den
Ausgabemodus auszuwählen.
- Wenn die MODE-Taste grün leuchtet:
Der im nächsten Schritt ausgewählte Eingang 1 - 6 wird zu
Ausgang 1 weitergeleitet.
- Wenn die MODE-Taste rot leuchtet:
Der im nächsten Schritt ausgewählte Eingang 1 - 6 wird zu
Ausgang 2 weitergeleitet.
- Wenn die MODE-Taste orange leuchtet:
Der im nächsten Schritt ausgewählte Eingang 1 - 6 wird
gleichzeitig zu Ausgang 1 und Ausgang 2 weitergeleitet.
Schritt 3
Drücken Sie eine oder zwei der Tasten für Eingang 1 - 6 an
der Vorderseite (je nachdem, welche vorderen oder hinteren
Eingänge von einem Gerät verwendet werden), um die
Materialien vom ausgewählten Wiedergabegerät zum
gewünschten Ausgang weiterzuleiten, der im letzten Schritt
ausgewählt wurde.
Beispiel: Sie möchten Ihren DVD-Player, der an Eingang 3
angeschlossen ist, zu Ausgang 1 weiterleiten. Drücken Sie die
MODE-Taste, bis sie grün leuchtet, und drücken Sie dann 3
auf der Vorderseite. Die LED von Eingang 3 an der
Vorderseite leuchtet grün.
F
ONCTIONNEMENT DU PERIPHERIQUE
Utilisation du commutateur avec la télécommande IR
Étape 1
Appuyer sur POWER ON pour allumer du commutateur.
Étape 2
Appuyer sur 1 à 6 sur les panneaux vert ou rouge pour
acheminer votre appareil de lecture aux sorties 1 ou 2
(le
panneau vert représente la sortie 1. Le panneau rouge
représente la sortie 2).
Utilisation du commutateur par le panneau avant
Étape 1
Appuyer sur POWER pour allumer le commutateur.
Étape 2
Appuyer sur la touche MODE pour sélectionner le mode
de sortie d'abord.
-Si le MODE du commutateur est vert : les entrées
sélectionnées à l’étape suivante seront acheminées vers la
sortie 1.
- Si le MODE du commutateur est rouge : les entrées
sélectionnées à l’étape suivante seront acheminées vers la
sortie 2.
- Si le MODE du commutateur est orange : les entrées 1 à 6
sélectionnées à l’étape suivante, seront acheminées vers les
sorties 1 et 2 en même temps.
Étape 3
Appuyer une ou deux fois sur les touches d’entrées 1 à 6 du
panneau avant (en fonction des entrées avant ou arrière
utilisées par le dispositif) pour acheminer les signaux de
l’appareil de lecture sélectionné à la sortie désirée,
sélectionnée à l'étape précédente.
Exemple : pour acheminer votre lecteur de DVD de l’entrée 3
à la sortie 1, appuyer sur la touche MODE jusqu’à ce qu’elle
devienne verte, puis appuyer sur 3 sur le panneau avant. La
DEL de l’entrée 3 du panneau avant devient verte.
La page charge ...
La page charge ...

13
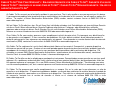
At Cables To Go, we want you to be totally confident in your purchase. That is why we offer a one year warranty on this device.
If you experience problems due to workmanship or material defect for the duration of this warranty, we will repair or replace this
device. To request a Return Merchandise Authorisation (RMA) number, contact customer service at 0800 328 2916 or
www.cablestogo.co.uk
Wir bei Cables To Go möchten, dass Sie mit Ihrem Kauf vollständig zufrieden sind. Deshalb bieten wir eine einjährige Garantie
auf dieses Gerät. Wenn während dieser Garantie Probleme aufgrund eines Fertigungs- oder Materialfehlers auftreten,
reparieren oder ersetzen wir dieses Gerät. Wenden Sie sich zum Anfordern einer Return Merchandise Authorization (RMA)-
Nummer an unseren Kundenservice unter 0800 328 2916 oder www.cablestogo.co.uk.
Chez Cables To Go, nous voulons que vous soyez complètement satisfait de votre achat. C'est pourquoi vous bénéficiez d'un
an de garantie sur cet appareil. Si vous rencontrez des problèmes liés à des défauts matériels ou de fabrication pendant la
durée de cette garantie, nous réparerons ou remplacerons cet appareil. Pour demander un numéro d'autorisation de retour de
marchandise (ARM), contactez le service client au 0800.328.2916 ou www.cablestogo.co.uk.
Alla Cables To Go, vogliamo che i nostri clienti abbiano totale fiducia nei loro acquisti. Ecco perché, su questo dispositivo
offriamo una garanzia di un anno. Qualora nel corso del periodo coperto da garanzia dovessero verificarsi problemi legati alla
manodopera o ai materiali utilizzati, sarà nostra cura occuparci della riparazione o della sostituzione del dispositivo. Per
richiedere un numero RMA (Return Merchandise Authorization / autorizzazione alla restituzione della merce), contattare il
Servizio Clienti al numero 0800 328 2916 o visitare il sito www.cablestogo.co.uk.
Bij Cables To Go willen we dat u volledig op uw aankoop kunt vertrouwen. Daarom bieden we een garantie van een jaar op dit
apparaat. Als u problemen ondervindt door slecht vakmanschap of een materieel defect tijdens de garantieperiode, zullen we
het apparaat repareren of vervangen. Als u een RMA-nummer (Return Merchandise Authorization - Toestemming voor retour
van consumentenproducten) wilt, kunt u contact opnemen met klantenservice op 0800 328 2916 of via www.cablestogo.co.uk.
En Cables To Go queremos que confíe completamente en su compra. Esa es la razón por la que ofrecemos un año de
garantía en este dispositivo. Si experimenta problemas debidos a mano de obra o defectos de material durante el periodo de
validez de esta garantía, repararemos o sustituiremos este dispositivo. Para solicitar un número de autorización de devolución
de mercancía, contacte con el servicio de atención al cliente en el número de teléfono 0800 328 2916 o visite
www.cablestogo.co.uk
CABLES TO GO
®
ONE YEAR WARRANTY / EINJÄHRIGE GARANTIE VON CABLES TO GO
®
/ GARANTIE D'UN AN DE
CABLES TO GO
®
/ GARANZIA DI UN ANNO CABLES TO GO
®
/ CABLES TO GO
®
EÉNJAARSGARANTIE / UN AÑO DE
GARANTÍA CABLES TO GO
®

14
Cables To Go
3555 Kettering Blvd.
Moraine, OH 45439
1-800-506-9607
www.cablestogo.com
! Do not plug the unit in any outlet that does not have enough current to allow the device to function. Refer to the
specifications in this manual for power level of the unit.
IMPORTANT SAFETY INFORMATION
IMPORTANT SAFETY INFORMATION
Do not plug the unit in any outlet that does not have enough
current to allow the device to function. Refer to the specifications
in this manual for power level of the unit.
Liquid: If this unit or its corresponding power adapter has had
liquid spilled on or in it, do not attempt to use the unit. Do not
attempt to use this product in an outdoor environment as
elements such as rain, snow, hail, etc. can damage the product.
In case of a storm, it is recommended that you unplug this device
from the outlet.
Avoid placing this product next to objects that produce heat such
as portable heaters, space heaters, or heating ducts.
THERE ARE NO USER SERVICEABLE PARTS. Do not attempt
to open this product and expose the internal circuitry. If you feel
that the product is defective, unplug the unit and refer to the
warranty information section of this manual.
WICHTIGE SICHERHEITSHINWEISE
Schließen Sie das Gerät nicht an eine Steckdose an, die nicht
genug Strom für das Gerät liefert. Die entsprechenden Daten für
das Gerät finden Sie in diesem Handbuch.
Flüssigkeit: Wenn auf dieses Gerät oder den dazugehörigen
Netzadapter Flüssigkeiten geschüttet wurden, darf es/er nicht
verwendet werden. Verwenden Sie dieses Produkt nicht im
Freien, da Regen, Schnee, Hagel usw. das Produkt beschädigen
können. Ziehen Sie bei einem Gewitter den Netzstecker des
Geräts.
Stellen Sie dieses Produkt nicht in der Nähe von Gegenständen
auf, die Hitze erzeugen, zum Beispiel tragbare Heizgeräte,
Heizöfen oder Heizungsleitungen.
ES BEFINDEN SICH KEINE VOM BENUTZER
REPARIERBAREN TEILE IM GERÄT. Versuchen Sie nicht, das
Produkt zu öffnen und den internen Schaltkreis freizulegen. Wenn
das Produkt defekt ist, ziehen Sie den Netzstecker und sehen Sie
im Abschnitt mit den Garantieinformationen in diesem Handbuch
nach.
INFORMATIONS DE SECURITE IMPORTANTES
Pour permettre à l'appareil de fonctionner, ne branchez pas l'unité sur
une prise ne délivrant pas assez de courant. Reportez-vous aux
spécifications de ce manuel pour connaître le niveau d'alimentation de
l'unité.
Liquide : Si du liquide s'est répandu sur ou à l'intérieur de cette unité
ou son adaptateur d'alimentation correspondant, n'essayez pas
d'utiliser cette unité. N'essayez pas d'utiliser ce produit dans un
environnement extérieur car des éléments tels que la pluie, la neige,
la grêle, etc. peuvent endommager ce produit.
En cas de tempête, il est recommandé de débrancher cet appareil de
la source de courant.
Évitez de placer ce produit près d'objets produisant de la chaleur
comme les appareils de chauffage portables ou non et les conduits de
chauffage
AUCUNE PIÈCE NE NÉCESSITE D'ÊTRE ENTRETENUE PAR
L'UTILISATEUR. N'essayez pas d'ouvrir ce produit et d'exposer sa
circuiterie interne. Si vous pensez que ce produit présente des
défauts, débranchez l'unité et reportez-vous à la section de ce guide
comportant des informations de garantie.
INFORMATIONS DE SÉCURITÉ IMPORTANTES
Non collegare l'unità a prese che non dispongono di un quantitativo di
corrente sufficiente a garantire il corretto funzionamento del
dispositivo. Consultare le specifiche tecniche presenti in questo
manuale per maggiori informazioni relative al livello energetico del
dispositivo.
Liquidi: Se l'unità o il relativo alimentatore entrano in contatto con dei
liquidi, non cercare di utilizzare il dispositivo. Non cercare di utilizzare
il prodotto in presenza di pioggia, neve, grandine, ecc. Il dispositivo si
potrebbe danneggiare.
In caso di temporale si consiglia di scollegare il dispositivo dalla presa
di corrente.
Evitare di posizionare il dispositivo nelle vicinanze di oggetti che
producono calore come ad esempio stufette portatili, convettori termici
o condotti di riscaldamento.
IL DISPOSITIVO NON CONTIENE PARTI CHE POSSONO ESSERE
RIPARATE DALL’UTENTE. Non cercare di aprire il prodotto fino a
scoprire i circuiti interni. Se si ritiene che il prodotto sia difettoso,
scollegare l'unità e consultare la sezione informativa sulla garanzia
all'interno del presente manuale.
BELANGRIJKE VEILIGHEIDSINFORMATIE
Sluit de unit niet aan op een stopcontact dat niet genoeg spanning
levert om het apparaat te laten functioneren. Raadpleeg de
specificaties in deze handleiding voor het spanningsniveau van de
unit.
Vloeistof:Als op of in deze unit of de bijbehorende stroomadapter
vloeistof is gemorst, moet de unit niet gebruiken.
Gebruik dit product niet buitenshuis aangezien regen, sneeuw, hagel
enz. schade aan het product kunnen toebrengen.
Bij onweer is het aan te bevelen dit product van de stroom af te halen.
Plaats dit product niet bij voorwerpen die hitte afgeven zoals
radiatoren, verwarmingselementen of verwarmingsbuizen.
ER ZIJN GEEN ONDERDELEN DIE DE GEBRUIKER ZELF KAN
HERSTELLEN. Dit product niet te openen en het interne circuit niet
blootstellen. Als u meent dat het product defect is, koppel de unit dan
af en raadpleeg het gedeelte in deze handleiding over de garantie-
informatie.
INFORMACIÓN DE SEGURIDAD IMPORTANTE
No conecte la unidad en una salida que no disponga de suficiente
corriente como para permitir que el dispositivo funcione. Consulte en
este manual las especificaciones sobre nivel de potencia de la
unidad.
Líquidos: Si se han derramado líquidos sobre la unidad, en la unidad
o en su correspondiente adaptador de potencia, no intente utilizar la
unidad. No intente utilizar este producto en el exterior, ya que
elementos como la lluvia, la nieve, el granizo, etc. pueden dañar el
producto.
En caso de tormenta, se recomienda que desconecte este dispositivo
del enchufe.
Evite situar este producto cerca de objetos que produzcan calor,
como calefacciones portátiles, calefactores o conductos de
calefacción.
NO HAY PIEZAS QUE PUEDA REPARAR EL PROPIO USUARIO.
No intente abrir este producto y exponer la circuitería interna. Si cree
que el producto presenta algún defecto, desconecte la unidad y
consulte la sección de garantía de este manual.
Important Safety Information

15
For more information on this product or to check for updated drivers,
manuals or frequently asked questions please visit our website.
Weitere Informationen über dieses Produkt und aktualisierte Treiber,
Handbücher und häufig gestellte Fragen finden Sie auf unserer Website.
Pour plus d'informations concernant ce produit ou pour rechercher des pilotes actualisés,
des manuels ou des questions souvent posées, veuillez visiter notre site web.
Per ulteriori informazioni su questo prodotto oppure per verificare la presenza di aggiornamenti di driver
e manuali o per consultare le domande frequenti, visitare il nostro sito web.
Ga voor meer informatie over dit product of over bijgewerkte stuurprogramma’s,
handleidingen of veel gestelde vragen naar onze website.
Para obtener más información sobre este producto o para comprobar controladores actualizados,
manuales o preguntas frecuentes, visite nuestro sitio web.
www.cablestogo.co.uk
VER. 2.1.07.01.10
-
 1
1
-
 2
2
-
 3
3
-
 4
4
-
 5
5
-
 6
6
-
 7
7
-
 8
8
-
 9
9
-
 10
10
-
 11
11
-
 12
12
-
 13
13
-
 14
14
-
 15
15
-
 16
16


C2G 89015 Mode d'emploi
- Catégorie
- Composants de commutateur réseau
- Taper
- Mode d'emploi
dans d''autres langues
- italiano: C2G 89015 Guida utente
- English: C2G 89015 User guide
- español: C2G 89015 Guía del usuario
- Deutsch: C2G 89015 Benutzerhandbuch
- Nederlands: C2G 89015 Gebruikershandleiding
Documents connexes
Autres documents
-
Wentronic Ultra HDMI Matrix 2x4 Manuel utilisateur
-
Tripp Lite B300-9X2-4K Le manuel du propriétaire
-
Sonos ZP90 Le manuel du propriétaire
-
NOXON Noxon M 740 Le manuel du propriétaire
-
Sonos ZonePlayer ZP80 Manuel utilisateur
-
Naim DAC Manuel utilisateur
-
Lindy 6x2 HDMI 10.2G Matrix Switch Manuel utilisateur