
SCF291
SCF293


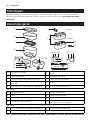
Introduction
Congratulations on your purchase and welcome to Philips! To fully benet from the
support that Philips oers, register your product at www.philips.com/welcome.
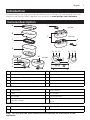
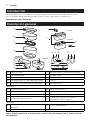
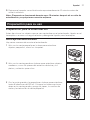
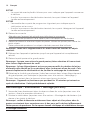
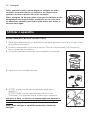
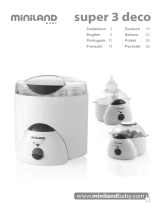
General description
A I
J
B
C
D
M
G
H
F
E
K
L
SCF293
SCF291
S UTN PO
Q
R
SCF291
SCF291
SCF293
SCF293
130ml
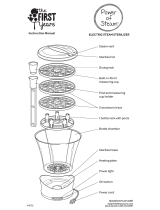
A
Lid with grip
F
Heating element with water reservoir
B
Small basket
G
Base unit
C
Bottom plate for large basket
H
Power cord
D
Large basket with drip tray
I
Tongs
E
Maximum water level indicator
J
Cord storage
SCF293
K
Filter cover
O
Auto mode
L
Filter
P
Dry mode
M
Air outlet
Q
On/o button
N
Sterilize mode
R
Control knob with progress indicator
lights
SCF291
S
On/o indicator light
U
Power o button
T
Power on button
Note: You can nd the type number of your sterilizer on the bottom of the
appliance.
3
English

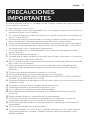
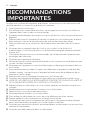
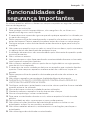
IMPORTANT
SAFEGUARDS
When using electrical appliances, basic safety precautions should always be followed
including the following:
1 Read all instructions.
2 To protect against electrical shock do not immerse cord, plugs or appliance in
water or other liquid.
3 Close supervision is necessary when any appliance is used by or near children.
4 Always unplug from outlet when not in use and before cleaning. Allow to cool
before putting on or taking o parts.
5 Always unplug the cord of the sterilizer before pouring away water and/or rinsing.
6 Do not operate any appliance with a damaged cord or plug or after the appliance
malfunctions or has been damaged in any manner.
7 The use of accessory attachments not recommended by the appliance
manufacturer may cause injuries.
8 Do not use outdoors.
9 Do not let cord hang over edge of table or counter, or touch hot surfaces.
10 Do not place on or near a hot gas or electric burner, or in a heated oven.
11 Extreme caution must be used when moving an appliance containing hot liquids.
Always let the appliance cool down before moving, cleaning or storing it.
12 Always unplug the appliance when not in use.
13 Do not use appliance for other than intended use.
14 WHEN IN USE, THE STERILIZER CONTAINS BOILING WATER AND STEAM ESCAPES
FROM THE VENT IN THE LID.
15 Ensure the sterilizer is placed on a rm level surface when in use.
16 Never move or open the unit when in use.
17 Always keep out of reach of children.
18 Never place items on top of the sterilizer.
19 To stop the sterilizer during the cycle, unplug at the electrical outlet.
20 Take care when opening as steam can burn.
21 Do not use chemical sterilizing solutions/tablets or bleach in your steam sterilizer
or on products to be sterilized.
22 Do not use abrasive, antibacterial materials or scourers to clean the sterilizer.
23 Do not use softened water in the sterilizer.
24 A short power cord has been provided to prevent the risk of it becoming entangled
in or being tripped over. Extension cords may be used if care is exercised in their
use.
25 If an extension cord is used, its electrical rating must be as great as the rating of
the appliance and it must not be draped over the edge of the table top where it
could be pulled by children or tripped over. The extension cord should be a
grounded type 3 wire cord.
26 Failure to follow de-scaling instructions may cause irreparable damage.
27 There are no serviceable parts inside the sterilizer. Do not attempt to open, service
or repair the sterilizer yourself.
4
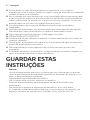
English

28 Do not touch hot surfaces. Use handles or knobs.
29 HOUSEHOLD USE ONLY.
30 Check if the voltage that is indicated on the appliance corresponds to the local
voltage before you connect the appliance.
31 Never turn on the sterilizer before lling water into the water reservoir in Sterilize
and Auto mode.
32 Do not sterilize very small parts which can fall through the holes of the containers
33 Using homeopathic additives in water can have negative impact on steam, health
and can damage plastic parts.
SAVE THESE
INSTRUCTIONS
Caution
- Never use any accessories or parts from other manufacturers or Philips which are
not specically recommended. If you use such accessories or parts, your warranty
becomes invalid.
- Use distilled water without any additives.
- Do not put bleach or other chemicals in the appliance.
- Only sterilize baby feeding products that have been approved for sterilization.
- Do not expose the appliance to extreme heat or direct sunlight.
- Environmental conditions can inuence the function of the appliance e.g.
temperature, air pressure, local altitudes (sea level), etc.
5
English

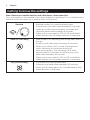
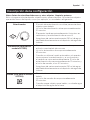
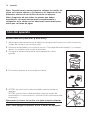
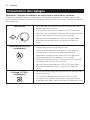
Getting to know the settings
Note: Before you sterilize bottles and other items, clean them rst.
Only place items in the sterilizer which are suitable for sterilizing. Do not sterilize items
that are lled with liquid, e.g. a teether with cooling uid.
Sterilize • Sterilize mode is for sterilizing baby items.
• A sterilizing cycle takes approximately 10 minutes.
• Heating up takes approximately 4 minutes and
sterilizing takes approximately 6 minutes.
• Make sure to pour exactly 130 ml/4.5 oz distilled
water directly into the water reservoir of the base .
/
Auto (SCF293 only)
• Auto mode is for sterilizing and drying baby items in
one go.
• An auto cycle takes approximately 40 minutes.
• When you use the “Auto” mode, the appliance
starts sterilizing rst and then drying will
start automatically. The sterilizing cycle takes
approximately 10 minutes, and the drying cycle
takes approximately 30 minutes.
• Make sure to pour exactly 130 ml/4.5 oz distilled
water directly into the water reservoir of the base .
Dry (SCF293 only)
• Dry mode is for drying baby items.
• A drying cycle takes approximately 30 minutes.
• When you dry baby items, do not add water to the
water reservoir of the base.
6
English

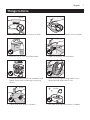
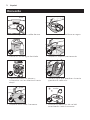
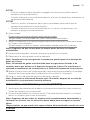
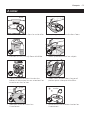
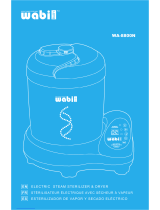
Things to Note
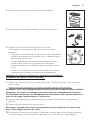
SCF293
• Don’t pour water into the air outlet.
• Don’t immerse the base unit in water.
130ml
4.5oz
Distilled
water
• Use 130 ml/4.5 oz distilled water.
• Clean the items beforehand.
• Disassemble all parts completely and
place them with openings pointing
down.
• Pour out the remaining water from
large basket after each use.
SCF293
• Clean the lter every 4 weeks.
Every
4 weeks
• Descale the sterilizer every 4 weeks.
7
English

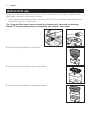
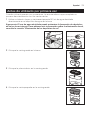
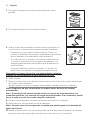
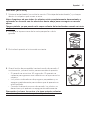
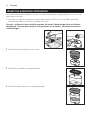
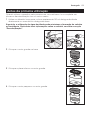
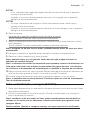
Before rst use
When you use the appliance for the rst time, we advise you to let it complete one
sterilization process with empty baskets.
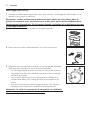
1 Use a clean baby bottle and pour exactly 130 ml/4.5 oz distilled water directly into
the water reservoir of the base.
Tip: Using distilled water can minimize the formation of limescale on heating
element. For more information on limescale, see section “Descaling”.
130ml
130ml
130ml/4.5oz
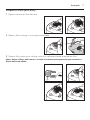
2 Place the large basket on the base.
3 Place the bottom plate in the large basket.
4 Place the small basket on the large basket.
8
English

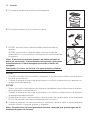
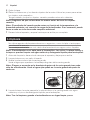
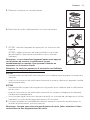
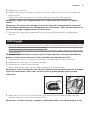
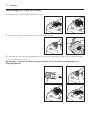
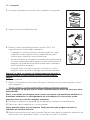
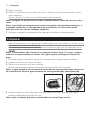
5 Place the lid on top of the small basket.
6 Put the plug in the wall socket.
7 SCF291: Press the power on button to switch on the
appliance.
SCF293: Turn the on/o button to “Sterilize” mode. Then
press it to switch on the appliance.
Note: If you plug in the appliance after you have pressed
the power on button, the sterilizer starts working
immediately. You can switch it o by pressing the power o
button.
Caution: The base, the baskets and the lid become hot
during or shortly after operation.
SCF291
SCF293
2
1
SCF291
• The on/o indicator light lights up to indicate that the appliance starts sterilizing.
• When the sterilization process is nished, the light goes o and the appliance
switches o automatically.
SCF293
• All of the progress indicator lights ash to show the appliance is sterilizing.
• When the sterilization process is nished, the lights go o and the appliance
switches o automatically.
• You can turn the on/o button to “Dry” mode to dry the appliance. It takes
approximately 30 minutes to complete the drying cycle.
8 After the appliance has cooled down completely, remove the lid, the small basket,
the bottom plate, the large basket and wipe them dry.
Note: When you remove the large basket from the base, be aware of the remaining
water on the base drip tray.
9 Let the appliance cool down completely for approximately 10 minutes before you
use it again.
Note: The appliance does not work for 10 minutes after a sterilizing cycle. It needs
to cool down rst.
9
English

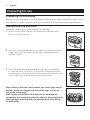
Preparing for use
Preparing for sterilizing
Before you put the items to be sterilized in the sterilizer, clean them thoroughly in the
dishwasher or clean them by hand with hot water and liquid dishwashing detergent.
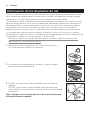
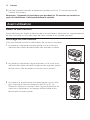
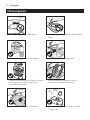
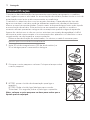
Assembling the sterilizer
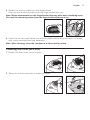
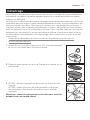
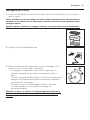
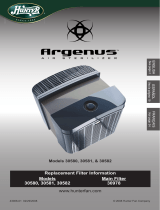
There are several ways to assemble the sterilizer.
1 With only the small basket on the base to sterilize small
items such as soothers.
2 With only the large basket on the base to sterilize medium-
sized items such as breast pump parts, toddler plates or
toddler cutlery.
3 With the large basket and the small basket on the base
to sterilize up to six 330ml/ 11oz bottles. Place the bottles
upside down in the large basket and place the bottle dome
caps, screw rings and nipples in the small basket.
Note: When you ll the small basket, put screw rings on the
bottom, place the nipples and the bottle caps loosely on
top of the screw rings.
Note: Make sure all parts that need to be sterilized are
completely disassembled and place them in the basket with
their openings pointing down to prevent them from lling
up with water.
10
English

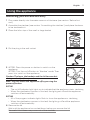
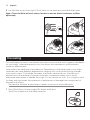
Using the appliance
Sterilizing (SCF291 and SCF293)
1 Pour water directly into the water reservoir of the base (see section “Before rst
use”).
2 Assemble the sterilizer (see section “Assembling the sterilizer”) and place the items
to be sterilized in it.
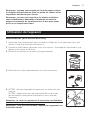
3 Place the lid on top of the small or large basket.
4 Put the plug in the wall socket.
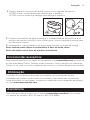
5 SCF291: Press the power on button to switch on the
appliance.
SCF293: Turn the on/o button to “Sterilize” mode. Then
press it to switch on the appliance.
Caution: The base, the baskets and the lid become hot
during or shortly after operation.
Note: You can switch the appliance o by pressing the
power o button.
SCF291
SCF293
2
1
SCF291
• The on/o indicator light lights up to indicate that the appliance starts sterilizing.
• When the sterilization process is nished, the light goes o and the appliance
switches o automatically.
SCF293
• All of the progress indicator lights ash to show the appliance is sterilizing.
• When the sterilization process is nished, the lights go o and the appliance
switches o automatically.
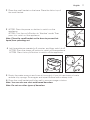
6 Remove the lid.
Wait until the appliance has cooled down before you remove the lid.
Be careful. Hot steam may come out of the sterilizer.
11
English

7 Remove the bottles and other items from the basket. Use the tongs to remove the
smaller items.
Be careful. The sterilized items may still be hot.
Note: Make sure you wash your hands thoroughly before you touch the sterilized
items.
8 Unplug the appliance and wait until the appliance has cooled down completely.
9 Remove the small basket and large basket.
Note: When you remove the large basket, be aware of the remaining water on the
base drip tray.
Note: The drip tray is designed to catch milk or food residue and prevent it from
going into the water reservoir of the base. This is to optimize the sterilizing
performance and make the heating element easy to clean.
10 Detach the bottom plate from the large basket. Pour out any remaining water from
the large basket drip tray and clean it (see section “Cleaning”).
11 Pour out any remaining water from the water reservoir and wipe it dry.
Note: The appliance does not work for 10 minutes after a sterilizing cycle. It needs
to cool down rst.
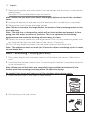
Auto – Sterilizing + Drying (SCF293)
1 Pour water directly into the water reservoir of the base (see section “Before rst
use”).
2 Assemble the sterilizer (see section “Assembling the sterilizer”) and place the items
to be sterilized in it.
Note: Make sure all the items are completely disassembled and placed in the
basket with their openings pointing down for eective drying.
Be careful. Hot steam will come out of the sterilizer when drying starts.
3 Place the lid on top of the small or large basket.
4 Put the plug in the wall socket.
12
English

5 Turn the on/o button to “Auto” mode. Then press it to
switch on the appliance.
• The appliance starts sterilizing rst. All of the progress
indicator lights ash to show the appliance is sterilizing.
• After that, drying will start automatically. The progress
indicator lights ash and go o gradually to show the
appliance is drying.
• When the whole process is nished, the lights go o and
the appliance switches o automatically.
Caution: The base, the baskets and the lid become hot
during or shortly after operation.
2
1
6 Remove the lid.
7 Remove the bottles and other items from the basket. Use the tongs to remove the
smaller items.
Be careful. The sterilized items may still be hot.
Note: Make sure you wash your hands thoroughly before you touch the sterilized
items.
Note: The drying result may vary depending on the ambient temperature, ambient
humidity and loading of sterilizer. You can run one more complete drying cycle if
necessary.
8 Unplug the appliance and wait until the appliance has cooled down completely.
9 Remove the small basket and large basket.
Note: When you remove the large basket, be aware of the remaining water on the
base drip tray.
10 Detach the bottom plate from the large basket. Pour out any remaining water from
the large basket drip tray and clean it (see section “Cleaning”)
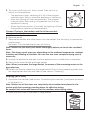
Drying (SCF293)
1 Assemble the sterilizer (see section “Assembling the sterilizer”) and place the items
to be dried in it.
Note: Make sure all the items are completely disassembled and placed in the
basket with their openings pointing down for eective drying.
Be careful. Hot steam will come out of the sterilizer when drying starts.
2 Place the lid on top of the small or large basket.
13
English

3 Put the plug in the wall socket.
4 Turn the on/o button to “Dry” mode. Then press it to
switch on the appliance.
• Drying will start after about 30 seconds. The appliance
warms up to produce warm air to dry items.
• The progress indicator lights ash and go o gradually to
show the appliance is drying.
• When the drying process is nished, the lights go o and
the appliance switches o automatically.
Caution: The base, the baskets and the lid become hot
during or shortly after operation.
2
1
5 Remove the lid.
6 Remove the bottles and other items from the basket. Use the tongs to remove the
smaller items.
Be careful. The dried items may still be hot.
Note: Make sure you wash your hands thoroughly before you touch the dried
items.
Note: The drying result may vary depending on the ambient temperature, ambient
humidity and loading of sterilizer. You can run one more complete drying cycle if
necessary.
7 Unplug the appliance and wait until the appliance has cooled down completely.
Cleaning
Do not use abrasive or aggressive cleaning agents (e.g. bleach) or a scouring pad to
clean this appliance.
Never immerse the base and the power cord in water or any other liquid.
Note: The sterilizer is not dishwasher-proof. The baskets, the bottom plate and the
lid can be cleaned with hot water and liquid dishwashing detergent.
1 Always unplug the appliance and let it cool down before you clean it.
2 Clean the base with a moist cloth.
14
English

3 Detach the bottom plate from the large basket.
Pour out any remaining water from the large basket drip tray.
Note: Water accumulates on the large basket drip tray after each sterilizing cycle.
Pour out the remaining water from the large basket after each use.
4 Clean the lid, the small basket, the bottom plate and the large basket in hot water
with some liquid dishwashing detergent.
Note: After cleaning, store the sterilizer in a clean and dry place.
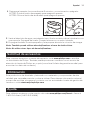
Cleaning the lter (SCF293)
1 Detach the lter cover from the base.
2 Take out the lter and clean it under tap water.
15
English

3 Let the lter air dry thoroughly. Put it back on the base and close the lter cover.
Note: Clean the lter at least every 4 weeks to ensure that it continues to lter
eectively.
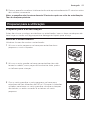
Descaling
The sterilization process is extremely important to ensure the most hygienic standards
for your baby. Limescale deposits can slow down the sterilization cycle and even
impair its eectiveness.
Limescale is the hard and chalky deposit. Depending on the water type in your area,
limescale can have dierent appearances ranging from snow white looking powder
to brownish stains. The harder the water, the faster scale builds up. It builds up in
appliances as the residue of minerals naturally contained in water, which fail to
evaporate when water is heated. Although it is not harmful as such, it is unsightly, hard
to clean and can impair the operation of appliances or damage their components if
allowed to build up.
Descale the sterilizer at least every 4 weeks to ensure it works eciently.
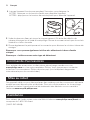
1 Pour 90ml/3oz of white vinegar (5% acetic acid) and
30ml/1oz of water into the water reservoir.
16
English

2 Place the small basket on the base. Place the lid on top of
the small basket.
3 SCF291: Press the power on button to switch on the
appliance.
SCF293: Turn the on/o button to “Sterilize” mode. Then
press it to switch on the appliance.
Note: Place the small basket on the base to prevent hot
liquid from splashing out.
SCF291
SCF293
2
1
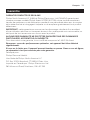
4 Let the appliance operate for 5 minutes, and then switch it o.
SCF291: Press the power o button to switch o the appliance.
SCF293: Press the on/o button to switch o the appliance.
5 min
SCF291
SCF293
5 Empty the water reservoir and rinse it thoroughly. If you still see traces of scale,
remove it by sponge. Rinse again and wipe the base with a damp cloth.
6 Rinse the small basket and lid as well to remove vinegar solution.
Note: You can also use citric acid based descalers.
Note: Do not use other types of descalers.
17
English

Ordering accessories
To buy accessories or spare parts, visit www.philips.com or go to your Philips dealer.
You can also contact the Philips Consumer Care Center in your country (see the
worldwide guarantee leaet for contact details).
Disposal
Your product is designed and manufactured with high quality materials and
components, which can be recycled and reused. For recycling information, please
contact your local waste management facilities or visit www.recycle.philips.com.
Assistance
For assistance visit our website: www.philips.com/Avent or call 1-800-54-Avent
(1-800-542-8368).
Warranty
FULL TWO-YEAR WARRANTY
Philips North America LLC (USA) and Philips Electronics Ltd (CANADA) warrant each
new Philips Avent product, model SCF291, SCF293, against defects in materials or
workmanship for a period of two years from the date of purchase, and agree to repair
or replace any defective product without charge.
IMPORTANT: This warranty does not cover damage resulting from accident, misuse or
abuse, lack of reasonable care, or the axing of any attachment not provided with the
product.
NO RESPONSIBILITY IS ASSUMED FOR ANY SPECIAL, INCIDENTAL OR
CONSEQUENTIAL DAMAGES.
In order to obtain warranty service, simply call 1-800-54 Avent.
Note: This appliance needs to be descaled regularly for optimal performance.
If you do not do this, the appliance may eventually stop working. In this case,
repair is NOT covered by your warranty.
Manufactured for:
Philips Personal Health
A division of Philips North America LLC
P.O. Box 10313, Stamford, CT 06904, USA
In Canada imported by: Philips Electronics Ltd
281 Hillmount Road, Markham, ON L6C 2S3
18
English

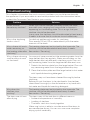
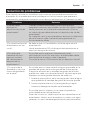
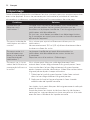
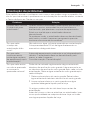
Troubleshooting
This chapter summarizes the most common problems you could encounter with
the appliance. If you are unable to resolve the problem with the information below,
contact the Consumer Care Center in your country.
Problem Solution
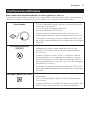
When should I
descale my sterilizer?
When you use the sterilizer, you may notice that there
are small spots ranging from snow white to brownish
appearing on the heating plate. This is a sign that your
sterilizer should be descaled.
In any case, the sterilizer should be descaled at least every
4 weeks to ensure that it continues to work eectively.
Why is the sterilizing
time so short?
You did not add enough water for sterilizing.
Pour exactly 130 ml/4.5 oz water directly into the water
reservoir of the base.
Why is there still much
water remaining on
the heating plate after
sterilizing?
The heating plate may be blocked by the limescale. The
sterilizer should be descaled at least every 4 weeks.
See section “Descaling”.
Why is there a burning
smell and burnt mark
on the base?
You may not have poured out the remaining water from the
large basket drip tray regularly. Water accumulates on the
large basket drip tray after each sterilizing cycle. Pour out
any remaining water from the large basket after each use.
1 Detach the bottom plate from the large basket. Pour out
any remaining water from the large basket drip tray.
2 Clean the bottom plate and the large basket in hot water
with liquid dishwashing detergent.
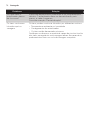
The items may not have been cleaned thoroughly before
sterilizing.
Before you put the items to be sterilized in the sterilizer,
clean them thoroughly in the dishwasher or by hand with
hot water and liquid dishwashing detergent.
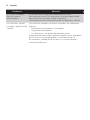
Why does the
sterilizer stop
working?
The heating plate may be blocked by the limescale. The
sterilizer should be descaled at least every 4 weeks.
See section “Descaling”.
The items are still wet
after drying.
The items may still be wet due to dierent reasons:
• Ambient temperature or humidity
• Loading of sterilizer
• The items stack too closely together
Make sure hot air is able to circulate around the items to
ensure eective drying. You can run one more complete
drying cycle if necessary.
19
English

Introducción
Enhorabuena por su adquisición y bienvenido a Philips Para poder beneciarse
por completo de la asistencia que ofrece Philips, registre el producto en
www.philips.com/welcome.
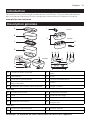
Descripción general
A I
J
B
C
D
M
G
H
F
E
K
L
SCF293
SCF291
S UTN PO
Q
R
SCF291
SCF291
SCF293
SCF293
130ml
A
Tapa con asa
F
Resistencia con depósito de agua
B
Cesta pequeña
G
Unidad base
C
Placa inferior para la cesta grande
H
Cable de alimentación
D
Cesta grande con bandeja de goteo
I
Pinzas
E
Indicador de nivel máximo de agua
J
Recogecable
SCF293
K
Cubierta del ltro
O
Modo automático
L
Filtro
P
Modo de secado
M
Salida de aire
Q
Botón de encendido
N
Modo de esterilización
R
Rueda de control con pilotos
indicadores de progreso
SCF291
S
Piloto indicador de encendido y
apagado
U
Botón de apagado
T
Botón de encendido
Nota: Puede encontrar el número de modelo del esterilizador en la parte inferior
del aparato.
20
Español
La page est en cours de chargement...
La page est en cours de chargement...
La page est en cours de chargement...
La page est en cours de chargement...
La page est en cours de chargement...
La page est en cours de chargement...
La page est en cours de chargement...
La page est en cours de chargement...
La page est en cours de chargement...
La page est en cours de chargement...
La page est en cours de chargement...
La page est en cours de chargement...
La page est en cours de chargement...
La page est en cours de chargement...
La page est en cours de chargement...
La page est en cours de chargement...
La page est en cours de chargement...
La page est en cours de chargement...
La page est en cours de chargement...
La page est en cours de chargement...
La page est en cours de chargement...
La page est en cours de chargement...
La page est en cours de chargement...
La page est en cours de chargement...
La page est en cours de chargement...
La page est en cours de chargement...
La page est en cours de chargement...
La page est en cours de chargement...
La page est en cours de chargement...
La page est en cours de chargement...
La page est en cours de chargement...
La page est en cours de chargement...
La page est en cours de chargement...
La page est en cours de chargement...
La page est en cours de chargement...
La page est en cours de chargement...
La page est en cours de chargement...
La page est en cours de chargement...
La page est en cours de chargement...
La page est en cours de chargement...
La page est en cours de chargement...
La page est en cours de chargement...
La page est en cours de chargement...
La page est en cours de chargement...
La page est en cours de chargement...
La page est en cours de chargement...
La page est en cours de chargement...
La page est en cours de chargement...
La page est en cours de chargement...
La page est en cours de chargement...
La page est en cours de chargement...
La page est en cours de chargement...
La page est en cours de chargement...
La page est en cours de chargement...
La page est en cours de chargement...
La page est en cours de chargement...
La page est en cours de chargement...
-
 1
1
-
 2
2
-
 3
3
-
 4
4
-
 5
5
-
 6
6
-
 7
7
-
 8
8
-
 9
9
-
 10
10
-
 11
11
-
 12
12
-
 13
13
-
 14
14
-
 15
15
-
 16
16
-
 17
17
-
 18
18
-
 19
19
-
 20
20
-
 21
21
-
 22
22
-
 23
23
-
 24
24
-
 25
25
-
 26
26
-
 27
27
-
 28
28
-
 29
29
-
 30
30
-
 31
31
-
 32
32
-
 33
33
-
 34
34
-
 35
35
-
 36
36
-
 37
37
-
 38
38
-
 39
39
-
 40
40
-
 41
41
-
 42
42
-
 43
43
-
 44
44
-
 45
45
-
 46
46
-
 47
47
-
 48
48
-
 49
49
-
 50
50
-
 51
51
-
 52
52
-
 53
53
-
 54
54
-
 55
55
-
 56
56
-
 57
57
-
 58
58
-
 59
59
-
 60
60
-
 61
61
-
 62
62
-
 63
63
-
 64
64
-
 65
65
-
 66
66
-
 67
67
-
 68
68
-
 69
69
-
 70
70
-
 71
71
-
 72
72
-
 73
73
-
 74
74
-
 75
75
-
 76
76
-
 77
77


Philips SCF291/00 Manuel utilisateur
- Taper
- Manuel utilisateur
- Ce manuel convient également à
dans d''autres langues
- English: Philips SCF291/00 User manual
- español: Philips SCF291/00 Manual de usuario
- português: Philips SCF291/00 Manual do usuário
Documents connexes
Autres documents
-
 Avent SCF291/00 Manuel utilisateur
-
 The First Years Y4572 Manuel utilisateur
-
 Miniland super 6 Manuel utilisateur
-
 Avent SCF291/00 Product Datasheet
-
 Miniland Baby super 3 deco Manuel utilisateur
-
Munchkin Steam Microwave Sterilizer Manuel utilisateur
-
 Wabi Baby WA-8800N Manuel utilisateur
-
 Hunter Fan 43006-01 Manuel utilisateur
-
 Philips AVENT SCF288/05 Manuel utilisateur
-
Avent SCF288/05 Manuel utilisateur


