LIVARNO LUX 14120905L Assembly, Operating And Safety Instructions
- Catégorie
- Accessoires de préparation de café
- Taper
- Assembly, Operating And Safety Instructions

LED DESK LAMP
IAN 283329
LED-TISCHLEUCHTE
Montage-, Bedienungs- und Sicherheitshinweise
LED DESK LAMP
Assembly, operating and safety instructions
LAMPE DE TABLE À LED
Instructions de montage, d‘utilisation et
consignes de sécurité
LED-TAFELLAMP
Montage-, bedienings- en veiligheidsinstructies

GB / IE / NI Assembly, operating and safety instructions Page 5
FR / BE Instructions de montage, d‘utilisation et consignes de sécurité Page 11
NL / BE Montage-, bedienings- en veiligheidsinstructies Pagina 17
DE / AT / CH Montage-, Bedienungs- und Sicherheitshinweise Seite 23
Before reading, unfold both pages containing illustrations and familiarise yourself with all functions of the
device.
Avant de lire le mode d‘emploi, ouvrez les deux pages contenant les illustrations et familiarisez-vous ensuite
avec toutes les fonctions de l‘appareil.
Vouw vóór het lezen de beide pagina‘s met de afbeeldingen open en maak u vertrouwd met alle functies
van het apparaat.
Klappen Sie vor dem Lesen die beiden Seiten mit den Abbildungen aus und machen Sie sich anschließend
mit allen Funktionen des Gerätes vertraut.

14120806L / 14121009L
2
45
1
3

14120905L
1
45
6
3
7
8

5 GB/IE/NI
List of pictograms used ........................................................................................................ Page 6
Introduction ................................................................................................................................... Page 6
Proper use ............................................................................................................................................Page 6
Included items .....................................................................................................................................Page 6
Parts Description ..................................................................................................................................Page 6
Technical Data ....................................................................................................................................Page 7
Safety .................................................................................................................................................Page 7
Safety advice .......................................................................................................................................Page 7
Initial use .........................................................................................................................................Page 8
Assembling the light ............................................................................................................................Page 8
Switching the light on / off ..................................................................................................................Page 8
Adjusting the lamp ..............................................................................................................................Page 8
Changing the bulb ..............................................................................................................................Page 8
Care and cleaning .................................................................................................................... Page 8
Disposal ............................................................................................................................................Page 9
Warranty and Service .......................................................................................................... Page 9
Warranty .............................................................................................................................................Page 9
Service address ................................................................................................................................... Page 9
Declaration of Conformity ..................................................................................................................Page 9
Manufacturer .......................................................................................................................................Page 9
Table of contents

6 GB/IE/NI
Introduction / SafetyIntroduction
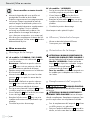
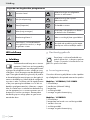
List of pictograms used
Read the instructions!
Observe the warnings and safety
notices!
Volt (AC) Warning! Risk of electric shock!
Hertz (mains frequency) For your safety
Watt (effective power)
This light is not suitable for dimmer
or electronic switches.
Safety class II Warning - Hot surfaces!
This light is only suitable for indoor
use in dry and enclosed spaces.
b
a
Dispose of the packaging and device
in an environmentally-friendly
manner!
LED desk lamp
Introduction
We congratulate you on the purchase of
your new device. You have chosen a
high
quality product. Please read carefully and
completely through these operating instructions. Fold
out the page with the illustrations. These instructions
form part of the product and contain important in-
formation about bringing the product into use and
its handling. Always observe all the safety advice.
Check that the correct mains voltage is available and
that all the parts have been properly assembled be-
fore bringing into use. Should you have any questions
or be uncertain as to how to operate the device,
please get in touch with your dealer or service point.
Please keep these instructions in a safe place and
hand them on to a third party if necessary.
Proper use
This light is suitable only for interior use,
in dry and enclosed spaces. This lamp
is intended for use only in a domestic
environment.
Included items
Check that all the items and accessories are present
and that the lamp is in perfect condition immediately
after unpacking.
Model no.: 14120806L / 14121009L
1 LED desk lamp
3 Tubes (each 2-piece)
1 Lamp shade
1 Bulb
1 Set of assembly instructions and instructions for use
Model no.: 14120905L
1 LED desk lamp
1 Lamp shade with light bulb holder
1 Tube with base
1 Bulb
1 Set of assembly instructions and instructions for use
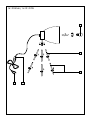
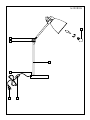
Parts Description
1
Light bulb
2
Screw thread (14120806L / 14121009L)
3
Tube
4
In-line switch
5
Mains plug

7 GB/IE/NI
Introduction / Safety
6
Base (14120905L)
7
Locating screw (14120905L)
8
Lamp arm (14120905L)
Technical Data
Model no.: 14120806L / 14121009L /
14120905L
Operating voltage: 230–240 V∼ 50 Hz
Rated power: 4 W
Protection class: II /
Safety
Safety advice
The right to claim under the guarantee shall be
rendered invalid in respect of damage caused by
the non-observance of these operating instructions!
No liability is accepted for consequent damage!
No liability is accepted for damage to property
or persons caused by improper handling or non-
observance of the safety advice!
To avoid danger to
life from electric shock
Every time before connecting the lamp the mains,
check it and the mains lead for damage. Never
use your light if you find it is damaged in any way.
A damaged light bulb means
your life is at risk from electric shock. If there is
any damage, repairs to be carried out or other
problems related to the light bulb, please contact
the service centre or a qualified electrician.
In order to prevent hazards, if the outer flexible
cable of this lamp becomes damaged it may
only be replaced by the manufacturer, a service
representative of the manufacturer or a similar
specialist!
Before assembly, ensure that the mains voltage
available corresponds to the operating voltage
necessary of the light (see “Technical Data“).
Never let the lamp come into contact with water
or other liquids.
Always unplug the light from the mains prior to
assembly, disassembly, cleaning or if the light
will not be used for extended periods.
Never open or insert anything into electrical
fittings or equipment. Doing this sort of thing can
lead to a serious danger to life from electric shock.
To avoid danger
of fire and injury
CAUTION! RISK OF INJURY! Check bulbs
for damage immediately after unpacking. Do
not fit defective bulbs into the light. If they are,
contact the service point for a replacement.
CAUTION! RISK OF BURNS DUE TO
HOT SURFACES! Ensure the lamp has been
switched off and allowed to cool before you
touch it. In this way you will avoid the danger
of burns. Bulbs give off a lot of heat around the
top of the lamp.
Do not cover the light or the mains plug with
objects. Excessive heat can result in a fire.
Never leave the lamp operating unattended.
Do not allow the lamp or the packaging materials
to lie around unattended. Plastic film or bags,
Styrofoam etc. can turn into dangerous toys for
children.
ATTENTION!
Do not look into the LED from a close distance
during operation.
Do not look at the LED with an optical instrument
(e.g. magnifier).
This light is not suitable for dimmer
or electronic switches.
Working safely
Install the light so that it is protected from
moisture and dirt.
Prepare carefully before assembly and allow
yourself enough time. Lay out all the individual
components and additional tools or materials
required so that you can see and reach them.
Introduction

8 GB/IE/NI
Disposal / Warranty and ServiceSafety / Initial use / Care and cleaning
Remain alert at all times and always watch what
you are doing. Always proceed with caution
and do not assemble the lamp if you cannot
concentrate or feel unwell.
In order to disconnect the lamp completely from
the power supply, the mains plug
5
must be
removed from the socket.
Initial use
Assembling the light
Model no.: 14120806L / 14121009L
Connect the sections of the tube
3
and screw
in place.
Note: Be sure to screw in the tubes
3
as far
as possible so that the light is stable.
Repeat this process with all sections of the
tube
3
.
Assemble the lamp head by screwing the tubes
3
one after the other onto the screw thread
2
.
Note: Be sure to screw in the tubes
3
as far
as possible so that the light is stable.
Use a clean, lint-free cloth to insert the bulb
1
.
S
crew the bulb
1
clockwise into the lamp socket.
Plug the mains plug
5
into a properly in-
stalled socket.
Verify it is seated correctly.
Model no.: 14120905L
Use a clean, lint-free cloth to insert the bulb
1
.
Screw the bulb
1
clockwise into the lamp
socket.
Plug the mains plug
5
into a properly installed
socket.
Verify it is seated correctly.
Your light is now ready to use.
Switching the light on / off
Use the in-line switch
4
to turn the LED light on
and off.
Adjusting the lamp
CAUTION! RISK OF BURNS DUE TO
HOT SURFACES! Allow the lamp to cool
down completely.
Model 14120905L: Bring the lamp arm into
the desired position
8
. If the lamp arm
8
changes position, retighten the locating screw
7
.
All models: The lamp head for all models can
be moved up or down.
Changing the bulb
DANGER OF ELECTRIC
SHOCK! First unplug the mains plug
5
from the
socket.
CAUTION! RISK OF BURNS DUE TO HOT
S
URFACES! Allow the light to cool down comple
tely.
Only replace the lamp after it has completely
cooled off.
Use a clean, lint-free cloth when replacing the
bulb
1
.
Twist the defective bulb
1
anti-clockwise out
of the bulb socket.
Only use LED bulbs with a maximum output of
4 W and E27 base.
Insert the new bulb
1
into the bulb socket and
turn it clockwise to tighten it. Ensure that it is
positioned correctly.
Plug the mains plug
5
into the socket again.
Care and cleaning
RISK OF ELECTRIC SHOCK!
First pull the mains plug
5
out of the mains socket.
CAUTION! RISK OF BURNS DUE TO HOT
SURFACES! First allow the lamp to cool completely.
RISK OF ELECTRIC SHOCK!
For electrical safety reasons, never clean the lamp
with water or other fluids nor immerse it in water.
Do not use any solvents, petrol or similar. This
would cause damage to the light.
Always use a dry, fluff-free cloth for cleaning.
Plug the mains plug
5
into the socket again.

9 GB/IE/NI
Disposal / Warranty and Service
Disposal
The packaging is made entirely of recy-
clable materials, which you may dispose
of at local recycling facilities. The Green
Dot is not valid for Germany.
b
a
Observe the marking of the packaging
materials for waste separation, which
are marked with abbreviations (a) and
numbers (b) with following meaning:
1–7: plastics / 20–22: paper and fibre-
board / 80–98: composite materials.
The product and packaging materials
are recyclable, dispose of it separately
for better waste treatment. The Triman
logo is valid in France only.
Contact your local refuse disposal author-
ity for more details of how to dispose of
your worn-out product.
To help protect the environment, please
dispose of the product properly when it
has reached the end of its useful life and
not in the household waste. Information
on collection points and their opening
hours can be obtained from your local
authority.
Warranty and Service
Warranty
You receive a 36 month warranty on this product,
valid from the date of purchase. The appliance has
been carefully produced under strict quality control.
Within the warranty period we shall rectify without
charge all material and manufacturing defects. In
the event of a defect during the warranty period,
please send the appliance to the listed Service
Centre address, referencing the following item
number: 14120806L / 14121009L /14120905L.
Wear parts (such as bulbs) and damage caused
by improper handling, non-observance of the
operating instructions or unauthorised interference
are excluded from the warranty. The performance
of services under the warranty does not extend or
renew the warranty period.
Service address
Briloner Leuchten GmbH
Im Kissen 2
DE-59929 Brilon
GERMANY
Tel.: +49 (0) 29 61 / 97 12–800
Fax: +49 (0) 29 61 / 97 12–199
E-Mail: [email protected]
www.briloner.com
IAN 283329
Please have your receipt and the product number
(e.g. IAN 12345) available for all queries as proof
of purchase.
Declaration of Conformity
This product fulfils the requirements of the applicable
European and national directives. Conformity has
been demonstrated. The relevant declarations and
documents are held by the manufacturer.
Manufacturer
Briloner Leuchten GmbH
Im Kissen 2
DE-59929 Brilon
GERMANY
Safety / Initial use / Care and cleaning

10
Table des matières

11 FR/BE
Légende des pictogrammes utilisés .......................................................................... Page 12
Introduction ................................................................................................................................... Page 12
Utilisation conforme ............................................................................................................................Page 12
Fourniture ............................................................................................................................................. Page 12
Descriptif des pièces ...........................................................................................................................Page 12
Caractéristiques techniques ................................................................................................................Page 13
Sécurité .............................................................................................................................................Page 13
Consignes de sécurité ......................................................................................................................... Page 13
Mise en service ...........................................................................................................................Page 14
Montage de la lampe .........................................................................................................................Page 14
Allumer / éteindre la lampe ................................................................................................................Page 14
Orientation de la lampe .....................................................................................................................Page 14
Remplacement de l‘ampoule ..............................................................................................................Page 14
Maintenance et nettoyage ...............................................................................................Page 15
Mise au rebut ............................................................................................................................... Page 15
Garantie et service après-vente ..................................................................................Page 15
Garantie ..............................................................................................................................................Page 15
Adresse du service après-vente .......................................................................................................... Page 16
Déclaration de conformité .................................................................................................................. Page 16
Fabricant ..............................................................................................................................................Page 16
Table des matières

12 FR/BE
Introduction / Sécurité Introduction
Légende des pictogrammes utilisés
Lisez les instructions!
Respecter les avertissements et
consignes de sécurité !
Volt (tension alternative)
Avertissement ! Risque
d'électrocution!
Hertz (fréquence) Conduite à tenir
Watt (puissance active)
Cette lampe n'est pas adaptée aux va-
riateurs et aux interrupteurs électriques.
Classe de protection II Attention, surfaces très chaudes !
Cette lampe est exclusivement conçue
pour un usage intérieur, dans des
locaux secs et fermés.
b
a
Mettez l’emballage et l’appareil au re-
but dans le respect de l'environnement !
Lampe de table à LED
Introduction
Félicitations pour l’acquisition de votre
nouvel appareil ! Vous avez opté pour
un produit de grande qualité. Veuillez
lire ce mode d‘emploi intégralement et attentivement.
Ouvrez la page contenant les illustrations. Le manuel
accompagne ce produit et contient des instructions
essentielles pour la mise en service et la manipulation.
Toujours respecter les consignes de sécurité. Avant
l‘installation, vérifiez si la tension est correcte et si
toutes les pièces sont correctement montées. Si vous
avez des questions ou des doutes concernant la
manipulation de l‘appareil, veuillez contacter votre
revendeur ou le S.A.V. Veuillez conserver soigneuse-
ment ce manuel et le remettre aux autres utilisateurs.
Utilisation conforme
Cette lampe est exclusivement conçue pour
un usage intérieur, dans des loca
ux secs
et fermés. Cet appareil est uniquement
destiné à un usage domestique.
Fourniture
Immédiatement après le déballage, veuillez toujours
contrôler que la fourniture est au complet et que
l‘appareil se trouve en parfait état.
N° de modèle : 14120806L / 14121009L
1 lampe de table à LED
3 tubes centraux (en 2 pièces chacun)
1 abat-jour
1 ampoule
1 notice de montage et d‘utilisation
N° de modèle : 14120905L
1 lampe de table à LED
1 abat-jour avec support d‘ampoule
1 tube central avec pied
1 ampoule
1 notice de montage et d‘utilisation
Descriptif des pièces
1
Ampoule
2
Filetage (14120806L / 14121009L)
3
Tube central
4
Interrupteur pour câble

13 FR/BE
Introduction / Sécurité Introduction
5
Fiche secteur
6
Pied (14120905L)
7
Vis de fixation (14120905L)
8
Bras de lampe (14120905L)
Caractéristiques techniques
N° de modèle : 14120806L / 14121009L /
14120905L
Tension de fonctionnement : 230–240 V∼ 50 Hz
Puissance nominale : 4 W
Classe de protection : II /
Sécurité
Consignes de sécurité
Les dommages causés par le non respect des
instructions de ce mode d‘emploi sont exclus de la
garantie ! Le fabricant décline toute responsabilité
pour les dommages indirects ! De même, toute
responsabilité est déclinée pour les dommages
matériels ou personnels causés par une manipulation
incorrecte ou le non respect des consignes de sécurité !
Prévention de risques mortels
par électrocution
Vérifier le bon état de la lampe avant chaque
usage. Ne jamais utiliser la lampe si vous
détectez le moindre endommagement.
Une lampe endommagé
e
représente un danger mortel d’électrocution.
En cas d‘endommagements, de réparations ou
d‘autres problèmes, veuillez contacter la filiale
S.A.V. ou un électricien.
Pour éviter les risques, ne remplacer le cordon
extérieur flexible endommagé de cette lampe
que par l’intermédiaire du fabricant, de son
représentant SAV ou par un spécialiste
comparable.
Avant l’utilisation, vérifiez que la tension secteur
corresponde à la tension de service requise de
la lampe (voir «Caractéristiques techniques»).
Absolument éviter tout contact de la lampe
avec de l‘eau ou d‘autres liquides.
Avant le montage, le démontage, le nettoyage
ou lorsque vous n‘utilisez pas l‘éclairage pen-
dant une certaine période, débranchez toujours
la fiche secteur de la prise.
Ne jamais ouvrir les composants électriques,
ni insérer des objets quelconques dans ceux-ci.
Ce type d‘intervention représente un danger
mortel d‘électrocution.
Prévention de risque
d‘incendies et de blessures
ATTENTION ! RISQUE DE BLESSURES !
Après avoir sorti l’ampoule de l’emballage,
contrôlez immédiatement qu’elle ne soit pas
endommagée. Ne montez jamais la lampe
avec des ampoules endommagées. Veuillez
dans ce cas contacter la filiale de service pour
une pièce de rechange.
ATTENTION! RISQUE DE BRÛLURES À
CAUSE DES SURFACES TRÈS CHAUDES !
Afin d‘éviter toutes brûlures, vérifiez que la
lampe est éteinte et suffisamment froide avant
de la manipuler. L‘ampoule dégage une forte
chaleur dans la tête de la lampe.
Ne couvrez pas la lampe ou la fiche secteur
avec des objets. Un dégagement de chaleur
excessif peut provoquer un incendie.
Ne pas laisser la lampe allumée sans surveillance.
Ne pas laisser la lampe ou le matériel d‘em-
ballage traîner négligemment. Les films et les
sachets en plastique, les éléments en matières
synthétiques, etc. peuvent devenir des jouets
dangereux dans les mains des enfants.
ATTENTION !
Lorsque les LED sont allumées, évitez de les
regarder de près.
Ne pas observer les LED à l‘aide d‘un instrument
optique (par exemple une loupe).
Cette lampe n‘est pas adaptée
aux variateurs et aux interrupteurs
électriques.

14 FR/BE
... / Maintenance et nettoyage / Mise au rebut / Garantie et service après-venteSécurité / Mise en service
Pour travailler en toute sécurité
Montez la lampe de telle sorte qu’elle soit
protégée de l’humidité et de la saleté.
Préparez soigneusement le montage et prenez
votre temps. Placez à portée de la main de
manière rangée l’ensemble des pièces et les
outils ou le matériel nécessaires supplémentaires.
Toujours être vigilant ! Toujours travailler
concentré et procéder avec prudence. Ne
jamais effectuer le montage de la lampe si
vous n‘êtes pas concentré ou vous sentez mal.
Afin de couper complètement la lampe de l‘ali-
mentation électrique, la fiche secteur
5
doit être
débranchée de la prise.
Mise en service
Montage de la lampe
N° de modèle : 14120806L / 14121009L
Assemblez les parties du tube central
3
et les
visser fermement.
Remarque : Veillez à ce que les tube cen-
traux
3
soient vissés au maximum, afin de
garantir une bonne stabilité de la lampe.
Répétez cette procédure avec tous les éléments
du tube central
3
.
Montez la tête de lampe, en vissant les tubes
centraux
3
les uns après les autres dans le
filetage
2
.
Remarque : Veillez à ce que les tube cen-
traux
3
soient vissés au maximum, afin de
garantir une bonne stabilité de la lampe.
Pour la mise en place de l‘ampoule
1
, utilisez
un chiffon propre et non pelucheux.
Vissez l‘ampoule
1
dans la douille, en suivant
le sens des aiguilles d‘une montre.
Branchez la fiche secteur
5
dans une prise
installée conformément aux spécifications ap-
plicables.
Contrôlez la position de montage.
N° de modèle : 14120905L
Pour la mise en place de l‘ampoule
1
, utilisez
un chiffon propre et non pelucheux.
Vissez l‘ampoule
1
dans la douille, en
suivant le sens des aiguilles d‘une montre.
Branchez la fiche secteur
5
dans une prise
installée conformément aux spécifications ap-
plicables.
Contrôlez la position de montage.
Votre lampe est alors prête à l‘emploi.
Allumer / éteindre la lampe
Allumer et éteindre la lampe LED avec
l‘interrupteur pour câble
4
.
Orientation de la lampe
ATTENTION! RISQUE DE BRÛLURES À
CAUSE DES SURFACES TRÈS CHAUDES !
Laissez d‘abord refroidir la lampe complètement.
Modèle 14120905L : Placez le bras de
lampe
8
dans la position souhaitée. Lorsque
la position du bras de lampe
8
se modifie,
resserrez la bis de fixation
7
.
Tous les modèles : La tête de lampe de tous
les modèles peut se déplacer vers le haut ou
vers le bas.
Remplacement de l‘ampoule
RISQUE D’ÉLECTRO-
CUTION! Débranchez d‘abord la fiche secteur
5
de la prise.
ATTENTION! RISQUE DE BRÛLURES !
SURFACES TRÈS CHAUDES! Laissez la lampe
refroidir complètement. Remplacez uniquement l‘am-
poule lorsque celle-ci est complètement refroidie.
Pour le remplacement de l‘ampoule
1
, utilisez
un chiffon propre, non pelucheux.
Dévissez l‘ampoule défectueuse
1
hors de la
douille, en la tournant dans le sens anti-horaire.

15 FR/BE
... / Maintenance et nettoyage / Mise au rebut / Garantie et service après-venteSécurité / Mise en service
Utilisez uniquement des ampoules à LED de
puissance maximale 4 W, dotées d‘un culot E27.
Insérez avec précaution l‘ampoule
1
neuve
dans la douille et tournez-la dans le sens horaire.
Contrôlez qu‘elle soit bien en place.
Rebranchez la fiche secteur
5
dans la prise
de courant.
Maintenance et nettoyage
RISQUE D’ELECTRO-
CUTION! Débranchez tout d’abord la prise
5
.
ATTENTION ! RISQUE DE BRÛLURES !
SURFACES TRÈS CHAUDES ! Laissez tout d’abo
rd
la lampe refroidir complètement.
RISQUE D’ELECTRO-
CUTION! Pour des raisons relevant de la sécurité
électrique, ne jamais nettoyer la lampe à l’eau ou
avec d’autres liquides, ni la plonger dans l’eau.
Ne pas utiliser de solvants, essence ou autres.
Ceci endommage la lampe.
Pour le nettoyage, utilisez uniquement un chiffon
sec ne bourrant pas.
Replacez la fiche secteur
5
dans la prise de
courant.
Mise au rebut
L’emballage se compose de matières
recyclables pouvant être mises au rebut
dans les déchetteries locales. Le «point
vert» n‘est pas valable en Allemagne.
b
a
Veuillez respecter l‘identification des ma-
tériaux d‘emballage pour le tri sélectif, ils
sont identifiés avec des abbréviations (a)
et des chiffres (b) ayant la signification
suivante : 1–7 : plastiques / 20–22 :
papiers et cartons / 80–98 : matériaux
composite.
Le produit et les matériaux d’emballage
sont recyclables, mettez-les au rebut sé-
parément pour un meilleur traitement des
déchets. Le logo Triman n’est valable
qu’en France.
Votre mairie ou votre municipalité vous
renseigneront sur les possibilités de mise
au rebut des produits usagés.
Afin de contribuer à la protection de
l’environnement, veuillez ne pas jeter votre
produit usagé dans les ordures ménagères,
mais éliminez-le de manière appropriée.
Pour obtenir des renseignements concer-
nant les points de collecte et leurs horaires
d’ouverture, vous pouvez contacter votre
municipalité.
Garantie et service après-vente
Garantie
Vous bénéficiez d’une garantie de 36 mois à partir
de la date d’achat de l’appareil. Cet appareil a été
fabriqué avec soin et soumis à un contrôle qualité
minutieux. Pendant la durée de la garantie, nous
réparons gratuitement tous les défauts de matériaux
ou de fabrication. Si vous deviez constater des dé-
fauts pendant la période de garantie, envoyez-nous
l‘appareil à l‘adresse du SAV mentionnée ci-dessous
en mentionnant le numéro d‘article : 14120806L /
14121009L /14120905L.
La garantie exclut les dommages dus à une mani-
pulation incorrecte, au non-respect des instructions
du mode d’emploi ou à une intervention par une
personne non autorisée, ainsi que les pièces d’usure
(p. ex. les ampoules). La durée de garantie n’est
aucunement prolongée ou renouvelée par une
prestation de garantie.

16 FR/BE
Garantie et service après-vente
Adresse du service après-vente
Briloner Leuchten GmbH
Im Kissen 2
DE-59929 Brilon
ALLEMAGNE
Tél. : +49 (0) 29 61 / 97 12–800
Fax : +49 (0) 29 61 / 97 12–199
Courriel : [email protected]
www.briloner.com
IAN 283329
Veuillez conserver le ticket de caisse et le numéro
de référence de l’article (par ex. IAN 12345) afin
de les produire à titre de preuves d’achat pour toute
demande.
Déclaration de conformité
Ce produit est conforme aux exigences des directives
européennes et nationales applicables. La conformité
a été attestée. Les déclarations et documents respec-
tifs sont en possession du fabricant.
Fabricant
Briloner Leuchten GmbH
Im Kissen 2
DE-59929 Brilon
ALLEMAGNE
Inhoudsopgave

17 NL/BE
Garantie et service après-vente Inhoudsopgave
Legenda van de gebruikte pictogrammen ..................................................... Pagina 18
Inleiding ....................................................................................................................................... Pagina 18
Doelmatig gebruik........................................................................................................................... Pagina 18
Leveringsomvang ............................................................................................................................ Pagina 18
Beschrijving van de onderdelen ..................................................................................................... Pagina 19
Technische gegevens ...................................................................................................................... Pagina 19
Veiligheid .................................................................................................................................... Pagina 19
Veiligheidsinstructies ....................................................................................................................... Pagina 19
Ingebruikname ...................................................................................................................... Pagina 20
Lamp monteren ................................................................................................................................ Pagina 20
Lamp aan- / uitschakelen ................................................................................................................ Pagina 20
Lamp instellen .................................................................................................................................. Pagina 20
Verlichting vervangen ..................................................................................................................... Pagina 20
Onderhoud en reiniging ................................................................................................. Pagina 21
Afvoer ............................................................................................................................................ Pagina 21
Garantie en service ............................................................................................................ Pagina 21
Garantie .......................................................................................................................................... Pagina 21
Serviceadres .................................................................................................................................... Pagina 21
Conformiteitsverklaring ................................................................................................................... Pagina 22
Fabrikant .......................................................................................................................................... Pagina 22

18 NL/BE
Inleiding / VeiligheidInleiding
Legenda van de gebruikte pictogrammen
Instructies lezen!
Waarschuwingen en veiligheidsin-
structies in acht nemen!
Volt (wisselspanning)
Waarschuwing! Kans op een
elektrische schok!
Hertz (frequentie) Zo handelt u correct
Watt (nuttig vermogen)
D
eze lamp is niet geschikt voor dimm
ers
en elektronische schakelaars.
Beschermingsklasse II
Wees voorzichtig bij hete oppervlakken!
Deze lamp is uitsluitend bedoeld
voor gebruik binnenshuis, in droge
en gesloten ruimtes.
b
a
Verwijder de verpakking en het appa-
raat op een milieuvriendelijke manier!
LED-tafellamp
Inleiding
Gefeliciteerd met de koop van uw nieuwe
apparaat. U heeft voor een hoogwaar
dig
product gekozen. Lees deze gebruiksaan-
wijzing en de veiligheidsinstructies volledig en zorg-
vuldig door. Vouw de pagina met de afbeel-dingen
open. Deze gebruiksaanwijzing hoort bij dit product
en bevat belangrijke aanwijzingen voor de ingebruik-
name en de bediening. Neem altijd de veiligheids-
instructies in acht. Controleer vóór de ingebruikname
of de juiste spanning beschikbaar is en of alle on-
derdelen goed gemonteerd zijn. Wanneer u vragen
hebt of onzeker bent in verband met de bediening
van het apparaat, kunt u contact opnemen met uw
leverancier of met het servicepunt. Bewaar deze
handleiding op een veilige plaats en geef ze evt.
aan derden door.
Doelmatig gebruik
Deze lamp is uitsluitend bedoeld voor
gebruik binnenshuis, in droge en gesloten
ruimten. Dit product is bestemd voor het
gebruik in privé-huishoudens.
Leveringsomvang
Controleer de levering altijd direct na het uitpakken
op volledigheid en de optimale staat van het product.
Modelnr.: 14120806L / 14121009L
1 LED-tafellamp
3 standbuizen (allemaal 2-delig)
1 lampenkap
1 verlichtingsmiddel
1 montage- en gebruiksaanwijzing
Modelnr.: 14120905L
1 LED-tafellamp
1 lampenkap met houder voor verlichtingsmiddel
1 standbuis met voet
1 verlichtingsmiddel
1 montage- en gebruiksaanwijzing

19 NL/BE
Inleiding / Veiligheid
Beschrijving van de
onderdelen
1
Verlichtingsmiddel
2
Schroefdraad (14120806L / 14121009L)
3
Standbuis
4
Snoerschakelaar
5
Stekker
6
Voet (14120905L)
7
Fixeerschroef (14120905L)
8
Lamparm (14120905L)
Technische gegevens
Modelnr.: 14120806L / 14121009L /
14120905L
Voedingsspanning: 230–240 V∼ 50 Hz
Nominaal vermogen: 4 W
Beschermingsklasse: II /
Veiligheid
Veiligheidsinstructies
Bij schade die ontstaat door het negeren van deze
gebruiksaanwijzing komt de garantieverlening te
vervallen! Voor volgschade zijn wij niet aansprakelijk!
Wij zijn niet aansprakelijk in geval van materiële
schade of persoonlijk letsel als gevolg van ondes-
kundig gebruik of het negeren van de veiligheidsin-
structies!
Levensgevaar door
elektrische schok
Controleer vóór ieder gebruik de lamp en de
aansluitkabel op eventuele beschadigingen.
Gebruik de lamp nooit wanneer u ongeacht
welke beschadiging ook hebt geconstateerd.
Bij een beschadigde
lamp bestaat levensgevaar door elektrische
schokken. Neem in geval van beschadigingen, re-
paraties of andere problemen aan de lamp c
on-
tact op met de klantenservice of een elektricien.
Ter vermijding van gevaren mag de externe,
flexibele leiding van deze lamp bij beschadiging
uitsluitend worden vervangen door de fabrikant,
zijn servicecenter of door dienovereenkomstig
opgeleid vakpersoneel!
Overtuig u er vóór de montage van dat de
bestaande netspanning overeenstemt met
de vereiste bedrijfsspanning van de lamp
(zie „Technische gegevens“).
Vermijd elk contact van de lamp met water of
andere vloeistoffen.
Trek voor de montage, demontage, reiniging
of wanneer u de lamp gedurende een langere
periode niet gebruikt, de stekker uit het stop-
contact.
Open nooit een van de elektrische bedrijfsmid-
delen en steek ook geen voorwerpen in deze
onderdelen. Bij dergelijke ingrepen bestaat
levensgevaar door elektrische schokken.
Vermijd brand- en
verwondingsgevaar
VOORZICHTIG! VERWONDINGSGE-
VAAR! Controleer iedere gloeilamp na het
uitpakken onmiddellijk op schade. Monteer de
lamp niet met defecte gloeilampen. Neem in
dit geval voor vervangende levering contact op
met de klantenservice.
VOORZICHTIG! KANS OP BRANDWO-
NDEN DOOR HETE OPPERVLAKKEN!
Voorkom brandwonden en waarborg dat de
lamp uitgeschakeld en afgekoeld is voordat u
hem aanraakt. Tijdens het bedrijf worden de
lampen rond de kop zeer heet.
Dek de lamp c.q. de stekker niet af met voor-
werpen. Een overmatige warmteontwikkeling
kan tot brand leiden.
Laat de lamp tijdens het gebruik niet zonder
toezicht.
Laat de lamp of het verpakkingsmateriaal niet
achteloos liggen. Plasticfolie / -zakken, kunststof-
delen enz. kunnen een gevaarlijk speelgoed
vormen voor kinderen.
ATTENTIE!
Tijdens het gebruik niet van een korte afstand
in de LED kijken.
Inleiding

20 NL/BE
Ingebruikname / Onderhoud en reiniging / Afvoer / Garantie en serviceVeiligheid / Ingebruikname
De LED niet met een optisch instrument (bijv.
vergrootglas) bekijken.
Deze lamp is niet geschikt voor dim-
mers en elektronische schakelaars.
Zo handelt u correct
Monteer de lamp zodanig dat hij beschermd
wordt tegen vocht en verontreiniging.
Bereid de montage zorgvuldig voor en neem
daarvoor voldoende tijd. Leg alle onderdelen
en het benodigde gereedschap of materiaal
tevoren overzichtelijk en binnen handbereik klaar.
Wees steeds opmerkzaam! Let altijd op wat u
doet en ga steeds met overleg te werk. Monteer
de lamp in geen geval wanneer u ongeconcen-
treerd bent of zich niet goed voelt.
Om de verbinding van de lamp met het stroom-
net volledig te onderbreken, moet de stekker
5
uit het stopcontact worden getrokken.
Ingebruikname
Lamp monteren
Modelnr.: 14120806L / 14121009L
Steek de onderdelen van de standbuis
3
in
elkaar en schroef ze vast.
Opmerking: Let erop dat de standbuizen
3
zo ver mogelijk erin worden gedraaid, om een
veilige stand van de lamp te waarborgen.
Herhaal dit proces bij alle delen van de stand-
buis
3
.
Monteer de lampkop door de standbuizen
3
na elkaar aan de schroefdraad
2
te schroeven.
Opmerking: Let erop dat de standbuizen
3
zo ver mogelijk erin worden gedraaid, om een
veilige stand van de lamp te waarborgen.
Gebruik voor het plaatsen van de lamp
1
een
schone, pluisvrije doek.
Draai het verlichtingsmiddel
1
rechtsom in de
lampfitting.
Steek de stekker
5
in een correct geïnstalleerde
wandcontactdoos.
Controleer de juiste montage.
Modelnr.: 14120905L
Gebruik voor het plaatsen van het verlichtings-
middel
1
een schone, pluisvrije doek.
Draai het verlichtingsmiddel
1
rechtsom in de
lampfitting.
Steek de stekker
5
in een correct geïnstalleerde
wandcontactdoos.
Controleer de juiste montage.
Uw lamp is nu gereed voor gebruik.
Lamp aan- / uitschakelen
Schakel de LED-lamp met behulp van de
snoerschakelaar
4
aan en uit.
Lamp instellen
VOORZICHTIG! KANS OP BRANDWON-
DEN DOOR HETE OPPERVLAKKEN! Laat
de lamp eerst volledig afkoelen.
Model 14120905L: Breng de lamparm
8
in de gewenste positie. Draai de fixeerschroef
7
aan als de positie van de lamparm
8
verande
rt.
Alle modellen: de lampkop van alle modellen
kan naar boven of naar onder worden versteld.
Verlichting vervangen
KANS OP EEN
ELEKTRISCHE SCHOK! Trek de stroomstekker
5
eerst uit de wandcontactdoos.
VOORZICHTIG! KANS OP BRAND-
WONDEN DOOR HETE OPPERVLAKKEN!
Laat de lamp volledig afkoelen. Vervang de lamp
alleen als deze volledig is afgekoeld.
Gebruik voor het vervangen van het verlichtings-
middel
1
een schone, pluisvrije doek.
Draai het defecte verlichtingsmiddel
1
linksom
uit de fitting.
Gebruik uitsluitend LED-lampen met maximaal
4 W en een E27-fitting.
La page est en cours de chargement...
La page est en cours de chargement...
La page est en cours de chargement...
La page est en cours de chargement...
La page est en cours de chargement...
La page est en cours de chargement...
La page est en cours de chargement...
La page est en cours de chargement...
La page est en cours de chargement...
-
 1
1
-
 2
2
-
 3
3
-
 4
4
-
 5
5
-
 6
6
-
 7
7
-
 8
8
-
 9
9
-
 10
10
-
 11
11
-
 12
12
-
 13
13
-
 14
14
-
 15
15
-
 16
16
-
 17
17
-
 18
18
-
 19
19
-
 20
20
-
 21
21
-
 22
22
-
 23
23
-
 24
24
-
 25
25
-
 26
26
-
 27
27
-
 28
28
-
 29
29


LIVARNO LUX 14120905L Assembly, Operating And Safety Instructions
- Catégorie
- Accessoires de préparation de café
- Taper
- Assembly, Operating And Safety Instructions
dans d''autres langues
- English: LIVARNO LUX 14120905L
- Deutsch: LIVARNO LUX 14120905L
- Nederlands: LIVARNO LUX 14120905L
Documents connexes


Autres documents
-
LIVARNO 316951 Le manuel du propriétaire
-
-
-
-
-
-
-
-
-