Zanussi ZDF3023S Manuel utilisateur
- Catégorie
- Lave-vaisselle
- Taper
- Manuel utilisateur

EN
User manual 2
FR
Notice d'utilisation 15
Dishwasher
Lave-vaisselle
ZDF3023

Contents
Safety instructions _ _ _ _ _ _ _ _ _ _ _ _ _ _ 2
Product description _ _ _ _ _ _ _ _ _ _ _ _ _ 3
Control panel _ _ _ _ _ _ _ _ _ _ _ _ _ _ _ _ _ 4
Programmes _ _ _ _ _ _ _ _ _ _ _ _ _ _ _ _ _ 4
Options _ _ _ _ _ _ _ _ _ _ _ _ _ _ _ _ _ _ _ _ 5
Before first use _ _ _ _ _ _ _ _ _ _ _ _ _ _ _ _ 5
Daily use _ _ _ _ _ _ _ _ _ _ _ _ _ _ _ _ _ _ _ 8
Care and cleaning _ _ _ _ _ _ _ _ _ _ _ _ _ 10
Troubleshooting _ _ _ _ _ _ _ _ _ _ _ _ _ _ _ 11
Technical information _ _ _ _ _ _ _ _ _ _ _ _ 14
Environment concerns _ _ _ _ _ _ _ _ _ _ _ 14
Subject to change without notice.
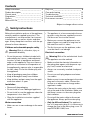
Safety instructions
Before the installation and use of the appliance,
carefully read the supplied instructions. The
manufacturer is not responsible if an incorrect
installation and use causes injuries and dam-
ages. Always keep the instructions with the ap-
pliance for future reference.
Children and vulnerable people safety
Warning! Risk of suffocation, injury or
permanent disability.
• Do not let persons, children included, with
reduced physical sensory, reduced mental
functions or lack of experience and knowl-
edge use the appliance. They must have su-
pervision or instruction for the operation of
the appliance by a person who is responsible
for their safety. Do not let children play with
the appliance.
• Keep all packaging away from children.
• Keep all detergents away from children.
• Keep children and pets away from the appli-
ance door when it is open.
Installation
• Remove all the packaging.
• Do not install or use a damaged appliance.
• Do not install or use the appliance where the
temperature is less than 0 °C.
• Obey the installation instruction supplied
with the appliance.
Water connection
• Make sure not to cause damage to the water
hoses.
• The appliance is to be connected to the wa-
ter mains using the new supplied hose-sets.
Old hose sets must not be reused.
• Before you connect the appliance to new
pipes or pipes not used for a long time, let
the water flow until it is clean.
• The first time you use the appliance, make
sure that there is no leakage.
Electrical connection
Warning! Risk of fire and electrical shock.
• The appliance must be earthed.
• Make sure that the electrical information on
the rating plate agrees with the power sup-
ply. If not, contact an electrician.
• Always use a correctly installed shockproof
socket.
• Do not use multi-plug adapters and exten-
sion cables.
• Make sure not to cause damage to the mains
plug and to the mains cable. Contact the
service or an electrician to change a dam-
aged mains cable.
• Connect the mains plug to the mains socket
only at the end of the installation. Make sure
that there is access to the mains plug after
the installation.
• Do not pull the mains cable to disconnect
the appliance. Always pull the mains plug.
• Only for UK and Ireland. The appliance
has a 13 amp mains plug. If it is necessary to
change the fuse in the mains plug, use a 13
amp ASTA (BS 1362) fuse.
2
www.zanussi.com

Use
• This appliance is intended to be used in
household and similar applications such as:
– Staff kitchen areas in shops, offices and
other working environments
– Farm houses
– By clients in hotels, motels and other resi-
dential type environments
– Bed and breakfast type environments.
Warning! Risk of injury.
• Do not change the specification of this appli-
ance.
• Put knives and cutlery with sharp points in
the cutlery basket with the points down or in
a horizontal position.
• Do not keep the appliance door open without
supervision to prevent to fall on it.
• Do not sit or stand on the open door.
• Dishwasher detergents are dangerous. Obey
the safety instructions on the detergent
packaging.
• Do not drink and play with the water in the
appliance.
• Do not remove the dishes from the appliance
until the programme is completed. There can
be detergent on the dishes.
Warning! Risk of electrical shock, fire or
burns.
• Do not put flammable products or items that
are wet with flammable products in, near or
on the appliance.
• Do not use water spray and steam to clean
the appliance.
• The appliance can release hot steam if you
open the door while a programme operates.
Disposal
Warning! Risk of injury or suffocation.
• Disconnect the appliance from the mains
supply.
• Cut off the mains cable and dispose of it.
• Remove the door catch to prevent children
and pets to get closed in the appliance.
Customer Care and Service
Contact the Service to repair the appliance.
We recommend only the use of original spare
parts.
When you contact the Service, ensure that you
have the following information that is available
on the rating plate.
Model :
PNC :
Serial Number :
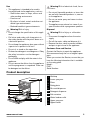
Product description
2
1
3
4
5
10
9
7
8
6
1
Worktop
2
Lower spray arm
3
Filters
4
Rating plate
5
Rinse aid dispenser
6
Detergent dispenser
7
Salt container
8
Water hardness dial
9
Upper spray arm
10
Upper basket
3
www.zanussi.com

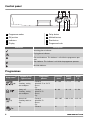
Control panel
1
8765
23 4
1
Programme marker
2
Off position
3
Indicators
4
Display
5
Delay button
6
Multitab button
7
Start button
8
Programme knob
Indicators Description
Washing phase indicator.
Drying phase indicator.
Rinse aid indicator. This indicator is off while the programme oper-
ates.
Salt indicator. This indicator is off while the programme operates.
Multitab indicator.
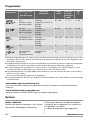
Programmes
Programme
1)
Degree of soil
Type of load
Programme
phases
Duration
(min)
Energy
(kWh)
Water
(l)
2)
All
Crockery, cutlery,
pots and pans
Prewash
Wash 45 °C or 70 °C
Rinses
Dry
90 - 130 1.1 - 1.7 11 - 22
Heavy soil
Crockery, cutlery,
pots and pans
Prewash
Wash 70 °C
Rinses
Dry
80 - 90 1.6 - 1.8 22 - 24
3)
Normal soil
Crockery and cut-
lery
Prewash
Wash 50 °C
Rinses
Dry
155 - 167 0.99 - 1.04 12.2 - 13
4)
All Prewash 12 0.1 4
4
www.zanussi.com

Programme
1)
Degree of soil
Type of load
Programme
phases
Duration
(min)
Energy
(kWh)
Water
(l)
5)
Fresh soil
Crockery and cut-
lery
Wash 65 °C
Rinse
30 0.9 9
1) The pressure and the temperature of the water, the variations of the mains supply, the options and the
quantity of dishes can change the programme duration and the consumption values.
2) The appliance senses the degree of soil and the quantity of items in the baskets. It automatically adjusts the
temperature and quantity of the water, the energy consumption and the programme duration.
3) This is the standard programme for test institutes. With this programme you have the most efficient use of
water and energy consumption for crockery and cutlery with normal soil.
4) Use this programme to quickly rinse the dishes. This prevents the remaining food to bond on the dishes and
bad odours to come out from the appliance.
Do not use detergent with this programme.
5) With this programme you can wash a load with fresh soil. It gives good washing results in a short time.
Information for test institutes
For all the necessary information for test performance. send an email to:
Write down the product number (PNC) that is on the rating plate.
Options
Multitab option
Activate this option only when you use the
combi detergent tablets.
This option deactivates the flow of rinse aid and
salt. The related indicators are off.
The programme duration can increase.
Activating the Multitab option
Activate or deactivate the Multitab option
before the start of a programme. You can-
not activate or deactivate this option while a
programme operates.
1. Press the on/off button to activate the appli-
ance. Make sure that the appliance is in set-
ting mode. Refer to ‘SETTING AND
STARTING A PROGRAMME'.
2. Press Multitab, the Multitab indicator
comes on.
The option stays on until you deactivate it.
Press Multitab, the Multitab indicator
goes off.
If you stop to use the combi detergent
tablets, before you start to use separately
detergent, rinse aid and dishwasher salt,
do these steps:
1. Deactivate the Multitab option.
2. Set the water softener to the highest level.
3. Make sure that the salt container and the
rinse aid dispenser are full.
4. Start the shortest programme with a rinsing
phase, without detergent and without
dishes.
5. Adjust the water softener to the water hard-
ness in your area.
6. Adjust the released quantity of rinse aid.
Before first use
1. Make sure that the set level of the water
softener agrees with the water hardness in
your area. If not, adjust the water softener.
Contact your local water authority to know
the water hardness in your area.
2. Fill the salt container.
5
www.zanussi.com

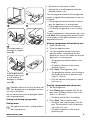
3. Fill the rinse aid dispenser.
4. Open the water tap.
5. Processing residues can stay in the appli-
ance. Start a programme to remove them.
Do not use detergent and do not load the
baskets.
If you use the combi detergent tablets, ac-
tivate the multitab function. These tablets
contain detergent, rinse aid and other added
agents. Be sure that these tablets are applica-
ble to the water hardness in your area. Refer to
the instructions on the packaging of the prod-
ucts.
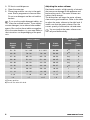
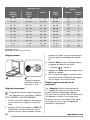
Adjusting the water softener
Hard water contains a high quantity of minerals
that can cause damage to the appliance and
bad washing results. The water softener neu-
tralises these minerals.
The dishwasher salt keeps the water softener
clean and in good conditions. Refer to the table
to adjust the water softener to the right level. It
makes sure that the water softener uses the
correct quantity of dishwasher salt and water.
You must adjust the water softener man-
ually and electronically.
Water hardness
Water softener
adjustment
German
degrees
(°dH)
French
degrees
(°fH)
mmol/l Clarke
degrees
Manual Elec-
tronic
51 - 70 91 - 125 9.1 - 12.5 64 - 88
2
1)
10
43 - 50 76 - 90 7.6 - 9.0 53 - 63
2
1)
9
37 - 42 65 - 75 6.5 - 7.5 46 - 52
2
1)
8
29 - 36 51 - 64 5.1 - 6.4 36 - 45
2
1)
7
23 - 28 40 - 50 4.0 - 5.0 28 - 35
2
1)
6
19 - 22 33 - 39 3.3 - 3.9 23 - 27
2
1)
5
1)
15 - 18 26 - 32 2.6 - 3.2 18 - 22 1 4
11 - 14 19 - 25 1.9 - 2.5 13 - 17 1 3
4 - 10 7 - 18 0.7 - 1.8 5 - 12 1 2
< 4 < 7 < 0.7 < 5
1
2)
1
2)
1) Factory position.
2) Do not use salt at this level.
6
www.zanussi.com

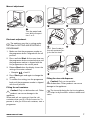
Manual adjustment
1 2
Turn the water hard-
ness dial to the posi-
tion 1 or 2.
Electronic adjustment
The appliance must be in setting mode.
Refer to ‘SETTING AND STARTING A
PROGRAMME’.
1. Make sure that the programme marker on
the programme knob is aligned with the off
position.
2. Press and hold Start. At the same time turn
the programme knob counterclockwise until
the programme marker is aligned with the
first programme on the control panel.
3. Release Start when the display shows the
setting of the water softener.
•
Example:
= level 5.
4. Press Start again and again to change the
setting.
5. To confirm the setting, turn the programme
knob until the programme marker is aligned
with the off position.
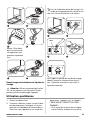
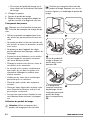
Filling the salt container
Caution! Only use dishwasher salt. Other
products can cause damage to the
appliance.
Water and salt can come out from the salt
container when you fill it. Risk of corrosion. To
prevent it, after you fill the salt container, start a
programme.
1 2
3
Put 1 litre of water in
the salt container (on-
ly for the first time).
4
5
6
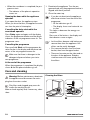
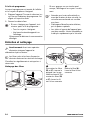
Filling the rinse aid dispenser
Caution! Only use rinse aid for
dishwashers. Other products can cause
damage to the appliance.
The rinse aid, during the last rinsing phase,
helps to dry the dishes without streaks and
stains.
7
www.zanussi.com

1 2
max
M
A
X
1
2
3
4
+
3
4
M
A
X
1
2
3
4
+
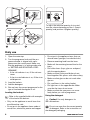
To adjust the released quantity of rinse aid,
turn the selector between position 1 (lowest
quantity) and position 4 (highest quantity).
Daily use
1. Open the water tap.
2. Turn the programme knob until the pro-
gramme marker is aligned with a pro-
gramme on the control panel. Make sure
that the appliance is in setting mode, refer
to ’SETTING AND STARTING A PRO-
GRAMME’.
• If the salt indicator is on, fill the salt con-
tainer.
• If the rinse aid indicator is on, fill the rinse
aid dispenser.
3. Load the baskets.
4. Add the detergent.
5. Set and start the correct programme for the
type of load and the degree of soil.
Loading the baskets
Refer to the supplied leaflet with examples
of the load of the baskets.
• Only use the appliance to wash items that
are dishwasher-safe.
• Do not put in the appliance items made of
wood, horn, aluminium, pewter and copper.
• Do not put in the appliance items that can
absorb water (sponges, household cloths).
• Remove remaining food from the items.
• Make soft the remaining burned food on the
items.
• Put hollow items (cups, glasses and pans)
with the opening down.
• Make sure that cutlery and dishes do not
bond together. Mix spoons with other cutlery.
• Make sure that glasses do not touch other
glasses.
• Put small items in the cutlery basket.
• Put light items in the upper basket. Make
sure that the items do not move.
• Make sure that the spray arms can move
freely before you start a programme.
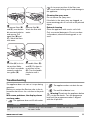
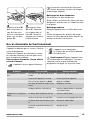
Using the detergent
Caution! Use only detergents for
dishwashers.
Do not use more than the correct quantity
of detergent. Refer to the instructions on
the detergent packaging.
8
www.zanussi.com

1 2
A
3
Put the detergent or
the tablet in compart-
ment (A).
A
B
If the programme has
a prewash phase, put
a small quantity of
detergent in compart-
ment (B).
4
Detergent tablets do not fully dissolve with
short programmes and detergent residues
can stay on the dishes.
We recommend that you use detergent tablets
with long programmes.
Setting and starting a programme
Setting mode
The appliance must be in setting mode to:
•
Start a programme.
• Set the level of the water softener.
• Activate the rinse aid dispenser when the
Multitab function is on.
Turn the programme knob until the programme
marker is aligned with a programme on the con-
trol panel:
• If the programme duration flashes in the dis-
play, the appliance is in setting mode.
• If the programme duration in the display is
not flashing, the appliance is not in setting
mode.
To put the appliance in setting mode, press and
hold Start until the programme duration flashes
in the display and the phase indicators for the
programme come on.
Starting a programme without delay start
1. Open the water tap.
2. Close the appliance door.
3. Turn the programme knob until the pro-
gramme marker is aligned with the pro-
gramme you want to set. Make sure that the
appliance is in setting mode.
• The programme duration flashes in the
display.
• The phase indicators of the set pro-
gramme come on.
4. Press Start. The programme starts.
• The programme duration stops flashing in
the display and starts to decrease with
steps of 1 minute.
• Only the indicator of the phase in opera-
tion stays on.
Starting a programme with delay start
1. Set the programme.
2. Press Delay again and again until the dis-
play shows the delay time you want to set
(from 1 to 19 hours).
• The delay time flashes in the display.
3. Press Start. The countdown starts.
• The delay time stops flashing in the dis-
play. The countdown starts to decrease
with steps of 1 hour.
• The phase indicators of the set pro-
gramme go off.
9
www.zanussi.com

• When the countdown is completed, the pro-
gramme starts.
– The indicator of the phase in operation
comes on.
Opening the door while the appliance
operates
If you open the door, the appliance stops.
When you close the door, the appliance contin-
ues from the point of interruption.
Cancelling the delay start while the
countdown operates
Press Delay again and again until the display
shows the programme duration and the phase
indicators of the set programme come on. The
programme starts.
Cancelling the programme
Press and hold Start until the programme du-
ration flashes in the display and the phase indi-
cators of the set programme come on.
Make sure that there is detergent in the
detergent dispenser before you start a
new programme.
At the end of the programme
When the programme is completed, the display
shows 0 and the phase indicators go off.
1. Deactivate the appliance. Turn the pro-
gramme knob until the programme marker is
aligned with the off position.
2. Close the water tap.
• If you do not deactivate the appliance,
after three minutes from the end of the
programme:
– All the indicators go off.
– The display shows one horizontal sta-
tus bar.
This helps to decrease the energy con-
sumption.
Press one of the buttons, the display and
the indicators come on again.
• Let the dishes become cold before you
remove them from the appliance. Hot
dishes can be easily damaged.
• First remove the items from the lower
basket, then from the upper basket.
• There can be water on the sides and on
the door of the appliance. Stainless
steel becomes cool more quickly than
the dishes.
Care and cleaning
Warning! Before maintenance, deactivate
the appliance and disconnect the mains
plug from the mains socket.
Dirty filters and clogged spray arms de-
crease the washing results.
Make a check regularly and, if necessary, clean
them.
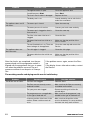
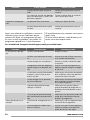
Cleaning the filters
1
C
B
A
2
10
www.zanussi.com

3
To remove filters (B)
and (C), turn the han-
dle counterclockwise
and remove. Pull
apart filter (B) and
(C). Wash the filters
with water.
A
4
Remove filter (A).
Wash the filter with
water.
D
A
5
Put filter (A) to its ini-
tial position. Make
sure that it assembles
correctly under the
two guides (D).
6
Assemble filters (B)
and (C). Put them in-
to position in filter
(A). Turn the handle
clockwise until it
locks.
An incorrect position of the filters can
cause bad washing results and damage to
the appliance.
Cleaning the spray arms
Do not remove the spray arms.
If the holes in the spray arms are clogged, re-
move remaining parts of soil with a thin pointed
object.
External cleaning
Clean the appliance with a moist soft cloth.
Only use neutral detergents. Do not use abra-
sive products, abrasive cleaning pads or sol-
vents.
Troubleshooting
The appliance does not start or it stops during
operation.
Before you contact the Service, refer to the in-
formation that follows for a solution to the prob-
lem.
With some problems, the display shows
an alarm code:
•
- The appliance does not fill with water.
•
- The appliance does not drain the wa-
ter.
•
- The anti-flood device is on.
Warning! Deactivate the appliance before
you do the checks. Turn the programme
knob until the programme marker is aligned
with the off position.
Problem Possible cause Possible solution
The programme does not
start.
The mains plug is not connected in
the mains socket.
Connect the mains plug.
11
www.zanussi.com

Problem Possible cause Possible solution
The appliance door is open. Close the appliance door.
You did not press Start. Press Start.
The fuse in the fuse box is damaged. Replace the fuse.
The delay start is set. Cancel the delay start or wait for the
end of the countdown.
The appliance does not fill
with water.
The water tap is closed. Open the water tap.
The water pressure is too low. Contact your local water authority.
The water tap is clogged or there is
limescale on it.
Clean the water tap.
The filter in the water inlet hose is
clogged.
Clean the filter.
The water inlet hose has a kink or a
bend.
Make sure that the position of the
hose is correct.
The anti-flood device is on. There are
water leakages in the appliance.
Close the water tap and contact the
Service.
The appliance does not
drain the water.
The sink spigot is clogged. Clean the sink spigot.
The water drain hose has a kink or a
bend.
Make sure that the position of the
hose is correct.
After the checks are completed, turn the pro-
gramme knob until the programme marker is
aligned with the programme that was in opera-
tion when the problem occurred. The pro-
gramme continues from the point of interrup-
tion.
If the problem occurs again, contact the Serv-
ice.
If the display shows other alarm codes, contact
the Service.
The washing results and drying results are not satisfactory
Problem Possible cause Possible solution
The dishes are not clean. The filters are clogged. Clean the filters.
The filters are not correctly assem-
bled and installed.
Make sure that the filters are correctly
assembled and installed.
The spray arms are clogged. Remove remaining soil with a thin
pointed object.
The programme was not applicable
for the type of load and soil.
Make sure that the programme is ap-
plicable for the type of load and soil.
Incorrect position of the items in the
baskets. Water could not wash all
items.
Make sure that the position of the
items in the baskets is correct and that
the water can easily wash all items.
12
www.zanussi.com

Problem Possible cause Possible solution
The spray arms could not turn freely. Make sure that the position of the
items in the baskets is correct and
does not cause the blockage of the
spray arms.
The quantity of detergent was not
sufficient.
Make sure that you add the correct
quantity of detergent in the dispenser
before you start a programme.
There was no detergent in the deter-
gent dispenser.
Make sure that you add detergent in
the dispenser before you start a pro-
gramme.
Limescale particles on the
dishes.
The salt container is empty. Make sure that there is dishwasher salt
in the salt container.
The set level of the water softener is
incorrect.
Make sure that the set level of the wa-
ter softener agrees with the water
hardness in your area.
The cap of the salt container is loose. Tighten the cap.
Whitish streaks and stains
or bluish layers on glasses
and dishes.
The released quantity of rinse aid is
too much.
Decrease the released quantity of
rinse aid
.
The quantity of detergent was too
much.
Make sure that you add the correct
quantity of detergent in the dispenser
before you start a programme.
Dry water drop stains on
glasses and dishes.
The released quantity of rinse aid
was not sufficient .
Increase the released quantity of rinse
aid.
The quality of the detergent can be
the cause.
Try a different brand of detergent.
The dishes are wet. The programme had no drying phase. Set a programme with the drying
phase.
The dishes are wet and
matt.
The rinse aid dispenser is empty. Make sure that there is rinse aid in the
rinse aid dispenser.
The quality of the rinse aid can be the
cause.
Try a different brand of rinse aid.
The quality of the combi detergent
tablets can be the cause.
• Try a different brand of combi deter-
gent tablets.
• Activate the rinse aid dispenser and
use the rinse aid together with the
combi detergent tablets.
Activating the rinse aid dispenser with the
multitab function activated
The appliance must be in setting mode, re-
fer to ‘SETTING AND STARTING A PRO-
GRAMME’.
1. Make sure that the programme marker on
the programme knob is aligned with the off
position.
2. Press and hold Start. At the same time turn
the programme knob counterclockwise until
the programme marker is aligned with the
first programme on the control panel.
13
www.zanussi.com

3. Release Start when the display shows the
setting of the water softener.
4. Turn the programme knob counterclockwise
until the programme marker is aligned with
the second washing programme on the
control panel.
5. The display shows the setting of the rinse
aid dispenser.
Off
On
6. Press Start to change the setting.
7. To confirm the setting, turn the programme
knob until the programme marker is aligned
with the off position.
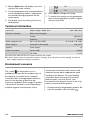
Technical information
Dimensions Width / Height / Depth (mm) 600 / 850 / 610
Electrical connection Refer to the rating plate.
Voltage 220-240 V
Frequency 50 Hz
Water supply pressure Min. / max. (bar / MPa) (0.5 / 0.05 ) / (8 / 0.8 )
Water supply
1)
Cold water or hot water
2)
max. 60 °C
Capacity Place settings 12
Power consumption Left-on mode 0.99 W
Off-mode 0.1 W
1) Connect the water inlet hose to a water tap with a 3/4'' thread.
2) If the hot water comes from alternative sources of energy, (e.g. solar panels, aeolian energy), use the hot
water supply to decrease energy consumption.
Environment concerns
The symbol on the product or on its
packaging indicates that this product may not
be treated as household waste. Instead it
should be taken to the appropriate collection
point for the recycling of electrical and
electronic equipment. By ensuring this product
is disposed of correctly, you will help prevent
potential negative consequences for the
environment and human health, which could
otherwise be caused by inappropriate waste
handling of this product. For more detailed
information about recycling of this product,
please contact your local council, your
household waste disposal service or the shop
where you purchased the product.
• Discard correctly the packaging material. Re-
cycle the materials with the symbol
.
14
www.zanussi.com

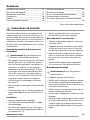
Sommaire
Instructions de sécurité _ _ _ _ _ _ _ _ _ _ _ 15
Description de l'appareil _ _ _ _ _ _ _ _ _ _ 17
Bandeau de commande _ _ _ _ _ _ _ _ _ _ 17
Programmes _ _ _ _ _ _ _ _ _ _ _ _ _ _ _ _ _ 18
Options _ _ _ _ _ _ _ _ _ _ _ _ _ _ _ _ _ _ _ 18
Avant la première utilisation _ _ _ _ _ _ _ _ _ 19
Utilisation quotidienne _ _ _ _ _ _ _ _ _ _ _ 21
Entretien et nettoyage _ _ _ _ _ _ _ _ _ _ _ 24
En cas d'anomalie de fonctionnement _ _ _ 25
Caracteristiques techniques _ _ _ _ _ _ _ _ 28
En matière de protection de l'environnement
_ _ _ _ _ _ _ _ _ _ _ _ _ _ _ _ _ _ _ _ _ _ _ _ 28
Sous réserve de modifications.
Instructions de sécurité
Avant d'installer et d'utiliser cet appareil, lisez
soigneusement les instructions fournies. Le fa-
bricant ne peut être tenu pour responsable des
dommages et blessures liés à une mauvaise in-
stallation ou utilisation. Conservez toujours cet-
te notice avec votre appareil pour vous y référer
ultérieurement.
Sécurité des enfants et des personnes
vulnérables
Avertissement Risque d'asphyxie, de
blessure ou d'invalidité permanente.
• Cet appareil n'est pas conçu pour être utilisé
par des personnes (y compris des enfants)
dont les facultés physiques, sensorielles ou
mentales sont réduites, ou qui manquent
d'expérience et de connaissances, à moins
qu'une personne responsable de leur sécu-
rité ne les supervise ou leur donne des ins-
tructions sur la manière de l'utiliser. Ne lais-
sez pas les enfants jouer avec l'appareil.
• Ne laissez pas les emballages à la portée
des enfants.
• Ne laissez pas les détergents à la portée des
enfants.
• Tenez les enfants et les animaux éloignés de
la porte de l'appareil lorsque celle-ci est ou-
verte.
Installation
• Retirez l'intégralité de l'emballage.
• N'installez pas et ne branchez pas un appa-
reil endommagé.
• N'installez pas l'appareil ou ne l'utilisez pas
dans un endroit où la température ambiante
est inférieure à 0 °C.
• Suivez scrupuleusement les instructions
d'installation fournies avec l'appareil.
Raccordement à l'arrivée d'eau
• Veillez à ne pas endommager les tuyaux de
circulation d'eau.
• L'appareil doit être raccordé au circuit d'eau
à l'aide des tuyaux neufs fournis. N'utilisez
pas de tuyaux provenant d'anciens appareils.
• Avant de brancher l'appareil à des tuyaux
neufs ou n'ayant pas servi depuis longtemps,
laissez couler l'eau jusqu'à ce qu'elle soit
propre.
• Avant d'utiliser l'appareil pour la première
fois, assurez-vous de l'absence de fuites.
Branchement électrique
Avertissement Risque d'incendie ou
d'électrocution.
• L'appareil doit être relié à la terre.
• Vérifiez que les données électriques figurant
sur la plaque signalétique correspondent à
celles de votre réseau. Si ce n'est pas le cas,
contactez un électricien.
• Utilisez toujours une prise de courant de sé-
curité correctement installée.
• N'utilisez pas d'adaptateurs multiprises ni de
rallonges.
• Veillez à ne pas endommager la fiche secteur
ni le câble d'alimentation. Contactez le servi-
ce après-vente ou un électricien pour rem-
placer le câble d'alimentation s'il est endom-
magé.
15
www.zanussi.com

• Ne connectez la fiche d'alimentation à la pri-
se de courant qu'à la fin de l'installation. As-
surez-vous que la prise de courant est ac-
cessible une fois l'appareil installé.
• Ne tirez jamais sur le câble d'alimentation
électrique pour débrancher l'appareil. Tirez
toujours sur la prise.
• Pour le Royaume-Uni et l'Irlande uni-
quement.L'appareil est livré avec une fiche
secteur de 13 ampères. Si vous devez chan-
ger le fusible de la fiche secteur, utilisez un
fusible 3 A approuvé ASTA (BS 1362).
Utilisation
• Cet appareil est conçu uniquement pour un
usage domestique et des situations telles
que:
– Cuisines réservées aux employés dans
des magasins, bureaux et autres lieux de
travail
– Bâtiments de ferme
– Pour une utilisation privée, par les clients,
dans des hôtels et autres lieux de séjour
– En chambre d'hôte.
Avertissement Risque de blessure.
• Ne modifiez pas les caractéristiques de cet
appareil.
• Placez les couteaux et les couverts avec des
bouts pointus dans le panier à couverts avec
les pointes tournées vers le bas ou en posi-
tion horizontale.
• Ne laissez pas la porte de l'appareil ouverte
sans surveillance pour éviter tout risque de
chute.
• Ne montez pas sur la porte ouverte de votre
appareil ; ne vous asseyez pas dessus.
• Les produits de lavage pour lave-vaisselle
sont dangereux. Suivez les consignes de sé-
curité figurant sur l'emballage du produit de
lavage.
• Ne buvez pas l'eau de l'appareil ; ne jouez
pas avec.
• N'enlevez pas la vaisselle de l'appareil avant
la fin du programme. Il peut rester du produit
de lavage sur la vaisselle.
Avertissement Risque d'électrocution,
d'incendie ou de brûlures.
• Ne placez pas de produits inflammables ou
d'éléments imbibés de produits inflammables
à l'intérieur, à proximité ou sur l'appareil.
• Ne pulvérisez pas d'eau ni de vapeur pour
nettoyer l'appareil.
• De la vapeur chaude peut s'échapper de
l'appareil si vous ouvrez la porte pendant le
déroulement d'un programme.
Mise au rebut
Avertissement Risque de blessure ou
d'asphyxie.
• Débranchez l'appareil de l'alimentation élec-
trique.
• Coupez le câble d'alimentation et mettez-le
au rebut.
• Retirez le dispositif de verrouillage de la por-
te pour empêcher les enfants et les animaux
de s'enfermer dans l'appareil.
Service après-vente
Contactez votre service après-vente pour faire
réparer l'appareil. N'utilisez que des pièces de
rechange d'origine.
Lorsque vous contactez le service, assurez-
vous de disposer des informations suivantes
(qui se trouvent sur la plaque signalétique).
Modèle :
PNC :
Numéro de série :
16
www.zanussi.com

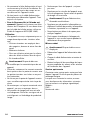
Description de l'appareil
2
1
3
4
5
10
9
7
8
6
1
Plan de travail
2
Bras d'aspersion inférieur
3
Filtres
4
Plaque signalétique
5
Distributeur de liquide de rinçage
6
Distributeur de produit de lavage
7
Réservoir de sel régénérant
8
Sélecteur de dureté de l'eau
9
Bras d'aspersion supérieur
10
Panier supérieur
Bandeau de commande
1
8765
23 4
1
Indicateur de programme
2
Position Arrêt
3
Voyants
4
Affichage
5
Touche Delay
6
Touche Multitab
7
Touche Start
8
Sélecteur de programme
Voyants Description
Voyant de phase de lavage.
Voyant de phase de séchage.
Voyant du réservoir de liquide de rinçage. Ce voyant est éteint pen-
dant le déroulement du programme.
Voyant du réservoir de sel régénérant. Ce voyant est éteint pendant
le déroulement du programme.
Voyant Multitab.
17
www.zanussi.com

Programmes
Programme
1)
Degré de salissu-
re
Type de charge
Phases du
programme
Durée
(min)
Consom-
mation
électrique
(KWh)
Eau
(l)
2)
Tous
Vaisselle, couverts,
plats et casseroles
Prélavage
Lavage à 45 °C ou 70 °C
Rinçages
Séchage
90 - 130 1.1 - 1.7 11 - 22
Très sale
Vaisselle, couverts,
plats et casseroles
Prélavage
Lavage à 70 °C
Rinçages
Séchage
80 - 90 1.6 - 1.8 22 - 24
3)
Normalement sale
Vaisselle et couverts
Prélavage
Lavage à 50 °C
Rinçages
Séchage
155 - 167 0.99 - 1.04 12.2 - 13
4)
Tous Prélavage 12 0.1 4
5)
Vaisselle fraîche-
ment salie
Vaisselle et couverts
Lavage à 65 °C
Rinçage
30 0.9 9
1) La durée du programme et les valeurs de consommation peuvent changer en fonction de la pression et de la
température de l'eau, des variations de l'alimentation électrique, de la quantité de vaisselle chargée ainsi que
des options sélectionnées.
2) L'appareil détecte le degré de salissure et la quantité de vaisselle dans les paniers. Il règle automatiquement
la température ainsi que le volume d'eau, la consommation d'énergie et la durée du programme.
3) Il s'agit du programme standard pour les instituts de tests. Ce programme vous permet d'optimiser votre
consommation d'eau et d'énergie pour la vaisselle et les couverts normalement sales.
4) Ce programme permet un rinçage rapide. Cela empêche les restes de nourriture de coller sur la vaisselle et
évite les mauvaises odeurs.
N'utilisez pas de produit de lavage avec ce programme.
5) Ce programme permet de laver une charge de vaisselle fraîchement salie. Il offre de bons résultats de lavage
en peu de temps.
Informations pour les instituts de test
Pour toute information relative aux performances de test, envoyez un courrier électronique à
l'adresse :
Notez le numéro du produit (PNC) situé sur la plaque signalétique.
Options
Option « Multitab »
Activez cette option uniquement si vous utilisez
des pastilles de détergent multifonctions.
Cette option désactive le débit du liquide de
rinçage et du sel régénérant. Les voyants cor-
respondants sont éteints.
La durée du programme peut augmenter.
18
www.zanussi.com

Activation de l'option Multitab
Activez ou désactivez l'option Multitab
avant le début d'un programme. Vous ne
pouvez pas activer ni désactiver cette option
pendant le déroulement d'un programme.
1. Appuyez sur la touche Marche/Arrêt pour
allumer l'appareil. Assurez-vous que l'appa-
reil est en mode Programmation. Reportez-
vous au chapitre « RÉGLAGE ET DÉPART
D'UN PROGRAMME ».
2. Appuyez sur la touche Multitab ; le voyant
Multitab s'allume.
Cette option reste activée jusqu'à ce que
vous la désactiviez. Appuyez sur la touche
Multitab ; le voyant Multitab s'éteint.
Si vous arrêtez d'utiliser des pastilles de
détergent multifonctions, avant de
commencer à utiliser séparément du
produit de lavage, du liquide de rinçage et
du sel régénérant, effectuez ces étapes :
1. Désactivez l'option Multitab.
2. Réglez l'adoucisseur d'eau au niveau maxi-
mum.
3. Assurez-vous que le réservoir de sel régé-
nérant et le distributeur de liquide de rinça-
ge sont pleins.
4. Démarrez le programme le plus court par
une phase de rinçage, sans produit de lava-
ge ni vaisselle.
5. Réglez l'adoucisseur d'eau en fonction de la
dureté de l'eau de votre région.
6. Ajustez la quantité de liquide de rinçage li-
bérée.
Avant la première utilisation
1. Assurez-vous que le niveau réglé pour
l'adoucisseur d'eau est compatible avec la
dureté de l'eau de votre région. Dans le cas
contraire, réglez l'adoucisseur d'eau. Con-
tactez votre compagnie des eaux pour con-
naître la dureté de l'eau de votre région.
2. Remplissez le réservoir de sel régénérant.
3. Remplissez le distributeur de liquide de rin-
çage.
4. Ouvrez le robinet d'eau.
5. Des résidus de traitement peuvent subsister
dans votre lave-vaisselle. Démarrez un pro-
gramme pour les supprimer. N'utilisez pas
de produit de lavage et ne chargez pas les
paniers.
Si vous utilisez des pastilles de détergent
multifonctions, activez la fonction « Tout en
1 ». Ces pastilles contiennent du produit de la-
vage, du liquide de rinçage et d'autres adju-
vants. Assurez-vous que ces pastilles sont
adaptées à la dureté de l'eau de votre région.
Reportez-vous aux instructions figurant sur
l'emballage de ces produits.
Réglage de l'adoucisseur d'eau
L'eau dure contient une grande quantité de mi-
néraux pouvant endommager l'appareil et don-
ner de mauvais résultats de lavage. L'adoucis-
seur d'eau neutralise ces minéraux.
Le sel régénérant préserve la propreté et le bon
état de l'adoucisseur d'eau. Reportez-vous au
tableau pour régler l'adoucisseur d'eau au ni-
veau adapté. Il garantit que l'adoucisseur d'eau
utilise la quantité correcte de sel régénérant et
d'eau.
L'adoucisseur d'eau doit être réglé ma-
nuellement et électroniquement.
19
www.zanussi.com

Dureté de l'eau
Adoucisseur d'eau
réglage
Degrés
allemands
(°dH)
Degrés
français
(°fH)
mmol/l Degrés
Clarke
Manuel Électro-
nique
51 - 70 91 - 125 9.1 - 12.5 64 - 88
2
1)
10
43 - 50 76 - 90 7.6 - 9.0 53 - 63
2
1)
9
37 - 42 65 - 75 6.5 - 7.5 46 - 52
2
1)
8
29 - 36 51 - 64 5.1 - 6.4 36 - 45
2
1)
7
23 - 28 40 - 50 4.0 - 5.0 28 - 35
2
1)
6
19 - 22 33 - 39 3.3 - 3.9 23 - 27
2
1)
5
1)
15 - 18 26 - 32 2.6 - 3.2 18 - 22 1 4
11 - 14 19 - 25 1.9 - 2.5 13 - 17 1 3
4 - 10 7 - 18 0.7 - 1.8 5 - 12 1 2
< 4 < 7 < 0.7 < 5
1
2)
1
2)
1) Réglage d'usine.
2) Ne pas utiliser de sel à ce niveau.
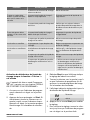
Réglage manuel
1
2
Tournez le sélecteur
de dureté de l'eau sur
la position 1 ou 2.
Réglage électronique
L'appareil doit être en mode Programma-
tion. Reportez-vous au chapitre « RÉGLA-
GE ET DÉPART D'UN PROGRAMME ».
1. Assurez-vous que l'indicateur de program-
me du sélecteur est aligné sur la position
Arrêt.
2. Appuyez de façon prolongée sur Start. Si-
multanément, tournez le sélecteur vers la
gauche jusqu'à ce que l'indicateur de pro-
gramme soit aligné sur le premier program-
me de lavage sur le bandeau de comman-
de.
3. Relâchez Start lorsque l'affichage indique
le réglage de l'adoucisseur d'eau.
•
Exemple :
= niveau 5.
4. Appuyez sur Start à plusieurs reprises pour
modifier le réglage.
5. Pour confirmer le réglage, tournez le sélec-
teur jusqu'à ce que l'indicateur de program-
me soit aligné sur la position Arrêt.
Remplissage du réservoir de sel
régénérant
Attention Utilisez uniquement du sel
régénérant pour lave-vaisselle. D'autres
produits peuvent endommager l'appareil.
De l'eau et du sel peuvent sortir du réservoir de
sel régénérant lorsque vous le remplissez.
Risque de corrosion. Afin d'éviter cela, après
avoir rempli le réservoir de sel régénérant,
démarrez un programme.
20
www.zanussi.com
La page est en cours de chargement...
La page est en cours de chargement...
La page est en cours de chargement...
La page est en cours de chargement...
La page est en cours de chargement...
La page est en cours de chargement...
La page est en cours de chargement...
La page est en cours de chargement...
La page est en cours de chargement...
La page est en cours de chargement...
La page est en cours de chargement...
La page est en cours de chargement...
-
 1
1
-
 2
2
-
 3
3
-
 4
4
-
 5
5
-
 6
6
-
 7
7
-
 8
8
-
 9
9
-
 10
10
-
 11
11
-
 12
12
-
 13
13
-
 14
14
-
 15
15
-
 16
16
-
 17
17
-
 18
18
-
 19
19
-
 20
20
-
 21
21
-
 22
22
-
 23
23
-
 24
24
-
 25
25
-
 26
26
-
 27
27
-
 28
28
-
 29
29
-
 30
30
-
 31
31
-
 32
32


Zanussi ZDF3023S Manuel utilisateur
- Catégorie
- Lave-vaisselle
- Taper
- Manuel utilisateur
dans d''autres langues
- English: Zanussi ZDF3023S User manual
Documents connexes
-
Zanussi ZDF2010 Manuel utilisateur
-
Zanussi ZDF3025 Manuel utilisateur
-
-
-
-
Zanussi ZDT15001FA Manuel utilisateur
-
Zanussi ZDF14001XA Manuel utilisateur
-
-
Zanussi ZDI15001XA Manuel utilisateur
-
Autres documents
-
Faure FDF3013 Manuel utilisateur
-
-
-
-
-
-
Aeg-Electrolux F45010M0 Manuel utilisateur
-
Aeg-Electrolux GSAIS221 Manuel utilisateur
-
AEG F45002M0 Manuel utilisateur