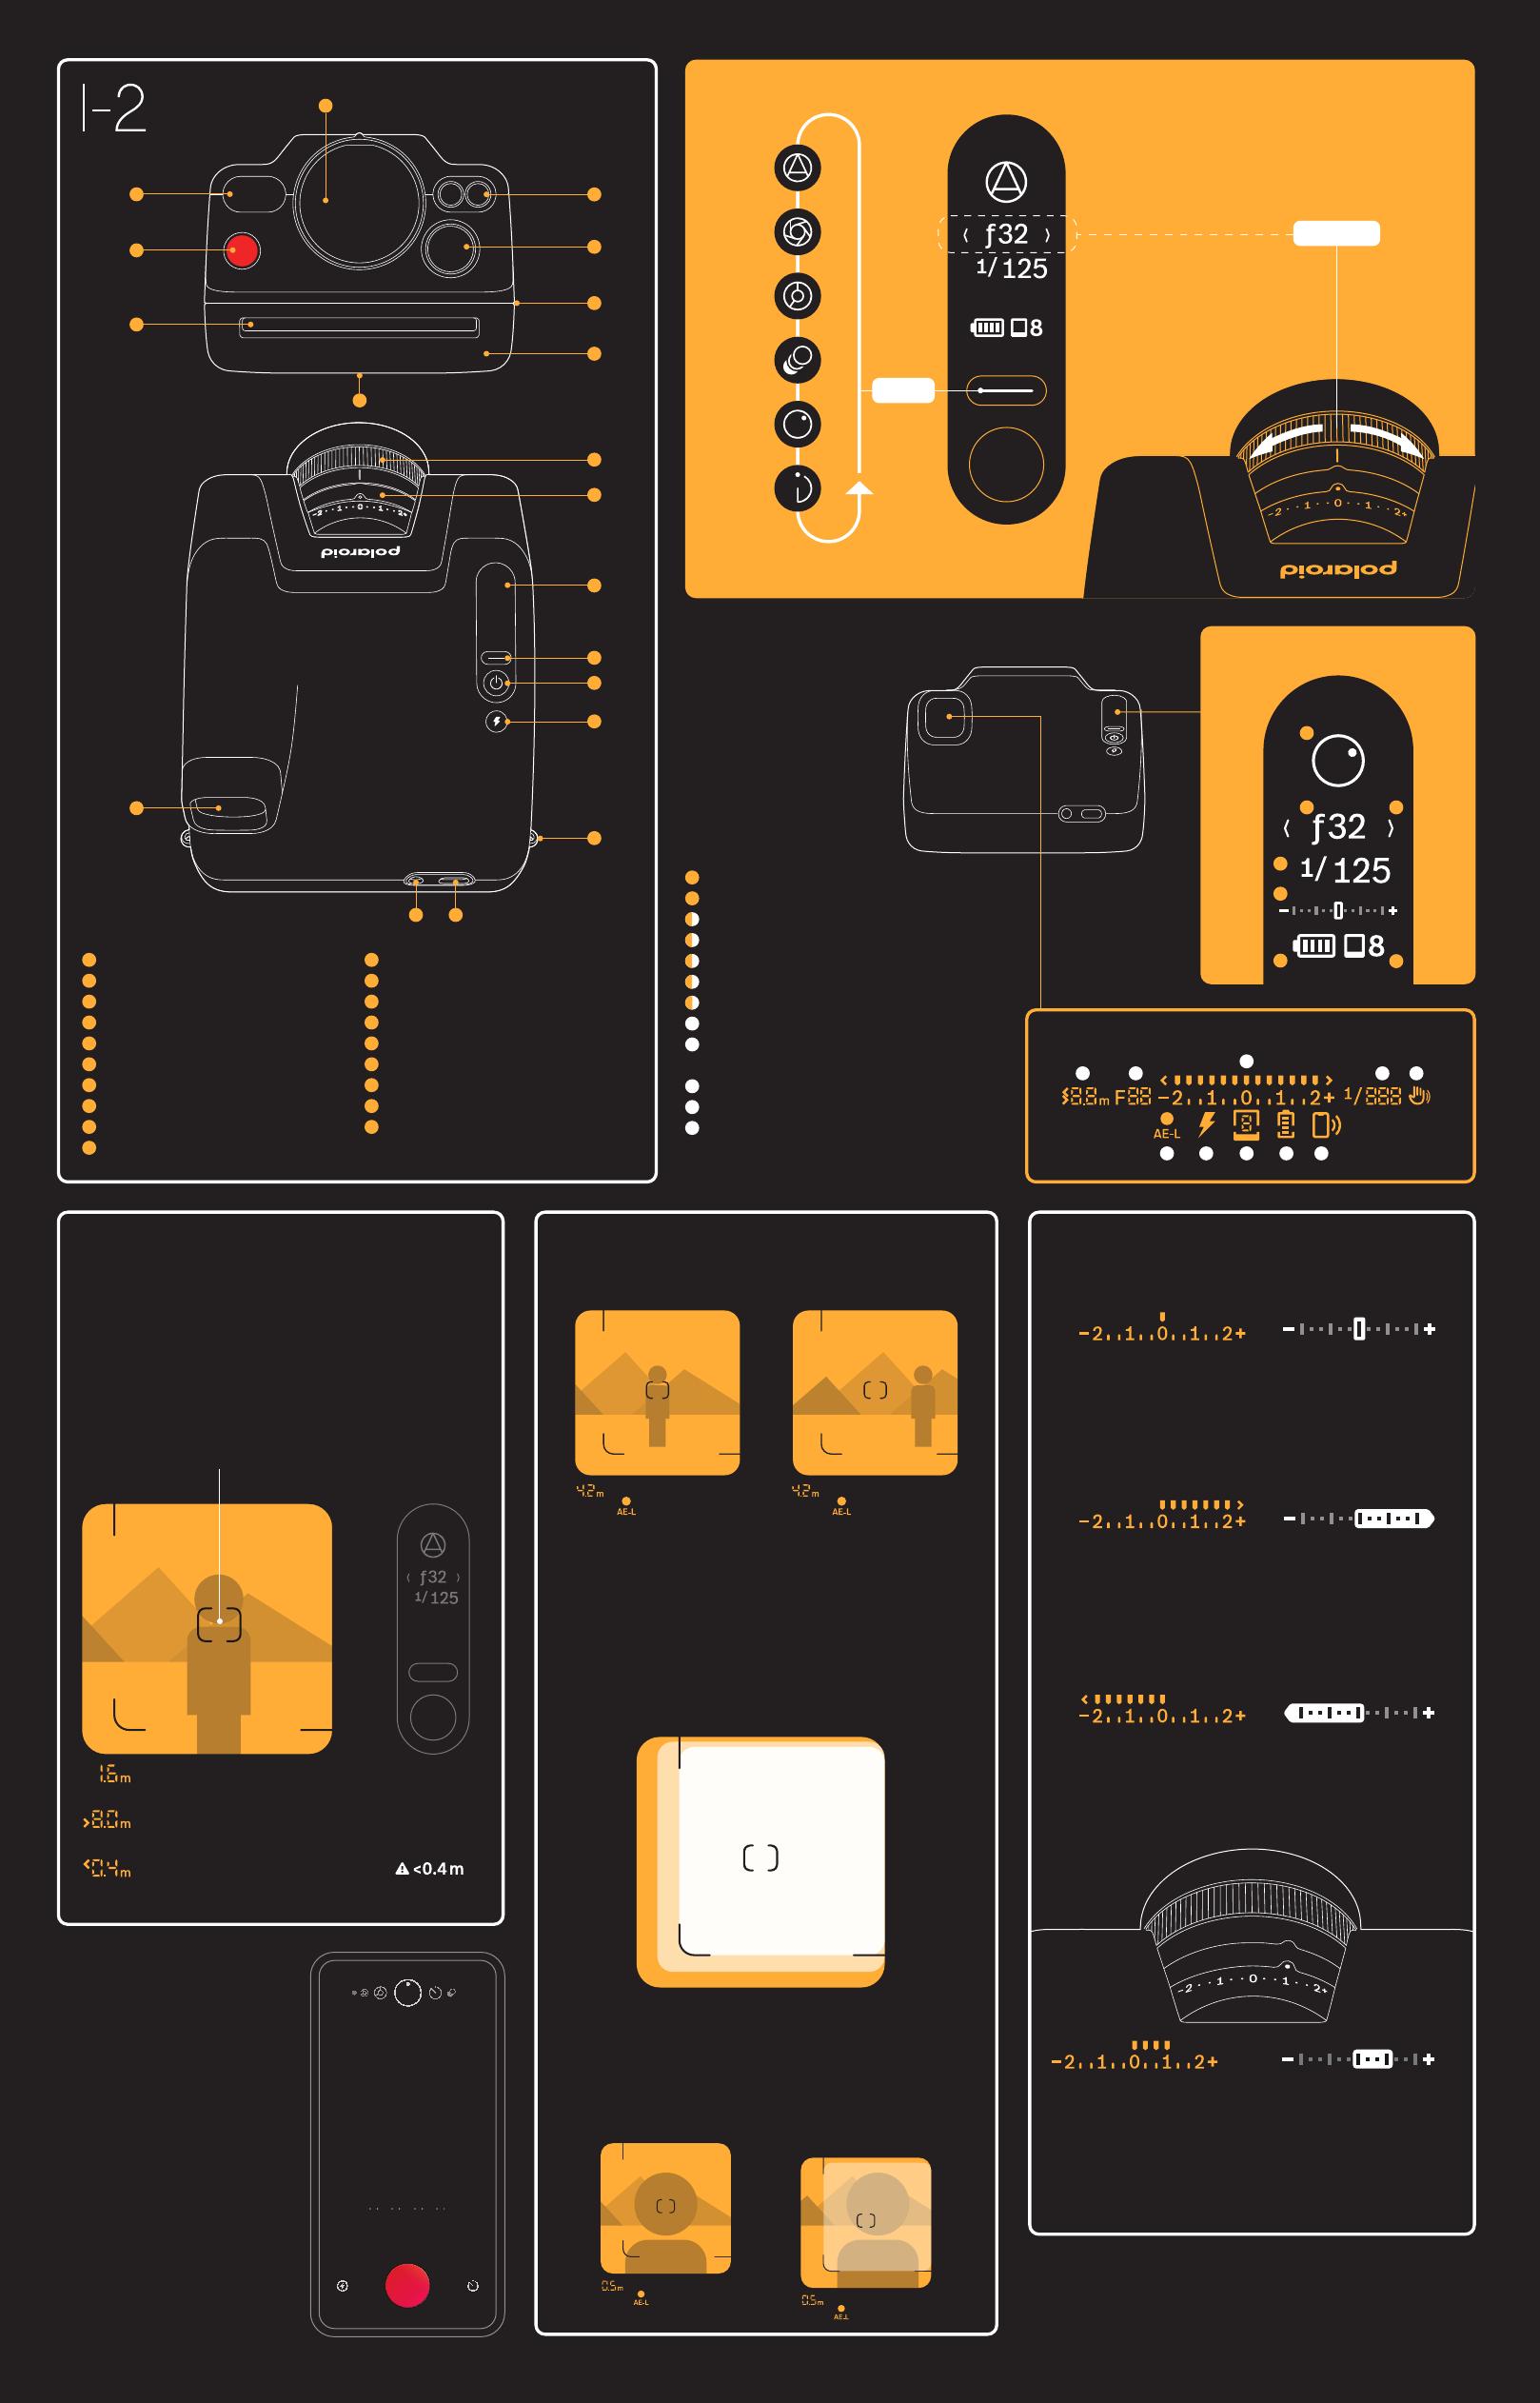
Menu navigation
Navigation du Menu
SELECT
Auto
mode
Mode auto
Aperture
priority
Priorité
ouverture
Shutter
priority
Priorité
vitesse
Manual
mode
Mode
manuel
Multiple
exposure
Multiples
expositions
Self
timer
Retardateur
MODE
Aim the center of the autofocus frame at your subject. When
you half-press the shutter button, the focus / subject distance
is shown on the inner and outer displays.
Placez le centre du cadre de mise au point sur votre sujet. Lorsque vous appuyez
à mi-course sur le déclencheur, la distance de mise au point s'affiche sur les
écrans intérieur et extérieur.
Focus distance
Distance de Mise au Point
∞
Over 8m = Infinity
Under 0.4m = Too Close!
Plus de 8m = Infini
Moins de 0.4m = Trop près!
1.6m
Autofocus Frame
Cadre de Mise au Point
While the Polaroid I-2 works as a
standalone instant camera, you
can download the Polaroid App
to access more features and gain
even greater control over your
photography.
Le Polaroid I-2 fonctionne comme un
appareil photo instantané autonome,
cependant, vous pouvez télécharger
l'application Polaroid pour accéder à
encore plus de fonctionnalités.
Polaroid App
Application Polaroid
100
1/
80 160
1/
0 1 212 + -
ƒ8ƒ11
200
1/
ƒ22
ƒ45
125
1/
SHUTTER SPEED
APERTURE
16ƒ
Exposure meter
Indicateur d’Exposition
In Manual mode the exposure meter helps to find the right
exposure (0) on the inner and outer displays.
En mode manuel, l’indicateur d’exposition aide à trouver la bonne exposition
(0) sur les écrans intérieur et extérieur.
If the meter points to the right, your photo will be overexposed.
Try a faster shutter speed or a higher ƒ/number.
Si l’indicateur d’exposition pointe vers la droite, votre photo sera surexposée.
Essayez une vitesse d'obturation plus rapide ou un plus grand nombre ƒ.
If the meter points to the left, your photo will be underexposed.
Try a slower shutter speed or a lower ƒ/number.
Si l’indicateur d’exposition pointe vers la gauche, votre photo sera sous-exposée.
Essayez une vitesse d'obturation plus lente ou un plus petit nombre ƒ.
In all other modes the camera will try to automatically select the
correct exposure (0). However, if you have used the EV dial to
compensate the exposure, the displays will reflect this.
Dans tous les autres modes, l'appareil photo sélectionnera automatiquement
l'exposition correcte (0). Cependant, si vous avez utilisé la molette EV pour
compenser l'exposition, ce réglage sera indiqué sur les écrans.
Apple and the App Store logo are trademarks of
Apple Inc., registered in the U.S. and other
countries and regions. Google Play and the Google
Play logo are trademarks of Google LLC. The
Bluetooth® word markand logos are registered
trademarks owned by Bluetooth SIG, Inc. and any
use of such marks by Polaroid International B.V. is
under license. Other trademarks and trade names
are those of their respective owners.
Made in China for, and distributed by, Polaroid International B.V., 1013
AP, Amsterdam, The Netherlands. POLAROID, the Color Spectrum, and
the Classic Border Logo are protected trademarks of Polaroid.
Fabriqué en Chine pour, et distribué par, Polaroid International B.V.,
1013 AP, Amsterdam, Pays-Bas. POLAROID, le Color Spectrum et le
Polaroid Classic Border Logo sont des marques protégées de Polaroid.
© 2023 Polaroid. All Rights Reserved.
Displays
Écrans
Inner display / Écran intérieur
Outer display / Écran extérieur
3 4
5
67
8
910 11
12
1
2
3
4
5
67
A
B
C
D
E
F
G
H
I
J
1
2
3
4
5
6
7
8
9
10
11
12
Mode / Mode
Selection Dial Indicator / Indicateur de Sélection
Aperture / Ouverture
Shutter Speed / Vitesse d'Obturation
Exposure Meter / Indicateur d'Exposition
Battery Level / Niveau de Batterie
Film Count / Nombre de Photos
Focus Distance / Distance de Mise au Point
Auto Exposure-Focus Lock / Verrouillage de
l'Exposition-Mise au Point
Flash On|Off / Flash Marche|Arrêt
App Connected / Application Connectée
Tripod Recommended / Trépied Recommandé
Flash / Flash
Shutter Button / Bouton Déclencheur
Film Shield / Protecteur de Film
Camera Lens / Objectif de l’Appareil
LIDAR Ranging / Télémètre LIDAR
Viewfinder Front / Viseur Avant
Film Door Latch / Loquet Compartiment Film
Film Door / Compartiment Film
Tripod Mount / Support de Trépied
Selection Dial / Molette de Sélection
EV Switch / Molette EV
Outer Display / Écran Extérieur
Mode-OK Button / Bouton Mode-OK
ON|OFF Button / Bouton Marche|Arrêt
Flash Button / Bouton Flash
Strap Mount / Attache pour Sangle
USB-C Charging Port / Port de Charge
2.5mm Flash Sync / 2.5mm Synchro Flash
Viewfinder / Viseur
K
L
M
N
O
P
R
Q
S
A
B
C
D
E
F
G
H
I
J
K
L
M
N
O
P
S
R Q
2.
1.
Subject Framing
Cadrage du sujet
Half-pressing the shutter button will
also lock exposure and focus on
the subject.
Appuyez à mi-course sur le déclencheur
pour verrouiller l'exposition et faire la mise
au point sur le sujet.
For an in-focus, off-center subject:
keep the button half-pressed, re-aim
the autofocus frame, and shoot.
Pour un sujet net et décentré: maintenez le
bouton enfoncé à mi-course, réorientez le
cadre de mise au point et prenez la photo.
Focus - Exposure lock
Mise au Point - Verrouillage de l'Exposition
The whole viewfinder represents a photo framed at ∞. When a subject
is closer than 8m, you may want to ensure your subject is centered
within the frame by 1. locking focus and 2. adjusting your framing.
L'ensemble du viseur représente une photo cadrée à ∞. Lorsqu'un sujet est à moins de
8 m, pour vous assurer que votre sujet est centré dans le cadre, 1. verrouillez d’abord la
mise au point puis 2. ajustez votre cadrage.
1.0m
0.5m
∞

