Asus P306 Mode d'emploi

Catégorie
Souris
Taper
Mode d'emploi
EN
ZH
ZH:SC
FR
PT:BRDE
RUIT
FITR
HU
ES
PLCS
SKNL
SV
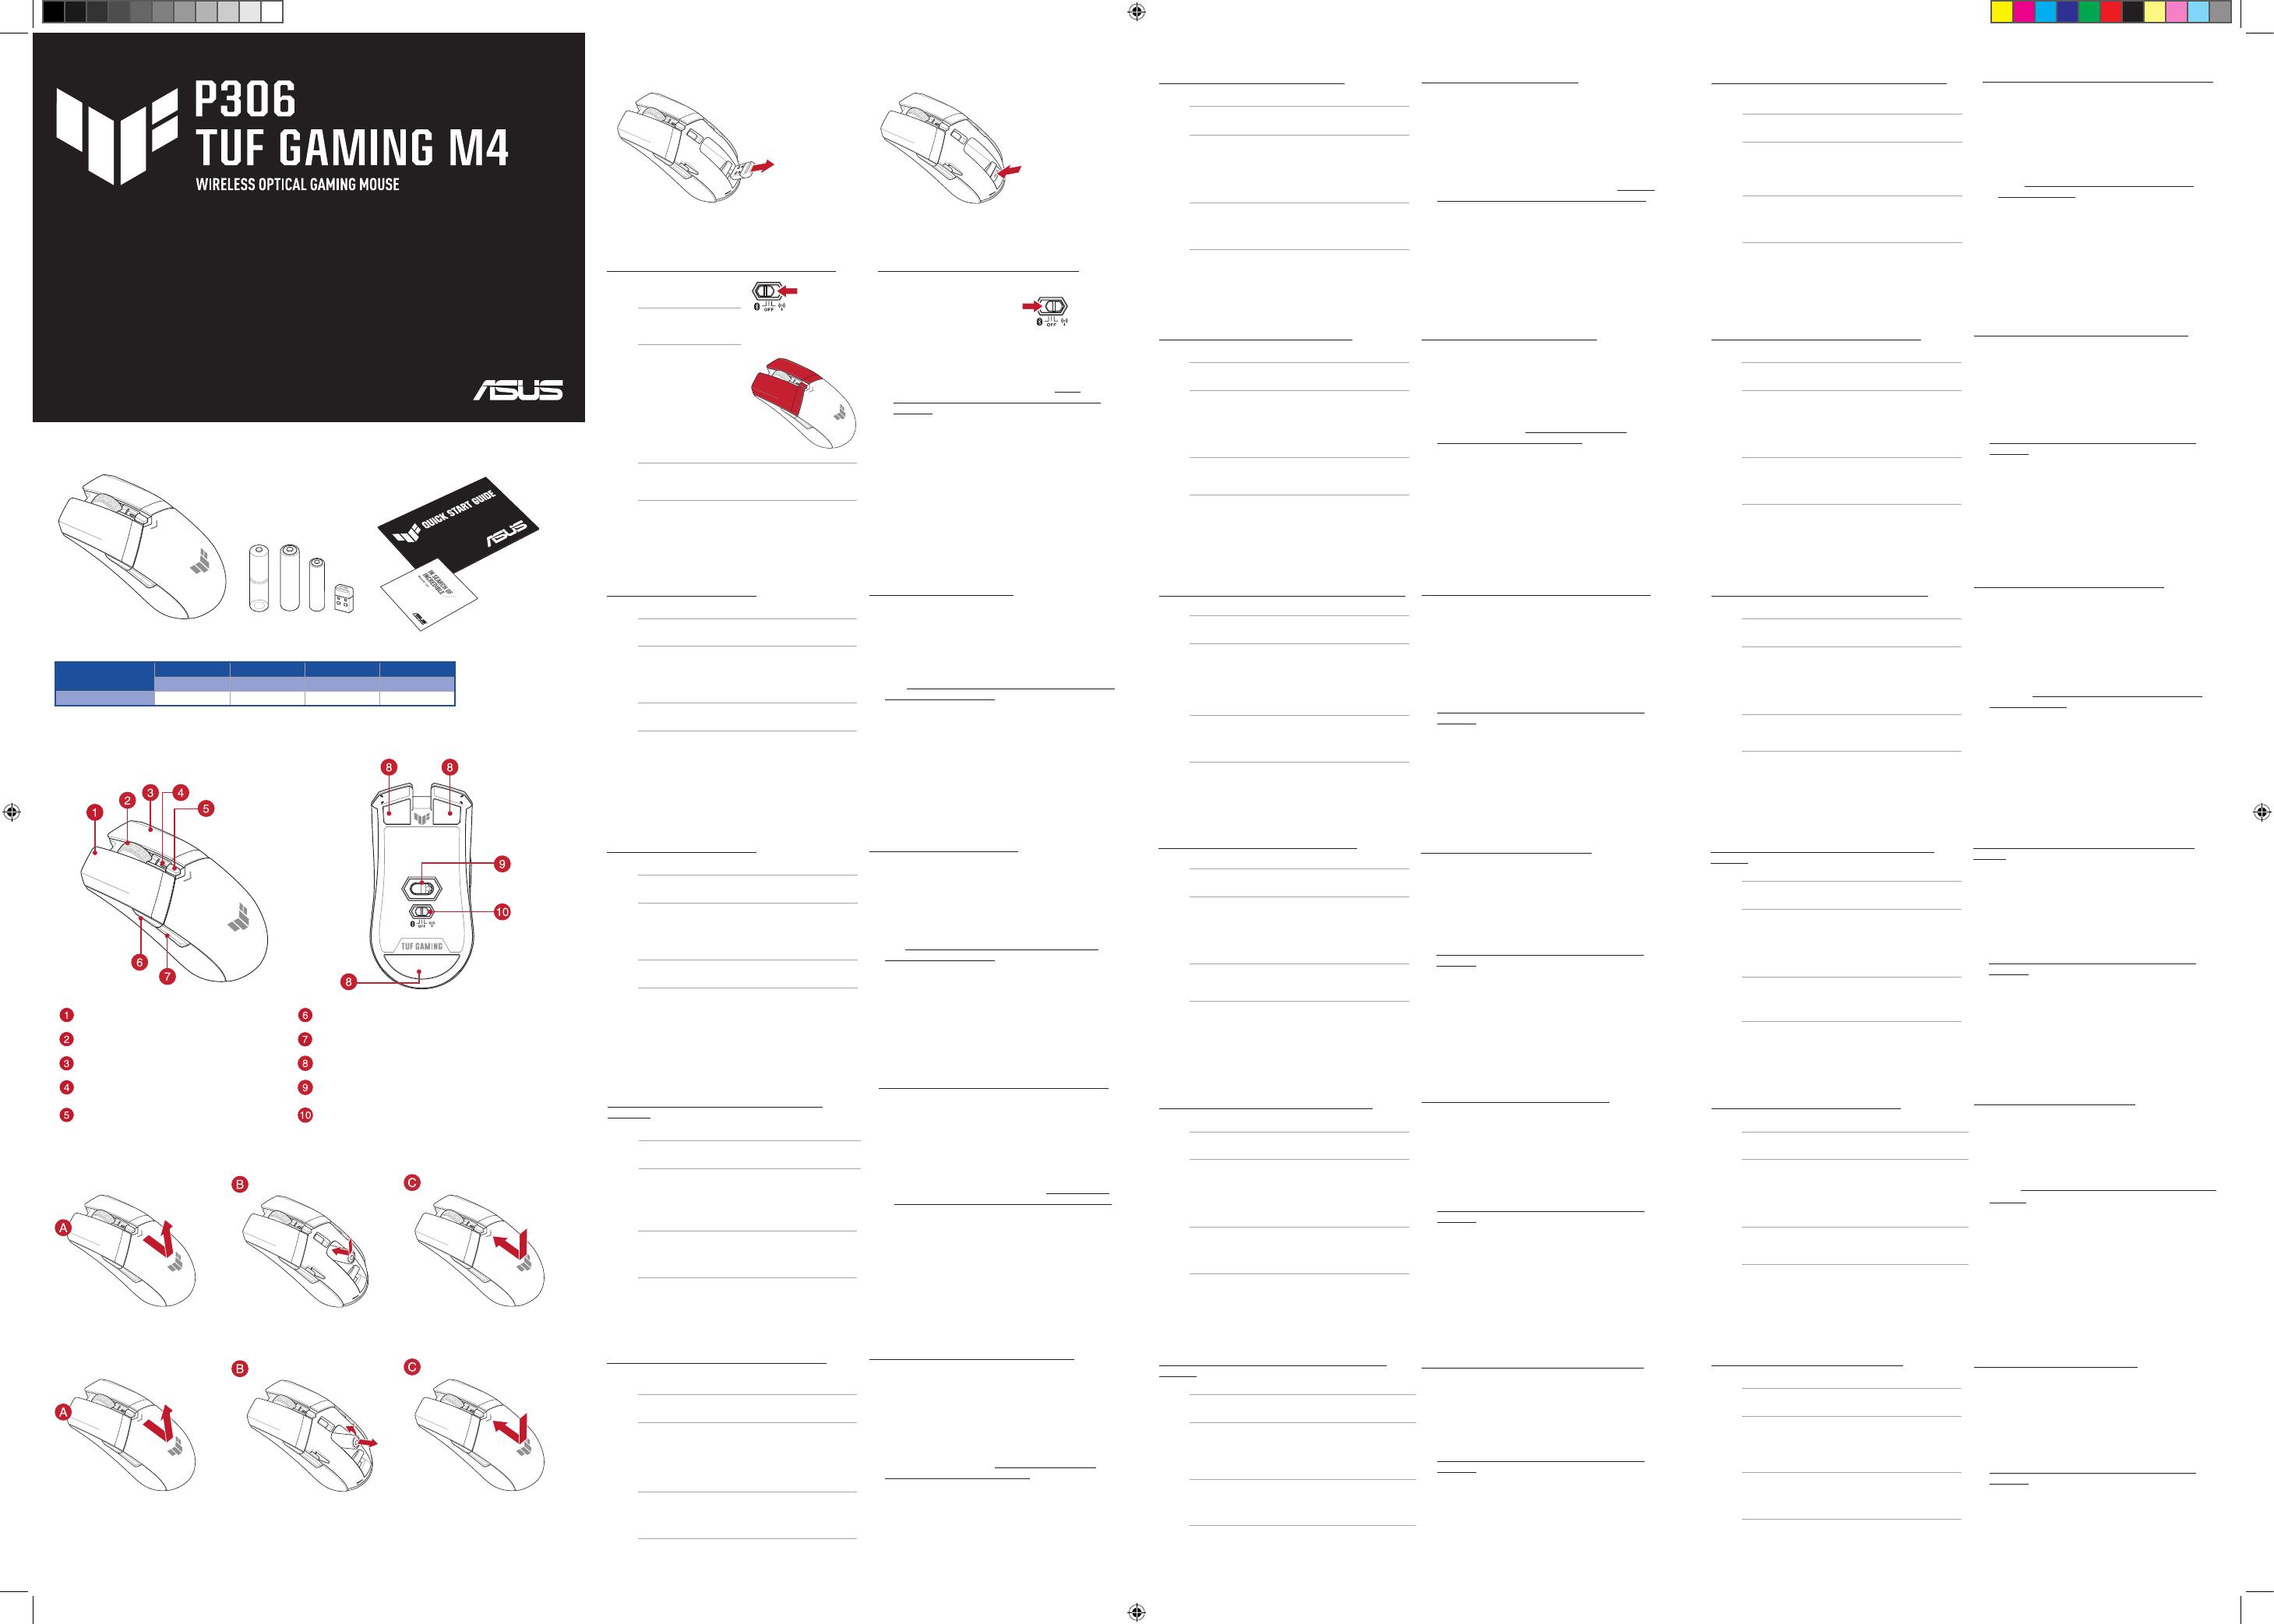
Mouse features / 滑鼠功能 / 鼠標功能
Package Contents
Q18199a
Quick Start Guide
快速使用指南(繁體中文)
快速使用指南(簡體中文)
クイックスタート (JP)
단사 설명 (KO)
Guide de démarrage rapide (FR)
Schnellstartanleitung (DE)
Guida rapida (IT)
Guia de Início Rápido (PT:BR)
Краткое руководство (RU)
Guía de inicio rápido (ES)
Beknopte handleiding (NL)
Hızlı Başlangıç Kılavuzu (TR)
Стисле керівництво для початку експлуатації (UA)
Przewodnik szybkiego startu (PL)
Rychlý průvodce (CS)
Ghid de pornire rapidă (RO)
Gyors üzembe helyezési útmutató (HU)
Snabbstartshandbok (SV)
Pikaopas (FI)
Hurtigstartveiledning (NO)
Stručný návod na používanie (SK)
(AR)
)HB
Specications*
Resolution DPI 1 DPI 2 DPI 3 (Default) DPI 4
Red Purple Blue Green
100 DPI to 12000 DPI 400 DPI 800 DPI 1600 DPI 3200 DPI
* You may customize the DPI settings for DPI 1-4 through Armoury Crate.
Removing the USB Dongle
Installing the battery
Removing the battery
Replacing the USB Dongle
Left-click button
/ 左鍵 / 左鍵
Forward button /
向前按鈕
/
向前按鈕
Scroll wheel
/ 滾輪 / 滾輪
Backward button /
向後按鈕
/
向後按鈕
Right-click button
/ 右鍵 / 右鍵
Mouse feet /
滑鼠腳墊 / 鼠標腳墊
DPI Indicator /
DPI 指示燈 / DPI 指示燈
Optical sensor /
光學感測器 / 光學感應器
DPI button /
DPI 按鈕 / DPI 按鈕
Connection mode switch /
連線模式切換開關 / 連接
模式切換開關
P306
TUF GAMING M4
WIRELESS OPTICAL GAMING MOUSE
Atualizar o rmware e personalizar
1. Conecte o dongle USB a uma porta USB e congure o mouse para
jogos no modo RF 2.4G wireless.
2. Faça Download e instale o software Armoury Crate a partir de
www.asus.com/supportonly/Armoury%20Crate/HelpDesk_
Download/..
3. Siga as instruções de software para atualizar o rmware do seu
rato gaming.
4. Personalize o seu rato gaming usando a Armoury Crate.
Estado da Bateria
O LED indicador de DPI piscará em vermelho quando a carga da
bateria estiver abaixo de 20% e continuará até que a carga da bateria
se esgote.
Ligar o seu rato gaming
Congurando seu mouse para jogos como um mouse sem o
Bluetooth
1. Dena a chave de conexão para o modo Bluetooth.
NOTA: Siga somente o passo 2 ao emparelhar o seu mouse de
jogo a um dispositivo diferente.
2. Pressione e segure o botão esquerdo, o botão direito e o botão
DPI por 3 segundos até que o LED indicador de DPI pisque em azul.
3. O LED indicador de DPI acenderá em azul por 5 segundos e voltará ao
efeito de iluminação original após o emparelhamento com sucesso.
NOTA: Se você estiver emparelhando o Bluetooth pela primeira
vez e falhar após 1 minuto, o LED indicador de DPI acenderá
em vermelho por 5 segundos e então voltará ao efeito de
iluminação original.
Conguração do seu rato gaming como um rato Wireless RF
1. Ligue o adaptador USB a uma porta USB do seu computador.
2. Dena o comutador do modo de ligação para o modo Wireless
RF 2.4G. Uppdatering av inbyggd programvara och
anpassning
1. Anslut USB-donglen till en USB-port, och ställ in spelmusen på
trådlöst RF 2,4G-läge.
2. Hämta och installera Armoury Crate-programvaran från
www.asus.com/supportonly/Armoury%20Crate/HelpDesk_
Download/.
3. Följ programvaruinstruktionerna för att uppdatera spelmusens
inbyggda programvara.
4. Anpassa spelmusen med Armoury Crate.
Batteristatus
DPI-indikatorn blinkar röd när batterinivån är lägre än 20 %, och
fortsätter tills batterinivån är full.
Ansluta spelmusen
Installera spelmusen som en trådlös Bluetooth-mus
1. Ställ in kopplingsbrytaren på Bluetooth-läge.
OBS: Följ bara steg 2 när du länkar din spelmus till en annan
enhet.
2. Tryck på vänsterklick-, högerklick- och DPI-knappen och håll
nedtryckta i 3 sekunder tills DPI-indikatorn blinkar blå.
3. DPI-indikatorn lyser blå i 5 sekunder och återgår därefter till att lysa
med den ursprungliga ljuseekten när länkningen är klar.
OBS: Om du länkar Bluetooth för första gången och
det misslyckas efter 1 minut, så lyser DPI-indikatorn röd
i 5 sekunder och återgår därefter till den ursprungliga
ljuseekten.
Installera spelmusen som en trådlös RF-mus
1. Anslut den medföljande USB-donglen till datorns USB-port.
2. Ställ in kopplingsbrytaren på trådlöst 2,4 G frekvensläge.
De rmware en aanpassing bijwerken
1. Sluit de USB-dongle aan op een USB-poort en stel uw
gamingmuis in op de RF 2.4G draadloze modus.
2. Download en installeer de Armoury Crate-software van
www.asus.com/supportonly/Armoury%20Crate/HelpDesk_
Download/.
3. Volg de softwareinstructies voor het bijwerken van de rmware
van uw gaming-muis.
4. Pas uw gamemuis aan met Armoury Crate.
Batterijstatus
De DPI-indicator zal rood knipperen wanneer het batterijvermogen
lager is dan 20% en dat blijven doen tot de batterij volledig plat is.
Uw gamemuis aansluiten
Uw gamemuis instellen als een draadloze Bluetooth-muis
1. Stel de verbindingsschakelaar in op Bluetooth-modus.
OPMERKING: Volg alleen stap 2 wanneer u uw gamingmuis
koppelt met een ander apparaat.
2. Houd de linkermuisknop, de rechtermuisknop en de DPI-knop 3
seconden ingedrukt tot de DPI-indicator blauw knippert.
3. De DPI-indicator licht gedurende 5 seconden blauw op en schakelt
dan terug naar het originele verlichtingseect na een geslaagde
koppeling.
OPMERKING: Als u Bluetooth voor de eerste keer koppelt
en dit na 1 minuut mislukt, licht de DPI-indicator rood op
gedurende 5 seconden en keert deze vervolgens terug naar
het originele verlichtingseect.
Uw gamemuis instellen als een bekabelde RF-muis
1. Sluit de meegeleverde USB-dongle aan op de USB-poort van uw
computer.
2. Stel de verbindingsschakelaar in op de RF 2.4G draadloze
modus.
Aktualizácia rmvéru a prispôsobenie
1. USB kľúč zapojte do portu USB a hernú myš nastavte na
bezdrôtový režim RF 2.4G.
2. Z lokality www.asus.com/supportonly/Armoury%20Crate/HelpDesk_
Download/ si prevezmite súbor Armoury Crate a nainštalujte si ho.
3. Podľa pokynov softvéru vykonajte aktualizáciu rmvéru hernej myši.
4. Hernej myši si prispôsobte podľa aplikácie Armoury Crate.
Stav batérie
Pri kapacite batérie menej ako 20 % bude blikať červený LED
indikátor DPI, až kým sa batéria nevybije.
Pripojenie hernej myši
Nastavenie hernej myši ako káblová myš Bluetooth
1. Spínač pripojenia prepnite do bezdrôtového režimu.
POZNÁMKA
: Krok 2 je potrebné vykonať iba pri spárovaní
hernej myši s iným zariadením.
2. Stlačte a na 3 sekundy podržte stlačené ľavé tlačidlo, pravé tlačidlo
a tlačidlo DPI, až kým nezačne blikať modrý LED indikátor DPI.
3. Modrý LED indikátor DPI bude svietiť po dobu 5 sekúnd a potom
sa po úspešnom spárovaní prepne späť do dôvodného svetelného
efektu..
POZNÁMKA
: Ak režim Bluetooth párujete po prvýkrát a do 1
minúty zlyhá, červený LED indikátor DPI svieti 5 sekúnd a potom
sa vráti späť do pôvodného svetelného efektu.
Nastavenie hernej myši ako káblová myš RF
1. Dodaný USB dongle zapojte do portu USB v počítači.
2. Spínač pripojenia prepnite do bezdrôtového režimu RF 2.4 G.
Aktualizování rmwaru a přizpůsobení
1. Připojte USB adaptér k portu USB a potom nastavte herní myš na
bezdrátový režim RF 2.4G.
2. Stáhněte a nainstalujte software Armoury Crate z webu
www.asus.com/supportonly/Armoury%20Crate/HelpDesk_
Download/.
3. Podle pokynů softwaru zaktualizujte rmware herní myši.
4. Přizpůsobte vaši herní myši pomocí Armoury Crate.
Stav baterie
Když je stav baterie nižší než 20 %, indikátor LED DPI bliká červeně,
dokud se baterie nevybije.
Připojení herní myši
Nastavení herní myši jako bezdrátové Bluetooth myši
1. Nastavte přepínač připojení na režim Bluetooth.
POZNÁMKA: Krok 2 postupujte pouze při párování herní myši
s jiným zařízením.
2. Stiskněte a podržte tlačítko levého klepací tlačítko myši, pravé
klepací tlačítko myši a tlačítko DPI po dobu 3 sekund, dokud
indikátor LED DPI neblikne modré.
3. Indikátor LED DPI bude svítit modré 5 sekund a po úspěšném
spárování se obnoví původní světelný efekt.
POZNÁMKA: Pokud provádíte párování Bluetooth poprvé
a párování se po 1 minutě nezdaří, indikátor LED DPI svítí
červeně 5 sekund a potom se obnoví původní světelný efekt.
Nastavení herní myši jako bezdrátové RF myši
1. Připojte dodaný kabel USB adaptér k portu USB počítače.
2. Nastavte přepínač připojení na bezdrátový radiofrekvenční
režim 2,4 G.
Aktualizowanie oprogramowania układowego
i dostosowywanie
1. Podłącz klucz sprzętowy USB do portu USB i ustaw
bezprzewodowy tryb RF 2.4G myszy dla graczy.
2. Pobierz i zainstaluj oprogramowanie Armoury Crate ze strony
www.asus.com/supportonly/Armoury%20Crate/HelpDesk_
Download/.
3. Wykonaj instrukcje w oprogramowaniu, aby zaktualizować
oprogramowanie układowe myszy do gier.
4. Dostosuj myszy do gier za pomocą oprogramowania Armoury Crate.
Stan baterii
Wskaźnik LED DPI zacznie migać na czerwono, gdy poziom
naładowania baterii spadnie poniżej 20% i będzie migał do jej
całkowitego rozładowania.
Podłączanie myszy dla graczy
Konguracja myszy dla graczy jako bezprzewodowej myszy
Bluetooth
1. Ustaw przełącznik połączenia w pozycji trybu Bluetooth.
UWAGA: Krok 2 należy wykonać tylko w przypadku parowania
myszy dla graczy z innym urządzeniem.
2. Naciśnij przyciski lewy, prawy i DPI i przytrzymaj je przez 3
sekundy, aż wskaźnik LED DPI zacznie migać na niebieski.
3. Po pomyślnym sparowaniu wskaźnik LED DPI zaświeci się na 5
sekund na niebieski, a następnie przywrócony zostanie początkowy
efekt podświetlenia.
UWAGA: Jeśli wykonywane po raz pierwszy parowanie Bluetooth
zakończy się po upływie 1 minuty niepowodzeniem, wskaźnik LED DPI
zaświeci się na 5 sekund na czerwono, a następnie przywrócony zostanie
początkowy efekt podświetlenia.
Konguracja myszy dla graczy jako bezprzewodowej myszy
radiowej
1. Podłącz dostarczony klucz USB do portu USB komputera.
2. Ustaw przełącznik połączenia w pozycji trybu połączenia
bezprzewodowego RF 2.4G.
Actualización del rmware y
personalización
1. Conecte la llave USB a un puerto USB y congure su mouse para
juegos en el modo inalámbrico de RF 2,4G.
2. Descargue e instale el software Armoury Crate desde
www.asus.com/supportonly/Armoury%20Crate/HelpDesk_
Download/.
3. Siga las instrucciones de software para actualizar el rmware del
ratón para juegos.
4. Personalice el ratón para juegos mediante Armoury Crate.
Estado de la batería
El LED indicador de PPP parpadeará en rojo cuando la carga de la
batería sea inferior al 20 % y continuará hasta que se agote.
Conectar el ratón para juegos
Congurar el ratón para juegos como ratón inalámbrico Bluetooth
1. Establecer el interruptor de conexión en el modo Bluetooth.
NOTA: Solo siga el paso 2 cuando asocie el ratón para juegos
a un dispositivo diferente.
2. Mantenga presionado el botón izquierdo del ratón, el botón
derecho y el botón DPI durante 3 segundos hasta que el indicador
LED de PPP parpadee en azul.
3. El LED indicador de PPP se iluminará en azul durante 5 segundos y
luego volverá al efecto de iluminación original después de que la
asociación se haya realizado correctamente.
NOTA: Si está asociando la funcionalidad Bluetooth por
primera vez y se produce un error después de 1 minuto, el LED
indicador de PPP se ilumina en rojo durante 5 segundos y, a
continuación, vuelve al efecto de iluminación original.
Congurar el ratón para juegos como ratón inalámbrico de RF
1. Conecte la llave USB integrada al puerto USB del equipo.
2. Establezca el conmutador de conexión en el modo inalámbrico
de 2,4 GHz de RF.
A rmware frissítése és testreszabás
1. Csatlakoztassa az USB kulcsot az USB-portra és állítsa be a játszó
egeret az RF 2.4G Vezeték nélküli mód.
2. Töltse le és telepítse az Armoury Crate szoftvert a következő
weboldalról www.asus.com/supportonly/Armoury%20Crate/
HelpDesk_Download/.
3. Frissítse az egér rmware-ét a szoftver útmutatása szerint.
4. Testreszabhatja a játékhoz való egérbe az Armoury Crate
segítségével.
Akkumulátor állapota
A DPI LED jelzőfény vörösen villog amikor az akkumulátor feszültsége
20% alatt van és folytatja, amíg az akkulátor teljesen lemerül.
A játszóegér üzembe helyezése
A játékegér beállítása mint Bluetooth vezeték nélküli egér
1. Állítsa a csatlakozűsi kapcsolót a Bluetooth mód állapotra.
MEGJEGYZÉS:Csak akkor kövesse a 2. lépést, amikor a játék
egerét más eszközzel párosítja.
2. Nyomja meg és tartsa lenyomva a bal, jobb és DPI gombot 3
másodpercig, amíg a DPI LED jelzőfény kéken kezd villogni.
3. A DPI LED jelzőfény kék színnel gyúl fel 5 másodpercig, majd
visszavált az eredeti világító eektusra miután sikeresen
párosodott.
MEGJEGYZÉS: Ha a Bluetooth-ot első alkalommal párosítja és
1 perc után nem sikerül, a DPI LED jelzőfény vörösen gyúl fel 5
másodpercig, majd visszavált az eredeti világító eektusra.
A játszóegér beállítása mint RF vezetéknélküli egér
1. Csatlakoztassa a tartozékként kapott USB-hardverkulcsot a
számítógép USB-portjába.
2. Állítsa át a csatlakozási kapcsolót az RF 2,4 GHz-es vezeték
nélküli üzemmódra.
Aygıt yazılımı güncelleme ve kişiselleştirme
1. USB donanım kilidini bir USB bağlantı noktasına bağlayın ve oyun
farenizi RF 2.4G Kablosuz moduna ayarlayın.
2. Armoury Crate yazılımını www.asus.com/supportonly/
Armoury%20Crate/HelpDesk_Download/ adresinden indirip
yükleyin.
3. Oyun farenizin donanım yazılımını güncellemek için yazılım
talimatlarını izleyin.
4. Armoury Crate yazılımını kullanarak oyun farenize özelleştirin.
Pil Durumu
DPI gösterge LED’i, pil gücü %20’nin altına düştüğünde kırmızı renkte
yanıp sönecek ve pil gücü bitene kadar devam edecektir.
Oyun farenizi bağlama
Oyun farenizi Bluetooth kablosuz fare olarak kurma
1. Bağlantı anahtarını Bluetooth moduna ayarlayın.
NOT: Oyun farenizi farklı bir aygıtla eşleştirirken yalnızca 2.
adımı izleyin.
2. DPI gösterge LED’i mavi renkte yanıp sönene kadar Sol tıklatma
düğmesini, Sağ tıklatma düğmesini ve DPI düğmesini 3 saniye
basılı tutun.
3. DPI gösterge LED’i 5 saniye boyunca mavi yanar ve başarılı bir
şekilde eşleştirildikten sonra orijinal aydınlatma efektine geri döner.
NOT: Bluetooth’u ilk kez eşleştiriyorsanız ve 1 dakika sonra
başarısız olursa, DPI gösterge LED’i 5 saniye boyunca kırmızı
yanar ve ardından orijinal ışık efektine geri döner.
Oyun farenizi RF kablosuz fare olarak ayarlama
1. Birlikte sağlanan USB yardımcı aygıtını bilgisayarınızın USB
bağlantı noktasına bağlayın.
2. Bağlantı anahtarını RF 2.4G Kablosuz moduna ayarlayın.
Laiteohjelmiston päivitys ja mukauttaminen
1. Liitä USB-käyttöavain USB-porttiin ja aseta pelihiiri langattomaan
RF 2,4 G -tilaan.
2. Lataa ja asenna Armoury Crate -ohjelmisto osoitteesta
www.asus.com/supportonly/Armoury%20Crate/HelpDesk_
Download/.
3. Päivitä pelihiiren laiteohjelmisto ohjelmiston ohjeiden mukaisesti.
4. Mukauta pelihiireesi Armoury Crate-ohjelmistolla.
Akun tila
DPI LED -merkkivalo vilkkuu punaisena, kun pariston varaus on alle
20 % ja se jatkuu, kunnes paristo on tyhjentynyt.
Pelihiiren liittäminen
Pelihiiren asettaminen langattomaksi Bluetooth-hiireksi
1. Aseta yhteyskytkin Bluetooth-tilaan.
HUOMAUTUS: Toimi vain vaiheen 2 mukaisesti, kun pariutat
pelihiiren eri laitteen kanssa.
2. Pidä hiiren vasenta painiketta, oikeaa painiketta ja DPI-
painiketta painettuna 3 sekuntia, kunnes DPI LED -merkkivalo
vilkkuu sininen.
3. DPI LED -merkkivalo palaa sininen 5 sekuntia ja vaihtuu takaisin
alkuperäiseen valaistustehosteeseen, kun pariutus on onnistunut.
HUOMAUTUS: Jos pariutat Bluetoothia ensimmäistä kertaa
ja se epäonnistuu 1 minuutin kuluttua, DPI LED -merkkivalo
palaa punaisena 5 sekuntia ja palaa taksin alkuperäiseen
valaistustehosteeseen.
Pelihiiren asettaminen langattomana radiotaajuushiirenä
1. Liitä toimitukseen kuuluva USB-käyttöavain tietokoneen USB-
porttiin.
2. Aseta liitäntäkytkin langattomaan RF 2.4G -tilaan.
Mise à jour du rmware et
personnalisation
1. Connectez le dongle USB à un port USB, puis réglez votre souris
gaming sur le mode sans l RF 2.4G.
2. Téléchargez et installez Armoury Crate sur : https://www.asus.
com/fr/supportonly/Armoury%20Crate/HelpDesk_Download/
3. Suivez les instructions du logiciel pour mettre à jour le rmware
de votre souris et du dongle USB.
4. Personnalisez votre souris gaming avec Armoury Crate.
État de la batterie
Le voyant DPI clignotera en rouge lorsque le niveau de batterie
est inférieur à 20% et continuera ainsi jusqu'à épuisement de la
batterie.
REMARQUE : Ne suivez l'étape 2 que lorsque vous appairez
votre souris à un autre appareil.
Connecter votre souris gaming Congurer votre souris gaming en tant que souris sans-l (RF)
2. Réglez l'interrupteur de connexion sur le mode sans l RF 2.4G.
Congurer votre souris gaming en tant que souris sans-l
(Bluetooth)
2. Maintenez enfoncés les boutons Clic gauche, Clic droit et DPI
pendant 3 secondes jusqu'à ce que le voyant DPI clignote en bleu.
3. Le voyant DPI s'allumera en bleu pendant 5 secondes, puis reviendra à
l'eet lumineux d'origine après un appairage réussi.
1. Réglez l'interrupteur de connexion sur le mode Bluetooth.
1. Connectez le dongle USB au port USB de votre ordinateur.
Firmware aktualisieren und anpassen
1. Verbinden Sie den USB-Dongle mit einem USB-Anschluss und
stellen Sie dann Ihre Gaming Maus auf den RF 2,4G WLAN-
Modus.
2. Laden Sie Armoury Crate unter www.asus.com/supportonly/
Armoury%20Crate/HelpDesk_Download/ herunter und
installieren Sie es.
3. Befolgen Sie die Anweisungen in der Software, um die Firmware
Ihrer Gaming Maus und des Dongles zu aktualisieren.
4. Passen Sie Ihre Gaming Maus über Armoury Crate an.
Akkustatus
Die LED der DPI-Anzeige blinkt rot, wenn die Batterieleistung unter
20% liegt, so lange, bis die Batterieleistung erschöpft ist.
Ihre Gaming Maus verbinden
Ihre Gaming Maus als Bluetooth-drahtlose Maus einrichten
1.
Legen Sie den Schalter für die Verbindung auf Bluetooth-Modus
fest.
HINWEIS: Befolgen Sie Schritt 2 nur, wenn Sie Ihre Gaming
Maus mit einem anderen Gerät koppeln.
2. Halten Sie die Linke Maustaste, Rechte Maustaste und DPI-Taste
3 Sekunden lang gedrückt, bis die LED der DPI-Anzeige blau blinkt.
3. Die LED der DPI-Anzeige leuchtet 5 Sekunden lang blau
und wechselt nach erfolgreicher Kopplung wieder in den
ursprünglichen Lichteekt zurück.
HINWEIS: Wenn Sie zum ersten Mal über Bluetooth koppeln
und dies nach 1 Minute fehlschlägt, leuchtet die LED der DPI-
Anzeige 5 Sekunden lang rot, um dann in den ursprünglichen
Lichteekt zurückzukehren.
Ihre Gaming Maus als WLAN-drahtlose Maus einrichten
1. Verbinden Sie den USB-Dongle mit einem USB-Anschluss an
Ihrem Computer.
2. Legen Sie den Schalter für die Verbindung auf RF 2,4G WLAN-
Modus fest.
Обновление прошивки и настройка
1. Подключите USB приемник к порту USB компьютера, затем
установите мышь в Беспроводной режим 2,4 ГГц.
2. Скачайте и установите программное обеспечение Armoury
Crate с www.asus.com/supportonly/Armoury%20Crate/
HelpDesk_Download/
3. Следуйте инструкциям для обновления прошивки мыши и
приемника.
4. Выполните настройку мыши с помощью Armoury Crate.
Состояние аккумулятора
Индикатора DPI начнет мигать красным цветом при разряде
батареи ниже 20% и будет продолжать до полного разряда
батареи.
ПРИМЕЧАНИЕ: Если, в первый раз не удается выполнить
сопряжение Bluetooth в течение 1 минуты, индикатор DPI
загорится красным в течение 5 секунд, затем вернется к
исходному состоянию.
ПРИМЕЧАНИЕ: При подключении игровой мыши к
другому устройству выполните только шаг 2.
Подключение игровой мыши
Настройка игровой мыши в качестве беспроводной мыши
2. Установите переключатель подключения в положение
Беспроводной режим 2,4 ГГц.
Настройка мыши в качестве беспроводной мыши Bluetooth
2. Нажмите и удерживайте левую, правую и DPI кнопки в течение
3 секунд, пока индикатор DPI не замигает синим.
3. Индикатор DPI загорится синим на 5 секунд, затем, после
успешного сопряжения, вернется к исходному состоянию.
1. Установите переключатель подключения в положение Режим
Bluetooth.1. Подключите адаптер USB к USB-порту компьютера.
Aggiornamento del rmware e
personalizzazione
1. Collegate il mouse gaming al computer usando il cavo in dotazione,
quindi inserite il dongle USB in una porta USB.
2. Scaricate e installate il software Armoury Crate dal sito
www.asus.
com/supportonly/Armoury%20Crate/HelpDesk_Download/
.
3. Seguite le istruzioni del software per aggiornare il rmware del vostro
mouse gaming e del dongle.
4. Usate Armory II per personalizzare il vostro mouse gaming.
Stato della batteria
I LED del mouse gaming si accendono di rosso (eetto respiro)
quando la carica residua della batteria è inferiore al 20% nelle modalità
Bluetooth o RF 2.4G. Potete caricare la batteria del mouse gaming
usando il cavo USB in dotazione.
Collegamento del mouse gaming
Installazione con connessione Bluetooth senza li
1. Impostare l’interruttore di connessione in Modalità Bluetooth.
NOTA:
Seguire solo il passaggio 2 quando si associa il gaming
mouse a un dispositivo diverso.
2. Tenere premuto il tasto clic sinistro, il tasto clic destro e il tasto
DPI per 3 secondi nché il LED dell’indicatore DPI non lampeggia
in blu.
3. Il LED dell’indicatore DPI si illumina in blu per 5 secondi, quindi
torna all’eetto luminoso originale dopo l’associazione corretta.
NOTA:
Se si sta associando il Bluetooth per la prima
volta e l’associazione non avviene dopo 1 minuto, il LED
dell’indicatore DPI si accende in rosso per 5 secondi, quindi
torna all’eetto luminoso originale.
Installazione con connessione RF senza li
1. Inserite il dongle USB in una porta USB del vostro computer.
2. Impostate il selettore modalità di connessione sulla modalità
senza li RF 2.4GHz.
更新韌體及個人化
1. USB 無線訊號接收器插入電腦的 USB 連接埠,接著將
連線模式切換至 RF 2.4G 無線模式。
2. 請至 https://www.asus.com/supportonly/Armoury%20
Crate/HelpDesk_Download/ 下載並安裝 Armoury Crate
體。
3. 請依照螢幕提示完成電競滑鼠及無線訊號接收器的韌體
更新。
4. 使用 Armoury Crate 個人化您的電競滑鼠。
電池狀態
當電池電量低於 20% 時,DPI 指示燈將閃爍紅色,並持續閃
爍直到電池電量耗盡。
連接您的電競滑鼠
將您的電競滑鼠設定為藍牙無線滑鼠
1. 將連線模式切換至 藍牙模式。
注意欲將電競滑鼠與其他額外裝置配對則需執行
步驟 2
2. 按住左鍵、右鍵與 DPI 按鈕三秒鐘,直到 DPI 指示燈閃爍
藍色。
3. 配對成功後,DPI 指示燈將亮藍色五秒,然後回到原來的
燈效。
注意: 首次配對藍牙時,若配對在一分鐘後失敗,
DPI 指示燈將亮紅色 5 秒,然後回到原來的燈效。
將您的電競滑鼠設定為 RF 無線滑鼠
1. USB 無線訊號接收器插入電腦的 USB 連接埠。
2. 將連線模式切換至 RF 2.4G
更新固件及個性化
1. USB 無線信號接收器插入電腦的 USB 接口,然後 將連
接模式切換至【RF 2.4G 無線模式】。
2. 請至 https://www.asus.com/supportonly/Armoury%20
Crate/HelpDesk_Download/ 下載並安裝 Armoury Crate
件。
3. 請依照屏幕提示完成電競鼠標及無線信號接收器的固件
更新。
4. 使用 Armoury Crate 個性化您的電競鼠標。
電池狀態
當電池電量低於 20% 時,DPI 指示燈將閃爍紅色,並持續閃
爍直到電池電量耗盡。
連接您的電競鼠標
將您的電競鼠標設置為藍牙無線鼠標
1.
將連接模式切換至【藍牙模式】。
注意欲將電競鼠標與其他額外設備配對需執行步
2
2. 按住左鍵、右鍵與 DPI 按鈕三秒鐘,直到 DPI 指示燈閃爍
藍色。
3. 配對成功後,DPI 指示燈將亮藍色五秒,然後回到原來的
燈效。
注意: 首次配對藍牙時,若配對在一分鐘後失敗,
DPI 指示燈將亮紅色 5 秒,然後回到原來的燈效。
將您的電競鼠標設置為 RF 無線鼠標
1. USB 無線信號接收器插入電腦的 USB 接口。
2. 將連接模式切換至【RF 2.4G 無線模式】。
Updating the rmware and customization
1. Connect the USB dongle to a USB port, and set your gaming
mouse to the RF 2.4G Wireless mode.
2. Download and install the Armoury Crate from https://
www.asus.com/supportonly/Armoury%20Crate/HelpDesk_
Download/
3. Follow the software instructions to update your gaming mouse
and dongle’s rmware.
4. Customize your gaming mouse using Armoury Crate.
Battery Status
The DPI indicator LED will blink red when the battery power is
below 20%, and continue until the battery power is depleted.
NOTE: If you are pairing Bluetooth for the rst time and
fails after 1 minute, the DPI indicator LED lights up red for 5
seconds then reverts back to the original lighting eect.
NOTE: Only follow step 2
when pairing your gaming
mouse to a dierent device.
Connecting your gaming mouse
Setting up your gaming mouse as a RF wireless mouse
2. Set the connection switch to the
RF 2.4G Wireless mode.
Setting up your gaming mouse as a Bluetooth wireless mouse
2. Press and hold the Left-click
button, Right-click button and
DPI button for 3 seconds until
the DPI indicator LED blinks blue.
3. The DPI indicator LED will light
up blue for 5 seconds then switch
back to the original lighting eect
after successfully pairing.
1. Set the connection switch to the
Bluetooth mode.1. Connect the USB dongle to a USB port on your computer.
REMARQUE : Si vous eectuez un appairage Bluetooth pour
la première fois et que ce dernier échoue après 1 minute,
le voyant DPI s’allume en rouge pendant 5 secondes, puis
revient à l’eet lumineux d’origine.
HB
NO
AR
RO
KO
UA

USBUSB 1
.
Armoury Crate 2
www.asus.com/supportonly/Armoury%20Crate/HelpDesk_
/Download
 3

Armoury Crate 4

 DPI
20%
Bluetooth
Bluetooth 1
2
.
DPI .2
DPI3
5DPI 3

Bluetooth
5DPI

RF
USBUSB 1
. 2
Оновлення мікропрограми та налаштування
параметрів
1. Підключіть ключ USB до ПК і переведіть ігрову мишу в
Бездротовий режим RF 2,4G.
2. Завантажте й встановіть ПЗ Armoury Crate з www.asus.com/
supportonly/Armoury%20Crate/HelpDesk_Download/.
3. Виконуйте інструкції до програмного забезпечення щодо
оновлення мікропрограми ігрової миші.
4. Виконайте налаштування параметрів ігрової миші за допомогою
Armoury Crate.
Стан акумулятора
Світлодіод стану DPI мерехтить червоним, коли заряд
акумулятора нижче 20 %, і продовжує так мерехтіти, доки
акумулятор не розрядиться.
Підключення ігрової миші
Налаштування ігрової миші як бездротової Bluetooth-миші
1. Встановіть перемикач підключення у режим Bluetooth.
ПРИМІТКА
: Виконуйте крок 2 лише під час створення пари
ігрової миші з іншим пристроєм.
2. Натисніть і утримуйте ліву кнопку, натисніть і утримуйте
праву кнопку і кнопку DPI 3 секунди, доки світлодіод стану DPI
почне мерехтіти синій.
3. Індикатор DPI засвітиться синій на 3 секунди, а потім, після
успішного поєднання в пару, повернеться на оригінальний
ефект освітлення.
ПРИМІТКА
: Якщо ви вперше утворюєте пару по Bluetooth,
і за 1 хвилину виникає помилка поєднання в пару,
світлодіод стану DPI засвічується червоним 5 секунд, а
потім повертається на оригінальний ефект освітлення.
Налаштування ігрової миші як бездротової (режим РЧ 2,4 ГГц)
1. Підключіть бездротовий адаптер USB до порту USB на
комп’ютері.
2. Встановіть перемикач підключення в положення бездротового
режиму РЧ 2,4 ГГц.
펌웨어 업데이트 및 사용자 지정
1. USB 동글을 USB 포트에 연결하고 게이밍 마우스를 RF 2.4G
무선 모드로 설정합니다.
2. www.asus.com/supportonly/Armoury%20Crate/HelpDesk_
Download/. 에서 Armoury Crate 소프트웨어를 다운로드하여
설치합니다 .
3. 소프트웨어 지침에 따라 게이밍 마우스의 펌웨어를
업데이트합니다 .
4. Armoury Crate 를 사용하여 게이밍 마우스를 사용자
지정합니다 .
배터리 상태
배터리 전원이 20% 미만으로 떨어지면 배터리 전원이 소진될
때까지 DPI 표시등 LED 가 계속 빨간색으로 깜박입니다 .
게이밍 마우스 연결하기
블루투스 무선 마우스로서 게이밍 마우스 설정하기
1. 연결 스위치를 블루투스 모드로 설정합니다.
참고 : 게이밍 마우스를 다른 장치에 페어링할 때만 2 단계를
따르십시오 .
2. DPI 표시등 LED가 파란색으로 깜박일 때까지 왼쪽 클릭 버튼,
오른쪽 클릭 버튼 및 DPI 버튼을 3초 동안 길게 누릅니다.
3. 성공적으로 페어링되면 DPI 표시등 LED가 5초 동안
파란색으로 켜진 후 원래의 조명 효과로 다시 전환됩니다.
참고 : 블루투스를 처음 페어링하던 중 1 분 후 페어링이
실패하면 DPI 표시등 LED 가 5 초 동안 빨간색으로 켜진
후 원래의 조명 효과로 되돌아갑니다 .
RF 무선 마우스로서 게이밍 마우스 설정하기
1. 제품과 함께 제공되는 USB 동글을 컴퓨터의 USB 포트에
연결합니다.
2. 연결 스위치를 RF 2.4G 무선 모드로 설정합니다.
Actualizarea rmware-ului și personalizarea
1. Conectați cheia USB la un port USB și setați mouse-ul pentru
jocuri la modul RF 2.4G Wireless.
2. Descărcaţi şi instalaţi software-ul Armoury Crate de la adresa
www.asus.com/supportonly/Armoury%20Crate/HelpDesk_
Download/.
3. Urmați instrucțiunile din software pentru a actualiza rmware-ul
mouse-ului pentru jocuri.
4. Particularizaţi mouse-ul pentru jocuri cu ajutorul software-ului
Armoury Crate.
Starea bateriei
LED-ul indicator DPI va clipi roșu atunci când puterea bateriei este
sub 20% și va continua până când energia bateriei este epuizată.
Conectarea mouse-ului dvs. pentru jocuri
Congurarea mouse-ului dvs. pentru jocuri ca un mouse Bluetooth
fără r
1. Setați butonul de conectare la modul Bluetooth.
NOTĂ: Urmați pasul 2 numai când asociați mouse-ul de joc cu
un alt dispozitiv.
2. Apăsați și țineți apăsat butonul clic stânga, butonul clic dreapta
și butonul DPI timp de 3 secunde până când LED-ul indicator DPI
clipește albastru.
3. LED-ul indicator DPI se va aprinde albastru timp de 5 secunde, apoi
va reveni la efectul de iluminare original după asocierea cu succes.
NOTĂ: Dacă asociați Bluetooth pentru prima dată și eșuează
după 1 minut, LED-ul indicator DPI se aprinde roșu timp de 5
secunde, apoi revine la efectul de iluminare original.
Congurarea mouse-ului dvs. pentru jocuri ca un mouse RF fără
r
1. Conectați dongle-ul USB inclus în pachet la portul USB de pe
computer.
2. Setați butonul de conectare la modul wireless RF 2.4G.

USBUSB .1

Armoury Crate 2


 3
Armoury Crate 4

DPILED
20%

Bluetooth
. .1
2
3DIP .2
DPILED
5DPILED 3

1Bluetooth
5DPILED


USBUSB
 1
. 2
Oppdaterer fastvaren og tilpass
1. Koble USB-donglen til USB-porten på datamaskinen, og sett
deretter spillmusen til RF 2,4 G trådløs modus.
2. Last ned og installer Armoury Crate-programvaren fr
www.asus.com/supportonly/Armoury%20Crate/HelpDesk_
Download/.
3. Følg instruksjonene i programvaren for å oppdatere fastvaren til
spillmusen.
4. Tilpass spillmusen ved hjelp av Armoury Crate.
Batteristatus
DPI-indikatorlampen blinker rødt når batteristrømmen er under 20 %,
og den fortsetter til batteriet er tomt.
Koble til spillmusen
Sette opp spillmusen som en trådløs Bluetooth-mus
1. Sett tilkoblingsbryteren til Bluetooth-modus.
MERK: Følg bare trinn 2 når du parer spillmusen med en
annen enhet.
2. Hold inne Venstreklikk-knappen, Høyreklikk-knappen og DPI-
knappen i 3 sekunder til DPI-indikatorlampen blinker blå.
3. DPI-indikatorlampen lyser blå i 5 sekunder, så går den tilbake til
den opprinnelige lyseekten når paring er vellykket.
MERK: Hvis du parer Bluetooth for første gang, og det
mislykkes etter 1 minutt, lyser DPI-indikatorlampen rødt i 5
sekunder, så går den tilbake til den opprinnelige lyseekten.
Sette opp spillmusen som en trådløs RF-mus
1. Koble den medfølgende USB-donglen til datamaskinens USB-
port.
2. Sett tilkoblingsbryteren til RF 2,4 GHz trådløs modus.JP
ファームウェア更新と設定のカスタマイ
1. 付属のUSBレシーバーをパソコンのUSBポートに接続し、
接続モードスイッチを 2.4GHzワイヤレスモード に設定し
ます。
2. Armoury Crate ソフアをダウンローイントー
し ま す。 www.asus.com/supportonly/Armoury%20Crate/
HelpDesk_Download/
3. 画面の指示に従い、キーボードのファームウェアを更新し
ます。
4. Armoury Crate で設定をカスタマイズします。
バッテリー状態
バッテリー残量が 20% 未満になると DPI インジケータは赤色
に点滅します。
2.4GHz ワイヤレスモードで使用する
マウスを接続する
1. 付属のUSBレシーバーをパソコンのUSB
ポートに接続します。
2. 本機底面の接続モードスイッチを 2.4GHz
ワイヤレスモードに設定します。
ご参考 : はじめてペアリングする際、ペアリング状態が 1
分間続き DPI インジケーターが 5秒間赤色に点灯してか
ら元の点灯状態に戻った場合は、ペアリングに失敗して
います。
ご参考 : 別の Bluetooth® 機器とペアリングする場合や再
ペアリングする場合のみ、手順 2 を実行してください。
Bluetooth® モードで使用する
2. DPIインジケーターが青色に点滅するまで、左クリック右ク
リックDPIボタンを3秒間長押しします。
3. Bluetooth® 機器でペアリングを行います。ペアリングが完了
するとDPIインジケーターが青色に5秒間点灯し、その後は元
の点灯状態に戻ります。
1. 本機底面の接続モードスイッチを Bluetooth® モード に設定し
ます。
CE Mark Warning
Manufacturer ASUSTek COMPUTER INC.
Address, City 1F., No. 15, Lide Rd., Beitou Dist., Taipei City 112, Taiwan
Authorized Representative in Europe ASUS COMPUTER GmbH
Address Harkortstrasse 21-23, 40880 Ratingen
Country Germany
Authorized Representative in United Kingdom ASUSTEK (UK) LIMITED
Address 1st Floor, Sackville House, 143-149 Fenchurch Street, London, EC3M 6BL,
England
Country United Kingdom
English ASUSTeK Computer Inc. hereby declares that this device is in compliance with the essential requirements and other relevant provisions of related
Directives. Full text of EU declaration of conformity is available at: www.asus.com/support
Français AsusTek Computer Inc. déclare par la présente que cet appareil est conforme aux critères essentiels et autres clauses pertinentes des directives
concernées. La déclaration de conformité de l’UE peut être téléchargée à partir du site Internet suivant : www.asus.com/support.
Deutsch ASUSTeK Computer Inc. erklärt hiermit, dass dieses Gerät mit den wesentlichen Anforderungen und anderen relevanten Bestimmungen der
zugehörigen Richtlinien übereinstimmt. Der gesamte Text der EU-Konformitätserklärung ist verfügbar unter: www.asus.com/support
Italiano ASUSTeK Computer Inc. con la presente dichiara che questo dispositivo è conforme ai requisiti essenziali e alle altre disposizioni pertinenti con le
direttive correlate. Il testo completo della dichiarazione di conformità UE è disponibile all’indirizzo: www.asus.com/support
Русский Компания ASUS заявляет, что это устройство соответствует основным требованиям и другим соответствующим условиям соответствующих
директив. Подробную информацию, пожалуйста, смотрите на www.asus.com/support
Български С настоящото ASUSTeK Computer Inc. декларира, че това устройство е в съответствие със съществените изисквания и другите приложими
постановления на свързаните директиви. Пълният текст на декларацията за съответствие на ЕС е достъпна на адрес: www.asus.com/support
Hrvatski ASUSTeK Computer Inc. ovim izjavljuje da je ovaj uređaj sukladan s bitnim zahtjevima i ostalim odgovarajućim odredbama vezanih direktiva. Cijeli
tekst EU izjave o sukladnosti dostupan je na: www.asus.com/support
Čeština Společnost ASUSTeK Computer Inc. tímto prohlašuje, že toto zařízení splňuje základní požadavky a další příslušná ustanovení souvisejících směrnic.
Plné znění prohlášení o shodě EU je k dispozici na adrese: www.asus.com/support
Dansk ASUSTeK Computer Inc. erklærer hermed, at denne enhed er i overensstemmelse med hovedkravene og andre relevante bestemmelser i de relaterede
direktiver. Hele EU-overensstemmelseserklæringen kan ndes på: www.asus.com/support
Nederlands ASUSTeK Computer Inc. verklaart hierbij dat dit apparaat voldoet aan de essentiële vereisten en andere relevante bepalingen van de verwante
richtlijnen. De volledige tekst van de EU-verklaring van conformiteit is beschikbaar op: www.asus.com/support
Eesti Käesolevaga kinnitab ASUSTeK Computer Inc, et see seade vastab asjakohaste direktiivide oluliste nõuetele ja teistele asjassepuutuvatele sätetele. EL
vastavusdeklaratsiooni täielik tekst on saadaval järgmisel aadressil: www.asus.com/support
Suomi ASUSTeK Computer Inc. ilmoittaa täten, että tämä laite on asiaankuuluvien direktiivien olennaisten vaatimusten ja muiden tätä koskevien säädösten
mukainen. EU-yhdenmukaisuusilmoituksen koko teksti on luettavissa osoitteessa: www.asus.com/support
Ελληνικά Με το παρόν, η AsusTek Computer Inc. δηλώνει ότι αυτή η συσκευή συμμορφώνεται με τις θεμελιώδεις απαιτήσεις και άλλες σχετικές διατάξεις των
Οδηγιών της ΕΕ. Το πλήρες κείμενο της δήλωσης συμβατότητας είναι διαθέσιμο στη διεύθυνση: www.asus.com/support
Magyar Az ASUSTeK Computer Inc. ezennel kijelenti, hogy ez az eszköz megfelel a kapcsolódó Irányelvek lényeges követelményeinek és egyéb vonatkozó
rendelkezéseinek. Az EU megfelelőségi nyilatkozat teljes szövege innen letölthető: www.asus.com/support
Latviski ASUSTeK Computer Inc. ar šo paziņo, ka šī ierīce atbilst saistīto Direktīvu būtiskajām prasībām un citiem citiem saistošajiem nosacījumiem. Pilns ES
atbilstības paziņojuma teksts pieejams šeit: www.asus.com/support
Lietuvių „ASUSTeK Computer Inc.“ šiuo tvirtina, kad šis įrenginys atitinka pagrindinius reikalavimus ir kitas svarbias susijusių direktyvų nuostatas. Visą ES
atitikties deklaracijos tekstą galima rasti: www.asus.com/support
Norsk ASUSTeK Computer Inc. erklærer herved at denne enheten er i samsvar med hovedsaklige krav og andre relevante forskrifter i relaterte direktiver.
Fullstendig tekst for EU-samsvarserklæringen nnes på: www.asus.com/support
Polski Firma ASUSTeK Computer Inc. niniejszym oświadcza, że urządzenie to jest zgodne z zasadniczymi wymogami i innymi właściwymi postanowieniami
powiązanych dyrektyw. Pełny tekst deklaracji zgodności UE jest dostępny pod adresem: www.asus.com/support
Português A ASUSTeK Computer Inc. declara que este dispositivo está em conformidade com os requisitos essenciais e outras disposições relevantes das
Diretivas relacionadas. Texto integral da declaração da UE disponível em: www.asus.com/support
Română ASUSTeK Computer Inc. declară că acest dispozitiv se conformează cerinţelor esenţiale şi altor prevederi relevante ale directivelor conexe. Textul
complet al declaraţiei de conformitate a Uniunii Europene se găseşte la: www.asus.com/support
Srpski ASUSTeK Computer Inc. ovim izjavljuje da je ovaj uređaj u saglasnosti sa osnovnim zahtevima i drugim relevantnim odredbama povezanih Direktiva.
Pun tekst EU deklaracije o usaglašenosti je dostupan da adresi: www.asus.com/support
Slovensky Spoločnosť ASUSTeK Computer Inc. týmto vyhlasuje, že toto zariadenie vyhovuje základným požiadavkám a ostatým príslušným ustanoveniam
príslušných smerníc. Celý text vyhlásenia o zhode pre štáty EÚ je dostupný na adrese: www.asus.com/support
Slovenščina ASUSTeK Computer Inc. izjavlja, da je ta naprava skladna z bistvenimi zahtevami in drugimi ustreznimi določbami povezanih direktiv. Celotno
besedilo EU-izjave o skladnosti je na voljo na spletnem mestu: www.asus.com/support
Español Por la presente, ASUSTeK Computer Inc. declara que este dispositivo cumple los requisitos básicos y otras disposiciones pertinentes de las directivas
relacionadas. El texto completo de la declaración de la UE de conformidad está disponible en: www.asus.com/support
Svenska ASUSTeK Computer Inc. förklarar härmed att denna enhet överensstämmer med de grundläggande kraven och andra relevanta föreskrifter i
relaterade direktiv. Fulltext av EU-försäkran om överensstämmelse nns på: www.asus.com/support
Українська ASUSTeK Computer Inc. заявляє, що цей пристрій відповідає основним вимогам та іншим відповідним положенням відповідних Директив.
Повний текст декларації відповідності стандартам ЄС доступний на: www.asus.com/support
re AsusTek Computer Inc., bu aygıtın temel gereksinimlerle ve ilişkili Yönergelerin diğer ilgili koşullarıyla uyumlu olduğunu beyan eder. AB uygunluk
bildiriminin tam metni şu adreste bulunabilir: www.asus.com/support
Bosanski ASUSTeK Computer Inc. ovim izjavljuje da je ovaj uređaj usklađen sa bitnim zahtjevima i ostalim odgovarajućim odredbama vezanih direktiva. Cijeli
tekst EU izjave o usklađenosti dostupan je na: www.asus.com/support
 


KC: Korea Warning Statement
Ukraine Certication Logo
UA.TR.028
EAC Certication Logo
Lithium-Ion Battery Warning
CAUTION: Danger of explosion if battery is incorrectly replaced. Replace only with the same or equivalent type
recommended by the manufacturer. Dispose of used batteries according to the manufacturer’s instructions.
警告 VCCI 準拠クラス B 機器(日本)
この装置は、情報処理装置等電波障害自主規制協議会 (VCCI) の基準に基づくクラスB情報技術装置です。この装置は、家庭環境で使用
することを目的としていますが、この装置がラジオやテレビジョン受信機に近接し a て使用されると、受信障害を引き起こすことがあ
ります。
取扱説明書に従って正しい取り扱いをして下さい。
VCCI: Japan Compliance Statement
VCCI Class B Statement
CE RED RF Output table (Directive 2014/53/EU)
Function Frequency Maximum Output Power (EIRP)
2.4GHz wireless (2403 - 2480MHz) - Mouse 7 dBm
(2403 - 2480 MHz) - Dongle 0 dBm
Bluetooth (2402 - 2480 MHz) - Mouse 7 dBm
UKCA RF Output table (The Radio Equipment Regulations 2017)
Function Frequency Maximum Output Power (EIRP)
2.4GHz wireless (2403 - 2480MHz) - Mouse 7 dBm
(2403 - 2480 MHz) - Dongle 0 dBm
Bluetooth (2402 - 2480 MHz) - Mouse 7 dBm
Горячая линия Службы технической поддержки в России:
Бесплатный федеральный номер для звонков по России: 8-800-100-2787
Номер для пользователей в Москве: +7(495)231-1999
Время работы: Пн-Пт, 09:00 - 21:00 (по московскому времени)
Официальные сайты ASUS в России:
www.asus.ru
www.asus.com/ru/support
NCC: Taiwan Wireless Statement
低功率射頻器材技術規範
「取得審驗證明之低功率射頻器材,非經核准,公司、商號或使用者均不得擅自變更頻率、加大功率或變更原設計之特性及功能。低功率
射頻器材之使用不得影響飛航安全及干擾合法通信經發現有干擾現象時,應立即停用,並改善至無干擾時方得繼續使用。前述合法通信,
指依電信管理法規定作業之無線電通信。低功率射頻器材須忍受合法通信或工業、科學及醫療用電波輻射性電機設備之干擾。」應避免影
響附近雷達系統之操作。
Précautions d’emploi de l’appareil :
a. Soyez particulièrement vigilant quant à votre sécurité lors de l’utilisation de cet appareil dans certains lieux (les aéroports, les hôpitaux, les
stations-service et les garages professionnels).
b. Évitez d’utiliser cet appareil à proximité de dispositifs médicaux implantés lors d’un appel téléphonique. Si vous portez un implant
électronique (stimulateurs cardiaques, pompes à insuline, neurostimulateurs…), veuillez impérativement respecter une distance minimale de
15 centimètres entre cet appareil et l’implant pour réduire les risques d’interférence.
c. Utilisez cet appareil dans de bonnes conditions de réception pour minimiser le niveau de rayonnement. Ce n’est pas toujours le cas dans
certaines zones ou situations, notamment les parkings souterrains, les ascenseurs, en train ou en voiture ou tout simplement dans un secteur
mal couvert par le réseau.
d. Tenez cet appareil à distance du ventre des femmes enceintes et du bas-ventre des adolescents.
Simplied UKCA Declaration of Conformity
ASUSTek Computer Inc. hereby declares that this device is in compliance with the essential requirements and other relevant provisions of The Radio Equipment
Regulations 2017 (S.I. 2017/1206). Full text of UKCA declaration of conformity is available at https://www.asus.com/support/.
Radio Frequency (RF) Exposure Information
The radiated output power of the Wireless Device is below the Innovation, Science and Economic Development Canada (ISED) radio frequency exposure limits.
The Wireless Device should be used in such a manner such that the potential for human contact during normal operation is minimized.
This device has also been evaluated and shown compliant with the ISED RF Exposure limits under portable exposure conditions. (antennas are less than 20 cm
of a person's body).
Informations concernant l'exposition aux fréquences radio (RF)
La puissance de sortie rayonnée du dispositif sans l est inférieure aux limites d'exposition aux radiofréquences d'Innovation, Sciences et Développement
économique Canada (ISED). Le dispositif sans l doit être utilisé de manière à minimiser le potentiel de contact humain pendant le fonctionnement normal.
Cet appareil a également été évalué et montré conforme aux limites d'exposition RF ISED dans des conditions d'exposition portable. (les antennes mesurent
moins de 20 cm du corps d'une personne).
Accessories that came with this product have been designed and veried for the use in connection with this product. Never use
accessories for other products to prevent the risk of electric shock or re.
付属品は本製品専用です。 本製品を使用の際には、 必ず製品パッケージに付属のものをお使いください。 また、 付属品は絶対他の製品には使
用しないでください。 製品破損もしくは、 火災や感電の原因となる場合があります。
Notices
Limitation of Liability
Circumstances may arise where because of a default on ASUS’ part or other liability, you are entitled to recover damages from ASUS. In each such instance,
regardless of the basis on which you are entitled to claim damages from ASUS, ASUS is liable for no more than damages for bodily injury (including death) and
damage to real property and tangible personal property; or any other actual and direct damages resulted from omission or failure of performing legal duties
under this Warranty Statement, up to the listed contract price of each product.
ASUS will only be responsible for or indemnify you for loss, damages or claims based in contract, tort or infringement under this Warranty Statement.
This limit also applies to ASUS’ suppliers and its reseller. It is the maximum for which ASUS, its suppliers, and your reseller are collectively responsible.
UNDER NO CIRCUMSTANCES IS ASUS LIABLE FOR ANY OF THE FOLLOWING: (1) THIRD-PARTY CLAIMS AGAINST YOU FOR DAMAGES; (2) LOSS OF, OR DAMAGE
TO, YOUR RECORDS OR DATA; OR (3) SPECIAL, INCIDENTAL, OR INDIRECT DAMAGES OR FOR ANY ECONOMIC CONSEQUENTIAL DAMAGES (INCLUDING LOST
PROFITS OR SAVINGS), EVEN IF ASUS, ITS SUPPLIERS OR YOUR RESELLER IS INFORMED OF THEIR POSSIBILITY.
REACH
Complying with the REACH (Registration, Evaluation, Authorisation, and Restriction of Chemicals) regulatory framework, we published the chemical substances
in our products at ASUS REACH website at http://csr.asus.com/english/REACH.htm.
Proper disposal
DO NOT throw the device in municipal waste. This product has been designed to enable proper reuse of parts and recycling. The symbol of
the crossed out wheeled bin indicates that the product (electrical, electronic equipment and mercury-containing button cell battery) should
not be placed in municipal waste. Check local regulations for disposal of electronic products.
DO NOT throw the device in re. DO NOT short circuit the contacts.
DO NOT disassemble the device.
ASUS Recycling/Takeback Services
ASUS recycling and takeback programs come from our commitment to the highest standards for protecting our environment. We believe in providing
solutions for you to be able to responsibly recycle our products, batteries, other components as well as the packaging materials. Please go to http://csr.asus.
com/english/Takeback.htm for detailed recycling information in dierent regions.
Federal Communications Commission Statement
This device complies with Part 15 of the FCC Rules. Operation is subject to the following two conditions:
This device may not cause harmful interference.
This device must accept any interference received including interference that may cause undesired operation.
This equipment has been tested and found to comply with the limits for a Class B digital device, pursuant to Part 15 of the FCC Rules. These limits are designed
to provide reasonable protection against harmful interference in a residential installation. This equipment generates, uses and can radiate radio frequency
energy and, if not installed and used in accordance with manufacturers instructions, may cause harmful interference to radio communications. However, there
is no guarantee that interference will not occur in a particular installation. If this equipment does cause harmful interference to radio or television reception,
which can be determined by turning the equipment o and on, the user is encouraged to try to correct the interference by one or more of the following
measures:
Reorient or relocate the receiving antenna.
Increase the separation between the equipment and receiver.
Connect the equipment to an outlet on a circuit dierent from that to which the receiver is connected.
Consult the dealer or an experienced radio/TV technician for help.
CAUTION! The use of shielded cables for connection of the monitor to the graphics card is required to assure compliance with FCC
regulations. Changes or modications to this unit not expressly approved by the party responsible for compliance could void the user’s
authority to operate this equipment.
部件名称 有害物质
铅 (Pb) 汞 (Hg) 镉 (Cd) 六价铬 (Cr (VI)) 多溴联苯 (PBB) 多溴二苯醚 (PBDE)
印刷电路板及其电子组件 ×○ ○
外壳
○ ○
外部信号连接头及线材
○ ○
其它 ×○ ○
本表格依據 SJ/T 11364 的規定編制。
○: 表示該有害物質在該部件所有均質材料中的含量均在 GB/T 26572 規定的限量要求以下。
×: 表示該有害物質至少在該部件的某一均質材料中的含量超出 GB/T 26572 規定的限量要求,然該部件仍符合歐盟指令 2011/65/EU 的規范。
備註:此產品所標示之環保使用期限,係指在一般正常使用狀況下。
電子電氣產品有害物質限制使用標識:圖中之數字為產品之環保使用期限。僅指電子電氣產品中含有的有害
物質不致發生外洩或突變,從而對環境造成汙染或對人身、財產造成嚴重損害的期限。
單元 限用物質及其化學符號
鉛 (Pb) 汞 (Hg) 鎘 (Cd) 六價鉻 (Cr+6) 多溴聯苯 (PBB) 多溴二苯醚 (PBDE)
印刷電路板及電子組件 ○ ○
外殼 ○ ○
滾輪裝置 ○ ○
其他及其配件 ○ ○
備考 1. “O”係指該項限用物質之百分比含量未超出百分比含量基準值。
備考 2. “-”係指該項限用物質為排除項目。
限用物質及其化學符號:
Compliance Statement of Innovation, Science and Economic Development Canada (ISED)
This device complies with Innovation, Science and Economic Development Canada licence exempt RSS standard(s). Operation is subject to the following
two conditions: (1) this device may not cause interference, and (2) this device must accept any interference, including interference that may cause undesired
operation of the device.
CAN ICES-003(B)/NMB-003(B)
Safety Guidelines
Keep the device away from liquid, humidity, or moisture. Operate the device only within the specic temperature range of 0°C(32°F) to 40°C(104°F). When the
device exceeds the maximum temperature, unplug or switch o the device to let it cool down.
安全說明
- 此滑鼠只應在溫度不高於 40°C(104°F)的環境下使用。
- 安裝錯誤型號的電池可能會導致爆炸。
RF Exposure Warning
The equipment complies with FCC RF exposure limits set forth for an uncontrolled environment. The equipment must not be co-located or operating in
conjunction with any other antenna or transmitter.
Déclaration de conformité de Innovation, Sciences et Développement économique Canada (ISED)
Le présent appareil est conforme aux CNR d’Innovation, Sciences et Développement économique Canada applicables aux appareils radio exempts de licence.
Lexploitation est autorisée aux deux conditions suivantes : (1) l’appareil ne doit pas produire de brouillage, et (2) l’utilisateur de l’appareil doit accepter tout
brouillage radioélectrique subi, même si le brouillage est susceptible d’en compromettre le fonctionnement.
CAN ICES-003(B)/NMB-003(B)
  • Page 1 1
  • Page 2 2

Asus P306 Mode d'emploi

Catégorie
Souris
Taper
Mode d'emploi