Motorola CURVE Series Mode d'emploi
- Catégorie
- Radios bidirectionnelles
- Taper
- Mode d'emploi

English
mQUICK REFERENCE GUIDE
CURVE SERIES TWO-WAY RADIO
* Voice Assistant button enables you to initiate connection through WiFi. Hold the VA button to log in or out, send a voice
message, or trigger a call.
Congratulations on your new Digital Radio!
Fully charge the battery before first use.
Refer to http://www.motorolasolutions.com/curve for information on product details, brochures, CPS software, and approved accessories.
A GETTING STARTED
1. INSTALLING THE BATTERY
• Slide the battery latch to unlock position and lift up the battery door.
• Align the battery contacts with the tabs in the battery compartment. Insert and fit the battery until it locks in place.
• Put the battery door back on the radio. Slide the latch to the lock position
2. CHARGING THE BATTERY
• Connect the power supply to the drop-in charger tray or a power cord to the multi-unit charger (MUC).
• Insert the radio into the tray. Ensure that the lateral battery slots are inserted in the tray rails.
• The charger LED flashes a few times to indicate the current battery charge when the radio is inserted into the charger.
• Short press the Power button to check the battery status on the device.
3. TURNING THE RADIO ON AND OFF
• To turn on the radio, press the Power button for around 3 seconds until the radio plays the power up tone and the radio Transmit/
Receive (Tx/Rx) Indicator LED begins to blink.
• To turn the radio off, press and hold the Power button until the power down tone is heard and the radio Tx/Rx Indicator LED turns off.
Tip: Every time the radio powers on, a voice prompt announces the current channel and battery level.
B TRANSMITTING AND RECEIVING
• Press the (+) or (-) button to increase or decrease the volume.
• To receive, listen through the speaker.
• To respond, press FIRMLY the PTT button and WAIT to hear the Talk Permit Tone (a quick double beep) Before you start speaking.
Hold the radio vertically 1 inch to 2 inches (2.5 cm to 5 cm) from mouth when talking.
• Release the PTT to listen.
C LED INDICATOR
D CHANGING CHANNELS
• To change channel, press the Channel/Menu button. The radio announces the current channel.
• Press (+) or (-) button to change the channel. The radios guides you through the channel changes with voice prompts.
• Short press PTT to exit.
Tip: It is not necessary to wait for the voice prompt to be completed before continuing with next button press.
E REPLYING PRIVATELY
The Top button is set to Private Reply Feature by default.
• Press the Top button to reply privately to the person currently talking to a group (Top button LED will blink orange).
• After the person finishes transmitting, press the PTT button to talk one-on-one (the Top button LED illuminates solid orange). Both
parties hear voice prompts to announce the beginning and end of the private transmission.
• After the private conversation is over, the Top button LED is off.
Important: The radio times out Private transmissions after 10 seconds of inactivity.
Tip: If you want to talk privately to someone, simply call the name of the person. When the person responds, press the Top button
and then press the PTT button to talk privately.
F ADVANCED CONFIGURATION MODE/OTHER FEATURES
The Curve Series allows for other special features such as Radio PROFILE ID, Maximum Channels, Top button programming, Home
Channel, and Instant Mute through Advanced Configuration Mode.
• To enter this mode, turn the radio on while pressing the PTT and (+) buttons while the voice prompts guides you.
Notice to Users (FCC and Industry Canada)
This device complies with Part 15 of the FCC rules and Industry Canada's license-exempt RSS's per the following conditions:
1. This device may not cause harmful interference.
2. This device must accept any interference received, including interference that may cause undesired operation.
3. Changes or modifications made to this device, not expressly approved by Motorola Solutions, could void the authority of the user to
operate this equipment.
The Curve series operates in the license-free 900MHz ISM Band (902-928 MHz). For product-related questions, please call: 1-800-448-
6686.
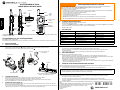
Antenna
Tx/Rx
Indicator
LED
PTT (Push-To-Talk)
Button
*VAB (Voice
Assistant Button)
Speaker
Power
Button
Channel/Menu
Button
Top Button
Volume/Up-Down
Control Buttons
Charging
Rail
Audio
Accessory
Connector
Microphone
Charging a Radio and Battery using a Multi Unit
Charger – MUC (Optional Accessory)
Battery Latch
Drop-in Tray Charger with
Power Supply
Holster
Lateral Battery Slot
Tray Rail
Tray Rail
1
2
Indicator Transmit/Receive Status Battery Charging Status
Slow blinking Red The radio is on standby. N/A
Solid Red The radio is in transmission mode. The battery is charging.
Fast Blinking Red The radio is in receiving mode. Indicates a faulty condition.
Slow Blinking Green VA in standby mode. Battery is fully charged.
Slower Blinking Green The radio is in scan mode. N/A
Solid Green VA is in transmission mode. N/A
Fast Blinking Green VA is in receiving mode. N/A
IMPORTANT! NON-INTERFERENCE/PRIVACY FEATURE
The Curve Series provides an easy way to ensure non-interference and improved private communications. Follow the following
simple steps to select your own four digit radio PROFILE ID Number (different from the default “0000”).
Make sure all your radios are configured with the same number.
1. Ensure that the radio is turned off.
2. Hold down PTT, (+), and Power buttons at the same time until you hear the radio turned on and announces “Programming Mode”.
3. Press Channel/Menu button. The radio announces “Current PROFILE ID <Number>”.
4. Use the (+) and (-) buttons to change each PROFILE ID digit.
5. Use Menu to move from one digit to the next.
6. After all PROFILE ID digits have been changed, the entire new number is announced.
7. To exit, press and hold the PTT button.
Important: Ensure that all your radios are configured with the same PROFILE ID or they will not communicate.
Tip: Select a PROFILE ID that is easy to remember, for example a store number or a street address number.
ATTENTION!
Before using this product, read the RF Energy awareness and Acoustic Safety information and operating instructions contained in
the Safety and RF Energy Exposure Booklet enclosed with your radio package.
MOTOROLA, MOTO, MOTOROLA SOLUTIONS and the Stylized M logo are trademarks
or registered trademarks of Motorola Trademark Holdings, LLC, and are used under
license. All other trademarks are the property of their respective owners.
© 2021 Motorola Solutions, Inc.
All rights reserved.
Printed in
*MN007945A01*
MN007945A01-AA

Fran
ç
ai
s
(Canada)
mGUIDE DE RÉFÉRENCE RAPIDE
RADIO BIDIRECTIONNELLE SÉRIE CURVE
* Le bouton d’aide vocale vous permet de lancer la connexion par Wi-Fi. Maintenez le bouton d’aide vocale enfoncé
pour vous connecter ou vous déconnecter, envoyer un message vocal ou déclencher un appel.
Félicitations pour votre nouvelle radio numérique!
Veuillez charger complètement la batterie avant la première utilisation.
Veuillez vous reporter au site http://www.motorolasolutions.com/curve pour plus d'information sur les détails du produit, les brochures, le
logiciel CPS et les accessoires approuvés.
A POUR COMMENCER
1. INSTALLATION DE LA BATTERIE
• Faites glisser le loquet de la batterie pour le déverrouiller et soulever le couvercle.
• Alignez les contacts de la batterie avec les languettes du compartiment de la batterie. Insérez et ajustez la batterie jusqu'à ce qu'elle
soit bien en place.
• Remettez le couvercle de la batterie sur la radio. Faites glisser le loquet en position de verrouillage .
2. CHARGE DE LA BATTERIE
• Branchez le bloc d'alimentation au chargeur instantané ou au cordon d'alimentation du multichargeur (MUC).
• Insérez la radio dans le chargeur. Assurez-vous que les logements de batterie latéraux sont insérés dans les rails du chargeur.
• Le voyant lumineux du chargeur clignote quelques fois pour indiquer la charge actuelle de la batterie lorsque la radio est insérée
dans le chargeur.
• Appuyez brièvement sur le bouton d’alimentation pour vérifier l’état de la batterie sur l’appareil.
3. MISE SOUS TENSION ET HORS TENSION DE LA RADIO
• Pour allumer la radio, maintenez le bouton d'alimentation enfoncé environ 3 secondes jusqu'à ce que la radio émette la tonalité de
mise sous tension et que le voyant de transmission/réception (Tx/Rx) de la radio commence à clignoter.
• Pour éteindre la radio, maintenez le bouton d'alimentation enfoncé jusqu'à ce que la radio émette la tonalité de mise hors tension et
que le voyant de transmission/réception (Tx/Rx) de la radio s'éteigne.
Conseil : Chaque fois que la radio s'allume, un message vocal annonce le canal actuel et le niveau de charge de la batterie.
B ÉMISSION ET RÉCEPTION
• Appuyez sur le bouton (+) ou (-) pour augmenter ou diminuer le volume.
• Pour recevoir un appel, écoutez à l'aide du haut-parleur.
• Pour répondre, appuyez FERMEMENT sur le bouton PTT et ATTENDEZ pour entendre la tonalité d'autorisation de parler (un
double bip rapide) AVANT de commencer à parler. Tenez la radio à la verticale, à une distance de 2,5 cm à 5 cm (de 1 po à 2 po) de
vos lèvres lorsque vous parlez.
• Relâchez le bouton PTT pour écouter.
C VOYANT LUMINEUX
D CHANGEMENTS DES CANAUX
• Pour changer de canal, appuyez sur le bouton Canal/Menu. La radio annonce le canal actuel.
• Appuyez sur les boutons (+) ou (-) pour changer de canal. Les radios vous guident à travers les changements de canal avec des
instructions vocales.
• Appuyez brièvement sur le bouton PTT pour quitter.
Conseil : Il n'est pas nécessaire d'attendre la fin du message vocal avant d'appuyer sur le bouton suivant.
E RÉPONDRE EN PRIVÉ
Le bouton supérieur est réglé sur la fonction réponse individuelle par défaut.
• Appuyez sur le bouton supérieur pour répondre en privé à une personne qui est en train de parler à un groupe (le voyant du bouton
supérieur clignotera en ORANGE).
• Lorsque la personne a terminé sa transmission, appuyez sur le bouton PTT pour parler un à un (le voyant du bouton supérieur s'allume
en ORANGE continu). Les deux personnes entendent des messages vocaux annonçant le début et la fin de la conversation privée.
• Une fois la conversation privée terminée, le voyant DEL du bouton supérieur s'éteint.
Important : La radio interrompt les conversations privées après 10 secondes d'inactivité.
Conseil : Si vous souhaitez parler en privé à quelqu'un, il vous suffit d'appeler le nom de la personne. Lorsque la personne répond,
appuyez sur le bouton supérieur, puis appuyez sur le bouton PTT pour parler en privé.
F MODE DE CONFIGURATION AVANCÉE/AUTRES FONCTIONS
La série Curve permet l'utilisation d'autres fonctions spéciales comme l'ID de profil radio, le nombre maximal de canaux, la programmation
du bouton supérieur, le canal d'accueil et le mode muet instantané grâce au mode de configuration avancée.
• Pour accéder à ce mode, allumez la radio tout en appuyant sur les boutons PTT et (+), tandis que le guide vocal vous guide.
Avis aux utilisateurs (FCC et Industrie Canada)
Le présent appareil est conforme aux CNR d’Industrie Canada applicables aux appareils radio exempts de licence et à la partie 15 des
règlements de la FCC :
1. Cet appareil ne doit pas causer d’interférence nuisible.
2. Cet appareil doit accepter toute interférence reçue, y compris les interférences pouvant entraîner un fonctionnement indésirable.
3. Toute modification apportée à cet appareil sans l’autorisation explicite de Motorola Solutions peut annuler l’autorisation d’utiliser cet appareil.
La série Curve fonctionne sur la bande ISM de 900 MHz sans licence (902 à 928 MHz). Pour des questions sur nos produits, composez le
1 800 448-6686.
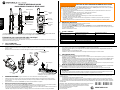
Antenne
Indicateur
Tx/Rx
Bouton PTT
(Push-To-Talk)
*Bouton d’aide
vocale
Haut-parleur
Bouton
d’alimentation
Bouton Canal/Menu
Bouton supérieur
Boutons
d'augmentation et de
diminution du volume
Barre de
chargement
Connecteur
d'accessoire
audio
Microphone
Charge de la radio et de la batterie avec un
multichargeur - MUC (accessoire en option)
Loquet de la batterie
Chargeur instantané avec
alimentation
Étui
Logement de batterie
latéral
Rail du
chargeur
Rail du chargeur
1
2
Voyant État de transmission/réception État de charge de la batterie
Rouge clignotant lentement La radio est en mode veille. S.O.
Rouge fixe La radio est en mode transmission. La batterie est en cours de charge.
Rouge clignotant rapidement La radio est en mode réception. Indique un état défectueux.
Vert clignotant lentement Aide vocale en mode veille. La batterie est entièrement chargée.
Clignotant vert plus lent La radio est en mode balayage. S.O.
Vert fixe L’aide vocale est en mode transmission. S.O.
Vert clignotant rapide L’aide vocale est en mode réception. S.O.
IMPORTANT!
FONCTION DE NON-INTERFÉRENCE/COMMUNICATION PRIVÉE
La série Curve offre une méthode facile pour éviter les interférences et avoir des communications privées améliorées. Suivez ces
étapes simples pour sélectionner votre propre numéro d'ID de profil de radio à 4 chiffres (différent du numéro « 0000 » par défaut).
Assurez-vous que toutes vos radios sont configurées avec le même numéro.
1. Assurez-vous que la radio est éteinte.
2. Maintenez enfoncés simultanément les boutons PTT, (+) et d'alimentation jusqu'à ce que la radio s'allume et vous annonce
«Mode de programmation ».
3. Appuyez sur le bouton Canal/Menu. La radio annonce « ID de profil actuel <numéro> ».
4. Utilisez les boutons (+) et (-) pour changer chaque chiffre de l’ID de profil.
5. Utilisez le menu pour passer d'un chiffre à l'autre.
6. Une fois que tous les chiffres de l'ID de profil ont été changés, le nouveau numéro entier est annoncé.
7. Pour quitter, maintenez le bouton PTT enfoncé.
Important : Assurez-vous que toutes vos radios sont configurées avec le même ID de profil, sinon elles ne pourront pas
communiquer entre elles.
Conseil : Sélectionnez un ID de profil facile à mémoriser, par exemple, un numéro de magasin ou une adresse postale.
ATTENTION!
Avant d'utiliser ce produit, lisez les informations relatives à l'exposition à l'énergie RF et à la sécurité acoustique ainsi que le mode
d'emploi contenu dans la brochure Normes de sécurité et exposition à l'énergie RF fournie avec la radio.
MOTOROLA, MOTO, MOTOROLA SOLUTIONS et le logo stylisé M sont des marques
de commerce ou des marques déposées de Motorola Trademark Holdings,
LLC et sont utilisées sous licence. Toutes les autres marques de commerce
sont la propriété de leurs détenteurs respectifs.
© 2021 Motorola Solutions, Inc.
Tous droits réservés.
*MN007945A01*
MN007945A01-AA
-
 1
1
-
 2
2


Motorola CURVE Series Mode d'emploi
- Catégorie
- Radios bidirectionnelles
- Taper
- Mode d'emploi
dans d''autres langues
- English: Motorola CURVE Series User guide
Documents connexes
-
Motorola DLR Series Quick Reference Manual
-
-
Motorola DLR1020 Manuel utilisateur
-
-
-
-
 Motorola Solutions RDU4100 Manuel utilisateur
-
 Motorola Solutions RDU4163d Manuel utilisateur
-