Haier HWF06XC3 Le manuel du propriétaire
- Taper
- Le manuel du propriétaire

Haier
What The _Torld Comes Home To '=
HWF06XC3
Usoy_d
_J Jel Us ie
Reedies#e_tlensbeforeieete&qeg°
[eft 1-S77-337-3639for qeestieneonperteeM _er_ke_
tire Jef i_#re_tioee eveet dep_e¢_der_Piestafletie_.
Peerteeteeqee_tio_fte#_ere_tlef pi&ef et I'e_tretie_,_e_pefezle _-_77-337-363_o
teeteeInetre_de_e_#nte_dein_teie__teperete
tt_me_e_e_F877- 337-363__i tie_epre_e_te_;_ebrerepee#e_oser_ido_
0010547047

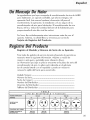
Thank You for buying a dependabb, energy saving and easy to operate
HALERroom air condifionen This manual contains useful information for
you to maintain, operate, install and safely use your room air conditioner.
Your air conditioner deans, cools and dehumidifies the air in your room to
provide you with the ultimate level of comfort.
Please read instructions carefully before using the producL Also, do not
Forget to fill out and maiUthe Prodgct Registration Card.
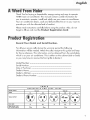
Record Your Modemand Serial Number.
For aHyour service calls during the warranty period the fallowing
information will be needed. Attach the sales receipt to this guide and keep
for future reference. This information can be obtained from the serial plate,
which is on your air conditioner. This is either on the cabinet (side or back)
or you may have to remove the front grille to locate iL
Model Number: ..............................................................
Serial Number: ...............................................................
Date of Purchase: ...........................................................
Dealer's Name: ..............................................................
Dealer's Address: ............................................................
Dealer's Phone Number: ...................................................
TABLE
RECEPTACLE AND FUSE TYPES
RATEDVOLTS 125/60 250/60
AMPS 1S _.0 15 20 30
WALL OUTLET
_USE SIZE )5 20 _ _5 ,_0 _ 30
T|ME DELAY FUSE
(or ¢it_co_ br_ker) (_mug pmug Pmug

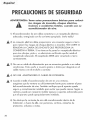
English
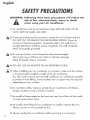
1)
Air conditioner must be connected to proper dectricaJ outJetwith the
correct dectricaJ suppJy. (see table]
Proper grounding must be ensured to reduce the risk of shock and fire.
DO NOT CUT OR REMOVE THE GROUNDING PRONG. Jfyou do
not have a threeoprong electric receptacle outJet in the waJJ,have a
certified dectrician instaJJthe proper receptacle. The waJJreceptacle
MUST be properJy grounded.
Do not use if power cord is frayed or otherwise damaged_
AJso avoid using it if there are cracks or abrasion damage
along the Jength, pJugor connector.
DO NOT USEAN ADAPTER OR AN EXTENSION CORD.
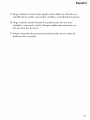
When installing your air conditioner in a window, make sure the window
is strong enough to hoJd the weight of the air condifionen
You also want to secure and correctJy instdJ your air conditioner propedy
to prevent it from falling. Extra brackets and or support may be required
depending on your window.
6) Do not bJock airfJow inside or outside the air conditioner with bJinds,
drapes, protective covers, shrubs or bushes_
7) Be carefuJof sharp edges on the front and rear fins of the unit that codd
cut and cause serious injury.
8) Be carefuJwhen Jilting the air conditioner to instaJJor remove the unit.
AJways usetwo or more peopJe for this_
9) AJways unpJug the air conditioner before servicing it or moving it.
2

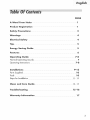
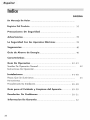
PAGE
A Word Fro_ Haler 1
Product Reglstrat_on 1
Safety Precautions 2
Warnings 4
£UectrlcaU $af÷ty 4
Tips 5
Energy Saving Guide 5
Features 6
Operatlng Guide 7-8
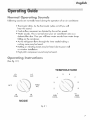
Normal Operating Sounds 7
Operating Instructions 7°8
Uns_Hattions 9- ! 3
PartsSupplied 10
TooJs 1O
Stepsfor installation ] ]- ]3
CUean and €ere Guide ]4-]5
TroubUeshootlng 15 ol 6
Warranty Jnformatlon ! 7

FoJJowingthe safety messages is very important.
These messages can save you from being injured or kiJJed.
Warning symboJsaJert you to be carefuJ and means Danger. AJways
foJJowinstructions to be safe and reduce chances of iniury or deatk
Warning and Danger signs wiJJprecede safety messages.
Grounding: This room air conditioner mustbegrounded.
Grounding reducesthe risk of dectric shockby
providing an escapewire for the dectric current.
Thepower cord hasa grounding wire with a
grounding pJug.PJugit into an outJetthat is
properJyinstdJedand grounded_
WARNUNG:
improperuseof thegrounding
pJugcan resuJtin a risk of eJectricshock.
CaJJa quaJifieddectridan if you don't understand
thegrounding instructionsor if you are not
sureif theair conditioner is properJygrounded_
Jfthe wall outJetis not grounded, pJeasecontactan
eJectridanto haveit repJacedwith a properJy
grounded outJet.
Do not, under any circumstances, cut or remove the
third (grgund) prong from the power ¢@rdo
Adapter PUug: We strongJyadvise againstusing an adapter pJug.
4

English
e This Air Conditioner is designed for use in a double hung window o
While installing unit be sure to flit air conditioner _/4 degree outward to
have the water drip outside the house.
mnstallthe unit on the north side as normally that is the shaded side. This
will enhance the operation of your unit.
_ Window has to be strong for installafion_ Extra brackets and or support
may be required depending on your window. (Brackets and Supports
not included in all models)
e Measure the window before installing, if the window is too big for the
unit you may require professional installafion_
_' Use correct electric voltage and proper ampere for the unit to run
effectively.
_o Only let a certified electrician do any modifications to your electrical
outJef,
®Use a dedicated line for the operation of your air conditioner to avoid
the possibiJify of an eJectricaJsurge,
o When installing your air conditioner make sure to seamall areas where
there is a possibilih/of air leakage.
Airflow should not be blocked inside either by curtains, drapes or
furniture or outside by shrubs or bushes,
• Do not needbssly use an ebctrical light or other appliances that
produce heat,
®Keep the blinds and the drapes drawn on all the other windows.
While cooking use an exhaust fan in the kitchen to remove the excess
heat produced_
®Always usethe correct BTU size air conditioner to cool the room to
attain optimum efficiency.

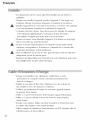
2 way
airflow
iiiJiiii_i
iiiiiiiiii
iiiiiiiiii
easy
access cool,roE
fil_ers pa_e!
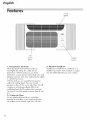
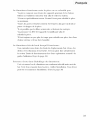
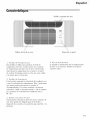
1° Teraperafure Set Knob
This knob adjusts the temperatureof the ain
The Higher thesetting tl_e cooler the air
temperature With this knob you can setthe
temperature to your desired comfort level Min, cod
being the warmest and Max. Cod being the coldest
2. MODE Set K_ob
with this knob you con control thefan speedas
wdHas the coding speed.There are 3 knob
positionson theA/C for you to seHectfrom LO wiHH
drdate air at the Howestvdocity MED at tJ_e
middHeJevdand HJwiJHcircuHateat themaximum.
You have 2 FanOnly speedsto choose from HHand
LO,
3o 2-Way Air FJow
The air directionaHlouversJetyou control the
direction of the airflow in your required direction.
The airflow can be directed right side- Heftside
4o Window Jnsi,ammN,i't.
Enablesyou to installthe air conditioner in a
doubHehung window Extra brackets or support
may be needed depending on your vdndow

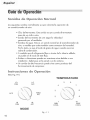
H@rm @petering $@u ds
FoJJowingsoundsare normaJJyheard during the operation of an air conditioner.
Thermostatcricks.As the thermostatcycleson/off you will
hear this sound.
Cod airflow movementas dictated by the set fan speed.
®Water sounds.This is normaJsinceyour air conditioner actsas a
dehumidifier also, Thusyou wiJJhear water soundsfrom water drops
falling on the condenser.
o As the refrigerant flows through the inner seabd tubing a
rushing noise may be heard.
RattJingor vibrating noisesmay be heard due to poor waJJ
or window instdJation.
High pitch compressorsoundmay be hear&
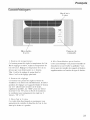
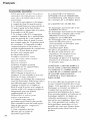
©pe l'i g I , st ctleHs
(Seefig. # 1)
OFF
LO LO
FAN ,AJC
HU Hm
FAN A/C
MODE
MED
A!C
TEMPERATURE
5 6
4 7
3
2
8
9
I
MUN
COOL
10
MAX
COOL
fig. # 1

English
After instaJJingyour air conditioner, pJugit into the proper
dectrkd outJetin the wall
1) Sdect Med. A!C on the FunctionSetknob.
2) SettheTemperatureSetknob at the mid JeveJsetting. ThiswiJJturn on
your air con@ionen
3) Youcan setthe thermostatfrom Min Cod to Max Coo[ Min Cod being
thewarmest settiilg Max Cool being the coJdestsetting.
4) Your air conditioner has 2 Fanspeeds and 3 A!C settings.
5) Letyour air conditioner run for a few hours before adjusting to the
desired settings.
6) Remember the compressor of your air conditioner will not work
when the temperature goes bdow 65°F.
7)Also when you shut off the air conditioner w_dt f'ol_ 3 minutes
befo_'etui'ning it on agairL This is the compressorcycle time.
8) if you haveany troubJein operating your air conditioner pJeaserefer to
theTrouble Shooting section.

°h
Beforeyou install your air conditioner checkthe fallowing:
The unitis free of aHobstructions inside and outside the room e.g. drapes,
curtains, furniture, pRants,shrubs,bushes,trees,other structuresRikebuilding,
garage etc.Air conditioner musthave dear unobstructedairflow through the
condenserto remove the heal
2) Thewindow is strong enough to hold the weight of the air conditioner.
Extra brackets or supportsmay be needed depending on your windows.
(Bracketsor Supports not provided in air modds/
3) Thewindow siJJand track are strong enough to hold the weight of the
air conditioner.
4) ThewaJJis strong enough to hdd the unit. Extra bracketsor supports may be
needed depending on thewall (Bracketsor Supports not provided in dJ modds).
5}
A 7)
Asl
Ag)
There is adequate and proper power suppJynear theair condifionen
DO NOT useadapter pJugs.
DO NOT useextension cords.
DO NOT cut or removethe ground prong_
DO NOT modify the pJugor thedectrkaJ waJJoutJetin any way.
if pJugdoes not fit the eJectricaloutJethavea certified dectrician do the
necessarychange.
A10) DO NOT connectelectrical power to the unit before installation.
_11) DO NOT useif power cord isworn out, frayed or otherwise damaged.
Avoid using if there are cracks or abrasion damage along the Jength,
pJugor connecfiom
] 2) DO NOT instaJJinto any existing cabinet or sleevewhich does not haveside
and top air vents, g

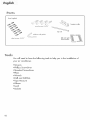
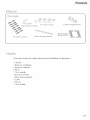
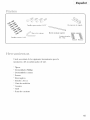
PartsSuppUied
sho['t sc[ews 13/32"
wood screws 3 !/32"
basepan angUe
!<¢_..
top rail
Ueftand right _ ':_\
side curtains
YouwiJJneed to have the foJJowingtooJsto hdp you in the installation of
your air conditionen
®Scissors
_PhiHipsScrewdriver
_Standard Screwdriver
oPRiers
oWrench
oDriJ[and DriJ[Bits
oTapeMeasure
oGJoves
®LeveJ
oSockets
10

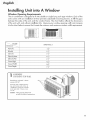
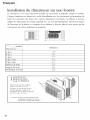
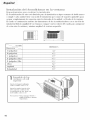
Jn4dDtg Unit intoA Window
Window Opening Requirements
The air candifioner is designed to fit into dauble or singb hung sash type windows. Each of the
units comes with an installation kit that provides adiustable mounting louvers, to fill the gaps
between the sides af the unit, and the window frame The chart bebw reflects the dimensions
of the units with, and without instdJation kits. Measure your window opening width and compare
it to the chart bdaw to ensure that it meetsthe minimum and maximum window width requirements.
14 D
'_ad_ HWFO6XC,3
Dimensior_
A(inch)
B0nch}
C(inch)
D(inch) Max ....i .
oo s
D(inch) Min
Case High
Case Width
Case Depth
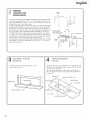
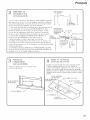
ASSEMBLE
CURTAINS/TOPRAIL
Install tap rail with 3 short
screws13/32.
Insel(fileside curlainsilltoIll(
lop and bottomrailsoftl_eair
(:(lIldilJolter [,_tsJoll 1[IO (:tffl_tilts
1o fl_( uni( willl 8 shot1 s(r_ws
13/3P_
CcauI_on: Never expose p[asfic Front
or griJJe to e×h'eme temperatures
11

PREPARE
WINDOW FOR
iNSTALLATiON
I This tmi_ is designed fbr installalion hi s_andard double htlng windo_
_lh actual openil_g _dd]s ol ¸22" k_ 36" • The upper and lower sash
mull open sufficienlly Io allow a dear vertical opel]illg of 14" flora Ihe
bo_R}m {if l]_e sash I{}Ill{!whldow s_{}oJ
2 If s_orm _lldow presenls inter_rence, _s_e_ a 2I' _de wood s_lip_{_
i_cluded) (OUTER SI[D k} file inner window sill acro_ _he filll _d_h of
file sill The wood s_rip _houkt be fllick enough I(_ raise Ihe heighl o[
file window sill s() Ihat _he lll]il can be ins_aIled _lhout i11_eI_!reI_(:e by
the sk_lm wi_{tow _ame (STORM WINDOW ERAME) or wood slrip
(()UT])O()I_S) k_ help c{mdensa_km Io drai_ plol)erly to _he outside¸
3 Install a second wood strip (approxhnalely 6" long by 3/2" _de a1_d
same _l]ickl_ess as Rrs_ s_rip) hi Ihe cen_er ol ¸lhe ouler sill flush agah_
fl_e back off file ilmer sill¸ This will raise basepan al_gle •
4 l[ _he distance belween STORM WIN[)()W ER&MI! and WOOl¸) ST_P
M()_J NTED ON TOP OF INN ER SILL i_ more _han 1" • _wo of wood
strip _e Ilo[ Ileces_a_
INNER
SH,L
v
W()OD%TRIP
I"MAX
o
u
T
D
0
0
R
S
S 5;
3 LOCAT][NGUNITIN
WINDOW
Open Ihe w]_ldow and ill irk ceilR,r [lilt, oil Ih{
c{nler of Ihe hm{l ill
INNER SI_
INDOOR SIDE J
ATTACHBASEPAN
ANGLE
lnsiall lhe basepan aagle behhld {he [nl_er whldow sill• wifl_
Ihe short skle of basel)an al]gle as shown¸ lJse Ill{! 2 shorl
screws 13/32" pr(_de{I
The basepan angle hops _{_hoH unR secure_ in place
Be sure Io place basepal] angle edge flush agains_ back
of hmer sill
1NNER SIU_
SttORP SCREWI 3/32'
CENTERI_INE
INS[DE
SHORT SllIE
./
()UTSH)E
BASEPAN ANGLE
12

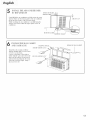
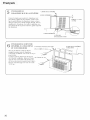
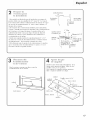
INSTALLTHEAIRCONDITIONER
IN THEWINDOW
C trefldly lilt tll_ air condilfoner and slide ii il_lo Ihe open
willd(l_ Make stlr_! [he bo_l(im _llid_! (if Ihe air c(llldi_ioner
drops into _he notches of die basepan angle,
While sleadying 1he air conditioner care_flly bring Ihe
_ndow sash down behind the tipper gukle of (tie air
conditionec,
AB(RJT I/4"
13

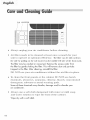
TAB AIRF[LTER
/
/
i
/
/
/
/
/
/
@
@
Always unplug your air condRioner bef_Jre cleaning.
Air filter needs to be cleaned at least once a mouth f_r your
unR to operate at optimmn effktiency. The fil_ercan be slid ou_ from
_he side by pulling on _he mb located on the middle left side of _he fron_ mask.
Thefilter may be washed or vacuumed. Removethe excesswater"from
the filter by gently shaking the filter. Thiswill remove dustand particles
trapped in the filter. After cleaning, reinstall the filter.
DO NOT use yore" air conditioner wRhout tile air filter in place.
To clean tile fl'ont panels or tile cabinet DO NOT use harsh
chemicals, abrasives, ammonia, chlorine, bleach, concentrated
detergents, solvents or metal scom'ing pads.
Some of these chemicals may dissolve, damage and!or discolor your
air conditioner,
Always use a soft cloth dampened wRh water or mild soap
and water solution to wipe the fl'ont if the cabinet.
Wipe dry with a so[#clo_h.
14

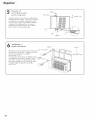
• Tosbreyour air conditioner, after the season,remove the unit from the
window as per the installation guide. Repackthe unit in its original box
and store away. If you do not intend to remove it from the window then
cover the outside with a winter cover.
Thiscan be purchased from the retaibr where you purchased your
air conditioner or from your JocaJhardware store,
®Beforeputting away your unit make sureany water left in the pan is
removed and drained away. Water left in the pan could lead to Rusting
or damage to the electrical connections.
Jf air ¢ondlfloner does not operate:
Check if unit is plugged in, Theplug may have come loose.
• Check if the unit is in "Off" mode.
Thefan control may be in "Off" position.
Air from air ¢ondltloner is warm:
TheA/C setting may need to be raised.
Thetemperatureoutside the room is beJow65°F. The compressorwill
not cycle on if the temperatureoutside is bdow 65°F_
ke formatlor_ on cooJlng colJs:
®Outside temperature too coJd.Setthe unit on fan onJy
settingto defrost ice.
• Lowertemperature setting_Temperaturesetting may be too coJd_
Unit BTUmay be too high for the room_
15

Air conditioner working but room not coohng:
• Roommay have appliances that produce heat=Usean exhaustfan to
remove excessheat.
o Redirectthe airflow. Removeany obstacles
AHdoors and windows need to be dosed socod air does
not escape theroom.
o Air filter may need cleaning.
Unit BTUmay be too Jowfor the required coding area.
o On extreme hot & humid days air conditioners may take
a JittJeJongerto cool
Air conditioner is making noise when cooUlng:
Youmay hear soundsof air movement,water, compressorclicking on and
off or window vibrations. Pleaseread Operating Guide - Normal
Operating Sounds. (see,page 7)
Water in the air conditioner cabinet:
This is normal as your air conditioner not only cads but also dehumidifies
theair. If there iswater dripping inside the room, check the instaJJationof
the unit. The unit may need to be reinstaJJed.(seeRage 13)
16

English
This warran_ covers aft defects
in _,orkmonshlp or mo_eriois
for:
1_The mechanical and eJectrlcd parts
(including Jabor costs)contained in this
Haier product, for a period of 12
months, Fromthe date of purchase,
(commercial or rental appJicafion, the
warranty is 90 days).
2 The sealed system and compressor
contained in this Haler product is for a
period of 5 years, from the date of
purchase (excluding labor costs after the
inltiaJ ] 2 month period). In commercial
or rental use, the additional limited
compressor warranty is for 1 year and 9
months, (excluding labor costs after the
initial 90 days period).
You must keep ond be abJe to
provide your orig_noJ soles
receipt os proof of the dote of
purchase.
Who is covered?
The original retail purchaser of this Haier
product.
What will be done?
Haier will repair or repJace, in your
home, any mechanical, electrical part or
the compressor, which proves defective
in normal househdd, use for a period of
] 2 months. Haler wiJJrepair or replace
(excluding labor costs) the sealed system
and compressor (parts onJy)for an
additionaJ 4 year period.
Hew con yea get service?
1_Contact your nearest Haier
authorized Service Depot. For the name
of the Service Depot nearest you,
contact Haier at (877) 337°3639.
2_AH service must be performed, by an
authorized Haier Service DepoL
THHSWARRANTY COVERS UNIYS
WiTHiN THE CONTINENTAL
UNITED STATES,CANADA
AND PUERTORH¢O°
THUSWAR_ANI_ DOES NOT
COVER:
• Damagesfrom improperinstallation
Damagesin shipping
Damagesfrom misuse,abuse,
accident,alteration,Jackof proper care
and maintenance
Damagesfrom service,by otherthan
an authorizeddealeror servicecenter
• Labor,service,transportationand
shippingchargesfor theremovalof
defectiveparts and instaJJationof a
repJacementpart, beyondtheinitiaJ12
monthperiod_
THIS LIMITEDWARRANTY ISGIVEN
IN LIEUOF ALL OTHER WARRANTIES,
EXPRESSOR mMPLIED,INCLUDmNG
THE WARRANTIES OF
MERCHANTABILITY AND FITNESSFOR
A PARTmCULARPURPOSE.
Theremedyprovided in thiswarranty is
exclusiveand isgrantedin Jieuof aJJ
other remedies_Thiswarranty doesnot
coverincidentalor consequential
damages Somestatesdo notaJJowthe
exclusionof incidentalor consequential
damages,sothis Jimitafionmay not
appJytoyou. Somestatesdo notaJJow
Jimitationson howlong an impJied
warranty Jasts,sothisJimitationmay not
appJytoyou_Thiswarranty givesyou
specificJegdrights,and you mayaJso
haveother rights,which vary fromstate
tostate.
1"1

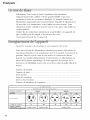
Fran_afs
Felk:im_ions!Vousvenez de fake I'acquisNon &m chma{iseur
d'appar{emen{facile _ miliser el &me grande fiabili{_e{quivous
perme{lra de fake des 6conomies d'energie. Ce manuel con{ien{des
infbrma{ionsimpormnles qui vous penneltron{ d'insmHerle dima{isem"e{
de proc_de_ _ sa maintenance e_de i'u_i[iseren mu_es_curi_. Vo_re
dima_isem"ne_oie, refroidi_e_ass_dhe I'ak de vo_repiece afin d'of[_'kun
confor{op{imal
VeuiHez_irebs insmm_ionsa_en_ivemen_avan_d'u_i_iserce_appareK De
plus, ffoubliezpas de remplire{de renvoyer la carte
d'enregistrement de I'appareil,
Notez le nmnc!ro du module et son nmn6ro de s_rie,
Vous aurez besoin des informations suivan{es pore {ou{es r_para{ions ou
opera{ions d'en{re{ien e{ de maintenance lots de _a pOriode couverm par _a
garan{ie. Fixez _e req'u de venm _ ce{{eno{k:e e{ conservez la afin de
pouvoir la consu_mr u_rieuremen_. Vous _rouverez ces informa_ions au
niveau de _a p_aque signa_6%ue de vo{re appareil. Si la p_aque ne se
_rouve pas sur N_abiHage (sur _ec6_ ou au dos), re_irez _a grille afin de _a
{rouver.
NmnOro du mode[e: ...................................................................................
Num_m de serie: .................................................................................
Da_e d'adhat: ............................................................................................
Nora du mvendeur:
Adresse du revendem': ...............................................................................
Num_m de {(_Ophone du revendem':
TABLEAU
PRISES ET FUSIBLES
] ENSION NOM]NAII __5/_0 _5_/0,0
A_P_S 15 _13 _S _0 3_
PRIS] MURAH
CAHBRE DU ]USIB_E _5 _ _S _ 30
YEMPORIS_ Wo _ion_<
18

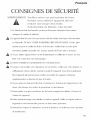
Franf;ais
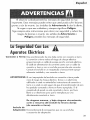
AVERTISSEMENT: Veuillez suivre ces precautions de base
Iorsque vous utiHsez Fappareil afin de
r_duire tout risqtle d'incendie,
d'61ecttocution, de blessure, voire de mort.
1)Le dimatiseur doi__re branch_ au niveau &me prise elec_rklued'une _ension
ad_quam.(Consulmz _emHeau)
_2) L'appaleil doi__re mis _ _a_erre (masse) afin de reduire _ou_risque d'_eOrocu_km
e{ d'incendie. NEPASCOUPERNIRET][RERLABROCHEDE MASSE.Sivmre prise
tam'Mene peu_ acc_ei_lirune fic/he_ _roisbroc/hes,veui_lezfaile en sor_equ'un
_eoricien quahf]een insm_leune. Laprise mmMe DOIT_re raise _ _amasse.
_3) Ne pas u_i_iser_'apparei_si _ecordon d'Mimenm_iones_effi_oc/h_ou issm'_,ou si _a
tic/hee_le connecmm"son_endommag_s.
_4) NE PASUT][LISERUN ADAPTATEUROU UNERALLONGE.
_5) Lorsquevous insm_ez vmre dima{isem"sin"m_efeH6{re,v&ifiezque ce{_edemi&'ees{
suf_{_sammen_robus_eafin de souvenir_epoids de ]['appareiLVousdevrez _gMemen_
flxe_['apparei_afin qu'i_ne puisse _omber e_insm_le_des supports e_fixations
supp_men_aims en fonOion du ffpe de lend,re.
(5)Ne pas g{?nerni obs_mer _efluxd'air _ I'n_&'iem'e__ ]['ex_&'iem"de ]['apparei_avec des
s{ores, des rideaux, des cadi_esde promc_ions,e{ des buissons.
7)Pmnezgarde _ ne pas vous Hesset sm bs bords coupan{s des aib{ms a I'avan{e{
I'arri&e de I'appareiL
8) Fai_esa_en_ion][orsquevous insmHezou re_irez]['appareiLVeiHez_ _oujom'ssou_ever
_'apparei_en vous faisan_aide_ par une ou deux au_respersonnes.
9) Debrandhez {ou}omsle dima{isem avan{de le d_placet ou d'effecmer{ou{eop&'a{ion
de maintenance.
_9
La page est en cours de chargement...
La page est en cours de chargement...
La page est en cours de chargement...
La page est en cours de chargement...
La page est en cours de chargement...
La page est en cours de chargement...
La page est en cours de chargement...
La page est en cours de chargement...
La page est en cours de chargement...
La page est en cours de chargement...
La page est en cours de chargement...
La page est en cours de chargement...
La page est en cours de chargement...
La page est en cours de chargement...
La page est en cours de chargement...
La page est en cours de chargement...
La page est en cours de chargement...
La page est en cours de chargement...
La page est en cours de chargement...
La page est en cours de chargement...
La page est en cours de chargement...
La page est en cours de chargement...
La page est en cours de chargement...
La page est en cours de chargement...
La page est en cours de chargement...
La page est en cours de chargement...
La page est en cours de chargement...
La page est en cours de chargement...
La page est en cours de chargement...
La page est en cours de chargement...
La page est en cours de chargement...
La page est en cours de chargement...
La page est en cours de chargement...
La page est en cours de chargement...
-
 1
1
-
 2
2
-
 3
3
-
 4
4
-
 5
5
-
 6
6
-
 7
7
-
 8
8
-
 9
9
-
 10
10
-
 11
11
-
 12
12
-
 13
13
-
 14
14
-
 15
15
-
 16
16
-
 17
17
-
 18
18
-
 19
19
-
 20
20
-
 21
21
-
 22
22
-
 23
23
-
 24
24
-
 25
25
-
 26
26
-
 27
27
-
 28
28
-
 29
29
-
 30
30
-
 31
31
-
 32
32
-
 33
33
-
 34
34
-
 35
35
-
 36
36
-
 37
37
-
 38
38
-
 39
39
-
 40
40
-
 41
41
-
 42
42
-
 43
43
-
 44
44
-
 45
45
-
 46
46
-
 47
47
-
 48
48
-
 49
49
-
 50
50
-
 51
51
-
 52
52
-
 53
53
-
 54
54


Haier HWF06XC3 Le manuel du propriétaire
- Taper
- Le manuel du propriétaire
dans d''autres langues
- English: Haier HWF06XC3 Owner's manual
- español: Haier HWF06XC3 El manual del propietario
Documents connexes
-
Haier HWF05XC3 Le manuel du propriétaire
-
-
-
-
-
-
-
Haier ESA3083 Le manuel du propriétaire
-
Amana ACE245R Manuel utilisateur
-