
Easy-Build
Barn Door
MKTD3719
DOOR ASSEMBLY INSTRUCTIONS
Skill Level: Easy
RENIN.COM

2 |
Installation Instructions
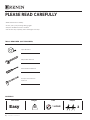
PLEASE READ CAREFULLY
• Read all instructions carefully
• Protect your eyes by wearing safety goggles
• Keep the installation area free of clutter
• Follow each step completely before starting the next step
TOOLS REQUIRED (NOT PROVIDED)
AS SE MBLY
1 HOUR
2
Time People
Flat Head Screwdriver
Tape Measure
Adjustable Wrench
Deep Socket Wrench
11/16 inch
Skill Level
Easy
Weight
113 LB
51 KG

| 3
Installation Instructions
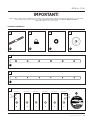
PACKAGE CONTENTS
IMPORTANT!
VERIFY THAT ALL PARTS ARE INCLUDED IN THE PACKAGING. IF ANY PARTS ARE MISSING, DO NOT RETURN THIS PRODUCT TO THE STORE.
FOR ANY PARTS ASSISTANCE, PLEASE CALL 1-800-493-5263 BETWEEN 8:30 AM - 4:30 PM EST, MONDAY TO FRIDAY
LANGUAGE: English, French and Spanish
12x 12x 12x 1x
1x
1x
6x
Panels with (G) Dowel
Horizontal Brace Bar (Pre-Drilled)
Horizontal Brace Bar (with pre-welded Acorn Nuts)
Double End Bolt
Outer Panel 1 Outer Panel 2 Outer Panel 3 Outer Panel 4 Outer Panel 5 Outer Panel 6
Holes
for
Right
Strap
Holes
for
Left
Strap
Acorn Nut Washer Scratch Shield (cut out of package)
P
L
A
C
E
O
V
E
R
A
C
O
R
N
N
U
T
S
T
O
P
R
O
T
E
C
T
B
R
A
C
E
B
A
R
S
U
R
F
A
C
E
•
Dowel
RENI N.COM
DCBA
F
G
1 2 3 4 5 6
E

4 |
Installation Instructions
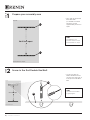
• Place both (E) Horizontal
Brace Bars with
pre-welded Acorn Nuts
facing the ground,
approximately 58.25 inch
apart.
• Screw in the first (A)
Double End Bolt into the
very first hole (left side) of
both (E) Horizontal Brace
Bars
1
2
Prepare your assembly area
Screw in the first Double End Bolt
STEPSTEP
HINT
Use flat-head screwdriver
to gently tighten
Top Left
Towel, blanket or carpet
58.25 inch apart
HINT
Assemble Door on a
protective surface such as
a towel, blanket or carpet.
Top Left
Towel, blanket or carpet
58.25 inch apart
E
A
E
E

| 5
Installation Instructions
Towel, blanket or carpet
Side profile
Bottom Cross-section view
Bottom Cross-section view
Bottom Cross-section view
Bottom Cross-section view
Cross-section view
Bottom Cross-section view
Bottom Cross-section view
REPEAT: Working from left to right - Repeat Steps 4 and 5 until all planks are connected (See above)
Serviette, couverture ou tapis
Vue de profil
Coupe transversale vue du dessous
Coupe transversale vue du dessous
Coupe transversale vue du dessous
Coupe transversale vue du dessous
Coupe transversale
Coupe transversale vue du dessous
Coupe transversale vue du dessous
RÉPÉTER
:
De gauche à droite, répéter les étapes 4 et 5 jusqu’à ce que toutes les planches soient solidarisées (voir ci-dessus).
Toalla, sábana o alfombra
Vista de lado
Vista transversal de la parte inferior
Vista transversal de la parte inferior
Vista transversal de la parte inferior
Vista transversal de la parte inferior
Vista transversal
Vista transversal de la parte inferior
Vista transversal de la parte inferior
REPITA:
Trabaje de izquierda a derecha y repita los pasos 4 y 5 hasta que todas las tablas estén conectadas. (Vea la imagen de arriba).
Spanish French English
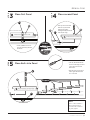
HINT
Holes on Panel and Brace
Bar should be aligned.
Use flat-head screwdriver
to gently tighten
• Take (A) Double End Bolts
and screw through (2) Panel
into both (E) Horizontal
Brace Bars
• Repeat Steps 4 and 5 from
left to right until all Panels
are connected
3
5
4
Place first Panel
Place Bolts into Panel
Place second Panel
STEPSTEP
STEP
Towel, blanket or carpet
Side profile
Bottom Cross-section view
Bottom Cross-section view
Bottom Cross-section view
Bottom Cross-section view
Cross-section view
Bottom Cross-section view
Bottom Cross-section view
REPEAT: Working from left to right - Repeat Steps 4 and 5 until all planks are connected (See above)
Serviette, couverture ou tapis
Vue de profil
Coupe transversale vue du dessous
Coupe transversale vue du dessous
Coupe transversale vue du dessous
Coupe transversale vue du dessous
Coupe transversale
Coupe transversale vue du dessous
Coupe transversale vue du dessous
RÉPÉTER
:
De gauche à droite, répéter les étapes 4 et 5 jusqu’à ce que toutes les planches soient solidarisées (voir ci-dessus).
Toalla, sábana o alfombra
Vista de lado
Vista transversal de la parte inferior
Vista transversal de la parte inferior
Vista transversal de la parte inferior
Vista transversal de la parte inferior
Vista transversal
Vista transversal de la parte inferior
Vista transversal de la parte inferior
REPITA:
Trabaje de izquierda a derecha y repita los pasos 4 y 5 hasta que todas las tablas estén conectadas. (Vea la imagen de arriba).
Spanish French English
• Insert (1) Outer Panel over
both assembled (A) Double
End Bolts
• Take (2) Inner Panel and
slide into (1) first Panel
and bring together
making sure (G) Dowel (at
bottom) fits snug
Dowel
RENI N.COM
E
A
A
2
2
G
1
1
Repeat

6 |
Installation Instructions
6 7
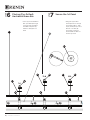
Placing (Pre-Drilled)
Horizontal Brace Bar
Secure the 1st Panel
STEP
STEP
• Using the (D) Scratch
Shield placed over the (B)
Acorn Nut, tighten - with
11/16" (17mm) deep Socket
Wrench - the first (B)
Acorn Nut on both (F)
Horizontal Brace Bars on
the first (1) Panel
• Place (F) Horizontal Brace
Bar (Pre-Drilled) through
all 6 exposed (A) Double
End Bolts and place (C)
Washers and (B) Acorn
Nuts
Serviette, couverture ou tapis
Toalla, sábana o alfombra
Spanish French English
Towel, blanket or carpet
1st
2nd
6th5th
4th3rd
Side profile
1
er
2
e
6
e
5
e
4
e
3
e
Vue de profil
1.°
2.°
6.°5.°4.°3.°
Vista de lado
F
B
B
B
AA
A
C
1 2 3
C
C
1
P
L
A
C
E
O
V
E
R
A
C
O
R
N
N
U
T
S
T
O
P
R
O
T
E
C
T
B
R
A
C
E
B
A
R
S
U
R
F
A
C
E
•
D

| 7
Installation Instructions
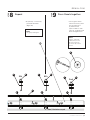
8 9
Repeat Press Panels together
STEP
STEP
• Press together all the
Panels into Panel (1) until
they are tight, place
(C) Washers and
(B) Acorn Nuts on both
Panel (6), (A) Double End
Bolts and tighten them.
• Repeat step 7 on Panel (6)
(A) Double End Bolts
(Right side)
HINT
Tighten - with 11/16"
(17mm) deep Socket
Wrench and use the
protective (D) Scratch
Shield
HINT
only gently hand tighten
RENI N.COM
Serviette, couverture ou tapis
Toalla, sábana o alfombra
Spanish French English
Towel, blanket or carpet
1st
2nd
6th5th
4th3rd
Side profile
1
er
2
e
6
e
5
e
4
e
3
e
Vue de profil
1.°
2.°
6.°5.°4.°3.°
Vista de lado
F
B B
B
A A A
4 5 6
C C
C
6
P
L
A
C
E
O
V
E
R
A
C
O
R
N
N
U
T
S
T
O
P
R
O
T
E
C
T
B
R
A
C
E
B
A
R
S
U
R
F
A
C
E
•
D

8 |
Installation Instructions
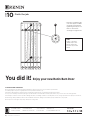
10
Finish the job
STEP
• Commence tightening the
rest of the (B) Acorn Nuts
using (D) Scratch Shield,
tightening both (B) Acorn
Nuts on each Panel -
working from right to left
You did it! Enjoy your new Renin Barn Door
5 YEAR LIMITED WARRANTY
Renin Corp warranties their products against manufacturer’s defects for up to five (5) years from the purchase date.
The warranty applies only to the original purchaser of the product from Renin Corp.
If a product is determined to be defective due to a manufacturers defect, Renin Corp will supply a replacement product.
The scope of the warranty is limited to replacing the product and does not include labor to install, repair, deliver, or any costs to remove the existing product.
This warranty is void in the event the product is damaged in transit, or if damage or failure is caused by abuse, misuse, storage of products in an improper environment,
abnormal usage, faulty installation, failure to follow installation instructions, damage in an accident, improper maintenance, or any repair.
Renin Corp reserves the right to inspect any claim prior to issuing credit.
Follow Us
HINT
Tighten - with 11/16"
(17mm) deep Socket
Wrench and use the
protective (D) Scratch
Shield
110 WALKER DRIVE
BRAMPTON, ON L6T 4H6
T. 800 -493-526 3
F. 905-791-7930
W. RENI N.COM
E.
INFO@RE NINCORP.COM
1141 RYDER STREET
TUPELO, MS 38804
B
P
L
A
C
E
O
V
E
R
A
C
O
R
N
N
U
T
S
T
O
P
R
O
T
E
C
T
B
R
A
C
E
B
A
R
S
U
R
F
A
C
E
•
P
L
A
C
E
O
V
E
R
A
C
O
R
N
N
U
T
S
T
O
P
R
O
T
E
C
T
B
R
A
C
E
B
A
R
S
U
R
F
A
C
E
•
B
B
P
L
A
C
E
O
V
E
R
A
C
O
R
N
N
U
T
S
T
O
P
R
O
T
E
C
T
B
R
A
C
E
B
A
R
S
U
R
F
A
C
E
•
B
B
P
L
A
C
E
O
V
E
R
A
C
O
R
N
N
U
T
S
T
O
P
R
O
T
E
C
T
B
R
A
C
E
B
A
R
S
U
R
F
A
C
E
•
B
B
P
L
A
C
E
O
V
E
R
A
C
O
R
N
N
U
T
S
T
O
P
R
O
T
E
C
T
B
R
A
C
E
B
A
R
S
U
R
F
A
C
E
•
B
D
1 2 3 4 5 6
-
 1
1
-
 2
2
-
 3
3
-
 4
4
-
 5
5
-
 6
6
-
 7
7
-
 8
8


TRUporte BD069W12BW1BWE36084 Mode d'emploi
- Taper
- Mode d'emploi
- Ce manuel convient également à
dans d''autres langues
Documents connexes

Autres documents
-
ReliaBilt 449399 Guide d'installation
-
NewAge Products 50827 Manuel utilisateur
-
Black & Decker 606404-00 Manuel utilisateur
-
 Backyard 6295 Manuel utilisateur
-
 NewAge Products Inc. 40400 Manuel utilisateur
-
Swing-N-Slide Playsets 4367 Mode d'emploi
-
NewAge Products 54233 Manuel utilisateur
-
-
RIDGID R4514-R8600521K Manuel utilisateur
-

