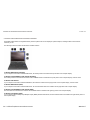
Lenovo ThinkPad X200 Tablet 7453 Manuel utilisateur
- Catégorie
- Comprimés
- Taper
- Manuel utilisateur
Ce manuel convient également à

Lenovo(Japan), Ltd., Date: April 09, 2009
Document Number: UY610-03-0055-76
User’s Manual
The attachment is the user’s manual of the specific Lenovo host PC device in this application,
which indicates the regulatory notice concerning the FCC Part 2 /15B /22H /24E and IC RSS-102/
132 /133, ICES-003.
In addition, some electronic user’s guidance referred to in the user’s manual is installed in each
host PC device, and it is displayed on the LCD screen. This exhibit also includes the screen copies
of electronic user’s guidance.

Part Number: 45N3690_01
ThinkPad Regulatory Notice for the Wireless WAN Adapter
Read first — regulatory information
Read this document before you use the computer. Be sure to also read
ThinkPad Regulatory Notice, included with your computer. The computer
complies with the radio frequency and safety standards of any country or
region in which it has been approved for wireless use. You must install and
use your computer in strict accordance with the instructions as described
hereafter.
Veuillez lire ce document avant d’utiliser l’ordinateur ThinkPad. Veillez à lire
également la consigne réglementaire ThinkPad Regulatory Notice, fournie avec
votre ordinateur. L’ordinateur ThinkPad est conforme aux normes de sécurité
et de radiofréquence du pays ou de la région où son utilisation sans fil est
agréée. Vous devez installer et utiliser votre ordinateur en respectant
scrupuleusement les instructions décrites ci-après.
USA — Federal Communications Commission (FCC)
If your computer integrates the wireless WAN adapter (Model: UNDP-1), you
may connect it to the radiocommunication Public Network in the USA.
I. FCC ID of the wireless adapter
Wireless WAN PCI Express Mini Card:
v FCC ID: J9CUNDP-1L (Model: UNDP-1)
There
is no FCC ID for the adapter shown on the enclosure of your computer.
Instead you will find an indicator pointing to the location of the FCC ID on
the bottom side of your computer. For the location of the FCC ID indicator,
see “Location of the FCC ID and IC Certification number label” in Access Help.
The FCC ID is affixed on the approved adapter installed in the PCI Express
Mini Card slot. For the location of the slot, see “PCI Express Mini Card slot
for wireless WAN” in Access Help.
II. Installation of the approved wireless adapter
If no integrated wireless WAN PCI Express Mini Card has been preinstalled in
your computer, you can install one, provided by Lenovo
®
as an option. Plug
the wireless option adapter into the PCI Express Mini Card slot. For the
© Copyright Lenovo 2009 1

installation procedure, see “Installing and replacing the PCI Express Mini
Card for wireless WAN connection” in Access Help.
Attention: The computers contain an authentication mechanism. If you
install an unauthorized wireless WAN PCI Express Mini Card that is not
approved for use in your computer, the computer will not start, but only
displays an error message and emits audible beeps.
III. RF safety compliance
The radiated energy from the antenna connected to the wireless WAN adapter
(Model: UNDP-1 ) conforms to the FCC limit of the SAR (Specific Absorption
Rate) requirement regarding 47 CFR Part 2 section 1093 when the computer
was tested in either conventional notebook or tablet computer orientations.
The transmission antenna is located at the screen section. See “Location of the
UltraConnect
™
wireless antennas” in Access Help.
IV. Emergency Calls
The wireless WAN adapter embedded in the computer does not support voice
calls, hence their use for essential communication is not possible, including
emergency calls regarding the E911 rule.
V. Simultaneous use of RF transmitters
The wireless WAN adapter (Model: UNDP-1) is approved for simultaneous
use of the wireless devices listed below:
v Wireless LAN/WiMAX adapter (FCC ID: PD9512ANXMU, PD9533ANXMU,
PD9512ANXHU, PD9LEN512ANMU, PD9533ANMU, PD9512ANHU,
PD9533ANHU, PPD-AR5BHB63-L, or TX2-RTL8191SE-L)
v Wireless USB adapter (FCC ID: TX2RTU7305BG13HMC)
v Bluetooth device (FCC ID: QDS-BRCM1033)
Make
sure of the following conditions when you use any other external
wireless option device:
1. When you use any other RF option device, all other wireless features
including the above integrated devices in your computer are required to
be turned off.
2. You must follow the RF Safety instructions on wireless option devices that
are included in the user manual of the RF option device.
2

Electronic emission notices
Federal Communications Commission (FCC) Statement
v Model: UNDP-1
This equipment has been tested and found to comply with the limits for a
Class B digital device, pursuant to Part 15 of the FCC Rules. These limits are
designed to provide reasonable protection against harmful interference in a
residential installation. This equipment generates, uses, and can radiate radio
frequency energy and, if not installed and used in accordance with the
instructions, may cause harmful interference to radio communications.
However, there is no guarantee that interference will not occur in a particular
installation. If this equipment does cause harmful interference to radio or
television reception, which can be determined by turning the equipment off
and on, the user is encouraged to try to correct the interference by one or
more of the following measures:
v Reorient or relocate the receiving antenna.
v Increase the separation between the equipment and receiver.
v Connect the equipment into an outlet on a circuit different from that to
which the receiver is connected.
v Consult an authorized dealer or service representative for help.
Lenovo
is not responsible for any radio or television interference caused by
unauthorized changes or modifications to this equipment. Unauthorized
changes or modifications could void the user’s authority to operate the
equipment.
This device complies with Part 15 of the FCC Rules. Operation is subject to
the following two conditions: (1) this device may not cause harmful
interference, and (2) this device must accept any interference received,
including interference that may cause undesired operation.
Responsible Party:
Lenovo (United States) Incorporated
1009 Think Place-Building One
Morrisville, NC 27560
Telephone: 1-919-294-5900
Tested To Comply
With FCC Standards
FOR HOME OR OFFICE USE
3

Canada — Industry Canada (IC)
IC Certification number
User installable wireless WAN adapter:
v IC: 2723A-UNDP1 (Model: UNDP-1)
There is no certification number of Industry Canada for the PCI Express Mini
Card shown on the enclosure of your computer. Instead you will find an
indicator pointing to the location of the certification number on the bottom
side of your computer. For the location of the certification number indicator,
see ″Location of the FCC ID and IC certification number label″ in Access Help.
The certification number of Industry Canada is affixed on the approved
module installed in the PCI Express Mini Card slot. For the location of the
slot, see ″PCI Express Mini Card slot for wireless WAN″ in Access Help.
Attention: The computer contains an authentication mechanism. You can
install or remove each wireless adapter by yourself. If you install an
unauthorized wireless adapter that is not approved for use in the computer,
the computer will not start, but only displays an error message and emits
audible beeps.
Exposure of humans to RF fields (RSS-102)
The computers employ low gain integral antennas that do not emit RF field in
excess of Health Canada limits for the general population; consult Safety Code
6, obtainable from Health Canada’s Web site at www.hc-sc.gc.ca/
The radiated energy from the antenna connected to the wireless WAN adapter
(Model: UNDP-1, IC: 2723A-UNDP1) conforms to the IC limit of the SAR
(Specific Absorption Rate) requirement regarding IC RSS-102, Issue 2 clause
4.1.
Industry Canada Class B Emission Compliance Statement
This Class B digital apparatus complies with Canadian ICES-003.
Operation is subject to the following two conditions: (1) this device may not
cause interference, and (2) this device must accept any interference, including
interference that may cause undesired operation of the device.
4

Numéro d’homologation IC
Module sans fil installable par l’utilisateur :
v IC : 2723A-UNDP1 (Model : UNDP-1)
Le boîtier de votre ordinateur ThinkPad ne comporte pas de numéro
d’homologation IC (Industry Canada) pour la carte mini-PCI Express ; mais
sous votre ThinkPad, vous trouverez un indicateur pointant vers
l’emplacement du numéro d’homologation IC. Pour connaître l’emplacement
du numéro d’homologation, consultez la section ″Emplacement de l’étiquette
d’identification FCC et du label du numéro de certification″ dans Access Help.
Le numéro d’homologation délivré par Industrie Canada est apposé sur le
module homologué installé dans l’emplacement de carte mini-PCI Express.
Pour savoir où se trouve cet emplacement, consultez la section ″Logement de
cartes mici-PCI Express pour réseau étendu sans fil″ dans Access Help.
Attention: L’ordinateur ThinkPad renferme un mécanisme d’authentification.
Vous pouvez installer ou retirer chaque carte sans fil vous-même. Si vous
installez une carte sans fil qui n’est pas homologuée dans votre ordinateur
ThinkPad, l’ordinateur ne démarrera pas mais affichera un message d’erreur
et générera des bips sonores.
Exposition des êtres humains aux champs radioélectriques (RF)
(CNR-102)
L’ordinateur ThinkPad utilise des antennes intégrales à faible gain qui
n’émettent pas un champ électromagnétique supérieur aux normes imposées
par le Ministére de la santé canadien pour la population. Consultez le Safety
Code 6 sur le site Web du Ministére de la santé canadien à l’adresse
www.hc-sc.gc.ca/
L’énergie émise par l’antenne reliée au adaptateur sans fil (modèle : UNDP-1,
IC : 2723A-UNDP1) respecte la limite concernant le débit d’absorption
spécifique (DAS) telle que définie par Industrie Canada dans la clause 4.1 du
document CNR-102.
Avis de conformité à la réglementation d’lndustrie Canada
Cet appareil numérique de la classe B est conforme à la norme NMB-003 du
Canada.
Le fonctionnement de ce type d’appareil est soumis aux deux conditions
suivantes : (1) Cet appareil ne doit pas perturber les communications radio, et
(2) cet appareil doit supporter toute perturbation, y compris les perturbations
qui pourraient provoquer son dysfonctionnement.
5

Trademarks
The following terms are trademarks of Lenovo in the United States, other
countries, or both:
Lenovo
®
ThinkPad
®
UltraConnect
Other company, product, and service names may be trademarks or service
marks of others.
Printed in China
6

Lenovo(Japan), Ltd., Date: June 10, 2008
Document Number: UY610-03-0048-18
The screen copies of electronic user’s guidance are extracted hereafter.

There is no FCC ID or IC Certification number for the PCI Express Mini Card shown on the enclosure of your ThinkPad® computer. Instead you will find
an indicator pointing to the location of the FCC ID and the IC Certification number for the installed transmitter card on the bottom side of your ThinkPad
as shown below. The FCC ID and IC Certification number label is affixed on the card installed in the Mini PCI Express Card slot of your ThinkPad
computer.
Note:
The wording of the label may vary depending on the model.
If no integrated wireless PCI Express Mini Card has been preinstalled in your ThinkPad computer, you can install one. To do this, follow the procedure
in Installing and replacing the PCI Express Mini Card for wireless LAN/WiMAX connection
or Installing and replacing the PCI Express Mini Card for
wireless WAN connection.
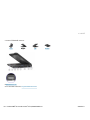
Location of the FCC ID and IC Certification number label
1/1 ページLocation of the FCC ID and IC Certification number label
2008/06/11file://C:\TamaTemp\fccidlbl.htm\fccidlbl.htm

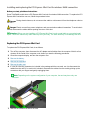
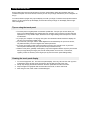
Location of the UltraConnect wireless antennas
ThinkPad® models feature an integrated diversity antenna system built into the display for optimal reception, enabling wireless communication
wherever you are.
The following shows the location of each built-in wireless antenna.
1. Wireless WAN antenna (Auxiliary)
If your computer comes with a wireless WAN feature, its auxiliary antenna is located at the top left side of the computer display.
2. Wireless LAN and WiMAX combo antenna (Auxiliary)
The auxiliary antenna connected to the wireless LAN or WiMAX feature is located at the top left portion of the computer display, near the center.
3. Wireless USB antenna
If your computer comes with a wireless USB feature, the antenna is located at the top right portion of the computer display, near the center.
4. Wireless WAN antenna (Main)
If your computer comes with a wireless WAN feature, its main transmitter antenna is located at the top right side of the computer display.
5. Wireless LAN and WiMAX combo antenna (Main)
The main antenna connected to the wireless LAN or WiMAX feature is located at the right top portion of the computer display.
6. Wireless LAN antenna (Third)
If your computer has the Multiple Input Multiple Output (MIMO) wireless LAN feature, the third wireless antenna is located at the right bottom portion of
the computer display.
1/2 ページLocation of the UltraConnect wireless antennas
2008/06/17file://C:\TamaTemp\antennas.htm\antennas.htm

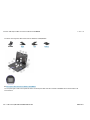
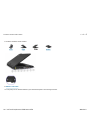
Location: Bluetooth antenna
Front
Right
Left Bottom
8.
Bluetooth
antenna
Some ThinkPad® models have Integrated
Bluetooth
features.
1/1 ページ
2008/06/11file://C:\DOCUME~1\murota\LOCALS~1\Temp\SQB5A3NH.htm

Location: PCI Express Mini Card slot for Wireless LAN/WiMAX
Front
Right Left Bottom
15. PCI Express Mini Card slot for Wireless LAN/WiMAX
Your computer might include a PCI Express Mini Card in the PCI Express Mini Card slot for Wireless LAN/WiMAX which enable wireless LAN
communications.
1/2 ページLocation: PCI Express Mini Card slot for Wireless LAN/WiMAX
2008/06/11file://C:\TamaTemp\LCMPCI.HTM\LCMPCI.HTM

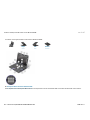
Location: PCI Express Mini Card slot for Wireless WAN
Front
Right Left Bottom
14. PCI Express Mini Card slot for Wireless WAN
Some computers have a PCI Express Mini Card in the PCI Express Mini Card slot for Wireless WAN which enable wireless WAN communications.
1/1 ページLocation: PCI Express Mini Card slot for Wireless WAN
2008/06/11file://C:\TamaTemp\LCMPCI2.HTM\LCMPCI2.HTM

Location: PCI Express Half Mini Card slot for Wireless USB
Front
Right Left Bottom
4. PCI Express Half Mini Card slot for Wireless USB
Some models have the Wireless USB features.
This slot also accepts an Intel
® Turbo Memory Card.
1/2 ページLocation: PCI Express Half Mini Card slot for Wireless USB
2008/06/11file://C:\TamaTemp\LCUWB.HTM\LCUWB.HTM

Before you start, print these instructions.
Your computer has a PCI Express Mini Card for wireless LAN/WiMAX. To replace the PCI Express Mini Card
with a new one, follow the procedure below.
Danger:
During electrical storms, do not connect the cable to or disconnect it from the telephone outlet on
the wall.
Danger:
Electric current from power, telephone, and communication cables is hazardous. To avoid shock
hazard, disconnect the cables before opening the cover of this slot.
Attention:
Before you start installing a module, touch a metal table or a grounded metal object. This
action reduces any static electricity from your body. The static electricity could damage the PCI Express Mini
Card.
Note:
Use the PCI Express Mini Card provided by Lenovo.
Replacing a PCI Express Mini Card with two connectors
Replacing a PCI Express Mini Card with three connectors
Replacing a PCI Express Mini Card with two connectors
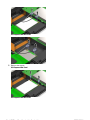
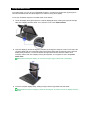
To replace the PCI Express Mini Card with two connectors, do as follows:
1.
Turn off the computer; then disconnect the AC adapter and all cables from the computer. Wait for a few
minutes, till the inside of the computer cools, before you start the following procedures.
2.
Close the computer display, and turn the computer over.
3.
Remove the battery
.
4.
Remove the keyboard
.
5.
Remove the palm rest
.
6.
If a tool for removing connectors is included in the package with the new card, use it to disconnect the
cables from the card. If no such tool is included, disconnect the cables from the card by picking up the
connectors with your fingers and gently unplugging them.
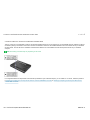
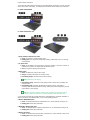
PCI Express Mini Card
Installing and replacing the PCI Express Mini Card for wireless LAN/WiMAX
connection
1/5 ページ
2008/06/11file://C:\TamaTemp\replpci.htm\replpci.htm

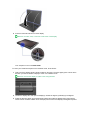
PCI Express Half Mini Card
7.
Remove the screws.
PCI Express Mini Card
PCI Ex
p
ress Half Mini Card
2/5 ページ
2008/06/11file://C:\TamaTemp\replpci.htm\replpci.htm

8.
Remove the card.
PCI Express Mini Card
PCI Express Half Mini Card
9.
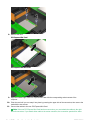
Align the contact edge of the PCI Express Mini Card with the corresponding socket contact of the
computer.
10.
Pivot the card until you can snap it into place by pressing the upper side of the connectors; then secure the
card with the two screws.
11.
Connect the cables to the new PCI Express Mini Card.
Note:
If the new PCI Express Mini Card has three connectors, you must attach the cables to the right
and left connectors. If you attach either cable to the center connector, the connection speed will be lower.
3/5 ページ
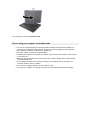
2008/06/11file://C:\TamaTemp\replpci.htm\replpci.htm

12.
Reinstall the palm rest
.
13.
Reinstall the keyboard
.
14.
Reinstall the battery
.
15.
Turn the computer over again. Connect the AC adapter and cables to the computer; then turn it on.
Replacing a PCI Express Mini Card with three connectors
If your computer has a Multiple Input Multiple Output (MIMO) or WiMAX feature, the PCI Express Mini Card
with three connectors comes with the computer. To replace the card for the MIMO or WiMAX feature, do as
follows:
1.
Turn off the computer; then disconnect the AC adapter and all cables from the computer. Wait for a few
minutes, till the inside of the computer cools, before you start the following procedures.
2.
Close the computer display, and turn the computer over.
3.
Remove the battery
.
4.
Remove the keyboard
.
5.
Remove the palm rest
.
6.
If a tool for removing connectors is included in the package with the new card, use it to disconnect the
cables from the card. If no such tool is included, disconnect the cables from the card by picking up the
connectors with your fingers and gently unplugging them.
7.
Remove the screws.
4/5 ページ
2008/06/11file://C:\TamaTemp\replpci.htm\replpci.htm

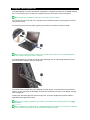
8.
Remove the card.
9.
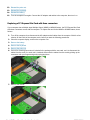
Align the contact edge of the new card with the corresponding socket contact of the computer.
10.
Pivot the card until you can snap it into place by pressing the upper side of the connectors; then secure the
card with the two screws.
11.
Connect the black cable (AUX) to the right connector, the white cable (MIMO third) to the center connector
and the gray cable to the left connector on the new card.
Note:
If the new PCI Express Mini Card has two connectors, you must attach the gray cable to the left
connector and the black cable to the right connector.
12.
Reinstall the palm rest
.
13.
Reinstall the keyboard
.
14.
Reinstall the battery
.
15.
Turn the computer over again. Connect the AC adapter and cables to the computer; then turn it on.
5/5 ページ
2008/06/11file://C:\TamaTemp\replpci.htm\replpci.htm

Before you start, print these instructions.
Some ThinkPad® models have a PCI Express Mini Card slot for wireless WAN connection. To replace the PCI
Express Mini Card with a new one, follow the procedure below.
Danger:
During electrical storms, do not connect the cable to or disconnect it from the telephone outlet on
the wall.
Danger:
Electric current from power, telephone, and communication cables is hazardous. To avoid shock
hazard, disconnect the cables before opening the cover of this slot.
Attention:
Before you start installing a PCI Express Mini Card, touch a metal table or a grounded metal
object. This action reduces any static electricity from your body. The static electricity could damage the card.
Replacing the PCI Express Mini Card
To replace the PCI Express Mini Card, do as follows:
1.
Turn off the computer; then disconnect the AC adapter and all cables from the computer. Wait for a few
minutes, till the inside of the computer cools, before you start the following procedures.
2.
Close the computer display, and turn the computer over.
3.
Remove the battery
.
4.
Remove the keyboard
.
5.
Remove the palm rest
.
6.
If a tool for removing connectors is included in the package with the new card, use it to disconnect the
cables from the card. If no such tool is included, disconnect the cables from the card by picking up the
connectors with your fingers and gently unplugging them.
Note:
Depending on the system configuration of your computer, the card may have only one
connector.
7.
Remove the screws that secure the card.
Installing and replacing the PCI Express Mini Card for wireless WAN connection
1/2 ページInstalling and replacing the PCI Express Mini Card for wireless WAN connection
2008/06/11file://C:\TamaTemp\replwan.htm\replwan.htm
La page est en cours de chargement...
La page est en cours de chargement...
La page est en cours de chargement...
La page est en cours de chargement...
La page est en cours de chargement...
La page est en cours de chargement...
La page est en cours de chargement...
La page est en cours de chargement...
La page est en cours de chargement...
La page est en cours de chargement...
La page est en cours de chargement...
La page est en cours de chargement...
La page est en cours de chargement...
La page est en cours de chargement...
La page est en cours de chargement...
La page est en cours de chargement...
La page est en cours de chargement...
La page est en cours de chargement...
La page est en cours de chargement...
La page est en cours de chargement...
La page est en cours de chargement...
La page est en cours de chargement...
La page est en cours de chargement...
La page est en cours de chargement...
La page est en cours de chargement...
La page est en cours de chargement...
La page est en cours de chargement...
-
 1
1
-
 2
2
-
 3
3
-
 4
4
-
 5
5
-
 6
6
-
 7
7
-
 8
8
-
 9
9
-
 10
10
-
 11
11
-
 12
12
-
 13
13
-
 14
14
-
 15
15
-
 16
16
-
 17
17
-
 18
18
-
 19
19
-
 20
20
-
 21
21
-
 22
22
-
 23
23
-
 24
24
-
 25
25
-
 26
26
-
 27
27
-
 28
28
-
 29
29
-
 30
30
-
 31
31
-
 32
32
-
 33
33
-
 34
34
-
 35
35
-
 36
36
-
 37
37
-
 38
38
-
 39
39
-
 40
40
-
 41
41
-
 42
42
-
 43
43
-
 44
44
-
 45
45
-
 46
46
-
 47
47


Lenovo ThinkPad X200 Tablet 7453 Manuel utilisateur
- Catégorie
- Comprimés
- Taper
- Manuel utilisateur
- Ce manuel convient également à
dans d''autres langues
Documents connexes
-
Qualcomm Technologies J9CGOBI2000-L Manuel utilisateur
-
Lenovo 44C9770 Manuel utilisateur
-
Lenovo T500 Manuel utilisateur
-
Lenovo 512AN_MMW Manuel utilisateur
-
-
-
-
-
-
Lenovo ThinkPad Edge E220s Manual D'utilisation