Sony MDR-IF140K Le manuel du propriétaire
- Catégorie
- Écouteurs
- Taper
- Le manuel du propriétaire

Cordless Stereo
Headphone
System
© 2003 Sony Corporation
Operating Instructions
Mode d’emploi
Manual de instrucciones
3-248-366-15(1)
MDR-IF140K
FR
ES
GB

2
GB
WARNING
To prevent fire or shock
hazard, do not expose the unit
to rain or moisture.
To prevent fire or shock hazard, do not
place objects filled with liquids, such as
vases, on the apparatus.
To avoid electrical shock, do not open
the cabinet. Refer servicing to qualified
personnel only.
Do not install the appliance in a
confined space, such as a bookcase or
built-in cabinet.
Owner’s Record
The model number is located on the top
of the transmitter and the left inner side
of the headband.
The serial number is located at the
bottom of the transmitter and the right
inner side of headband.
Record these numbers in the spaces
provided below. Refer to them
whenever you call upon your Sony
dealer regarding this product.
Model No. MDR-IF140K
Transmitter TMR-IF130
Headphones MDR-IF140
Serial No.
Transmitter
Headphones
You are cautioned that any changes or
modifications not expressly approved in this
manual could void your authority to operate
this equipment.
The validity of the CE marking is restricted
to only those countries where it is legally
enforced, mainly in the countries EEA
(European Economic Area).
Disposal of Old
Electrical &
Electronic
Equipment
(Applicable in the
European Union
and other European
countries with
separate collection
systems)
This symbol on the product or on its
packaging indicates that this product
shall not be treated as household waste.
Instead it shall be handed over to the
applicable collection point for the
recycling of electrical and electronic
equipment. By ensuring this product is
disposed of correctly, you will help
prevent potential negative
consequences for the environment and
human health, which could otherwise
be caused by inappropriate waste
handling of this product. The recycling
of materials will help to conserve
natural resources. For more detailed
information about recycling of this
product, please contact your local city
office, your household waste disposal
service or the shop where you
purchased the product.
For customers in Australia
The supply cord of AC power adaptor
can not be replaced; if cord is damaged,
AC power adaptor should be discarded.

3
GB
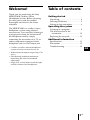
Welcome!
Thank you for purchasing the Sony
MDR-IF140K Cordless Stereo
Headphone System. Before operating
the unit, please read this manual
thoroughly and retain it for future
reference.
The MDR-IF140K is a cordless stereo
headphone system using infrared
transmission. You can enjoy listening to
a program free from the restriction of
the headphone cord by simply
connecting the transmitter to a TV, or
audio components equipped with a
headphone jack or a line output jack.
• Cordless, noiseless infrared headphone
system resistant to external noise, etc.
• Wide infrared reception range of up to 7m
(23 ft.).
• Self-adjusting headband mechanism
eliminating the need for headband
adjustment.
• Single VOL control adjusts both the right
and left volume of the headphones.
Table of contents
Getting started
Unpacking ........................................... 4
Inserting the battery .......................... 5
Setting up the transmitter ................. 6
Operating the system
Listening to a program ...................... 8
The effective area of the
transmitter ..................................... 10
Replacing the ear pads .................... 10
Additional information
Specifications .................................... 11
Precautions ....................................... 12
Troubleshooting ............................... 13
GB

Getting started
4
GB
N Getting started
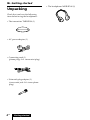
Unpacking
Check that you have the following
items before using the headphones:
• The transmitter TMR-IF130 (1)
• AC power adaptor (1)
• Connecting cord (1)
(phono plugs h stereo mini plug)
• Unimatch plug adaptor (1)
(stereo mini jack h stereo phone
plug)
• The headphones MDR-IF140 (1)

Getting started
5
GB
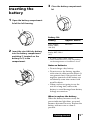
Inserting the
battery
1 Open the battery compartment
lid of the left housing.
2 Insert the size AAA dry battery
into the battery compartment
matching 3 terminal on the
battery to 3 in the
compartment.
3 Close the battery compartment
lid.
Battery life
*
1
at 1 kHz, 1 mW+1 mW output
*
2
Time stated above may vary, depending
on the temperature or conditions of use.
Notes on Batteries
• Do not charge a dry battery.
• Do not carry a dry battery together
with coins or other metallic objects. It
can generate heat if the positive and
negative terminals of the battery are
accidentally come into contact with
metallic objects.
• When you are not going to use the
unit for a long time, remove the
battery to avoid damage from battery
leakage or corrosion.
When to replace the battery
When the battery becomes weak, the
power indicator light dims, or sound
becomes distorted or noisy. Replace the
battery with new one as soon as
possible.
Battery
Sony alkaline
battery LR03/
AM-4(N)
Sony manganese
battery R03/UM-4
(NU)
Approx. hours*
1
60 hours*
2
28 hours*
2

Getting started
6
GB
RLINE IN
DC IN 9V
L
PHONES IN
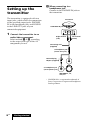
Setting up the
transmitter
The transmitter is equipped with two
input jacks, which allows for connection
to the specified output jacks: PHONES
IN to the headphone jack, and LINE IN
to the LINE OUT jacks of your
connected equipment.
1 Connect the transmitter to an
audio/video component.
Select method A or B, according
to the output jack type of the AV
component you use.
* WALKMAN is a registered trademark of
Sony Corporation to represent Headphone
Stereo products.
Transmitter
Unimatch plug
adaptor (supplied)
WALKMAN*, TV,
VCR, etc.
A When connecting to a
headphones jack
Connect to the PNONES IN jack on
the transmitter.
Connecting cord
(supplied)
to PHONES IN jacks
to headphone jack
(stereo mini jack)
to headphone jack
(stereo phone jack)
Left channel
(white)
Right channel
(red)

Getting started
7
GB
Note
If your AV component has a stereo mini jack
(LINE OUT), connect the stereo mini jack to
LINE IN jack of the transmitter by using the
connecting cord RK-G136 sold separately. If
you connect LINE OUT jack of your AV
component to PHONES IN jack of the
transmitter, volume may be too low.
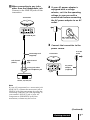
B When connecting to any jacks
other than the headphones jack
Connect to the LINE IN jacks on the
transmitter.
2 If your AC power adaptor is
equipped with a voltage
selector, set it to the operating
voltage in your area with a
screw driver before connecting
the AC power adaptor to an AC
outlet.
3 Connect the transmitter to the
power source.
(Continued)
RLINE IN
DC IN 9V
L
PHONES IN
Transmitter
to LINE IN jack
Right channel
(red)
Left channel
(white)
to any jacks other
than headphone jack
Connecting cord
(supplied)
Stereo, TV, VCR, etc.
RLINE IN
DC IN 9V
L
PHONES IN
to DC IN 9
V jack
Transmitter
to an AC
outlet
AC power
adaptor
(supplied)

Operating the system
8
GB
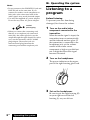
N Operating the system
Listening to a
program
Before listening
To prevent your ears from being
damaged, first lower the volume.
1 Turn on the audio/video
component connected to the
transmitter.
When the audio signal is input, the
transmitter turns on automatically
and the infrared emitters glow. If
the transmitter is connected to the
headphone jack, set the volume
control of the audio source
component as high as possible but
not so high that the audio signal
becomes distorted.
2 Turn on the headphones.
The power indicator on the upper
part of the right housing glows red.
3 Put on the headphones.
Be sure to put the right housing (R)
on your right ear and the left
housing (L) on your left ear.
Notes
•Do not connect to the PHONES IN jack and
LINE IN jack at the same time. If you
connect two audio/visual components to
both jacks at the same time, both of the
audio signals may result in mixed output.
•Use only the supplied AC power adaptor.
Do not use any other AC power adaptor.
•When you connect the connecting cord
directly to an earphone jack (monaural
mini jack), the audio signal may not be
output through the right channel. In such a
case, use the separately sold PC-236MS
plug adaptor (stereo mini jack h
monaural mini plug) between the
connecting cord and the earphone jack.
Unified
polarity plug

Operating the system
9
GB
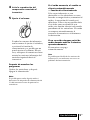
4 Start playback of the
component connected to the
transmitter.
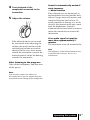
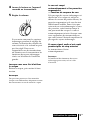
5 Adjust the volume.
If the infrared sensors are covered
by your hands when adjusting the
volume, the mute function will be
activated and volume may not be
adjusted. In this case, move nearer
toward the transmitter or orient the
infrared emitters on the left housing
towards the transmitter.
After listening to the programs
Take off the headphones, and then turn
off the power.
Note
You may hear some noise when you
disconnect the AC power adaptor from the
transmitter before taking off the headphones.
Sound is automatically muted if
noise increases
— Mute function
If the infrared rays are obstructed, or
the headphones are used outside their
effective range, noise will increase and
sound will become hard to hear. To
avoid potential ear damage as a result
of noise, this function mute any sound
from the headphones. Sound is
automatically restored when you move
nearer the transmitter or remove the
obstruction.
If no audio signal is input for
more than approximately 5
minutes
The transmitter turns off automatically.
Note
The brightness of the infrared emitters may
not be uniform, however, this is not a
malfunction.

Operating the system
10
GB
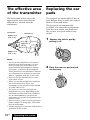
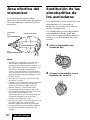
The effective area
of the transmitter
The illustration below shows the
approximate area covered by the
infrared rays emitted from the
transmitter.
Notes
• If you use the headphones at too great a
distance from the transmitter, you may
hear a hissing noise and if there is an
object between the headphones and the
transmitter, sound may be interrupted.
These phenomena are inherent to infrared
ray communication and do not mean that
there is a problem with the system itself.
• Do not cover the infrared sensors with
your hands or hair.
• When you use the headphones inside the
area in the illustration above, the
transmitter can be placed in front, behind
or by the side of you.
• The noise you may hear through the
headphones may vary depending on the
transmitter position and room conditions.
It is recommended that you place the
transmitter in a location that produces the
clearest sound.
• Do not use this system in areas exposed to
direct sunlight or strong light. The sound
may be interrupted.
• Plasma displays may interfere with normal
operation of this system.
45°
45°
Transmitter
Infrared ray
Approx. 3 m
(118
1
/
8
in.)
Approx. 3 m
(118
1
/8 in.)
Approx. 7 m
(23 ft.)
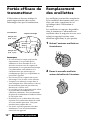
Replacing the ear
pads
The ear pads are replaceable. If the ear
pads become dirty or worn out, replace
them as illustrated below.
The ear pad is not commercially
available. You can order replacements
from the store where you purchased
this system, or at your nearest Sony
dealer.
1 Remove the old ear pad by
pulling it off.
2 Place the new ear pad around
the housing.

Additional information
11
GB
N
Additional information
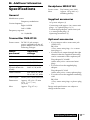
Specifications
General
Modulation system
Frequency modulation
Carrier frequency
Right 2.8 MHz
Left 2.3 MHz
Frequency response
18 – 22,000 Hz
Transmitter TMR-IF130
Power source DC IN 9 V jack accepts
power supplied from the AC
power adaptor for use on the
following voltages:
Audio input Phono jacks/stereo mini jack
Dimensions Approx. 152 × 38 × 72 mm
(6 × 1
1
/2 × 2
3
/4 in.)
(w/h/d)
Mass Approx. 75 g (2.7 oz.)
Headphone MDR-IF140
Power source Dry battery (size AAA)
Mass Approx. 125 g (4.41 oz.)
including battery
Supplied accessories
AC power adaptor (1)
Connecting cord (approx. 1m, stereo mini
plug × 1 y phono plug × 2) (1)
Unimatch plug adaptor (stereo mini jack
y stereo phone plug) (1)
Operating instructions (1)
Optional accessories
• If you connect with a stereo mini jack
(LINE OUT )
RK-G136
(1.5 m, stereo mini plug × 1 y stereo
mini plug × 1)
• If sound is not output through the right
channel when the supplied connecting
cord is connected to the earphone jack.
Plug adaptor PC-236MS
(stereo mini jack y monaural mini
plug)
• If you have lost the supplied plug
adaptor.
Plug adaptor PC-234S
(stereo mini jack y stereo phone plug)
• If you have lost the supplied connecting
cord.
RK-G129
(1.5 m, stereo mini plug y phono plug
× 2)
Design and specifications are subject to
change without notice.
Where
purchased
U.S.A.
U.K.
European countries
Japan (except for
Japanese domesitic
model)
Other countries
Operating
voltage
120 V AC, 60 Hz
230 V AC, 50 Hz
230 V AC, 50 Hz
110 V/120 V/220 V/
240 V AC, 50/60 Hz
220 – 230 V AC, 50/60
Hz or 120 V AC, 60 Hz

Additional information
12
GB
Precautions
• When the transmitter is not to be
used for a long period of time,
disconnect the AC power adaptor
from the AC outlet holding the plug
and remove the battery to avoid
damage caused by battery leakage
and subsequent corrosion.
• Do not leave the cordless stereo
headphones system in a location
subject to direct sunlight, heat or
moisture (It is recommended to use
the headphones at a temperature of
between 5˚C and 35˚C (between 41˚F
and 104˚F).)
• Do not drop, hit or otherwise subject
the transmitter or headphones to
strong shocks of any kind. This could
damage the product.
Notes on headphones
preventing hearing damage
Avoid using headphones at high
volume. Hearing experts advise against
continuous, loud and extended play. If
you experience a ringing in your ears,
lower the volume or discontinue use.
Caring for others
Keep the volume at a moderate level.
This will allow you to hear outside
sounds and to be considerate to the
people around you.
If you have any questions or problems
concerning the system that are not
covered in this manual, please consult
nearest Sony dealer.
Be sure to bring the headphones and
the transmitter to Sony dealer when
requiring repair work.

Additional information
13
GB
, If you connect the headphone jacks of
your connected equipment to the LINE
IN jack of the transmitter, sound may
be distorted when raising the volume.
Use the PHONES IN jacks of the
transmitter instead. See “Setting up the
transmitter.”
Loud background noise
, Move closer to the transmitter. (As you
move away from the transmitter, more
noise is likely to be heard. This is
inherent in infrared ray communication
and does not mean that there is a
problem with the unit itself.)
, Check that there is no object between
the transmitter and the headphones.
, Check that the infrared sensors are not
covered with your hands or hair.
, If you use the headphones by a
window where the sunlight is too
strong, draw the curtains/blinds to
shut out the direct sunlight, or use the
headphones away from the sunlight.
, Change the position or angle of the
transmitter.
, If the transmitter is connected to the
headphones jack, raise the volume of
the audio/video equipment connected
to the transmitter.
, The headphones’ power indicator light
dims, flashes or goes off.
• Replace dry battery with new one. If
the power indicator is still off after
replacing the battery, take the
headphones to a Sony dealer.
, When you have another transmitter,
check if more than one transmitters are
used at the same time.
• Turn off other transmitter or move to
a place outside the range of this
transmitter.
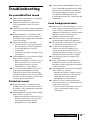
Troubleshooting
No sound/Muffled sound
, Turn on the transmitter first, and then
put on the headphones.
, Check the connection of the audio/
video equipment or the AC power
adaptor.
, Check that the audio/video equipment
connected to the transmitter is turned
on.
, If the transmitter is connected to the
headphones jack, raise the volume of
the audio/video equipment connected
to the transmitter.
, The mute function is activated.
• Check if there is any object between
the transmitter and the headphones.
• Use the headphones near the
transmitter.
• Change the position and angle of the
transmitter.
, The headphones’ power indicator light
dims, flashes or goes off.
• Replace dry battery with new one. If
the power indicator is still off after
replacing the battery, take the
headphones to a Sony dealer.
, If you connect the LINE OUT jacks of
your connected equipment to the
PHONES IN jacks of the transmitter,
volume may be too low. Use the LINE
IN jacks of the transmitter instead. See
“Setting up the transmitter.”
Distorted sound
, If the transmitter is connected to the
headphones jack, lower the volume of
the audio/video equipment connected
to the transmitter.
, The headphones’ power indicator light
dims, flashes or goes off.
• Replace dry battery with new one. If
the power indicator is still off after
replacing the battery, take the
headphones to a Sony dealer.

2
FR
AVERTISSEMENT
Pour éviter tout risque
d’incendie ou d’électrocution,
n’exposez pas cet appareil à la
pluie ni à l’humidité.
Pour éviter tout risque d’incendie ou
d’électrocution, ne posez pas de
récipients remplis d’eau (p. ex. des
vases) sur l’appareil.
Pour éviter tout risque d’électrocution,
n’ouvrez pas le coffret. Ne confiez les
réparations qu’à un technicien qualifié.
N’installez pas l’appareil dans un
espace restreint, comme une
biblioth
è
que ou un meuble encastré.
La validité du marquage CE est
restreinte aux pays dans lesquels il est
en vigueur, c’est-à-dire principalement
les pays de l’Espace Économique
Européen.
Traitement des
appareils
électriques et
électroniques en fin
de vie (Applicable
dans les pays de
l’Union Européenne
et aux autres pays
européens
disposant de systèmes de collecte
sélective)
Ce symbole, apposé sur le produit ou
sur son emballage, indique que ce
produit ne doit pas être traité avec les
déchets ménagers. Il doit être remis à
un point de collecte approprié pour le
recyclage des équipements électriques
et électroniques. En s’assurant que ce
produit est bien mis au rebus de
manière appropriée, vous aiderez à
prévenir les conséquences négatives
potentielles pour l’environnement et la
santé humaine. Le recyclage des
matériaux aidera à conserver les
ressources naturelles. Pour toute
information supplémentaire au sujet du
recyclage de ce produit, vous pouvez
contacter votre municipalité, votre
déchetterie ou le magasin où vous avez
acheté le produit.

3
FR
Bienvenue !
Nous vous remercions d’avoir fait
l’acquisition de ce système de casque
stéréo sans fil MDR-IF140K de Sony.
Avant d’utiliser cet appareil, lisez
attentivement le présent mode d’emploi
et conservez-le pour toute référence
ultérieure.
Le MDR-IF140K est un casque stéréo
sans fil fonctionnant par transmission
de rayons infrarouges. En raccordant
simplement le transmetteur à un
téléviseur ou à un appareil audio
équipé d’une prise de casque ou d’une
prise de sortie de ligne, vous pouvez
écouter une émission sans être gêné par
le cordon du casque.
• Casque à infrarouges sans fil n’émettant
pas de parasites et résistant aux parasites
externes, etc.
• Large plage de réception des rayons
infrarouges allant jusqu’à 7 m (23 pi.).
• Mécanisme de serre-tête auto-ajustable qui
évite à l’utilisateur d’avoir à régler la taille
du serre-tête.
• Une commande VOL unique permet de
régler à la fois le volume des écouteurs
droit et gauche du casque.
Table des
matières
Préparatifs
Déballage............................................. 4
Mise en place de la pile ..................... 5
Installation du transmetteur............. 6
Utilisation du système
Écoute d’un programme ................... 8
Portée efficace du transmetteur ..... 10
Remplacement des oreillettes ........ 10
Informations
complémentaires
Caractéristiques techniques............ 11
Précautions ....................................... 12
Dépannage ........................................ 13
FR

Préparatifs
4
FR
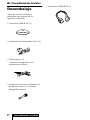
N Préparatifs
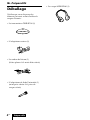
Déballage
Vérifiez que vous disposez des
éléments suivants avant d’utiliser le
casque d’écoute :
• Le transmetteur TMR-IF130 (1)
• L’adaptateur secteur (1)
• Le cordon de liaison (1)
(fiches phono h mini-fiche stéréo)
• L’adaptateur de fiche Unimatch (1)
(mini-prise stéréo h prise de
casque stéréo)
• Le casque MDR-IF140 (1)

Préparatifs
5
FR
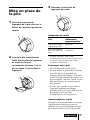
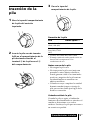
Mise en place de
la pile
1 Ouvrez le couvercle du
logement de la pile situé sur le
boîtier de l’écouteur gauche du
casque.
2 Insérez la pile sèche (format
AAA) fournie dans le logement
de la pile en faisant
correspondre la borne 3 de la
pile au signe 3 inscrit dans le
logement.
3 Refermez le couvercle du
logement de la pile.
Autonomie de la pile
*
1
à 1 kHz, sortie de 1 mW +1 mW
*
2
La durée mentionnée ci-dessus peut varier
en fonction de la température ou des
conditions d’utilisation.
Remarques sur la pile
• Ne rechargez pas la pile sèche.
• Ne mettez pas la pile sèche en contact
avec des pièces de monnaie ou
d’autres objets métalliques. Si le pôle
positif et le pôle négatif de la pile sont
mis en contact l’un avec l’autre via un
objet métallique, de la chaleur peut
être générée.
• Si vous prévoyez de ne pas utiliser
l’appareil pendant une longue
période, retirez-en la pile afin d’éviter
des dégâts dus à une fuite
d’électrolyte ou à la corrosion.
Quand remplacer la pile
Lorsque la pile devient faible, le voyant
d’alimentation faiblit ou le son est
déformé ou parasité. Remplacez la pile
par une pile neuve le plus tôt possible.
Pile
Pile alcaline LR03/
AM-4(N) de Sony
Pile au manganèse
R03/UM-4(NU) de
Sony
Autonomie
approximative*
1
60 heures*
2
28 heures*
2

Préparatifs
6
FR
RLINE IN
DC IN 9V
L
PHONES IN
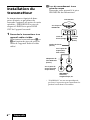
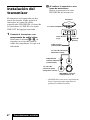
Installation du
transmetteur
Le transmetteur est équipé de deux
prises d’entrée, ce qui permet de
raccorder l’appareil aux prises de sortie
spécifiées : PHONES IN à la prise de
casque et LINE IN aux prises LINE
OUT de l’appareil raccordé.
1 Raccordez le transmetteur à un
appareil audio et vidéo.
Sélectionnez le raccordement A ou
B en fonction du type de prise de
sortie de l’appareil audio et vidéo
utilisé.
* “WALKMAN” est une marque déposée
par Sony Corporation pour représenter les
produits stéréo dotés d’écouteurs.
Transmetteur
Adaptateur de
fiche Unimatch
(fourni)
WALKMAN*,
téléviseur,
magnétoscope, etc.
A Lors du raccordement à une
prise de casque
Raccordez votre appareil à la prise
PHONES IN du transmetteur.
Cordon de liaison
(fourni)
vers les prises
PHONES IN
vers la prise de
casque (mini-
fiche stéréo)
vers la prise de
casque (prise de
casque stéréo)
Canal de
gauche
(blanc)
Canal de
droite (rouge)

Préparatifs
7
FR
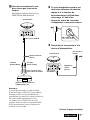
Remarque
Si votre appareil audio et vidéo est doté
d’une mini-prise (LINE OUT), raccordez la
mini-prise stéréo à la prise LINE IN du
transmetteur en utilisant le cordon de liaison
RK-G136 vendu séparément. Si vous
raccordez la prise LINE OUT de votre
appareil audio et vidéo à la prise PHONES
IN du transmetteur, il est possible que le
volume soit trop faible.
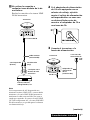
B Lors du raccordement à une
prise autre que la prise de
casque
Raccordez l’appareil aux prises
LINE IN du transmetteur.
2 Si votre adaptateur secteur est
doté d’un sélecteur de tension,
réglez-le à la tension de
fonctionnement utilisée dans
votre pays à l’aide d’un
tournevis avant de raccorder
l’adaptateur à une prise secteur.
3 Raccordez le transmetteur à la
source d’alimentation.
(Suite à la page suivante)
RLINE IN
DC IN 9V
L
PHONES IN
Transmetteur
vers la prise LINE IN
Canal de
droite (rouge)
Canal de
gauche (blanc)
vers une prise autre
que la prise de casque
Cordon de liaison
(fourni)
Appareil stéréo, téléviseur,
magnétoscope, etc.
RLINE IN
DC IN 9V
L
PHONES IN
vers la prise
DC IN de 9 V
Transmetteur
vers une prise
secteur
Adaptateur
secteur
(fourni)

Utilisation du système
8
FR
N Utilisation du système
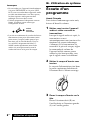
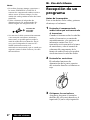
Écoute d’un
programme
Avant l’écoute
Pour éviter d’endommager votre ouïe,
baissez d’abord le volume.
1 Mettez sous tension l’appareil
audio et vidéo raccordé au
transmetteur.
Lorsque le signal audio est capté, le
transmetteur se met
automatiquement sous tension et les
émetteurs de rayons infrarouges
s’allument. Si le transmetteur est
raccordé à la prise de casque, réglez
la commande de volume de
l’appareil utilisé comme source
sonore le plus haut possible, sans
que le signal sonore soit déformé.
2 Mettez le casque d’écoute sous
tension.
Le voyant d’alimentation situé dans
la partie supérieure du boîtier de
l’écouteur droit s’allume en rouge.
3 Placez le casque d’écoute sur la
tête.
Placez l’écouteur droit (R) sur
l’oreille droite et l’écouteur gauche
(L) sur l’oreille gauche.
Remarques
•Ne raccordez pas l’appareil simultanément
à la prise PHONES IN et à la prise LINE
IN. Si vous raccordez deux appareils audio
et vidéo simultanément à ces deux prises,
les deux signaux audio peuvent être
mélangés au niveau de la sortie.
•Utilisez uniquement l’adaptateur secteur
fourni. N’utilisez aucun autre type
d’adaptateur secteur.
•Lors du raccordement du cordon de liaison
directement à une prise d’écouteur (mini-
prise mono), le signal audio peut ne pas
être émis par le canal de droite. Dans ce
cas, utilisez l’adaptateur de fiche PC-
236MS vendu séparément (mini-fiche
stéréo h mini-prise mono) entre le
cordon de liaison et la prise de casque.
Fiche à
polarité
universelle
La page charge ...
La page charge ...
La page charge ...
La page charge ...
La page charge ...
La page charge ...
La page charge ...
La page charge ...
La page charge ...
La page charge ...
La page charge ...
La page charge ...
La page charge ...
La page charge ...
La page charge ...
La page charge ...
La page charge ...
La page charge ...
La page charge ...
La page charge ...
-
 1
1
-
 2
2
-
 3
3
-
 4
4
-
 5
5
-
 6
6
-
 7
7
-
 8
8
-
 9
9
-
 10
10
-
 11
11
-
 12
12
-
 13
13
-
 14
14
-
 15
15
-
 16
16
-
 17
17
-
 18
18
-
 19
19
-
 20
20
-
 21
21
-
 22
22
-
 23
23
-
 24
24
-
 25
25
-
 26
26
-
 27
27
-
 28
28
-
 29
29
-
 30
30
-
 31
31
-
 32
32
-
 33
33
-
 34
34
-
 35
35
-
 36
36
-
 37
37
-
 38
38
-
 39
39
-
 40
40


Sony MDR-IF140K Le manuel du propriétaire
- Catégorie
- Écouteurs
- Taper
- Le manuel du propriétaire
dans d''autres langues
- English: Sony MDR-IF140K Owner's manual
- español: Sony MDR-IF140K El manual del propietario
Documents connexes
-
Sony MDR-IF140K Le manuel du propriétaire
-
Sony MDR-IF140 Manuel utilisateur
-
-
-
Sony MDR-IF240RK Le manuel du propriétaire
-
-
-
-
-
