
2
F
E
G
S
Manuel d’utilisation
Bedienungsanleitung
Owner’s manual
Manual de usuario
Wireless Tuner

2
Precautions
Location
Using the unit in the following locations can result in a malfunction.
• In direct sunlight
• Locations of extreme temperature or humidity
• Excessively dusty or dirty locations
• Locations of excessive vibration
• Close to magnetic fields
Power supply
Be sure to turn the power switch to OFF when the unit is not in use.
Remove the battery in order to prevent it from leaking when the unit
is not in use for extended periods.
Interference with other electrical devices
Radios and televisions placed nearby may experience reception
interference. Operate this unit at a suitable distance from radios and
televisions.
Handling
To avoid breakage, do not apply excessive force to the switches or
controls.
Care
If the exterior becomes dirty, wipe it with a clean, dry cloth. Do not
use liquid cleaners such as benzene or thinner, or cleaning
compounds or flammable polishes.
Keep this manual
After reading this manual, please keep it for later reference.
Keeping foreign matter out of your equipment
Never set any container with liquid in it near this equipment. If liquid
gets into the equipment, it could cause a breakdown, fire, or
electrical shock. Be careful not to let metal objects get into the
equipment.
CAUTION
Risk of Explosion if Battery is replaced by an incorrect type. Dispose
of used batteries according to the instructions.
THE FCC REGULATION WARNING (for USA)
This equipment has been tested and found to comply with the
limits for a Class B digital device, pursuant to Part 15 of the FCC
Rules. These limits are designed to provide reasonable
protection against harmful interference in a residential
installation. This equipment generates, uses, and can radiate
radio frequency energy and, if not installed and used in
accordance with the instructions, may cause harmful
interference to radio communications. However, there is no
guarantee that interference will not occur in a particular
installation. If this equipment does cause harmful interference to
radio or television reception, which can be determined by
turning the equipment off and on, the user is encouraged to try
to correct the interference by one or more of the following
measures:
• Reorient or relocate the receiving antenna.
•Increase the separation between the equipment and receiver.
• Connect the equipment into an outlet on a circuit different from
that to which the receiver is connected.
•
Consult the dealer or an experienced radio/TV technician for help.
Unauthorized changes or modification to this system can void
the user’s authority to operate this equipment.
This device complies with Part 15 of the FCC Rules. Operation
is subject to the following two conditions: (1) This device may not
cause harmful interference, and (2) this device must accept any
interference received, including interference that may cause
undesired operation.
Complies with Canadian ICES-003 Class B.
Conforme au Reglement Canadian NMB-003 classe B.

3
Operation is subject to the following two conditions :
(1) this device may not cause interference, and
(2) this device must accept any interference, including
interference that may cause undesired operation of the
device.
The installer of this radio equipment must ensure that the
antenna is located or pointed such that it does not emit RF field
in excess of Health Canada limits for the general population;
consult Safety Code 6, obtainable from Health Canada’s website
www.hc-sc.gc.ca/rpb
CALIFORNIA USA ONLY
This Perchlorate warning applies only to primary CR
(Manganese Dioxide) Lithium coin cells sold or distributed ONLY
in California USA.
“Perchlorate Material–special handling may apply,
See www.dtsc.ca.gov/hazardouswaste/perchlorate.”
European Union Directives
Conformance Statement
Korg Inc. hereby declares that the product meets
the requirements of Directive 1999/5/EC.
You can view the Declaration of Conformity(DoC)
to Directive 1999/5/EC in the Owner's Manual of
this product posted on the Korg website
(www.korg.com).
Notice regarding disposal (EU only)
When this “crossed-out wheeled bin” symbol is displayed
on the product, owner’s manual, battery, or battery
package, it signifies that when you wish to dispose of this
product, manual, package or battery you must do so in an
approved manner. Do not discard this product, manual,
package or battery along with ordinary household waste.
Disposing in the correct manner will prevent harm to
human health and potential damage to the environment.
Since the correct method of disposal will depend on the
applicable laws and regulations in your locality, please
contact your local administrative body for details. If the battery
contains heavy metals in excess of the regulated amount, a
chemical symbol is displayed below the “crossed-out wheeled bin”
symbol on the battery or battery package.
IMPORTANT NOTICE TO CONSUMERS
This product has been manufactured according to strict
specifications and voltage requirements that are applicable in
the country in which it is intended that this product should be
used. If you have purchased this product via the internet,
through mail order, and/or via a telephone sale, you must verify
that this product is intended to be used in the country in which
you reside.
WARNING: Use of this product in any country other than that for
which it is intended could be dangerous and could invalidate the
manufacturer’s or distributor’s warranty.
Please also retain your receipt as proof of purchase otherwise your
product may be disqualified from the manufacturer’s or distributor’s
warranty.
*All product names and company names are the trademarks or
registered trademarks of their respective owners.

4
Thank you for purchasing the Korg Wi-Tune Wireless Tuner. To help you get the most out of your
new tuner, please read this manual carefully.
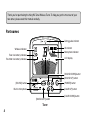
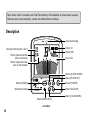
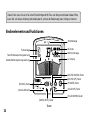
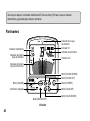
Part names
[POWER] button
[SOUND UP] button
[CALIB UP] button
[CALIB DOWN] button
[SOUND DOWN] button
Built-in microphone
[SOUND] button
[BACKLIGHT] button
Tuning guide indicator
LCD display
Tuner
Wireless indicator
Tuner low battery indicator
Trasmitter low battery indicator
ID indicator
Microphone indicator

5
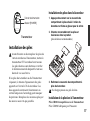
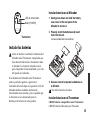
Power LED
[POWER] button
Transmitter
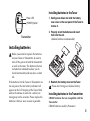
Installing batteries
Before you install or replace the batteries
on your Tuner or Transmitter, be sure to
turn off the power to both the transmitter
as well as the tuner. The batteries that are
included are intended to allow you to
check functionality and may have a short
life.
If the batteries for the Tuner or Transmitter are
low on power, the low battery indicator will
appear on the LCD display of the Tuner. Both
units will continue to work for a while, but
tuning may not be accurate. Please replace the
batteries with new ones as soon as possible.
Installing batteries in the Tuner
1. Gently press down and slide the battery
case cover on the rear panel of the Tuner to
remove it.
2. Properly orient the batteries and insert
them into the unit.
(Alkaline batteries recommended)
3. Reattach the battery cover on the Tuner.
Please don’t charge an alkaline battery.
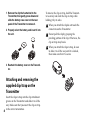
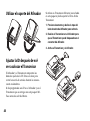
Installing batteries in the Transmitter
CR2032 batteries that are compatible with the
Transmitter
CR2032 batteries made by Panasonic

6
1. Remove the clip that’s attached to the
Transmitter, then gently press down and
slide the battery case cover on the near
panel of the Transmitter to remove it.
2. Properly orient the battery and insert it into
the unit.
3. Reattach the battery cover on the Transmit-
ter.
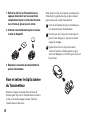
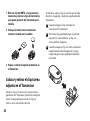
Attaching and removing the
supplied clip/strap on the
Transmitter
Insert the clip or strap into the clip attachment
groove on the Transmitter and slide it in all the
way. Make sure that you insert the clip or strap
in the correct orientation.
To remove the clip or strap, hold the Transmit-
ter securely and slide the clip or strap while
holding it by its sides.
When you attach the clip do not touch the
connectors on the Transmitter.
Do not pull the clip by grasping the
pinching portion of the clip. Otherwise, the
clip or strap may break.
When you attach the clip or strap, be sure
to slide it in all the way until it is locked,
then make sure that it’s secure.

7
When you clip the Transmitter to or remove
it from the musical instrument, handle it
gently. Attaching the Transmitter to the
musical instrument for a long period of
time may leave a trace on the instrument.
Applying excessive force to the Transmitter
or clip may cause damage.
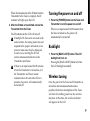
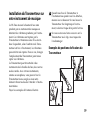
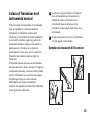
Transmitter attachment position
examples
Attaching the Transmitter to
your musical instrument
The Wi-Tune measures the pitch of a musical
instrument by sensing vibrations from the
instrument. These vibrations are picked up by
the Transmitter, and wirelessly transmitted to
the Tuner. However, depending where the
Transmitter is attached to the instrument, the
vibrations may not be picked up very well. In
this case, try repostioning the Transmitter to
pick up these vibrations better.
The Transmitter can be attached to musical
instruments such as woodwind, brass or strings
instruments. With some musical instruments,
such as a saxophone, you can attach the
Transmitter to a strap or other part that
vibrates, rather than directly to the instrument
itself.
Please refer to the attachment position
examples that are shown in the figures to the
right.

8
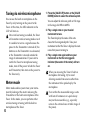
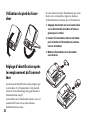
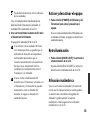
Using the Tuner stand
Setting the ID after replacing
the Transmitter
The ID setting data is shared by the Tuner and
Transmitter. This is done to prevent signal
scramble during wireless communication.
An ID was programmed into the Tuner and
Transmitter supplied in this Wi-Tune package
before they shipped from the factory.
If you are using a different Transmitter (that
was not included in this package), you must set
the ID on that Transmitter.
1. Gently press down and slide the cover on
the right side of the Tuner to remove it.
2. Slide the Transmitter into the Tuner so that
the Transmitter will lock into the Tuner’s
connector.
3. Turn on the power to the Transmitter and
Tuner.
You can do this while the power to each
unit is turned on.

9
When the transmission of the ID data from the
Transmitter to the Tuner is complete, the ID
indicator will light up on the LCD.
4. After the ID data is transmitted, remove the
Transmitter from the Tuner.
The ID indicator on the LCD will turn off.
If multiple Wi-Tune units are used in the
same location, the tuning meter may not
respond to the proper instrument, or an
incorrect note name may be displayed.
In such cases, resetting the ID will
restore communication between the
Transmitter and Tuner.
If there is no input sound for 20 minutes
while the Transmitter is turned on, or if
the Transmitter and Tuner cannot
communicate with each other for two
minutes, the power will automatically
be turned off.
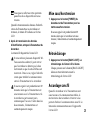
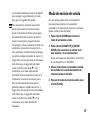
Turning the power on and off
1. Press the [POWER] button on the Tuner and
Transmitter to turn the power on and off.
If there is no input sound for 20 minutes while
the Tuner is turned on, the power will
automatically be turned off.
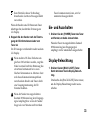
Backlight
1. Press the [BACK LIGHT] button. The LCD
backlight will turn on.
Pressing the [BACK LIGHT] button will turn
the LCD backlight on and off.
Wireless tuning
Once the power to the Tuner and Transmitter is
turned on and communication becomes
possible, the built-in microphone of the Tuner
will turn off, enabling you to use the wireless
function. At this time, the wireless indicator
will appear on the LCD.

10
Tuning via wireless microphone
You can use the built-in microphone on the
Tuner by only turning on the power to the
Tuner. At this time, the MIC indicator on the
LCD will turn on.
Once wireless tuning is enabled, the Tuner
will maintain wireless tuning mode even if
it is unable to receive a signal because the
power to the Transmitter is turned off, the
batteries on the Transmitter are exhausted,
or the Transmitter is moved outside the
range of communication. If you want to
switch the Tuner to microphone tuning
mode, turn off the power to both the Tuner
and Transmitter, then turn on the power to
the Tuner only.
Meter mode
Meter mode enables you to tune your instru-
ment by looking at the meter and using the
Transmitter or the built-in microphone of the
Tuner. In this mode, you can perform either
wireless tuning or tuning with the built-in
microphone of the Tuner.
1. Press the [CALIB UP] button or the [CALIB
DOWN] button to select the reference pitch.
You can adjust the reference pitch in 1Hz steps
in the range of 410Hz to 480Hz.
2. Play a single note on your musical
instrument to tune.
The Tuner displays the name of the note
closest to the recognized pitch. Tune your
instrument so that the Tuner displays the note
name that you are turning to.
3. Play a single note again and tune your
instrument so that the tuning guide
indicator (the center of the meter) will turn
on.
When you are using the Tuner’s built-in
microphone for tuning, try to avoid
allowing sounds from sources other than
the instrument to be picked up by the
microphone.
Even within the measurable range, a note
with lots of harmonics or a quick decay
may not be measurable (e.g., especially
notes in the extreme bass or treble range of
the piano).

11
To raise a pitch by a pure major 3rd or a
pure minor 3rd, adjust the tuning so that
the meter needle will point to the pure
major or minor 3rd mark respectively. For
example, if you want to raise the note of A
(0 cent) by a pure major 3rd, first tune your
instrument so that the display will indicate
the note name C#, then fine-tune the
instrument so that the meter needle will
point the down arrow ▼ (–13.7 cents) on
the left side of the meter. If you want to
raise the note of A (0 cent) by a pure minor
3rd, tune your instrument so that the
display will indicate note name C, then
fine-tune the instrument so that the meter
needle will point the up arrow ▼ (+15.6
cents) on the right side of the meter.
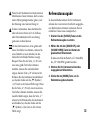
Sound-out mode
In this mode, you can tune your instrument by
referring to the oscillator sound at the reference
pitch (output from the speaker of the Tuner).
1. Press the [SOUND] button to engage
sound-out mode.
2. Press the [SOUND UP] or [SOUND DOWN]
button to select the name of the note that
you want to tune to.
You can select a pitch in the range of C4
(261.63Hz) to C5 (523.25Hz).
3. Tune your instrument while referring to the
oscillator sound at the reference pitch
output from the Tuner.
4.
To exit Sound-out mode, press the [SOUND]
button.

12
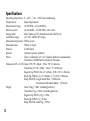
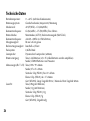
Specifications
Operating temperature: 0 – +40˚C / +32 – +104˚F (non-condensing)
Temperament: Equal temperament
Measurement range: A0 (27.50Hz) – C8 (4186.01Hz)
Reference pitch: C4 (261.63Hz) – C5 (523.25Hz); One octave
Tuning mode: Meter mode (AUTO), Sound-out mode (MANUAL)
Calibration range: A4 = 410 – 480Hz (1Hz steps)
Measurement precision: Within ±1cent
Sound precision: Within ±1.5cents
Wireless: 2.4GHz band
Speaker: Dynamics speaker (ø23mm)
Power: Tuner; AA batteries (x2) = 3V (Alkaline batteries recommended)
Transmitter; CR2032 batteries made by Panasonic
Dimensions (W x D x H):Tuner; 100 x 99 x 34mm / 3.94 x 3.90 x 1.34inches
Transmitter; 27 x 45 x 10mm / 1.06 x 1.77 x 0.39inches
Regular clip (WR-01); 56 x 22 x 47mm / 2.20 x 0.87 x 1.85inches
Small clip (WR-01); 44 x 17 x 24mm / 1.73 x 0.67 x 0.94inches
Strap (WR-01S); Length about 50cm / 19.69inches
Maximum width about 40mm / 1.57inches
Weight: Tuner; 204g / 7.20oz. (including batteries)
Transmitter; 11g / 0.39oz. (including batteries)
Regular clip (WR-01); 11g / 0.39oz.
Small clip (WR-01); 5g / 0.18oz.
Strap (WR-01S); about 65g / 2.29oz.

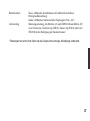
13
Battery life: Tuner; Approx. 45hours (during wireless tuning operation with backlight on)
Transmitter; Approx. 25hours (continuous A4 input operation)
Accessories: Owner's Manual; AA batteries (x2) and CR2032 lithium battery (3V) (x1) for
checking operation; Regular clip (WR-01), Small clip (WR-01) or Strap (WR-
01S) for attaching to the musical instrument.
* Specifications and appearance are subject to change without notice for improvement.

14
Précautions
Emplacement
L’ utilisation de cet instrument dans les endroits suivants peut en
entraîner le mauvais fonctionnement.
• En plein soleil
• Endroits très chauds ou très humides
• Endroits sales ou fort poussiéreux
• Endroits soumis à de fortes vibrations
• A proximité de champs magnétiques
Alimentation
Lorsque vous n’utilisez pas l’appareil, n’oubliez pas de le mettre
hors tension. Retirez les piles pour éviter toute fuite lorsque
l’appareil ne sera pas utilisé pendant de longues périodes de temps.
Interférences avec d’autres appareils électriques
Les postes de radio et de télévision situés à proximité peuvent par
conséquent souffrir d’interférences à la réception. Veuillez dès lors
faire fonctionner cet appareil à une distance raisonnable de postes
de radio et de télévision.
Maniement
Pour éviter de les endommager, manipulez les commandes et les
boutons de cet instrument avec soin.
Entretien
Lorsque l’instrument se salit, nettoyez-le avec un chiffon propre et
sec. Ne vous servez pas d’agents de nettoyage liquides tels que du
benzène ou du diluant, voire des produits inflammables.
Conservez ce manuel
Après avoir lu ce manuel, veuillez le conserver soigneusement pour
toute référence ultérieure.
Evitez toute intrusion d’objets ou de liquide
Ne placez jamais de récipient contenant du liquide près de
l’instrument. Si le liquide se renverse ou coule, il risque de
provoquer des dommages, un court-circuit ou une
électrocution.Veillez à ne pas laisser tomber des objets métalliques
dans le boîtier (trombones, par ex.).
ATTENTION
Il y a risque d’explosion en cas d’utilisation de piles d’un type non
adéquat. Mettez les piles au rebut conformément aux instructions
données.
L’ utilization de ce dispositif est autorisée seulement aux
conditions suivantes:
(1) il ne doit pas produire de brouillage et
(2) l’ utilisateur du dispositif doit étre prêt à accepter tout
brouillage radioélectrique reçu, même si ce brouillage est
susceptible de compromettre le fonctionnement du dispositif.
L’installateur de ce matériel radio doit s’assurer que l’antenne
est située ou orientée de façon à ne pas émettre de champ RF
excédant les limites fixées par Santé Canada pour la population
générale: consultez le Code de sécurité 6, disponible sur le site
Internet de Santé Canada (www.hc-sc.gc.ca/rpb).

15
Déclaration de conformité aux
directives de l’Union européenne
Korg Inc. déclare par la présente que le produit
est conforme aux exigences de la directive 1999/
5/CE.
Vous pouvez consulter la Déclaration de
conformité (DoC) à la directive 1999/5/CE dans le
mode d’emploi de ce produit, disponible sur le
site Internet de Korg (www.korg.com).
Note concernant les dispositions (Seulement EU)
Quand un symbole avec une poubelle barrée d’une
croix apparait sur le produit, le mode d’emploi, les piles
ou le pack de piles, cela signifie que ce produit,
manuel ou piles doit être déposé chez un représentant
compétent, et non pas dans une poubelle ou toute
autre déchetterie conventionnelle. Disposer de cette
manière, de prévenir les dommages pour la santé
humaine et les dommages potentiels pour
l'environnement. La bonne méthode d'élimination
dépendra des lois et règlements applicables dans votre
localité, s’il vous plaît, contactez votre organisme administratif
pour plus de détails. Si la pile contient des métaux lourds au-
delà du seuil réglementé, un symbole chimique est affiché en
dessous du symbole de la poubelle barrée d’une croix sur la pile
ou le pack de piles.
REMARQUE IMPORTANTE POUR LES CLIENTS
Ce produit a été fabriqué suivant des spécifications sévères et
des besoins en tension applicables dans le pays où ce produit
doit être utilisé. Si vous avez acheté ce produit via l’internet, par
vente par correspondance ou/et vente par téléphone, vous
devez vérifier que ce produit est bien utilisable dans le pays où
vous résidez.
ATTENTION: L’utilisation de ce produit dans un pays autre que
celui pour lequel il a été conçu peut être dangereuse et annulera
la garantie du fabricant ou du distributeur. Conservez bien votre
récépissé qui est la preuve de votre achat, faute de quoi votre
produit ne risque de ne plus être couvert par la garantie du
fabricant ou du distributeur.
*Tous les noms de produits et de sociétés sont des marques
commerciales ou déposées de leur détenteur respectif.

16
Merci d’avoir choisi l’accordeur sans fil Wi-Tune de Korg. Afin d’exploiter au mieux toutes les possi-
bilités de votre nouvel accordeur, veuillez lire attentivement ce manuel.
Description
Bouton [POWER]
Bouton [SOUND UP]
Bouton [CALIB UP]
Bouton [CALIB DOWN]
Bouton [SOUND DOWN]
Microphone interne
Bouton [SOUND]
Bouton [BACKLIGHT]
Guide d’accordage
Ecran LCD
Accordeur
Téoin de communication sans fil
Témoin d’épuisement des
piles du Accordeur
Témoin d’épuisement des
piles du Transmetteur
Témoin ID
Témoin MIC

17
Témoin d’alimentation
Bouton [POWER]
Transmetteur
Installation des piles
Avant d’insérer ou de remplacer les piles de
votre Accordeur ou Transmetteur, mettez le
transmetteur ET l’accordeur hors tension.
Les piles fournies sont destinées à vérifier
le fonctionnement du dispositif et ont une
durée de vie assez brève.
Si les piles du Accordeur ou du Transmetteur
s’épuisent, le témoin d’épuisement des piles
apparaît sur l’écran LCD du Accordeur. Les
deux appareils continuent à fonctionner un
certain temps mais l’accordage peut manquer
de précision. Remplacez les anciennes piles par
des neuves aussi vite que possible.
Installation des piles dans le Accordeur
1. Appuyez doucement sur le couvercle du
compartiment à piles situé à l’arrière du
Accordeur et faites-le glisser pour le retirer.
2. Orientez convenablement les piles et
insérez-les dans le produit.
(piles alcalines recommandées)
3. Refermez le couvercle du compartiment à
piles du Accordeur.
Ne chargez jamais une pile alcaline.
Installation de la pile dans le Transmetteur
Piles CR2032 compatibles avec le Transmetteur
Piles CR2032 fabriquées par Panasonic

18
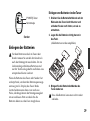
1. Retirez le clip fixé au Transmetteur puis
appuyez doucement sur le couvercle du
compartiment à pile à l’arrière du Transmet-
teur et faites-le glisser pour le retirer.
2. Orientez convenablement la pile et insérez-
la dans le dispositif.
3. Replacez le couvercle du compartiment à
pile du Transmetteur.
Fixer et retirer le clip/la lanière
du Transmetteur
Insérez le clip ou la lanière dans la fente de
fixation pour clip sur le Transmetteur et insérez
le clip ou la lanière jusqu’au bout. Veillez à
l’insérer dans le bon sens.
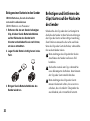
Pour retirer le clip ou la lanière, maintenez les
côtés droit et gauche du clip ou de la lanière
puis extrayez-le/la du Transmetteur.
Lors de la fixation du clip, ne touchez pas
les connecteurs du Transmetteur.
Ne tirez pas sur le clip en le tenant par la
pince. Faute de quoi, le clip ou la lanière
risque de rompre.
Quand vous fixez le clip ou la lanière,
veillez à l’insérez à fond jusqu’à ce qu’il
(elle) soit bloqué(e) et vérifiez qu’il (elle) est
bien fixé(e).

19
Quand vous fixez le Transmetteur à
l’instrument ou quand vous l’en détachez,
maniez-le avec douceur. Si vous laissez le
Transmetteur fixé longtemps à l’instru-
ment, ce dernier risque d’en porter la trace.
Si vous exercez une force excessive sur le
Transmetteur ou le clip, vous risquez de
l’endommager.
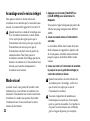
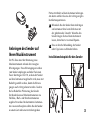
Exemples de positions de fixation du
Transmetteur
Installation du Transmetteur sur
votre instrument de musique
Le Wi-Tune mesure la hauteur d’une note
produite par un instrument de musique en
détectant les vibrations produites par l’instru-
ment. Ces vibrations sont captées par le
Transmetteur et transmises sans fil au Accor-
deur. Cependant, selon l’endroit où le Trans-
metteur est fixé à l’instrument, les vibrations
peuvent être mal captées. Dans ce cas, changez
l’emplacement du Transmetteur pour mieux
capter ces vibrations.
Le Transmetteur peut être attaché à des
instruments de la famille des bois, des cuivres
ou des cordes. Avec certains instruments,
comme un saxophone, vous pouvez fixer le
Transmetteur à une sangle ou à un autre
élément vibrant au lieu de l’attacher à l’instru-
ment même.
Voyez les exemples de fixations illustrés.

20
Utilisation du pied du Accor-
deur
Réglage d’identification après
le remplacement du Transmet-
teur
Les données d’identification sont partagées par
le Accordeur et le Transmetteur. Cette identifi-
cation évite tout brouillage du signal durant la
communication sans fil.
Le Accordeur et le Transmetteur fournis avec cet
ensemble Wi-Tune ont reçu des données
d’identification en usine.
Si vous utilisez un autre Transmetteur que celui
fourni avec cet ensemble, réglez les données
d’identification en fonction de ce Transmetteur.
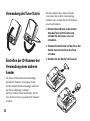
1. Appuyez doucement sur le couvercle situé
sur le côté droit du Accordeur et faites-le
glisser pour le retirer.
2. Insérez le Transmetteur dans le Accordeur
pour brancher le Transmetteur au connec-
teur du Accordeur.
3. Mettez le Transmetteur et le Accordeur
sous tension.
La page charge ...
La page charge ...
La page charge ...
La page charge ...
La page charge ...
La page charge ...
La page charge ...
La page charge ...
La page charge ...
La page charge ...
La page charge ...
La page charge ...
La page charge ...
La page charge ...
La page charge ...
La page charge ...
La page charge ...
La page charge ...
La page charge ...
La page charge ...
La page charge ...
La page charge ...
La page charge ...
La page charge ...
La page charge ...
La page charge ...
La page charge ...
La page charge ...
La page charge ...
La page charge ...
La page charge ...
La page charge ...
-
 1
1
-
 2
2
-
 3
3
-
 4
4
-
 5
5
-
 6
6
-
 7
7
-
 8
8
-
 9
9
-
 10
10
-
 11
11
-
 12
12
-
 13
13
-
 14
14
-
 15
15
-
 16
16
-
 17
17
-
 18
18
-
 19
19
-
 20
20
-
 21
21
-
 22
22
-
 23
23
-
 24
24
-
 25
25
-
 26
26
-
 27
27
-
 28
28
-
 29
29
-
 30
30
-
 31
31
-
 32
32
-
 33
33
-
 34
34
-
 35
35
-
 36
36
-
 37
37
-
 38
38
-
 39
39
-
 40
40
-
 41
41
-
 42
42
-
 43
43
-
 44
44
-
 45
45
-
 46
46
-
 47
47
-
 48
48
-
 49
49
-
 50
50
-
 51
51
-
 52
52


Korg WITUNE Le manuel du propriétaire
- Taper
- Le manuel du propriétaire
- Ce manuel convient également à
dans d''autres langues
- English: Korg WITUNE Owner's manual
- español: Korg WITUNE El manual del propietario
- Deutsch: Korg WITUNE Bedienungsanleitung
Documents connexes
-
Korg WDT-1 Le manuel du propriétaire
-
-
-
-
-
Korg Dolcetto-T Le manuel du propriétaire
-
-
-
-