La page est en cours de chargement...

9.19.22 357-00063-01 Rev A © Inovonics, 2022 - www.inovonics.com
EN1501 Pulse Meter Transmitter
Installation Instructions
1 Overview
The EN1501 pulse meter transmitter is a pulse counter which can be used
for water, gas and electric submetering applications.
The pulse meter transmitter is available in North America, Australia and
New Zealand; the radio frequency band has been configured for the
appropriate geographic area at the factory.
1.1 Inovonics Contact Information
If you have any problems with this procedure, contact Inovonics Wireless
technical services:
• E-mail: [email protected].
• Phone: (800) 782-2709.
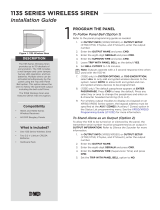
1.2 EN1501 Components
Figure 1 EN1501 Components
1.3 What’s In The Carton
• Fifty drywall anchors.
• Fifty mounting screws.
• Fifty pieces of mounting tape.
2 Installation and Startup
2.1 Installation Notes
• These products are designed to be maintained by professional
technicians.
• Products are tested for indoor use.
2.2 Input Requirements
The EN1501 requires the following input specifications for compatibility with
the meter:
• A dry contact such as a reed switch.
• The pulse width of a switch output when it is activated must be greater
than or equal to 10ms.
• A maximum rate of six pulses per second.
• Closed impedance of the pulser mechanism must be smaller than 1k
ohm.
• Open impedance of the pulser mechanism must be greater than five
megohms.
2.3 Connect Transmitter to Meter
Connect the transmitter to the meter as follows:
1. Open the housing by pressing down on the base tab near the wiring
through-hole while lifting away the cover.
2. Fully insert stripped wires into the removable header terminal.
3. Use a small Phillips screwdriver to tighten the screws that secure wires
to the removable header terminal.
4. Attach removable header terminal (if removed) to the transmitter board
as shown.
Note: If connecting to a meter that has polarity to its pulse output, the
negative (–) should be connected to the outside terminal, closest to the
corner of the board.
Figure 2 Connect the Transmitter to the Meter
2.4 Mount the Transmitter
1. Use the double-sided tape to mount the transmitter to a clean wall.
2. As desired, secure the transmitter to the wall with the mounting screw
and anchor.
Note: To secure the EN1501, you will need to remove the battery to access
the mounting screw hole. Make sure to press the reset button after
replacing the battery to initialize the transmitter.
For product and installation videos visit us at
www.inovonics.com/videos or use the QR
code below.
ABattery BTamper switch CRemovable header
terminal
DReset button
ABC
D
ACabling through-hole BRemovable header terminal
A
B

9.19.22 357-00063-01 Rev A © Inovonics, 2022 - www.inovonics.com 2
Note: Ensure cabling enters the housing through the access wiring thru-
hole, and replace the housing (Figure 2).
Figure 3 Mount the Transmitter
2.5 Register the Transmitter
1. Confirm that transmitter is connected to the meter.
2. Confirm that the battery is installed.
3. Press the reset button to take the transmitter out of sleep/shipping
mode.
• The red LED on the board will blink, indicating the transmitter has
woken up.
4. See the TapWatch Application User Manual for details about adding
transmitters to a site.
3 Replace the Battery
When the low battery message is received, you will need to replace the
EN1501 battery.
1. Open the housing by pressing down on the base tab near the wiring
through-hole while lifting away the cover.
2. Remove the old battery, taking note of the battery orientation.
3. Insert the new battery, making sure it is aligned correctly.
4. Press the reset button.
Note: EN1501 transmitters retain programming data in non-volatile
memory. They do not require reprogramming after loss of power. Install
new battery and press the transmitter reset button to initialize the
transmitter and restore programming. Its count will go to zero and the initial
Meter Read count will be updated in the RF gateway.
4 Specifications
Dimensions: 3.57" x 1.70" x 0.85".
Operating environment: -20°- 60°C (-4°- 140°F), 90% relative humidity,
non-condensing.
Typical battery life: EN1501: 10 year battery life in a climate controlled
environment with the specified Panasonic CR123A battery.
EN1501 Battery (BAT604): Panasonic CR123A 3.0V lithium battery. The
battery is always supervised.
5 Television and Radio Interference
This equipment has been tested and found to comply with the limits for a
Class B digital device, pursuant to Part 15 of the FCC Rules. These limits
are designed to provide reasonable protection against harmful interference
in a residential installation. This equipment generates, uses and can
radiate radio frequency energy and, if not installed and used in accordance
with the instructions, may cause harmful interference to radio
communications. However, there is no guarantee that interference will not
occur in a particular installation. If this equipment does cause harmful
interference to radio or television reception, which can be determined by
turning the equipment off and on, the user is encouraged to try to correct
the interference by one or more of the following measures:
• Reorient or relocate the receiving antenna.
• Increase the separation between the equipment and receiver.
• Connect the equipment into an outlet on a circuit different from that to
which the receiver is connected.
• Consult the dealer or an experienced radio/TV technician for help.
6 FCC Part 15 and Innovation, Science and
Economic Development Canada (ISED)
Compliance
This device complies with part 15 of the FCC Rules, and ISED license-
exempt RSS standard(s). Operation is subject to the following two
conditions: (1) this device may not cause interference, and (2) this device
must accept any interference that may cause undesired operation of the
device.
Le présent appareil est conforme aux CNR Innovation, Sciences et
Développement économique Canada applicables aux appareils radio
exempts de licence. L'exploitation est autorisée aux deux conditions
suivantes: (1) l'appareil ne doit pas produire de brouillage, et (2) l'utilisateur
de l'appareil doit accepter tout brouillage radioélectrique subi, même si le
brouillage est susceptible d'en compromettre le fonctionnement.
7 Radiation Exposure Limits
7.1 FCC
This equipment complies with FCC radiation exposure limits set forth for an
uncontrolled environment. In order to avoid the possibility of exceeding the
FCC radio frequency exposure limits, human proximity to the antenna shall
not be less than 20 cm during normal operation and must not be co-located
or operating in conjunction with any other antenna or transmitter.
7.2 ISED
This equipment complies with ISED RSS-102 radiation exposure limits set
forth for an uncontrolled environment. This transmitter must be installed to
provide a separation distance of at least 20 cm from all persons and must
not be co-located or operating in conjunction with any other antenna or
transmitter.
Cet équipement est conforme avec ISED RSS-102 des limites d'exposition
aux rayonnements définies pour un environnement non contrôlé. Cet
émetteur doit être installé à au moins 20 cm de toute personne et ne doit
pas être colocalisé ou fonctionner en association avec une autre antenne
ou émetteur.
AAnchor installed in wall BDouble-sided tape
CMounting screw
A
B
C
/