Ega Master 65424 Le manuel du propriétaire
- Catégorie
- Mesure, test
- Taper
- Le manuel du propriétaire

MANUAL DE INSTRUCCIONES
OPERATING INSTRUCTIONS
MANUEL D’INSTRUCTIONS
ESPAÑOL ............................... 2
ENGLISH .............................. 10
FRANÇAIS ........................... 18
GARANTIA / GUARANTEE
GARANTIE ........................... 27
MEDIDOR DE DISTANCIAS LASER
LASER DISTANCE METER
MESURE DE DISTANCE AU LASER
COD.65424

2
ESPAÑOL
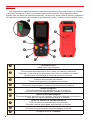
Los medidores de distancia láser son dispositivos portátiles que pueden medir con facilidad
y precisión la longitud, el área y el volumen presionando un botón. Estas herramientas se
pueden usar en diseño de interiores/exteriores, construcción, supervisión de fábrica, inspección
de ingeniería, recopilación de pruebas de accidentes de tráco, evaluación de incendios y más.
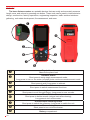
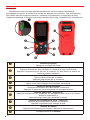
Nivelador físico
Observe el nivel del plano
Botón a distancia
Pulse brevemente para entrar en el modo de medición individual;
Pulse por un período prolongado para encender el medidor (en estado
desactivado) e introduzca el modo de medición continua.
Botón +/-
Presione brevemente para añadir;
Presione de manera prolongada para sustraer.
Botón de funciones
Pulse brevemente para cambiar las funciones de medición.
Botón de registro
Pulse brevemente para desplazarse por el historial;
Pulse de manera prolongada para guardar los registros.
Botón de borrado/apagado
Pulse brevemente para borrar los registros (retroceda después de borrarlos);
Pulse de forma prolongada para apagar el medidor.
Botón de cambio de unidad/referencia
Pulse brevemente para cambiar de referencia;
Pulse de manera prolongada para cambiar de unidad.
Botón bocina
Presione brevemente para encender/apagar la bocina
.
Compartimento de la batería.

3
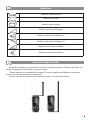
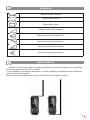
SÍMBOLOS
Medición única/continua
Medición de áreas
Medición del volumen
Medición directa de Pitágoras
Medición indirecta de Pitágoras
Medición indirecta de Pitágoras
Medición horizontal automática
Medición vertical automática
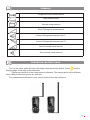
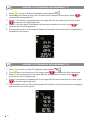
INSTRUCCIONES DE USO
Encienda el medidor y por defecto se iniciará la medición individual. Presione (símbolo) y el
borde que parpadee es el borde que se va a medir.
*Preste atención a la referencia de medida. El punto de partida será diferente cuando se
seleccionen diferentes puntos de referencia.
En este manual, la referencia de medición se reere a la referencia trasera.

4
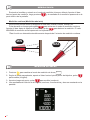
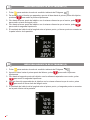
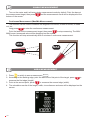
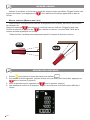
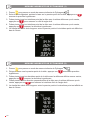
MEDIDA ÚNICA
Encienda el medidor y entrará en el modo de medición única por defecto. Apunte el láser
hacia el punto de medición, luego presione y el resultado de la medición aparecerá en la
parte inferior de la pantalla .
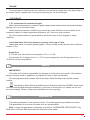
Medición continua (Medición máx./min)
Esta función permite medir la diagonal de una casa, buscar niveles, marcar, etc.
Pulse durante un tiempo prolongado para entrar en el modo de medición continua.
Apunte el láser hacia el objetivo de medición y pulse para detener la medición. El valor
MIN/MAX de medición actual aparecerá en la pantalla.
*Esta función se detendrá automáticamente después de 5 minutos de medición continua.
MIN MAX
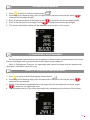
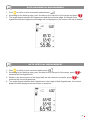
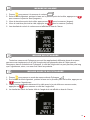
MEDICIÓN DE ÁREAS
1. Presione para cambiar al modo de medición de áreas .
2. Según el borde parpadeante, apunte el láser hacia el primer punto del objetivo, pulse
para medirlo (longitud).
3. Apunte al segundo punto, pulse para medirlo (anchura).
4. Los resultados del cálculo de la longitud, anchura, circunferencia y área se mostrarán en la
pantalla.

5
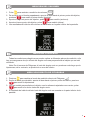
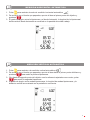
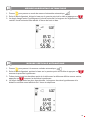
MEDICIÓN DEL VOLUMEN
1. Pulse para cambiar a medición de volumen .
2. De acuerdo con el borde parpadeante, apunte el láser hacia el primer punto del objetivo,
presione para medir el primer borde (longitud).
3. Apunte al segundo punto del objetivo, pulse para medirlo (anchura).
4. Apunte al tercer punto del objetivo, pulse para medirlo (altura).
5. Los resultados del cálculo del volumen se mostrarán en la parte inferior de la pantalla.
MEDICIÓN PITAGÓRICA
Todas las mediciones pitagóricas se pueden aplicar a diferentes planos de medición, sólo
hay que asegurarse de que el lado del ángulo recto sea perpendicular al objeto que se está
midiendo.
Nota: En el teorema de Pitágoras, el lado del ángulo recto no puede ser más largo que la
hipotenusa; de lo contrario, se producirá un error de cálculo.
MEDICIÓN DIRECTA DE PITÁGORAS
1. Presione para cambiar al modo de medición directo de Pitágoras .
2. Según el borde que destella, apunte el láser hacia el primer punto del blanco, presione
para medir la hipotenusa.
3. Gire en sentido perpendicular al objetivo con la referencia ajustada como centro, pulse
para medir uno de los lados del ángulo recto.
4. El resultado del cálculo del otro lado del ángulo recto se muestra en la parte inferior de la
pantalla.

6
MEDICIÓN INDIRECTA DE PITÁGORAS (1)
1. Pulse para cambiar al modo de medición indirecta de Pitágoras .
2. De acuerdo con el borde que parpadea, apunte el láser hacia el primer punto del objetivo,
presione para medir la primera hipotenusa.
3. Gire hasta el tercer punto del objetivo con la misma referencia que el centro, pulse
para medir un lado de ángulo recto.
4. Gire hasta el tercer punto del objetivo con la misma referencia que el centro, pulse
para medir la segunda hipotenusa.
5. El resultado del cálculo de la longitud entre el primer punto y el tercer punto se muestra en
la parte inferior de la pantalla.
MEDICIÓN INDIRECTA DE PITÁGORAS (2)
1. Pulse para cambiar al modo de medición indirecta de Pitágoras .
2. Apunte el láser hacia el primer punto del blanco, pulse para medir la primera
hipotenusa.
3. Gire hasta el segundo punto del objetivo con la referencia ajustada como centro, pulse
para medir la segunda hipotenusa.
4. Gire en dirección perpendicular al objetivo con la misma referencia que el centro, pulse
para medir el tercer lado del ángulo recto.
5. El resultado del cálculo de la longitud entre el primer punto y el segundo punto se muestra
en la parte inferior de la pantalla.

7
MEDICIÓN HORIZONTAL AUTOMÁTICA
1. Pulse para cambiar al modo de medición horizontal automático
2. De acuerdo con el borde que parpadea, apunte el láser al primer punto del objetivo y
presione .
3. El grado de ángulo entre la hipotenusa y el borde horizontal, la longitud de la hipotenusa/
borde vertical/ borde horizontal se mostrará en la pantalla de arriba a abajo.
MEDICIÓN VERTICAL AUTOMÁTICA
1. Pulse para cambiar a la medición vertical automática .
2. De acuerdo con el borde que parpadea, apunte el láser hacia el primer punto del blanco y
presione para medir la primera hipotenusa.
3. Gire hasta el segundo punto del objetivo con la referencia ajustada como centro, pulse
para medir la segunda hipotenusa.
4. El grado de ángulo entre ambas hipotenusas, la longitud de ambas hipotenusas y la
distancia vertical se mostrarán en la pantalla en secuencia.

8
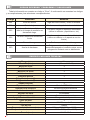
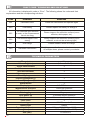
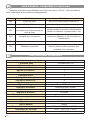
CÓDIGO DE ERROR - PROBLEMAS Y SOLUCIONES
Toda la información se muestra en código o “Error”. A continuación se muestran los códigos
y sus explicaciones y las soluciones correspondientes.
Código Problema Solución
204 Error de cálculo Siga las instrucciones y vuela a utilizarla.
220 Batería baja Por favor, sustituya la batería o cámbiela.
255
La luz reectante recibida es
débil o el tiempo de medición es
demasiado largo.
Por favor, mejore la supercie reectante
(utilice un reector, papel blanco, etc.)
256 La señal recibida es demasiado
fuerte
Por favor, mejore la supercie reectante
(utilice un reector o no apunte a una luz
fuerte)
261 Fuera del rango Por favor, mida dentro del rango
500 Avería de hardware
Si sigue ocurriendo después de haber
encendido/apagado el medidor varias veces,
póngase en contacto con su distribuidor.
ESPECIFICACIONES TÉCNICAS
*Rango (m) 60m
**Precisión (mm) ± (2.0mm+5x10⁻⁵ D)
Medición única ѵ
Medición continua ѵ
Medición de áreas ѵ
Medición de volumen ѵ
Pitágoras directo ѵ
Pitágoras indirecto (1) ѵ
Pitágoras indirecto (2) ѵ
Añadir/restaurar ѵ
Tipo de visualización Pantalla EBTN 2.0''
Referencia de medición Referencia delantera/trasera
Unidades de medida m/ft/in/ft+in
Registro de datos 20 unidades
Apagado automático 3 minutos sin operación
Apagado automático del laser 30 segundos sin operación
Clase de láser 2
Tipo de láser 630-670nm, <1mW
Tipo de pila AAAx2
Temperatura de funcionamiento OºC ~ +40ºC (32ºF ~ +104ºF)
Temperatura de almacenamiento -20ºC ~ 70ºC (-4ºF ~ 158ºF)
Tamaño (mm) 122x52x29.5

9
*RANGO
Los datos del rango se basan en la referencia trasera; el rango máximo puede variar en
función del modelo; consulte el embalaje del producto para conocer los rangos reales.
**PRECISIÓN
(La “D” representa la longitud medida)
Bajo unas buenas condiciones de medición (buena medición de la supercie/temperatura
ambiente/iluminación interior, etc.): hasta un rango nominal.
Bajo malas condiciones de medición (demasiada luz, reejos débiles en la supercie de los
objetos medidos o gran diferencia de temperatura, etc.): el rango de error puede aumentar.
Consejo: use un panel o una supercie móvil con buen reejo en caso de poca luminosidad
o para medir en supercies con poca reexión.
En su estado ideal, la precisión de la distancia corta puede ser de hasta 1mm
(El estado ideal se reere a una velocidad constante (velocidad<1m/s) y a una supercie de
contacto plana; distancia corta signica <1,5m).
Error de ángulo
0,1º es el error causado por la temperatura, D es +/- 0-45º.
Por ejemplo, el error de 0 grados es de +/-0,3º a temperatura ambiente, el error de 45
grados es de +/-0,85º a temperatura no ambiente.
NOTAS
IMPORTANTE!
El fabricante no se responsabiliza de los daños o mal funcionamiento del aparato, en
caso de que no se use correctamente o se haya utilizado para trabajos para los que no esté
diseñado.
De acuerdo con la Directiva de Residuos de Aparatos Eléctricos y Electrónicos
(RAEE), estos deben ser recogidos y dispuestos por separado. Si usted tiene que tirar, por
favor, no use la basura habitual. Por favor, póngase en contacto con su distribuidor para el
reciclaje de forma gratuita.
GARANTÍA
Esta garantía no cubre aquellas piezas que por su uso normal tienen un desgaste.
Nota: para obtener la validez de la garantía, es absolutamente imprescindible que
complete y remita al fabricante el documento de “CERTIFICADO DE GARANTÍA”, dentro
de los siete días a partir de la fecha de compra.

10
ENGLISH
The laser distance meters are portable devices that can easily and accurately measure
length, area, and volume by pressing one button. These tools can be used in interior/exterior
design, construction, factory supervision, engineering inspection, trac accident evidence
gathering, real estate development, re assessment, and more.
Physical leveler
Observe the plane level
Distance button
Short press to enter single measurement mode;
Long press to turn on the meter (o state)/enter continuous measurement mode
.
+/- button
Short press to add; Long press to subtract.
Function button
Short press to switch measurement functions.
Log button
Short press to scroll through history; Long press to save records.
Clear/o button
Short press to delete records (returns back after clearing);
Long press to turn o the meter.
Unit/reference switching button
Short press to switch the reference; Long press to switch the unit.
Buzzer button
Short press to turn on/o the buzzer.
Battery compartment.

11
SYMBOLS
Single/continuous measurement
Area measurement
Volume measurement
Direct Pythagoras measurement
lndirect Pythagoras measurement
lndirect Pythagoras measurement
Auto horizontal measurement
Auto vertical measurement
OPERATION INSTRUCTIONS
Turn on the meter and it will enter the single measurement by default. Press and the
ashing edge is the edge to be measured.
* Please pay attention to the measurement reference. The starting point will be dierent
when dierent reference points are selected.
The measurement reference in this manual refers to the rear reference.

12
SINGLE MEASUREMENT
Turn on the meter and it will enter single measurement mode by default. Point the laser at
the measurement target, then press and the measurement result will be displayed al the
bottom of the screen.
Continuous Measurement (Max/Min Measurement)
This function can be used to measure the diagonal of a house, to look for levels, to stake
out, etc.
Long press to enter the continuous measurement.
Point the laser at the measurement target, then press to stop measuring. The MIN/
MAX/current measured value will be displayed on the screen.
This function will stop automatically after 5 minutes of continuous measurement.
MIN MAX
AREA MEASUREMENT
1. Press to switch to area measurement .
2. According to the ashing edge, point the laser at the rst point of the target, press to
measure the rst edge (length).
3. Point at the second point, press to measure the second edge (width).
4. The calculation results of the length, width, circumference and area will be displayed on the
screen.

13
VOLUME MEASUREMENT
1. Press to switch to volume measurement .
2. According to the ashing edge, point the laser at the rst point of the target, press to
measure the rst edge (length).
3. Point at the second point of the target, press to measure the second edge (width).
4. Point at the third point of the target, press to measure the third edge (height).
5. The volume calculation results will be displayed at the bottom of the screen.
PYTHAGOREAN MEASUREMENT
AII Pythagorean measurements can be applied to dierent plane measurements, jusi ensure
that the right-angle side is perpendicular to the object being measured.
Note: In Pythagorean Theorem, the right-angle side cannot be longer than the hypotenuse;
otherwise a calculation error will occur.
DIRECT PYTHAGORAS MEASUREMENT
1. Pres to switch to direct Pythagoras measurement .
2. According to the ashing edge, point the laser at the rst point of the target, press to
measure the hypotenuse.
3. Rotate to the direction perpendicular to the target with the set reference as center, press
to measure one right-angle side.
4. The calculation result of the other right-angle side is displayed at the bottom of the screen.

14
INDIRECT PYTHAGORAS MEASUREMENT (1)
1. Press to switch to indirect Pythagoras measurement .
2. According to the ashing edge, point the laser at the rst point of the target, press to
measure the rst hypotenuse.
3. Rotate to the direction perpendicular to the target with the set reference as center, press
to measure one right-angle side.
4. Rotate to the third point of the target with the same reference as center, press to
measure the second hypotenuse.
5. The calculation result of the length between the rst point and the third point is displayed at
the bottom of the screen.
INDIRECT PYTHAGORAS MEASUREMENT (2)
1. Press to switch to indirect Pythagoras measurement .
2. Point the laser to the rst point of the target, press to measure the rst hypotenuse.
3. Rotate to the second point of the target with the set reference as center, press to
measure the second hypotenuse.
4. Rotate to the direction perpendicular to the target with the same reference as center, press
to the third right-angle side.
5. The calculation result of the length between the rst point and the second point is displayed
and at the bottom of the screen.

15
AUTO HORIZONTAL MEASUREMENT
1. Pres to switch to auto horizontal measurement
2. According to the ashing edge, point the laser to the rst point of the target and press .
3. The angle degree between the hypotenuse and the horizontal edge, the length of the
hypotenuse/vertical edge/horizontal edge will be displayed on the screen from top to bottom.
AUTO VERTICAL MEASUREMENT
1. Pres to switch to auto vertical measuremen .
2. According to the ashing edge, point the laser to the rst point of the target, press to
measure the rst hypotenuse.
3. Rotate to the second point of the target with the set reference as center, press to
measure the second hypotenuse.
4. The angle degree between both hypotenuses, the length of both hypotenuses, the vertical
distance will be displayed on the screen in sequence.

16
FAULT CODE - PROBLEMS AND SOLUTIONS
AII information is displayed in code or “Error”. The following shows the codes and their
explanations and the corresponding solutions.
Code Problems Solutions
204 Calculation error Follow the instructions and operate again
220 Low battery Please replace the battery or charge it
255
The reected light received
is weak, or the measurement
time is too long
Please improve the reective surface (use a
reector, white paper, etc.)
256 The received signal is too
strong
Please improve the reective surface (use a
reector, or do not aim at strong light)
261 Over range Please measure within the range
500 Hardware malfunction lf it still appears after the meter has been turned on/
o multiple times, please contact your dealer.
TECHNICAL PARAMETERS
*Range (m) 60m
**Accuracy (mm) ± (2.0mm+5x10⁻⁵ D)
Single measurement ѵ
Continuous measurement ѵ
Area measurement ѵ
Volume measurement ѵ
Direct Pythagoras ѵ
lndirect Pythagoras (1) ѵ
lndirect Pythagoras (2) ѵ
Add/Subtract ѵ
Display type 2.0" EBTN screen
Measurement reference Front/rear reference
Measurement units m/ft/in/ft+in
Data logging 20 groups
Auto power o 3 minutes without operation
Auto laser o 30 seconds without operation
Laser class 2
Laser type 630-670nm, <1mW
Battery type AAAx2
Operating temperature OºC ~ +40ºC (32ºF ~ +104ºF)
Storage temperature -20ºC ~ 70ºC (-4ºF ~ 158ºF)
Size (mm) 122x52x29.5

17
*RANGE
The range data is based on the rear reference; the maximum range may vary depending on
the model version, please refer to the product packing for the actual ranges.
**ACCURACY
(“D” represents the measured length)
Under good measurement conditions (good measurement surface/room temperature/indoor
lighting, etc.): up to the rated range.
Under bad measurement conditions (too much light, weak reection on the surface of the
measured objects or large temperature dierence, etc.): the error may increase.
Tip: Use a target board or a good reective surface in case of poor daylight or target
reection.
In the ideal state, the short distance accuracy can be up to 1mm.
(Ideal state refers to constant speed (speed < 1m/s) and at contact surface; short distance
means <1.5m)
Angle Error
0.1º is the error caused by the temperature, D is +/ -0~45º.
For example, the 0 degree error is +/ -0.3º at room temperature, the 45 degrees error is +/
-0.85ºat non-room temperature.
NOTES
IMPORTANT!
The maker will not take responsibility for damage or malfunction as a result of the machine
being incorrectly used or, applied for a purpose for which it was not intended.
For ordering spare parts, please refer to the Spare Parts Drawing and note the needed
number.
According to Waste Electrical and Electronic Equipment directive (WEEE), these ones
must be collected and arranged separately. If you have to throw them out, please, do not use
the usual rubbish. Please, contact your distributor for free recycling.
GUARANTEE
The maker guarantees to the machine owner 12 months against any manifacture defect.
This guaranteee do not cover the parts wich are consumables.
Note: to apply the guarantee its necesary to send the “GUARANTEE CERTIFICATE” duly
lled within one week after purchased the machine to the maker.

18
FRANÇAIS
Les télémètres laser sont des appareils portables qui peuvent mesurer facilement et
précisément la longueur, la surface et le volume en appuyant sur un bouton. Ces outils peuvent
être utilisés dans la conception intérieure / extérieure, la construction, la supervision d’usine,
l’inspection technique, la collecte de preuves d’accident de la route, l’évaluation des incendies, etc
.
Niveleur physique
Observez le niveau de l’avion
Bouton à distance
Appuyez brièvement pour accéder au mode de mesure individuelle;
Appuyez longuement pour allumer le compteur (à l’état éteint) et passer en
mode de mesure continue.
Bouton +/-
Appuyez brièvement pour ajouter;
Appuyez longuement pour soustraire.
Bouton de fonction
Appui court pour changer les fonctions de mesure.
Bouton d’enregistrement
Appuyez brièvement pour faire déler l’historique;
Appuyez longuement pour enregistrer les enregistrements
.
Bouton Supprimer / Désactiver
Appuyez brièvement pour supprimer les enregistrements (revenir en arrière
après la suppression);
Appuyez longuement pour éteindre le lecteur.
Bouton de changement d’unité / référence
Appuyez brièvement pour changer la référence
;
Appuyez longuement pour changer d’unité.
Bouton de klaxon
Appuyez brièvement pour allumer / éteindre le haut-parleur.
Compartimento de la batería.

19
SYMBOLES
Mesure simple / continue
Mesure des surfaces
Mesure de volume
Mesure directe de Pythagore
Mesure indirecte de Pythagore
Mesure indirecte de Pythagore
Mesure horizontale automatique
Mesure verticale automatique
MODE D’EMPLOI
Allumez le mètre et par défaut, la mesure individuelle commencera. Appuyez sur (symbole)
et le bord clignotant est le bord à mesurer.
* Faites attention à la référence de mesure. Le point de départ sera diérent lorsque diérents
waypoints sont sélectionnés.
Dans ce manuel, la référence de mesure fait référence à la référence arrière.

20
MESURE UNIQUE
Allumez le compteur et il entrera en mode de mesure unique par défaut. Dirigez le laser vers
le point de mesure, puis appuyez sur et le résultat de la mesure apparaîtra en bas de
l’écran.
Mesure continue (Mesure max / min)
Cette fonction vous permet de mesurer la diagonale d’une maison, de trouver des niveaux,
de marquer, etc.
Appuyez longtemps pour passer en mode de mesure continue. Dirigez le laser vers
la cible de mesure et appuyez sur pour arrêter la mesure. La valeur MIN / MAX de la
mesure actuelle apparaîtra sur l’écran.
*Cette fonction s’arrêtera automatiquement après 5 minutes de mesure continue.
MIN MAX
MESURE DES SURFACES
1. Presse pour passer en mode de mesure de surface .
2. Sur la base du bord clignotant, pointez le laser sur le premier point de la cible, appuyez sur
pour le mesurer (longueur).
3. Visez le deuxième point, appuyez sur pour le mesurer (largeur).
4. Les résultats du calcul de la longueur, largeur, circonférence et surface seront achés à
l’écran.
La page est en cours de chargement...
La page est en cours de chargement...
La page est en cours de chargement...
La page est en cours de chargement...
La page est en cours de chargement...
La page est en cours de chargement...
La page est en cours de chargement...
La page est en cours de chargement...
La page est en cours de chargement...
La page est en cours de chargement...
-
 1
1
-
 2
2
-
 3
3
-
 4
4
-
 5
5
-
 6
6
-
 7
7
-
 8
8
-
 9
9
-
 10
10
-
 11
11
-
 12
12
-
 13
13
-
 14
14
-
 15
15
-
 16
16
-
 17
17
-
 18
18
-
 19
19
-
 20
20
-
 21
21
-
 22
22
-
 23
23
-
 24
24
-
 25
25
-
 26
26
-
 27
27
-
 28
28
-
 29
29
-
 30
30


Ega Master 65424 Le manuel du propriétaire
- Catégorie
- Mesure, test
- Taper
- Le manuel du propriétaire
dans d''autres langues
- English: Ega Master 65424 Owner's manual
- español: Ega Master 65424 El manual del propietario
Autres documents
-
Tripp Lite T030-50M Le manuel du propriétaire
-
Perel EEM700 Manuel utilisateur
-
Flex ADM 1 Manuel utilisateur
-
Hilti PD-E Operating Instructions Manual
-
-
Hilti PD-I Mode d'emploi
-
-
-
Einhell Classic TC-LD 50 Manuel utilisateur
-
Laserliner DistanceMaster Vision Le manuel du propriétaire