Tripp Lite SRCOOL33K/SRXCOOL33K Air Conditioning Unit Le manuel du propriétaire
- Taper
- Le manuel du propriétaire

1
Table of Contents
1. Introduction 2
2. Important Safety Instructions 2
3. Features 3
4. Specifications 4
5. Operation 5
6. Troubleshooting 11
7. Preventive Maintenance 12
8. Storage and Service 14
9. Warranty & Warranty Registration 15
Español 17
Francais 33
Русский 49
Self-Contained
Air Conditioning Unit
Models: SRCOOL33K, SRXCOOL33K
Owner’s Manual
1111 W. 35th Street, Chicago, IL 60609 USA • www.tripplite.com/support
Copyright © 2013 Tripp Lite. All trademarks are the sole property of their respective owners.
WARRANTY
REGISTRATION
Register online today for a chance
to win a FREE Tripp Lite product
www.tripplite.com/warranty
13-11-214-93-3139.indb 1 12/10/2013 10:18:51 AM

2
1. Introduction
2. Important Safety Instructions
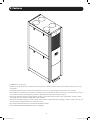
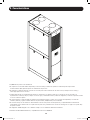
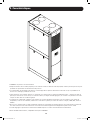
Tripp Lite’s SRCOOL33K/SRXCOOL33K is a self-contained air conditioning unit housed in a standard 42U enclosure. The SRCOOL33K/
SRXCOOL33K is optimized for general computer room cooling or supplemental cooling in a large server room. It features an inverter-driven
DC (direct current) variable-speed compressor that delivers high-efficiency precision cooling. This helps maintain set temperature without the
traditional method of wasteful On/Off cycling.
A menu-driven, multi-line LCD screen provides on-site monitoring and control of various operating conditions. These operational conditions
can also be monitored and controlled remotely via SNMP, Web, telnet or Modbus.
SAVE THESE INSTRUCTIONS
All sections of this owner’s manual contain instructions and warnings that must be followed during the operation of the products described
in this manual. Read ALL instructions before attempting to operate these products. Failure to comply may invalidate the warranty and cause
serious property damage and/or personal injury.
• Prior to use, the individual user must determine whether this device is suitable, adequate or safe for the use intended. Since individual
applications are subject to great variation, the manufacturer makes no representation or warranty as to the suitability or fitness of this
device for any specific application.
• The cooling unit operates under pressure. Observe proper safety precautions when operating or servicing the unit.
• Do not operate the unit with any cover, guard, door, or panel removed unless the instructions indicate otherwise.
• Do not run cabling or service utilities in front of the fan outlets.
• Connect the unit directly to a grounded AC power outlet. Failure to do so may cause electric shock or fire. Note: If the unit is hardwired,
the user should ground it according to local regulations.
• The power supply for the unit must be rated as specified on the unit’s nameplate.
• Never modify the unit’s plug or use an adapter if the unit is equipped with an input power cord.
• Comply with all local and national wiring and safety regulations applicable where the unit will be installed, e.g. The National Electric Code
(NEC) in the United States.
• On models with an input cord, never use the cord as a means to turn the unit on or off. A serious electric shock may occur. Always use the
control panel to power the unit on or off.
• Always turn the unit off and disconnect it from the mains input source by unplugging the unit or opening the mains circuit breaker before
performing maintenance.
• Before connecting the unit to a dedicated drainage system, turn it off and unplug it.
• Maintenance should be performed by trained personnel only.
• Do not use thinners, alcohol, detergents or abrasive brushes to clean the unit’s cabinet. These may damage the cabinet.
• Do not operate the unit without the air filter. This may cause dust accumulation that can damage the unit.
• Do not attempt to operate the unit in any room with inadequate air circulation. There must be adequate airflow to the condenser.
• Do not place objects on top of the unit.
• Prior to operation, ensure that:
• The unit has been properly installed in accordance with the procedures detailed in the Installation Manual
• There is no evidence of damage to the unit
• The unit is level and stabilized
• The clearance around the cooling unit complies with local and national codes and regulations as well as the installation manual
• Warning! Do not use this equipment in the presence of a flammable anesthetic mixture with air, oxygen or nitrous oxide.
13-11-214-93-3139.indb 2 12/10/2013 10:18:51 AM

3
3. Features
• 33,000 BTU of cooling power
• Variable-speed, DC-inverter-driven compressor and microprocessor-controlled electronic expansion valve (EEV) enable precision cooling
adjustments
• Soft-start feature limits inrush current to prevent introduction of line noise, voltage disruptions and potential circuit overloads
• Self-contained, zero-maintenance unit atomizes condensate and expels it through the exhaust air stream—no floor drain, water collection
tank, external condenser, refrigerant piping, ductwork or plumbing required when used in typical conditions
• Convenient LCD control panel and network interface enable local and remote monitoring and control of temperature, fan speed, alarms
and logging via front-panel buttons, SNMP, Web, telnet or Modbus
• Row-based airflow path maximizes hot-aisle/cold-aisle efficiency and cooling predictability by supplying cold intake air high in the cold aisle
and removing hot equipment exhaust air low from the hot aisle
• Eco-friendly R410a refrigerant meets environmental standards worldwide
• Nominal 208-240V AC Input, 50/60 Hz frequency compatibility
13-11-214-93-3139.indb 3 12/10/2013 10:18:51 AM

4
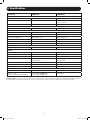
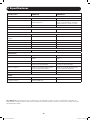
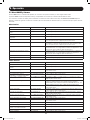
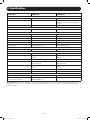
4. Specifications
Specification SRCOOL33K SRXCOOL33K
Input
Nominal input voltage 208-240V; 50/60Hz 208-240V; 50/60Hz
Input connection type L6-30P (Hardwire Optional) Hardwire (User supplied IEC 309 32 amp
cord set, optional)
Input cord length (ft/m) 10 ft / 3.05 m 10 ft / 3.05 m
LEDs, Alarms and Switches
Controls Multi-line LCD control panel Multi-line LCD control panel
Physical
Unit weight (lb/kg) 700 / 317.5 700 / 317.5
Unit dimensions (HWD/in) 78.5 x 23.75 x 48 78.5 x 23.75 x 48
Unit dimensions (HWD/cm) 199.3 x 60.3 x 122 199.3 x 60.3 x 122
Material of construction Steel and aluminum Steel and aluminum
Color Black Black
Form factor Tower (42U equivalent) Tower (42U equivalent)
Environmental
Cooling capacity (BTU) 33,000 33,000
Features
Dehumidifier capacity 0.85 gal/hr 0.85 gal/hr
Compressor type DC, inverter-driven, variable speed DC, inverter-driven, variable speed
Refrigerant (type/capacity) R410a / 4kg (8.81 lbs.) R410a / 4kg (8.81 lbs.)
Air flow Evaporator: 1000-1230 CFM Condenser:
945-1012 CFM
Evaporator: 1000-1230 CFM Condenser:
945-1012 CFM
Amp draw Variable (0-24 L6-30P; 0-30 Hardwire) Variable (0-24 L6-30P; 0-30 Hardwire)
Sound level (noise) <75dBA <75dBA
Air tube length (in/cm) 71/180 71/180
Warranty
Standard limited warranty 1 year (US/Canada only) 1 year (Parts only)
Optional coverage
(extensions of standard warranty period)
2-year (WEXT3-SRCOOL33K);
4-year (WEXT5-SRCOOL33K)
Not available
Regulatory Notice: This unit carries less than 22 lbs. of refrigerant and complies with all Department of Transportation shipping regulations.
It is exempt from any additional requirements. The user does not have to make any extra accommodations to transport the unit.
13-11-214-93-3139.indb 4 12/10/2013 10:18:51 AM

5
5. Operation
Caution: Before attempting to operate the SRCOOL33K/SRXCOOL33K, ensure that it has been properly installed in accordance
with the Installation Manual, including stabilization and sufficient clearance around the unit.
Tip Warning! If the unit has been tilted more than 15° during shipping, unpacking or installation, allow unit to
stand for 24 hours before turning on. Do not operate if there is visible internal or external damage.
5.1 Cooling Methods
The main function of the SRCOOL33K/SRXCOOL33K is to remove waste heat and return treated air to the room at the required temperature.
The specific cooling method used is determined by the configuration of the rack enclosures in the room. The unit continuously varies the
cooling output to maintain a set temperature at the return of the unit. The cooling output is varied by constantly adjusting the speed of the
fans and the compressor. If desired, the fan speed may be set to a constant value by the user. Note: Setting a lower fan speed may limit the
unit’s capacity.
The unit uses the setpoint entered by the user to control the fan speed. This variable should be set based on the installation configuration.
Configurations
Room Cooling Mode: When the unit is installed stand-alone in a server room acting as a CRAC unit, the setpoint should be set to the
desired room temperature.
In-Row/Hotspot Mode: When the unit is installed in a hot aisle/cold aisle configuration, the setpoint should be set to the desired cold aisle
temperature plus the expected temperature rise across the problem rack (~10°C; 50°F).
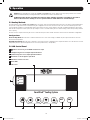
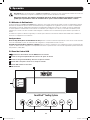
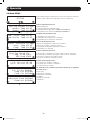
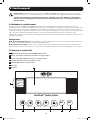
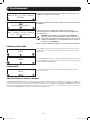
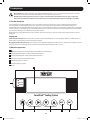
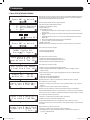
5.2 LCD Control Panel
A
button leads directly to the HOME menu/Cancels input
B
Left/Right navigation arrows/Input adjustment buttons
C
Up/Down navigation arrows/ Input adjustment buttons
D
SET button scrolls through the input elds
E
ENT button conrms new value
F
Status LEDs
G
LCD Screen
POWER
CRITICAL
WARNING
SmartRack™ Cooling System
SET ENT
A
F
G
B D EC
13-11-214-93-3139.indb 5 12/10/2013 10:18:52 AM

6
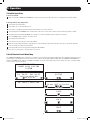
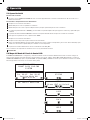
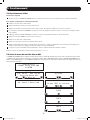
5.4 LCD Control Panel Menu Map
The SRCOOL33K/SRXCOOL33K is configured and controlled via an interactive, menu-based LCD Control Panel. Navigate from menu to menu
by touching the left and right arrows. There are five menus: STATUS, SETUP, LOGS, INFO and HELP. When the SRCOOL33K/SRXCOOL33K is
initialized, the HOME screen appears. The HOME and ALARMS screens are menus that alert you to the status of the unit. To navigate within
a menu, use the up and down arrows.
5. Operation
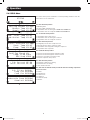
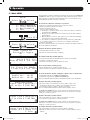
5.3 Initial Operation
To Power the Unit On
1
Make sure that the SRCOOL33K/SRXCOOL33K is properly connected to the AC input source according to the Installation Manual.
To Change Initial Cooling Temperature
1
Scroll right to the SETUP Menu.
2
Press ENT to access the password screen.
3
Press SET to select Open Password option then press ENT to access the sub-menu.
4
The default password is 000000 and is already listed on the screen. Press SET to enter the password and press ENT to confirm.
5
The display will read SYSTEM UNLOCKED. The system will lock itself automatically after 3 minutes of inactivity.
6
Press the HOME button to return to the home screen.
7
Scroll right to the SETUP Menu.
8
Scroll down to the first sub-menu of the SETUP Menu.
9
Enter the desired Target Temperature using SET to select the temperature field and the up/down arrow keys to modify the numerical
value. Press ENT to confirm new temperature.
10
Pressing the ENT key will now toggle the Cooling Mode ON and OFF.
Note: The unit has a factory default cooling temperature of 25°C (77°F).
13-11-214-93-3139.indb 6 12/10/2013 10:18:52 AM

7
5. Operation
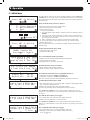
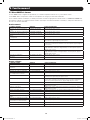
5.5 HOME Menu and Alarms
The HOME menu indicates if the unit is operational, the current operating conditions and if there are any active alarms.
The HOME screen displays the current temperature and the set temperature the unit is trying to achieve.
If an alarm condition is indicated, details can be viewed by touching the down arrow. The SRCOOL33K/SRXCOOL33K can sense and display
the following alarm conditions. (W) indicates a warning/advisory alarm; (!) indicates a fault that requires immediate attention.
Warnings
Alarm Conditions Display User Action
Supply air sensor failure 1 (W)SUP AIR SEN FAIL Call Tripp Lite for service.
Condenser in sensor failure 3 (W)COND IN SEN FAIL Call Tripp Lite for service.
Condenser out sensor failure 4 (W)COND OUT SEN FAIL Call Tripp Lite for service.
Evaporator temperature probe fault 6 (W)EVAP TEMP FAIL Call Tripp Lite for service.
Air filter blockage/clog 9 (W)AIR FILTER CLOG Check the air filter for any blockage. Replace the air filter.
Call Tripp Lite for service if error remains.
Air filter requires replacement 10 (W)AF HOURS EXCEEDED Check the air filter for any blockage. Replace the air filter. Reset the
Air Filter Hours menu. Call Tripp Lite for service if error remains.
Excessive return temperature 20 (W)RETURN AIR HIGH The alarm set point is too low and the unit cannot keep up with the
heat load. Reduce the heat load. If error remains, call Tripp Lite for
service.
Excessive supply temperature 21 (W)SUPPLY AIR HIGH The alarm set point is too low and the unit cannot keep up with the
heat load. Reduce the heat load. If error remains, call Tripp Lite for
service.
Low suction pressure 28 (W)LOW SUCT PRESS Call Tripp Lite for service.
Water leak 33 (W)WATER LEAK Identify the water leak and correct it.
Critical Faults
Alarm Conditions Display User Action
Return air sensor failure 2 (!)RET AIR SEN FAIL Call Tripp Lite for service.
Suction temperature sensor fault 5 (!)SUCT TEMP SENSOR Call Tripp Lite for service.
High discharge pressure 7 (!) HI DISCH PRESS Check for any blockage of the condenser. Call Tripp Lite for service.
Suction pressure failure 8 (!)SUCT PRESS FAIL Call Tripp Lite for service.
Communications between controller
and compressor have failed
12 (!)INVERTER COM FAIL Call Tripp Lite for service.
Remote shutdown has been closed 13 (!)REMOTE SHUT DOWN Reset the EPO or remote contact. If the error persists, call Tripp Lite
for service.
Water pump failure 14 (!)H2O PUMP FAIL Check for any water in the upper tray. If the tray is full, pump
the water out of the unit using the supplied hose and adjust any
humidification systems in use. If the upper tray is dry, call Tripp Lite
for service.
Condenser failure 18 (!)COND FAILURE Check for any blockage of the condenser. Call Tripp Lite for service.
Evaporator failure 22 (!)EVAP FAILURE Check the air filter and evaporator for any blockage. Call Tripp Lite for
service.
Evaporator icing 23 (!)EVAP ICE UP Check the air filter and evaporator for any blockage. Call Tripp Lite for
service.
Excessive discharge pressure 24 (!)HIGH DISCH PRESS Check for any blockage of the condenser. Call Tripp Lite for service.
Discharge switch failure 25 (!)DISCH SWITCH FAIL Call Tripp Lite for service.
Excessive system pressure 26 (!)HIGH SYSTEM PRESS Check for any blockage of the condenser. Call Tripp Lite for service.
System has run out of refrigerant 27 (!)LOW CHARGE Call Tripp Lite for service.
Persistent low suction pressure 29 (!)LOW SUCT PRESS Call Tripp Lite for service.
High and low pressures have not
returned to nominal
30 (!)LINE IMBALANCE Call Tripp Lite for service.
Compressor failure 31 (!)COMPRESSOR FAIL Call Tripp Lite for service.
Fan failure 34 (!)FAN FAIL Call Tripp Lite for service.
13-11-214-93-3139.indb 7 12/10/2013 10:18:52 AM

8
5. Operation
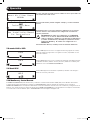
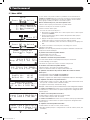
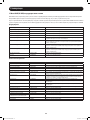
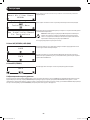
5.6 STATUS Menu
The STATUS menu provides information on current operating conditions. Touch the
down arrow to access sub-menus.
The rst sub-menu provides:
• Operating mode
• Cooling output (estimated in kW)
• Temperature of the air entering the SRCOOL33K/SRXCOOL33K
• Temperature of the air leaving the SRCOOL33K/SRXCOOL33K
The second sub-menu provides:
• Temperature at the remote sensor
• Temperature of the air entering the condenser
• Temperature of the air leaving the condenser
The third sub-menu provides:
• Refrigerant pressure at the compressor inlet
• Discharge pressure at the compressor outlet
• Temperature of the refrigerant entering the compressor
• Temperature at the evaporator
The fourth sub-menu provides:
• Speed of the fans that regulate evaporator air flow
• Speed of the fans that regulate condenser air flow
• Frequency of compressor operation (in Hz)
• Electronic expansion valve position
The fth sub-menu provides:
• Current the compressor is drawing
• Current the fans are drawing
• Total current for the unit
The sixth and seventh sub-menus provide the time the following components
have been in use:
• Air filter
• Evaporator fan
• Condenser fan
• Compressor
• Condensate pump
• Atomizer
13-11-214-93-3139.indb 8 12/10/2013 10:18:53 AM

9
5. Operation
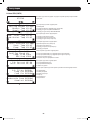
5.7 SETUP Menu
The SETUP menu enables you to set the operating parameters of the SRCOOL33K/
SRXCOOL33K. To access sub-menus, you must first unlock the menu by providing
the assigned password. When at the initial SETUP menu, press ENT to bring up the
password menu.
In the password menu, you have to option to:
• Enter the password to unlock the SETUP system
• Close the password and lock the system
• Create a new password
To create a new password:
1. Unlock the SETUP system with the current password. The default password is
000000.
2. Scroll back to the password menu and use SET to scroll to ‘New Password’.
3. Press SET to access the numerical field and use the up/down arrows to enter
the new password. Press ENT.
4. At the confirmation menu, re-enter the new password and press ENT.
5. The unit will notify you if the password has been successfully changed.
• Exit the SETUP menu
Note: Passwords can be up to six characters in length and must be made up of
numeric values.
The rst sub-menu allows you to input:
• Target temperature of the room
• System mode (On or Off)
The second sub-menu allows you to input:
• Whether the unit should start automatically when plugged in
• Units of display (SI or English )
• Beeping preference when keys are pressed
The third sub-menu allows you to input:
• Hours until the air filter must be replaced
• Enable or disable air filter replacement alarm
The fourth sub-menu allows you to set high-limit alarms for:
• Temperature leaving the SRCOOL33K/SRXCOOL33K
• Temperature entering the SRCOOL33K/SRXCOOL33K
Note: The unit alerts you when either temperature exceeds your set value.
The fth sub-menu allows you to input:
• The normal state of the accessory input. (N.O. is defined as Normally Open while
N.C. is defined as Normally Closed)
• Whether the unit shuts down if the input state changes
Note: The unit will always send a warning when the sensor changes.
The SRCOOL33K/SRXCOOL33K comes with an input contact that can be user-
defined. The contact monitors a sensor and responds to any changes in the state of
the sensor.
The sixth sub-menu allows you to toggle:
• The normal state of the water leak sensor (Open or Closed)
• Whether the unit shuts down if a leak is detected
The SRCOOL33K/SRXCOOL33K comes with an output contact that can be user-
defined. The contact monitors a sensor and responds to any changes in the state of
the sensor.
The seventh sub-menu allows you to toggle:
• The normal state of the accessory output (Open or Closed)
• What type of alarm causes the output to change from normal
(None, All or Critical)
° °
° °
° °
13-11-214-93-3139.indb 9 12/10/2013 10:18:54 AM

10
5. Operation
The eighth sub-menu allows you to reset the number of hours the current air
lters has been in use.
The ninth sub-menu allows you to set the time and access the Technician
menu.
The Technician menu is used for changing the electrical current settings
when using the unit in a hardwire conguration.
WARNING! Do not change this setting on the SRCOOL33K when
using the supplied L6-30P input cord. Do not place setting at any
other value other than 24.0 Amps (with Input Cord) or 30.0 Amps
(Hardwire). Do not change this setting on the SRXCOOL33K.
Please consult the Installation Manual for further information.
5.8 LOGS and INFO Menus
The LOGS menu provides access to the Event Log page. All alarms are entered into
the Event log, tagged with a time/date stamp.
The INFO Menu provides access to the Information Page. This page displays the
Model Name, Serial Number, Location, Unit Name and other information about the
SRCOOL33K/SRXCOOL33K.
5.9 HELP Menu
The HELP Menu provides an on-screen tutorial showing how to navigate through the
menus and sub-menus.
5.10 Remote Monitoring and Control
The SRCOOL33K/SRXCOOL33K can be remotely monitored and controlled via SNMP, Web, telnet or Modbus. Remote monitoring and control
requires a network card such as Tripp Lite’s SNMPWEBCARD (sold separately) in order to turn the SRCOOL33K/SRXCOOL33K into a
network-managed device. Please consult the SRCOOL33K/SRXCOOL33K installation manual and web card documentation for further
information on installing and configuring your network card. Update to the latest version of the SNMPWEBCARD firmware. It can be
downloaded from tripplite.com.
° °
13-11-214-93-3139.indb 10 12/10/2013 10:18:55 AM

11
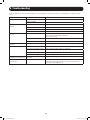
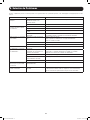
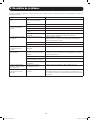
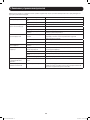
6. Troubleshooting
Locate the problem and review possible solutions in the following table. If the problem persists, visit www.tripplite.com/support to obtain
service.
Problem Possible Cause Possible Solution
Fan fails to start. Cooling unit shutdown due to an
external command.
Disconnect communications cable and restart unit.
Faulty fan. Replace the fan.
Cooling unit cannot achieve
setpoint.
Dirty filter. Clean filter.
Dirty coil. Clean coil.
Heat load is too far away. Relocate cooling unit.
Improper fan speed. Fan speed set to Low. Set fan speed to Auto or increase fan speed.
Excess water in or around
the unit.
Room humidity too high. Add drain line.
Adjust set point on humidifying equipment.
Improve room sealing.
Dirty filter. Clean filter.
Dirty coil. Clean coil.
Cooling unit noise level is
excessive.
Improper fan speed. Select lower fan speed.
Water around cooling unit. Condensate drain hose not
connected or not properly routed.
Verify proper connection of condensate drain hose, proper routing to
pump and proper routing outside of cooling unit.
Leak in drain system. Locate and repair leak.
Cooling unit not properly leveled. Adjust cooling unit’s leveling feet.
Piping insulation damaged. Locate damage area and repair insulation.
Cooling unit operates but
LCD panel does not function.
Local display not properly
connected.
Verify proper connection of local display cable.
Unable to reset the switched
circuit breaker.
Tripped high pressure switch. Open unit’s rear door and depress the high pressure cut off switch
located above the compressor. Once reset, return the front panel
circuit breaker to the ON position.
13-11-214-93-3139.indb 11 12/10/2013 10:18:55 AM

12
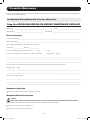
7. Preventive Maintenance
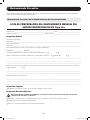
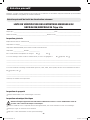
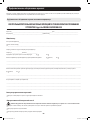
Self-Contained Air Conditioning Unit Preventive Maintenance
Note: The following pages can be photocopied for use during scheduled maintenance. Tripp Lite recommends that completed maintenance
forms be saved for future reference.
Tripp Lite SRCOOL33K/SRXCOOL33K MONTHLY MAINTENANCE CHECKLIST
Prepared By: __________________________________________________________________Date:______________________________________
Model Number_________________________________________________Serial Number______________________________________________
General Inspection
Location of cooling unit____________________________________________________________________________________________________
Temperature setpoint______________________________________________________________________________________________________
Room temperature/humidity near the return of the cooling unit:
Temperature _________________Humidity _________________
Is the unit maintaining the temperature setpoint? Yes q No q
Is there visible damage to the cooling unit, e.g. dents or scratches? Yes q (Specify) No q
________________________________________________________________________________________________________________________
________________________________________________________________________________________________________________________
________________________________________________________________________________________________________________________
Are there indications of environmental damage (dirt, dust, debris, liquid stains) around the unit installation area?
Yes q (Specify) No q
________________________________________________________________________________________________________________________
________________________________________________________________________________________________________________________
Previous month’s alarm history:
________________________________________________________________________________________________________________________
________________________________________________________________________________________________________________________
________________________________________________________________________________________________________________________
Cleanliness Inspection
q Check the condition of return air filters. Change if necessary.
Mechanical/Electrical Inspection
Caution!
Turn off the cooling unit and disconnect all power sources before performing mechanical and electrical checks.
q Check the fan. All components should be moving freely, with no indication of binding or damage.
q Verify that the condensate line is flowing freely.
q Inspect the power cord and plug for damage.
13-11-214-93-3139.indb 12 12/10/2013 10:18:55 AM

13
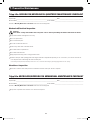
7. Preventive Maintenance
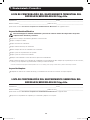
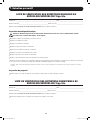
Tripp Lite SRCOOL33K/SRXCOOL33K QUARTERLY MAINTENANCE CHECKLIST
Prepared By: __________________________________________________________________Date:______________________________________
Model Number_________________________________________________Serial Number______________________________________________
Perform all Monthly Maintenance Checklist tasks PLUS the following tasks:
Mechanical/Electrical Inspection
Caution!
Turn off the cooling unit and disconnect all power sources before performing mechanical and electrical checks.
q Inspect fan hardware and tighten if necessary.
q Clean or replace filters.
q Clean condensate pans.
q Clean the condensate drain line.
q Remove any debris from condensate floats.
q Clean dust from door perforations.
q Clean dust from fan bezels.
q Verify proper functioning of the cooling operation mode.
q Treat the drain pan with a plating product like Virginia Pan Tabs. Verify that the product you use is non-toxic, non-corrosive and will not
leave deposits that could damage the unit and drain pan.
Note: Treating the drain pain helps eliminate problems such as odor, overflow and water damage by preventing plugged drain lines and openings.
Cleanliness Inspection
q Check the condition of the drain pan and accumulation of debris in the pan. Clean as required.
Tripp Lite SRCOOL33K/SRXCOOL33K SEMIANNUAL MAINTENANCE CHECKLIST
Prepared By: __________________________________________________________________Date:______________________________________
Model Number_________________________________________________Serial Number______________________________________________
Perform all Monthly Maintenance Checklist tasks PLUS the following task:
q Inspect the evaporator and condenser coils and clean if required.
13-11-214-93-3139.indb 13 12/10/2013 10:18:55 AM

14
8. Storage and Service
Storage
Before storing the unit, confirm that all ducts and vents are secured or removed and properly stored. Also confirm that the unit is drained of
condensation.
Service
Your Tripp Lite product is covered by the warranty described in this manual. A variety of Extended Warranty and On-Site Service Programs
are also available from Tripp Lite. For more information on service, visit www.tripplite.com/support. Before returning your product for service,
follow these steps:
1. Review the installation and operation procedures in this manual to insure that the service problem does not originate from a misreading
of the instructions.
2. If the problem continues, do not contact or return the product to the dealer. Instead, visit www.tripplite.com/support.
3. If the problem requires service, visit www.tripplite.com/support and click the Product Returns link. From here you can request a Returned
Material Authorization (RMA) number, which is required for service. This simple on-line form will ask for your unit’s model and serial
numbers, along with other general purchaser information. The RMA number, along with shipping instructions will be emailed to you.
Any damages (direct, indirect, special or consequential) to the product incurred during shipment to Tripp Lite or an authorized Tripp
Lite service center is not covered under warranty. Products shipped to Tripp Lite or an authorized Tripp Lite service center must have
transportation charges prepaid. Mark the RMA number on the outside of the package. If the product is within its warranty period, enclose
a copy of your sales receipt. Return the product for service using an insured carrier to the address given to you when you request the
RMA.
13-11-214-93-3139.indb 14 12/10/2013 10:18:55 AM

15
9. Warranty and Warranty Registration
1-YEAR LIMITED WARRANTY
Seller warrants this product, if used in accordance with all applicable instructions, to be free from original defects in material and workmanship for a period of 1 year from the date
of initial purchase. If the product should prove defective in material or workmanship within that period, Seller will repair or replace the product, in its sole discretion. Service under
this Warranty can only be obtained by your delivering or shipping the product (with all shipping or delivery charges prepaid) to: Tripp Lite, 1111 W. 35th Street, Chicago, IL 60609
USA. Seller will pay return shipping charges.
THIS WARRANTY DOES NOT APPLY TO NORMAL WEAR OR TO DAMAGE RESULTING FROM ACCIDENT, MISUSE, ABUSE OR NEGLECT. SELLER MAKES NO EXPRESS WARRANTIES
OTHER THAN THE WARRANTY EXPRESSLY SET FORTH HEREIN. EXCEPT TO THE EXTENT PROHIBITED BY APPLICABLE LAW, ALL IMPLIED WARRANTIES, INCLUDING ALL WARRANTIES
OF MERCHANTABILITY OR FITNESS, ARE LIMITED IN DURATION TO THE WARRANTY PERIOD SET FORTH ABOVE; AND THIS WARRANTY EXPRESSLY EXCLUDES ALL INCIDENTAL AND
CONSEQUENTIAL DAMAGES. (Some states do not allow limitations on how long an implied warranty lasts, and some states do not allow the exclusion or limitation of incidental or
consequential damages, so the above limitations or exclusions may not apply to you. This Warranty gives you specific legal rights, and you may have other rights which vary from
jurisdiction to jurisdiction).
WARNING: The individual user should determine prior to use whether this device is suitable, adequate or safe for the use intended. Since individual applications are subject to great
variation, the manufacturer makes no representation or warranty as to the suitability or fitness of this device for any specific application.
WARRANTY REGISTRATION
Visit www.tripplite.com/warranty today to register the warranty for your new Tripp Lite product. You’ll be automatically entered into a drawing for a chance to win a FREE Tripp Lite
product!*
* No purchase necessary. Void where prohibited. Some restrictions apply. Open to U.S. residents only. See www.tripplite.com for details.
Regulatory Compliance Identification Numbers
For the purpose of regulatory compliance certifications and identification, your Tripp Lite product has been assigned a unique series number. The series number can be found on the
product nameplate label, along with all required approval markings and information. When requesting compliance information for this product, always refer to the series number. The
series number should not be confused with the marking name or model number of the product.
Tripp Lite follows a policy of continuous improvement. Specifications are subject to change without notice.
13-11-214-93-3139.indb 15 12/10/2013 10:18:55 AM

16
1111 W. 35th Street, Chicago, IL 60609 USA • www.tripplite.com/support
13-11-214-93-3139.indb 16 12/10/2013 10:18:55 AM

Índice
1. Introducción 18
2. Instrucciones
Importantes de Seguridad 18
3. Características 19
4. Especificaciones 20
5. Operación 21
6. Solución de Problemas 27
7. Mantenimiento Preventivo 28
8. Almacenamiento y Servicio 30
9. Garantía y Registro de Garantía 31
English 1
Francais 33
Русский 49
Unidad Autónoma
de Aire Acondicionado
Modelos: SRCOOL33K, SRXCOOL33K
Manual del propietario
1111 W. 35th Street, Chicago, IL 60609 EE UU • www.tripplite.com/support
MÁS DE
Copyright © 2013 Tripp Lite. Todas las marcas registradas son de propiedad única de sus respectivos propietarios.
13-11-214-93-3139.indb 17 12/10/2013 10:18:58 AM

1. Introducción
2. Instrucciones Importantes de Seguridad
El SRCOOL33K/SRXCOOL33K de Tripp Lite es una unidad autónoma de aire acondicionado alojada en un gabinete estándar de 42U. El
SRCOOL33K/SRXCOOL33K está optimizado para enfriamiento general de salas de computadoras o enfriamiento suplementario en una
sala grande de servidores. Cuenta con un compresor de velocidad variable controlado por inversor de CD (corriente directa) que entrega
enfriamiento de precisión de alta eficiencia. Esto ayuda a mantener la temperatura establecida sin el costoso método tradicional de ciclos
de encendido/apagado.
Una pantalla LCD controlada por menú, de líneas múltiples proporciona el monitoreo y control en sitio de las diversas condiciones de
operación. Estas condiciones de operación pueden monitorearse y controlarse también en forma remota mediante SNMP, Web, telnet o
Modbus.
GUARDE ESTAS INSTRUCCIONES
Todas las secciones de este Manual del Propietario contienen instrucciones y advertencias que deben observarse durante la operación de
los productos descritos en este manual. Lea TODAS las instrucciones antes de intentar operar estos productos. El no hacerlo puede invalidar
la garantía y causar serios daños a la propiedad y/o lesiones personales.
• Antes de usarlo, cada usuario debe determinar si este dispositivo es adecuado o seguro para el uso previsto. Ya que las aplicaciones
individuales están sujetas a gran variación, el fabricante no garantiza la adecuación de este dispositivo para alguna aplicación específica.
• La unidad de enfriamiento funciona a presión. Observe las precauciones de seguridad adecuadas cuando opere o dé mantenimiento a la
unidad.
• No opere la unidad con alguna cubierta, puerta, panel o guarda desmontados a menos que las instrucciones indiquen lo contrario.
• No conduzca cables o instalaciones de servicio en frente de las descargas de los ventiladores.
• Conecte la unidad directamente a un tomacorriente de CA conectado a tierra. La omisión puede causar una descarga eléctrica o un
incendio. Nota: si la unidad tiene instalación eléctrica permanente, el usuario debe conectarla a tierra de acuerdo a los reglamentos
locales.
• La alimentación de energía para la unidad debe ser dimensionada como se especifica en la placa de identificación de la unidad.
• Nunca modifique la clavija de la unidad o utilice un adaptador si la unidad está equipada con un cable de alimentación.
• Cumpla con todos los reglamentos de cableado y seguridad aplicables, nacionales y locales, en donde se vaya a instalar la unidad, p.e. el
Código Eléctrico Nacional (NEC) en los Estados Unidos.
• En modelos con un cable de alimentación, nunca use el cable como un medio para encender o apagar la unidad. Puede causar una
descarga eléctrica severa. Use siempre el panel de control para encender o apagar la unidad.
• Antes de realizar un trabajo de mantenimiento, apague siempre la unidad y desconéctela de la alimentación de la red comercial
desenchufando la unidad o abriendo el breaker de alimentación de la red del circuito.
• Antes de conectar la unidad a un sistema de drenaje dedicado, apáguela y desconéctela.
• El mantenimiento lo debe realizar sólo personal capacitado.
• No use solventes, alcohol, detergentes, o cepillos abrasivos para limpiar el gabinete de la unidad. Pueden dañar el gabinete.
• No opera la unidad sin el filtro de aire. Esto puede causar acumulación de polvo que puede dañar la unidad.
• No intente operar la unidad en un cuarto con circulación de aire inadecuada. Debe haber flujo de aire adecuado para el condensador.
• No coloque objetos en la parte superior de la unidad.
• Antes de la operación cerciórese de que:
• La unidad se ha instalado apropiadamente de acuerdo con los procedimientos detallados en el manual de instalación
• No exista evidencia de daño a la unidad
• La unidad esté nivelada y estabilizada
• El espacio alrededor de la unidad de enfriamiento cumple con los códigos y reglamentos locales y nacionales así como lo indicado en el
manual de instalación
• ¡Advertencia! No use este equipo en presencia de una mezcla inflamable de anestésicos con aire, oxígeno u óxido nitroso.
18
13-11-214-93-3139.indb 18 12/10/2013 10:18:58 AM

3. Características
• 33,000 BTU de potencia de enfriamiento
• El compresor de velocidad variable impulsado por un inversor CD y la válvula de expansión controlada por microprocesador
electrónicamente (EEV) permiten ajustes de enfriamiento de precisión
• El arranque por software limita las corrientes de inserción para evitar la introducción de ruido de línea, interrupciones de voltaje y
sobrecargas potenciales de circuitos
• Unidad autónoma de cero mantenimiento atomiza el condensado y lo expulsa a través de la corriente de aire de descarga--sin
requerimientos de drenajes de piso, tanque colector de agua, condensador externo, tubería de refrigerante, conductos o plomería cuando
se usa en condciones típicas
• El cómodo panel de control de LCD y la interfaz de red permiten monitoreo y control local y remoto de temperatura, velocidad del
ventilador, alarmas y registro mediante botones del panel frontal, SNMP, Internet, Telnet o Modbus
• El recorrido del flujo de aire basado en filas maximiza la eficiencia de pasillo caliente/pasillo frío y la predictibilidad del enfriamiento
suministrando aire de admisión frío en la parte alta del pasillo frío y eliminando aire caliente de descarga de los equipos en la parte baja
del pasillo caliente
• El refrigerante R410A amigable con el ambiente cumple con los estándares ambientales mundiales
• Alimentación 208-240V CA Nominales, compatibilidad de frecuencia 50/60 Hz
19
13-11-214-93-3139.indb 19 12/10/2013 10:18:58 AM

4. Especificaciones
Especificaciones SRCOOL33K SRXCOOL33K
Alimentación
Voltaje nominal de entrada 208-240V; 50/60Hz 208-240V; 50/60Hz
Tipo de conexión de entrada L6-30P (Instalación eléctrica permanente
(hardwire) Opcional)
Instalación eléctrica permanente [Hardwire]
(Juego de cable IEC 309 de 32 Amperes
proporcionado por el usuario, opcional)
Longitud del cable de entrada (pies/m) 10 pies / 3.05 m 10 pies / 3.05 m
LEDs, Alarmas e Interruptores
Controles Panel de control de LCD Multilínea Panel de control de LCD Multilínea
Físicas
Peso de la Unidad (lb/kg) 700 / 317.5 700 / 317.5
Dimensiones de la unidad (Al x An x Pr/
pulgadas)
78.5 x 23.75 x 48 78.5 x 23.75 x 48
Dimensiones de la unidad (Al x An x Pr/cm) 199.3 x 60.3 x 122 199.3 x 60.3 x 122
Material de construcción Acero y aluminio Acero y aluminio
Color Negro Negro
Factor de forma Torre (equivalente a 42U) Torre (equivalente a 42U)
Ambiental
Capacidad de enfriamiento (BTU) 33,000 33,000
Características
Capacidad del deshumidificador 0.85 gal/hr 0.85 gal/hr
Tipo de compressor CD, controlada por inversor, velocidad
varable
CD, controlada por inversor, velocidad
varable
Refrigerante (tipo/capacidad) R410a / 4kg (8.81 lbs.) R410a / 4kg (8.81 lbs.)
Flujo de aire Evaporador: 1000-1230 CFM
Condensador: 945-1012 CFM
Evaporador: 1000-1230 CFM
Condensador: 945-1012 CFM
Consumo en Amperes Variable (0-24 L6-30P; 0-30 Instalación
eléctrica permanente (hardwire))
Variable (0-24 L6-30P; 0-30 Instalación
eléctrica permanente (hardwire))
Nivel sonoro (ruido) <75dBA <75dBA
Longitud del tubo de aire (pulg./cm) 71/180 71/180
Garantía
Garantía limitada estándar 1 año (EE UU/Canadá solamente) 1 año (Sólo partes)
Cobertura opcional (extensiones del período
de gatantía estándar)
2-años (WEXT3-SRCOOL33K); 4 años
(WEXT5-SRCOOL33K)
No disponible
Aviso Obligatorio: esta unidad lleva menos de 10 kg [22 lbs.] de refrigerante y cumple con todos los reglamentos de embarque del
Departamento de Transporte (EE UU). Está exento de cualquier otro requisito adicional. El usuario no tiene que hacer arreglos adicionales
para transportar la unidad.
20
13-11-214-93-3139.indb 20 12/10/2013 10:18:58 AM
La page est en cours de chargement...
La page est en cours de chargement...
La page est en cours de chargement...
La page est en cours de chargement...
La page est en cours de chargement...
La page est en cours de chargement...
La page est en cours de chargement...
La page est en cours de chargement...
La page est en cours de chargement...
La page est en cours de chargement...
La page est en cours de chargement...
La page est en cours de chargement...
La page est en cours de chargement...
La page est en cours de chargement...
La page est en cours de chargement...
La page est en cours de chargement...
La page est en cours de chargement...
La page est en cours de chargement...
La page est en cours de chargement...
La page est en cours de chargement...
La page est en cours de chargement...
La page est en cours de chargement...
La page est en cours de chargement...
La page est en cours de chargement...
La page est en cours de chargement...
La page est en cours de chargement...
La page est en cours de chargement...
La page est en cours de chargement...
La page est en cours de chargement...
La page est en cours de chargement...
La page est en cours de chargement...
La page est en cours de chargement...
La page est en cours de chargement...
La page est en cours de chargement...
La page est en cours de chargement...
La page est en cours de chargement...
La page est en cours de chargement...
La page est en cours de chargement...
La page est en cours de chargement...
La page est en cours de chargement...
La page est en cours de chargement...
La page est en cours de chargement...
La page est en cours de chargement...
La page est en cours de chargement...
-
 1
1
-
 2
2
-
 3
3
-
 4
4
-
 5
5
-
 6
6
-
 7
7
-
 8
8
-
 9
9
-
 10
10
-
 11
11
-
 12
12
-
 13
13
-
 14
14
-
 15
15
-
 16
16
-
 17
17
-
 18
18
-
 19
19
-
 20
20
-
 21
21
-
 22
22
-
 23
23
-
 24
24
-
 25
25
-
 26
26
-
 27
27
-
 28
28
-
 29
29
-
 30
30
-
 31
31
-
 32
32
-
 33
33
-
 34
34
-
 35
35
-
 36
36
-
 37
37
-
 38
38
-
 39
39
-
 40
40
-
 41
41
-
 42
42
-
 43
43
-
 44
44
-
 45
45
-
 46
46
-
 47
47
-
 48
48
-
 49
49
-
 50
50
-
 51
51
-
 52
52
-
 53
53
-
 54
54
-
 55
55
-
 56
56
-
 57
57
-
 58
58
-
 59
59
-
 60
60
-
 61
61
-
 62
62
-
 63
63
-
 64
64


Tripp Lite SRCOOL33K/SRXCOOL33K Air Conditioning Unit Le manuel du propriétaire
- Taper
- Le manuel du propriétaire
dans d''autres langues
Documents connexes
-
Tripp Lite SRCOOL33K Manuel utilisateur
-
Tripp Lite SRXCOOL7KRM Le manuel du propriétaire
-
Tripp Lite SRCOOL33K & SRXCOOL33K Manuel utilisateur
-
-
-
-
-
-
-
