Tripp Lite SRXCOOL12K Le manuel du propriétaire
- Taper
- Le manuel du propriétaire

1
Portable Air Conditioning Unit
SRCOOL12K (120 V, 60 Hz)
SRXCOOL12K (230 V, 50 Hz)
Owner’s Manual
Warranty
Registration:
register online today for a
chance to win a FREE Tripp Lite
product—www.tripplite.com/warranty
Introduction 2
Important Safety Instructions 2
Features 3
Installation 4
Operation 8
Maintenance 9
Troubleshooting 10
Storage & Service 10
Warranty & Warranty Registration 10
Español 11
Français 21
Русс 31
1111 W. 35th Street, Chicago, IL 60609 USA
www.tripplite.com/support
Copyright © 2011 Tripp Lite.
Book 1.indb 1 7/29/2011 9:34:11 AM

SYST
RPS
STAT
DUPLX
SPEED
MODE
15X31X33X
47X
50
MASTR
STACK
SYST
RPS
STAT
DUPLX
SPEED
MODE
15X31X33X
MASTR
STACK
SYST
RPS
STAT
DUPLX
SPEED
MODE
15X31X33X
MASTR
STACK
AT
DUPLX
SPEED
MODE
15X31X33X
STACK
31X33X
47X
50
47X
50
47X
50
47X
50
50
2
Introduction
The self-contained Portable Air Conditioning Unit (SRCOOL12K / SRXCOOL12K) provides 12,000 BTU (up to 3.4 kW) of supplemental
cooling capacity. Designed for IT environments, it’s ideal for cooling overheated rack enclosures, IT equipment hot spots and network closets
without access to facility air conditioning. The Portable Air Conditioning Unit can focus cool air through its flexible cooling duct or cool a small
room through its louvered vent. It also filters and dehumidifies air to improve operating conditions and equipment reliability. Condensate is
re-evaporated for drip-free operation, so you won’t waste time emptying water collection tanks. The self-contained design does not require any
plumbing or special circuits, so setup is quick and easy. Eco-friendly R410A refrigerant meets environmental standards worldwide.
Recommended Applications:
Important Safety Instructions
SAVE THESE INSTRUCTIONS
This manual contains instructions and warnings that should be followed during the installation, operation
and storage of this product. Failure to heed these warnings may affect your warranty.
Warnings
applications are subject to great variation, the manufacturer makes no representation or warranty as to the suitability or fitness of this device for
any specific application.
button to turn the unit on or off.
support equipment or to significantly affect its safety or effectiveness is not recommended. Do not use this equipment in the presence of a
flammable anesthetic mixture with air, oxygen or nitrous oxide.
1. Cooling an overheated rack enclosure. 2. Cooling an equipment hot spot inside or
outside a rack enclosure.
3. Cooling a small room.
Book 1.indb 2 7/29/2011 9:34:16 AM

A
B
C
D
E
F
G
H
IJ
K
M
O
Q
P
R
S
T
N
X
V
W
U
L
3
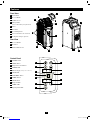
Features
Front View
A Control Panel
B Recessed Handle
C
D Drainage Outlet
(Shown with Drainage Plug Installed)
E Casters
F
G Cool Air Output Vent
H Louvered Vent Insert (Pre-Installed)
I Cooling Duct Adapter (Optional)
Rear View
J Recessed Handles
K Rear Panel
L Warm Air Exhaust Vent
Control Panel
M
N
O Temperature Control Buttons
P
Q
R
S
T
U
V
W
X
Book 1.indb 3 7/29/2011 9:34:20 AM

> 20 in (51 cm)
> 20 in (51 cm)
WALL
100 in.2 (645 cm2) Vent
(For Confined Spaces)
1
2-1
2-2
A
A
4
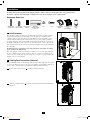
Installation
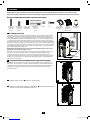
Warning: After removing the unit from the shipping container, check for damage or missing parts. (Refer to the parts list below.)
If you notice a problem, visit www.tripplite.com/support for service. Do not attempt to operate a damaged unit.
Accessory Parts List:
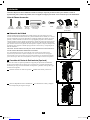
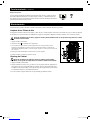
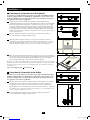
1 Unit Placement
Place the unit on a flat, level surface near a grounded AC outlet rated in accordance with the
unit nameplate (90-110% of specified voltage). Leave adequate space around the unit for
obstacles. Place the unit in a location with convenient access to a drop ceiling or window to
provide the straightest, shortest path available for the flexible exhaust duct. If you plan to use
the flexible cooling duct to focus cool air on a specific rack enclosure or device, place the unit
near the targeted rack enclosure or device to provide the straightest, shortest path available for
the cooling duct.
Warning: Do not use an extension cord to connect the unit to an AC outlet. Use only the
power cord that came with the unit.
Note: If the unit will operate in a confined space (such as closet), you must supply makeup air
in order to maintain airflow efficiency. A 100 in.2 (645 cm2) or larger vent installed near the
bottom of the door should supply adequate makeup air for a typical closet. Consult applicable
building codes for more information.
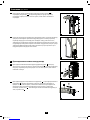
2 Cooling Duct Connection (Optional)
The pre-installed louvered vent insert is appropriate for room cooling applications. If you plan
to cool a room, skip step 2 and proceed to step 3. If you plan to use the flexible cooling duct to
focus cool air on a specific device or rack enclosure, follow the instructions below.
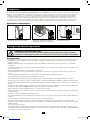
2-1 Remove the louvered vent insert A by pulling it outward and upward.
Exhaust Duct
(Longer Tube)
Cooling Duct
(Shorter Tube)
Exhaust Duct
Adapter
Adjustable
Exhaust Panel
(2 Sections)
Nut Bolt Cooling Duct
Adapter
Louvered Vent
Insert
(Pre-Installed)
Drainage
Plug
2-2 Align the cooling duct adapter A in the vent opening and push it downward until it snaps
into place.
Book 1.indb 4 7/29/2011 9:34:29 AM

1
2
1
2
1
2
2-3
2-4
3-1
3-2
A
A
A
B
B
B
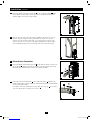
5
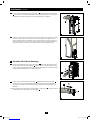
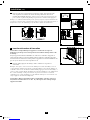
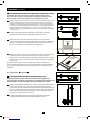
2-3 Connect the flexible cooling duct (shorter tube A) to the cooling duct adapter B. Align
the duct with the circular adapter opening, push the duct downward and turn the duct
clockwise until it screws into the adapter solidly.
Installation (continued)
2-4 Place the other end of the cooling duct near the air intake of the target device or rack
enclosure, using the straightest, shortest path available. If you plan to cool a rack
enclosure, place the end of the cooling duct over a perforated area near the top of the
enclosure’s front door (or near the top of the bank of equipment that requires cooling).
Cool air will sink and spread across the air intakes at the front of the rack enclosure.
3 Exhaust Duct Connection
3-1 Connect the flexible exhaust duct (longer tube A) to the warm air exhaust vent on the rear
panel of the unit B. Align the duct with the circular vent opening, push the duct inward
and turn the duct clockwise until it screws into the exhaust vent solidly.
3-2 Connect the other end of exhaust duct A to the exhaust duct adapter B. Align the duct
with the circular adapter opening, push the duct inward and turn the duct clockwise until it
screws into the adapter solidly.
If you plan to connect the exhaust duct to a drop ceiling, proceed to step 4. If you plan to
connect the exhaust duct to a window, proceed to step 5.
Book 1.indb 5 7/29/2011 9:34:39 AM

Nut
Bolt
Nut
Bolt
4-1
5-1
4-2
5-2
4-3
4-4
Ceiling Panel
(From Below)
Ceiling Panel
(From Above)
Exhaust Panel
6
Installation (continued)
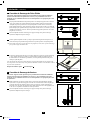
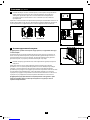
4 Drop Ceiling Exhaust Connection
Warning: Some ceilings may require modified installation procedures. The user must
determine the fitness of hardware and procedures before installing. The procedures
described in this manual may not be appropriate for all applications.
4-1 Choose a removable drop ceiling panel near the unit to provide the straightest, shortest path
the portion that rests on the ceiling grid. Combine the two sections of the adjustable
exhaust panel, then adjust the exhaust panel to match the width of the ceiling panel. After
the exhaust panel is set to the correct width, use the included nut and bolt to lock it in
place. Note: The exhaust panel can adjust from 26.6 to 49.2 inches (67.5 to 125 cm).
4-2 Insert the exhaust duct adapter into the oblong hole in the adjustable exhaust panel. The
adapter will snap into place.
4-3 Slide the ceiling panel out of the way and place the exhaust panel inside the ceiling space.
Allow the exhaust panel to rest on top of the ceiling grid. Note: There must be at least 10
inches (25.4 cm) of open space above the exhaust panel to allow adequate airflow.
4-4 Slide the ceiling panel back into place so that it adjoins the exhaust panel and closes any
gaps in the ceiling. A tight seal will permit maximum cooling efficiency. If the installation
is permanent, trim the ceiling panel so it doesn’t overlap the ceiling grid.
Note: The flexible exhaust duct can extend to a maximum length of 118 inches (300 cm). Provide
the straightest, shortest path available. Excessive bending or stretching of the duct will reduce
cooling efficiency.
After completing step 4, proceed to step 6.
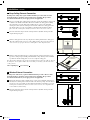
5 Window Exhaust Connection
Warning: Some windows may require modified installation procedures. The user must
determine the fitness of hardware and procedures before installing. The procedures
described in this manual may not be appropriate for all applications.
5-1
then adjust the exhaust panel to match the width of the window opening. After the exhaust
panel is set to the correct width, use the included nut and bolt to lock it in place. Note: The
exhaust panel can adjust from 26.6 to 49.2 inches (67.5 to 125 cm). It is compatible with
vertical and horizontal mounting.
5-2 Insert the exhaust duct adapter into the oblong hole in the adjustable exhaust panel. The
adapter will snap into place.
Book 1.indb 6 7/29/2011 9:34:47 AM

Horizontal Window
Opening
Vertical
Window
Opening
INCORRECT CORRECT
5-3
6-1
7
Installation (suite)
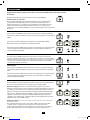
5-3 Insert the exhaust panel into the window opening, then close the window against the
exhaust panel. A tight seal will permit maximum cooling efficiency. Note: There must be
at least 10 inches (25.4 cm) of open space behind the exhaust panel to allow adequate
airflow.
Note: The flexible exhaust duct can extend to a maximum length of 118 inches (300 cm). Provide
the straightest, shortest path available. Excessive bending or stretching of the duct will reduce
cooling efficiency.
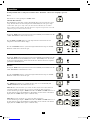
6 Drainage Plug Insertion
Warning: The unit’s built-in re-evaporator will not function until you insert the drainage
plug into the drainage outlet.
When the unit cools or dehumidifies, condensation forms. The unit has a built-in re-evaporator
that allows it to expel condensation through the warm air exhaust stream. This feature allows the
unit to operate indefinitely without requiring you to empty a water collection tank.
6-1 Insert the drainage plug into the drainage outlet to enable the re-evaporation of
condensation.
Note: You can connect the drainage outlet to a dedicated drainage system instead of using the
re-evaporation feature. Remove the drainage plug if it is installed, connect one end of a suitable
drain tube to the drainage outlet and connect the other end of the drain tube to your facility’s
drainage receptacle. If the drainage system becomes clogged, a small internal reservoir will
collect condensation. If the drainage system is not cleared before the internal reservoir fills, the
unit will shut down automatically.
Warning: Before connecting the unit to a dedicated drainage system, turn it off and
unplug it. There is a risk of electric shock while the unit is plugged in.
Book 1.indb 7 7/29/2011 9:35:03 AM

8
Operation
Warning: Install the unit according to the instructions in the “Installation” section before attempting to operate it.
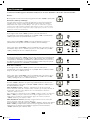
Power
Automatic Restart Feature
The unit will turn on and resume operation automatically when power is restored after a power
outage. The unit will use the same settings that it used immediately before the power outage
occurred. Note: If the power outage is brief, the unit will run in Fan mode for two minutes
before resuming normal operation. The delay allows the compressor to depressurize so the unit
will function properly when it enters Cool mode.
Cool Mode
temperature is shown on the numeric display.
illuminates to indicate the selected fan speed.
Dehumidify Mode
at a fixed speed and temperature controls are irrelevant. Close windows and doors for optimal
performance in Dehumidify mode.
Fan Mode
illuminates to indicate the selected fan speed.
Timer
Timer On (Note: The unit must be off to activate the Timer On function. Confirm that mode,
temperature and fan speed settings are correct before activating the Timer On function. )
the delay (in hours) before the unit will turn on. The number of hours is shown on the numeric
Timer Off (Note: The unit must be on to activate the Timer Off function.)
the delay (in hours) before the unit will turn off. The number of hours is shown on the numeric
Book 1.indb 8 7/29/2011 9:35:04 AM

A
A
9
Operation (continued)
Maintenance
System Lock
Periodic maintenance extends the unit’s lifespan and permits maximum operating efficiency.
Cleaning the Air Filters
It is important to keep the air filters clean and free of dust. When the filters are dirty or clogged with dust, it decreases cooling efficiency and can
threaten air quality. Tripp Lite recommends cleaning the filters at least once every two weeks.
Before cleaning the filters, turn the unit off and unplug it! There is a risk of electric shock while the unit is plugged in.
1. Turn the unit off and unplug it.
2. Remove the filters A by sliding them out of the cabinet.
3. Wash the filters in warm water with a neutral detergent. Do not put the filters into a
dishwasher or use harsh detergents or chemicals. Allow the filters to air dry completely after
washing. Note: Do not use water hotter than 104° F (40° C) to clean the filters.
4. Replace the filters by sliding them back into their original position.
Cleaning the Cabinet
Before cleaning the cabinet, turn the unit off and unplug it! There is a risk
of electric shock while the unit is plugged in.
1. Turn the unit off and unplug it.
2. Wipe the unit with a dry, non-abrasive cloth. Do not use gasoline, benzene, thinners or other
harsh chemicals that may damage the surface. Do not pour water directly over the unit or
into the working parts. This causes a risk of electrical shock and deterioration of electrical
components and wiring insulation.
3. In extreme cases, wipe the unit with a damp cloth to remove residue.
Book 1.indb 9 7/29/2011 9:35:06 AM

10
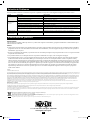
Warranty
Seller warrants this product, if used in accordance with all applicable instructions, to be free from original defects in material and workmanship for a period of 1 year from the date of initial purchase. If the product
should prove defective in material or workmanship within that period, Seller will repair or replace the product, in its sole discretion. Service under this Warranty can only be obtained by your delivering or shipping the
above limitations or exclusions may not apply to you. This Warranty gives you specific legal rights, and you may have other rights which vary from jurisdiction to jurisdiction).
representation or warranty as to the suitability or fitness of this device for any specific application.
WARRANTY REGISTRATION
Regulatory Compliance Identification Numbers
all required approval markings and information. When requesting compliance information for this product, always refer to the series number. The series number should not be confused with the marking name or model
number of the product.
WEEE Compliance Information for Tripp Lite Customers and Recyclers (European Union)
Note: This statement applies to products marked with the WEEE logo.
Under the Waste Electrical and Electronic Equipment (WEEE) Directive and implementing regulations, when customers buy new electrical and electronic equipment from Tripp Lite they are entitled to:
Tripp Lite has a policy of continuous improvement. Product specifications are subject to change without notice.
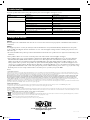
Troubleshooting
Storage and Service
Review the possible solutions below. If the problem persists, please visit www.tripplite.com/support for service.
Problem Possible Cause Possible Solution
The unit does not function. The unit is turned off. Turn the unit on. (See “Operation” section.)
The unit is not plugged in. Plug the unit into a suitable outlet.
Main power is off. Check fuses or circuit breaker.
Cooling performance is unsatisfactory. The air exhaust or intake is blocked. Confirm that all ducts and intakes are clear of obstructions.
The temperature setting is too high. Adjust the temperature setting.
The fan speed setting is too low. Adjust the fan setting.
The air filters are dirty. Clean the air filters.
The wattage of the rack enclosure, the size of the room or the ambient
temperature exceeds the cooling capacity of a single unit.
Install additional units or contact Tripp Lite for additional cooling solutions
suitable for your application.
The unit leaks water. The drainage plug is not installed. Insert the drainage plug in the drainage outlet. (See “Installation” section.)
The unit generates excessive noise or vibration. The unit is on an uneven or unstable surface. Move the unit to a level, stable surface.
Storage
Before storing the unit, confirm that the ducts and vents are secured or removed and cared for properly. Also confirm that the unit is drained of
condensation.
Service
Your Tripp Lite product is covered by the warranty described in this manual. A variety of Extended Warranty and On-Site Service Programs
follow these steps:
1. Review the installation and operation procedures in this manual to insure that the service problem does not originate from a misreading of the
instructions.
2. If the problem continues, do not contact or return the product to the dealer. Instead, visit www.tripplite.com/support.
damages (direct, indirect, special or consequential) to the product incurred during shipment to Tripp Lite or an authorized Tripp Lite service
center is not covered under warranty. Products shipped to Tripp Lite or an authorized Tripp Lite service center must have transportation charges
1111 W. 35th Street, Chicago, IL 60609 USA
www.tripplite.com/support
Book 1.indb 10 7/29/2011 9:35:06 AM

11
Unidad Portátil de Aire Acondicionado
SRCOOL12K (120V, 60 Hz)
SRXCOOL12K (230V, 50 Hz)
Manual del Propietario
Warranty
Registration:
register online today for a
chance to win a FREE Tripp Lite
product—www.tripplite.com/warranty
Introducción 12
Instrucciones Importantes de Seguridad 12
Características 13
Instalación 14
Operación 18
Mantenimiento 19
Solución de Problemas 20
Almacenamiento y Servicio 20
Garantía y Registro de Garantía 20
English 1
Français 21
Russian 31
1111 W. 35th Street, Chicago, IL 60609 USA
www.tripplite.com/support
Copyright © 2011 Tripp Lite.
Book 1.indb 11 7/29/2011 9:35:06 AM

SYST
RPS
STAT
DUPLX
SPEED
MODE
15X31X33X
47X
50
MASTR
STACK
SYST
RPS
STAT
DUPLX
SPEED
MODE
15X31X33X
MASTR
STACK
SYST
RPS
STAT
DUPLX
SPEED
MODE
15X31X33X
MASTR
STACK
AT
DUPLX
SPEED
MODE
15X31X33X
STACK
31X33X
47X
50
47X
50
47X
50
47X
50
50
12
Introducción
La Unidad independiente Portátil de Aire Acondicionado (SRCOOL12K / SRXCOOL12K) proporciona 12,000 BTU (hasta 3.4 kW) de capacidad
complementaria de enfriamiento. Diseñada para ambientes de TI, es ideal para enfriar gabinetes de rack sobrecalentados, puntos calientes de equipo de
TI y gabinetes de cableado de red sin acceso al aire acondicionado de la instalación. La Unidad Portátil de Aire Acondicionado puede enfocar aire frío
de modo que usted no gaste
de modo que la instalación es rápida
Aplicaciones Recomendadas
Instrucciones de seguridad importantes
GUARDE ESTAS INSTRUCCIONES
Este manual contiene instrucciones y advertencias que deben seguirse durante la instalación, el funcionamiento y el
almacenamiento de este producto. Si no tiene en cuenta estas advertencias se puede anular la garantía.
Advertencias
paredes u otros obstáculos.
está enchufada.
construcción aplicables.
calentado.
po dentro o fuera de un gabinete de rack.
Book 1.indb 12 7/29/2011 9:35:10 AM

A
B
C
D
E
F
G
H
IJ
K
M
O
Q
P
R
S
T
N
X
V
W
U
L
13
Características
Vista Frontal
A Panel de Control
B
C
D
E Ruedas
F
G
H Inserto de Ventila con Persiana (Preinstalado)
I (Opcional)
Vista Posterior
J
K Panel Posterior
L Ventila de Descarga del Aire Caliente
Panel de Control
M
N
O Botones del Control de Temperatura
P
Q(Para Temperatura o Retraso de Tiempo)
R
S
T
U
V
W
X
Book 1.indb 13 7/29/2011 9:35:15 AM

> 20 in (51 cm)
> 20 in (51 cm)
PARED
100 in.2
(645 cm2) Vent
(Para Espacios Limitados)
1
2-1
2-2
A
A
14
Instalación
Advertencia: Después de retirar la unidad del contenedor de embarque, compruebe para detectar daños o partes faltantes. (Consulte la
siguiente lista de partes.) Si detecta un problema, visite www.tripplite.com/support para solicitar servicio. No intente operar una unidad dañada.
Lista de Piezas Accesorias:
1 Ubicación de Unidad
ducto de enfriamiento.
Advertencia: No utilice cables de extensión para conectar la unidad a un tomacorriente de CA.
Use sólo el cable de alimentación suministrado con la unidad.
Nota: Si la unidad funcionará en un espacio reducido (como un armario), debe suministrar aire
mayor instalada cerca de la parte inferior de la puerta debe suministrar aire complementario adecuado
2 Conexión del Ducto de Enfriamiento (Opcional)
de salas. Si planea enfriar una sala, salte el paso 2 y proceda al paso 3. Si planea usar el ducto de
las instrucciones siguientes.
2-1 A
Tubo de
Descarga
(Tubo Mayor)
Tubo de
Enfriamiento
(Tubo Menor)
Adaptador de
Tubo de
Descarga
Panel Ajustable
de Descarga (2
Secciones)
Tuerca Tornillo Adaptador
del Ducto de
Enfriamiento
Inserto de
Ventila con
Persiana
(Preinstalado)
Tapón de
Drenaje
2-2 Alinee el adaptador del ducto de enfriamiento A
Book 1.indb 14 7/29/2011 9:35:24 AM

1
2
1
2
1
2
2-4
3-1
3-2
A
A
A
B
B
B
15
2-3 A) al adaptador del tubo de enfriamiento
B
Instalación (continued)
2-4
de rack en cuestión, usando la ruta más recta y corta posible Si planea enfriar un gabinete de rack,
puerta frontal del gabinete (o cerca de la parte superior del banco de equipo que requiera enfriamiento).
3 Conexión del Ducto de Descarga
3-1 A
caliente en el panel posterior de la unidad B
3-2 A al adaptador del ducto de descarga B
adaptador.
Si planea conectar el ducto de descarga a un falso plafón, proceda al paso 4. Si planea conectar
5.
Book 1.indb 15 7/29/2011 9:35:34 AM

Tuerca
Tornillo
Tuerca
Tornillo
4-1
5-1
4-2
5-2
4-3
4-4
Panel de Plafón
(Desde Abajo)
Panel de Plafón
(Desde Arriba)
Panel de Descarga
16
Instalación (continuación)
4 Conexión de Descarga de Falso Plafón
El usuario debe determinar la aptitud de los accesorios y los procedimientos antes de la
instalación. Los procedimientos descritos en este manual pueden no ser apropiados para todas
las aplicaciones.
4-1
4-2
4-3 Deslice el panel del plafón a un lado y coloque el panel de descarga dentro del espacio en el
4-4
de enfriamiento. Si la instalación es permanente, recorte el panel del plafón de modo que no
Después de terminar el paso 4, proceda al paso 6.
5 Conexión de Descarga de Ventana
El usuario debe determinar la idoneidad de los accesorios y los procedimientos antes de la
instalación. Los procedimientos descritos en este manual pueden no ser apropiados para todas
las aplicaciones.
5-1
5-2
Book 1.indb 16 7/29/2011 9:35:42 AM

Abertura Horizontal
de Ventana
Abertura
Vertical de
Ventana
INCORRECTO CORRECTO
5-3
6-1
17
Instalación (continuación)
5-3
6 Inserción del Tapón de Drenaje
Advertencia: El re-evaporador integrado de la unidad no funcionará hasta que usted inserte el
tapón de drenaje en la salida de drenaje.
recolector de agua.
6-1
Advertencia: Antes de conectar la unidad a un sistema de drenaje dedicado, apague la unidad y
desenchúfela. Existe un riesgo de descarga eléctrica cuando la unidad está enchufada.
Book 1.indb 17 7/29/2011 9:35:58 AM

18
Funcionamiento
Advertencia: Instale la unidad de acuerdo a las instrucciones en la sección de “Instalación” antes de intentar operarla.
Encendido
Función de Reinicio Automático
ocurrencia del apagón.
Modo de Enfriamiento
Modo de Desecado
Modo de Ventilación
Temporizador
Temporizador Activo
Temporizador Inactivo
Book 1.indb 18 7/29/2011 9:35:59 AM

A
A
19
Funcionamiento (continuación)
Mantenimiento
Bloqueo del Sistema
Limpieza de los Filtros de Aire
¡Antes de la limpieza de los filtros, apague la unidad y desenchúfela! Existe un riesgo de descarga eléctrica cuando
la unidad está enchufada.
A
Cleaning the Cabinet
¡Antes de la limpieza del gabinete, apague la unidad y desenchúfela!
Existe un riesgo de descarga eléctrica cuando la unidad está enchufada.
Book 1.indb 19 7/29/2011 9:36:00 AM

20
Garantía
REGISTRO DE LA GARANTÍA
Conformidad con las regulaciones sobre números de identificación
Información de cumplimiento con WEEE para los clientes y recicladores de Tripp Lite (Unión Europea)
Nota: Esta declaración aplica a productos marcados con el logotipo WEEE.
Bajo la Directiva de Residuos de Aparatos Eléctricos y Electrónicos (WEEE) y las reglamentaciones reguladoras, cuando los clientes compran cualquier equipo eléctrico y electrónico nuevo de Tripp Lite tienen derecho a:
Solución de Problemas
Almacenamiento y servicio
Problema Causa posible Solución posible
La unidad no funciona. La unidad está apagada. Encienda la unidad. Consulte la sección “Operación”.
La unidad no está enchufada. Enchufe la unidad en un tomacorrientes adecuado.
La alimentación principal está apagada. Compruebe los fusibles o disyuntores.
El rendimiento del
enfriamiento no es
satisfactorio.
Está bloqueada la entrada o la descarga de aire. Confirme que todos los ductos y entradas estén libres de obstrucciones.
La calibración de temperatura es demasiado alta. Ajuste el parámetro de temperatura.
La calibración de velocidad del ventilador es demasiado baja. Ajuste el parámetro del ventilador.
Los filtros de aire están sucios Limpie los filtros de aire.
La potencia del gabinete de rack, el tamaño de la sala o la temperatura
ambiente excede la capacidad de enfriamiento de una sola unidad.
Instale unidades adicionales o póngase en contacto con Tripp Lite para consultar soluciones de
enfriamiento adicional adecuadas para su aplicación.
La unidad gotea agua. El tapón de drenaje no está instalado. Instale el tapón de drenaje en la salida del drenaje. Consulte la sección “Instalación”.
La unidad genera ruido o
vibración excesivos.
La unidad está sobre una superficie dispareja o inestable. Mueva la unidad a una superficie nivelada y estable.
Almacenamiento
unidad está libre de condensado.
Servicio
comprensión de las instrucciones.
cuando solicite el RMA.
1 1 1 1 W. 35th Street, Chicago, IL 60609 USA
www.tripplite.com/support
Book 1.indb 20 7/29/2011 9:36:00 AM
La page est en cours de chargement...
La page est en cours de chargement...
La page est en cours de chargement...
La page est en cours de chargement...
La page est en cours de chargement...
La page est en cours de chargement...
La page est en cours de chargement...
La page est en cours de chargement...
La page est en cours de chargement...
La page est en cours de chargement...
La page est en cours de chargement...
La page est en cours de chargement...
La page est en cours de chargement...
La page est en cours de chargement...
La page est en cours de chargement...
La page est en cours de chargement...
La page est en cours de chargement...
La page est en cours de chargement...
La page est en cours de chargement...
La page est en cours de chargement...
-
 1
1
-
 2
2
-
 3
3
-
 4
4
-
 5
5
-
 6
6
-
 7
7
-
 8
8
-
 9
9
-
 10
10
-
 11
11
-
 12
12
-
 13
13
-
 14
14
-
 15
15
-
 16
16
-
 17
17
-
 18
18
-
 19
19
-
 20
20
-
 21
21
-
 22
22
-
 23
23
-
 24
24
-
 25
25
-
 26
26
-
 27
27
-
 28
28
-
 29
29
-
 30
30
-
 31
31
-
 32
32
-
 33
33
-
 34
34
-
 35
35
-
 36
36
-
 37
37
-
 38
38
-
 39
39
-
 40
40


Tripp Lite SRXCOOL12K Le manuel du propriétaire
- Taper
- Le manuel du propriétaire
dans d''autres langues
Documents connexes
-
Tripp Lite SRCOOL18K Manuel utilisateur
-
-
-
-
-
-
-
-
-