Dynex CRT Television DX-R24TV Manuel utilisateur
- Catégorie
- Téléviseurs LCD
- Taper
- Manuel utilisateur
Ce manuel convient également à

USER GUIDE
GUIDE DE L’UTILISATEUR • GUÍA DEL USUARIO
24” Round Tube TV
Téléviseur à tube rond de 24 po
Televisor de tubo de imagen curvo de 24
DX-R24TV

2
Introduction
Introduction
Congratulations on your purchase of a high quality Dynex product. Your DX-R24TV represents
the state of the art in television design, and is designed for reliable and trouble-free
performance.
This manual explains how to correctly install, operate, and get the best performance from
your television. Read this user guide carefully before installing your television, then keep it
near your television for quick reference.
Verify that the box contains:
• Color television
• Remote control
•User Guide
Contents
Introduction ......................................................................................2
Safety information ............................................................................2
Features.............................................................................................6
Setting up your television................................................................10
Using your television.......................................................................16
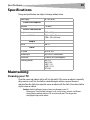
Specifications ..................................................................................39
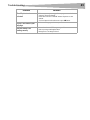
Troubleshooting ..............................................................................40
Regulatory Statements....................................................................43
Limited warranty.............................................................................45
Français ...................................................47
Español....................................................95
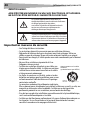
Safety information
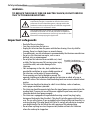
CAUTION:
TO REDUCE THE RISK OF
ELECTRIC
SHOCK, DO NOT REMOVE
COVER
(OR BACK). NO USER-SERVICEABLE
PARTS INSIDE. REFER SERVICING
TO
QUALIFIED SERVICE PERSONNEL.

Safety information
3
WARNING:
TO REDUCE THE RISK OF FIRE OR ELECTRIC SHOCK, DO NOT EXPOSE
THIS TV TO RAIN OR MOISTURE.
Important safeguards
• Read all of these instructions.
• Save these instructions for later use.
• Unplug this television from the power outlet before cleaning. Use a dry cloth for
cleaning. Do not use liquid cleaners or aerosol cleaners.
• To avoid hazards, use only attachments recommended by the television manufacturer.
• Do not use this television near water, such as near a
bathtub, sink, or swimming pool.
• Do not place this television on an unstable cart, stand,
or table. The television may fall, causing serious injury
to a child or adult, and serious damage to the
television.
• Slots and openings in the sides, back, and bottom are
provided for ventilation, to ensure reliable operation of
the television, and to protect it from overheating.
These openings must not be blocked or covered. The
openings should never be blocked by placing the television on a bed, sofa, rug, or
other soft surface. This television should never be placed near or over a radiator or heat
register.
• This television should not be placed in a built-in installation, such as a bookcase,
unless proper ventilation is provided.
• This television should be operated only from the type of power source indicated on the
marking label. If you are not sure of the power supplied to your home, consult your
television dealer or local power company.
• This television is equipped with a polarized alternating-current line plug (a plug
having one blade wider than the other). This plug fits into the power outlet only one
way. This is a safety feature. If you are unable to insert the plug fully into the outlet, try
reversing the plug. If the plug should still fail to fit, contact your electrician to replace
your obsolete outlet. Do not defeat the safety purpose of the polarized plug.
• Do not allow anything to rest on the power cord, and do not locate this television
where the cord may be stepped on.
The lightning flash with arrowhead symbol, within an
equilateral triangle is intended to alert the user to the
presence of uninsulated dangerous voltage within the
product’s enclosure that may be of sufficient magnitude
to constitute a risk of electric shock.
The exclamation point within an equilateral triangle is
intended to alert the user to the presence of important
operating and maintenance (servicing) instructions in the
literature accompanying the appliance.
Portable Cart Warning
(symbol provided by RETAC)

4
Safety information
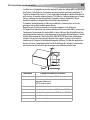
• Follow all warnings and instructions marked on the television.
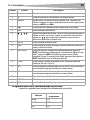
• If an outside antenna or cable system is connected to the television, be sure the
antenna or cable system is grounded so as to provide some protection against voltage
surges and built-up static charges. Article 810 of the National Electrical Code, ANSI/
NFPA 70, provides information with regard to proper grounding of the mast and
supporting structure, grounding of the lead-in wire to an antenna discharge unit, size
of grounding conductors, location of antenna-discharge unit, connection to grounding
electrodes, and requirements for the grounding electrode.
• Use No. 10 AWG (5.3 mm
2
) copper, No. 8 AWG (8.4 mm
2
) aluminum, No. 17 AWG
(1.0 mm
2
) copper-clad steel or bronze wire, or larger, as a ground wire.
• Secure antenna lead-in and ground wires to house with stand-off insulators spaced
from 4-6 feet (1.22 -1.83 m) apart.
• Mount antenna discharge unit as close as possible to where lead-in enters house.
• Use jumper wire not smaller than No. 6 AWG (13.3 mm
2
) copper, or the equivalent,
when a separate antenna-grounding electrode is used. See ANSI/NFPA70.
• An outside antenna system should not be located in the vicinity of overhead power
circuits, or where it can fall into such power lines or circuits. When installing an outside
antenna system, extreme care should be taken to keep from touching such power lines
or circuits as contact with them might be fatal.
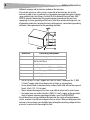
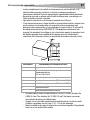
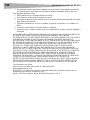
Reference Grounding component
1 Electric service equipment
2 Power service grounding electrode system
(NEC Art 250, Part H)
3Ground clamp
4 Grounding conductors (NEC Section 810-21)
5 Antenna discharge unit (NEC Section 810-20)
6Ground clamp
7 Antenna lead-in wire
6
7
5
2
1
3
4

Safety information
5
• For added protection for this television during a lightning storm, or when it is left
unattended and unused for long periods of time, unplug it from the power outlet and
disconnect it from the antenna or cable system. This prevents damage to the television
due to lightning and power line surges.
• Do not overload wall outlets and extension cords, because overloading can cause a fire
or electric shock.
• Never push objects of any kind into this television through slots in the case, as they
may touch dangerous voltage points or short out parts that could result in a fire or
electric shock. Never spill liquid of any kind on the television.
• Do not attempt to service this television yourself, because opening or removing covers
may expose you to dangerous voltages or other hazards. Refer all servicing to qualified
service technicians.
• Unplug this television from the wall outlet and refer servicing to qualified service
technicians under the following conditions:
• When the power cord or plug is damaged or frayed.
• If liquid has been spilled into the television.
• If the television has been exposed to rain or water.
• If the television does not operate normally by following the operating instructions.
Adjust only those controls that are covered by the operating instructions, because
incorrect adjustment of other controls may result in damage and often requires
extensive work by a qualified technician to restore normal operation.
• If the television has been dropped or the case has been damaged.
• When the television exhibits a distinct change in performance.
• When replacement parts are required, be sure the service technician has used
replacement parts specified by the manufacturer that have the same characteristics as
the original part. Unauthorized substitutions may result in fire, electric shock, or other
hazards.
• Upon completion of any service or repairs to this television, ask the service technician
to perform routine safety checks to determine that the television is safe to operate.
Warning: For continued safety, replace safety-critical components only with parts
recommended by the manufacturer (refer to service literature).
Note to cable television system installer
This reminder is provided to call the cable television system installer’s attention to Section
820 40 of the NEC which provides guidelines for proper grounding and, in particular, specifies
that the cable ground shall be connected to the grounding system of the building, as close to
the point of cable entry as practical.

6
Features
Features
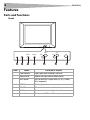
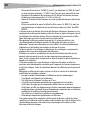
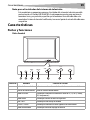
Parts and functions
Front
Item Name Function or control
1 Power indicator Lights green when the power is turned on
2 Remote sensor Receives the signal from the remote control
3 INPUT button Press to select the TV signal source (TV, AV1[S-Video],
AV2, Component)
4 MENU button Press to display the on-screen menu
5 VOL-/VOL+ Press to decrease or increase the volume
6 CH-/CH+ Press to select a lower or higher channel
7 Power button Press to turn the TV on or off
CH
+
VOL
+
VOL
CH
MENU
INPUT
1
2
3
4
5
6
7

Features
7
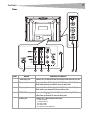
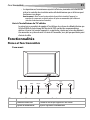
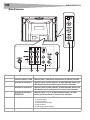
Rear
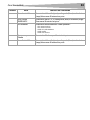
Item Name Function or control
1 S-Video input jack Connect the S-Video cable from an external video source to this jack
2 AV1 input jacks Connect the Video (Yellow), Audio Left (White), and Audio Right
(Red) cables from an external AV source to these jacks
3 AV output jacks Connect the Video (Yellow), Audio Left (White), and Audio Right
(Red) cables to an external AV device to these jacks
4 COMPONENT input jacks Connect the Y, C
B
, C
R
, Audio Left (White), and Audio Right (Red)
cables from an external AV source to these jacks
5 Antenna jack Connect the 75 ohm antenna cable from:
• an indoor antenna
• an outdoor antenna
• the cable TV cable
• the satellite cable
• the cable from a descrambler box
(
1
)
1
4
5
6
2
3
7

8
Features
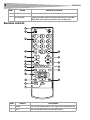
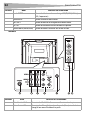
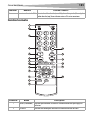
Remote control
6 headphone jack Connect your headphone cord to this jack
7 AV2 input jacks Connect the Video (Yellow), Audio Left/Mono (White), and Audio
Right (Red) cables from an external AV source to these jacks
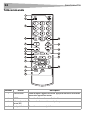
Item Button Description
1 POWER Press to turn the television on. Press again to turn the television off.
2 INPUT Press this button to select the video input source.
Item Name Function or control
DISPLAY
CCD
ENTER
10
1
14
2
3
4
5
6
7
8
9
11
12
13
15
16
17
18
19

Features
9
Universal remote control programming
This TV is compatible with several popular universal remote controls.
3 Direct channel
selection (0-9)
Use to directly go to any channel.
4 Previous channel Press to return to the previous channel selected
5 CH + Press to change to a higher numbered channel set into memory.
6 CH - Press to change to a lower numbered channel set into memory.
7 MUTE To turn off the sound, press this button once. The television is
silenced. The muting feature can be turned off by pressing the MUTE
button again or the VOL + button.
8 ZOOM In digital TV mode, press to zoom in on the picture.
9 MENU Press to display the on-screen menu.
10
Menu navigation buttons. Press the arrows to move down, up, left,
or right in the on-screen menus.
Press to confirm changes or to toggle options on and off in
the on-screen menu.
11 EXIT Press to exit the on-screen menus.
12 PICTURE Press this button to adjust elements of the picture, such as
brightness, contrast, color, tint, and sharpness.
13 SLEEP To set the television to turn off after a preset amount of time, press
the SLEEP button. To confirm the sleep time setting, press the
SLEEP button once and the remaining time is momentarily
displayed. To cancel sleep time, press the SLEEP button repeatedly
until the display turns to 0 minutes.
14 – (dash) Press to enter the channel number for digital TV sub-channels (such
as 8-3 or 10-1).
15 VOL + Press to increase the volume level.
16 VOL - Press to decrease the volume level.
17 CCD Press this button to turn closed captioning on or off.
18 DISPLAY Press to display channel status and signal information.
19 GUIDE Press to display the program guide.
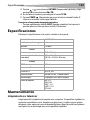
Brand Program code
Philips 115
DirecTV 10463
RCA 135
Item Button Description

10
Setting up your television
For compatibility with other universal remotes, use the codes listed for Emerson, Memorex,
Orion, Sansui, Sylvania, or Zenith.
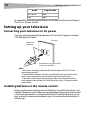
Setting up your television
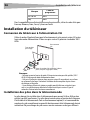
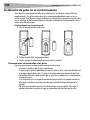
Connecting your television to AC power
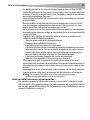
Use the AC polarized cord provided for operation on AC. Insert the AC plug into a standard
120V 60Hz polarized AC outlet.
Notes:
- Never connect the AC plug to other than the specified voltage (120V 60 Hz). Use the
attached power cord only.
- If the polarized AC cord does not fit into a non-polarized AC outlet, do not file or cut the
blade. It is your responsibility to have an electrician replace the obsolete outlet.
- If you cause a static discharge when touching the television and the television fails to
work, unplug the television from the AC outlet, then plug it back in. The television should
work normally.
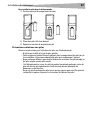
Installing batteries in the remote control
Before using the remote control, you must install batteries. Use two AAA size batteries (not
supplied). The batteries may last about one year depending on how much the remote control
is used. For best performance, we recommend the batteries should be replaced on a yearly
basis, or when the remote operation becomes erratic. Do not mix old and new batteries or
different types.
One-For-All 0463
Sony 8042
Brand Program code
AC outlet
Wider hole
and blade
Polarized AC plug (one blade is
wider than the other.)

Setting up your television
11
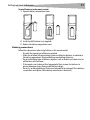
To install batteries in the remote control:
1 Open the battery compartment cover.
2 Install two AAA batteries (not supplied).
3 Replace the battery compartment cover.
Battery precautions
Follow these precautions when using batteries in this remote control:
• Use only the size and type of batteries specified.
• Make sure to follow the correct polarity when installing the batteries as indicated in
the battery compartment. Reversed batteries may damage the device.
• Do not mix different types of batteries together (such as alkaline and carbon-zinc) or
old batteries with fresh ones.
• If the remote is not to be used for a long period of time, remove the batteries to
prevent damage or injury from possible battery leakage.
• Do not try to recharge batteries that are not intended to be recharged. These batteries
can overheat and rupture (follow battery manufacturer's directions).

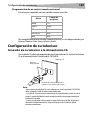
12
Setting up your television
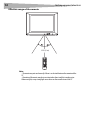
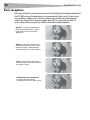
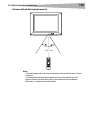
Effective range of the remote
Notes:
- The remote may not work correctly if there is an obstacle between the remote and the
TV.
- Operation of the remote may be inconsistent when direct sunlight, incandescent or
fluorescent light, or any strong light source shines on the remote sensor of the TV.
15 ft. (5 m)

Setting up your television
13
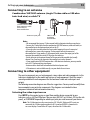
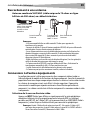
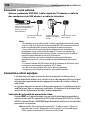
Connecting to an antenna
Combination VHF/UHF antenna (single 75 ohm cable or 300 ohm
twin-lead wire) or cable TV
Notes:
- We recommend that you use 75 ohm coaxial cable to eliminate interference and noise.
- Connect the 75 ohm cable from the combination VHF/UHF antenna, cable wall outlet, or
descrambler box to the Antenna Input jack on the TV.
- If you subscribe to a cable television service which requires the use of a converter/
descrambler box, connect the incoming 75 ohm coaxial cable to the converter/
descrambler box. Using another 75 ohm coaxial cable, connect the output jack of the
converter/descrambler box to the RF IN jack on the television.
-Set the television to the output channel of the converter/descrambler box (usually
channel 3 or 4) and use the converter/descrambler box to select channels.
- If your combination VHF/UHF antenna has a 300 ohm twin-lead wire, you may need to
use a 300-75 ohm matching transformer.
- Antenna cables should not be bundled with electrical power cords.
- If the antenna is not installed correctly, see your dealer for assistance.
Connecting to other equipment
The exact arrangement you use to interconnect various video and audio components to the
television is dependent on the model and features of each component. Check the owner's
manual provided with each component for the location of video and audio inputs and
outputs.
The following connection diagrams are offered as suggestions. You may need to modify them
to accommodate your particular components. The diagrams are intended to show
component video and audio interconnections only.
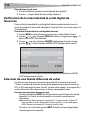
Selecting the video input source
Press INPUT on the remote to view a signal from another device connected to your
television, such as a VCR or DVD player. You can select ANT, AV1 (or S-Video), AV2 (on the side
panel), or COMPONENT depending on which input jacks you used to connect your devices.
Note: The S-Video input uses the same circuit as AV1. If both S-Video and AV1 inputs are
connected, the S-Video signal overrides the AV1 signal and SVIDEO is shown on the
on-screen display. To watch the AV1 input, disconnect the S-Video cable.
Antenna input jack
75 ohm coaxial cable
from antenna, cable
wall outlet, or
descrambler box
300-75 ohm
matching
transformer
Antenna input jack
- OR -

14
Setting up your television
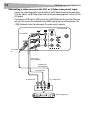
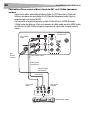
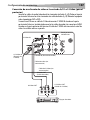
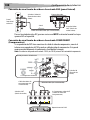
Connecting a video source to the AV1 or S-Video (rear panel) input
Connect the audio/video cables from the Audio (L and R)/Video terminal on the back of the
TV to the Audio (L and R)/Video output terminals on your video equipment (such as a VCR or
DVD player).
If you connect a VCR with a S-VIDEO cord to the S-VIDEO IN jack on the rear of the television,
you must also connect the audio cords to the AUDIO jacks on the rear of the television. The
S-VIDEO cord only carries the video signal. The audio signal is separate.
(
1
)
R
w
VIDEO OUT
S-VIDEO OUT
L
AUDIO OUT
R
R
Y
w
Y
To Audio OUT
Audio cord
(not supplied)
S-Video cord
(not supplied)
To S-Video OUT
To Audio IN
To S-Video
IN
TV back panel
To Video IN
To Video OUT
Video equipment

Setting up your television
15
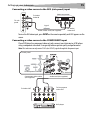
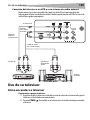
Connecting a video source to the AV2 (side panel) input
To view the AV2 video input, press INPUT on the remote repeatedly until AV2 appears on the
screen.
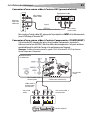
Connecting a video source to the COMPONENT input
If your DVD player has component video out jacks, connect your television to a DVD player
using a component video cord. It can greatly enhance picture quality and performance.
Note: This television can only receive Y Cb Cr (not Y Pb Pr) signals through the Component input.
W
Y
R
R
W
Y
To Audio/
Video OUT
To Audio/
Video IN
Audio/ Video cord (not supplied)
Signal
Video equipment
TV side
panel
(
1
)
G
B
R
W
L
COMPONENT OUTPUT
AUDIO OUTPUT
Y
C
b
C
r
R
R
R
w
G
B
R
To Audio OUT
Audio cord (not supplied)
Component video cable
(not supplied)
To Component
video OUT
To Audio IN
DVD player
To Component video IN
TV back panel

16
Using your TV
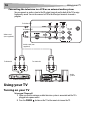
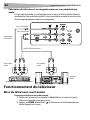
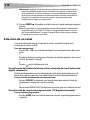
Connecting the television to a VCR or an external audio system
You can connect an audio system to the AV output terminals on the back of the TV to enjoy
high quality sound. You can also connect a VCR to the AV output terminals to record a
program.
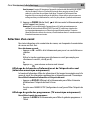
Using your TV
Turning on your TV
To turn your TV on or off:
1 Make sure that the antenna or cable television system is connected and the TV is
plugged into a power outlet.
2 Press the POWER button on the TV or the remote to turn on the TV.
(
1
)
L/MONO
Video cord
(not supplied)
Audio cord (not
supplied)
To Audio OUT
To Audio IN
To Video OUT
To Video IN
Audio
system
VCR for recording

Using your TV
17
Warning: The AC plug supplied with this TV is polarized to help minimize the possibility of
electric shock. If the polarized AC cord does not fit into a non-polarized AC outlet, do not
file or cut the blade. It is your responsibility to have an electrician replace the obsolete
outlet. Do not use this plug with an extension cord or other outlet unless the blades can be
fully inserted.
3 Press the POWER button on the TV or the remote again to turn off the TV.
Note: You can set the TV to turn off automatically by setting the SLEEP timer. In TV mode, the
TV will turn off automatically, if there is no input signal for 15 minutes. After you turn off
the TV, you should wait at least 5 seconds before you turn it on again.
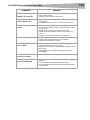
Selecting a channel
For information on channel numbering, see Understanding US channel numbering.
To select a channel:
•Press the CH – or CH + button on the remote control to go to the next lower or higher
channel.
Or
Press the number buttons to select a channel (for example, if you want channel 83,
press 8, then press 3).
Or
Press the button to go to the last viewed channel.
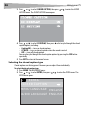
Viewing the information banner and channel label (digital TV only)
The information banner shows status information (such as the channel number and signal
source) on the screen. Additional information is available in digital TV mode.
To view the information banner and channel label:
•Press DISPLAY on the remote to show the information banner and channel label on
screen.
Or
Open the CHANNEL SETUP menu to view the channel label.
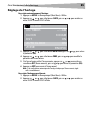
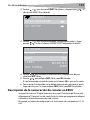
Viewing the program guide (digital TV only)
To view the program guide:
•Press GUIDE on the remote to show the program guide on screen.
Adjusting the volume
To adjust the volume:
•Press the VOL+ to increase the volume, or the VOL- button to decrease the volume.
•Press MUTE to mute the sound. Press MUTE again to restore the sound (you can also
restore the sound by pressing the VOL+ button).

18
Using your TV
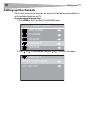
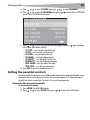
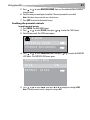
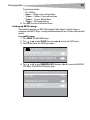
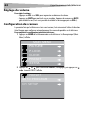
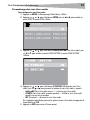
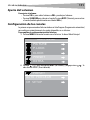
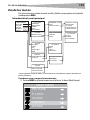
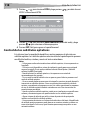
Setting up the channels
The first time you turn on the television, you should use Auto Program to automatically set
up the available channels on your TV.
To complete initial television setup:
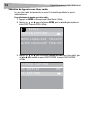
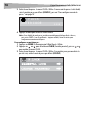
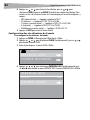
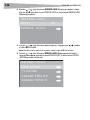
1 Press MENU on the TV or remote. The MAIN MENU opens.
2 Press
or to select PRESET, then press or . The PRESET menu opens.
MAIN MENU
PIC
TURE
P. LOCK
CLOCK
PRESET
EXTRA
AUTO PROGRAM
CH SETUP
PRESET

Using your TV
19
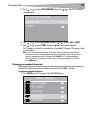
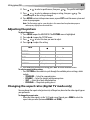
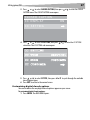
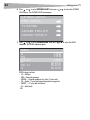
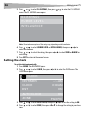
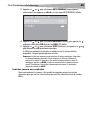
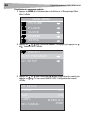
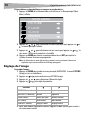
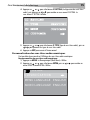
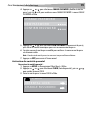
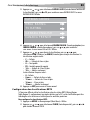
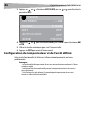
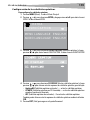
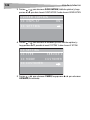
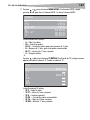
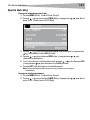
3 Press or to select AUTO PROGRAM, then press or . The AUTO PROGRAM
submenu opens.
4 Press
or to select ANTENNA, then press or to select AIR or CABLE.
5 Press
or to select START, then press or to start Auto Program.
The TV begins to search for, and memorize, all available TV channels. This process takes
several minutes.
Note: The TV will first memorize analog TV channels. After all available analog channels
have been memorized, it begins memorizing digital TV channels. If you want to stop the
process of memorizing analog TV channels, press MENU. The TV begins memorizing
digital TV channels. If you want to stop the process of memorizing digital TV channels,
press MENU again.
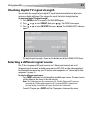
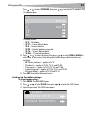
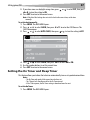
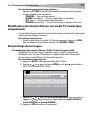
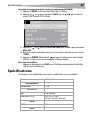
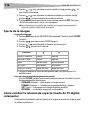
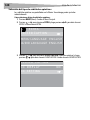
Skipping unwanted channels
After saving channels into memory, you can eliminate unwanted channels from memory so
that only the channels you want to watch are selected with the CH+/- buttons.
To eliminate unwanted channels:
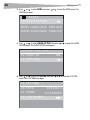
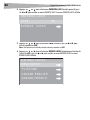
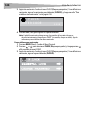
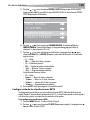
1 Press MENU on the TV or remote. The MAIN MENU opens.
ANTENNA
START
AUTO PROGRAM
AIR
MAIN MENU
PIC
TURE
P. LOCK
CLOCK
PRESET
EXTRA

20
Using your TV
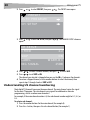
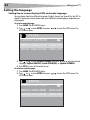
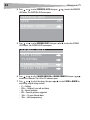
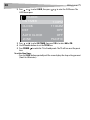
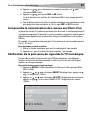
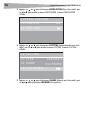
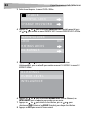
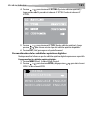
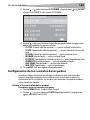
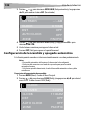
2 Press or to select PRESET, then press or . The PRESET menu opens.
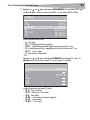
3 Press
or to select CH SETUP, then press or . The CHANNEL SETUP submenu
opens.
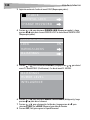
4 Press
or to select a channel number, then press to select SKIP.
5 Press
or to set SKIP to ON.
The channel you selected is skipped when you use the CH+/- to browse the channels.
6 To restore a skipped channel, use the number buttons to select the channel, then
repeat steps 1 through 4 and set SKIP to OFF.
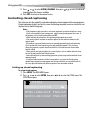
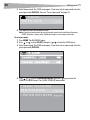
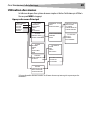
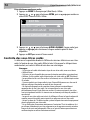
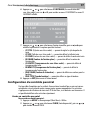
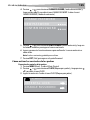
Understanding US channel numbering
Most digital TV channels have more than one channel. The main channel carries the signal
for the main TV program. The sub-channels carry signals for additional or alternate
programming, such as a radio or news broadcast.
For example, if the main channel number is 8, the sub-channel number might be 8-1, 8-2, or
8-3.
To select a sub-channel:
1 Press the number buttons for the main channel (for example 8).
2 Press the – button, then press the sub-channel button (for example 1).
AUTO PROGRAM
CH SETUP
PRESET
CH NO
SKIP
CH SETUP
2-2
ON
LABEL
WGBH-DX
DIG SIGNAL
25DB
La page est en cours de chargement...
La page est en cours de chargement...
La page est en cours de chargement...
La page est en cours de chargement...
La page est en cours de chargement...
La page est en cours de chargement...
La page est en cours de chargement...
La page est en cours de chargement...
La page est en cours de chargement...
La page est en cours de chargement...
La page est en cours de chargement...
La page est en cours de chargement...
La page est en cours de chargement...
La page est en cours de chargement...
La page est en cours de chargement...
La page est en cours de chargement...
La page est en cours de chargement...
La page est en cours de chargement...
La page est en cours de chargement...
La page est en cours de chargement...
La page est en cours de chargement...
La page est en cours de chargement...
La page est en cours de chargement...
La page est en cours de chargement...
La page est en cours de chargement...
La page est en cours de chargement...
La page est en cours de chargement...
La page est en cours de chargement...
La page est en cours de chargement...
La page est en cours de chargement...
La page est en cours de chargement...
La page est en cours de chargement...
La page est en cours de chargement...
La page est en cours de chargement...
La page est en cours de chargement...
La page est en cours de chargement...
La page est en cours de chargement...
La page est en cours de chargement...
La page est en cours de chargement...
La page est en cours de chargement...
La page est en cours de chargement...
La page est en cours de chargement...
La page est en cours de chargement...
La page est en cours de chargement...
La page est en cours de chargement...
La page est en cours de chargement...
La page est en cours de chargement...
La page est en cours de chargement...
La page est en cours de chargement...
La page est en cours de chargement...
La page est en cours de chargement...
La page est en cours de chargement...
La page est en cours de chargement...
La page est en cours de chargement...
La page est en cours de chargement...
La page est en cours de chargement...
La page est en cours de chargement...
La page est en cours de chargement...
La page est en cours de chargement...
La page est en cours de chargement...
La page est en cours de chargement...
La page est en cours de chargement...
La page est en cours de chargement...
La page est en cours de chargement...
La page est en cours de chargement...
La page est en cours de chargement...
La page est en cours de chargement...
La page est en cours de chargement...
La page est en cours de chargement...
La page est en cours de chargement...
La page est en cours de chargement...
La page est en cours de chargement...
La page est en cours de chargement...
La page est en cours de chargement...
La page est en cours de chargement...
La page est en cours de chargement...
La page est en cours de chargement...
La page est en cours de chargement...
La page est en cours de chargement...
La page est en cours de chargement...
La page est en cours de chargement...
La page est en cours de chargement...
La page est en cours de chargement...
La page est en cours de chargement...
La page est en cours de chargement...
La page est en cours de chargement...
La page est en cours de chargement...
La page est en cours de chargement...
La page est en cours de chargement...
La page est en cours de chargement...
La page est en cours de chargement...
La page est en cours de chargement...
La page est en cours de chargement...
La page est en cours de chargement...
La page est en cours de chargement...
La page est en cours de chargement...
La page est en cours de chargement...
La page est en cours de chargement...
La page est en cours de chargement...
La page est en cours de chargement...
La page est en cours de chargement...
La page est en cours de chargement...
La page est en cours de chargement...
La page est en cours de chargement...
La page est en cours de chargement...
La page est en cours de chargement...
La page est en cours de chargement...
La page est en cours de chargement...
La page est en cours de chargement...
La page est en cours de chargement...
La page est en cours de chargement...
La page est en cours de chargement...
La page est en cours de chargement...
La page est en cours de chargement...
La page est en cours de chargement...
La page est en cours de chargement...
La page est en cours de chargement...
La page est en cours de chargement...
La page est en cours de chargement...
La page est en cours de chargement...
La page est en cours de chargement...
La page est en cours de chargement...
-
 1
1
-
 2
2
-
 3
3
-
 4
4
-
 5
5
-
 6
6
-
 7
7
-
 8
8
-
 9
9
-
 10
10
-
 11
11
-
 12
12
-
 13
13
-
 14
14
-
 15
15
-
 16
16
-
 17
17
-
 18
18
-
 19
19
-
 20
20
-
 21
21
-
 22
22
-
 23
23
-
 24
24
-
 25
25
-
 26
26
-
 27
27
-
 28
28
-
 29
29
-
 30
30
-
 31
31
-
 32
32
-
 33
33
-
 34
34
-
 35
35
-
 36
36
-
 37
37
-
 38
38
-
 39
39
-
 40
40
-
 41
41
-
 42
42
-
 43
43
-
 44
44
-
 45
45
-
 46
46
-
 47
47
-
 48
48
-
 49
49
-
 50
50
-
 51
51
-
 52
52
-
 53
53
-
 54
54
-
 55
55
-
 56
56
-
 57
57
-
 58
58
-
 59
59
-
 60
60
-
 61
61
-
 62
62
-
 63
63
-
 64
64
-
 65
65
-
 66
66
-
 67
67
-
 68
68
-
 69
69
-
 70
70
-
 71
71
-
 72
72
-
 73
73
-
 74
74
-
 75
75
-
 76
76
-
 77
77
-
 78
78
-
 79
79
-
 80
80
-
 81
81
-
 82
82
-
 83
83
-
 84
84
-
 85
85
-
 86
86
-
 87
87
-
 88
88
-
 89
89
-
 90
90
-
 91
91
-
 92
92
-
 93
93
-
 94
94
-
 95
95
-
 96
96
-
 97
97
-
 98
98
-
 99
99
-
 100
100
-
 101
101
-
 102
102
-
 103
103
-
 104
104
-
 105
105
-
 106
106
-
 107
107
-
 108
108
-
 109
109
-
 110
110
-
 111
111
-
 112
112
-
 113
113
-
 114
114
-
 115
115
-
 116
116
-
 117
117
-
 118
118
-
 119
119
-
 120
120
-
 121
121
-
 122
122
-
 123
123
-
 124
124
-
 125
125
-
 126
126
-
 127
127
-
 128
128
-
 129
129
-
 130
130
-
 131
131
-
 132
132
-
 133
133
-
 134
134
-
 135
135
-
 136
136
-
 137
137
-
 138
138
-
 139
139
-
 140
140
-
 141
141
-
 142
142


Dynex CRT Television DX-R24TV Manuel utilisateur
- Catégorie
- Téléviseurs LCD
- Taper
- Manuel utilisateur
- Ce manuel convient également à
dans d''autres langues
Documents connexes
Autres documents
-
Insignia NS-PDP50HD-09 Manuel utilisateur
-
-
Sansui HDLCDVD265 Le manuel du propriétaire
-
-
-
-
-
Magnavox 42MF531D/37B Manuel utilisateur