
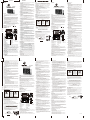
DUAL ALARM WALL CLOCK
MODEL BD4000
For Remote Handset
10. Snooze button
11. Alarm 1 Set
12. Alarm 1 ON/OFF
13. Time Set
14. Alarm 2 Set
15. Alarm 2 ON/OFF
16. DATE
17. UP
18. 12/24 hour
FEATURES
For Clock
1. PM indicator (for 12 Hr mode only)
2. Alarm 1 ON indicator
3. Alarm 2 ON indicator
4. Mode button
5. Up button
6. Down button
7. Battery compartment
8. DC Adaptor Input Socket
9. Mounting Hole
19. Display Mode
20. Down
o o
21. Temp C / F
22. Battery Compartment
1) Installing the Clock and Remote Control
Please check the mains specification before plugging into the socket. Plug the power adaptor
into the DC input jack (8), then plug the adaptor into the wall socket. The clock digit will flash
to indicate it is working properly.
1.1) Clock DC Backup (Optional)
Insert a 4.5-Volt (3 pcs x AAA size) battery into the Battery Compartment (7). Please make
sure fresh batteries are used (Do not mix new and old batteries). This function prevents the
clock time from being lost due to power failure. (Note: The LED display will not show during
power failure but the battery will keep the clock IC running until the power is restored).
1.2) Remote Handset
Insert 3 Volts (2 pcs x AA size) batteries into the Battery Compartment (22). (If the remote
handset is not used for a long time, then it is advisable to remove the batteries.
b) Press the MODE button (4) again to toggle to adjust the minute. The minute digit will flash,
then press UP (5) or DOWN button (6) to adjust the minute.
2.1.2 Setting Alarm 2
a) Follow from above, press MODE button (4) to enter the Alarm 2 setting mode. The hour
digit and the AL2 indicator will flash, MODE button (4), then press UP (5) or DOWN button
(6) to adjust the hour.
b) Press the MODE button (4) again to toggle to adjust the minute. The minute digit will flash,
then press UP (5) or DOWN button (6) to adjust the minute.
2.1.3 Setting Hour Format (12H or 24H)
a) Follow from above, press MODE button (4) to enter the Hour Format setting mode. The
display will show “12H” or “24H”, then press of the UP button (5) to toggle between “12H”
for 12 hour format and “24H” for 24 hour format.
2.1.4 Setting Time
a) Follow from above, press MODE button (4) to enter the TIME setting mode. The hour digit
will flash, then press UP (5) or DOWN button (6) to adjust the hour.
b) Follow from above, press MODE button (4) to enter the Minute setting mode. The minute
digit will flash, then press of the UP (5) or DOWN button (6) to adjust the minute.
2.1.5 Setting Year
a) Follow from above, press of the MODE button (4) to enter the Year setting mode. The Year
digit will flash, then press UP (5) or DOWN button (6) to adjust the Year.
2.1.6 Setting Date Format (Day-Month, or Month-Day)
a) Follow from above, press MODE button (4) to enter the Date Format setting mode. The
display will flash nn dd or dd nn, then press UP button (5) to adjust the Date Format. .
nn=month, dd=day.
2.1.7 Setting Month
a) Follow from above, press MODE button (4) to enter the Month setting mode. The month
digit will flash, then press of the UP (5) or DOWN button (6) to adjust the month.
b) Follow from above, press MODE button (4) to enter the Day setting mode. The day digit
will flash, then press of the UP (5) or DOWN button (6) to adjust the day.
English
Model BD4000
IMPORTANT:
- Please read these instructions carefully before use and retain for future reference. See
operating instructions on back.
- Use only the supplied or recommended Sonic Alert adaptor to connect the unit.
OPERATION INSTRUCTIONS
Sonic Boom Dual Alarm Wall Clock
with Calendar and Temperature
MAINTENANCE: Use only damp cloth to clean the lens and the frame. Do not use thinner, alcohol,
or any other cleaning agent to clean the lens or the frame, failure to do so may
results in damage to the coating on the lens or the frame.
Warning:
To prevent fire or shock hazard do not expose this appliance to rain or moisture. Before
connecting to mains/ power make sure that the requirements specified on the apparatus
corresponds to the available power supply in that country i.e. AC100-240V~, 50/60 Hz.
- The ventilation should not be impeded by covering the ventilation openings with items
such as, newspaper, table cloth, curtains, etc;
- No naked flame sources, such as lighted candles should be placed on the apparatus.
- It shall not be exposed to dripping or splashing and that no objects filled with liquids, such
as vases, shall be placed on the apparatus.
- Do not place the product in closed bookcases or racks without proper ventilation.
- Where the mains/ power plug is used as the disconnect device, the disconnect device
shall remain readily operable.
1
3
2
UP
DOWN
SNOOZE AL1.SET
T.SET
12/24
DISPLAY
MODE
AL1.
ON/OFF
AL2.
ON/OFF
DATE
F/ C
AL2.SET
10
11
12
15
18
14
21
20
13
16
17
19
22
UP
DOWN
SNOOZE AL1.SET
T.SET
12/24
DISPLAY
MODE
AL1.
ON/OFF
AL2.
ON/OFF
DATE
F/ C
AL2.SET
10
11
12
15
18
14
21
20
13
16
17
19
MODE
UP
DOWN
LR03/AAA/1.5V
LR03/AAA/1.5V
LR03/AAA/1.5V
DC 9.5V
4
5
6
8
7
9
Specialized Hearing Solution
GENERAL DATA
Adaptor Input: AC100-240V~ 50/60Hz Output: DC9.5V , 370mA
Clock Battery: AAA size (UM4/R03) x 3 pieces
Remote Battery: AA size (UM3/R6) x 2 pieces
99.00mm
風琴式 二邊印 白底黑字 80克紙質
297.00 mm
Using button on the clock
2.1) Setting the Clock
2.1.1 Setting Alarm 1
a) Press MODE button (4) to enter the Alarm 1 setting mode. The hour digit and the AL1
indicator (2) will flash, then press UP (5) or DOWN button (6) to adjust the hour.
2) Setting the Clock
NOTE: After entered into each setting mode, if no action is taken within 3 seconds
(except setting minute, no action within 60 seconds), it will exit that setting mode and
return normal time mode.
There are two ways to which you can set the time either by the buttons on the back of the clock
or using remote handset.
o o
2.1.8 C or F)Setting Temperature Unit (
a) Follow from above, press of the MODE button (4) to enter the Temperature Unit setting
o o
mode. The display will flash, then a short press of the UP button (5) to adjust to C or F.
Once all the above setting are completed, the display will return to the show the time.
3) Activating the alarm
There are two ways to activate the alarm, either by using the buttons on the back of the clock or
by using the remote handset.
3.1 Using Buttons on Clock
3.1.1 To turn on Alarm 1, press and hold for 2 seconds the UP button (17) the display and the
AL1 dot (2) will flash to show the alarm time . Press UP button (17) to toggle the Alarm 1
ON or OFF. The AL.1 dot (2) will light up to indicate alarm 1 is ON.
3.1.2 To turn on Alarm 2, press and hold for 2 seconds the DOWN button (20) the display and
the AL2 dot (3) will flash to show the alarm time . Press DOWN button (20) to toggle the
Alarm 2 ON or OFF. The AL.2 dot (3) will light up to indicate alarm 2 is ON.
3.2 Using Remote Handset
3.2.1 To turn on Alarm 1, press and hold for 2 seconds the AL1 ON/OFF button (12) the display
and the AL1 dot (2) will flash to show the alarm time . Press UP button (17) to toggle the
Alarm 1 ON or OFF. The AL.1 dot (2) will light up to indicate alarm 1 is ON.
3.2.2 To turn on Alarm 2, press and hold for 2 seconds the AL2 ON/OFF button (15) the display
and the AL2 dot (3) will flash to show the alarm time . Press to toggle the UP button (17)
Alarm 2 ON or OFF. The AL.2 dot (3) will light up to indicate alarm 1 is ON.
NOTE: Alarm 1 will beep 2 times every second, while Alarm 2 will beep 3 times every second.
4) Stop the Alarm
When the alarm is sounded, the corresponding alarm indicator will flash to indicate that alarm is
active. You can stop the alarm either by using the buttons on the back of the clock or by using
the remote control.
4.1 Using Buttons on clock
Press any key on the back of the clock. The alarm will be stopped permanently for the day.
Using Remote Handset
Setting Time2.2.1
a) SET button (13) to enter the TIME setting mode. The Press and hold for 2 seconds the T.
hour digit will flash, then press UP (17) or DOWN button (20) to adjust the hour.
b) Follow from above, press T. SET button (13) to enter the Minute setting mode. The minute
digit will flash, then press of the UP (17) or DOWN button (20) to adjust the minute.
2.2.2 Setting Hour Format (12H or 24H)
a) Press and hold for 2 seconds the 12/24 button (18) to enter the Hour Format setting mode.
The display will show “12H” or “24H”, then press of the UP button to toggle between “12H”
for 12 hour format and “24H” for 24 hour format.
2.2.3 Setting Year
a) Press and hold for 2 seconds the DATE button (16) to enter the Year setting mode. The
Year digit will flash, then press of the UP (17) or DOWN button (20) to adjust the Year.
2.2.5 Setting Month/ Day
a) Follow from above, press DATE button (16) to enter the Month setting mode. The month
digit will flash then press of the UP (17) or DOWN button (20) to adjust the month.
b) Follow from above, press DATE button (16) to enter the Day setting mode. The day digit
will flash then press of the UP (17) or DOWN button (20) to adjust the day.
o o
2.2.6 Setting Temperature Unit ( C or F)
o o
a) Press and hold for 2 seconds the C/ F button (21) to enter the Temperature Unit setting
mode. The current displayed temperature will flash, then press of the UP button (16) to
o o
toggle between C or F.
2.2.7 Setting Alarm 1 (AL.1)
a) Press and hold for 2 seconds the AL.1 SET button (11) to enter the Alarm 1 setting mode.
The hour digit and the AL1 indicator will flash, then press UP (16) or DOWN button (20) to
adjust the hour.
b) Follow from above, press the AL.1 SET button (11) to toggle to adjust the minute. The
minute digit will flash, then press UP (17) or DOWN button (20) to adjust the minute.
2.2.8 Setting Alarm 2 (AL.2)
a) Press and hold for 2 seconds the AL.2 SET button (14) to enter the Alarm 1 setting mode.
The hour digit and the AL2 indicator will flash, then press UP (16) or DOWN button (20) to
adjust the hour.
b) Follow from above, press the AL.2 SET button (14) to toggle to adjust the minute. The
minute digit will flash, then press UP (17) or DOWN button (20) to adjust the minute.
2.2.4 Setting Date Format (Day-Month, or Month-Day)
a) Follow from above, press DATE button (16) to enter the Date Format setting mode. The
display will flash, nn dd or dd nn, then press UP button (5) to adjust the Date format.
(nn=month, dd=day).
5) Snooze
When the alarm is sounded, the corresponding alarm indicator will flash to indicate that alarm is
active. On the remote handset, press SNOOZE button (10) the alarm will be turned off for 8-9
minutes for extra sleep. The alarm will come back again after 8-9 minutes. You may repeat this
cycle many times.
6) Dimmer (5 Levels)
In normal Time mode, press the SNOOZE button (10) on the remote handset to change the
display brightness. The brightness will cycle from bright to dim then from dim to bright.
7) Display Mode <<6 is the default setting>>
There are six different display mode for the user to select from:
7.1 Press and hold for 2 seconds the DISPLAY MODE button (19) to enter the display mode
setting. Press the UP button (17) to cycle through the display mode list.
Display Mode List
1) H show just the TIME.
2) d show just the date.
3) 7E show just the temperature.
4) 6 shows the Time for 6 seconds, date for 2 seconds then Time for 6 seconds, Temperature
for 2 seconds.
5) 15 shows the Time for 15 seconds, date for 2 seconds then Time for 15 seconds,
Temperature for 2 seconds.
6) 30 shows the time for 30 seconds, date for 2 seconds then Time for 30 seconds,
Temperature for 2 seconds.
8) Batteries
It is advisable to change the clock batteries every 6 - 9 months for optimal performance. Do not
mix new and old batteries, for best results use Alkaline batteries.
If the remote handset is not used for a long time, then it is advisable to remove the batteries.
9) Wall Mount
This clock can be wall mount by using the mounting holes (9). The hole to hole distance is 200mm.
4.2 Using Remote Control
Press any key on the remote handset. The alarm will be stopped permanently for the day. If
however, when the alarm is sounded and there is no user intervention, the alarm will sound
for 5 minutes and then stopped permanently for the day.
Normal function may be disturbed by strong electromagnetic interference. If this is the case,
normal function can be resumed by simply resetting the unit following the procedure in the
instructions manual. If function does not resume, try moving the unit to another location.
5 Swallow Court, Swallowfields, Welwyn Garden City,
Hertfordshire, AL7 1SB,
For product support: 01707 384438
www.geemarc.com
Distributed by :
eemarc
g
Hear the Difference
United Kingdom
SONIC ALERT'S 2 YEAR LIMITED WARRANTY
Geemarc Telecom, 5 Swallow Court, Swallowfields,
Welwyn Garden City, Hertfordshire, AL7 1SB, UK
From the moment your Sonic Alert product is purchased, Sonic Alert guarantee it for the
period for 2 years. The guarantee does not cover accidents, negligence or breakage to
any parts. The product is covered by the legal guarantee of conformity as provided by
applicable law.
Important: your receipt is part of the guarantee and must be retained and produced in
event of warranty claim. After sales telephone number: +44(0)1707 384438
RECYCLING DIRECTIVES
The WEEE (Waste Electrical and Electronic Equipment) has been put in place for the products in end of life
are recycled in the best way. When this product is out of order, please do not put it in your domestic waste bin.
Please use one of the following disposal options:
- Remove the batteries and deposit them in an appropriate WEEE skip. Deposit the product in a appropriate
WEEE skip.
- Or hand the old product to the retailer. If you purchase a new one, they should accept it.
Thus if you respect these instructions you ensure human health and environmental protection.
CE Declaration: Hereby Sonic Alert declares that this product is in
compliance with the essential requirements and other relevant provisions
of the Electromagnetic compatibility (EMC) 2004/108/EC, and of Low
Voltage Directive (LVD) 2006/95/EC (if applicable).
The declaration of conformity may be consulted at www.geemarc.com
CAUTION:
TO REDUCE THE RISK
OF ELECTRICAL
SHOCK, DO NOT
REMOVE THE COVER
(OR BACK) FROM THE
PRODUCT. NO USER
SERVICEABLE PARTS
INSIDE. REFER
SERVICING TO YOUR
SONIC ALERT DEALER.
The Lightning flash with arrowhead
symbol, within an equilateral
triangle, is intended to alert the
user to the presence of uninsulated
“dangerous voltage” within the
product’s enclosure that may be of
sufficient magnitude to constitute a
risk of electric shock to persons.
The exclamation point within an
equilateral triangle is intended
to alert the user to the presence
of important operating and
maintenance (servicing)
instructions in the literature
accompanying the appliance.
Modèle BD4000
Français
Attention:
pour éviter tout risque d'incendie ou d'électrocution, n'exposez pas cet appareil à la pluie ou à l'humidité.
Avant de raccorder l'appareil au réseau électrique, assurez-vous que les exigences spécifiées sur
l'appareil correspondent à l'alimentation électrique disponible dans le pays, soit
CA100-240V~, 50/60 Hz.
-- La ventilation ne doit pas être entravée, les orifices d'aération doivent rester libres de tout objet, tel
que des journaux, des nappes, des rideaux, etc. ;
-- Aucune source de flamme nue, comme une bougie allumée ne doit être placée sur l'appareil.
-- L'appareil ne sera pas installé à proximité d'un dispositif qui goutte ou soumis à des éclaboussures et
aucun objet rempli de liquide ne doit être placé sur l'appareil, tel qu'un vase par exemple.
-- Ne placez pas l'appareil dans un meuble fermé ou sur un rack ne disposant pas d'une ventilation
adéquate.
-- Lorsque la fiche secteur est utilisée comme dispositif de déconnexion, celle-ci doit toujours être
facilement accessible.
MODE D'EMPLOI
IMPORTANT:
Veuillez lire attentivement cette notice et la conserver pour toute consultation ultérieure. Voir les
instructions de fonctionnement au verso du document.
- Utilisez exclusivement l'adaptateur fourni ou recommandé Sonic Alert pour brancher l'unité.
Les caractéristiques du produit figurent dans le schéma ci-dessus :
Specialized Hearing Solution
MAINTENANCE :
utilisez uniquement un chiffon doux pour nettoyer le cadre et les lentilles. Ne vous servez pas
de diluant, ni d'alcool, ou de tout autre produit de nettoyage pour essuyer les lentilles ou le
cadre, faute de quoi, vous pourriez endommager leur revêtement.
INFORMATIONS GÉNÉRALES
Entrée de l'adaptateur : CA 100-240V~ 50/60Hz Sortie : CC 9,5V , 370mA
Piles du réveil : taille AAA (UM4/R03) x 3 pièces
Piles de la télécommande : taille AA (UM3/R6) x 2 pièces
1) Installation du réveil et de la télécommande
Veuillez vérifier les spécifications du bloc secteur avant le branchement dans la prise. Branchez
l'adaptateur secteur dans le jack d'entrée CC (8), puis branchez l'adaptateur dans la prise murale. Les
chiffres du réveil se mettront à clignoter pour indiquer que l'appareil fonctionne correctement.
1.1) Alimentation CC de secours pour le réveil (en option)
Insérez des piles de 4,5 -volts (3 pièces de taille AAA) dans le compartiment de batterie (7). Utilisez
des piles neuves uniquement (ne mélangez pas les nouvelles piles avec des anciennes piles). Cette
fonction empêche la perte des données du réveil suite à une coupure d'électricité. (Remarque :
l'écran LED ne s'allumera pas en cas de coupure d'électricité mais la batterie maintiendra l'IC du réveil
en état de marche jusqu'à ce que l'alimentation soit restaurée).
1.2) Télécommande
Insérez les piles de 3 volts (2 pièces de taille AA) dans le compartiment des piles (22). Si la
télécommande n'est pas utilisée pendant une longue durée, il est conseillé de retirer les batteries.
2) Réglage du réveil
REMARQUE : une fois entré dans un des modes de réglages, si aucune action n'est entreprise dans
les 3 secondes (sauf pour le réglage des minutes qui peut prendre jusqu'à 60 secondes), le réveil
quittera ce mode de réglage et retournera au mode normal d'affichage de l'heure.
Il existe deux moyens de régler l'heure, soit à l'aide des boutons présents au dos du réveil,
soit en utilisant la télécommande.
Pour le réveil
1. Indicateur PM
(pour le mode de 12 h. uniquement)
2. Indicateur ON de l'alarme 1
3. Indicateur ON de l'alarme 2
4. Bouton du mode
5. Bouton progressif (plus)
6. Bouton progressif (moins)
7. Compartiment des piles
8. Prise d'entrée de l'adaptateur CC
9. Trou de fixation
Pour la télécommande
10. Bouton de rappel d'alarme
11. Réglage de l'alarme 1
12. Alarme 1 ON/OFF
13. Réglage de l'heure
14. Réglage de l'alarme 2
15. Alarme 2 ON/OFF
16. DATE
17. Plus
18. 12/24 heures
19. Mode d'affichage
20. Moins
21. Temp °C / °F
22. Compartiment des
piles
Utilisation des boutons du réveil
2.1) Réglage du réveil
2.1.1 Réglage de l'alarme 1
a) Appuyez sur le bouton MODE (4) pour entrer dans le mode de réglage de l'alarme 1. Les heures
et l'indicateur AL1 (2) commenceront à clignoter; appuyez sur le bouton UP "Haut" (5) ou DOWN
"BAS" (6) pour régler l'heure.
b) Rappuyez sur le bouton MODE (4) pour passer au réglage des minutes. Les chiffres des minutes
se mettront à clignoter; appuyez sur le bouton UP "Haut" (5) ou DOWN "BAS" (6) pour régler les
minutes.
2.1.2 Réglage de l'alarme 2
a) Procédez comme avant, appuyez sur le bouton MODE (4) pour entrer dans le mode de réglage
de l'alarme 2. Les heures et l'indicateur AL2 se mettront à clignoter, rappuyez sur le bouton
MODE (4), puis sur UP "Haut" (5) ou DOWN "BAS" (6) pour régler l'heure.
b) Rappuyez sur le bouton MODE (4) pour passer au réglage des minutes. Les chiffes des minutes
se mettront à clignoter; appuyez sur le bouton UP "Haut" (5) ou DOWN "BAS" (6) pour régler
les minutes.
2.1.3 Réglage du format de l'heure (12H ou 24H)
a) Procédez comme avant, appuyez sur le bouton MODE (4) pour entrer dans le mode de réglage
du format de l'heure. L'écran affiche «12H» ou «24H»; appuyez sur le bouton UP "Haut" (5) pour
basculer entre «12H» pour le format de 12h et «24H» pour le format de 24 heures.
2.1.4 Réglage de l'heure
a) Procédez comme avant, appuyez sur le bouton MODE (4) pour entrer dans le mode de réglage
de l'HEURE. Les chiffres horaires se mettront à clignoter; appuyez sur le bouton UP "Haut" (5)
ou DOWN "BAS" (6) pour régler l'heure.
b) Procédez comme avant, appuyez sur le bouton MODE (4) pour entrer dans le réglage des
minutes. Les chiffres des minutes se mettront à clignoter; appuyez sur le bouton UP "Haut" (5)
ou DOWN "BAS" (6) pour régler les minutes.
2.1.5 Réglage de l'année
a) Procédez comme avant, appuyez sur le bouton MODE (4) pour entrer dans le mode de réglage
de l'année. Les chiffres de l'année se mettront à clignoter; appuyez sur le bouton UP "Haut" (5)
ou DOWN "BAS" (6) pour régler l'année.
2.1.6 Réglage du format de la date (Jour –Mois, ou Mois -Jour)
a) Procédez comme avant, appuyez sur le bouton MODE (4) pour entrer dans le mode de réglage
du format de la date. «nn dd» ou «dd nn» se mettront à clignoter à l'écran; appuyez sur le
bouton UP (5) pour régler le format de la date (nn = mois, dd = jour).
2.1.7 Réglage du mois
a) Procédez comme avant, appuyez sur le bouton MODE (4) pour entrer dans le mode de réglage
du mois. Les chiffres se mettront à clignoter; appuyez sur le bouton UP "Haut" (5) ou DOWN
"BAS" (6) pour régler le mois.
b) Procédez comme avant, appuyez sur le bouton MODE (4) pour entrer dans le mode de réglage
du jour. Les chiffres du jour se mettront à clignoter; appuyez sur le bouton UP "Haut" (5) ou
DOWN "BAS" (6) pour régler le jour.
2.1.8 Réglage de l'unité de température (°C ou °F)
a) Procédez comme avant, appuyez sur le bouton MODE (4) pour entrer dans le mode de réglage
de l'unité de température. L'écran se mettra à clignoter; appuyez brièvement sur le bouton
UP "Haut" (5) pour régler sur °C ou °F. Une fois tous les réglages terminés, l'heure s'affichera à
nouveau à l'écran.
RÉVEIL MURAL DOUBLE ALARME
MODÈLE BD4000
Utilisation de la télécommande
2.2.1 Réglage de l'heure
a) Appuyez sur le bouton T.Set (13) et maintenez-le enfoncé pendant 2 secondes pour entrer dans
le mode de réglage de l'HEURE. Les chiffres horaires se mettront à clignoter; appuyez sur le
bouton UP "Haut" (17) ou DOWN (20) pour régler l'heure.
b) Procédez comme avant, appuyez sur le bouton T. SET (13) pour entrer dans le mode de réglage
des minutes. Les chiffres des minutes se mettront à clignoter; appuyez sur le bouton UP "Haut"
(17) ou DOWN "BAS" (20) pour régler les minutes.
2.2.2 Réglage du format de l'heure (12H ou 24H)
a) Appuyez sur le bouton 12/24 (18) et maintenez-le enfoncé pendant 2 secondes pour entrer
dans le mode de réglage du format de l'heure. «12H» ou «24H» s'affichent à l'écran ; appuyez
sur le bouton UP "Haut" pour basculer entre «12H» pour le format de 12 heures et «24H» pour le
format horaire de 24 heures.
2.2.3 Réglage de l'année
a) Appuyez sur le bouton DATE (16) et maintenez-le enfoncé pendant 2 secondes pour entrer
dans le mode de réglage de l'année. Les chiffres de l'année se mettront à clignoter; appuyez
sur le bouton UP "Haut" (17) ou DOWN "BAS" (20) pour régler l'année.
2.2.4 Réglage du format de la date (Jour -Mois, ou Mois -Jour)
a) Procédez comme avant, appuyez sur le bouton DATE (16) pour entrer dans le mode de réglage
du format de la date. « nn dd » ou « dd nn » s'afficheront à l'écran ; appuyez sur le bouton
UP "Haut" (5) pour régler le format de la date (nn=mois, dd=jour).
2.2.5 Réglage du mois/jour
a) Procédez comme avant, appuyez sur le bouton DATE (16) pour entrer dans le mode de réglage
du mois. Les chiffres se mettront à clignoter ; appuyez sur le bouton UP "Haut" (17) ou DOWN
"BAS" (20) pour régler le mois.
b) Procédez comme avant, appuyez sur le bouton DATE (16) pour entrer dans le mode de réglage
du jour. Les chiffres se mettront à clignoter ; appuyez sur le bouton UP "Haut" (17) ou DOWN
"BAS" (20) pour régler le jour.
2.2.6 Réglage de l'unité de température (°C or °F)
a) Appuyez sur le bouton °C/°F (21) et maintenez-le enfoncé pendant 2 secondes pour entrer
dans le mode de réglage de l'unité de température. La température actuellement affichée
commencera à clignoter. Appuyez sur le bouton UP "Haut" (16) pour basculer entre °C ou °F.
2.2.7 Réglage de l'alarme 1 (AL.1)
a) Appuyez sur le bouton AL.1 SET (11) et maintenez-le enfoncé pendant 2 secondes pour entrer
dans le mode de réglage de l'alarme 1. Les chiffres de l'heure et l'indicateur AL.1 se mettront à
clignoter; appuyez sur le bouton UP "Haut" (16) ou DOWN "BAS" (20) pour régler l'heure.
b) Procédez comme avant, appuyez sur le bouton AL.1 SET (11) pour basculer et régler les
minutes. Les chiffres des minutes commenceront à clignoter; appuyez sur le bouton UP "Haut"
(17) ou DOWN "BAS" (20) pour régler les minutes.
2.2.8 Réglage de l'alarme 2 (AL.2)
a) Appuyez sur le bouton AL.2 SET (14) et maintenez-le enfoncé pendant 2 secondes pour entrer
dans le mode de réglage de l'alarme 1. Les chiffres horaires et l'indicateur AL2 commenceront
à clignoter ; appuyez sur le bouton UP "Haut" (16) ou DOWN "BAS" (20) pour régler l'heure.
b) Procédez comme avant, appuyez sur le bouton AL.2 SET (14) pour basculer et régler les
minutes. Les chiffres des minutes commenceront à clignoter; appuyez sur le bouton UP "Haut"
(17) ou DOWN "BAS" (20) pour régler les minutes.
3) Activation de l'alarme
Il existe deux manières d'activer l'alarme, soit en utilisant les boutons placés au dos du réveil, soit par
le biais de la télécommande.
3.1 Utilisation des boutons sur le réveil
3.1.1 Pour activer l'alarme 1, appuyez sur le bouton UP "Haut" (17) et maintenez-le enfoncé pendant 2
secondes, l'écran et le point AL.1 (2) commenceront à clignoter et afficheront l'heure de l'alarme.
Appuyez sur le bouton UP "Haut" (17) pour activer ou désactiver l'alarme. Le point AL.1 (2)
s'allumera pour indiquer que l'alarme est activée.
3.1.2 Pour activer l'alarme 2, appuyez pendant 2 secondes sur le bouton DOWN "BAS" (20). L'écran
297.00 mm
BD4000
Réveil mural double alarme Sonic Boom
avec calendrier et indicateur de température
et le point AL.2 (3) commenceront à clignoter et afficheront l'heure de l'alarme. Appuyez sur le
bouton DOWN "BAS" (20) pour activer ou désactiver l'alarme. Le point AL.2 (3) s'allumera pour
indiquer que l'alarme est activée.
3.2 Utilisation de la télécommande
3.2.1 Pour activer l'alarme 1, appuyez pendant 2 secondes sur le bouton AL1 ON/OFF (12), l'écran et
le point AL1 (2) se mettront à clignoter pour montrer l'heure de l'alarme. Appuyez sur le bouton
UP "Haut" (17) pour activer ou désactiver l'alarme. Le point AL.1 (2) s'allumera pour indiquer
que l'alarme est activée.
3.2.2 Pour activer l'alarme 2, appuyez pendant 2 secondes sur le bouton AL2 ON/OFF (15), l'écran et
le point AL2 (3) commenceront à clignoter pour montrer l'heure de l'alarme. Appuyez sur le
bouton UP "Haut" (17) pour activer ou désactiver l'alarme. Le point AL.2 (3) s'allumera pour
indiquer que l'alarme est activée.
REMARQUE : l'alarme 1 bipera 2 fois par seconde, alors que l'alarme 2 bipera 3 fois par seconde.
4) Arrêter l'alarme
Lorsque l'alarme retentit, l'indicateur d'alarme correspondant clignote pour indiquer que l'alarme est
activée. Vous pouvez arrêter l'alarme en utilisant les boutons placés au dos du réveil ou par le biais de
la télécommande.
4.1 Utilisation des boutons placés sur le réveil
Appuyez sur un bouton placé au dos du réveil. L'alarme sera désactivée pendant toute la journée.
4.2 Utilisation de la télécommande
Appuyez sur une touche de la télécommande. L'alarme sera désactivée pendant toute la journée. Si
par contre, l'alarme retentit et que l'utilisateur n'intervient pas, elle sonnera pendant 5 minutes puis
s'éteindra et restera désactivée pendant toute la journée.
5) Rappel d'alarme
Lorsque l'alarme se déclenche, l'indicateur correspondant se met à clignoter pour indiquer que l'alarme
est active. Appuyez sur le bouton SNOOZE (10) de la télécommande, l'alarme se désactivera pendant
8-9 minutes afin que vous puissiez bénéficier de quelques instants supplémentaires de sommeil.
L'alarme se réactivera après 8-9 minutes. Ce cycle peut être répété plusieurs fois.
6) Variateur (5 niveaux)
En mode horaire normal, appuyez sur le bouton SNOOZE (10) de la télécommande pour changer la
luminosité de l'écran. La luminosité passera progressivement de clair à sombre, puis de sombre à clair.
La fonction normale peut être affectée par de fortes interférences électromagnétiques (à partir d'autres
appareils). Si cela se produit, essayez de déplacer l'appareil vers un autre emplacement. La fonction
normale devrait reprendre, mais vous devrez peut-être réinitialiser l'unité en suivant la procédure
décrite dans le manuel d'instructions.
AVERTISSEMENT : POUR ÉVITER TOUT RISQUE D'INCENDIE OU D'ÉLECTROCUTION,
N'EXPOSEZ PAS CET APPAREIL À LA PLUIE OU À L'HUMIDITÉ.
INFORMATIONS GÉNÉRALES –
Adaptateur secteur homologué UL : CA100-240V~, 50/60Hz
Consommation électrique : sortie de l'adaptateur : CC9.5V ,370mA
Le triangle montrant un
éclair en forme de flèche
est un symbole
d'avertissement indiquant
la présence d'une tension
élevée à l'intérieur du
produit.
ATTENTION :
POUR RÉDUIRE LE
RISQUE DE CHOC
ÉLECTRIQUE, NE
RETIREZ PAS LE
COUVERCLE (OU LA FACE
ARRIÈRE) DU PRODUIT.
AUCUNE PIÈCE NE PEUT
ÊTRE RÉPARÉE PAR
L'UTILISATEUR. POUR
TOUTE RÉPARATION,
CONTACTEZ VOTRE
REVENDEUR SONIC ALERT.
Le triangle contenant un
point d'exclamation est un
symbole d'avertissement
afin d´attirer votre attention
sur les instructions
importantes fournies avec
le produit.
Distribué par:
Parc de l’etoile, 2 rue Galilée,
59791 Grande-Synthe Cedex
Tel: +33 (0) 3 28 58 75 75 Fax: +33 (0) 3 28 58 75 76
www.geemarc.com
FRANCE
GARANTIE LIMITÉE DEUX ANS SUR LE PRODUIT SONIC ALERT
Le réveil Sonic Alert est garanti pendant deux (2) ans, à compter de sa date d'achat.La garantie
ne couvre pas les accidents, les pièces cassées, les liquides renversés, ni la négligence de
l'utilisateur. La garantie Sonic Alert ne limite en aucun cas les droits que vous accorde la loi. Le
produit est couvert par la garantie légale de conformité telle que prévue par la réglementation
applicable.
Important: votre facture d'achat est un élément essentiel de votre garantie. elle vous sera
demandée en cas d'intervention sous garantie.
Geemarc Telecom: SAV au (0) 3 28 58 75 99
Parc de l’etoile, 2 rue Galilée, 59791 Grande Synthe Cedex, FRANCE
RECOMMANDATIONS POUR LE RECYCLAGE
La directive DEEE (Déchet d'Equipement Electrique et Electronique) a été mise en place dans le but d'assurer la
collecte sélective en vue de la valorisation,réutilisation ou recyclage des produits en fin de vie. Lorsque votre produit
ne fonctionne plus, ne le jetez pas dans votre poubelle ménagère.
Suivez l'une des procédures décrites ci-dessous:
- Déposez les piles et votre ancien appareil dans un lieu de collecte approprié.
- Ou rapportez votre ancien appareil chez le distributeur qui vous vendra le nouveau. Il devra
l'accepter. Ainsi, si vous respectez ces instructions vous faites un geste pour l'environnement et
vous contribuez à la préservation des ressources naturelles et à la protection de la santé humaine.
DECLARATION CE: CE produit respecte les exigences demandées par la directive européenne tel que la directive
Compatibilité électromagnétique (EMC) 2004/108/EC et la directive basse tension (LVD) 2006/95/EC. (Si applicable).
La déclaration de conformité peut être consultée sur le site: www.geemarc.com
eemarc
g
Hear the Difference
7) Mode d'affichage <<6 est le paramètre par défaut>>
Il existe six modes d'affichage différents sélectionnables par l'utilisateur.
7.1 Appuyez pendant 2 secondes sur le bouton DISPLAY MODE (19) pour entrer dans les réglages du
mode d'affichage. Appuyez sur le bouton UP (17) pour naviguer dans la liste des modes d'affichage.
Liste des modes d'affichage
1) H affichage de l'HEURE uniquement.
2) d affichage de la date uniquement.
3) 7E affichage de la température uniquement.
4) 6 affichage de l'heure pendant 6 secondes, de la date pendant 2 secondes, puis de l'heure
pendant 6 secondes et de la température pendant 2 secondes.
5) 15 affichage de l'heure pendant 15 secondes, de la date pendant 2 secondes puis de l'heure
pendant 15 secondes et de la température pendant 2 secondes.
6) 30 affichage de l'heure pendant 30 secondes, de la date pendant 2 secondes, puis de l'heure
pendant 30 secondes, et de la température pendant 2 secondes.
8) Piles
Il est recommandé de changer les piles du réveil tous les 6-9 mois pour des performances optimales.
Ne mélangez pas les nouvelles piles et les anciennes piles. Pour des résultats optimaux, utilisez des
piles alcalines. Si la télécommande n'est pas utilisée pendant un long moment, il est recommandé de
retirer les piles.
9) Montage mural
Ce réveil peut être monté au mur en utilisant les trous de fixation (9). La distance entre les trous est de
200mm.
Deutsch
Modell BB4000
WICHTIG
-- Lesen Sie diese Anleitung vor Inbetriebnahme des Gerätes sorgfältig durch und bewahren Sie
sie für zukünftige Verwendung auf. Beachten Sie die umseitige Betriebsanleitung.
-- Das Gerät darf nur an das mitgelierte oder empfohlene Sonic Alert-Netzgerät angeschlossen
werden.
Warnung:
Zur Verhinderung von Brand- oder Stromschlaggefahr darf das Gerät nicht Regen oder
Feuchtigkeit ausgesetzt werden. Stellen Sie vor dem Anschluss an den Netzstrom sicher, dass
die in dem jeweiligen Land verfügbare Stromversorgung mit den auf dem Gerät angeführten
Anforderungen übereinstimmt, d.h. ~100-240 VAC, 50/60 Hz.
- Zur Verhinderung einer Blockierung der Luftzufuhr die Lüftungsöffnungen nicht mit Gegenständen
wie Zeitungen, Tischdecken, Vorhängen, usw., abdecken.
- Keine offenen Flammen, wie Kerzen, auf das Gerät platzieren.
- Darf nicht Tropf- oder Spritzwasser ausgesetzt werden. Keine mit Wasser gefüllten Gefäße wie
Vasen auf das Gerät stellen.
- Das Gerät nicht in geschlossene Bücherschränke oder Regale ohne ordnungsgemäße Belüftung
stellen.
- Wo der Netzstecker als Ausschalter dient, muss er jederzeit frei zugänglich sein.
BEDIENUNGSANLEITUNG
Sonic Boom Duale Weck- und Wanduhr
mit Kalender und Thermometer
Specialized Hearing Solution
WARTUNG:
Linse und Einfassung nur mit feuchtem Tuch reinigen Es dürfen kein Verdünner, Alkohol
oder anderes Reinigungsmittel zur Reinigung der Linse oder der Einfassung verwendet
werden. Bei Zuwiderhandlung kann die Beschichtung der Linse oder der Einfassung
beschädigt werden.
ALLGEMEINE ANGABEN
Netzgerät Eingang: AC 100-240 V~ 50/60 Hz
Ausgang: DC 9,5 V 370 mA
Uhrbatterie: 3 x Größe AAA (UM4/R03)
Batterie für den drahtlosen Fernbedienung: 2 x Größe AA (UM3/R6)
DUALE WECK- UND WANDUHR
Modell BD4000
FUNKTIONEN
Für Uhr
1. PM-Anzeige
(nur für 12-Stunden-Modus)
2. Weckruf 1 EIN Anzeige
3. Weckruf 2 EIN Anzeige
4. Modus-Taste
5. Aufwärts-Taste
6. Abwärts-Taste
7. Batteriefach
8. Eingangsbuchse für DC-Adapter
9. Montageloch
Für drahtlosen Handapparat
10. Schlummertaste
11. Weckruf 1 Einstellen
12. Weckruf 1 ON/OFF
13. Einstellen der Uhrzeit
14. Weckruf 2 Einstellen
15. Weckruf 2 ON/OFF
16. DATUM
17. Aufwärts
18. 12/24-Stundenanzeige
19. Anzeigemodus
20. Abwärts
o o
21. Temp C / F
22. Batteriefach
1) Installation der Uhr und Fernbedienung
Bitte prüfen Sie die Netzstromangaben, bevor Sie das Gerät anschließen. Netzteilstecker
erst an die DC Eingangsklinke (8), dann an die Wandsteckdose anschließen. Die Uhrziffern
blinken, und zeigen damit ordnungsgemäßen Betrieb an.
1.1) DC-Backup für die Uhr (Optional)
Legen Sie drei Batterien der Größe AAA (4,5 V) in das Batteriefach (7) ein.
Vergewissern Sie sich, dass nur neue Batterien verwendet werden (alte und neue
Batterien nicht gemeinsam verwenden). Diese Option verhindert den Ausfall der Uhr durch
Stromausfall. (Hinweis: Die LED-Anzeige wird während des Stromausfalls nicht
funktionieren, aber die Batterie hält den Betrieb der Uhr aufrecht, bis die
Netzstromversorgung wiederhergestellt ist).
1.2) Drahtloser Fernbedienung
Legen Sie zwei Batterien der Größe AA (3 V) in das Batteriefach (22) ein. (Wird der
drahtlose Fernbedienung über einen längeren Zeitraum nicht verwendet, sollten die
Batterien herausgenommen werden.
2.1.4 Uhrzeit einstellen
a) Drücken Sie wie vorstehend angeführt die MODE-Taste (4), um auf den
Einstellmodus für TIME (Uhrzeit) zuzugreifen. Die Stundenziffer blinkt. Drücken Sie
die Tasten UP (Aufwärts) (5) oder DOWN (Abwärts) (6), um die Stunde
einzustellen.
b) Drücken Sie wie vorstehend angeführt die MODE-Taste (4), um auf den
. Einstellmodus für Minuten zuzugreifen. Die Minutenziffer blinkt. Drücken Sie die
Tasten UP (Aufwärts) (5) oder DOWN (Abwärts) (6), um die Minute einzustellen.
2.1.5 Jahreszahl einstellen
a) Drücken Sie wie vorstehend angeführt die MODE-Taste (4), um auf den
Einstellmodus für die Jahreszahl zuzugreifen. Die Jahresziffer blinkt. Drücken Sie
die Tasten UP (Aufwärts) (5) oder DOWN (Abwärts) (6), um die Jahreszahl
einzustellen.
2.1.6 Datumsformat einstellen (Tag-Monat, oder Monat-Tag)
a) Drücken Sie wie vorstehend angeführt die MODE-Taste (4), um auf den
Einstellmodus für das Datumsformat zuzugreifen. In der Anzeige blinkt nn dd oder
dd nn. Drücken Sie die Tasten UP (Aufwärts) (5), um das Datumsformat
einzustellen. nn=Monat, dd=Tag.
2.1.7 Monat einstellen
a) Drücken Sie wie vorstehend angeführt die MODE-Taste (4), um auf den
Einstellmodus für den Monat zuzugreifen. Die Monatsziffer blinkt. Drücken Sie die
Tasten UP (Aufwärts) (5) oder DOWN (Abwärts) (6), um den Monat einzustellen.
b) Drücken Sie wie vorstehend angeführt die MODE-Taste (4), um auf den
Einstellmodus für den Tag zuzugreifen. Die Tagesziffer blinkt. Drücken Sie die .
Tasten UP (Aufwärts) (5) oder DOWN (Abwärts) (6), um den Tag einzustellen.
o o
2.1.8 Temperatureinheit einstellen ( C oder F)
a) Drücken Sie wie vorstehend angeführt die MODE-Taste (4), um auf den
Einstellmodus für die Temperatureinheit zuzugreifen. Die Anzeige blinkt. Drücken
o o
Sie kurz auf die Tasten UP (Aufwärts) (5) um C oder F einzustellen.
Nach Abschluss aller vorstehenden Einstellungen erscheint wieder die Uhrzeit im
Display.
Verwendung der Fernbedienung
2.2.1 Uhrzeit einstellen
a) Drücken und halten Sie die Taste T. SET (Zeiteinstellung) (13), um auf den
Einstellmodus für TIME (Uhrzeit) zuzugreifen. Die Stundenziffer blinkt. Drücken Sie
die Tasten UP (Aufwärts) (17) oder DOWN (Abwärts) (20), um die Stunde
einzustellen.
b) Drücken Sie wie vorstehend angeführt die Taste T. SET (Zeiteinstellung) (13), um
auf den Einstellmodus für Minuten zuzugreifen. Die Minutenziffer blinkt. Drücken Sie
die Tasten UP (Aufwärts) (17) oder DOWN (Abwärts) (20), um die Minute
einzustellen.
2.2.2 Einstellen der Stundenanzeige (12 Std. oder 24 Std.)
a) Drücken und halten Sie die Taste 12/24 (18), um auf den Einstellmodus für
Zeitformat zuzugreifen. Auf dem Display erscheint “12H” oder “24H”. Drücken Sie
die UP (Aufwärts) Taste, um zwischen “12H” für das 12-Stunden-Format und “24H”
für das 24-Stunden-Format zu wechseln.
2.2.3 Jahreszahl einstellen
a) Drücken und halten Sie die Taste DATE (Datum) (16), um auf den Einstellmodus für
die Jahreszahl zuzugreifen. Die Jahresziffer blinkt. Drücken Sie die Tasten UP
(Aufwärts) (17) oder DOWN (Abwärts) (20), um die Jahreszahl einzustellen.
2.2.4 Datumsformat einstellen (Tag-Monat, oder Monat-Tag)
a) Drücken Sie wie vorstehend angeführt die DATE-Taste (16), um auf den
Einstellmodus für das Datumsformat zuzugreifen. In der Anzeige blinkt nn dd oder
dd nn. Drücken Sie die Tasten UP (Aufwärts) (5), um das Datumsformat einzustellen.
(nn=Monat, dd=Tag).
Mittels der Tasten an der Uhr
2.1) Uhr einstellen
2.1.1 Einstellen des Weckrufs 1
a) Drücken Sie die MODE-Taste (4), um auf den Einstellmodus für Weckruf 1
zuzugreifen. Die Stundenziffer und die AL1-Anzeige (2) blinken. Drücken Sie die
Tasten UP (Aufwärts) (5) oder DOWN (Abwärts) (6), um die Stunde einzustellen.
b) Drücken Sie die MODE-Taste (4) erneut, um zur Minuteneinstellung zu wechseln.
Die Minutenziffer blinkt. Drücken Sie die Tasten UP (Aufwärts) (5) oder DOWN
(Abwärts) (6), um die Minuten einzustellen.
2.1.2 Einstellen des Weckrufs 2
a) Drücken Sie wie vorstehend angeführt die MODE-Taste (4), um auf den
Einstellmodus für Weckruf 2 zuzugreifen. Die Stundenziffer und die AL2-Anzeige
blinkt, MODE-Taste (4). Drücken Sie dann die Tasten UP (Aufwärts) (5) oder
DOWN (Abwärts) (6), um die Stunde einzustellen.
b) Drücken Sie die MODE-Taste (4) erneut, um zur Minuteneinstellung zu wechseln.
Die Minutenziffer blinkt. Drücken Sie die Tasten UP (Aufwärts) (5) oder DOWN
(Abwärts) (6), um die Minuten einzustellen.
2.1.3 Einstellen der Stundenanzeige (12 Std. oder 24 Std.)
a) Drücken Sie wie vorstehend angeführt die MODE-Taste (4), um auf den
Einstellmodus für Stundenanzeige zuzugreifen. Auf dem Display erscheint “12H”
oder “24H”. Drücken Sie die UP (Aufwärts) Taste, um zwischen “12H” für das
12-Stunden-Format und “24H” für das 24-Stunden-Format zu wechseln.
2) Uhr einstellen
HINWEIS: Wird ein Einstellmodus aufgerufen, schaltet das Gerät in den normalen
Zeitmodus zurück, wenn nicht innerhalb von drei Sekunden eine Einstellung
vorgenommen wird (bei der Minuteneinstellung liegt die Grenze bei 60 Sekunden.
Die Zeit kann auf zwei Weisen eingestellt werden: entweder über die Tasten auf der
Rückseite der Uhr oder mittels der Fernbedienung.
2.2.5 Monat/ Tag einstellen
a) Drücken Sie wie vorstehend angeführt die DATE-Taste (16), um auf den
Einstellmodus für den Monat zuzugreifen. Die Monatsziffer blinkt. Drücken Sie die
Tasten UP (Aufwärts) (17) oder DOWN (Abwärts) (20), um den Monat einzustellen.
b) Drücken Sie wie vorstehend angeführt die DATE-Taste (16), um auf den
Einstellmodus für den Tag zuzugreifen. Die Tagesziffer blinkt. Drücken Sie die
Tasten UP (Aufwärts) (17) oder DOWN (Abwärts) (20), um den Tag einzustellen.
o o
2.2.6 Temperatureinheit einstellen ( C oder F)
o o
a) Drücken und halten Sie 2 Sekunden lang die Taste C/ F, um den Temperaturmodus
einzustellen. Die aktuell eingestellte Temperaturanzeige blinkt. Drücken die Taste
o o
von UP (Aufwärts), um zwischen C und F zu wechseln.
2.2.7 Einstellen des Weckrufs 1 (AL.1)
a) Drücken und halten Sie die Taste AL.1 SET (Einstellen des Weckrufs 1) (11), um
auf den Einstellmodus für Weckruf 1 zuzugreifen. Die Stundenziffer und die
AL1-Anzeige (16) blinken. Drücken Sie die Tasten UP (Aufwärts) (20) oder DOWN
(Abwärts) (16), um die Stunde einzustellen.
b) Drücken Sie wie vorstehend angeführt die AL. 1 SET (Einstellen des Weckrufs 1)
(11), um zur Minuteneinstellung zu wechseln. Die Minutenziffer blinkt. Drücken Sie
die Tasten UP (Aufwärts) (17) oder DOWN (Abwärts) (20), um die Minute
einzustellen.
2.2.8 Einstellen des Weckrufs 2 (AL.2)
a) Drücken und halten Sie die Taste AL.2 SET (Einstellen des Weckrufs 2) (14), um
auf den Einstellmodus für Weckruf 2 zuzugreifen. Die Stundenziffer und die
AL2-Anzeige (16) blinken. Drücken Sie die Tasten UP (Aufwärts) (20) oder DOWN
(Abwärts) (16), um die Stunde einzustellen.
b) Drücken Sie wie vorstehend angeführt die Taste AL.2 SET (Einstellen des
Weckrufs 1) (14), um zur Minuteneinstellung zu wechseln. Die Minutenziffer blinkt.
Drücken Sie die Tasten UP (Aufwärts) (17) oder DOWN (Abwärts) (20), um die
Minute einzustellen.
3) Weckruf aktivieren
Der Weckruf kann auf zwei Weisen eingestellt werden: entweder über die Tasten auf der
Rückseite der Uhr oder mittels der Fernbedienung .
3.1 Verwendung der Tasten an der Uhr
3.1.1 Zum Einschalten von Weckruf 1, drücken und halten Sie 2 Sekunden lang die Taste
UP (Aufwärts) (17). Die Anzeige und der AL.1-Punkt (2) blinken, um die Weckzeit
anzuzeigen. Drücken Sie die Taste UP (Aufwärts) (17) um Weckruf 1 zu aktivieren
oder zu deaktivieren (ON oder OFF). Der AL.1-Punkt (2) leuchtet auf, um
anzuzeigen, dass Weckruf 1 aktiviert ist.
3.1.2 Zum Einschalten von Weckruf 2, drücken und halten Sie 2 Sekunden lang die Taste
UP (Aufwärts) (20). Die Anzeige und der AL.2-Punkt (3) blinken, um die Weckzeit
anzuzeigen. Drücken Sie die Taste DOWN (Abwärts) (20), um Weckruf 2 zu
aktivieren oder zu deaktivieren (ON oder OFF). Der AL.2-Punkt (3) leuchtet auf,
um anzuzeigen, dass Weckruf 2 aktiviert ist.
7) Anzeigemodus <<6 ist die Standardeinstellung>>
Der Benutzer kann aus sechs unterschiedlichen Anzeigemodi wählen:
7.1 Drücken und halten Sie 2 Sekunden lang die Taste DISPLAY MODE (Anzeigemodus),
um die Einstellung des Anzeigemodus einzugeben. Drücken Sie die Taste UP (Aufwärts)
(17), um durch die Liste der Anzeigemodi zu blättern.
Liste der Anzeigemodi
1) H nur die Uhrzeit anzeigen.
2) d nur das Datum anzeigen.
3) 7E zeigt nur die Temperatur an.
4) 6 blendet die Uhrzeit 6 Sekunden, das Datum 2 Sekunden, dann die Uhrzeit 6
Sekunden lang, und die Temperatur 2 Sekunden lang ein.
5) 15 blendet die Uhrzeit 15 Sekunden, das Datum 2 Sekunden, dann die Uhrzeit 15
Sekunden lang, und die Temperatur 2 Sekunden lang ein.
6) 30 blendet die Uhrzeit 30 Sekunden, das Datum 2 Sekunden, dann die Uhrzeit 30
Sekunden lang, und die Temperatur 2 Sekunden lang ein.
8) Batterien
Für maximale Leistung sollten die Uhrbatterien alle 6 - 9 Monate ausgewechselt werden.
Verwenden Sie neue und alte Batterien nicht gleichzeitig. Beste Ergebnisse erzielen Sie
mit Alkali-Batterien.
Wird die Fernbedienung über einen längeren Zeitraum nicht verwendet, sollten
die Batterien herausgenommen werden.
9) Wandmontage
Diese Uhr kann mittels der Montagelöcher an die Wand montiert werden. Der Abstand
zwischen den Öffnungen beträgt 200 mm.
Die normale Funktion kann durch starke elektromagnetische Interferenz beeinträchtigt
werden. Tritt dieser Fall ein, kann die normale Funktion durch einfache Rückstellung des
Gerätes gemäß des in der Benutzeranleitung angeführten Verfahrens wiederhergestellt
werden. Ist die Funktion danach nicht wiederhergestellt, versuchen Sie, das Gerät an
einem anderen Standort aufzustellen.
6) Dimmer (5 Stufen)
Drücken Sie in normalem Zeitmodus die Taste SNOOZE (Schlummertaste) (10) an der
Fernbedienung, um die Anzeigehelligkeit zu ändern. Die Helligkeit wandelt sich von hell
nach verdunkelt und zurück von verdunkelt nach hell.
5) Schlummern
Wenn der Weckruf ertönt, blinkt die entsprechende Weckrufanzeige, um anzuzeigen,
dass der Weckruf aktiviert ist. Drücken Sie die Taste SNOOZE (Schlummertaste) (10)
der Fernbedienung. Der Weckruf wird für 8-9 Minuten zusätzliche Schlafzeit
abgestellt. Nach 8-9 Minuten ertönt der Weckruf erneut. Diesen Zyklus können Sie
beliebig oft wiederholen.
4) Weckruf abstellen
Wenn der Weckruf ertönt, blinkt die entsprechende Weckrufanzeige, um anzuzeigen,
dass der Weckruf aktiviert ist. Sie können den Weckruf entweder mittels der Tasten auf
der Rückseite der Uhr oder mittels der Fernbedienung abstellen.
4.1 Verwendung der Tasten an der Uhr
Drücken Sie jede beliebige Taste auf der Rückseite der Uhr. Der Weckruf wird sofort
für einen Tag dauerhaft abgestellt.
4.2 Verwendung der Fernbedienung
Drücken Sie jede beliebige Taste der Fernbedienung. Der Weckruf wird
sofort für einen Tag dauerhaft abgestellt. Wenn jedoch der Weckruf ertönt und nicht
abgestellt wird, ertönt der Weckruf fünf Minuten lang und stellt sich dann dauerhaft für
diesen Tag aus.
3.2 Verwendung der Fernbedienung
3.2.1 Zum Einschalten von Weckruf 1, drücken und halten Sie 2 Sekunden lang die Taste
AL.1 ON/OFF (EIN/AUS) (12). Die Anzeige und der AL.1-Punkt (2) blinken, um die
Weckzeit anzuzeigen. Drücken Sie die Taste DOWN (Abwärts) (20), um
Weckruf 1 zu aktivieren oder zu deaktivieren (ON oder OFF). Der AL.1-Punkt (2)
leuchtet auf, um anzuzeigen, dass Weckruf 1 aktiviert ist.
3.2.2 Zum Einschalten von Weckruf 2, drücken und halten Sie 2 Sekunden lang die Taste
AL.2 ON/OFF (EIN/AUS) (15). Die Anzeige und der AL.2-Punkt (3) blinken, um die
Weckzeit anzuzeigen. Drücken Sie die Taste DOWN (Abwärts) (20), um
Weckruf 2 zu aktivieren oder zu deaktivieren (ON oder OFF). Der AL.2-Punkt (3)
leuchtet auf, um anzuzeigen, dass Weckruf 2 aktiviert ist.
HINWEIS: Weckruf 1 pfeift zwei Mal pro Sekunde, während Weckruf 2 drei Mal pro
Sekunde pfeift.
093-WC408E-004
WARNUNG: UM DIE GEFAHR EINES BRANDES ODER ELEKTROSCHOCKS ZU
VERMEIDEN, DAS GERÄT NICHT REGEN ODER FEUCHTIGKEIT AUSSETZEN.
Eine normale Funktion kann durch eine starke elektromagnetische Signalueberlagerungen (von
anderen Geraeten) beeinflusst werden. Falls das eintritt versuchen Sie bitte das Geraet an einen
anderen Platz zu stellen. Dann sollte es wieder normal funktionieren. Es koennte jedoch moeglich
sein, dass Sie das Geraet wieder neu einstellen muessen. Folgen Sie dafuer bitte den Anweisungen
in der Anleitung.
RECYCLING VORSCHRIFT
Die WEEE-Richtlinie (Elektro- und Elektronikaltgeräte) wurde aufgestellt, damit Altgeräte auf
beste Art und Weise verwertet werden. Wenn dieses Produkt defekt ist, werfen Sie es bitte
nicht in Ihren Hausmüll.
Bitte nutzen Sie eine der folgenden Entsorgungsmöglichkeiten :
- Entfernen Sie die Batterien und werfen Sie diese in einen geeigneten Rücknahmecontainer.
Geben Sie das Produkt bei einer Altgerätesammelstelle ab.
- Oder geben Sie das alte Produkt dem Händler zurück. Bei Kauf eines neuen Geräts sollte
der Händler das Altgerät annehmen. Wenn Sie sich an diese Anweisungen halten, stellen
Sie den Schutz der Gesundheit und Umwelt sicher.
CE ERKLÄRUNG: Sonic Alert erklärt hiermit, dass dieses Produkt die notwendigen
Vorraussetzungen sowie die weiteren betreffenden Bestimmungen der Elektromagnetische
Verträglichkeit (EMC) 2004/108/EC und der Niederspannungsrichtlinie (LVC) 2006/95/EC.
(falls zutreffend).
Die Konformitätserklärung kann unter folgender Adresse gefunden werden :
www.geemarc.com/de
2 JAHR EINGESCHRÄNKTE GARANTIE VON SONIC ALERT
Sonic Alert gewährt 2 jahre garantie für das gerät. Von dieser garantie sind unfälle,
unsachgemäße bedienung oder mangelnde sorgfalt ausgeschlossen. Ihre rechte
werden von dieser Sonic Alert garantie in keiner weise beeinträchtigt. Das produkt
ist durch die gesetzliche garantie der konformität abgedeckt wie gesetzlich
vorgesehen. Witctig: Ihr kaufbeleg ist teil der garantie und muss aufbewahrt und im
garantiefall vorgelegt werden. N°dienstservice: +49 (0) 228 548 89 932
GEEMARC TELECOM
Parc de l'etoile, 2 rue Galilée, 59791 Grande-Synthe Cedex, FRANCE
Produktsupport und Hilfe erhalten Sie auf unserer
Webseite unter www.geemarc.com/de E-mail: kontakt@geemarc.com
Produktsupport und Hilfe erhalten Sie auf unserer
Webseite unter www.geemarc.com/de
E-mail: kontakt@geemarc.com
Vertrieb:
eemarc
g
Hear the Difference
Deutschland
1
3
2
UP
DOWN
SNOOZE AL1.SET
T.SET
12/24
DISPLAY
MODE
AL1.
ON/OFF
AL2.
ON/OFF
DATE
F/ C
AL2.SET
10
11
12
15
18
14
21
20
13
16
17
19
22
UP
DOWN
SNOOZE AL1.SET
T.SET
12/24
DISPLAY
MODE
AL1.
ON/OFF
AL2.
ON/OFF
DATE
F/ C
AL2.SET
10
11
12
15
18
14
21
20
13
16
17
19
MODE
UP
DOWN
LR03/AAA/1.5V
LR03/AAA/1.5V
LR03/AAA/1.5V
DC 9.5V
4
5
6
8
7
9
Der Blitz im Dreieck ist
ein Warnzeichen, dass Sie
auf lebensgefährliche
Spannung im
Geräteinneren hinweist
VORSICHT:
ZUR VERMEIDUNG VON
STROMSCHLAGGEFAHR:
BITTE KEINE
GEHÄUSETEILE
ENTFERNEN!
WENDEN SIE SICH FÜR
WARTUNGEN AN IHREN
SONIC ALERT-
KUNDENDIENST.
Das Ausrufungszeichen
im Dreieck ist ein
Warnzeichen, das Sie auf
wichtige Anweisungen
hinweist, die dem Produkt
beiliegen.
-
 1
1

dans d''autres langues
- English: Geemarc BD4000 User guide
- Deutsch: Geemarc BD4000 Benutzerhandbuch
Documents connexes
-
Geemarc WAKE 'N' SHAKE CURVE Mode d'emploi
-
-
Geemarc WAKE 'N' SHAKE STAR Mode d'emploi
-
-
-
-
-
-
-
Autres documents
-
Renkforce 1369489 Le manuel du propriétaire
-
Bresser VA colour RC Weather Station Le manuel du propriétaire
-
Denver CR-420MK2 Manuel utilisateur
-
 NEWONE Radio réveil FM CR100 Double alarme Le manuel du propriétaire
-
Trevi RC 860 BL Manuel utilisateur
-
Explore Scientific Slim Projection Radio-controlled Dual alarm clock Le manuel du propriétaire
-
Caliber HCG007 Le manuel du propriétaire
-
Silvercrest SRW 250 A1 Le manuel du propriétaire
-
Sylvania SIP235 Manuel utilisateur
-
Caliber HCG008Q Le manuel du propriétaire
