Solar PL2545 Le manuel du propriétaire
- Catégorie
- Chargeurs de batterie
- Taper
- Le manuel du propriétaire

Operator’s Manual
Battery Charger Model No. PL2545
(Part No. 141-252-000)
Failure to follow instructions may cause
damage or explosion, always shield eyes.
Read entire instruction manual before use.
WARNING
WARNING: This product can expose you to chemicals,
including Vinyl-Chloride, Styrene and Acrylonitrile, which are
known to the State of California to cause cancer.
For more information go to www.P65Warnings.ca.gov.

2
IMPORTANT SAFETY INSTRUCTIONS - READ THESE FIRST
A
WARNING
Read these instructions completely before using the Battery Charger and save them for future
reference. Before using the Battery Charger to charge a battery, read these instructions and the
instruction manual/safety information provided by the car, truck, boat or equipment manufacturer.
Following all manufacturers’ instructions and safety procedures will reduce the risk of accident.
Working around lead-acid batteries may be dangerous. Lead-acid batteries release explosive gases
during normal operation, charging and jump starting. Carefully read and follow these instructions for
safe use. Always follow the specific instructions in this manual and on the Battery Charger each time
you use the Battery Charger.
All lead-acid batteries (car, truck and boat) produce hydrogen gas which may violently explode in the
presence of fire or sparks. Do not smoke, use matches or a cigarette lighter while near
batteries. Do not handle the battery while wearing vinyl clothing because static electricity sparks are
generated when vinyl clothing is rubbed. Review all cautionary material on the Battery Charger and
in the engine compartment.
Always wear eye protection, appropriate protective clothing and other safety equipment when
working near lead-acid batteries. Do not touch eyes while working on or around lead-acid batteries.
Always store clamps away from each other or common conductors. Improper storage of clamps may
cause the clamps to come in contact with each other, or a common conductor, which would be
hazardous if the Battery Charger was plugged into an AC outlet.
Use extreme care while working within the engine compartment, because moving parts may cause
severe injury. Read and follow all safety instructions published in the vehicle's Owner's Manual.
Batteries being charged with the Battery Charger unit likely contain liquid acids which are hazardous
if spilled.
WARNING: Changes or modifications to this unit not expressly approved by the party responsible
for compliance could void the user’s authority to operate the equipment.
NOTE: This equipment has been tested and found to comply with the limits for a Class B digital
device, pursuant to Part 15 of the FCC Rules. These limits are designed to provide reasonable
protection against harmful interference in a residential installation. This equipment generates,
uses and can radiate radio frequency energy and, if not installed and used in accordance with
the instructions, may cause harmful interference to radio communications. However, there is no
guarantee that interference will not occur in a particular installation. If this equipment does cause
harmful interference to radio or television reception, which can be determined by turning the
equipment off and on, the user is encouraged to try to correct the interference by one or more of
the following measures:
- Reorient or relocate the receiver antenna
- Increase the separation between equipment and receiver.
- Connect the equipment into an outlet on a circuit different from that to which the receiver is
connected.
- Consult the dealer or an experienced radio TV technician for help.
This Class B digital apparatus complies with Canadian ICES-003.
INPUT/OUPUT Specifications:
INPUT: 120VAC 60Hz 4.5A (6A start)
OUTPUT: 12VDC 20A (28A start, 4 min max)

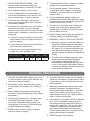
1. SAVE THESE INSTRUCTIONS – This
manual contains important safety and
operating instructions for Model No. PL2545.
2. Do not expose charger to rain or snow.
3. Use of an attachment not recommended or
sold by the manufacturer may result in a risk
of fire, electric shock, or injury to persons.
4. To reduce risk of damage to electric plug
and cord, pull by plug rather than cord when
disconnecting charger.
5. An extension cord should not be used unless
absolutely necessary. Use of an improper
extension cord could result in a risk of fire and
electric shock. If extension cord must be used,
make sure:
a. That pins on plug of extension cord are the
same number, size, and shape as those of
plug on charger,
b. That extension cord is properly wired and in
good electrical condition; and
c. That the wire size is large enough for the
length of cord as specified below.
Cord Length: ft.(m) 25(8) 50(16) 100(31) 150(46)
AWG size of cord: 18 16 14 12
6. To prevent electric shock - Dispose of battery
charger if cord becomes defective.
7. Do not operate charger if it has received
a sharp blow, been dropped, or otherwise
damaged in any way; take it to a qualified
service center.
8. Do not disassemble charger; take it to a
qualified service center when service or repair
is required. Incorrect reassembly may result in
a risk of electric shock or fire.
9. To reduce risk of electric shock, unplug the
charger from outlet before attempting any
maintenance or cleaning. Turning off controls
will not reduce this risk.
10. Monitor battery charger daily when using it to
maintain battery for extended periods.
11. WARNING – RISK OF EXPLOSIVE GASES.
a. Working in vicinity of a lead-acid battery is
dangerous. Batteries generate explosive
gases during normal battery operation. For
this reason, it is of utmost importance that
each time before using your charger, you
read this manual and follow the instructions
exactly.
b. To reduce risk of battery explosion, follow
these instructions and those published
by the battery manufacturer and the
manufacturer of any equipment you intend
to use in the vicinity of the battery. Review
cautionary markings on these products and
in the engine compartment.
1. Someone should be within range of your voice
or close enough to come to your aid when you
work near a lead-acid battery.
2. Have plenty of fresh water and soap nearby
in case battery acid contacts skin, clothing, or
eyes.
3. Wear complete eye protection and clothing
protection. Avoid touching eyes while working
near battery.
4. If battery acid contacts skin or clothing, wash
immediately with soap and water. If acid
enters eye, immediately flood eye with cold
running water for at least 10 minutes and get
medical attention immediately.
5. NEVER smoke or allow a spark or flame in
vicinity of battery or engine.
6. Be extra cautious to reduce risk of dropping a
metal tool onto battery. It might spark or short-
circuit battery or other electrical part that may
cause explosion.
7. Remove personal metal items such as rings,
bracelets, necklaces, and watches when
working with a lead-acid battery. A lead-acid
battery can produce a short-circuit current
high enough to weld a ring or other jewelry to
metal, causing a severe burn.
8. Use charger for charging LEAD-ACID batteries
only. It is not intended to supply power to a
low voltage electrical system other than in a
starter-motor application. Do not use battery
charger for charging dry-cell batteries that
are commonly used with home appliances.
These batteries may burst and cause injury to
persons and damage to property.
9. NEVER charge a frozen battery.
PERSONAL PRECAUTIONS
B

PREPARING TO CHARGE BATTERY:
1. If it is necessary to remove battery from vehicle
to charge, always remove grounded terminal
from battery first. Make sure all accessories in
the vehicle are off, so as not to cause an arc.
2. Be sure area around battery is well ventilated
while battery is being charged. Gas can be
forcefully blown away by using a piece of
cardboard or other non-metallic material as a
fan.
3. Clean battery terminals with a mixture of
baking soda and hot water. Be careful to keep
corrosion from coming in contact with eyes.
4. Add distilled water in each cell until battery
acid reaches level specified by battery
manufacturer. This helps purge excessive gas
from cells. Do not overfill. For Maintenance
Free Batteries - carefully follow manufacturer’s
recharging instructions.
5. Study all battery manufacturer’s specific
precautions such as removing or not removing
cell caps while charging and recommended
rates of charge.
6. Determine voltage of battery by referring
to vehicle owner’s manual and make sure
that charger output voltage matches vehicle
voltage.
1. Locate the charger as far away from the
battery as DC cables permit.
2. Never place the charger directly above the
battery being charged; gases from the battery
will corrode and damage the charger.
3. Never allow battery acid to drip on the charger
when reading specific gravity or filling the
battery.
4. Do not operate the charger in a closed area or
restrict ventilation in any way.
5. Do not set a battery on top of the charger.
6. Locate the charger at least 18” above the
floor.
7. Do not place the charger where rain, snow, or
other moisture could drip on it.
1. CAUTION: Connect and disconnect DC output clips only after setting any switches with an OFF
position to OFF and removing AC power cord from electric outlet. Never allow clips to touch each
other.
2. When hooking up charger, attach one clip to battery and the other to a point away from battery (see
sections G & H). Do not hook up charger until reading sections A–J.
3. Always make battery connections prior to plugging charger into AC outlet.
To reduce explosion risk, never connect both clips directly to the battery. When making each connection,
twist or rock clip back and forth several times to make a good connection and to reduce the risk of a clip
slipping off and creating a spark. Do not twist or rock clip on the battery after the second clip connection
is made.
CAUTION: A MARINE (BOAT) BATTERY MUST
BE REMOVED AND CHARGED ON SHORE.
TO CHARGE IT ON BOARD REQUIRES
EQUIPMENT SPECIALLY DESIGNED FOR
MARINE USE.
CAUTION: A SPARK NEAR BATTERY MAY
CAUSE BATTERY EXPLOSION. TO REDUCE
RISK OF A SPARK NEAR BATTERY:
1. Position AC and DC cords to reduce risk of
damage by hood, door, or moving engine part.
2. Stay clear of fan blades, belts, pulleys, and
other parts that can cause injury to persons.
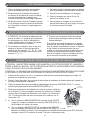
3. Check polarity of battery posts. POSITIVE
PREPARATION
C
LOCATING THE CHARGER
D
BATTERY CHARGER CONNECTION PRECAUTIONS
E
CHARGING A BATTERY THAT IS INSTALLED IN A VEHICLE
F

5
(POS, P, +) battery post usually has larger
diameter than NEGATIVE (NEG, N, –) post.
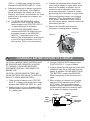
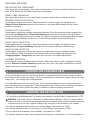
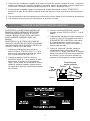
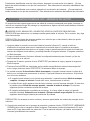
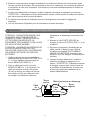
4. Determine which post of battery is grounded
(connected) to the chassis. If the negative
post is grounded to the chassis (as in most
vehicles), see Figure 1 and instruction 5a. If the
positive post is grounded to the chassis, see
instruction 5b.
5. a) For NEGATIVE GROUNDED vehicle,
connect POSITIVE (Red) clip from the
battery charger to the POSITIVE (POS, P,
+) ungrounded post of the battery.
b) For POSITIVE GROUNDED vehicle,
connect the NEGATIVE (Black) clip from
the battery charger to the NEGATIVE
(NEG, N, –) ungrounded post of the
battery. (This arrangement is usually found
in pre-1970 foreign vehicles or pre-1970
farm tractors. This is a rare occurrence.)
6. Connect the remaining battery charger clip
to the vehicle chassis or engine block, as far
away from the battery as possible. Do not
connect the clip to carburetor, fuel lines, or
sheet metal body parts. Connect to a heavy
gauge metal part of the frame or engine block.
7. When disconnecting charger, turn charging
sequence OFF by depressing the START/
STOP button, disconnect AC cord, remove
clip from vehicle chassis, and then remove clip
from battery terminal.
8. Refer to the Operating Instructions for
information on setting selector switches.
CAUTION: A MARINE (BOAT) BATTERY MUST
BE REMOVED AND CHARGED ON SHORE.
TO CHARGE IT ON BOARD REQUIRES
EQUIPMENT SPECIALLY DESIGNED FOR
MARINE USE.
CAUTION: A SPARK NEAR BATTERY MAY
CAUSE BATTERY EXPLOSION. TO REDUCE
RISK OF A SPARK NEAR BATTERY:
1. Check polarity of battery posts. POSITIVE
(POS, P, +) battery post usually has a larger
diameter than NEGATIVE (NEG, N, –) post.
2. Attach at least a 24” long, #6 gauge (AWG)
insulated battery cable to NEGATIVE (Neg,
N, –) battery post.
3. Connect POSITIVE (RED) charger clip to
POSITIVE (POS, P, +) post of battery.
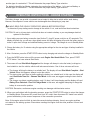
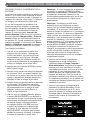
4. Position yourself and the free end of the cable
(installed in step #2) as FAR away from the
battery as possible. FACING AWAY FROM
THE BATTERY, connect the NEGATIVE
(Black) charger clip to the free end of the
cable.
5. When charging is complete, turn charging
sequence off by depressing the START/
STOP button. Then disconnect charger,
always in reverse sequence of connecting
procedure and break first connection while
as far away from battery as practical.
+_
Cable
from
Charger Cable from
Charger
Positive Booster
Cable Negative
Figure 2
Negative to
Chassis Ground
Positive
Figure 1
CHARGING A BATTERY OUTSIDE OF A VEHICLE
G

6
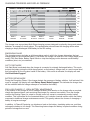
BATTERY CHARGING SETTINGS
Upon making a proper battery connection (see
Section F or G as applicable), plug AC power
cord into an AC receptacle. The unit’s display
should power up per step 1 below. The charger is
now in Standby Mode.
If, upon making the battery connection and
powering up the charger, you see an error
message on the display, disconnect from AC
power supply immediately and determine the
cause of the alarm. If you see Reverse Polarity
Detected, check all connections. If you see
Charging Stopped – Voltage Error, double
check that you are connected to a 12V system,
which is the only system voltage for which this
charger is appropriate. If you See Battery Error –
Suspect Bad Battery, the charger has detected
battery fault, such as a shorted cell.
To charge a battery:
1. Upon making a proper connection and
powering up the charger, the display will power
up, you will see a logo splash screen and then
the display will provide the battery status in
terms of open circuit voltage and estimated
battery percent of charge. The charger is in
Standby Mode.
2. Press the MODE button once to enter Battery
Charging Mode.
3. Next, choose a battery charging rate by
pressing the RATE button. Small batteries
found in lawn and garden, motorcycle or ATV
applications should be charged in the lowest
possible charge rate setting.
4. Next, choose your battery type by pressing the
TYPE button until the correct battery type is
shown. For more on managing this selection,
please see Section J, Choosing the Battery
Type.
5. Once all settings are correct, press the START/
STOP button to commence the charging
process. The charger will automatically run
through and complete the charging process.
During charging, the display will indicate the
settings chosen (10A AGM) as well as the
battery’s voltage and percent of charge. If you
press the START/STOP button at any point
during the charging sequence, the charger will
stop charging and return to Standby Mode.
Note: If, at any time in the charging process,
an ERROR message appears on the display,
disconnect from AC power immediately and
determine the cause of the alarm. See Additional
Features for a list of conditions that might cause
this warning.
Note: The charger is designed to protect
against faults and shorts (see Battery Charger
Features). If the battery to be charged has an
open circuit voltage of less than 1V, the charger
will indicate an error. If, after unplugging unit,
checking connections and verifying all settings,
you determine the problem causing the “fault”
condition is battery voltage below 1V, you can
override the charger’s protection by holding down
the START/STOP button for 3 seconds. The
charger will commence the charging sequence
and, assuming there are no other hindrances
that caused the fault indication, will complete the
charging process and automatically turn off when
the battery has reached full charge.
6. When the battery reaches full charge and
enters maintenance mode, the display will read
Charge Complete – Maintenance Mode. The
charging phase is complete and, if you need
to put your battery into service, you can do so
now. If you wish to maintain a battery in long
term storage, your charger is ideally suited
to do so. Its enhanced maintenance mode
will provide a beneficial maintenance routine,
whether the battery is connected to the charger
for days, weeks or months.
7. When you are finished with the charging
process, disconnect AC power cord from AC
outlet, then disconnect DC leads from vehicle
ground (if charging with battery in vehicle)
and battery in the reverse sequence of the
connection procedure.
OPERATING INSTRUCTIONS - CHARGING
H

7
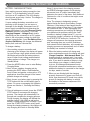
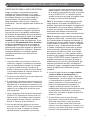
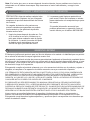
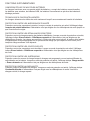
CHARGING PROGRESS AND DISPLAY FEEDBACK
PHASE 1 PHASE 2 PHASE 3 PHASE 4 PHASE 5 PHASE 6 PHASE 7
ENERGIZING FAST CHARGE ABSORPTIONCOMPLETION RESTORINGRESTING EXERCISING
14
12
10
8
6
4
2
0
VOLTAGE CURRENT
MULTI-PHASE CHARGING PROCESS
V
21
18
15
12
9
6
3
0
-3
CONSTANT CURRENT
CONSTANT
VOLTAGE
DISPLAY = EP
The charger uses a proprietary Multi-Stage charging process designed to optimally charge and maintain
batteries. An example is shown above. The representation above shows the charging routine when
charging a deeply discharged AGM battery in the 20A setting.
ENERGIZING PHASE
The charging process includes an initial energizing mode in which the charger determines the best
charging path for the connected battery. From there, the charger can enter the Fast Charge stage (most
cases), Soft Start Mode, Battery Repair Mode or stop the charging routine because unsafe battery
conditions (short, etc.) are detected.
SOFT START MODE
Soft Start Mode is activated when the charger is connected to a deeply discharged battery. This mode
protects the battery during the initial charge period, as the battery’s voltage rises to a more normal level,
and is beneficial for the long-term health of the battery. If this mode is activated, the display will read
Soft Start Mode Engaged.
BATTERY REPAIR MODE
During the Energizing Phase, if the charger detects the presence of battery sulfation, it will activate If this
mode is engaged, the display will read Battery Repair Mode Engaged. This indicates the charge time
will be extended while the charger attempts to recondition the battery.
PRO-LOGIX PHASES 5-7: IDEAL BATTERY MAINTENANCE
A key feature of this charger is how it manages a battery that remains on the charger after a complete
charge has been achieved, such as during the storage of a seasonal use vehicle. Once the charger
reaches the Resting Phase, its output is virtually turned off, except to occasionally monitor battery
condition. This is beneficial for the connected battery, as it reduces chemical reaction within the battery
compared to traditional charger maintenance modes. This greatly reduces the chance of damaging a
battery in long-term storage.
In addition, in Phase 6 Exercising, we introduce a load on the battery, simulating active use, and then
recharge the battery to full charge. This Exercising feature keeps the battery in optimal condition during
periods of storage and non-use.

ADDITIONAL FEATURES
MULTIPLE BATTERY COMPATIBILITY
The charger will properly charge a wide variety of battery types, including Conventional, Maintenance Free,
AGM, Spiral Wound, Gel Cell, Marine and Deep Cycle batteries.
SMART CLAMP TECHNOLOGY
The charger will send power to the output leads only when a proper battery connection is made.
REVERSE POLARITY PROTECTION
Guards against reverse connections. When this protection mode is engage, the display will read
Reverse Polarity Detected and power will not be sent to the output cables/clamps until the reverse
condition is corrected.
BATTERY FAULT PROTECTION
Guards against excessively charging compromised batteries. When this protection mode is engaged, the
display will read Battery Error – Suspect Bad Battery and power will not be sent to the output cables/
clamps. Conditions that cause this error include: if the battery voltage does not rise appropriately during the
charging process (indicating a shorted cell) or if the maximum charge time has been exceeded.
SHORT CIRCUIT PROTECTION
Guards against shorted connections. When this protection mode is engage, the display will read
Battery Error – Suspect Bad Battery and power will not be sent to the output cables/clamps.
OVER-VOLTAGE PROTECTION
Guards against charging errors where the charger is programmed to charge in a different voltage
than the detected voltage of the battery. When this protection mode is engage, the display will read
Charging Stopped – Voltage Error
and power will not be sent to the output cables/clamps.
OVERHEAT PROTECTION
Guards against overheat conditions within the charger. When this protection mode is engaged, the display
will read
Overheat Condition Detected
and power will not be sent to the output cables/clamps. Once the
charger cools down, it will resume charging.
CHOOSING THE CHARGING RATE
I
For the small batteries found in motorcycles, jet skis, snowmobiles and lawn tractors, always charge on
the lowest possible charge rate setting. It is not recommended to charge these smaller batteries at a high
charge rate – a low charge rate is most beneficial.
For large batteries found in cars, trucks, vans, SUVs, agricultural equipment and commercial vehicles,
higher charging rates are appropriate. Please always remember to reference the charging instructions on
the battery or the vehicle in which the battery is installed for specific charging requirements.
CHOOSING THE BATTERY TYPE
J
For Conventional and Maintenance Free flooded (wet) batteries, the ideal Battery Type selection is “STD”.
WARNING: This battery charger is designed to charge lead acid batteries. Using it to charge a lithium
battery will result in serious property damage and/or personal injury. Never charge a lithium battery with
a charger that does not have a specific setting for the exact type of lithium battery to be charged.
For batteries identified as AGM construction, the ideal Battery Type selection is “AGM”.
For batteries identified as Gel Cell construction, the ideal Battery Type selection is “GEL”.
For most Spiral Wound batteries, the best Battery Type selection is “AGM”.
For batteries identified as Deep Cycle, determine the construction of the battery. Is it a wet cell battery or

9
The battery charger can provide a increased-current output to help start a vehicle with a weak battery.
However, the computer in some vehicles can be damaged when attempting to jump start.
ALWAYS READ THE VEHICLE OPERATOR’S MANUAL BEFORE BOOSTING
to determine if jump starting can do damage to the vehicle. If not, read and follow these instructions.
CAUTION: Do not try to jump start a vehicle that does not contain a battery or you may damage electrical
systems in the vehicle.
1. Upon making a proper battery connection (see Section F), plug AC power cord into an AC receptacle. The
display will power up, you will see a logo splash screen and then the display will provide the battery status in
terms of open circuit voltage and estimated battery percent of charge. The charger is now in Standby Mode.
2. Charge the battery for 10 minutes using the appropriate settings for the size and type of battery installed in
the vehicle.
3. After 10 minutes, press the START/STOP button to stop charging and return the charger to Standby Mode.
4. Press the MODE button twice until the screen reads Engine Start Assist Mode. Then, press START/
STOP button. You have entered Start Mode.
5. The screen will read
Start Mode Engaged
and the charger will attempt to raise the battery’s voltage to a
level suitable to start the vehicle, which could take several minutes. One of three outcomes will occur:
a. The charger will bring the battery to a suitable level. The display will read
Start Mode Complete – Start
Vehicle
. When this happens, attempt to start the vehicle.
b. The start routine could time out before getting the battery to a suitable level. In this case, the display will
read
Start Mode Time Out – Resume Start Mode
. In this case, we suggest running the start mode a
again.
c. The charger can detect a problem battery, and, if it does, it will stop charging and the display will read
Battery Error Detected – Run Full Charge Mode. In this case, we suggest attempting to charge the
battery to overcome the problem.
CAUTION: Excessive, continuous engine cranking can damage vehicle starter motors.
6. When you are finished with the boosting process, press the START/STOP button to return the charger
to Standby Mode. Disconnect AC power cord from AC outlet, then disconnect DC leads from vehicle
ground and battery in the reverse sequence of the connection procedure.
Note: If the engine spins but fails to start after several starting attempts, there is an engine problem
not related to the starting system. Discontinue cranking the engine until the other problem is found and
corrected.
OPERATING INSTRUCTIONS - ENGINE STARTING
K
another type of construction? This will determine the proper Battery Type selection.
For batteries identified as Marine, determine the construction of the battery. Is it a wet cell battery or
another type of construction? This will determine the proper Battery Type selection.

10
This product is warranted to be free from defects in material or workmanship for a period of one year
from the date of original end user purchase.
This warranty extends to each person who acquires lawful ownership within one year of the original
retail purchase, but is void if the product has been abused, altered, misused or improperly packaged and
damaged when returned for repair.
This warranty applies to the product only and does not apply to any accessory items included with the
product which are subject to wear from usage; the replacement or repair of these items shall be at the
expense of the owner.
THE TERMS OF THE LIMITED WARRANTY CONSTITUTE THE BUYER’S SOLE AND EXCLUSIVE
REMEDY. IMPLIED WARRANTIES OF MERCHANTABILITY AND FITNESS FOR A PARTICULAR
PURPOSE ARE LIMITED IN DURATION TO THIS EXPRESS WARRANTY. AFTER 1 YEAR FROM
DATE OF PURCHASE, ALL RISK OF LOSS FROM WHATEVER REASON SHALL BE PUT UPON THE
PURCHASER.
MANUFACTURER SHALL NOT BE LIABLE FOR INCIDENTAL AND CONSEQUENTIAL DAMAGES
UNDER ANY CIRCUMSTANCES: LIABILITY, IF ANY, SHALL NEVER EXCEED THE PURCHASE
PRICE OF THIS PRODUCT REGARDLESS OF WHETHER LIABILITY IS PREDICATED UPON
BREACH OF WARRANTY (EXPRESS OR IMPLIED), NEGLIGENCE, STRICT TORT OR ANY OTHER
THEORY.
Some states do not permit the limitation of warranties or limitation of consequential or incidental damages,
so the above disclaimer and limitation may not apply to you. This warranty gives you specific legal rights,
and you may also have other rights which vary from state to state.
CAUTION – Make sure charger is unplugged from electrical outlet before performing any maintenance.
A minimum amount of care can keep your battery charger working and looking good for years.
1. Clean the clamps after each use. Wipe off any battery fluid that may have come in contact with the
clamps to prevent corrosion. Battery fluid may be neutralized with a solution of water and baking soda
2. If needed, the case may be wiped clean with a soft cloth. There are no user-serviceable parts inside.
For information concerning use, applications, or service, call Technical Service at 800.328.2921.
CHARGER CARE & MAINTENANCE
L
LIMITED WARRANTY
M

11
If this product fails within the warranty period, return it to your dealer for an exchange.
A valid, dated sales receipt is required to obtain service under this warranty.
Instructions for obtaining service under this warranty:
To obtain service under this warranty, return your charger to the place of purchase, along with your
dated sales receipt, for an exchange. Your product can also be sent back to Clore Automotive for
exchange – visit www.cloreautomotive.com for shipping address.
Registering Your Purchase
For best service and to receive periodic product updates, please visit www.cloreregistration.com, click
on the SOLAR logo, complete the information in the web form and click “submit.” It’s that easy!
For answers to questions concerning use, out-of-warranty service, or warranty/service information on
this or other Clore Automotive products, contact Clore Automotive Technical Service at 800.328.2921;
913.310.1050; www.cloreautomotive.com .
Model Nos. PL2545
Part No. 141-252-000
FOR WARRANTY OR SERVICE
N

12
ADVERTENCIA
Manual Del Usario
INSTRUCCIONES IMPORTANTES DE SEGURIDAD-LEA ESTO PRIMERO
A
PL2545
Cargador de batería

13
1. CONSERVE ESTAS INSTRUCCIONS - Este
#manual contiene importantes instruccciones
de seguridad y operación para el modelo
PL2545.
2. No exponga el cargador a la lluvia o nieve.
3. El uso de accesorios no recomendados o no
vendidos por el fabricante puede tener como
consecuencia riesgos de incendio, descarga
eléctrica o lesiones físicas.
4. Para reducir el riesgo de daños al cable y
enchufe, tire siempre de la clavija y no del
cable.
5. No se deben usar extendiones a menos que
sea absolutamente necesario. El uso de una
extensión inadecuada podria crear riesgo de
incendio y descargas eléctricas. Si se necesita
una extensión, asegúrese de que:
a. la clavija de la extensión tenga el mismo
número de vástagos, y estos sean del
mismo tamaño y forma que los de la clavija
del cargador,
b. la extensión las conexiones correctas y esté
en buen estado eléctrico; y que
c. el calibre delos cables sea adecuado para la
logitud de la extensión, según se especifica
del cable en pies:
Longitud del cable en M : (7,60) (15,24) (30,50) (45,75)
Calibre AWG del cable : 18 16 14 12
6. Para evitar descargas eléctricas, deseche
el cargador de baterías si el cable presenta
defectos.
7. No opere el cargador se ha sufrido algún
impactso fuerte, se ha caido o se ha dañado
de alguna manera. Llévelo a un técnico
capacitado para que lo repare.
8. No desarme el cargador. Llévelo a un técnico
capacitado cuando necesite mantenmiento o
reparación. Se se arma incorrectamente se
puede crear un riesgo de descarga eléctrica o
incendio.
9. Pare recucri el riesgo de descarga eléctrica,
desenchufe el cargador de la toma de corriente
antes de intentar cualquier mantenimiento o
limpieza. Con solo apagar los controles no se
reduce este riesgo.
10. Controle cargador de baterías diariamente
cuando se usa mantener batería por períodos
prolongados.
11. ADVERTENCIA - RIESGO DE GASES
EXPLOSIVOS.
a. Es peligroso trabajar en la cercania de
una batería de plomo-acido. Las baterías
generan gases explosivos durante su
operación normal. Por esta razon es muy
importante que, antes de usar su cargador,
lea este manual, y siga estas instrucciones
al pie de la letra.
b. Para reducir el riesgo de explosión de
la bateria, siga estas instrucciones y las
indicaciones publicadas poor el fabricante
de la bateria y el fabricante de los equipos
que piensa usar cerca de la bateria. Vea y
lea cuidadosamente las indicaciones en los
productos y en el compartimiento de la bateria.

14
PREPARACIÓN
C
PREPARACIÓN PARA CARGAR LA BATERÍA
1. Cuando sea necesario sacar la batería del
vehículo para poder cargarla, desconecte
primero el terminal de toma a tierra. Asegúrese
de que estén apagados (off) todos los
accesorios del vehículo para que no se
produzca un arco.
2. Asegúrese de tener buena ventilación alrededor
de la batería cuando se esté cargando. Puede
disipar el gas que se acumule soplando con
fuerza con un pedazo de cartón o algún otro
material no metálico, a modo de abanico
3. Limpie los bornes de la batería. Tenga cuidado
de que el material corroído no haga contacto
con sus ojos.
4. Agregue agua destilada en cada celda hasta
que la batería de ácido alcance el nivel que
especifica el fabricante de baterías. Esto ayuda
a purgar el exceso de gas de las celdas. No
cargue excesivamente. Para las baterías libres
de mantenimiento, siga las instrucciones de
recarga del fabricante cuidadosamente.
5. Estudie todas las precauciones específicas del
fabricante de la batería, como la recomendación
de remover o no los tapones de las celdas y la
intencidad de carga recomendada.
6. Determine el voltaje de la batería consultando
el manual del usuario del vehículo y asegúrese
de que el voltaje de salida del cargador coincide
con el voltaje del vehículo.
1. Asegúrese de que haya persoas que le
puedan oir o estén suficientemente cerca para
brindarle auxilio cuando trabaje cerca de una
bateria de plomo-ácido.
2. Tenga siempre cerca agua y jabón en
abundancia en caso de que el ácido de la
bateria haga contacto con cu piel, ropa u ojos.
3. Use protección completa para los ojos,
además de la ropa protectora. No se toque los
ojos cuando trabaje cerca de una bateria de
plomo-ácido.
4. Si el ácido de la bateria hace contacto con
su ropa o su piel, lávese inmediatamente con
agua y jabón. Si el ácido entra a sus ojos,
enjuáguese inmediatamente con aguacorriente
fria por lo menos durante 10 minutos y consiga
atención médico inmediata.
5. NUNCA fume ni permita que haya chispas o
fuego ceca de la bateria o del motor.
6. Tenga sumo cudado para evitar el riesgo de
que se caiga una herramienta de metal sobre
la bateria. Podria ocasionarse una chispa o
corto circuito de la bateriao de alguna otra
pieza y producir una explosión.
7. Quitese todos los objetos metálicos personales
como anillos, brazaletes, collares y relojes que
podrian atorarse en una pieza en movimiento
o causar un corto circuito por ser conductores.
Las baterias de plomo-ácido pueden producir
corto circuitos con potencia suficiente como
para derretir un anillo u otro objeto de metal
similar, causando severas quemaduras.
8. Use el cargador para cargar baterias de
PLOMO-ACIDO solamente. Este cargador
no ha sido diseñado para proporcionar voltaje
a sistemas eléctricos de bajo voltaje que
no sean para arrancar motores. No use el
cargador de la bateria para cargar baterias
secas comúnmente usadas bara aparatos del
hogar. Estas baterias pueden estallar y causar
heridas a las personas o a la propiedad.
9. NUNCA trate de cargar una bateria congelada.
PRECAUCIONES PERSONALES
B

15
UBICACION DEL CARGADOR
D
PRECAUCIONES AL CONECTAR EL CARGADOR DE LA BATERIA
E
1. Coloque el cargador en un lugar tan apartado
de la batería como lo permitan los cables de
paso de corriente continua.
2. Nunca ponga el cargador directamente arriba de
la batería que está cargando, ya que los gases
emanados por la batería pueden corroer y dañar
el cargador.
3. Nunca permita que gotee ácido de la batería
sobre el cargador cuando use el densímetro o
cuando llene la batería.
4. No opere el cargador en un lugar encerrado ni
obstruya la ventilación de ninguna manera.
5. No ponga la batería encima del cargador.
6. Coloque el cargador por lo menos 18” (50 cm)
sobre el nivel del piso.
7. No coloque el cargador en lugares donde
pueda caer lluvia, nieve u otro tipo de
humedad.
1. ADVERTENCIA : Conecte y desconecte
las mordazas de salida de corriente directa
únicamente luego de haber colocado los
interruptores en posición de apagado (off) y de
haber retirado el cable de corriente continua del
receptáculo. Nunca permita que las mordazas
se toquen entre sí.
2. Para conectar el cargador coloque una mordaza
en la batería y la otra en un punto apartado
de la batería (vea las secciones “G” y “H”). No
concecte el cargador sin leer previamente las
secciones de la “A” a la “J.”
3. Siempre haga las conexiones de batería antes
de tapar el corcel en la salida de C.A.
Para reducir el riesgo de una explosión de
la batería, nunca conecte ambas mordazas
directamente a la batería. Al hacer cada conexión,
gire u oscile la mordaza hacia atrás y hacia adelante
varias veces para lograr una buena conexión y
reducir el riesgo de que se salga la mordaza y cree
una chispa. Nunca debe girar ni oscilar una mordaza
conectada a la batería, después de haber hecho la
segunda conexión.
CARGA DE UNA BATERÍA INSTALADA EN EL VEHÍCULO
F
ADVERTENCIA: LAS BATERIAS MARINAS (DE EMBARCACIONES) DEBEN SER RETIRADAS PARA
CARGARLAS EN TIERRA. SI SE LAS CARGA A BORDO, SE NECESITA UN EQUIPO ESPECIALMENTE
DISEÑADO PARA USO MARINO.
ADVERTENCIA: SI SE PRODUCEN CHISPAS CERCA DE LA BATERIA SE PUEDE OCASIONAR UNA
EXPLOSION. PARA EVITAR EL RIESGO DE CHISPAS CERCA DE LA BATERIA:
1. Coloque el cable de CA y de CC de modo que no sea dañado por la cubierta del motor, puerta o partes en
movimiento del motor.
2. Manténgase alejado de las aspas de ventiladores, bandas, poleas y otras
partes en movimiento que pueden causar lesiones.
3. Verifique la polaridad de los bornes de la batería. El borne POSITIVO (POS,
P, +) de la batería tiene por lo general un diámetro mayor que el borne
NEGATIVO (NEG, N, –).
4. Determine cuál de los bornes de la batería está conectado a tierra en el
chasis. Si el borne negativo está conectado al chasis (como en la mayoría
de los vehículos), vea la figura 1 y el paso 5 a. Si el borne positivo está
conectado al chasis, vea el paso 5 b.
5. a) En un vehículo CON NEGATIVO A TIERRA, conecte la mordaza
POSITIVA (roja) del cargador de la batería en la posición POSITIVA
(POS, P, +), o sea, en el borne no conectado a tierra.
b) En un vehículo CON POSITIVO A TIERRA, conecte la mordaza NEGATIVA
(negra) al borne NEGATIVO (NEG, N, –), o sea, borne no conectado a tierra de la batería. (Este
arreglo se encuentra generalmente en pre-1970 vehículos extranjeros o pre-1970 tractores de la
granja. Esto es una ocurrencia rara.)
Negativo a tierra
del chasis
Positivo
Figura 1

16
CARGA DE LA BATERÍA FUERA DEL VEHÍCULO
G
ADVERTENCIA: LAS BATERIAS MARINAS (DE
EMBARCACIONES) DEBEN SER RETIRADAS
PARA CARGARLAS EN TIERRA. SI SE LAS
CARGA A BORDO, SE NECESITA UN EQUIPO
ESPECIALMENTE DISEÑADO PARA USO
MARINO.
ADVERTENCIA: SI SE PRODUCEN CHISPAS
CERCA DE LA BATERIA SE PUEDE OCASIONAR
UNA EXPLOSION. PARA EVITAR EL RIESGO DE
CHISPAS CERCA DE LA BATERIA:
1. Verifique la polaridad de los bornes de la
batería. El borne POSITIVO (POS, P, +) de la
batería tiene por lo general un diámetro mayor
que el borne NEGATIVO (NEG, N, –).
2. Conecte un cable (no provisto) al borne
NEGATIVO (NEG, N, –) de la batería. El cable
deberá tener un mínimo de 24 pulgadas de
largo, y de un calibre que no sea menor que los
cables de salida del cargador (pueden usarse
los cables de la batería y extensiones para paso
de corriente).
3. Conecte la mordaza POSITIVA (roja) del
cargador al borne POSITIVO (POS, P, +) de la
batería.
4. Colóquese del lado libre del cable (instalado en
el paso 2) lo más LEJOS posible de la batería.
ALEJANDOSE DE LA BATERIA, para reducir
el riesgo de lesiones, conecte la mordaza
del cable NEGATIVO (negro) del cargador al
extremo libre del cable.
5. Cuando la carga esté completa, apague la
secuencia de carga presionando el botón
“START/STOP”. Luego, desconecte el cargador,
siempre en secuencia inversa al procedimiento
de conexión y corte la conexión mientras se
mantiene lo más alejado de la batería posible.
+_
Cable
del
cargador Cable
del
cargador
Positivo
Extensión para
pascar corriente
Negativo
Figura 2
6. Conecte la otra mordaza del cargador de la batería al chasis del vehículo o bloque del motor, lo más lejos
posible de la batería. No conecte la mordaza al carburador, tubería de combustible, o partes metálicas de
la carrocería. Conéctela a una parte pesada de metal en el chasis o bloque del motor.
7. Al desconectar el cargador, apague la secuencia de cargado presionando el botón “START/STOP”,
desconecte el cable de CA, retire la pinza del chasis del vehículo y luego retire la pinza del terminal de la
batería.
8. Vea las instrucciones de funcionamiento para información sobre el ajuste de los interruptores de selección.
9. Vea operando instrucciones para la información de duración de carga.

17
INSTRUCCIONES DE USO – CARGA LA BATERÍA
H
CONFIGURACIÓN PARA LA CARGA DE BATERÍAS
Luego de realizar una conexión correcta de
la batería (consulte la Sección F o G, según
corresponda), conecte el cable de alimentación
de corriente alterna en un tomacorriente de
corriente alterna. La pantalla de la unidad
debe encenderse según el paso 1 descrito a
continuación. Ahora el cargador está en Modo de
espera.
Si luego de haber realizado la conexión de la
batería y de encender el cargador, aparece un
mensaje de error en la pantalla, desconéctelo
de la fuente de alimentación de corriente alterna
de inmediato y determine la causa de la alarma.
Si lee en la pantalla Se detectó polaridad
invertida, verifique todas las conexiones. Si lee
en la pantalla Carga detenida: Error de voltaje,
verifique nuevamente que se ha conectado a
un sistema de 12V, que es el único voltaje del
sistema para el cual este cargador es adecuado.
Si lee en la pantalla Error de batería - Sospecha
de batería defectuosa, el cargador detectó
una falla en la batería, como una celda en
cortocircuito.
Para cargar una batería:
1. Luego de realizar una conexión correcta y de
encender el cargador, la pantalla se encenderá,
verá una pantalla de bienvenida con el logotipo
y luego la pantalla mostrará el estado de la
batería en términos de voltaje de circuito abierto
y porcentaje estimado de carga de la batería. El
cargador está en modo de espera.
2. Presione el botón MODE una vez para ingresar al
modo de carga de la batería.
3. A continuación, seleccione un tipo de carga de la
batería presionando el botón RATE. Las baterías
pequeñas que se encuentran en aplicaciones de
césped y jardín, motocicletas o cuatrimotos deben
cargarse en la configuración del tipo de carga
más baja posible.
4. Luego, seleccione el tipo de batería presionando
el botón TYPE hasta que se muestre el tipo de
batería correcto. Para obtener más información
sobre la gestión de esta selección, consulte la
Sección J, Elección del tipo de batería.
5. Una vez que todos los ajustes son correctos,
presione el botón START/STOP para comenzar
el proceso de carga. El cargador se activará
automáticamente y completará el proceso de
carga. Durante la carga, la pantalla indicará los
ajustes elegidos (10A AGM), así como el voltaje
de la batería y el porcentaje de carga. Si presiona
el botón START/STOP en cualquier momento
durante la secuencia de carga, el cargador dejará
de cargar y volverá al Modo de espera.
Nota: Si en cualquier momento del proceso de
carga, aparece un mensaje de ERROR en la
pantalla, desconecte de inmediato el cargador de
la alimentación de corriente alterna y determine
la causa de la alarma. Consulte Características
adicionales para obtener una lista de las
condiciones que pueden causar esta advertencia.
Nota: El cargador se ha diseñado para brindar
protección contra fallas y cortocircuitos (consulte
las Características del cargador de baterías). Si
la batería que se va a cargar tiene un voltaje de
circuito abierto de menos de 1 voltio, el cargador
indicará un error. Si después de desconectar
la unidad, comprobar las conexiones y verificar
todos los ajustes, determina que el problema
que causa la condición de “falla” es un voltaje
de la batería inferior a 1 voltio, puede anular la
protección del cargador manteniendo presionado
el botón START/STOP durante 3 segundos. El
cargador comenzará la secuencia de carga y,
asumiendo que no hay otros impedimentos que
causaron la indicación de falla, completará el
proceso de carga y se apagará automáticamente
cuando la batería haya alcanzado la carga
completa.
6. Cuando la batería alcanza la carga completa
y entra en Modo de mantenimiento, la
pantalla mostrará Carga Completa - Modo de
mantenimiento. La fase de carga está completa
y, si necesita poner su batería en servicio,
puede hacerlo ahora. Si desea mantener una
batería en almacenamiento prolongado, su
cargador es ideal para hacerlo. Su modo de
mantenimiento mejorado proporcionará una rutina
de mantenimiento beneficiosa, ya sea que la
batería esté conectada al cargador durante días,
semanas o meses.
7. Cuando finalice con el proceso de carga,
desconecte el cable de alimentación de corriente
alterna del tomacorriente, luego desconecte
el cable de corriente continua de la tierra del
vehículo (si se está cargando con la batería en el
vehículo) y los cables de la batería en secuencia
inversa a la del procedimiento de conexión.

18
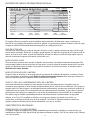
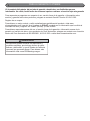
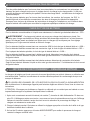
PROGRESO DE CARGA E INFORMACIÓN EN PANTALLA
FASE 1FASE 2FASE 3FASE 4FASE 5FASE 6FASE 7
ACTIVACIÓN CARGA RÁPIDA ABSORCIÓN FINALIZACIÓN RESTABLECIMIENTOEN REPOSO EN ACTIVIDAD
14
12
10
8
6
4
2
0
VOLTAJE CORRIENTE
PROCESO DE CARGA DE MÚLTIPLES FASES
V
21
18
15
12
9
6
3
0
-3
CORRIENTE CONTINUA VOLTAJE
CONTINUA
PANTALLA = EP
TIEMPO TRANSCURRIDO
El cargador utiliza un proceso de carga de múltiples etapas patentado, diseñado para cargar y mantener las
baterías de forma óptima. Más arriba se muestra un ejemplo. La representación anterior muestra la rutina de carga
al cargar una batería AGM completamente descargada en la configuración de 20 A.
FASE DE ACTIVACIÓN
El proceso de carga incluye un modo de activación inicial en el cual el cargador determina la mejor ruta de carga
para la batería conectada. Desde allí, el cargador puede ingresar a la etapa de Carga rápida (en la mayor parte de
casos), al modo de Inicio suave, al modo de Reparación de batería o detener la rutina de carga debido a que se
detectan condiciones inseguras de la batería (cortocircuito, etc.).
MODO DE INICIO SUAVE
El modo de inicio suave se activa cuando el cargador está conectado a una batería totalmente descargada. Este
modo protege la batería durante el período de carga inicial, ya que el voltaje de la batería aumenta a un nivel más
normal y es beneficioso para el estado a largo plazo de la batería. Si se activa este modo, la pantalla mostrará
Modo de inicio suave activado.
MODO DE REPARACION DE LA BATERIA
Durante la fase de activación, si el cargador detecta la presencia de sulfatación de la batería, se activará. Si este
modo está activado, la pantalla mostrará Modo de reparación de batería activado. Esto indica que el tiempo de
carga se extenderá mientras el cargador intenta reacondicionar la batería.
FASES 5-7 PRO-LOGIX: MANTENIMIENTO IDEAL DE LA BATERÍA
Una función clave de este cargador es cómo manejar una batería que permanece en el cargador luego de
alcanzar la carga completa, tal como durante el almacenamiento de un vehículo de uso estacional. Una vez que el
cargador llega a la Fase de reposo, su salida prácticamente se desconecta, excepto para controlar la condición de
la batería de vez en cuando. Esto es beneficioso para una batería que está conectada, ya que reduce la reacción
química dentro de la batería en comparación a los modos de mantenimiento convencionales de los cargadores.
Esto reduce en gran medida la probabilidad de dañar una batería durante el almacenamiento a largo plazo.
Además, en la Fase 6, En actividad, se introduce una carga en la batería, que simula el uso activo y, a
continuación, se recarga la batería hasta la carga completa. La función En actividad mantiene la batería en
óptimas condiciones durante periodos de almacenamiento o en que no se utiliza.
CARACTERÍSTICAS ADICIONALES
COMPATIBILIDAD CON VARIAS BATERÍAS
El cargador cargará correctamente una amplia variedad de tipos de baterías, incluidas las convencionales, sin
mantenimiento, baterías AGM, Spiral Wound (de celdas enrolladas en espiral), Gel Cell (de celdas de gel), Marinas
y de Ciclo profundo.

19
TECNOLOGIA “Smart Clamp” (PINZA INTELIGENTE)
El cargador enviará corriente a los cables de carga solamente si la conexión con la batería se ha realizado
de forma adecuada.
PROTECCIÓN CONTRA INVERSIÓN DE POLARIDAD
Protege contra conexiones invertidas. Cuando este modo de protección está activado, la pantalla mostrará
Se detectó inversión de polaridad y no se enviará energía a los cables/pinzas de salida hasta que se corrija la
condición invertida.
PROTECCIÓN CONTRA FALLAS DE LA BATERÍA
Protege contra la carga excesiva de baterías en peligro. Cuando este modo de protección está activado, la
pantalla mostrará Error de batería - Sospecha de batería defectuosa y no se enviará energía a los cables/
pinzas de salida. Las condiciones que causan este error incluyen: Si el voltaje de la batería no aumenta
adecuadamente durante el proceso de carga (lo que indica una celda en cortocircuito) o si se ha excedido el
tiempo máximo de carga.
PROTECCIÓN CONTRA CORTOCIRCUITO
Protege contra conexiones en cortocircuito. Cuando este modo de protección está activado, la pantalla mostrará
Battery Error de batería - Sospecha de batería defectuosa y no se enviará energía a los cables/pinzas de
salida.
PROTECCION CONTRA SOBREVOLTAJE
Protege contra los errores de carga cuando el cargador está programado para cargar en un voltaje diferente
que el voltaje detectado de la batería. Cuando este modo de protección está activado, la pantalla mostrará
Carga detenida - Error de voltaje y no se enviará energía a los cables/pinzas de salida..
PROTECCIÓN CONTRA SOBRECALENTAMIENTO
Protege contra condiciones de sobrecalentamiento dentro del cargador. Cuando este modo de protección está
activado, la pantalla mostrará Se detectó una condición de sobrecalentamiento y no se enviará energía a los
cables/pinzas de salida. Una vez que el cargador se enfríe, se reanudará la carga.
SELECCIONAR EL TIPO DE BATERÍA
J
Para baterías convencionales y baterías libres de mantenimiento inundadas (húmedas), la selección ideal
de tipo de batería es “STD”.
ADVERTENCIA: Este cargador de batería está diseñado para cargar baterías de plomo ácido. Sise
utiliza para cargar una batería de litio, se producirán daños graves a la propiedad y / o lesiones
personales. Nunca cargue una batería de litio con un cargador que no tenga una configuración
específica para el tipo exacto de batería de litio que se cargará.
Para baterías identificadas como construcción AGM, la selección ideal de tipo de batería es “AGM”.
Para baterías identificadas como construcción por células de gel, la selección ideal de tipo de batería es
“GEL”.
Para la mayoría de las baterías con estructura en espiral, la selección ideal de tipo de batería es “AGM”.
SELECCIONAR LA VELOCIDAD DE CARGA
I
Para las pequeñas baterías que se encuentran en motocicletas, motos acuáticas, motonieves y tractores
de jardín, realice siempre la carga a la menor velocidad posible. No se recomienda cargar estas baterías
más pequeñas a una velocidad de carga alta; es mejor utilizar una velocidad baja.
Para baterías grandes que se encuentran en autos, camiones, camionetas, utilitarios, equipos de
agricultura y vehículos comerciales, es apropiado utilizar mayores velocidades de carga. Siempre
recuerde remitirse a las instrucciones de carga de la batería o del vehículo en el que se instala la batería
para consultar requisitos específicos de carga.

20
INSTRUCCIONES DE USO - ARRANQUE DEL MOTOR
K
El cargador de batería puede proporcionar una salida de corriente incrementada para ayudar a arrancar un
vehículo con una batería baja. Sin embargo, la computadora en algunos vehículos puede dañarse al intentar
arrancar con cables de auxilio.
SIEMPRE LEA EL MANUAL DEL USUARIO DEL VEHÍCULO ANTES DE REALIZAR UNA
PROPULSIÓN para determinar si el arranque auxiliar puede dañar el vehículo. De lo contrario, lea y siga
estas instrucciones.
PRECAUCIÓN: No intente dar arranque auxiliar a un vehículo que no tiene batería, dado que puede
dañar los sistemas eléctricos del vehículo.
1. Luego de realizar la conexión correcta de la batería (consulte la Sección F), conecte el cable de
alimentación de corriente alterna en un tomacorriente de corriente alterna. La pantalla se encenderá,
mostrará una pantalla de bienvenida con el logotipo y luego la pantalla mostrará el estado de la batería en
términos de voltaje de circuito abierto y porcentaje estimado de carga de la batería. El cargador está ahora
en Modo de espera.
2. Cargue la batería durante 10 minutos utilizando la configuración adecuada para el tamaño y el tipo de
batería instalada en el vehículo.
3. Después de 10 minutos, presione el botón START/STOP para detener la carga y regresar el cargador al
Modo de espera.
4. Presione el botón MODE dos veces hasta que la pantalla muestre Modo de asistencia de arranque del
motor. Luego, presione el botón START/STOP. Ha activado el Modo de arranque.
5. La pantalla mostrará Se ha activado el Modo de arranque y el cargador intentará elevar el voltaje de la
batería a un nivel adecuado para arrancar el vehículo, lo que podría demorar varios minutos. Se producirá
uno de los tres resultados:
a. El cargador llevará la batería a un nivel de carga adecuado. La pantalla mostrará Modo de arranque
completo - Arranque el vehículo. Cuando esto ocurre, intente arrancar el vehículo.
b. La rutina de inicio podría agotarse antes de llevar la batería a un nivel de carga adecuado. En este caso,
la pantalla mostrará Modo de arranque agotado - reanudar el modo de arranque. En este caso,
sugerimos ejecutar nuevamente el modo de arranque.
c. El cargador puede detectar un problema en la batería y, si lo hace, dejará de cargar y la pantalla
mostrará el mensaje Se detectó error de batería - Ejecutar modo de carga completa. En este caso,
sugerimos intentar cargar la batería para solucionar el problema.
PRECAUCIÓN: Un arranque de motor continuo y excesivo puede dañar los motores de arranque de los
vehículos.
6. Cuando haya terminado con el proceso de propulsión, presione el botón “START/STOP” (ARRANQUE/
PARADA) para volver el cargador al Modo de espera. Desconecte el cable de alimentación CA de la
toma de CA, luego desconecte los cables de CC de la masa del vehículo y la batería, en secuencia
inversa al procedimiento de conexión.
Para baterías identificadas como de ciclo profundo, determine la construcción de la batería. ¿Es una
batería de celdas húmedas u otro tipo de construcción? Esto determinará la selección adecuada del tipo
de batería.
Para baterías identificadas como marinas, determine la construcción de la batería. ¿Es una batería de
celdas húmedas u otro tipo de construcción? Esto determinará la selección adecuada del tipo de batería.
La page charge ...
La page charge ...
La page charge ...
La page charge ...
La page charge ...
La page charge ...
La page charge ...
La page charge ...
La page charge ...
La page charge ...
La page charge ...
La page charge ...
La page charge ...
La page charge ...
-
 1
1
-
 2
2
-
 3
3
-
 4
4
-
 5
5
-
 6
6
-
 7
7
-
 8
8
-
 9
9
-
 10
10
-
 11
11
-
 12
12
-
 13
13
-
 14
14
-
 15
15
-
 16
16
-
 17
17
-
 18
18
-
 19
19
-
 20
20
-
 21
21
-
 22
22
-
 23
23
-
 24
24
-
 25
25
-
 26
26
-
 27
27
-
 28
28
-
 29
29
-
 30
30
-
 31
31
-
 32
32
-
 33
33
-
 34
34


Solar PL2545 Le manuel du propriétaire
- Catégorie
- Chargeurs de batterie
- Taper
- Le manuel du propriétaire
dans d''autres langues
- English: Solar PL2545 Owner's manual
- español: Solar PL2545 El manual del propietario
Documents connexes
Autres documents
-
 pro.point Battery Charger Manuel utilisateur
-
Schumacher Motomaster Eliminator 011-1981-2 – CT044 Workshop Series Battery Charger Le manuel du propriétaire
-
-
-
-
-
-
-
-
Schumacher BE01250 Automatic Battery Charger SC1280 Automatic Battery Charger SC1323 Automatic Battery Charger Le manuel du propriétaire
