Panasonic ET-PLF10 Manuel utilisateur
- Catégorie
- Lentilles de projection
- Taper
- Manuel utilisateur

ENGLISH
FRANÇAIS
日本語
Operating Instructions
Lens Fixed Attachment
Model No. ET-PLF10
DPQX1156ZC
Commercial Use
Thank you for purchasing this Panasonic product.
■To ensure safe and correct use, please read this manual together with the operating instructions supplied
with the projector carefully.
■ Before using this product, be sure to read “Read this rst!” (Page 3).
■Please save this manual for future use.

2 - ENGLISH
Contents
Read this rst! ................................................................................................... 3
Before Use.......................................................................................................... 4
Attaching ............................................................................................................ 5
Preparing the Projection Lens ............................................................................................ 5
Preparing the Lens Fixing Attachment ................................................................................ 5
Attaching the Lens Fixing Attachment ................................................................................ 6
Attaching the Lens Hood .................................................................................................... 9
Specications .................................................................................................. 11
External Dimensions ....................................................................................... 11

ENGLISH - 3
Read this rst! Always follow these precautions
WARNING:
Before attaching the lens xing attachment, be sure to turn off the power and disconnect the power
plug from the wall outlet.
zUnexpected projection of light may cause injury to eyes.
zReplacing without removing the power plug may result in electrical shock.
Do not allow children to reach the supplied at washers, spring washers, and thumbscrews.
zThese items can cause personal injury if swallowed.
zIf swallowed, seek medical help immediately.
CAUTION:
Do not touch any part or remove parts other than specied.
zDoing so may cause a loss of performance or safety.

4 - ENGLISH
Before Use
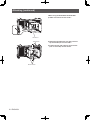
■Overview
This product suppresses vibration of projection images due to vibration of the lens by xing the projection lens of
the projector.
■Supported Projectors
PT-RQ32K, PT-RZ31K, and PT-RS30K series
PT-RQ13K, PT-RZ12K, and PT-RS11K series
PT-RZ21K and PT-RS20K series
Note
zModels other than the above may also be supported. Refer to the operating instructions of the projector you
are using.
■Structural components
Part name Appearance (quantity) Application
Lens xing attachment
mount bracket
x1
This part attaches to the projector unit.
It is a bracket for attaching the lens xing
attachment bracket
Lens xing attachment
bracket
x1
This part attaches to the lens xing
attachment mount bracket.
It is a bracket for adjusting and xing the
positions of the lens xing brackets.
Lens xing bracket (A)
x2
These x a lens other than the ET-D75LE50 /
ET-D75LE90 / ET-D75LE95 / ET-D3LEW50 /
ET-D3LEF70.
Lens xing bracket (B)
x2
These x the ET-D75LE50 / ET-D75LE90 /
ET-D75LE95 / ET-D3LEW50 / ET-D3LEF70.
Screws and washers Spring washer (M4)
x4
These are used for bracket assembly and
xing the lens xing brackets.
Flat washer (M4)
x4
Thumbscrew (M4 x 10)
x8

ENGLISH - 5
Preparing the Projection Lens
Attach the lens xing attachment after installing and adjusting the lens.
If the lens hood, which is an accessory of the projector, is already mounted, it must rst be removed.
Attention
zThe projection lens will be xed after attaching the lens xing attachment. Do not perform lens calibration or
lens adjustment after the lens xing attachment is attached.
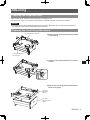
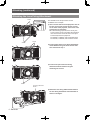
Preparing the Lens Fixing Attachment
Attaching
1) Remove the two upper thumbscrews (inserted
in round holes).
Lens xing attachment bracket
Lens xing attachment
mount bracket
2) Loosen the two lower thumbscrews (inserted
in slots).
3) Remove the lens xing attachment bracket as
shown in the gure.
Lens xing
attachment
bracket
Lens xing
attachment mount
bracket

6 - ENGLISH
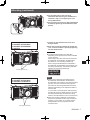
Attaching (continued)
The illustrations for this procedure use the
PT-RZ21K as an example.
1) Of the screws that surround projection lens at
its four corners (two screws at each corner)
on the front of the projector, remove the inner
screws (four screws total).
zFor the following projectors, there is only one
screw at each corner surrounding the projection
lens. Remove the screws at each corner (four
screws total) for these projectors.
PT-RQ32K, PT-RZ31K, and PT-RS30K series
PT-RQ13K, PT-RZ12K, and PT-RS11K series
Screws
Screws
Attaching the Lens Fixing Attachment
2) Fix the upper part the lens xing attachment
mount bracket using two of the screws that
were removed in step 1.
4) Attach the lens xing attachment bracket to
the lens xing attachment mount bracket as
shown in the gure.
3) Fix the lower part of the lens xing
attachment mount bracket using the
remaining two screws.
Lens xing attachment
bracket
Screws
Screws

ENGLISH - 7
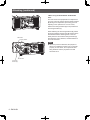
Attaching (continued)
5) Fix the upper part of the lens xing
attachment bracket using the thumbscrews
removed in step 1 of "Preparing the Lens
Fixing Attachment."
6) Fix the lower part of the lens xing attachment
bracket by tightening the thumbscrews (two
places).
7) Loosen the two thumbscrews of the lens
xing brackets.
8) Push the lens xing brackets up against the
lens, and then x them in place by tightening
the two thumbscrews.
Attention
zThe lens xing brackets to be used differ
depending on the projection lens that is installed
on the projector.
When using a lens other than the ET-D75LE50 /
ET-D75LE90 / ET-D75LE95 / ET-D3LEW50 /
ET-D3LEF70, use lens xing brackets (A).
When using the ET-D75LE50 / ET-D75LE90 /
ET-D75LE95 / ET-D3LEW50 / ET-D3LEF70, use
lens xing brackets (B). The following indication
appears on lens xing brackets (B).
Note
zWhen using a projection lens other than the
ET-D75LE50 / ET-D75LE90 / ET-D75LE95 /
ET-D3LEW50 / ET-D3LEF70, lens xing brackets
(B) may come into contact with the projection
lens when the lens xing attachment bracket is
attached, depending on the adjustment state of
the lens shift.
In such cases, use the projector with lens xing
brackets (B) removed. Safely store the removed
lens xing brackets (B), thumbscrews, spring
washers, and at washers so as not to lose them.
zWhen this product is attached, the projector's
active focus optimizer function may not operate
properly. In such cases, do not press the lens
xing brackets onto the projection lens with
excessive force.
Lens xing brackets (A)
When using a lens other than the
ET-D75LE50 / ET-D75LE90 /
ET-D75LE95 / ET-D3LEW50 /
ET-D3LEF70
When using the ET-D75LE50 /
ET-D75LE90 / ET-D75LE95 /
ET-D3LEW50 / ET-D3LEF70
Lens xing brackets (B)

8 - ENGLISH
<When using the ET-D75LE90 / ET-D75LE95
lens>
The lock screw of the peripheral focus adjustment
ring may come into contact with lens xing brackets
(B) during focus adjustment, preventing you from
adjusting to the optimal focus. In such cases,
reattach lens xing brackets (B) in the positions for
lens xing brackets (A).
When attaching the lens xing brackets (B), attach
the spring washers and then the at washers to the
thumbscrews before attaching them to the unit.
Safely store the removed lens xing brackets (A),
thumbscrews, spring washers, and at washers so
as not to lose them.
Note
zWhen this product is attached, the projector's
active focus optimizer function may not operate
properly. In such cases, do not press the lens
xing brackets onto the projection lens with
excessive force.
Flat washer
Spring washer
Lens xing
bracket (B)
Thumbscrew
Attaching (continued)

ENGLISH - 9
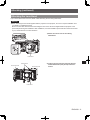
Attaching the Lens Hood
If you need to attach the lens hood, attach it after attaching the lens xing attachment.
Attention
zWhen mounting the lens hood supplied with the projector to the projector, be sure to request installation from
your dealer or certied personnel.
Be sure to hand this manual and the "Mounting the lens hood" document supplied with the projector to the
personnel performing the installation. After installation, have the installation personnel return these documents
to you, and store them for future reference.
1) Attach lens hood 1 to the lens xing
attachment.
2) Tighten the lens hood screws (two places)
and thumbscrews (two places) to x lens
hood 1.
Attaching (continued)
Lens hood 1
Thumbscrews
Lens hood 1
Lens hood screw
Lens hood screw

10 - ENGLISH
<When using the ET-D75LE8 / ET-D75LE40>
1) Attach lens hood 2 to lens hood 1.
2) Attach the thumbscrews (one place each at
top and bottom) to x lens hood 2.
3) Tighten the left and right lens hood screws
(one on each side) of lens hood 2.
Thumbscrews
Knurled screws
Attaching (continued)
Lens hood 2

ENGLISH - 11
Specications
External Dimensions
(Unit: mm)
External dimensions
Width: 238 mm (9-3/8")
Height: 125 mm (4-29/32")
Depth: 242 mm (9-17/32")
Weight Approx. 0.68 kg (1.5 lb)
225.5 (8-7/8")
238 (9-3/8")
122.5 (4-13/16")
242 (9-17/32")
119.5 (4-23/32")
113.5 (4-15/32")
125 (4-29/32")
26 (1-1/32")
99 (3-29/32")
73 (2-7/8")
33
(1-5/16")

12 - ENGLISH
English
Manufactured by:
Panasonic Connect Co., Ltd.
4-1-62 Minoshima, Hakata-ku, Fukuoka 812-8531, Japan
Importer:
Panasonic Connect Europe GmbH
Authorized Representative in EU:
Panasonic Testing Centre
Winsbergring 15, 22525 Hamburg, Germany
Importer for UK;
Panasonic Connect UK,
a branch of Panasonic Connect Europe GmbH,
Maxis 2, Western Road, Bracknell, Berkshire, RG12 1RT
Français
Fabriqué par:
Panasonic Connect Co., Ltd.
4-1-62 Minoshima, Hakata-ku, Fukuoka 812-8531, Japon
Importateur :
Panasonic Connect Europe GmbH
Représentant autorisé dans l’UE :
Panasonic Testing Centre
Winsbergring 15, 22525 Hambourg, Allemagne
Español
Fabricado por:
Panasonic Connect Co., Ltd.
4-1-62 Minoshima, Hakata-ku, Fukuoka 812-8531, Japón
Importador:
Panasonic Connect Europe GmbH
Representante Autorizado para la UE:
Panasonic Testing Centre
Winsbergring 15, 22525 Hamburgo, Alemania
Deutsch
Hergestellt von:
Panasonic Connect Co., Ltd.
4-1-62 Minoshima, Hakata-ku, Fukuoka 812-8531, Japan
Importeur:
Panasonic Connect Europe GmbH
Vertretungsberechtigter in der EU:
Panasonic Testing Centre
Winsbergring 15, 22525 Hamburg, Deutschland
Italiano
Fabbricato da:
Panasonic Connect Co., Ltd.
4-1-62 Minoshima, Hakata-ku, Fukuoka 812-8531, Giappone
Importatore:
Panasonic Connect Europe GmbH
Rappresentante autorizzato nell’UE:
Panasonic Testing Centre
Winsbergring 15, 22525 Amburgo, Germania
Български
Производител:
Panasonic Connect Co., Ltd.
4-1-62 Minoshima, Hakata-ku, Fukuoka 812-8531, Япония
Вносител:
Panasonic Connect Europe GmbH
Упълномощен представител в ЕС:
Panasonic Testing Centre
Winsbergring 15, 22525 Hamburg, Германия
Čeština
Vyrobil:
Panasonic Connect Co., Ltd.
4-1-62 Minoshima, Hakata-ku, Fukuoka 812-8531, Japonsko
Dovozce:
Panasonic Connect Europe GmbH
Oprávněný zástupce v EU:
Panasonic Testing Centre
Winsbergring 15, 22525 Hamburk, Německo
Dansk
Fremstillet af:
Panasonic Connect Co., Ltd.
4-1-62 Minoshima, Hakata-ku, Fukuoka 812-8531, Japan
Importør:
Panasonic Connect Europe GmbH
Autoriseret repræsentant i EU:
Panasonic Testing Centre
Winsbergring 15, 22525 Hamburg, Tyskland
Eesti
Tootja:
Panasonic Connect Co., Ltd.
4-1-62 Minoshima, Hakata-ku, Fukuoka 812-8531, Jaapan
Maaletooja:
Panasonic Connect Europe GmbH
Volitatud esindaja ELis:
Panasonic Testing Centre
Winsbergring 15, 22525 Hamburg, Saksamaa
Ελληνικά
Κατασκευάστηκε από:
Panasonic Connect Co., Ltd.
4-1-62 Minoshima, Hakata-ku, Fukuoka 812-8531, Ιαπωνία
Εισαγωγέας:
Panasonic Connect Europe GmbH
Εξουσιοδοτημένος αντιπρόσωπος στην ΕΕ:
Panasonic Testing Centre
Winsbergring 15, 22525 Hamburg, Γερμανία
Hrvatski
Proizvodi:
Panasonic Connect Co., Ltd.
4-1-62 Minoshima, Hakata-ku, Fukuoka 812-8531, Japan
Uvoznik:
Panasonic Connect Europe GmbH
Ovlašteni zastupnik u EU-u:
Panasonic Testing Centre
Winsbergring 15, 22525 Hamburg, Njemačka
Latviešu
Ražotājs:
Panasonic Connect Co., Ltd.
4-1-62 Minoshima, Hakata-ku, Fukuoka 812-8531, Japāna
Importētājs:
Panasonic Connect Europe GmbH
Ociālais pārstāvis ES:
Panasonic Testing Centre
Winsbergring 15, 22525 Hamburg, Vācija

ENGLISH - 13
Lietuvių
Gamintojas:
Panasonic Connect Co., Ltd.
4-1-62 Minoshima, Hakata-ku, Fukuoka 812-8531, Japonija
Importuotojas:
Panasonic Connect Europe GmbH
Įgaliotasis atstovas ES:
Panasonic Testing Centre
Winsbergring 15, 22525 Hamburgas, Vokietija
Magyar
Gyártotta:
Panasonic Connect Co., Ltd.
4-1-62 Minoshima, Hakata-ku, Fukuoka 812-8531, Japán
Importőr:
Panasonic Connect Europe GmbH
Hivatalos képviselő az EU-ban:
Panasonic Testing Centre
Winsbergring 15, 22525 Hamburg, Németország
Nederlands
Geproduceerd door:
Panasonic Connect Co., Ltd.
4-1-62 Minoshima, Hakata-ku, Fukuoka 812-8531, Japan
Importeur:
Panasonic Connect Europe GmbH
Bevoegde vertegenwoordiger in de EU:
Panasonic Testing Centre
Winsbergring 15, 22525 Hamburg, Duitsland
Norsk
Produsert av:
Panasonic Connect Co., Ltd.
4-1-62 Minoshima, Hakata-ku, Fukuoka 812-8531, Japan
Importør:
Panasonic Connect Europe GmbH
Autorisert representant i EU:
Panasonic Testing Centre
Winsbergring 15, 22525 Hamburg, Tyskland
Polski
Wyprodukowano przez:
Panasonic Connect Co., Ltd.
4-1-62 Minoshima, Hakata-ku, Fukuoka 812-8531, Japonia
Importer:
Panasonic Connect Europe GmbH
Upoważniony przedstawiciel w UE:
Panasonic Testing Centre
Winsbergring 15, 22525 Hamburg, Niemcy
Português
Fabricado por:
Panasonic Connect Co., Ltd.
4-1-62 Minoshima, Hakata-ku, Fukuoka 812-8531, Japão
Importador:
Panasonic Connect Europe GmbH
Representante Autorizado na UE:
Panasonic Testing Centre
Winsbergring 15, 22525 Hamburgo, Alemanha
Română
Fabricat de:
Panasonic Connect Co., Ltd.
4-1-62 Minoshima, Hakata-ku, Fukuoka 812-8531, Japonia
Importator:
Panasonic Connect Europe GmbH
Reprezentant autorizat în UE:
Panasonic Testing Centre
Winsbergring 15, 22525 Hamburg, Germania
Slovenčina
Výrobca:
Panasonic Connect Co., Ltd.
4-1-62 Minoshima, Hakata-ku, Fukuoka 812-8531, Japonsko
Dovozca:
Panasonic Connect Europe GmbH
Autorizovaný zástupca v EÚ:
Panasonic Testing Centre
Winsbergring 15, 22525 Hamburg, Nemecko
Slovenščina
Proizvaja:
Panasonic Connect Co., Ltd.
4-1-62 Minoshima, Hakata-ku, Fukuoka 812-8531, Japonska
Uvoznik:
Panasonic Connect Europe GmbH
Pooblaščeni zastopnik v EU:
Panasonic Testing Centre
Winsbergring 15, 22525 Hamburg, Nemčija
Türkçe
Tarafından Üretilmiştir:
Panasonic Connect Co., Ltd.
4-1-62 Minoshima, Hakata-ku, Fukuoka 812-8531, Japonya
İthalatçı:
Panasonic Connect Europe GmbH
AB Yetkili Temsilcisi:
Panasonic Testing Centre
Winsbergring 15, 22525 Hamburg, Almanya
Suomi
Valmistaja:
Panasonic Connect Co., Ltd.
4-1-62 Minoshima, Hakata-ku, Fukuoka 812-8531, Japani
Maahantuoja:
Panasonic Connect Europe GmbH
Valtuutettu edustaja EU:ssa:
Panasonic Testing Centre
Winsbergring 15, 22525 Hampuri, Saksa
Svenska
Tillverkad av:
Panasonic Connect Co., Ltd.
4-1-62 Minoshima, Hakata-ku, Fukuoka 812-8531, Japan
Importör:
Panasonic Connect Europe GmbH
Auktoriserad representant i EU:
Panasonic Testing Centre
Winsbergring 15, 22525 Hamburg, Tyskland

14 - ENGLISH
MEMO

ENGLISH - 15
MEMO

SS1216AM2042 -PS
Printed in Japan
Panasonic Connect Co., Ltd.
Web Site : https://panasonic.net/cns/projector/
© Panasonic Connect Co., Ltd. 2022
-
 1
1
-
 2
2
-
 3
3
-
 4
4
-
 5
5
-
 6
6
-
 7
7
-
 8
8
-
 9
9
-
 10
10
-
 11
11
-
 12
12
-
 13
13
-
 14
14
-
 15
15
-
 16
16


Panasonic ET-PLF10 Manuel utilisateur
- Catégorie
- Lentilles de projection
- Taper
- Manuel utilisateur
dans d''autres langues
- English: Panasonic ET-PLF10 User manual
- română: Panasonic ET-PLF10 Manual de utilizare
Documents connexes
-
Panasonic ET-D3Q Series Manuel utilisateur
-
Panasonic ET-D3QW200 Manuel utilisateur
-
Panasonic ET-ELW21 Manuel utilisateur
-
Panasonic ET-LAV300 Replacement Lamp Unit Manuel utilisateur
-
Panasonic AK-HVF100G Manuel utilisateur
-
-
-
-
Panasonic KXMB2025G Mode d'emploi
-
Panasonic KXMB1530G Mode d'emploi