DOC023.97.93060
Ultrapure Conductivity Module
01/2019, Edition 7
User Manual
Manuel d'utilisation
Manual de usuario
用户手册

English..............................................................................................................................3
Français......................................................................................................................... 22
Español.......................................................................................................................... 42
中文................................................................................................................................. 64
2

Specifications
Specifications are subject to change without notice.
Contacting conductivity sensors
Specification 8310 8311 8312
Application
Drinking water and wastewater treatment
Chemical processes
Demineralized and softened water
Body material Black PSU Black PSU Black PSU
Internal electrode SS 316L SS 316L Graphite
External electrode SS 316L SS 316L Graphite
Insulator PSU PSU PSU
Connector Glass polyester (IP65) Glass polyester (IP65) Glass polyester (IP65)
Cell constant K 0.01 (cm
-1
) 0.1 (cm
-1
) 1.0 (cm
-1
)
Accuracy < 2% < 2% < 2%
Measurement range 0.01—200 μS.cm
-1
0.1 μS—2 mS.cm
-1
1 μS—20 mS.cm
-1
Temperature response < 30 seconds < 30 seconds < 30 seconds
Maximum temperature 125 °C 125 °C 125 °C
Maximum pressure 10 bars 10 bars 10 bars
Sample connection ¾ inch NPT ¾ inch NPT ¾ inch NPT
Specification 8315 8316 8317 8394
Application
Pure water production
Process water monitoring (condensates, cleaning cycles, heat
exchangers)
Monitoring of
ultrapure water in
pharmaceutical and
food industries
Suitable for CIP-SIP
processes
Body material SS 316L SS 316L SS 316L SS 316L
Internal electrode SS 316L SS 316L Graphite SS 316L
External electrode SS 316L SS 316L Graphite SS 316L
Insulator PES PES PES PEEK
Connector Glass polyester
(IP65)
Glass polyester
(IP65)
Glass polyester
(IP65)
Glass polyester
(IP65)
Cell constant K 0.01 (cm
-1
) 0.1 (cm
-1
) 1.0 (cm
-1
) 0.01 (cm
-1
)
Accuracy < 2% < 2% < 2% < 2%
Measurement range 0.01—200 μS.cm
-1
0.1 μS—2 mS.cm
-1
1 μS—20 mS.cm
-1
0.01—200 μS.cm
-1
Temperature
response
< 30 seconds < 30 seconds < 30 seconds < 30 seconds
Maximum
temperature
150 °C 150 °C 150 °C 150 °C
English 3

Specification 8315 8316 8317 8394
Maximum pressure 25 bars 25 bars 25 bars 25 bars
Sample connection ¾ inch NPT ¾ inch NPT ¾ inch NPT
Tri-Clamp 1½ or
2 inch
Inductive conductivity sensors
Specification 8398 series 8332
Application Corrosive and fouling applications Measurement in harsh conditions
Material PEEK PVDF
Cell constant K 2.35 (cm
-1
) 10 (cm
-1
)
Accuracy ± 2 % ± 2 %
Measurement range 0—2000 mS/cm 100 μS/cm—10 S/cm
Conductivity response < 1 second < 1 second
Temperature response < 2 minutes < 2 minutes
Maximum pressure 18 bars 7.5 bars
Maximum temperature 140 °C 120 °C
General information
In no event will the manufacturer be liable for direct, indirect, special, incidental or consequential
damages resulting from any defect or omission in this manual. The manufacturer reserves the right to
make changes in this manual and the products it describes at any time, without notice or obligation.
Revised editions are found on the manufacturer’s website.
Safety information
N O T I C E
The manufacturer is not responsible for any damages due to misapplication or misuse of this product including,
without limitation, direct, incidental and consequential damages, and disclaims such damages to the full extent
permitted under applicable law. The user is solely responsible to identify critical application risks and install
appropriate mechanisms to protect processes during a possible equipment malfunction.
Please read this entire manual before unpacking, setting up or operating this equipment. Pay
attention to all danger and caution statements. Failure to do so could result in serious injury to the
operator or damage to the equipment.
Make sure that the protection provided by this equipment is not impaired. Do not use or install this
equipment in any manner other than that specified in this manual.
Use of hazard information
D A N G E R
Indicates a potentially or imminently hazardous situation which, if not avoided, will result in death or serious injury.
W A R N I N G
Indicates a potentially or imminently hazardous situation which, if not avoided, could result in death or serious
injury.
C A U T I O N
Indicates a potentially hazardous situation that may result in minor or moderate injury.
4 English

N O T I C E
Indicates a situation which, if not avoided, may cause damage to the instrument. Information that requires special
emphasis.
Precautionary labels
Read all labels and tags attached to the product. Personal injury or damage to the product could
occur if not observed. A symbol on the instrument is referenced in the manual with a precautionary
statement.
This symbol, when noted on a product, indicates a potential hazard which could cause serious
personal injury and/or death. The user should reference this instruction manual for operation and/or
safety information.
This symbol, when noted on a product enclosure or barrier, indicates that a risk of electrical shock
and/or electrocution exists and indicates that only individuals qualified to work with hazardous
voltages should open the enclosure or remove the barrier.
This symbol, when noted on the product, indicates the presence of devices sensitive to electrostatic
discharge and indicates that care must be taken to prevent damage to them.
This symbol, when noted on a product, indicates the instrument is connected to alternate current.
Electrical equipment marked with this symbol may not be disposed of in European public disposal
systems. In conformity with European local and national regulations, European electrical equipment
users must now return old or end-of-life equipment to the manufacturer for disposal at no charge to
the user.
Note: For return for recycling, please contact the equipment producer or supplier for instructions on how to return
end-of-life equipment, producer-supplied electrical accessories, and all auxiliary items for proper disposal.
Products marked with this symbol indicates that the product contains toxic or hazardous substances
or elements. The number inside the symbol indicates the environmental protection use period in
years.
Product overview
The module, when installed in an sc200 or a Polymetron 9500 controller, allows an analog sensor to
connect to the controller.
Installation
W A R N I N G
Multiple hazards. Only qualified personnel must conduct the tasks described in this section of the document.
N O T I C E
Measurement variations of approximately 8% occur at ~25 MHz and in the 600-700 MHz frequency band. These
deviations occur only with 1 kHz 80% carrier amplitude modulation, and although amplitude modulated signals in
this band are unlikely to occur at customer installations, user care in the routing of both probe cable and controller
power lines to avoid ambient field interference is necessary.
Connect the sensor to the module
W A R N I N G
Potential electrocution hazard. Always disconnect power to the controller when making electrical connections.
English 5

W A R N I N G
Electrocution hazard. High voltage wiring for the controller is conducted behind the high voltage barrier in the
controller enclosure. The barrier must remain in place except when installing modules, or when a qualified
installation technician is wiring for power, relays or analog and network cards.
N O T I C E
Potential instrument damage. Delicate internal electronic components can be damaged by static electricity,
resulting in degraded performance or eventual failure.
To install the module and connect the sensor, refer to the illustrated steps that follow and the wiring
table.
Be sure to connect all sensor ground/shield wires to the controller enclosure grounding screws.
Note: If the sensor cable is not long enough to reach the controller, an interconnect cable (model 150727,10000)
and junction box (model 08335=A=6000) should be used to extend the distance.
Table 1 Conductivity sensor wiring
Terminal Description Sensor
8398 831x and 8394
1 Inner electrode White (white cable) White
2 Inner electrode Black (white cable) —
3 Ground — Green
4 — — —
5 — — —
6 — — —
7 Temp - Green Black
8 — — —
9 — — —
10 Temp + Yellow Blue
11 Outer electrode Brown (brown cable) Red
12 Outer electrode Black (brown cable) —
In Step 3 of the following sequence, set the switch as follows:
Switch Setting Description
Setting 1 Contacting conductivity sensor
Setting 2 Inductive conductivity sensor
6 English

English 7

8 English

Operation
User navigation
Refer to the User interface and navigation section of the controller documentation for keypad
description and navigation information.
Sensor configuration
Contacting conductivity sensor configuration
Use the CONFIGURE menu to enter identification information for the sensor and to change options
for data handling and storage.
1. Push the menu key and select SENSOR SETUP>[Select Sensor]>CONFIGURE.
2. Select an option and push enter. To enter numbers, characters or punctuation, push and hold the
up or down arrow keys. Push the right arrow key to advance to the next space.
Option Description
EDIT NAME Changes the name that corresponds to the sensor on the top of the measure screen.
The name is limited to 16 characters in any combination of letters, numbers, spaces or
punctuation. Only the first 12 characters are displayed on the controller.
SENSOR S/N Allows the user to enter the serial number of the sensor, limited to 16 characters in any
combination of letters, numbers, spaces or punctuation.
SELECT MEASURE Changes the measured parameter to CONDUCTIVITY (default), TDS (total dissolved
solids), SALINITY or RESISTIVITY. All other configured settings are reset to the
default values.
Note: If SALINITY is selected, the measurement unit is defined as ppt (parts per
thousand) and cannot be changed.
DISPLAY FORMAT Changes the number of decimal places that are shown on the measure screen. When
set to auto, the number of decimal places changes automatically with changes in the
measured value.
MEAS UNITS Changes the units for the selected measurement—select the unit from the list
available.
TEMP UNITS Sets the temperature units to °C (default) or °F.
T-COMPENSATION Adds a temperature-dependent correction to the measured value:
• NONE—Temperature compensation not required
• USP—Set the alarm level for the standard USP definition table
• ULTRA PURE WATER—Not available for TDS. Set the compensation type
according to the sample characteristics—Select NaCl , HCl, AMMONIA or ULTRA
PURE WATER
• USER—Select BUILT IN LINEAR, LINEAR or TEMP TABLE:
• BUILT IN LINEAR—Use the pre-defined linear table (slope defined as 2.0%/°C,
reference temperature as 25 °C)
• LINEAR—Set the slope and reference temperature parameters if different from
the built-in parameters
• TEMP TABLE—Set the temperature and multiplication factor points (refer to
Configure user tables on page 11)
• NATURAL WATER—Not available for TDS
CONFIG TDS TDS only—changes the factor that is used to convert conductivity to TDS: NaCl
(0.49 ppm/µS) or CUSTOM (enter factor between 0.01 and 99.99 ppm/µS).
CABLE PARAM Sets the sensor cable parameters to improve measurement accuracy when the sensor
cable is extended or shortened from the standard 5 m. Enter the cable length,
resistance and capacitance.
English 9

Option Description
TEMP ELEMENT Sets the temperature element to PT100 or PT1000 for automatic temperature
compensation. If no element is used, the type can be set to MANUAL and a value for
temperature compensation can be entered.
FILTER Sets a time constant to increase signal stability. The time constant calculates the
average value during a specified time—0 (no effect) to 60 seconds (average of signal
value for 60 seconds). The filter increases the time for the sensor signal to respond to
actual changes in the process.
LOG SETUP Sets the time interval for data storage in the data log—5, 30 seconds, 1, 2, 5, 10,
15 (default), 30, 60 minutes.
RESET DEFAULTS Sets the configuration menu to the default settings. All sensor information is lost.
Inductive conductivity sensor configuration
Use the CONFIGURE menu to enter identification information for the sensor and to change options
for data handling and storage.
1. Push the menu key and select SENSOR SETUP>[Select Sensor]>CONFIGURE.
2. Select an option and push enter. To enter numbers, characters or punctuation, push and hold the
up or down arrow keys. Push the right arrow key to advance to the next space.
Option Description
EDIT NAME Changes the name that corresponds to the sensor on the top of the measure screen.
The name is limited to 16 characters in any combination of letters, numbers, spaces or
punctuation. Only the first 12 characters are displayed on the controller.
SENSOR S/N Allows the user to enter the serial number of the sensor, limited to 16 characters in any
combination of letters, numbers, spaces or punctuation.
SELECT MEASURE Changes the measured parameter to CONDUCTIVITY (default), RESISTIVITY,
SALINITY, TDS (total dissolved solids) or CONCENTRATION. All other configured
settings are reset to the default values.
Note: If SALINITY is selected, the measurement unit is defined as ppt (parts per
thousand) and cannot be changed.
DISPLAY FORMAT Changes the number of decimal places that are shown on the measure screen. When
set to auto, the number of decimal places changes automatically with changes in the
measured value.
MEAS UNITS Changes the units for the selected measurement—select the unit from the list
available.
TEMP UNITS Sets the temperature units to °C (default) or °F.
T-COMPENSATION Adds a temperature-dependent correction to the measured value:
• LINEAR—Set the slope and reference temperature parameters
• NATURAL WATER—Not available for TDS or CONCENTRATION
• TEMP TABLE—Set the temperature and multiplication factor points (refer to
Configure user tables on page 11)
• NONE—Temperature compensation not required
CONFIG TDS TDS only—changes the factor that is used to convert conductivity to TDS: NaCl
(0.49 ppm/µS) or CUSTOM (enter factor between 0.01 and 99.99 ppm/µS).
10 English

Option Description
CONFIG CONC CONCENTRATION only—sets the type of concentration table to use.
• BUILT-IN—Set the CHEMICAL that is measured:
• H2SO4 0-30%
• HNO3 0-28%
• HCl 0-18%
• NaOH 0-16%
Note: Although the range is shown as 0-16%, the tables can be more accurately
defined as 0-10% for all temperatures.
• NaCl 0-25%
• H3PO4 0-40%
• USER TABLE—Set the conductivity and concentration% points (refer to Configure
user tables on page 11)
TEMP ELEMENT Sets the temperature element to PT100 or PT1000 for automatic temperature
compensation. If no element is used, the type can be set to MANUAL and a value for
temperature compensation can be entered.
FILTER Sets a time constant to increase signal stability. The time constant calculates the
average value during a specified time—0 (no effect) to 60 seconds (average of signal
value for 60 seconds). The filter increases the time for the sensor signal to respond to
actual changes in the process.
LOG SETUP Sets the time interval for data storage in the data log—5, 30 seconds, 1, 2, 5, 10,
15 (default), 30, 60 minutes.
RESET DEFAULTS Sets the configuration menu to the default settings. All sensor information is lost.
Configure user tables
Depending on the type of sensor and the type of measurement required, user-defined tables can be
selected during sensor configuration. The following explains how to configure a user-defined table.
Concentration tables
By default, this table contains only 2 points (P1 and P2) that define the minimum and maximum
limits. When P1 and P2 have been defined, additional points can be inserted between them. As an
example to define the minimum conductivity and concentration as zero, and the maximum
conductivity as 750 with a maximum concentration of 30. proceed as follows:
1. From the USER TABLE option select P1>EDIT POINT.
2. Enter the minimum conductivity (X) as 0.0 and push enter.
3. Enter the minimum concentration% (Y) as 0.0 and push enter.
4. Select SAVE CHANGES? and push enter.
5. From the USER TABLE option select P2>EDIT POINT.
6. Enter the maximum conductivity (X) as 750.0 and push enter.
7. Enter the maximum concentration% (Y) as 30.0 and push enter.
8. Select SAVE CHANGES? and push enter.
The following table has been defined:
Conductivity Concentration%
P1 0 0
P2 750 30
To insert an additional point with a conductivity of 250 and a concentration of 15, select the point with
a conductivity value immediately above the value to insert. In this example select P2. The new
conductivity value of 250 will then become P2 and the existing P2 will become P3 as follows:
English
11

1. From the USER TABLE option select P2>INSERT POINT.
2. Enter the conductivity (X) as 250.0 and push enter.
3. Enter the concentration% (Y) as 15.0 and push enter.
4. Select SAVE CHANGES? and push enter.
The table will now be defined as:
Conductivity Concentration%
P1 0 0
P2 250 15
P3 750 30
Additional points can be inserted up to a maximum of P10.
Note: The conductivity value taken into account is temperature compensated according to the temperature
compensation option configured.
Temperature tables
The process is the same as described for the concentration tables, but the X value refers to
temperature and the Y value is a factor used to multiply against the non-compensated conductivity
value to obtain a temperature compensated conductivity value.
For example, if the temperature table was configured as follows:
Temperature Value
P1 0 1
P2 20 1.1
P3 40 1.2
This can be displayed graphically as:
This shows that a temperature of 10° corresponds to a factor of 1.05. Therefore, a non-compensated
conductivity value of 10 mS/cm at 10° will give a temperature compensated value of 10.5 mS/cm (i.e.
10 mS/cm multiplied by a factor of 1.05).
Calibrate the sensor
About sensor calibration
The sensor characteristics slowly shift over time and cause the sensor to lose accuracy. The sensor
must be calibrated regularly to maintain accuracy. The calibration frequency varies with the
application and is best determined by experience.
12
English

Contacting conductivity sensors: Use air (zero calibration) and the process sample to define the
calibration curve. When the process sample is used, the reference value must be determined with a
certified secondary verification instrument.
Inductive conductivity sensors: Use air (zero calibration) and a reference solution or process
sample to define the calibration curve. A reference solution calibration is recommended for best
accuracy. When the process sample is used, the reference value must be determined with a certified
secondary verification instrument.
Calibration limits
A calibration will fail if the value is ± 10% of the target value.
Cell constant
Before making a calibration make sure the sensor cell parameters are correct.
1. Push the menu key and select SENSOR SETUP>[Select Sensor]>CALIBRATE.
2. If the pass code is enabled in the security menu for the controller, enter the pass code.
3. Select CELL CONSTANT and push enter.
4. Contacting conductivity sensors: Select the cell K range for the sensor (0.01, 0.1 or 1.0) then
enter the actual K value as printed on the label attached to the sensor.
Inductive conductivity sensors: Enter the actual K value as printed on the label attached to the
sensor.
Zero calibration procedure
Use the zero calibration procedure to define the unique zero point of the sensor.
1. Remove the sensor from the process. Wipe with a clean towel to make sure the sensor is dry.
2. Push the menu key and select SENSOR SETUP>[Select Sensor]>CALIBRATE.
3. If the pass code is enabled in the security menu for the controller, enter the pass code.
4. Select ZERO CAL and push enter.
5. Select the option for the output signal during calibration:
Option Description
ACTIVE The instrument sends the current measured output value during the calibration procedure.
HOLD The sensor output value is held at the current measured value during the calibration procedure.
TRANSFER A preset output value is sent during calibration. Refer to the controller user manual to change
the preset value.
6. Place the sensor in air, push enter.
7. Review the calibration result:
• PASS—the sensor is calibrated and ready to measure samples.
• FAIL—the calibration is outside of accepted limits. Clean the sensor and retry. Refer to
Troubleshooting on page 18 for more information.
8. If the calibration passed, push enter to continue.
9. If the option for operator ID is set to YES in the CAL OPTIONS menu, enter an operator ID. Refer
to Change calibration options on page 17.
10. On the NEW SENSOR screen, select whether the sensor is new:
Option Description
YES The sensor was not calibrated previously with this controller. The days of operation and previous
calibration curves for the sensor are reset.
NO The sensor was calibrated previously with this controller.
English 13

11. Return the sensor to the process and push enter. The output signal returns to the active state
and the measured sample value is shown on the measure screen.
Note: If the output mode is set to hold or transfer, select the delay time when the outputs return to the active
state.
Calibration with the process sample
The sensor can remain in the process sample, or a portion of the process sample can be removed
for calibration.
1. Push the menu key and select SENSOR SETUP>[Select Sensor]>CALIBRATE.
2. If the pass code is enabled in the security menu for the controller, enter the pass code.
3. Select SAMPLE CAL and push enter.
4. Select the option for the output signal during calibration:
Option Description
ACTIVE The instrument sends the current measured output value during the calibration procedure.
HOLD The sensor output value is held at the current measured value during the calibration procedure.
TRANSFER A preset output value is sent during calibration. Refer to the controller user manual to change
the preset value.
5. With the sensor in the process sample, push enter. The measured value is shown. Wait for the
value to stabilize and push enter.
6. Measure the conductivity value with a certified secondary verification instrument. Use the arrow
keys to enter this value if different from the value displayed and push enter.
7. Review the calibration result:
• PASS—the sensor is calibrated and ready to measure samples.
• FAIL—the calibration is outside of accepted limits. Clean the sensor and retry. Refer to
Troubleshooting on page 18 for more information.
8. If the calibration passed, push enter to continue.
9. If the option for operator ID is set to YES in the CAL OPTIONS menu, enter an operator ID. Refer
to Change calibration options on page 17.
10. On the NEW SENSOR screen, select whether the sensor is new:
Option Description
YES The sensor was not calibrated previously with this controller. The days of operation and previous
calibration curves for the sensor are reset.
NO The sensor was calibrated previously with this controller.
11. Return the sensor to the process and push enter. The output signal returns to the active state
and the measured sample value is shown on the measure screen.
Note: If the output mode is set to hold or transfer, select the delay time when the outputs return to the active
state.
Calibration with a reference solution (inductive conductivity sensors)
Calibration adjusts the sensor reading to match the value of a reference solution. Use a reference
solution that is at the same value or higher than the expected measurement readings.
Note: If the sensor is calibrated for the first time, be sure to complete the zero calibration first.
1. Thoroughly rinse the clean sensor in deionized water.
2. Push the menu key and select SENSOR SETUP>[Select Sensor]>CALIBRATE.
3. If the pass code is enabled in the security menu for the controller, enter the pass code.
4. Select SOLN CAL and push enter.
14
English

5. Select the option for the output signal during calibration:
Option Description
ACTIVE The instrument sends the current measured output value during the calibration procedure.
HOLD The sensor output value is held at the current measured value during the calibration procedure.
TRANSFER A preset output value is sent during calibration. Refer to the controller user manual to change
the preset value.
6. Put the sensor in the reference solution. Make sure that the sensing area is fully immersed in the
solution. Stir the sensor to remove bubbles.
7. Wait for the sensor and solution temperature to equalize. This can take 30 minutes or more if the
temperature difference between the process and reference solution is significant.
8. With the sensor in the reference solution, push enter.
9. Use the arrow keys to enter the reference solution temperature and push enter.
10. Use the arrow keys to enter the reference solution slope and push enter. The measured value is
shown. Wait for the value to stabilize.
11. Use the arrow keys to enter the reference value and push enter.
12. Review the calibration result:
• PASS—the sensor is calibrated and ready to measure samples. The new cell constant K value
is shown.
• FAIL—the calibration slope or offset is outside of accepted limits. Clean the sensor and retry
with a fresh reference solution. Refer to Troubleshooting on page 18 for more information.
13. If the calibration passed, push enter to continue.
14. If the option for operator ID is set to YES in the CAL OPTIONS menu, enter an operator ID. Refer
to Change calibration options on page 17.
15. On the NEW SENSOR screen, select whether the sensor is new:
Option Description
YES The sensor was not calibrated previously with this controller. The days of operation and previous
calibration curves for the sensor are reset.
NO The sensor was calibrated previously with this controller.
16. Return the sensor to the process and push enter. The output signal returns to the active state
and the measured sample value is shown on the measure screen.
Note: If the output mode is set to hold or transfer, select the delay time when the outputs return to the active
state.
Resistor calibration (contacting conductivity sensors)
This type of calibration is sometimes referred to as an electrical calibration and is used to verify the
electrical connection rather than the sensor itself.
1. Push the menu key and select SENSOR SETUP>[Select Sensor]>CALIBRATE.
2. If the pass code is enabled in the security menu for the controller, enter the pass code.
3. Select RESISTOR CAL and push enter.
4. Select the option for the output signal during calibration:
Option Description
ACTIVE The instrument sends the current measured output value during the calibration procedure.
HOLD The sensor output value is held at the current measured value during the calibration procedure.
TRANSFER A preset output value is sent during calibration. Refer to the controller user manual to change
the preset value.
English 15

5. Disconnect the sensor from the sensor cable and push enter. Connect a 50 kΩ, 5 kΩ, 500 Ω, or
50 Ω NIST resistor (accuracy ±0.05%) on pins 2-3 of the sensor cable and push enter. Use the
arrow keys to enter the value of the resistor and push enter.
6. Review the calibration result:
• PASS—the calibration is successful.
• FAIL—the cell constant is outside of accepted limits. Clean the sensor and retry. Refer to
Troubleshooting on page 18 for more information.
7. If the calibration passed, push enter to continue.
8. If the option for operator ID is set to YES in the CAL OPTIONS menu, enter an operator ID. Refer
to Change calibration options on page 17.
9. On the NEW SENSOR screen, select whether the sensor is new:
Option Description
YES The sensor was not calibrated previously with this controller. The days of operation and previous
calibration curves for the sensor are reset.
NO The sensor was calibrated previously with this controller.
10. Reconnect the sensor, return it to the process and push enter. The output signal returns to the
active state and the measured sample value is shown on the measure screen.
Note: If the output mode is set to hold or transfer, select the delay time when the outputs return to the active
state.
Resistor calibration (inductive conductivity sensors)
This type of calibration is sometimes referred to as an electrical calibration and is used to verify the
electrical connection rather than the sensor itself.
1. Push the menu key and select SENSOR SETUP>[Select Sensor]>CALIBRATE.
2. If the pass code is enabled in the security menu for the controller, enter the pass code.
3. Select RESISTOR CAL and push enter.
4. Select the option for the output signal during calibration:
Option Description
ACTIVE The instrument sends the current measured output value during the calibration procedure.
HOLD The sensor output value is held at the current measured value during the calibration procedure.
TRANSFER A preset output value is sent during calibration. Refer to the controller user manual to change
the preset value.
5.
Remove the sensor from the sample. Place a 5 kΩ, 500 Ω, 50 Ω, or 5 Ω resistor loop through the
sensor and push enter. Push enter when the displayed resistor value is stable. Use the arrow
keys to enter the actual value of the resistor and push enter.
6. Review the calibration result:
• PASS—the calibration is successful.
• FAIL—the calibration slope or offset is outside of accepted limits. Clean the sensor and retry.
Refer to Troubleshooting on page 18 for more information.
16
English

7. If the calibration passed, push enter to continue.
8. If the option for operator ID is set to YES in the CAL OPTIONS menu, enter an operator ID. Refer
to Change calibration options on page 17.
9. On the NEW SENSOR screen, select whether the sensor is new:
Option Description
YES The sensor was not calibrated previously with this controller. The days of operation and previous
calibration curves for the sensor are reset.
NO The sensor was calibrated previously with this controller.
10. Reconnect the sensor, return it to the process and push enter. The output signal returns to the
active state and the measured sample value is shown on the measure screen.
Note: If the output mode is set to hold or transfer, select the delay time when the outputs return to the active
state.
Temperature calibration
The temperature sensor has been calibrated at the factory. However, it is recommended to always
calibrate the temperature sensor before calibrating the measurement sensor.
1. Put the sensor in a container of water that is at a known temperature. Measure the temperature of
the water with an accurate thermometer or independent instrument.
2. Push the menu key and select SENSOR SETUP>[Select Sensor]>CALIBRATE.
3. If the pass code is enabled in the security menu for the controller, enter the pass code.
4. Select 1 PT TEMP CAL and push enter.
5. The raw temperature value is displayed. Push enter.
6. Enter the correct value if different from that displayed and push enter.
7. Push enter to confirm the calibration.
Exit calibration procedure
If the back key is pushed during a calibration, the user can exit the calibration.
1. Push the back key during a calibration. Three options are shown:
Option Description
QUIT CAL Stop the calibration. A new calibration must start from the beginning.
BACK TO CAL Return to the calibration.
LEAVE CAL Exit the calibration temporarily. Access to other menus is allowed. To return to the
calibration, push the menu key and select SENSOR SETUP.
2. Use the arrow keys to select one of the options and push enter.
Change calibration options
The user can set a calibration reminder or include an operator ID with calibration data from this
menu.
1. Push the menu key and select SENSOR SETUP>[Select Sensor]>CALIBRATE.
2. If the pass code is enabled in the security menu for the controller, enter the pass code.
English
17

3. Select CAL OPTIONS and push enter.
4. Use the arrow keys to select an option and push enter.
Option Description
CAL REMINDER Sets a reminder for the next calibration in days, months or years—select the required
delay from the list.
OP ID ON CAL Includes an operator ID with calibration data—YES or NO (default). The ID is entered
during the calibration.
Troubleshooting
Intermittent data
During calibration, data is not sent to the datalog which will result in the datalog having areas where
the data is intermittent.
Test the contacting conductivity sensor
Figure 1 Sensor connector
1 Electrodes 2 Pt100
1. Disconnect the sensor from the module.
2. Electrodes: Check the insulation between the two electrodes. There should be an infinite
resistance when the sensor is dry and exposed to air.
3. Pt100: Compare the resistance measured directly on the connector with the values below:
Temperature (°C) Resistance (Ω)
0 100.00
10 103.90
20 107.70
30 111.67
40 115.54
50 119.40
60 123.24
70 127.07
80 130.89
90 134.70
100 138.50
18 English

Test the inductive conductivity sensor
If there is a doubt concerning the operation of the sensor, disconnect it from the controller but leave it
in place in your sample process. Check the following resistance values across the terminals indicated
(refer also to the wiring table Table 1 on page 6):
Wiring connections Resistance
Terminals 7-10 (Temperature sensor Pt100) ≈ 110 Ω (at 25 °C)
Terminals 1-2 (Secondary coil) ≈ 1—2 Ω
Terminals 11-12 (Primary coil) ≈ 1—2 Ω
If the checks do not generate any erroneous resistance values, the sensor can be considered to be
working properly.
If the measurement is still not satisfactory proceed as follows:
1. Set T-COMPENSATION to NONE (see Inductive conductivity sensor configuration on page 10).
2. Perform a ZERO CALIBRATION of the sensor (see Zero calibration procedure on page 13).
3. Perform a RESISTOR CALIBRATION of the sensor (see Resistor calibration (inductive
conductivity sensors) on page 16).
4. Check the following:
Displayed conductivity (K = 2.35) Simulated resistance
470 μS/cm 5 kΩ
4.7 mS/cm 500 Ω
47 mS/cm 50 Ω
470 mS/cm 5 Ω
Sensor diagnostic and test menu
The sensor diagnostic and test menu shows current and historical information about the instrument.
Refer to Table 2.
To access the sensor diagnostic and test menu, push the menu key and select SENSOR
SETUP>[Select Sensor]>DIAG/TEST.
Table 2 Sensor DIAG/TEST menu
Option Description
MODULE INFORMATION Shows information about the sensor module.
SENSOR INFORMATION Shows the name and serial number that was entered
by the user.
CAL DAYS Shows the number of days since the last calibration.
CAL HISTORY Shows a list of all calibrations by date/time stamp. Use
the arrows keys to select a calibration and push enter
to view the details.
RESET CAL HISTORY Resets the calibration history for the sensor (requires
service-level passcode). All previous calibration data is
lost.
POLARIZATION Contacting conductivity sensors only. Shows
information about the electrode polarization, the cable
capacitance and the time before the next
measurement.
English 19
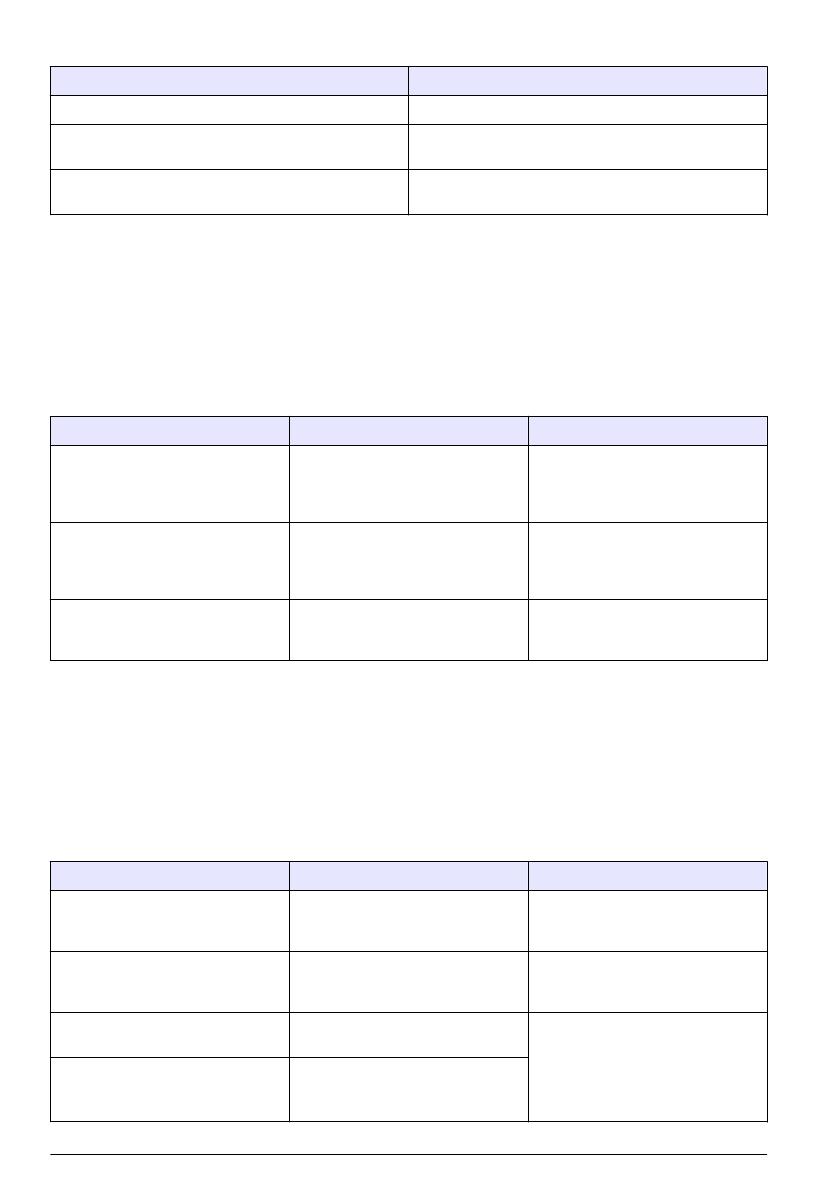
Table 2 Sensor DIAG/TEST menu (continued)
Option Description
SENSOR SIGNALS Shows the current sensor signal information.
SENSOR DAYS Shows the number of days that the sensor has been in
operation.
RESET SENSOR Resets the number of days that the sensor has been in
operation and resets all calibration data to defaults.
Error list
Errors may occur for various reasons. An error icon consists of an exclamation point within a circle.
When an error occurs, the error icon and the measurement screen flash alternately in the main
display. All outputs are held when specified in the controller menu. To view errors, push the menu
key and select DIAGNOSTICS. Then select the device to view any problems associated with that
device.
A list of possible errors is shown in Table 3.
Table 3 Error list for conductivity sensors
Error Description Resolution
ADC FAILURE The analog to digital conversion
failed
Make sure that the sensor module is
fully inserted into the controller
connector. Replace the sensor
module.
SENSOR MISSING The sensor is missing or
disconnected
Examine the wiring and connections
for the sensor and for the module.
Make sure that the terminal block is
fully inserted into the module.
SENS OUT RANGE The sensor signal is outside of the
accepted limits (2 S/cm)
Make sure that the display format is
set for the correct measurement
range.
Warning list
A warning icon consists of an exclamation point within a triangle. Warning icons appear on the right
of the main display below the measurement value. A warning does not affect the operation of menus,
relays and outputs. To view warnings, push the menu key and select DIAGNOSTICS. Then select
the device to view any problems associated with that device. The warning icon will no longer be
displayed once the problem has been corrected or acknowledged.
A list of possible warnings is shown in Table 4.
Table 4 Warning list for conductivity sensors
Warning Description Resolution
MEAS TOO HIGH The measured value is > 2 S/cm,
1,000,000 ppm, 200% or 20,000 ppt
Make sure that the display format is
set for the correct measurement
range
MEAS TOO LOW The measured value is < 0 μS/cm,
0 ppm, 0% or 0 ppt
Make sure that the sensor is
configured for the correct cell
constant.
ZERO TOO HIGH The zero calibration value is too
high
Make sure that the sensor is held in
air during zero calibration and is not
located near radio frequency or
electromagnetic interference. Make
sure that the cable is shielded by
metal conduit.
ZERO TOO LOW The zero calibration value is too low
20 English
La page est en cours de chargement...
La page est en cours de chargement...
La page est en cours de chargement...
La page est en cours de chargement...
La page est en cours de chargement...
La page est en cours de chargement...
La page est en cours de chargement...
La page est en cours de chargement...
La page est en cours de chargement...
La page est en cours de chargement...
La page est en cours de chargement...
La page est en cours de chargement...
La page est en cours de chargement...
La page est en cours de chargement...
La page est en cours de chargement...
La page est en cours de chargement...
La page est en cours de chargement...
La page est en cours de chargement...
La page est en cours de chargement...
La page est en cours de chargement...
La page est en cours de chargement...
La page est en cours de chargement...
La page est en cours de chargement...
La page est en cours de chargement...
La page est en cours de chargement...
La page est en cours de chargement...
La page est en cours de chargement...
La page est en cours de chargement...
La page est en cours de chargement...
La page est en cours de chargement...
La page est en cours de chargement...
La page est en cours de chargement...
La page est en cours de chargement...
La page est en cours de chargement...
La page est en cours de chargement...
La page est en cours de chargement...
La page est en cours de chargement...
La page est en cours de chargement...
La page est en cours de chargement...
La page est en cours de chargement...
La page est en cours de chargement...
La page est en cours de chargement...
La page est en cours de chargement...
La page est en cours de chargement...
La page est en cours de chargement...
La page est en cours de chargement...
La page est en cours de chargement...
La page est en cours de chargement...
La page est en cours de chargement...
La page est en cours de chargement...
La page est en cours de chargement...
La page est en cours de chargement...
La page est en cours de chargement...
La page est en cours de chargement...
La page est en cours de chargement...
La page est en cours de chargement...
La page est en cours de chargement...
La page est en cours de chargement...
La page est en cours de chargement...
La page est en cours de chargement...
La page est en cours de chargement...
La page est en cours de chargement...
-
 1
1
-
 2
2
-
 3
3
-
 4
4
-
 5
5
-
 6
6
-
 7
7
-
 8
8
-
 9
9
-
 10
10
-
 11
11
-
 12
12
-
 13
13
-
 14
14
-
 15
15
-
 16
16
-
 17
17
-
 18
18
-
 19
19
-
 20
20
-
 21
21
-
 22
22
-
 23
23
-
 24
24
-
 25
25
-
 26
26
-
 27
27
-
 28
28
-
 29
29
-
 30
30
-
 31
31
-
 32
32
-
 33
33
-
 34
34
-
 35
35
-
 36
36
-
 37
37
-
 38
38
-
 39
39
-
 40
40
-
 41
41
-
 42
42
-
 43
43
-
 44
44
-
 45
45
-
 46
46
-
 47
47
-
 48
48
-
 49
49
-
 50
50
-
 51
51
-
 52
52
-
 53
53
-
 54
54
-
 55
55
-
 56
56
-
 57
57
-
 58
58
-
 59
59
-
 60
60
-
 61
61
-
 62
62
-
 63
63
-
 64
64
-
 65
65
-
 66
66
-
 67
67
-
 68
68
-
 69
69
-
 70
70
-
 71
71
-
 72
72
-
 73
73
-
 74
74
-
 75
75
-
 76
76
-
 77
77
-
 78
78
-
 79
79
-
 80
80
-
 81
81
-
 82
82
Hach 8398 Series Manuel utilisateur
- Taper
- Manuel utilisateur
- Ce manuel convient également à
dans d''autres langues
- English: Hach 8398 Series User manual
- español: Hach 8398 Series Manual de usuario
Documents connexes
-
 Hach sc200 4-20 Manuel utilisateur
-
 Hach Polymetron Manuel utilisateur
-
 Hach sc200 4-20 Manuel utilisateur
-
 Hach Polymetron 9523 Basic User Manual
-
 Hach pHD Sensor Manuel utilisateur
-
 Hach Polymetron 9523sc pH Basic User Manual
-
 Hach pHD Sensor Manuel utilisateur
-
 Hach Polymetron 9526 Basic User Manual
-
 Hach 3700 series Basic User Manual
-
 Hach LDO Manuel utilisateur
Autres documents
-
Ohaus STARTER 3100M Manuel utilisateur
-
Ohaus ST3100C-B Manuel utilisateur
-
Consort C3430 Manuel utilisateur
-
 Thermo Fisher Scientific Elite CTS Tester Mode d'emploi
-
Elcometer 138 Manuel utilisateur
-
Omega FTB691A through FTB695A Le manuel du propriétaire
-
Baumer AFI4 Installation and Operating Instructions


